
Academic Authors: Jatinder Kaur, Ayushi Jain
Book Production: Rakesh Kumar Singh
Project Lead: Jatinder Kaur
VP, Learning: Abhishek Bhatnagar
All products and brand names used in this book are trademarks, registered trademarks or trade names of their respective owners.
© Uolo EdTech Private Limited
First published 2025
This book is sold subject to the condition that it shall not by way of trade or otherwise, be lent, resold, hired out, or otherwise circulated without the publisher’s prior written consent in any form of binding or cover other than that in which it is published and without a similar condition including this condition being imposed on the subsequent purchaser and without limiting the rights under copyright reserved above, no part of this publication may be reproduced, stored in or introduced into a retrieval system, or transmitted in any form or by any means, electronic, mechanical, photocopying, recording or otherwise, without the prior written permission of both the copyright owner and the above-mentioned publisher of this book.
Book Title: Hexa ICSE Computer Science Teacher Manual 8
ISBN: 978-93-49697-76-8
Published by Uolo EdTech Private Limited
Corporate Office Address:
85, Sector 44, Gurugram, Haryana 122003
CIN: U74999DL2017PTC322986
Illustrations and images: www.shutterstock.com, www.stock.adobe.com and www.freepik.com
All suggested use of the internet should be under adult supervision.
In today’s rapidly evolving digital landscape, computer science has become an essential field of study, shaping the world around us in countless ways. From the smartphones in our pockets to the vast networks that connect people across the globe, computer science drives innovation and progress in nearly every aspect of modern life. In today’s fast-paced digital world, understanding the basics of computer science is as important as learning to read, write, or solve maths problems.
Recognising this imperative, the National Education Policy (NEP) 2020 has strongly recommended the integration of coding skills, computational thinking, critical analysis, and problem-solving abilities into the curriculum.
Inspired by these insights, Uolo has introduced a comprehensive program, Hexa, for grades 1 to 8, to empower young minds with the knowledge and skills they need to thrive in the digital age. From the basics of how computers function to the tools that shape our digital landscape, this series opens the door to a world of endless possibilities.
We believe that learning computer science should be an engaging and accessible experience for all children. This series takes a project-based approach, allowing students to learn by way of concurrently applying acquired knowledge and skills. As they progress through the course, they will build strong foundations in computational thinking, coding basics, and digital literacy. Our program focuses on three key areas:
1. Computer Science Fundamentals: Core concepts are introduced step by step, ensuring a solid grasp of how computers function, and how information is processed and stored.
2. Latest Computer Tools: Various computer tools relevant to today’s world are included, equipping students with the confidence to thrive in the digital age.
3. Introduction to Coding: The series offers an introductory look into coding, preparing students for more advanced learning in the future.
To support teachers in delivering effective and engaging lessons, we offer a thoughtfully designed Teacher Manual to enhance the teaching and learning experience. Rather than prescribing teaching methods, the manual provides examples and demonstrates how and why teachers can apply these examples in their classes.
Each chapter in this manual is structured to provide a comprehensive lesson plan. The chapters are divided into multiple sessions, each following the Warm up, Engage, Build, and Sum up (WEBS) strategy.
• The Warm up phase sets the stage for learning by connecting to prior knowledge and building curiosity.
• The Engage phase captures the students’ attention and motivates them to participate actively.
• In the Build phase, questions from various sections are discussed to build the understanding of the students.
• Finally, the Sum up phase reinforces learning through easy-to-recall activities and questions.
Time duration for each section has been suggested based on the requirements of the students. Additionally, an answer key for every chapter is provided to assist teachers in assessing their students’ understanding and guiding their learning effectively.
We hope this Teacher Manual empowers educators to implement the curriculum effectively, support diverse student learning, and create interactive, engaging environments tailored to their students’ needs and interests.
Operating System—Its Need and Functions
Types of Operating Systems and User Interface (UI)
Computer Networks and Its Types
Networking Concepts
Cloud Computing, Network Security, and Cyber Ethics 3 Computational and Algorithmic Thinking
Computational Thinking
Introduction to Algorithms and Flowcharts
Introduction to Apps and Accessing Apps
Classification of Mobile Apps and Developing an App
Formulas and Functions-II
Formulas and Functions-III
Understanding Charts, Components of a Chart, and Types of Charts
Creating a Chart in Google Sheets and Moving, Resizing, and Deleting Charts
Basics of Java
Fundamentals of Java Programming Data Types, Variables, and Operators
User Inputs and Conditions
Conditions
Introduction to Loops Jump
Understanding CSS
Adding Images and Links
Adding Audio and Video
Forms Setting Properties of a Form Using Internal CSS

This chapter is divided into the following sessions
1. Operating System—Its Need and Functions
2. Types of Operating Systems and User Interface (UI)
At the end of the session, the students will be able to:
● define an operating system.
● describe the need for an operating system.
● describe the functions of an operating system.
Keywords
● Operating system: It is a program that controls and manages computer hardware. It acts as an interface between the user and a computer system.
WEBS at a Glance
Engage the students by giving examples of OS that they use in their daily lives.
Introduce the definition of OS.
Discuss the need for OS.
Also, discuss the functions of OS.
5 mins
Up
● Discuss real-world examples of operating systems. Mention popular ones like Windows, macOS, Linux, Android, and iOS.
● Ask students to share their experiences with different operating systems on various devices like smartphones, tablets, laptops, etc.
Explain the following concepts:
Define an operating system.
15 mins
Introduce to the students the concept of an operating system with its definition and various activities performed by an OS, as given on page 1.
Describe the need for an operating system. Elaborate on the need of an operating system and the various responsibilities handled by OS, as given on page 1.
Describe the functions of an operating system. Discuss with the students the various functions of an OS that help the smooth running of the computer, as given on page 2.
● Read aloud the questions provided in the Do It Yourself 1A section and encourage the students to solve the questions. Instruct the students to write the answers in their books.
Correct Responses:
7 mins
● Conduct a group discussion in the class among students on the topic “Fundamental role of OS in computing”.
Correct Responses:
An operating system manages everything on a computer.
It allocates and de-allocates memory space to running processes, ensuring efficient use of RAM.
It gives you a friendly way to talk to the computer.
An operating system protects a computer from viruses and hackers.
It detects and handles errors or crashes, preventing a single application or hardware issue from crashing the entire system.
● Conclude the session by summarising that the Operating system is an important component of a computer system. OS handles various responsibilities, such as controlling and managing all computer resources and providing multiple execution modes. It carries out various important functions, such as allocating and de-allocating memory space to running processes and protecting a computer from viruses and hackers.
● Assign the following questions from the Chapter Checkup given at the end of the chapter as homework.
A. Fill in the Blanks: Question 1
C. Write T for True and F for False: Question 4
D. Answer the Following: Question 1
At the end of the session, the students will be able to:
● differentiate between the various types of operating systems.
● describe the user interface and its types.
Keywords
● Single-user operating system: It is designed for personal use and allows only one person to use the computer at a time.
● Multiuser operating system: It allows multiple users who are on different computers or terminals to access shared resources and data at the same time.
● Multitasking operating system: It allows a computer to run and manage multiple tasks or processes simultaneously.
● Real-time operating system: It is a specialised computer operating system designed for tasks that require extremely precise and predictable timing and responsiveness.
● Distributed operating system: It manages multiple computers or devices that are connected via a single communication channel to work together seamlessly as if they were a single, coordinated entity.
● User interface: A user interface (UI) works as a bridge that allows people to communicate with computers, smartphones, and various digital devices in a manner that is simple and easy to use.
Ask the students about the type of operating system they are using in their school computer lab.
Explain to the students the different types of operating systems. Explain the concept of user interface. Also, explain its types.
● Ask students to name the operating system that they are using in the computer lab. Help them to guess the name of the OS by giving them hints about the types of operating systems.
Explain the following concepts:
Differentiate between the various types of operating systems.
Describe the user interface and its types.
Discuss the different types of operating systems, like single-user, multiuser, multitasking, real-time, and distributed operating systems. Also, explain the function of each type, as given on pages 2 to 5. Also, highlight the difference between the types of Operating systems.
Tell students that a user interface works as a bridge that allows people to communicate with computers, smartphones, and various digital devices in a manner that is simple and easy to use. Also, tell them about the Character User Interface and Graphical User Interface, as given on pages 5 to 7.
● Read aloud the questions provided in the Do It Yourself 1B, Do It Yourself 1C, Do It Yourself 1D, and Do It Yourself 1E sections and encourage the students to solve the questions. Instruct the students to write the answers in their books.
Correct Responses:
Do It Yourself 1B
1. Multiuser 2. Single-user
Do It Yourself 1C
1. Real-time operating system 2. Multitasking operating system
Do It Yourself 1D
1. multiple 2. single
Do It Yourself 1E
1. F 2. F Build 7 mins
● Ask the students to answer the question, “Explore the icons and symbols you see on your device. What do these symbols represent, and how do they make using apps and devices easier?” asked in the Think and Tell section, given on page 7.
Correct Response: The icons and symbols I see on my device represent the various graphical elements of the Graphical User Interface (GUI). These graphical elements enable users to interact with computers and software applications. It helps GUI provide an intuitive and visual based means of navigating, controlling, and accessing digital content, making computing more user-friendly.
● Conduct a group discussion in the class among students based on the topic “Which UI is better: CUI or GUI?”
Possible Response: GUIs are easier to learn, more user-friendly, attractive, and more appealing than CUIs. Moreover, GUIs provide immediate visual feedback of the action performed, unlike CUIs, which have limited or no visual feedback of the action performed.
● Conclude the session by summarising the functions of various types of operating systems, such as single-user, multiuser, multitasking, real-time, and distributed operating systems. Also, highlight the concept of user interface with the differences between the Character user interface and the Graphical user interface.
● Assign the following questions from the Chapter Checkup given at the end of the chapter as homework.
A. Fill in the Blanks: Questions 2, 3, 4, and 5
B. Who Am I?: Questions 1, 2, 3, and 4
C. Write T for True and F for False: Questions 1, 2, 3, and 5
D. Answer the Following: Questions 2, 3, 4, and 5
E. Apply Your Learning: Questions 1, 2, and 3
This chapter is divided into the following sessions
1. Computer Networks and Its Types
2. Networking Concepts
3. Cloud Computing, Network Security, and Cyber Ethics
At the end of the session, the students will be able to:
● describe computer networks.
● plan network architecture.
● identify types of computer networks.
Keywords
● Computer networks: Computer networks are systems of interconnected computers, devices, or nodes that share resources and information with each other.
● Protocols: Protocols are the set of rules and guidelines that ensure seamless and standardised communication between the devices on a network.
● Network architecture: Network architecture refers to the design and structure of devices used in computer networks.
Ask the students how roads are connected to form a network.
Explain to the students about computer networks, network architecture, and types of networks. Group discussion Conclude the concepts Assign homework
● Ask the students how roads are connected to form a network.
● Just like road networks, computers can also be connected to form a computer network.
● Now, build on the concept that computer networks are systems of interconnected computers, devices, or nodes that share resources and information with each other.
Explain the following concepts:
Describe computer networks.
Plan network architecture.
Identify types of computer networks.
15 mins
Explain to the students that computer networks are systems of interconnected computers, devices, or nodes that share resources and information with each other. Explain parts of a data communication system like sender, receiver, protocols, etc., as given on page 10.
Explain to the students that network architecture refers to the design and structure of devices such as routers, switches, and modems used in computer networks, as given on page 10.
Explain the types of networks, such as PAN, LAN, CAN, MAN, and WAN, to the students, as given on page 11.
Ask the following questions to the students to check their understanding.
● What is a Sender in a Data Communication System?
a. A device that receives data.
b. A device that repairs networks.
c. A device that starts communication by sending data.
d. A device that connects networks.
Correct Response:
c. A device that starts communication by sending data.
● What role do protocols play in a computer network?
a. They physically connect computers together.
b. They store the data for network use.
c. They ensure seamless communication between the devices.
d. They act as the sender and receiver in the data communication.
Correct Response:
c. They ensure seamless communication between the devices.
● Conduct a group discussion in the class among the students based on the topic “Various types of networks and their purposes, coverage areas, and examples of where they are commonly used” provided in the Discuss section as mentioned on page 11.
Possible Responses: Following are the various types of networks:
1. Personal Area Network (PAN)
Purpose: A PAN is designed for personal use within a very small area. It’s meant to connect personal devices like smartphones, tablets, and accessories, which are connected through technologies like Bluetooth.
Coverage Area: Typically covers a range of about 10 meters (33 feet).
Examples of Use: Connecting your Bluetooth earphones to your smartphone.
2. Local Area Network (LAN)
Purpose: A LAN allows devices to share files, printers, and instant accounts. LANs are widely used in homes and small organisations to connect computers and other devices for smooth communication.
Coverage Area: Can range from a single room to an entire building or a group of buildings close to each other.
Examples of Use: Computers in a school computer lab sharing a single printer, or the Wi-Fi network in your home that connects all the devices to the internet and each other.
3. Campus Area Network (CAN)
Purpose: CAN connects multiple LANs within a specific area.
Coverage Area: It covers a small area, such as a school campus or a big office building.
Examples of Use: It helps to easily share information between the classrooms of a school.
4. Metropolitan Area Network (MAN)
Purpose: MAN connects multiple LANs within that area, which enables communication between various locations. MANs are essential for universities or within cities to connect multiple offices for data exchange and communication.
Coverage Area: MAN covers a large area, like a city.
Examples of Use: Cable TV networks
5. Wide Area Network (WAN)
Purpose: It connects LANs and MANs over long distances that cover cities, nations, or continents.
Coverage Area: This can cover anything from a large region to the entire globe.
Examples of Use: The internet is the most significant WAN that enables global communication.
3 mins
Sum Up
● Conclude the session by summarising that computer networks are systems of interconnected computers, devices, or nodes that share resources and information with each other. Network architecture refers to the design and structure of devices used in computer networks. There are various types of networks, such as PAN, LAN, CAN, MAN, and WAN.
● Assign the following questions from the Chapter Checkup given at the end of the chapter as homework.
A. Fill in the Blanks: Questions 1 and 2
B. Tick the Correct Option: Questions 1 and 2
C. Who Am I?: Question 1
D. Write T for True and F for False: Questions 1 and 5
E. Answer the Following: Question 1
F. Apply Your Learning: Questions 2 and 3
At the end of the session, the students will be able to:
● identify the different networking devices.
● describe the different network terminologies.
● describe protocols and their types.
● identify a network topology.
Keywords
● Networking devices: Networking devices are the hardware devices that are used to connect computers together to share files or printers.
● Modem: A modem is a device that connects your computer to the environment, which translates the digital data from your computer into signals that can travel over the telephone or cable lines.
● IP address: An IP address is a unique numerical label assigned to every device (like computers and smartphones) on a network.
● Hypertext: Hypertext is a way of organising and connecting information in digital documents, such as web pages.
● Bandwidth: Bandwidth is the capacity of a network connection. It is measured in bits per second (bps) or Bytes per second (Bps).
● Protocols: In computer networks, protocols are a set of rules and conventions that govern how data is transmitted, received, and processed between devices.
● Network topologies: Network topologies refer to the arrangement of devices and connections on a computer network.
Ask the students about the devices at home that are connected to a network. Ask the students what are the rules that we follow while communicating.
Explain the networking devices, network terminologies, protocols and their types, and the network topologies. Group discussion Conclude the concepts
5 mins
Warm Up
● Ask the students about the devices at home that are connected to a network.
● Tell them that one device that is commonly used is a Modem.
● Ask the students what are the rules that we follow while communicating.
● Tell them that the protocols are a set of rules and conventions that govern how data is transmitted, received, and processed between the devices.
15 mins
Explain the following concepts:
Identify the different networking devices. Tell the students that networking devices are the hardware devices that are used to connect computers together to share files or printers. Explain different networking devices, such as modem, switch, hub, router, and gateway, as given on page 12.
Describe the different network terminologies. Explain the different network terminologies, like internet, intranet, URL, ISP, etc., to the students, as given on pages 12 and 13.
Describe protocols and their types.
Identify a network topology.
Explain to the students that protocols are a set of rules and conventions that govern how data is transmitted, received, and processed between the devices. Explain the types of protocols, like HTTP, FTP, TCP/IP, IMAP, and SMTP to the students, as given on pages 13 and 14.
Explain to the students that network topologies refer to the arrangement of devices and connections on a computer network. Explain the types of topologies such as bus, star, ring, mesh, and hybird to the students, as given on pages 15 and 16.
● Read aloud the questions provided in Do It Yourself 2A, Do It Yourself 2B, and Do It Yourself 2C and encourage the students to solve them. Instruct them to write the answers in their book. Do It Yourself 2A
Correct Responses:
1. Bandwidth 2. Link 3. Switch 4. Website 5. Internet Do It Yourself 2B
Correct Responses: 1. Internet Message Access Protocol
2. Simple Mail Transfer Protocol 3. Hypertext Transfer Protocol 4. File Transfer Protocol
5. Transmission Control Protocol/Internet Protocol
Correct Responses:
Ring, Mesh, Hybrid
● Conduct a group discussion in the class among the students based on the topic “The Main Disadvantage of a Star Topology”.
Possible Responses: The disadvantage of the star topology is that if the hub fails, the whole network will be disabled. Sum Up
● Conclude the session by summarising that networking devices are the hardware devices that are used to connect the computers together to share files or printers. Protocols are a set of rules and conventions that govern how data is transmitted, received, and processed between the devices. Network topologies refer to the arrangement of devices and connections on a computer network.
● Assign the following questions from the Chapter Checkup given at the end of the chapter as homework.
A. Fill in the Blanks: Questions 3, 4, and 5
B. Tick the Correct Option: Questions 3 and 4
C. Who Am I?: Questions 2, 3, 4, 5, and 6
D. Write T for True and F for False: Questions 2 and 4
E. Answer the Following: Questions 2 and 6
F. Apply Your Learning: Question 1
At the end of the session, the students will be able to:
● explain cloud computing.
● describe network security.
● define cyber ethics.
Keywords
● Cloud computing: Cloud computing is the process of manipulating, configuring, and accessing online applications. Cloud computing offers an online data storage facility; one can access them through the internet on remote servers.
● Network security: Network security involves the implementation of strategies, protocols, and tools to protect computer networks, systems, and data from unauthorised access, attacks, and damage.
● Cyber ethics: Cyber ethics refers to a responsible and ethical behaviour on the internet.
Ask the students if they know how they can access data and applications from anywhere and on multiple devices with an internet connection.
Ask the students that why do they have to login with their credentials to access their student profiles on the school portal.
Introduce cloud computing. Explain the characteristics and advantages of cloud computing. Introduce networking security, such as firewalls, antivirus software, encryption, and intrusion detection systems, to safeguard sensitive information from cyber threats. Introduce cyber ethics.
● Ask students if they know how they can access data and applications from anywhere and on multiple devices with an internet connection.
● Tell students that cloud computing helps them do so.
● Ask the students why do they have to login with their credentials to access their student profiles on the school portal.
● Tell the students that this is to protect the data from an unauthorised access and that the network security ensures that only authorised users can access the specific data.
Explain the following concepts:
Explain cloud computing.
Describe network security.
Explain to the students that cloud computing offers an online data storage facility through the internet on remote servers. List common examples of cloud computing, such as Google Drive, Microsoft OneDrive, Dropbox, and Apple iCloud Drive. Explain the characteristics, advantages, storing, and sharing of data, using cloud computing to the students, as given on pages 16 and 17.
Explain to the students that network security involves the implementation of strategies, protocols, and tools to protect computer networks, systems, and data from unauthorised access, attacks, and damage, as given on page 18.
Define cyber ethics. Explain to the students that cyber ethics refers to a responsible and ethical behaviour on the internet. Explain cyber ethics to the students, as given on page 18.
Ask the following question to the students to check their understanding.
● Mention one advantage of using cloud computing for storing data.
Correct Response: One advantage of using cloud computing for storing data is the ability to access the data from anywhere with an internet connection.
● How can you ensure responsible and ethical behaviour on the internet?
Correct Response: We can ensure responsible and ethical behaviour on the internet by being respectful, honest, and considerate during online interactions. This includes avoiding cyberbullying, respecting others’ privacy, and giving credit to original content providers for using their online content.
7 mins
Build
● Conduct a group discussion in the class among the students based on the topic “Discuss the concept of storing and sharing data using cloud computing.” provided in the Discuss section as mentioned on page 17.
Possible Responses: Storing and sharing data using cloud computing means saving your files, documents, and information on the internet, rather than on your computer’s hard drive. Cloud computing allows you to access these resources from anywhere, using an internet connection. Additionally, you can easily share this data with others, which enables collaboration and makes it convenient for remote work or sharing information with colleagues or friends. Such storing and sharing eliminate the need for physical storage devices and offers flexibility and accessibility to your data.
● Conclude the session by summarising that cloud computing offers an online data storage facility; one can access them through the internet on remote servers. Network security includes measures like firewalls, antivirus software, encryption, and intrusion detection systems to safeguard sensitive information from cyber threats. Cyber ethics refers to a responsible and ethical behaviour on the internet.
● Assign the following questions from the Chapter Checkup given at the end of the chapter as homework.
A. Fill in the Blanks: Question 6
B. Tick the Correct Option: Question 5
D. Write T for True and F for False: Question 3
E. Answer the Following: Questions 3, 4, and 5
F. Apply Your Learning: Question 4
This chapter is divided into the following sessions
Computational Thinking
Introduction to Algorithms and Flowcharts
At the end of the session, the students will be able to:
● explain computational thinking.
● describe the four pillars of computational thinking.
Keywords
● Computational thinking: Computational thinking is the process of conceptualising problems in such a way that the resulting solutions can be viewed as computational operations and algorithms.
● Decomposition: Decomposition is the process of dividing a difficult activity or problem into smaller, easy-to-solve components or sub-problems.
● Pattern recognition: Pattern recognition is a data analysis method that uses machine learning algorithms to automatically recognise patterns and regularities in data.
● Abstraction: Abstraction means focusing on the most important parts and ignoring the details that don’t matter.
● Algorithmic design: Algorithmic design is a critical problem-solving skill. It strengthens the ability to create a process for finding a solution as opposed to focusing on the answer itself.
Ask the students if they have ever tried to solve a problem with a logical approach.
Also, ask them what is their approach to solve a complex problem.
Explain to the students what computational thinking is.
Explain to the students the four pillars of computational thinking.
Group discussion
Conclude the concepts
Assign homework
5 mins
Warm Up
● Ask the students if they have ever tried to solve a problem with a logical approach.
● Also, ask them what is their approach to solve a complex problem.
● Tell the students that turning a big problem into small, easy-to-understand pieces that can help solve a complex problem.
15 mins
Engage
Explain the following concepts:
Learning Outcomes
Explain computational thinking.
Describe the four pillars of computational thinking.
Explanation
Explain to the students that computational thinking is the process of conceptualising problems in such a way that the resulting solutions can be viewed as computational operations and algorithms, as given on page 22.
Explain to the students the four pillars of computational thinking, such as Decomposition, Pattern recognition, Abstraction, and Algorithmic design, as given on pages 22 to 24.
● Read aloud the questions provided in the Do It Yourself 3A section and encourage the students to solve the questions. Instruct the students to write the answers in their books.
Correct Responses:
1. Small
2. Abstraction
Build
7 mins
● Conduct a group discussion in the class among the students based on the topic provided in the Discuss section, as mentioned on page 24.
Possible Responses: By integrating computational thinking into various subjects, such as Science, Mathematics and Social Studies, we learn to approach problems in a structured way, making them easier to solve. We become better at focusing on the most important details, patterns, and sequences, and we get skilled at breaking down complex problems into smaller sub-problems.
3 mins
Sum Up
● Conclude the session by summarising that computational thinking is the process of conceptualising problems in such a way that the resulting solutions can be viewed as computational operations and algorithms. It is a way to solve problems by breaking them down into smaller parts, finding patterns, focusing on important details, and creating step-by-step solutions.
● Assign the following questions from the Chapter Checkup given at the end of the chapter as homework.
A. Fill in the Blanks: Questions 1, 3, 4, and 5
B. Tick the Correct Option: Questions 1, 3, and 4
C. Who Am I?: Questions 1, 3, and 4
D. Write T for True and F for False: Questions 1 and 4
E. Answer the Following: Question 1
At the end of the session, the students will be able to:
● develop an algorithm.
● solve problems using flowcharts.
Keywords
● Algorithm: An algorithm is a step-by-step process to complete a task or solve a particular problem.
● Flowchart: A flowchart is a visual representation of an algorithm or process, using symbols and arrows to illustrate the sequence of steps.
Ask the students how do they perform any task, like making tea, planting a seed, or getting ready for the school.
Also, ask them whether they perform all these tasks in a step-by-step manner.
Explain algorithm, its characteristics, and the steps to develop an algorithm. Also, explain its various forms. Introduce the students to flowcharts and the various symbols used in flowcharts to solve a problem. Also, tell them how to solve problems using flowcharts.
Group discussion
Conclude the concepts Assign homework
● Ask the students how they perform any task, like making tea, planting a seed, or getting ready for school.
● Now, relate the concept of algorithms and tell them that when they perform a particular task in a step-by-step manner, it is called an algorithm.
Explain the following concepts:
Develop an algorithm.
Solve problems using flowcharts.
Explain the characteristics of a good algorithm, steps to develop an algorithm, and writing algorithms to the students, as given on pages 25 to 27.
Explain flowcharts, various symbols used in flowcharts, and solving problems using flowcharts to the students, as given on pages 27 and 28.
● Read aloud the questions provided in the Do It Yourself 3B and encourage students to solve them. Instruct them to write the answers in their book.
Correct Responses: To plan and organise a school event like a science fair, I would use computational thinking elements as follows:
Decomposition: Break down the event into smaller tasks, like setting up exhibits, scheduling presentations, and managing attendees.
Pattern matching: Identify the recurring elements, like registration procedures or equipment setup to streamline processes.
Abstraction: Focus on key details like coordinating with participants and judges, abstracting away less critical aspects.
Algorithm design: Develop step-by-step procedures for tasks like exhibit registration, judge assignment, and event scheduling to ensure smooth operation.
7 mins
Build
● Conduct a group discussion in the class among the students based on the topic provided in the Discuss section as mentioned on page 25.
Possible Responses: Algorithmic thinking is crucial because it enhances a student’s ability to think critically. It broadens their minds to the additional capabilities of a particular solution and helps them see a problem more holistically. For example, imagine you have a list of numbers that you want to sort in ascending order. A small algorithm for this would be as given below:
a. Start with the first element in the list.
b. Compare the current element with the next element.
c. If the current element is greater than the next element, swap them.
d. Move to the next element and repeat the comparison and swap if necessary.
e. Continue this process until no swaps are needed, indicating the list is sorted.
● Ask the students to answer to the question “Imagine you have a box of colourful crayons. You want to arrange them in a pattern, but you can use only two colours at a time. How would you create a beautiful pattern using your crayons?” asked in the Think and Tell section on page 25.
Possible Responses: To create a beautiful pattern, we would group the crayons into pairs of two colours and arrange them in a repeating sequence, such as alternating between red and blue, yellow and green, or any other combination that appeals to us.
● Conduct a group discussion in the class among the students based on the topic provided in the Discuss section as mentioned on page 26.
Possible Responses: Computational thinking, like using algorithms, is like following a recipe to solve everyday problems step by step, whether you are completing your homework, planning a party, or even sorting your clothes. By breaking big tasks into smaller, manageable parts (decomposition), and finding patterns (pattern recognition) or creating steps to make things easier (algorithms), focusing on the tasks that require priority (abstraction), you can tackle almost any challenge more efficiently.
● Ask the students to answer to the question “Imagine you are a chef, and your job is to bake a perfect chocolate cake. Just like following a recipe, you have to follow a set of step-by-step instructions. What do you think would happen if you mixed up the steps or left some out? How important is it to follow the ‘algorithm’ (recipe) correctly when baking a cake?” asked in the Think and Tell section on page 27.
Possible Responses: If the steps are mixed, then the following may happen:
a. Ingredients not mixing properly: If you add ingredients in the wrong order, they may not mix as intended. For example, mixing sugar into whipped eggs before adding the flour can affect the cake’s structure and texture.
b. Inconsistent texture: Beating eggs and sugar before adding other ingredients incorporates air and gives the cake its lightness. Doing this out of order could result in a dense or uneven texture.
c. Failed chemical reactions: Baking powder or baking soda, which causes the cake to rise, must be added at specific times for it to react properly. Mixing up the steps could lead to a cake that does not rise.
3 mins
Sum Up
● Conclude the session by summarising that an algorithm is a step-by-step guide to solve a problem or complete a task, and it is important because by using algorithms, we can clearly outline what we need to start with, the steps we need to take, and what we aim to achieve, making tasks simpler and more straightforward. Again, flowcharts help us see how to solve problems visually, using shapes to represent steps, like adding two numbers together and then checking if the result is even or odd with a decision step.
● Assign the following questions from the Chapter Checkup given at the end of the chapter as homework.
A. Fill in the Blanks: Question 2
B. Tick the Correct Option: Questions 2 and 5
C. Who Am I?: Questions 2 and 5
D. Write T for True and F for False: Questions 2, 3, and 5
E. Answer the Following: Questions 2, 3, 4, and 5
F. Apply Your Learning: Questions 1, 2, 3, 4, and 5
This chapter is divided into the following sessions
1. Introduction to Apps and Accessing Apps
2. Classification of Mobile Apps and Developing an App
At the end of the session, the students will be able to:
● discuss apps.
● explain different types of apps.
● access apps.
Keywords
● Apps: They are software programs or mobile applications that can be downloaded and installed on electronic devices like smartphones, tablets, and computers.
● Mobile apps: Mobile apps are programs you install on your phone to make it more fun or helpful for whatever you want to do.
● Desktop apps: Desktop apps are like the computer version of the apps that you use on your phone, but they are designed to work on your computer and do all sorts of things, from writing documents to playing games or editing pictures.
● Web apps: A web app is a software application that operates on web servers and is accessed by users through web browsers over the internet.
Ask the students if they have played games on their parents’ mobile.
Explain to the students the concept of apps. Discuss different types of apps. Tell them about different methods to access the apps.
Think and Tell Group discussion Conclude the concepts Assign homework
mins
● Ask students if they have played games on their parents’ mobile.
● Tell the students that the game they played is an app.
Explain the following concepts:
Learning Outcomes
15 mins
Explanation
Discuss apps. Discuss with the students that an app refers to a program or software application designed to perform specific tasks or functions on a computer, smartphone, tablet, or other kinds of digital devices, as given on page 32.
Explain different types of apps. Explain to the students about different types of apps like social networking apps, productivity apps, gaming apps, food delivery and cooking apps, as given on pages 32 and 33.
Access apps. Tell the students that they can access apps from their mobile phones, desktops, or directly from the web, as given on pages 33 and 34.
● Read aloud the question provided in the Do It Yourself 4A section and encourage the students to solve the question. Instruct the students to write the answers in their book.
Correct Responses:
1. Facebook, Instagram
2. downloaded
3. Web apps
Build
4. app store 5. Desktop apps
7 mins
● Ask the students to give the answer to the question “What are the most popular apps according to you?”, asked in the Think and Tell section on page 33.
Possible Responses: Zomato, Microsoft Word, Facebook, Google Drive, Temple Run, etc.
● Conduct a group discussion in the class among the students on the topic “Why do you think apps were invented? How do they make our lives easy?”, as given in the Discuss section on page 33.
Possible Responses: Apps were invented to provide users with convenient access to specific functionalities or services on digital devices such as smartphones, tablets, and computers. These apps make our lives easy as they can be used for playing games, access social media, learning, productivity, communication, and many other activities.
● Conclude the session by summarising that an app refers to a program or software application designed to perform specific tasks or functions on a computer, smartphone, tablet, or other kinds of digital devices. There are different types of apps like social networking apps, productivity apps, gaming apps, food delivery and cooking apps. One can access apps from their mobile phones, desktops, or directly from the web.
● Assign the following questions from the Chapter Checkup given at the end of the chapter as homework.
A. Fill in the Blanks: Questions 1 and 5
B. Who Am I?: Question 3
C. Write T for True and F for False: Questions 1 and 3
D. Answer the Following: Question 3
E. Apply Your Learning: Question 4
At the end of the session, the students will be able to:
● classify mobile apps.
● create an app.
● create code for the app.
● test the app.
Keywords
● Native apps: They are specifically designed for particular types of phones, such as iPhones or Android phones.
● Hybrid apps: They can work on different types of phones and use web technologies, allowing them to work on multiple platforms and access device features.
Ask the students to name any app that they have used for entertainment. Discuss how to classify apps based on how they are created and used. Tell them how to develop an app using MIT App Inventor. Group discussion Conclude the concepts Assign
● Ask the students to name any app that they have used for entertainment.
● Relate to the concept that today we have apps for almost everything. Tell them there are educational apps, social networking apps, entertainment apps, banking apps, and e-commerce apps.
Explain the following concepts:
Classify mobile apps.
Discuss with the students that the apps can be classified based on the technology used to create them, and their usage, as given on pages 34 to 36.
Create an app. Explain to the students that MIT App Inventor is a visual development platform that allows users to create mobile applications for Android devices without the need to write any traditional codes. Also, tell them the steps to create an app, as given on pages 37 to 41.
Create code for the app.
Tell the students that they can create a code for their app by using various blocks present in the Blocks Editor. Discuss the steps to create a code for the app, as given on pages 42 and 43.
Test the app. Tell them the steps to test an app, as given on pages 43 and 44.
● Read aloud the questions provided in the Do It Yourself 4B and Do It Yourself 4C sections and encourage the students to solve the questions. Instruct the students to write the answers in their book.
Correct Responses: (Do It Yourself 4B):
1. Examples of native apps include Camera, Gallery, Clock, Maps, and Settings. Examples of hybrid apps include Uber, Zomato, Instagram, Telegram, and X (formerly known as Twitter). Native apps are mostly used.
2. a. Education apps b. Social networking apps c. Banking apps d. E-commerce apps e. Entertainment apps
Correct Responses: (Do It Yourself 4C): Do it yourself.
Build
● Conduct a group discussion in the class among the students on the topic “How can we get hybrid apps on our phones? Is it similar to how we get the native apps?”, as given in the Discuss section on page 35.
Possible Responses: We can download hybrid apps from the app stores. Getting hybrid apps on your phone is generally similar to getting native apps.
● Conduct a group discussion in the class among the students on the topic “In your opinion, from the various categories of apps, which ones are the most widely used and by whom?”, as given in the Discuss section on page 36.
Possible Response: Entertainment apps are the most used by people.
● Conclude the session by summarising that apps can be classified based on the technology used to create them as native and hybrid. Based on their usage, apps can be classified as educational apps, social networking apps, entertainment apps, banking apps, and e-commerce apps. MIT App Inventor is a visual development platform that allows users to create mobile applications for Android devices without the need to write traditional codes. Also summarise how to create an app, create code for the app, and test the app.
● Assign the following questions from the Chapter Checkup given at the end of the chapter as homework.
A. Fill in the Blanks: Questions 2, 3, and 4
B. Who Am I?: Questions 1, 2, 4, and 5
C. Write T for True and F for False: Questions 2, 4, and 5
D. Answer the Following: Questions 1, 2, 4, and 5
E. Apply Your Learning: Questions 1, 2, 3, and 5
This chapter is divided into the following sessions
1. Formulas and Functions-I
2. Formulas and Functions-II
3. Formulas and Functions-III
At the end of the session, the students will be able to:
● describe what a spreadsheet is.
● create a spreadsheet.
● identify the various elements of a spreadsheet.
● refer to a cell using the cell names.
● apply formulas in Google Sheets.
● use functions in Google Sheets.
Keywords
● Spreadsheet: A spreadsheet is a tool that helps you organise data in rows and columns and do calculations.
● Row: The horizontal set of boxes is called a row or record.
● Column: The vertical set of boxes is called a column or field.
● Cell: The intersection of a row and a column is called a cell.
● Functions: Functions allow you to calculate more efficiently using the cell ranges instead of typing out the name of each cell.
Ask the students if they keep track of the money spent and the amount of money to save monthly.
Ask the students what tools or software they use for doing calculations.
Explain to the students what a spreadsheet is. Also, tell them the steps to create a spreadsheet. Explain the different elements of a spreadsheet. Explain to them how to refer to a cell using cell names. Also, tell them the steps to apply formulas and functions in Google Sheets.
● Ask the students if they keep track of the money spent and the amount of money to save monthly.
● Ask the students what tools or software they use for doing calculations.
● Tell the students that they can do it with the help of a spreadsheet which is a tool that helps you organise data in rows and columns and do calculations. Spreadsheets also allow you to analyse and visualise data. 15 mins
Explain the following concepts:
Describe what a spreadsheet is.
Tell the students that a spreadsheet is a tool that helps you organise data in rows and columns and do calculations. Also tell them the various examples of spreadsheets, as given on page 46.
Create a spreadsheet. Explain the steps to create a spreadsheet using Google Sheets, as given on page 46.
Identify the various elements of a spreadsheet.
Refer to a cell using the cell names.
Tell the students that a spreadsheet consists of a grid-like structure. Explain to them the various components of a spreadsheet, like a row, a column, and a cell, as given on page 47.
Tell the students that a cell name is a combination of letters and numbers. Also, tell them the steps to enter the data in the sheet, as given on page 47.
Apply formulas in Google Sheets.
Use functions in Google Sheets.
Tell students the steps to apply formulas in Google Sheets, as given on pages 47 and 48.
Explain to the students that functions allow us to calculate efficiently using the cell ranges instead of typing out the name of each cell. Explain to them the various functions, such as the Sum(), Average(), and other commonly used functions. Tell the students the steps to apply functions in Google Sheets, as given on pages 49 and 50.
● Read aloud the questions provided in the Do It Yourself 5A and Do It Yourself 5B sections and encourage the students to solve the questions. Instruct the students to write the answers in their book.
Correct Responses: Do It Yourself 5A
1. Cell Cell Name

2. =B1+C1+D1 Do It Yourself 5B
1. a. Function name b. cell range
2. =SUM(B2:B8) = 40580 =AVERAGE(B2:B8) = 5797.143
Build
7 mins
● Conduct a group discussion in the class among students based on the topic, “How are formulas and functions different?” provided in the Discuss section as mentioned on page 51.
Correct Response: You can simplify your formulas by using the functions. Functions allow you to calculate more efficiently, as they are a built-in formula in Google Sheets.
● Ask the students to give the answer to the question, “You are tracking the number of hours you study for different subjects in a Google Sheets. Which function would you use to find the subject that you have studied the longest? Hint: Refer to the table given above.” asked in the Think and Tell section given on page 51.
Possible Responses: MAX/MIN/COUNT/IF
Correct Response: MAX
● Conclude the session by summarising that a spreadsheet is a tool that helps you organise data in rows and columns and do calculations. A spreadsheet consists of a grid-like structure. Google Sheets is one such example. There are various components of a spreadsheet, like a row, a column, and a cell. Also revise the steps to create a spreadsheet, enter data in Google Sheets, and how to apply formulas and functions in Google Sheets.
● Assign the following questions from the Chapter Checkup given at the end of the chapter as homework.
A. Fill in the Blanks: Questions 2, 4, and 5
B. Tick the Correct Option: Questions 1, 4, and 5
C. Who Am I?: Questions 1 and 2
D. Write T for True and F for False: Question 4
E. Answer the Following: Questions 1, 2, and 4
F. Apply Your Learning: Questions 2, 3, and 4
At the end of the session, the students will be able to:
● sort data.
● group data.
● filter data.
Keywords
● Sorting: Sorting means arranging data in a particular sequence based on specific criteria.
● Filters: Filters are a useful feature used in Google Sheets that enables you to display data according to specific criteria.
Ask the students that if they have a set of numbers that need to be analysed and understood. How will they simplify the process of analysing of this data?
Explain to the students how to sort, group, and filter data in Google Sheets. Tell them the steps to apply these features to Google Sheets.
Group discussion Conclude the concepts
Assign homework
5 mins
Warm Up
● Ask the students if they have a set of numbers that need to be analysed and understood. How will they simplify the process of analysing this data?
● Tell the students that for this, they should arrange the data in a specific order, for example, descending or ascending order. The sorting feature of Google Sheets helps us arrange data in a specific order.
● They may also display data according to specific criterion, for example, by displaying only those numbers that are greater than 100. For this, they may use the filter feature.
Explain the following concepts:
Sort data. Tell the students that sorting means arranging data in a particular sequence based on specific criteria. Tell them the steps to sort the data, as given on pages 51 and 52.
Group data. Tell the students that grouping means putting similar things together. Grouping keeps things tidy and helps you find what you need faster. Also tell them the steps to group data, as given on pages 52 and 53.
Filter data. Tell the students that filters are a useful feature used in Google Sheets that enables you to display data according to specific criteria. Also, tell them the steps to filter data, as given on pages 53 and 54.
● Read aloud the questions provided in the Do It Yourself 5C section. Encourage the students to solve the questions. Instruct the students to write the answers in their book.
Correct Responses:
Do It Yourself 5C
1. b. Filtering
2. a. T b. F
7 mins
● Conduct a group discussion in the class among students based on the topic, ”How is filtering different from grouping?” provided in the Discuss section as mentioned on page 54.
Correct Response: Filtering helps display data according to specific criteria. Filters can help narrow down the options to what we want and hide the rest. On the other hand, grouping means putting similar things together. Grouping keeps things tidy and helps you find what you need faster.
3 mins
● Conclude the session by summarising that sorting means arranging data in a particular sequence based on specific criteria. Grouping means putting similar things together. Grouping keeps things tidy and helps you find what you need faster. Filters are a useful feature used in Google Sheets that enables you to display data according to specific criteria.
● Assign the following questions from the Chapter Checkup given at the end of the chapter as homework.
B. Tick the Correct Option: Question 2
C. Who Am I?: Question 4
D. Write T for True and F for False: Questions 2 and 3
E. Answer the Following: Question 3
F. Apply Your Learning: Question 1
At the end of the session, the students will be able to:
● create a chart.
● add a new sheet tab, and colour the sheet tabs.
Keyword
● Charts: Charts help us look at the data in the form of pictures.
Warm Up Engage Build Sum Up
Ask the students which they find easier to understand: the data presented in numbers or in pictures. Tell them the concept of charts.
Explain to the students the concept of charts. Also, tell the students how to add sheet tabs and how to colour them. Group discussion Conclude the concepts
Assign homework
Action Plan
Warm Up
● Ask the students if they find it easier to understand data when it is presented in numbers or when it is presented as pictures.
● Now, relate the concept of chart with data and explain that to the students. 15 mins
Engage
Explain the following concepts:
Learning Outcomes
Explanation
Create a chart. Tell the students that charts help us look at data in the form of pictures. This helps us to understand the data in a better way. Explain to them the different kinds of charts, such as column chart, bar chart, pie chart, and line chart. Also tell them the steps to create a chart, as given on pages 54 and 55.
Add a new sheet tab and colour sheet tabs. Tell the students the steps to add a new sheet tab and colour those sheet tabs, as given on page 57.
● Read aloud the questions provided in the Do It Yourself 5D section. Encourage the students to solve the questions. Instruct the students to write the answers in their book.
Correct Responses: Do It Yourself 5D
1. c. To help understand and analyse data more easily.
2. c. Pie chart
Build
7 mins
● Conduct a group discussion in the class on the topic, ”Why is using charts to represent data more interactive?”
Correct Response: Charts help us see information in pictures, making it easier and quicker for our eyes and brains to understand it.
3 mins
● Conclude the session by summarising that charts help us look at data in the form of pictures. Also, revise the steps to apply these features in Google Sheets, to add a new sheet tab, and colour it.
● Assign the following questions from the Chapter Checkup given at the end of the chapter as homework.
A. Fill in the Blanks: Questions 1 and 3
B. Tick the Correct Option: Question 3
C. Who Am I?: Questions 3 and 5
D. Write T for True and F for False: Question 1
E. Answer the Following: Question 5
This chapter is divided into the following sessions
1. Understanding Charts, Components of a Chart, and Types of Charts
2. Creating a Chart in Google Sheets and Moving, Resizing, and Deleting Charts
Learning Outcomes
At the end of the session, the students will be able to:
● explain charts.
● describe the components of a chart.
● describe types of charts.
Keywords
● Data visualisation: It is the process of graphically presenting data to reveal patterns, trends, and insights.
● Chart: A visual representation of data that helps you understand the information more easily.
Ask the students what they like more graphical information or text. Explain to them that graphical information is more understandable in comparison to textual information.
Describe to the students the concept of data visualisation and charts. Also, explain to them about different components and types of charts. Think and Tell Conclude the concepts
Assign homework
5 mins
Warm Up
● Ask the students what they like more graphical information or text.
● Explain to them that graphical information is more understandable in comparison to textual information.
● Now, relate the concept of data visualisation and chart using the appropriate example.
Explain the following concepts:
Explain charts.
Describe the components of a chart.
15 mins
Describe to the students that data visualisation is the process of graphically presenting data to reveal patterns, trends, and insights. Also, explain that chart is a visual representation of data that helps you understand the information more easily, as given on page 62.
Tell them about different components of a chart, such as Chart title, Chart Area, Axes, Data series, Legends, Gridlines, etc., as given on pages 62 and 63.
Describe types of charts. Tell them about different types of charts such as column bar charts, line charts, pie charts, scatter plots, and area charts, given on pages 63 to 65.
● Which chart uses dots to show the relationship between the two variables in a dataset?
Correct Response: Scatter plot
● Name the chart that represents data as slices of a circle, where each slice represents a proportion of the whole.
Correct Response: Pie chart
Build
7 mins
● Ask the students to answer the question “Describe a real-world situation where effective data visualisation could improve decision making. Explain the data suitable chart type, and benefits.” as asked in the Think and Tell section given on page 68.
Possible Responses:
Scenario: You and your classmates are planning a school trip to a nearby zoo. Your teacher wants to decide on the best day of the trip based on the weather forecasts for the upcoming week. However, the weather data is presented in a confusing table format, making it difficult to understand at a glance.
To improve the decision-making, you could create a simple bar chart showing the forecasted temperatures for each day of the week. Each bar represents a day, and its height corresponds to the forecasted temperature. You could colour-code the bars to indicate different weather conditions like sunny, cloudy, or rainy.
Benefits of using a bar chart
● Comparison: You can compare the heights of the bars and easily identify the warmest and coolest days.
● Decision-making: With a clear visual representation of the forecast, you, your classmates, and teachers can easily decide on the best day for the trip based on weather preferences.
3 mins
Sum Up
● Conclude the session by summarising that data visualisation is the process of graphically presenting data to reveal patterns, trends, and insights. Also, tell the students that chart is a visual representation of data that help them understand information more easily. Tell them about different components of a chart, such as Chart title, Chart Area, Axes, Data series, Legends, Gridlines, etc. Also, discuss with them the different types of charts used for representing data.
● Assign the following questions from the Chapter Checkup given at the end of the chapter as homework.
A. Fill in the Blanks: Questions 1, 2, 3, and 4
B. Tick the Correct Option: Questions 1, 2, and 3
C. Who Am I?: Questions 1, 2, 3, and 4
D. Write T for True and F for False: Questions 1, 2, 3, and 4
E. Answer the Following: Questions 1, 2, and 3
F. Apply Your Learning: Question 1
At the end of the session, the students will be able to:
● create a chart.
● move a chart.
● resize a chart.
● delete a chart.
Ask the students the names of different types of charts.
Describe to the students the steps to create a chart.
Describe how to move, resize, and delete a chart. Group discussion Conclude the concepts Assign homework
● Ask the students the names of different types of charts.
● Now relate the concept by describing how to create a chart.
Engage
Explain the following concepts:
Learning Outcomes
5 mins
15 mins
Explanation
Create a chart. Describe to the students the steps to create a chart in Google Sheets, as given on pages 65 to 68.
Move a chart. Describe to the students the steps to move a chart, as given on page 68.
Resize a chart. Describe to the students the steps to resize a chart, as given on page 69.
Delete a chart. Describe to the students the steps to delete a chart, as given on page 69.
● Ask the question, “Can we restore the deleted chart?” to the students to check their understanding.
Possible Response: Yes/No
Correct Response: Yes
● Conduct a group discussion in the class among the students based on the topic “Share your experience with creating a chart or graph using Google Sheets. What were the challenges you faced, and how did you customise the chart to effectively present your data?” provided in the Discuss section as mentioned on page 69.
Possible Responses: The steps to create a chart are as follows:
1. Open the Google Sheets spreadsheet.
2. Enter the data into the Google Sheets.
3. Select the data in the spreadsheet for creating a chart.
4. Go to the Insert menu in the Menu bar of the Google Sheets and click on Chart.
5. A column chart is created by default and displayed on the spreadsheet. Also, the Chart editor panel will appear on the right side of the screen.
6. Click on the Chart type list box. A drop-down list appears.
7. Select the desired chart type from the drop-down list that you want to create.
8. You can customise your chart by adjusting various options available under the Customize tab in the Chart editor.
Challenges:
● Understanding which chart type suits your data best.
● Adjusting the chart to fit neatly within your spreadsheet.
Tips:
● Keep it simple. A clear, straightforward chart is more effective.
● Ask for the feedback from your teacher or classmates to improve your chart.
● Conclude the session by summarising the steps to create a chart in the Google Sheets. Tell them the steps to move and resize a chart. Also, tell them the steps to delete a chart.
● Assign the following questions from the Chapter Checkup given at the end of the chapter as homework.
A. Fill in the Blanks: Question 5
B. Tick the Correct Option: Questions 4 and 5
D. Write T for True and F for False: Question 5
E. Answer the Following: Questions 4 and 5
F. Apply Your Learning: Question 2
This chapter is divided into the following sessions
1. Basics of Java
2. Fundamentals of Java Programming
3. Data Types, Variables, and Operators
At the end of the session, the students will be able to:
● describe what programming is.
● describe Java.
● explain how a Java program works.
● explain OOPs.
Keywords
● Programming: Programming is the process of creating a set of instructions that tell a computer how to perform a task.
● Java language: Java is a widely used programming language and software platform that runs on billions of devices.
● Compiler: A compiler is a computer program that converts high-level program instructions into machine language.
● OOP: Object Oriented Programming (OOP) is a programming paradigm that is widely used in Java and many other programming languages.
● Objects: An object is a self-contained unit that represents a real-world entity or concept and contains both data (attributes) and methods (functions).
● Classes: A class is a blueprint for creating objects that defines the structure and behaviour of objects.
Ask the students to write the steps to make a sandwich, as if they are giving instructions to someone who has never made one before.
Explain to the students what programming is. Also, describe Java.
Explain how a Java program works.
Explain OOPs and the structure of OOPs.
Attempt the given activity.
Warm Up
● Ask the students to write the steps to make a sandwich, as if they are giving instructions to someone who has never made one before.
● Then relate the same concept to programming that it is all about giving clear, step-by-step instructions that a computer can follow.
Engage
Explain the following concepts:
Describe what programming is. Tell the students that programming is the process of creating a set of instructions that tells a computer how to perform a task as given on page 73.
Describe Java. Tell the students that Java is a widely used programming language and software platform that runs on billions of devices, as given on page 73.
Explain how a Java program works. Discuss the factors used for the execution of a Java program as given on page 74.
Explain OOPs. Tell the students that Object Oriented Programming (OOP) is a programming paradigm that is widely used in Java and many other programming languages, as given on page 75.
● What is programming, and how is Java used in programming?
● What is Object-Oriented Programming (OOP), and why is it important in Java?
Correct Responses:
1. Programming is the process of giving instructions to a computer to perform specific tasks. Java is a high-level programming language used to write programs that can run on different devices and platforms.
2. Object-Oriented Programming (OOP) is a programming approach based on the concept of "objects", which contain data and methods. Java uses OOP to make code more organised, reusable, and easier to manage by modelling real-world entities.
● Give an example of a class-object model with the attributes and methods of the class.
Possible Response:
Take an example of a class: Book.
Its attributes can be:
- title (e.g., "Harry Potter")
- author (e.g., "J.K. Rowling")
- pages (e.g., 500)
- genre (e.g., "Fantasy")
- price (e.g., 399.0)
Methods can be:
- displayDetails() – shows the book's information
- readSample() – displays a short sample or excerpt
● Conclude the session by summarising that Java is a programming language and software platform that runs on billions of devices. Also, we use a compiler to convert the Java source code to a Java Byte code. Object Oriented Programming (OOP) is a programming paradigm that is widely used in Java and many other programming languages. It has two principles: objects and classes.
● Assign the additional activity given on the panel to the students as homework.
● Assign the following questions from the Chapter Checkup given at the end of the chapter as homework.
A. Fill in the Blanks: Question 1
D. Write T for True and F for False: Question 5
At the end of the session, the students will be able to:
● describe the Java tokens.
● explain the structure of a Java program.
● describe syntax and syntax errors.
Keywords
● Identifiers: An identifier is any name assigned to various components of a Java program.
● Keywords: Keywords are the reserved words in Java that have a special meaning and can only be used for that purpose.
● Constants: Constants are the fixed values that do not change during the execution of a program.
● Punctuators: Punctuators are the symbols used to separate other tokens.
● Documentation statement: The documentation statement tells us what the program is about when we start a Java program.
● Syntax: Syntax refers to the set of rules defining how a program should be written.
● Syntax error: Syntax errors are mistakes in the code, such as spelling mistakes and punctuation errors.
Ask the students to spot and correct the mistake in a simple English sentence like: ‘She go to school every day.’ Describe the Java tokens to the students. Explain the structure of a Java program. Define a class. Describe syntax and syntax errors.
Attempt the given activity.
Conclude the concepts
Assign homework
5 mins
● Ask the students to spot and correct the mistake in a simple English sentence like: ‘She go to school every day.’
● Then, connect the same concept of following grammar rules or syntax in Java programming.
Explain the following concepts:
Describe the Java tokens.
Explain the structure of a Java program.
mins
Describe the tokens used in Java, like identifiers, keywords, constants, and punctuators, as given on pages 75 and 76.
Explain the basic structure of a Java program as given on pages 76 and 77.
Describe syntax and syntax errors. Tell the students that syntax refers to the set of rules defining how a program should be written, and syntax errors are mistakes in the code, such as spelling mistakes and punctuation errors, as given on pages 79 and 80.
● Ask the following additional questions to the students to check their understanding.
1. List the five types of Java tokens and give one example for each.
2. Explain the structure of a basic Java program.
Correct Responses:
1. Java tokens: Keywords – class Identifiers – myVariable Literals – "Hello" Operators – + Separators – ;
2. A basic Java program includes: A class definition The main() method
Statements inside the main method Braces {} to define blocks of code Semicolons ; to end statements
Build
● Create Java programs for the following:
1. Calculate the perimeter of a circle.
2. Calculate the area of a square.
Correct Responses:
1. public class CirclePerimeter { public static void main(String[] args) { System.out.println("Perimeter of the circle: " + (2 * 3.14 * 5.0));
15 mins
2. public class SquareArea { public static void main(String[] args) { System.out.println("Area of the square: " +(6 * 6));
● Conclude the session by summarising that in Java, we have some tokens such as identifiers, keywords, constants, and punctuators. Also, conclude that the structure of a Java program includes a documentation statement, a class definition statement, and the main () method. We also have syntax, which refers to the set of rules defining how a program should be written, and syntax errors are mistakes in the code, such as spelling mistakes and punctuation errors.
● Assign the following questions from the Chapter Checkup given at the end of the chapter as homework.
B. Tick the Correct Option: Question 1
C. Who Am I?: Question 1
At the end of the session, the students will be able to:
● define data types.
● explain variables.
● describe the types of variables.
● list the rules for naming a variable.
● describe operators and their types.
Keywords
● Data types: Data types allow us to define what type of data a memory location can hold.
● Variables: A variable is a memory location on a computer that can hold any value and can also change over time, as needed.
● Camel case: In camel case, when we have two or more distinct words in a variable name, we can write them without spaces in between and capitalise the first letter of each new word.
● Operators: Operators are special symbols that are used to perform calculations.
Ask the students to write down any three things they use daily and describe what type of information each holds (e.g., name, age, price).
Describe the concept of the data types to the students. Explain variables and their types. Also, define the rules for naming a variable. Describe operators and their types.
Attempt the given activity. Conclude the concepts Assign homework
5 mins
● Ask the students to write down any three things they use daily and describe what type of information each holds (e.g., name, age, price).
● Then tell them that just like we label things and store different types of information in real life, in programming, we use variables and data types to store and work with different kinds of data.
Explain the following concepts:
Define data types. Tell the students that data types allow us to define what type of data a memory location can hold, as given on page 80.
Explain variables. Explain variables as memory locations on a computer, which can hold any value and can also change over time, as needed, as given on pages 81 to 83.
Describe the types of variables.
List the rules for naming a variable.
Describe operators and their types.
Describe various types of variables like local, instance, and static, as given on pages 83 and 84.
Tell the students the various rules for naming a variable and camel case pattern for naming a variable with examples, as given on pages 84 to 86.
Describe operators as special symbols that are used to perform calculations and their types, as given on pages 86 to 88.
● Ask the following additional question to the students to check their understanding.
● Identify the data type, variable name, and operator in the following Java statement: int marks = 85 + 10;
Correct Response:
Data type: int
Variable name: marks
Operator: + Build
● Create Java programs for the following:
1. Declare variables of different data types.
2. A basic calculator.
Correct Responses:
1. public class DataTypeExample { public static void main(String[] args) { int age = 15; // integer type double height = 5.6; // decimal type char grade = 'A'; // character type boolean passed = true; // boolean type String name = "Riya"; // object type (class)
System.out.println("Name: " + name);
System.out.println("Age: " + age);
System.out.println("Height: " + height);
System.out.println("Grade: " + grade);
System.out.println("Passed: " + passed);
2. public class OperatorExample { public static void main(String[] args) { int num1 = 10; int num2 = 5; int sum = num1 + num2; int difference = num1 - num2; int product = num1 * num2; int quotient = num1 / num2;
System.out.println("Sum: " + sum);
System.out.println("Difference: " + difference);
System.out.println("Product: " + product);
System.out.println("Quotient: " + quotient);
Sum Up
3 mins
● Conclude the session by summarising that data types allow us to define what type of data a memory location can hold. Variable is a memory location on a computer that can hold any value and can also change over time, as needed. Also, we have three types of variables: local, static, and instance variable. Finally, conclude that operators are special symbols that are used to perform calculations, and we have four types of operators, such as unary, arithmetic, comparison, and logical operators.
● Assign the following questions from the Chapter Checkup given at the end of the chapter as homework.
A. Fill in the Blanks: Questions 2, 3, 4, and 5
B. Tick the Correct Option: Questions 2, 3, and 4
C. Who Am I?: Questions 2, 3, 4, and 5
D. Write T for True and F for False: Questions 1, 2, 3, and 4
E. Answer the Following: Questions 1, 2, 3, 4, and 5
F. Apply Your Learning: Questions 1, 2, 3, 4, and 5
At the end of the session, the students will be able to:
● take user inputs.
● apply conditions.
● use decision statements.
● use the if statement in Java programs.
● use the if-else statement in Java programs.
Keywords
● Decision statement: The decision statement in Java allows you to decide based on the outcome of a condition.
● If statement: The If statement is used to execute a statement or a block of statements only when the given condition becomes true.
● The If-else statement: The if-else statement has two sets of code to be executed, whether the given condition is true or false.
Ask the students what they do if it’s raining when they’re about to go outside.
Demonstrate to the students how to take the user inputs during the execution of the programs.
Explain the decision statements to them. Demonstrate how to use the if statement and the if-else statement.
Attempt the given activity.
Conclude the concepts
Assign homework
5 mins
Warm Up
● Ask the students what they do if it’s raining when they’re about to go outside.
● Then tell them that just like we make decisions based on conditions in real life—like carrying an umbrella if it rains—programs use if and if-else statements to make decisions based on user inputs and conditions.
8 mins Engage
Explain the following concepts:
Take user inputs. Tell the students that to get the input from the user, we have to use the Scanner class as, given on page 91. Also, demonstrate to them how to use it.
Apply conditions. Explain to the students that there are many real-life scenarios where we have to make decisions based on the given conditions, as given on page 92.
Use decision statements.
Use the if statement in Java programs.
Use the if-else statement in Java programs.
Tell the students that decision statements in Java allow them to decide based on the outcome of a condition, as given on page 93.
Tell the students that the if statement is used to execute a statement or a block of statements only when the given condition becomes true, as given on pages 93 and 94. Demonstrate the usage of if statement using programs.
Tell the students that if-else statement has two sets of code to be executed, whether the given condition is true or false, as given on pages 94 and 95. Demonstrate the usage of if-else statement using programs.
● Can a computer make decisions on its own, or does it always need instructions from us? Why do you think so?
Possible Response:
A computer cannot make decisions on its own. It always follows the instructions given by the programmer. We use conditional statements like if and if-else to tell the computer how to respond in different situations. So, the computer only seems to make decisions, but in reality, it is just following the logic we have programmed into it.
14 mins
Build
● Create a Java program to check if the temperature outside is hot or cold. You can consider temperature more than 25 degrees to be hot.
Correct Response:
public class TemperatureCheck { public static void main(String[] args) {
int temperature = 12; if (temperature >= 25) { System.out.println("It’s a hot day."); } else { System.out.println("It’s a cold day."); } } }
● Conclude the session by summarising that to get input from the user, we have to use the Scanner class. Decision statements in Java allow you to decide based on the outcome of a condition. The if statement is used to execute a statement or a block of statements only when the given condition becomes true. Also, conclude that the if-else statement has two sets of code to be executed, whether the given condition is true or false.
● Assign the following questions from the Chapter Checkup given at the end of the chapter as homework.
A. Fill in the Blanks: Questions 1, 2, and 5
B. Write T for True and F for False: Questions 2, 3, 4, and 5
C. Answer the Following: Questions 2, 3, and 5
D. Apply Your Learning: Questions 3, 4, 5, and 6
At the end of the session, the students will be able to:
● use nested if statement in Java programs.
● use if-else-if ladder in Java programs.
Keywords
● Nested if statement: When one if statement is used inside another if statement, then is called as nested if statement.
● The if-else-if ladder: It is used in situations where multiple cases need to be checked.
Ask the students how they decide what to wear when they do not know whether it will be sunny, rainy, or cold.
Describe the nested if statement to the students.
Also, discuss the if-else-if ladder.
Attempt the given activity.
Conclude the concepts
Assign homework
5 mins
● Ask the students how they decide what to wear when they do not know whether it will be sunny, rainy, or cold.
● Then tell them that just like we check multiple conditions before making a decision in real life, in Java, we use nested if and if-else-if ladders to handle situations where more than one condition needs to be checked.
Engage
Explain the following concepts:
Use nested if statement in Java programs.
8 mins
Explanation
Tell the students that when one if statement is used inside another if statement, then it is called as nested if statement, as given on pages 97 and 98. Demonstrate the usage of nested if statement using programs.
Use if-else-if ladder in Java programs.
Tell the students that the if-else-if ladder is used in situations where multiple cases need to be checked, as given on pages 100 and 101. Demonstrate the usage of the if-else-if ladder using programs.
● Ask the following additional question to the students to check their understanding. You want to write a program that prints “Excellent” if a student's marks are 90 or above, “Good” if marks are between 75 and 89, “Average” if between 50 and 74, and “Needs Improvement” if below 50. Which control structure would be more suitable — nested if or if-else-if ladder? Why?
Correct Response:
The if-else-if ladder is more suitable because it is clearer and more efficient for checking multiple exclusive conditions in a sequence.
● Write a program to print “Good Morning”, “Good Day”, and “Good Evening”, depending on the time.
Correct Response: class Main{ public static void main(String[] args){ int time = 22; if(time < 10) { System.out.println("Good morning."); } else if (time < 18){ System.out.println("Good day."); } else { System.out.println("Good evening."); } } }
● Conclude the session by summarising that when one if statement is used inside another if statement, then it is called as nested if statement. Also, the if-else-if ladder is used in situations where multiple cases need to be checked.
● Assign the following questions from the Chapter Checkup given at the end of the chapter as homework.
A. Fill in the Blanks: Questions 3 and 4
B. Write T for True and F for False: Question 1
C. Answer the Following: Questions 1 and 4
D. Apply Your Learning: Questions 1 and 2
This chapter is divided into the following lab sessions
1. Introduction to Loops
At the end of the session, the students will be able to:
● describe loops and its types.
Keyword
2. Jump Statements
● Loop: Loop executes a set of instructions until a termination condition is reached. Loops are also called iterative statements.
Ask the students to name some actions they do every day without fail—like brushing their teeth or tying their shoelaces.
Explain to the students about loops and its types.
Attempt the given activity.
Action Plan
Conclude the concepts Assign
Warm Up
● Ask the students to name some actions they do every day without fail — like brushing their teeth or tying their shoelaces.
● Then explain that just like we repeat certain actions every day, loops in programming are used to repeat tasks automatically.
Explain the following concept:
Describe loops and its types.
Explain to the students that a loop executes a set of instructions until a termination condition is reached. Loops are also called iterative statements. Tell them that there are three iteration statements in Java: while, do-while, and for, as given on pages 104 to 107.
● Ask the following additional questions to the students to check their understanding. What is the main difference between a for loop and a while loop in Java?
Correct Response:
A for loop is used when the number of repetitions is known, while a while loop is used when the number of repetitions is not fixed and depends on a condition.
7 mins
Build
● Write a Java program to print numbers from 1 to 5 using for, while, and do-while loops.
Correct Response: public class LoopExample { public static void main(String[] args) { // For loop
System.out.println("Using for loop:"); for (int i = 1; i <= 5; i++) {
System.out.println("Number: " + i); }
// While loop
System.out.println("\nUsing while loop:"); int j = 1; while (j <= 5) { System.out.println("Number: " + j); j++; }
// Do-while loop
System.out.println("\nUsing do-while loop:"); int k = 1; do { System.out.println("Number: " + k); k++; } while (k <= 5);
● Conclude the session by summarising that loop executes a set of instructions until a termination condition is reached. Loops are also called iterative statements. There are three types of loops: while, do-while and for loop. A while loop repeats the statement or a block of statements as long as the looping conditions remain true, and a for loop needs a loop control variable, which acts as a counter.
● Assign the additional activity given on the panel to the students as homework.
● Assign the following questions from the Chapter Checkup given at the end of the chapter as homework.
A. Fill in the Blanks: Questions 2, 4, and 5
B. Write T for True and F for False: Questions 1, 2, and 5
C. Answer the Following: Questions 1, 2, and 5
D. Apply Your Learning: Questions 1, 2, 3, 4, and 5
At the end of the session, the students will be able to:
● describe jump statements and its types.
Keyword
● Jump statements: These are the statements that transfers control of the execution of a program from one place to another.
Ask the students to recall a time when they wanted to skip a part of their homework or stop doing something halfway. Demonstrate the use of jump statements and their two types: break and continue. Attempt the given activity.
Conclude the concepts Assign homework
Warm Up
● Ask the students to recall a time when they wanted to skip a part of their homework or stop doing something halfway.
● Then connect it to how computers also need ways to skip or exit parts of a program using jump statements.
Engage
Explain the following concept:
Learning Outcome
Describe jump statements and its types.
Explanation
Explain to the students that jump statements are the statements that transfers the control of the execution of a program from one place to another. Describe break and continue statements to the students along with their syntax and examples, as given on pages 108 and 109.
● Ask the following additional questions to the students to check their understanding. Name one jump statement in Java and describe what it does.
Possible Response:
One jump statement in Java is break. It is used to immediately exit a loop or switch statement when a certain condition is met, stopping further execution of that block.
● Create a Java program to describe jump statements and its types.
Correct Response:
public class Example { public static void main(String[] args) { // Using 'break' for (int i = 1; i <= 10; i++) { if (i == 5) break; System.out.println(i); } System.out.println();
// Using 'continue' for (int i = 1; i <= 10; i++) { if (i == 5) continue; System.out.println(i);
● Conclude the session by summarising that jump statements are the statements that transfer control of the execution of a program from one place to another. There are two jump statements in java: break and continue. Break statement is used to exit a loop. Continue statement is used to skip a particular iteration.
● Assign the additional activity given on the panel to the students as homework.
● Assign the following questions from the Chapter Checkup given at the end of the chapter as homework.
A. Fill in the Blanks: Questions 1 and 3
B. Write T for True and F for False: Questions 3 and 4
C. Answer the Following: Questions 3 and 4
D. Apply Your Learning: Question 6
This chapter is divided into the following sessions
1. Basics of HTML
2. Understanding CSS
3. Adding Images and Links
4. Adding Audio and Video
At the end of the session, the students will be able to:
● define HTML.
● explain about tags.
● discuss about elements.
● explain attributes.
● tell the structure of an HTML document.
● explain and use basic tags of HTML.
Keywords
● HTML: HTML, the short form for HyperText Markup Language, is a markup language used to design web pages.
● Markup language: It refers to a language which creates layout of web pages and applies formatting to them.
● Text editor: It is a software used to write the code of HTML documents.
● Web browser: A web browser is used to access and view web pages.
● Web page: It is a document placed on the World Wide Web (WWW) as a part of a website.
Ask the students to name their favourite websites that they use to search for information.
Discuss about HTML and its basics with the students.
Demonstrate how to use basic HTML tags to create a web page.
Think and Tell Conclude the concepts
Assign homework
● Ask the students to name their favourite websites that they use to search for information.
● Then, tell them that these websites are created using HTML.
Explain the following concepts:
Define HTML. Discuss with the students that HTML stands for HyperText Markup Language. HTML is a markup language used to design web pages. It defines the structure of a web page and tells the web browser how and where to display the content of the web page, as given on page 111.
Explain about tags. Describe that a tag is a basic building block of an HTML document that specifies how the content is displayed on the web page, as given on page 111.
Discuss elements. Explain to the students that the combination of the opening tag, content and closing tag is known as an element. There are two types of elements in HTML which are container elements and empty elements, as given on page 112.
Explain attributes. Describe to the students that an attribute provides additional information about an HTML element and modifies its behaviour, as given on page 112.
Tell the structure of an HTML document.
Explain and use basic tags of HTML.
Explain to them that the structure of an HTML document is divided into two main parts: the head and the body, as given on pages 112 and 113.
Discuss some basic tags in HTML like <h1> to <h6>, <sub>, <sup>, <b>, etc. Also demonstrate how to use these tags to create a web page, as given on pages 113 and 114.
● Read aloud the questions provided in the Do It Yourself 10A section and encourage the students to solve the questions. Instruct the students to write the answers in their book.
Correct Responses:
1. <html></html>, <head></head>, and <body></body>
2. a. <b> b. <p> c. <i>
● Ask the students to give the answer to the question “How are tags and attributes different?“, asked in the Think and Tell section on page 112.
Possible Responses: A tag is a basic building block of an HTML document that specifies how the content is displayed on the web page.
An attribute provides additional information about an HTML element and modifies its behaviour. Attributes are always placed inside the opening tags of HTML elements.
● Conclude the session by summarising that HTML stands for HyperText Markup Language. HTML is a markup language used to design web pages. A tag is a basic building block of an HTML document that specifies how the content is displayed on the web page. The combination of an opening tag, content and closing tag is known as an element. An attribute provides additional information about an HTML element and modifies its behaviour. The structure of an HTML document is divided into two main parts: the head and the body. Also, summarise the basic tags of HTML like <h1> to <h6>, <sub>, <sup>, <b>, etc.
● Assign the following questions from the Chapter Checkup given at the end of the chapter as homework.
A. Fill in the Blanks: Questions 1, 2, and 3
B. Tick the Correct Option: Questions 1, 2, and 3
C. Who Am I?: Question 1
D. Write T for True and F for False: Question 1
E. Answer the Following: Questions 1 and 2
F. Apply Your Learning: Question 1
At the end of the session, the students will be able to:
● define CSS.
● discuss about CSS selectors.
● explain properties and values.
● use CSS in a web page.
Keyword
● CSS: CSS, the short form for Cascading Style Sheets, is a language used to style the HTML elements.
Ask the students to think about how they decorate their homes with different furniture and colours.
Explain about CSS, selectors, properties and values to the students. Demonstrate different ways to use CSS in a web page.
Attempt the given activity.
Conclude the concepts Assign homework
● Ask the students to think about how they decorate their homes with different furniture and colours.
● Then, tell them that they can decorate the web pages also using CSS.
Explain the following concepts:
Learning Outcomes
Define CSS.
Discuss about CSS selectors.
Explanation
Describe that Cascading Style Sheets (CSS) is a language used to style the HTML elements. It allows us to change the look and feel of the web pages, as given on page 114.
Tell the students that CSS uses selectors to target HTML elements. Selectors can target elements by tag name, class, ID, attribute, and more, as given on page 114.
Explain properties and values.
Discuss with the students that CSS is used in a property-value pair. CSS properties define the styles that are to be applied to the selected elements, and values specify the settings for those properties, as given on page 114. Explain about different CSS properties, as given on pages 114 and 115.
Use CSS in a web page. Tell the students that CSS can be used in three ways on a web page which are, Inline CSS, Internal CSS, and External CSS, as given on pages 115 and 116.
● Read aloud the Question 1 provided in the Do It Yourself 10C section and encourage the students to solve the question. Instruct the students to write the answer in their book.
Correct Responses:
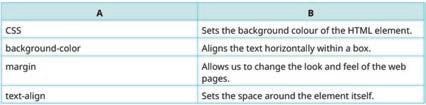
Build 7 mins
● Create a basic web page and decorate it using CSS.
Possible Response: <!DOCTYPE html> <head>
<title>Underwater World</title> <style>
body { background-color: #0077be; color: white; font-family: ‘Verdana’, sans-serif; } h1 { color: #00b3b3; text-align: center; } p { font-size: 18px; text-align: center; }
</style> </head> <body>
<h1>Welcome to the Underwater World!</h1>
<p>The clownfish is one of the most colourful fish found in the ocean!</p>
<p>Explore the beauty and mystery of marine life.</p> </body> </html>
● Conclude the session by summarising that Cascading Style Sheets (CSS) is a language used to style the HTML elements. CSS uses selectors to target HTML elements. Selectors can target elements by tag name, class, ID, attribute, etc. CSS is used in a property-value pair. CSS can be used in three ways on a web page which are, Inline CSS, Internal CSS, and External CSS.
● Assign the following questions from the Chapter Checkup given at the end of the chapter as homework.
A. Fill in the Blanks: Question 4
B. Tick the Correct Option: Question 4
C. Who Am I?: Questions 2 and 3
D. Write T for True and F for False: Question 2
E. Answer the Following: Question 3
At the end of the session, the students will be able to:
● add images.
● create links.
Keyword
● Link: A link, also known as hyperlink, is a text with the functionality to navigate you to some other web pages of the website.
Ask the students how they feel when they see a lot of images on a web page instead of text while they are surfing the internet. Ask them if they like it or not.
Discuss how to add images and create links on web pages.
Group discussion Conclude the concepts
Assign homework
5 mins
Warm Up
Ask the students how they feel when they see a lot of images on a web page instead of text while they are surfing the internet. Ask them if they like it or not. Then, tell them that we have an <img> tag in HTML that is used to insert images in a web page.
15 mins
Engage
Explain the following concepts:
Learning Outcomes
Explanation
Add images. Demonstrate how to use the <img> tag to add images to a web page, as given on pages 117 and 118.
Create links. Describe that the <a> tag is used to create links in HTML. Show them how to create links on a web page, as given on pages 119 and 120.
● Read aloud the questions provided in the Do It Yourself 10B section and encourage the students to solve the questions. Instruct the students to write the answers in their book.
Correct Responses:
1. a. <img src=”flower.jpg” alt=”Flower”>
b. <a download href=”flower1.jpg”> Flower </a>
2. img { border: 10px solid }
● Conduct a group discussion in the class among the students on the topic “What would happen if there were no hyperlinks in a web page?”.
Possible Responses: If there were no hyperlinks in a web page, then it would not be possible to navigate the website. Also, users would be stuck on a single page, unable to explore related content or delve deeper into topics.
● Conclude the session by summarising that the <img> tag of HTML allows us to add images to the web page. A link, also known as hyperlink, is a text with the functionality that helps you to navigate some other web page of the website. The <a> tag is used to create links in HTML.
● Assign the following questions from the Chapter Checkup given at the end of the chapter as homework.
B. Tick the Correct Option: Question 5
C. Who Am I?: Question 4
D. Write T for True and F for False: Question 3
F. Apply Your Learning: Question 2
At the end of the session, the students will be able to:
● add audio on a web page.
● add video on a web page.
Ask the students to imagine they are creating a fun web page to showcase their favourite music and movie clips.
Discuss how to add audio and video on a web page. Attempt the given activity.
Conclude the concepts
Assign homework 5 mins 15 mins 7 mins 3 mins
5 mins
Ask the students to imagine they are creating a fun web page to showcase their favourite music and movie clips.
Then relate it to how we can add sound and video to a web page using HTML elements.
Engage
Explain the following concepts:
Learning Outcomes
Add audio on a web page.
Add video on a web page.
15 mins
Explanation
Tell the students that HTML provides the <audio> tag to insert audio files on a web page. Explain them the various attributes of the <audio> tag. Also demonstrate to them how to create a web page to add an audio file, as given on pages 120 and 121.
Tell the students that HTML allows us to add a video on a web page using the <video> tag. Explain them the attributes of the <video> tag. Also demonstrate to them how to create a web page to add a video, as given on pages 121 and 122.
● Read aloud the Question 2 provided in the Do It Yourself 10C section and encourage the students to solve the question. Instruct the students to write the answer in their book.
Correct Responses: Autoplay, Controls, Loop
● Create a basic web page to add an audio and video file.
Correct Response:
<!DOCTYPE html>
<head>
<title>Media on Web Page</title>
</head>
<body>
<h1>Welcome to My Media Page!</h1>
<h2>Listen to My Favorite Song</h2>
<audio controls>
<source src=”your-audio-file.mp3” type=”audio/mp3”>
Your browser does not support the audio element.
</audio>
<h2>Watch a Cool Video</h2>
<video width=”320” height=”240” controls>
<source src=”your-video-file.mp4” type=”video/mp4”>
Your browser does not support the video tag.
</video>
</body> </html>
● Conclude the session by summarising that HTML provides the <audio> tag to insert audio files on a web page. The <source> tag is used with the <audio> tag to specify the path of the audio file. HTML allows us to add a video on a web page using the <video> tag. The <source> tag is used with the <video> tag to specify the path of the video file.
● Assign the additional activity given on the panel to the students as homework.
● Assign the following questions from the Chapter Checkup given at the end of the chapter as homework.
A. Fill in the Blanks: Question 5
C. Who Am I?: Question 5
D. Write T for True and F for False: Questions 4 and 5
E. Answer the Following: Questions 4 and 5
F. Apply Your Learning: Questions 3 and 4
This chapter is divided into the following sessions
1. Basics of HTML Forms
2. Setting Properties of a Form Using Internal CSS
At the end of the session, the students will be able to:
● describe HTML forms.
● discuss the various form elements.
● create and display a form.
● use the attributes of the <form> element.
● validate a form.
Keywords
● HTML form: HTML forms are commonly used when websites need to gather information from users.
● Form validation: Form validation is to ensure that users provide the correct type of information.
Ask the students where do they use forms in real life?
Describe to the students about HTML forms. Explain to them about the various form attributes.
Discuss with them how to validate a form.
Group discussion Conclude the concepts
Assign homework
● Ask the students where do they use forms in real life.
● Now, build upon the concept that a form is a collection of input fields that is used to collect information. We use these forms in schools while taking new admissions, applying for an identity card, etc.
Explain the following concepts:
Describe HTML forms. Tell the students that HTML forms are used to collect information from users, such as their names, email addresses, and hobbies, as given on page 126. Discuss the various form elements.
Create and display a form.
Explain the various form elements like <input>, <textarea>, <button>, and <select>. Elaborate on the usage of elements and options in forms, as given on pages 126 to 129.
Demonstrate to them how to use different elements to create a form, as given on pages 129 and 130.
Use the attributes of the <form> element. Explain about the different attributes used to control the behaviour of the form, as given on page 131.
Validate a form. Tell the students that form validation means checking the form details provided by the user, as given on page 131.
● Read aloud the questions provided in the Do It Yourself 11A section and encourage the students to solve the questions. Instruct the students to solve the answers in their books.
Correct Responses:
Question 1
a. Radio b. Action
Question 2
a. Method attribute specifies the Hyper Text Transfer Protocol (HTTP) method to be used.
b. The Radio button option allows users to select one option from a list.
Build
● Ask the students to give the answer to the question, “Imagine you are designing a website for a local library. The librarian wants to use an HTML form to allow users to request the issuing of books. Think about the various form elements you would include in this form.”, mentioned in the Think and Tell section on page 129.
Possible Responses: Text input, date input, radio button, checkboxes, textarea element, select element, etc.
● Conclude the session by summarising that HTML forms are used to collect information from users. <input>, <textarea>, <button>, and <select> are the various form elements. We have various form attributes that are used to control form elements. Also, validation of the form means checking the form details provided by the user.
● Assign the following questions from the Chapter Checkup given at the end of the chapter as homework.
A. Fill in the Blanks: Questions 1, 2, 3, and 4
B. Tick the Correct Option: Questions 1, 2, 3, 4, and 5
C. Write T for True and F for False: Questions 1, 2, 3, 4, and 5
D. Answer the Following: Questions 1, 2, 4, and 5
E. Apply Your Learning: Questions 2 and 3
At the end of the session, the students will be able to:
● set properties of a form using internal CSS.
Keyword
● Internal CSS: You can make your HTML forms look attractive and arrange them on a web page by using the style element.
Ask the students to think about how a form looks when they fill it out online.
Describe CSS and the usage of CSS in HTML.
Demonstrate how to style a form using internal CSS. Attempt the given activity.
the concepts
Warm Up
● Ask the students to think about how a form looks when they fill it out online.
● Then connect the concept to how they can use styles to improve the appearance of buttons, text fields, and the background using internal CSS.
Engage
Explain the following concept:
Explanation
Use internal CSS. Demonstrate the usage of internal CSS to style a form in HTML, as given on pages 131 to 133.
● Read aloud the question provided in the Do It Yourself 11A section and encourage the students to solve it. Instruct the students to write the answer in their books.
Correct Response: Question 1: c. <style>
Build
● Create a simple form and style it using CSS.
<!DOCTYPE html>
<head>
<title>Styled Form</title>
<style> body { font-family: Arial, sans-serif; background-color: #f4f4f4; text-align: center; } form { background-color: #fff; padding: 20px; border-radius: 5px; width: 250px; margin: 50px auto; } input { width: 100%; padding: 8px; margin: 10px 0; border: 1px solid #ddd; border-radius: 4px; } input[type="submit"] { background-color: #4CAF50; color: white;
7 mins
border: none; }
</style>
</head>
<body>
<h1>Contact Form</h1> <form>
<input type="text" placeholder="Name">
<input type="email" placeholder="Email">
<input type="submit" value="Submit"> </form>
</body> </html>
● Conclude the session by summarising the importance of CSS in forms.
● Assign the following questions from the Chapter Checkup given at the end of the chapter as homework.
A. Fill in the Blanks: Question 5
D. Answer the Following: Question 3
E. Apply Your Learning: Question 1
A. Fill in the Blanks.
1. Operating system 2. Single-user 3. Multitasking 4. GUI 5. complex
B. Who Am I?
1. Single-user Operating System
2. GUI (Graphical User Interface)
3. Distributed Operating System
4. Real-time Operating System
C. Write T for True and F for False.
1. F 2. T 3. T 4. T 5. F
D. Answer the Following.
1. An operating system is needed to:
● control and manage all the computer resources.
● provide an interface for users.
● hide the complexity of a software.
● support multiple execution modes.
● monitor the execution of user programs to prevent errors.
2. A user interface (UI) works as a bridge that allows people to communicate with computers, smartphones, and various digital devices in a simple and easy-to-use manner. A UI encompasses all the elements and design components that users see and interact with on their monitor screens.
3. GUI stands for Graphical User Interface. It employs graphical elements such as icons, buttons, windows, and menus to enable users to interact with computers and software applications. It makes our work easier as it provides an intuitive and visual based means of navigating, controlling, and accessing digital content, making computing more user-friendly.
4. A single-user operating system is designed for personal use and allows only one person to use the computer at a time, whereas a multiuser operating system is a computer system that allows multiple users that are on different computers to access shared resources and data at the same time.
5. Features of a real-time operating system:
i. A real-time operating system is engineered to provide rapid and consistent responses to processes or tasks.
ii. RTOS ensures that a task starts and finishes at a specific time, which is essential for applications such as data acquisition where data must be sampled at fixed intervals without deviation.
iii. A RTOS guarantees that tasks are executed with precise and consistent timing. This reliability ensures that critical operations such as controlling machinery or processing data occur predictably and within specified time constraints.
E. Apply Your Learning.
1. Mohini is using a Graphical User Interface (GUI).
2. Shehnaz is working on a Character User Interface (CUI).
3. Rohit has a single-user operating system on his laptop.
Chapter Checkup
A. Fill in the Blanks.
1. Source 2. Structure 3. Telephone 4. Router 5. Capacity 6. Ethical
B. Tick () the Correct Option.
1. b. Local area network
2. d. MAN
3. a. Uniform resource locator
4. a. Connects devices and directs data only to the intended device
5. c. Rapid elasticity
C. Who Am I?
1. Medium 2. DNS (Domain Name System) 3. Gateway 4. Link 5. Web Portal
6. IMAP (Internet Message Access Protocol)
D. Write T for True and F for False.
1. F 2. F 3. T 4. T 5. F
E. Answer the Following.
1. PAN CAN
In PAN, devices like smartphones or tablets connect through technologies like Bluetooth. In CAN, devices connect with multiple LANs within a specific area. A PAN can be wired or wireless. CAN is wired.
2. Hypertext is a way of organising and connecting information in the digital documents, such as web pages. It allows you to click on the words or phrases (called hyperlinks) to jump to the related information or different sections within the same document or on other web pages.
3. Cloud computing is the process of manipulating, configuring, and accessing online applications. Cloud computing offers convenience, scalability, and accessibility, allowing users to access data and applications from anywhere with an internet connection.
4. One characteristic of cloud computing is on-demand self-service.
5. Cyber ethics refers to a responsible and ethical behaviour on the internet. These ethics involve being respectful, honest, and considerate while doing online interactions. Cyber ethics is important to create a safe and positive online space for all.
6. ISP stands for Internet Service Provider. An ISP is a company that provides internet access services to individuals and businesses, connecting them to the internet.
F. Apply Your Learning.
1. HTTP stands for Hypertext Transfer Protocol. It is a request-response protocol used for transmitting information and files on the internet. When you type a website address in your browser and press Enter, your browser uses HTTP to request the web page from the server where the website is stored.
2. LAN stands for a local area network. A LAN is a network that connects devices in a limited area, for example, homes, offices, or schools. This network allows devices to share files, printers, and instant accounts. A school lab is an example of LAN.
3. For this purpose, Deepak should choose a WAN network because it connects LANs and MANs over a long distance that covers cities, nations, and even continents.
4. On-demand Self-service: Cloud services are available whenever needed. Resources like storage and software can be accessed based on the requirements without waiting for any approval or assistance. Measured Services: In cloud computing, services are billed only for what is used. This ensures precise charges for the services needed, avoiding unnecessary expenses.
Chapter Checkup
A. Fill in the Blanks.
1. Solving 2. Flowchart 3. Algorithmic 4. Simpler 5. Pattern
B. Tick () the Correct Option.
1. b. A strategy for solving problems
2. b. Developing a step-by-step process for problem-solving
3. d. Flowchart
4. c. Decomposition
5. c. Well-defined and unambiguous
C. Who Am I?
1. Abstraction 2. Algorithm 3. Pattern Recognition 4. Computational thinking 5. Flowchart
D. Write T for True and F for False.
1. T 2. T 3. T 4. F 5. T
E. Answer the Following.
1. Computational thinking (CT) is the process of conceptualising problems in such a way that the resulting solutions can be viewed as computational operations and algorithms. On the other hand, algorithm thinking is a step-by-step process to complete a task or solve a particular problem.
2. Decision box is used to check whether a condition is true (yes) or false (no).
3. Input/output symbol is used to represent the input and output of the flowchart.
Processing symbol is used to represent the processing like arithmetic operations, data assignments, etc.
4. Following are the three characteristics of an algorithm:
Clear Inputs and Outputs—A good algorithm specifies what information is needed at the beginning (inputs) and what it will produce at the end (outputs).
No Ambiguity—Its instructions must be crystal clear, avoiding any confusion.
Precise Steps—It should offer specific steps for problem-solving, eliminating uncertainties.
5. An algorithm is a step-by-step process to complete a task or solve a particular problem. On the other hand, a flowchart is a visual representation of an algorithm or process, using symbols and arrows to illustrate the sequence of steps.
F. Apply Your Learning.
1. An algorithm to plan for a trip:
● How many travellers are there?
● When is the departure date?
● When is the arrival date?
● How long will the trip last?
● What are the places to visit?
2. Area of circle = pi × r2
Start Stop area = pi * (radius * radius)
Input variables pi = 3.14, radius, and area
Read radius
Print area
3. Following symbols can be used to create a flowchart for the same purposes:
Start/Stop
Input/Output Processing
Flow lines
4. Correct symbol for the condition is given below: Yes No X<Y
5. Correct shape/symbol for Z = A + B + C is:
Z = A + B + C
Chapter Checkup
A. Fill in the Blanks.
1. app 2. E-commerce 3. Hybrid 4. palette 5. social networking
B. Who Am I?
1. Banking app 2. MIT App Inventor 3. An app 4. Properties section 5. Hybrid
C. Write T for True and F for False.
1. T 2. T 3. F 4. T 5. T
D. Answer the Following.
1. Banking apps are like a virtual bank branch on your phone or tablet. They are the special apps provided by your bank to help you do immediate money transactions without going to the bank in person.
2. Hybrid apps can work on different types of phones and use web technologies, allowing them to work on multiple platforms and access device features. They are compatible with both iPhones and Android phones and can be downloaded and installed from their respective app stores, such as the Google Play Store for the Android phones and App Store for the iPhones.
3. Difference between the web apps and the desktop apps:
A web app is a software application that operates on web servers and is accessed by users through web browsers over the internet.
Since web apps are hosted on web servers, users can access them from anywhere, using various devices, without the need for installation.
Padlet, YouTube, Gmail, and Google Drive are few examples of web apps.
Desktop apps are like the computer version of the apps you use on your phone, but they are designed to work on your computer and do all sorts of different things, from writing documents to playing games or editing pictures.
Desktop apps can be used on a computer or a laptop where they are installed and run locally.
Skype, Microsoft Power Point, Paint, Microsoft Excel, and iTunes are a few examples of desktop apps.
4. Native apps are specifically designed for a particular type of phone, such as iPhones or Android phones. They are known for their high speed and excellent performance because they are designed exclusively for your phone. Examples of native apps include Camera, Gallery, Clock, Maps, and Settings.
5. MIT App Inventor is a visual development platform that allows users to create mobile applications for Android devices without the need to write traditional codes. It provides a visual, drag-and-drop interface for designing the user interface and functionality. Users can assemble components and connect blocks to create the app’s logic.
E. Apply Your Learning.
1. Ramesh can visit the following website: https://appinventor.mit.edu/
2. E-commerce apps are online stores on your phone or tablet. They are special apps that let you shop for all sorts of things without having to go to a physical store. A few examples are Amazon, Flipkart, etc.
3. Umang can download an app from the app store on an iPhone.
4. A web app is a software application that operates on web servers and is accessed by users through web browsers over the internet. Web apps, short for web applications, are software applications that run on web servers and are accessed through web browsers over the internet.
5. Meher has installed a hybrid app.
Chapter Checkup
A. Fill in the Blanks.
1. length 2. average 3. visual 4. letters, numbers 5. A1:A5
B. Tick () the Correct Option.
1. c. MAX
2. c. Combining related rows or columns together
3. b. Show data visually and help understand it
4. c. They do specific tasks with data
5. b. Performing calculations and handling data
C. Who Am I?
1. Function 2. COUNT() 3. Column chart 4. Sorting 5. ‘+’ symbol
D. Write T for True or F for False.
1. T 2. F 3. T 4. F
E. Answer the Following.
1. The basic element of a spreadsheet is called a “cell”. It holds different types of data, like numbers, texts, and formulas.
2. =B1*B2*B3*B4*B5*B6*B7
3. We can arrange the data in ascending or descending order.
4. Functions are pre-built formulas that you can use to perform various calculations or operations on your data. INT(), SQRT(), POWER(), MOD(), and PRODUCT() are some basic functions.
5. Bar chart or a column chart
F. Apply Your Learning.
1. Ishita should use sorting to arrange a list of words in the dictionary order.
2. a. =SUM() b. B8
3. UPPER()
4.
Chapter Checkup
A. Fill in the Blanks.
1. charts 2. categories 3. Pie 4. dots 5. drag
B. Tick () the Correct Option.
1. c. To simplify data and reveals patterns.
2. c. Chart Title
3. c. Line chart
4. c. Click and drag it to the desired location.
5. a. Shift
C. Who Am I?
1. Bar chart 2. Area chart 3. Pie chart 4. Legend
D. Write T for True and F for False.
1. F 2. T 3. T 4. F 5. T
E. Answer the Following.
1. Data visualisation is important in today’s data driven environment because it interprets and represents the data in an effective manner in the form of graphics.
2. The key components of a chart are the Chart Title, Chart Area, Data Series, Plot Area, Legend, Gridline, Axes, Data labels, etc.
3. Three common charts created in Google Sheets are Column charts, Pie charts, and Line charts.
● A column chart is used for comparing values across different categories.
● A line chart is used to display data trends over a continuous range.
● Pie chart represents data as slices of a circle, where each slice represents a proportion of the whole.
4. The steps to resize a chart in a Google Sheets spreadsheet are as follows:
● Click on the chart that you want to resize.
● Drag its corner or edge handle by holding down the Shift key while resizing.
5. The steps to delete a chart in a Google Sheets spreadsheet are as follows:
● Click on the chart that you want to delete.
● Click in the three dots in the top right corner of the chart and select the Delete chart option.
F. Apply Your Learning.
1. A column chart is a practical and effective choice for visualising monthly expenditure data over a year that provides a clear representation of trends in expenditures over time.
Some of the reasons for using column charts are:
● Comparison: Column charts allow for easy comparison between different months. Each column represents a month, making it simple to see how expenditures vary from one month to another.
● Sequential data: The sequence of months is well represented in a column chart. This makes it easy for the viewers to follow the progression of expenditures throughout the year.
● Clear representation: Column charts provide a clear visual representation of data. The height of each column directly corresponds to the expenditure amount making it straightforward for viewers to interpret the data accurately.
2. You can customise the chart by adjusting various options, such as chart styles, chart and axis titles, data series, legends, gridlines, etc., available under the Customise tab in the Chart editor pane. As you make changes in the Chart editor, you can preview your chart in real-time to see how it will look.
Chapter Checkup
A. Fill in the Blanks.
1. class 2. instance 3. block of code 4. Arithmetic 5. logical
B. Tick () the Correct Option.
1. b. class 2. c. Static variable 3. b. Comparison operator 4. a. ;
C. Who Am I?
1. new Operator 2. BEDMAS 3. Comparison Operator 4. and Operator 5. Unary Operator
D. Write T for True and F for False. 1. F 2. T 3. F 4. F 5. T
E. Answer the Following.
1. A variable that is defined and created within a method, constructor, or function in Java is called a local variable. This variable cannot be used outside the block it has been initialised to. On the other hand, a variable declared inside a class but outside the body of methods is called an instance variable. Instance variables cannot be accessed directly. The new operator is used to create an instance of the class, which is used to access the instance variables.
2. Arithmetic operators in Java are used along with the integer or float values and variables to perform mathematical operations on them.
Operator Name Description Example + Addition Adds two values together. public class
AddTwoNumbers { public static void main(String[] args) { int num1 = 5; int num2 = 6; int sum = num1 + num2; System.out.println(“The sum of “ + num1 + “ and “ + num2 + “ is: “ + sum); }
Operator Name Description Example
- Subtraction Subtracts one value from another. public class
SubtractTwoNumbers { public static void main(String[] args) { int num1 = 5; int num2 = 6; int difference = num1 - num2; System.out.println(“The difference between “ + num1 + “ and “ + num2 + “ is: “ + difference); } }
* Multiplication Multiplies two values. public class MultiplyTwoNumbers { public static void main(String[] args) { int num1 = 5; int num2 = 6; int product = num1 * num2; System.out.println(“The product of “ + num1 + “ and “ + num2 + “ is: “ + product); } }
3. The purpose of variables in Java is:
● Variables are the containers that hold data values.
● Variables can be updated or modified during the execution of a program.
● Variables reserve a specific memory location for the stored data.
● A variable can be used multiple times in a program.
4. Relational Operator:
Operator Name Example == Equal to public class CheckEquality { public static void main(String[] args) { int num1 = 5; int num2 = 6; System.out.println(“The numbers are equal.”, num1==num2); } }
5. Logical and operator (&&) returns true if both the statements are true and logical, or the operator (||) returns true if one of the statements is true.
F. Apply Your Learning.
1. public class Person { // Instance variables public String name; public int age; public String address; // Main method to test the Person class public static void main(String[] args) { // Creating a Person object Person person1 = new Person();
// Initialising instance variables person1.name = "John Doe";
person1.age = 25; person1.address = "123 Main Street"; // Accessing and printing the information about the person System.out.println("Name: " + person1.name); System.out.println("Age: " + person1.age); System.out.println("Address: " + person1.address);
2. import java.time.Year; public class Person { // Instance variables
public String name; public int age; public String address; // Main method to test the Person class public static void main(String[] args) { // Creating a Person object
Person person1 = new Person(); // Initialising instance variables person1.name = "John Doe"; person1.age = 25; person1.address = "123 Main Street"; // Accessing and printing information about the person System.out.println("Name: " + person1.name); System.out.println("Age: " + person1.age); System.out.println("Address: " + person1.address); // Calculating and printing the birth year directly in the main method int currentYear = Year.now().getValue(); int birthYear = currentYear - person1.age; System.out.println("Birth Year: " + birthYear);
3. public class Person { // Instance variables
public String name; public int subject1; public int subject2; public int subject3; public int subject4; public int subject5; // Main method
public static void main(String[] args) { // Creating a Person object
Person student = new Person(); // Initialising instance variables
student.name = "John Doe";
// Simulating the input for the marks (replace this with the actual input logic) student.subject1 = 85; student.subject2 = 90; student.subject3 = 75; student.subject4 = 88; student.subject5 = 92;
// Calculating and printing the total marks directly in the main method int totalMarks = student.subject1 + student.subject2 + student.subject3 + student.subject4 + student. subject5;
System.out.println("Total Marks obtained by " + student.name + ": " + totalMarks);
4. public class Person { // Instance variables
public String name; public int subject1; public int subject2; // Main method
public static void main(String[] args) { // Creating a Person object
Person student = new Person();
// Initialising instance variables student.name = "John Doe";
// Simulating the input for marks (replace this with actual input logic) student.subject1 = 85; student.subject2 = 78;
// Printing the result directly in the main method
System.out.println("Comparison of marks for " + student.name + " in Subject 1 and Subject 2:"); System.out.println("Subject 1 marks: " + student.subject1); System.out.println("Subject 2 marks: " + student.subject2); System.out.println("Marks in Subject 1 are higher.",student.subject1 > student.subject2);
5. public class Person { // Instance variables
public String name; public int subject1; public int subject2; public int subject3; public int subject4; public int subject5; public static void main(String[] args) { // Creating a Person object for the student
Person student = new Person();
// Initialising instance variables for the student
student.name = "Alice"; student.subject1 = 85; student.subject2 = 90; student.subject3 = 75; student.subject4 = 88; student.subject5 = 92;
// Calculating the total marks for the student int totalMarks = student.subject1 + student.subject2 + student.subject3 + student.subject4 + student. subject5;
// Printing the total marks and result for the student System.out.println(student.name + "'s total marks: " + totalMarks); System.out.println("Result: " + determineResult(totalMarks)); }
// Function to determine the result based on the total marks private static String determineResult(int totalMarks) { return (totalMarks >= 200) ? "Pass" : "Fail"; } }
Chapter Checkup
A. Fill in the Blanks.
1. Scanner 2. nextLine() 3. nested 4. else 5. object
B. Write T for True and F for False.
1. T 2. T 3. F 4. T 5. T
C. Answer the Following.
1. Nest means within, and in Java an ‘if statement’ is referred to as being nested if it is stated inside another ‘if statement’ or an ‘if-else statement’.
2. The types of control flow statements for decision making in Java are:
a. if statement
b. if-else statement
c. Nested if statements
d. if-else-if statements
3. Difference between if and if-else statements: if statement if-else statement
The if statement is used to execute a statement only when the given condition becomes true.
The if-else statement has two sets of code to be executed, whether the given condition is true or false. if(condition){ //Task to be performed } if(condition){ //Task to be performed } else{ //Task to be performed }
4. The if-else-if ladder statement is used in situations where multiple cases need to be checked. If one of the conditions in an if-else-if ladder statement is true, the statements defined in the if block will be executed.
If some other condition is true, the statements defined in the else-if block will be executed. Eventually, the statements defined in the else block will be executed if none of the conditions are true.
5. a. nextLong(): Reads a long value from the user. b. nextFloat(): Reads a float value from the user.
c. nextInt(): Reads an int value from the user.
D. Apply Your Learning.
1. import java.util.Scanner; public class ExamResultChecker { public static void main(String[] args) { Scanner scanner = new Scanner(System.in); System.out.println("Enter the student's score: "); int score = scanner.nextInt();
// Check if the score is within a valid range if (score >= 0 && score <= 100) { // Check if the student has passed or not if (score >= 60) { System.out.println("Congratulations! The student has passed the exam."); } else { System.out.println("Sorry, the student has not passed the exam."); }
} else { System.out.println("Invalid score. Please enter a score between 0 and 100.");
2. import java.util.Scanner; public class NumberToWordsConverter { public static void main(String[] args) { Scanner scanner = new Scanner(System.in); // Prompt user to enter a number (1, 2, or 3) System.out.println("Enter a number (1, 2, or 3): "); int number = scanner.nextInt();
// Check if the entered number is within the valid range if (number==1) { System.out.println("One"); } else if (number==2) { System.out.println("Two"); } else if (number==3) {
System.out.println("Three"); } else {
System.out.println("Invalid number. Please enter a number between 1 and 3.");
3. public class LeapYearChecker { public static void main(String[] args) { int year = 2024;
// Check if the year is a leap year if (year % 4 == 0 && year % 100 != 0) { System.out.println(year + " is a leap year."); } else { System.out.println(year + " is not a leap year.");
4. import java.util.Scanner; public class NumberGreaterThanTenChecker { public static void main(String[] args) { Scanner scanner = new Scanner(System.in); // Prompt user to enter a number System.out.println("Enter a number: "); int number = scanner.nextInt(); // Check if the number is greater than 10 using the if statement if (number > 10) { System.out.println("The entered number is greater than 10."); } else { System.out.println("The entered number is not greater than 10.");
}
5. import java.util.Scanner; public class TriangleTypeCheckerWithoutMethod { public static void main(String[] args) { Scanner scanner = new Scanner(System.in);
// Prompt the user to enter the lengths of the three sides of the triangle
System.out.println("Enter the length of side 1: "); double side1 = scanner.nextDouble();
System.out.println("Enter the length of side 2: "); double side2 = scanner.nextDouble();
System.out.println("Enter the length of side 3: "); double side3 = scanner.nextDouble();
// Check if the given side lengths form a valid triangle if (side1 + side2 > side3 && side1 + side3 > side2 && side2 + side3 > side1) {
// Determine and print the type of the triangle if (side1 == side2 && side2 == side3) {
System.out.println("The triangle is an equilateral triangle."); } else if (side1 == side2 || side1 == side3 || side2 == side3) { System.out.println("The triangle is an isosceles triangle."); } else {
System.out.println("The triangle is a scalene triangle."); } } else {
System.out.println("Invalid input. The given side lengths do not form a valid triangle.");
6. import java.util.Scanner; public class DivisibilityBy15Checker { public static void main(String[] args) { Scanner scanner = new Scanner(System.in);
// Prompt user to enter a number System.out.println("Enter a number: "); int number = scanner.nextInt();
// Check if the number is divisible by 15 if (number % 15 == 0) {
System.out.println(number + " is divisible by 15."); } else {
System.out.println(number + " is not divisible by 15."); }
A. Fill in the Blanks.
1. jump 2. loop 3. break 4. loop control variable 5. condition
B. Write T for True and F for False.
1. F 2. T 3. T 4. F 5. F
C. Answer the Following.
1. Loops are also called iterative statements. Loop executes a set of instructions until a termination condition is reached. Three types of iterative statements are: 1. while 2. do-while 3. for
2. A while loop repeats the statement or a block of statements as long as the looping conditions remain true whereas for loop needs a loop control variable, which act as a counter.
3. Jump Statements are the statements that transfer control of the execution of a program from one place to another.
4. Break statement is used to exit a loop. Whereas, the continue statement is used to skip a particular iteration. 5. for (initialisation; condition; increment/decrement) { // body of the loop }
D. Apply Your Learning.
1. public class SeriesSum {x public static void main(String[] args) { int start = 1; int end = 28; int step = 3; int sum = 0; for (int i = start; i <= end; i += step) { sum += i; }
System.out.println("Sum of the series: " + sum);
2. public class EvenNumbers { public static void main(String[] args) { for (int i = 2; i < 20; i += 2) { System.out.println(i); }
3. public class FibonacciSeries { public static void main(String[] args) { int n = 10; int first = 0, second = 1, next;
System.out.println("First " + n + " numbers of the Fibonacci series:");
int count = 0; while (count < n) { System.out.print(first + " "); next = first + second; first = second; second = next; count++;
4. public class SumOfOddNumbers { public static void main(String[] args) { int sum = 0; int number = 1; while (number <= 50) { if (number % 2 != 0) { sum += number; } number++; }
System.out.println("Sum of odd numbers from 1 to 50: " + sum); } }
5. import java.util.Scanner; public class PrimeChecker { public static void main(String[] args) { Scanner scanner = new Scanner(System.in);
System.out.println("Enter a number: "); int number = scanner.nextInt();
boolean isPrime = true; if (number <= 1) { isPrime = false; } else { for (int i = 2; i <= Math.sqrt(number); i++) { if (number % i == 0) { isPrime = false; break; } } } if (isPrime) { System.out.println(number + " is a prime number."); } else { System.out.println(number + " is not a prime number.");
6. import java.util.Scanner; public class MultiplicationTable { public static void main(String[] args) { Scanner scanner = new Scanner(System.in);
// Get the number from the user System.out.println("Enter the number: "); int number = scanner.nextInt();
// Print the multiplication table using a for loop for (int i = 1; i <= 10; i++) { System.out.println(number + " X " + i + " = " + (number * i)); }
Chapter-10 Introduction to HTML
Chapter Checkup
A. Fill in the Blanks.
1. HTML 2. element 3. <sub> 4. inline 5. <audio>
B. Tick () the Correct Option.
1. a. To write the code of web pages 2. b. closing 3. a. <title> and </title> 4. b. padding
5. c. <a href=”URL of the web page”> Text </a>
C. Who Am I?
1. <em> 2. colon (:) 3. External CSS 4. download 5. loop
D. Write T for True and F for False.
1. F 2. T 3. T 4. T 5. T
E. Answer the Following.
1. The term ‘markup language’ refers to a language which creates layout of web pages and applies formatting on them. It makes the objects on the web page like texts, images, audios, etc. more interactive, and it also enriches the look and feel of the web pages.
2. The syntax to add an attribute is as follows: <element attribute=”value”>Content</element>
Where,
Element: The HTML element to which the attribute belongs. Attribute: The name of the attribute.
Value: The value assigned to the attribute.
3. The padding property sets the space around the content of the element. Whereas, the margin property sets the space around the element itself.
4. The Autoplay attribute specifies that the audio will start playing as soon as the web page is loaded in the web browser. On the other hand, the Controls attribute specifies that audio controls should be displayed (such as a play/pause button etc).
5. The attributes of the <video> tag which do not require any value are autoplay, controls, loop, and muted.
F. Apply Your Learning.
1. HTML code to display the following output: a3 − b3 Factorisation: (a − b) × (a2 + ab + b2) <!DOCTYPE html> <html> <head> <title>Factorisation</title> </head> <body> <p>a<sup>3</sup> - b<sup>3</sup> Factorisation: (a - b) × (a<sup>2</sup> + ab + b<sup>2</sup>)</p> </body> </html>
2. CSS code to create a box using <div> tag: <!DOCTYPE html>
<html> <head>
<title>Box Example</title> <style> .box { height: 400px; width: 500px; border: 5px solid grey; }
</style> </head> <body> <div class=”box”></div> </body> </html>
3. Rohan can use the <video> tag in his HTML web page.
4. Code of <audio> tag to insert the ‘cartoon.mp3’ video to the web page: <audio controls=”controls” style=”display: none;”> <source src=”cartoon.mp3” type=”audio/mpeg”>
Your browser does not support the audio element. </audio>
Chapter Checkup
A. Fill in the Blanks.
1. form 2. <textarea> 3. radio 4. required 5. inline
B. Tick () the Correct Option.
1. b. <form> 2. b. text 3. b. <select> 4. b. pattern 5. c. To submit the form
C. Who Am I?
1. Arithmetic operator 2. document.write() 3. JavaScript 4. if… else… if statement
D. Write T for True and F for False.
1. T 2. T 3. F 4. T 5. T
E. Answer the Following.
1. An HTML <form> element is used to create fields where users can provide information in an interactive way. It includes fields where users can type texts, numbers, email addresses, and passwords, and indicate choices like selecting check boxes or clicking buttons.
2. Form validation is crucial to ensure that users provide the correct type of information. HTML introduced built-in form validation, using attributes like required, min, max, and pattern. For example: <label for=”age”>Age:</label> <input type=”number” id=”age” name=”age” required min=”18” max=”99”>
3. Setting properties of a form using internal CSS is also known as embedded CSS or inline CSS. You can make your HTML forms look attractive and arrange them on your web page by using the <style> element. This <style> element is placed in the <head> section of your HTML document. Steps to set properties of a form using internal CSS are:
● Open an HTML Document: Start by creating a standard HTML document structure, including the <!DOCTYPE html>, <html>, <head>, and <body> elements.
● Include the <style> Element: Inside the <head> section of your HTML document, include a <style> element.
● Select the Form Element: To target the form you want to style, use the form selector.
● Define CSS Properties: Within the selected form CSS block, you can define various CSS properties to control the appearance of the form.
● Style Form Elements: Inside a form block, you can target specific form elements such as labels, input fields, buttons, and other related elements.
● Save and Apply: When you have defined your internal CSS rules, save the HTML document.
4. Forms can have various attributes to control the behaviour of a form:
Action: Specifies the URL to which the form data will be submitted.
Method: Specifies the HyperText Transfer Protocol (HTTP) method to be used (either “GET” or “POST”).
Name: Assigns a name to the form for easy identification.
Target: Specifies where to display the response after the form submission.
5. The <input> element is used to create various fields to collect different types of information from the users, such as texts, email addresses, passwords, and more. The <label> element is used to attach a text with the input fields.
Some common types of input fields are:
Text Input: It is used to take the textual information from the user like name, age, roll number, etc.
Email Input: It is used to take the email address as information from the user.
F. Apply Your Learning.
1. Program to create a form to receive parent’s feedback: <!DOCTYPE html> <html lang=”en”> <head> <title>Feedback Form</title> <style> body { font-family: Arial, sans-serif; background-color: #f0f0f0; margin: 0; padding: 20px; } form { max-width: 600px; margin: 0 auto; background-color: #fff; padding: 20px; border-radius: 5px; box-shadow: 0 2px 5px rgba(0,0,0,0.1); } h1 { text-align: center; } label { display: block; margin-bottom: 5px;
}
input[type=”text”], textarea { width: 100%; padding: 8px; margin-bottom: 10px; border: 1px solid #ccc; border-radius: 3px; box-sizing: border-box; }
input[type=”submit”] { background-color: #4CAF50; color: white; padding: 10px 20px; border: none; border-radius:3px; cursor: pointer; font-size: 16px; }
input[type=”submit”]:hover { background-color: #45a049; }
</style>
</head>
<body>
<h1>Feedback Form</h1>
<form id=”feedbackForm” onsubmit=”return validateForm()”>
<label for=”studentName”>Student Name:</label>
<input type=”text” id=”studentName” name=”studentName” required> <label for=”parentName”>Parent Name:</label>
<input type=”text” id=”parentName” name=”parentName” required> <label for=”class”>Class:</label>
<input type=”text” id=”class” name=”class” required>
<label for=”section”>Section:</label>
<input type=”text” id=”section” name=”section” required> <label for=”email”>Email Address:</label>
<input type=”email” id=”email” name=”email” required> <label for=”comments”>Comments:</label>
<textarea id=”comments” name=”comments” rows=”4” required></textarea>
<input type=”submit” value=”Submit”> </form>
<script>
function validateForm() { var form = document.getElementById(“feedbackForm”); var email = document.getElementById(“email”).value;
var emailPattern = /^[^\s@]+@[^\s@]+\.[^\s@]+$/; if (!emailPattern.test(email)) { alert(“Please enter a valid email address.”); return false; } return true; } </script> </body> </html>
2. Form to conduct a survey: <!DOCTYPE html> <html lang=”en”> <head> <title>Favourite Subject Survey</title> <style> body { font-family: Arial, sans-serif; background-color: #f0f0f0; margin: 0; padding: 20px; } form { max-width: 400px; margin: 0 auto; background-color: #fff; padding: 20px; border-radius: 5px; box-shadow: 0 2px 5px rgba(0,0,0,0.1); } h1 { text-align: center; } label { display: block; margin-bottom: 10px; } input[type=”submit”] { background-color: #4CAF50; color: white; padding: 10px 20px; border: none; border-radius: 3px; cursor: pointer; font-size: 16px; margin-top: 10px;
} input[type=”submit”]:hover { background-color: #45a049; }
</style>
</head> <body>
<h1>Favourite Subject Survey</h1>
<form> <label>
<input type=”radio” name=”subject” value=”mathematics”> Mathematics </label> <label>
<input type=”radio” name=”subject” value=”science”> Science </label> <label>
<input type=”radio” name=”subject” value=”history”> History </label> <label>
<input type=”radio” name=”subject” value=”english”> English </label>
<input type=”submit” value=”Submit”> </form> </body> </html>
3. HTML form for an ice-cream parlour:
<!DOCTYPE html>
<html lang=”en”>
<head>
<title>Ice Cream Flavour Preference</title>
<style> body { font-family: Arial, sans-serif; background-color: #f0f0f0; margin: 0; padding: 20px; } form { max-width: 400px; margin: 0 auto; background-color: #fff; padding: 20px; border-radius: 5px; box-shadow: 0 2px 5px rgba(0,0,0,0.1); }
h1 {
text-align: center; } label { display: block; margin-bottom: 10px; }
input[type=”submit”] { background-color: #4CAF50; color: white; padding: 10px 20px; border: none; border-radius: 3px; cursor: pointer; font-size: 16px; margin-top: 10px; }
input[type=”submit”]:hover { background-color: #45a049; }
</style> </head> <body>
<h1>Ice Cream Flavour Preference</h1> <form>
<label>
<input type=”checkbox” name=”flavour” value=”chocolate”> Chocolate </label> <label>
<input type=”checkbox” name=”flavour” value=”vanilla”> Vanilla </label> <label>
<input type=”checkbox” name=”flavour” value=”choco-chip”> Choco Chip </label> <label>
<input type=”checkbox” name=”flavour” value=”strawberry”> Strawberry </label> <label>
<input type=”checkbox” name=”flavour” value=”butterscotch”> Butterscotch </label>
<input type=”submit” value=”Submit”> </form> </body> </html>
A. Fill in the Blanks.
1. operating system 2. Hub 3. flowchart 4. Mobile
B. Tick () the Correct Option.
1. d. Distributed 2. c. MAN 3. b. Pattern Recognition 4. a. Sum()
C. Write T for True and F for False.
1. T 2. T 3. T 4. T
D. Answer the Following Questions.
1. CUI (Character User Interface): Users interact with the computer by typing commands (e.g., Command Prompt).
GUI (Graphical User Interface): Users interact using graphical elements like windows, icons, and buttons (e.g., Windows OS, macOS).
2. Bandwidth is the capacity of a network connection. It is measured in bits per second (bps) or Bytes per second (Bps). This capacity determines how much data can be transmitted over the network at a given time. More bandwidth means faster data transmission. Bandwidth is measured in Hz (Hertz).
3. The four pillars of computational thinking are:
i. Decomposition
ii. Pattern Recognition
iii. Abstraction
iv. Algorithm Design
4. A banking app allows users to perform financial transactions such as checking balances, transferring money, and paying bills quickly and securely from their mobile devices, anytime and anywhere.
E. Apply Your Learning.
1. Divyansh can use WAN (Wide Area Network). It connects computers across long distances.
2. Pihu should use a rectangle, which represents a process or operation in a flowchart.
A. Fill in the Blanks.
1. 0s and 1s 2. if 3. Bar 4. <button>
B. Tick () the Correct Option.
1. b. while 2. a. Margin 3. c. Comparison 4. c. Scatter plots
C. Write T for True and F for False.
1. T 2. T 3. F 4. T
D. Answer the Following Questions.
1. A legend is a part of a chart that explains what each colour, pattern, or symbol in the chart represents. It helps identify the data series.
2. The nextBoolean() method is part of the Scanner class in Java and is used to read a boolean value (true or false) from user input.
3. Jump statements in programming are used to transfer control to another part of the program. Examples include break, continue, and return.
4. CSS (Cascading Style Sheets) is a stylesheet language used to describe the presentation and layout of web pages, including colours, fonts, spacing, and positioning.
E. Apply Your Learning.
1. 20 x 50 = 1000
(Because 20 * 50 = 1000 and the result is concatenated with the string.)
2. action attribute
A. Fill in the Blanks.
1. 0s, 1s 2. true 3. text-align 4. <button>
B. Tick () the Correct Option.
1. b. while 2. a. Margin 3. c. Comparison
C. Write T for True and F for False.
1. T 2. T 3. F 4. T
D. Answer the Following Questions.
1. A compiler is a special program that translates code written in a high-level programming language into machine language so that a computer can understand and execute it.
2. The nextBoolean() method is a part of the Scanner class in Java. It reads and returns the a boolean value from the user (true or false).
3. Jump statements in Java are used to transfer control to another part of the program. Common jump statements are:
break (exits a loop or switch statement)
continue (skips the current loop iteration and continues with the next)
return (exits from a method and optionally returns a value)
4. CSS (Cascading Style Sheets) is a language used to describe the style and layout of HTML documents. It controls the visual presentation of web elements such as colours, fonts, spacing, and positioning.
E. Apply Your Learning.
1. Output: 20 x 50 = 1000
2. The correct form attribute is: action.
Uolo has introduced a comprehensive program, Hexa, for Grades 1 to 8, aimed at empowering young minds with essential knowledge and skills for the digital age.
To support the effective implementation of Hexa in classrooms, this Teacher Manual has been thoughtfully designed. It provides structured lesson plans for each chapter, guiding teachers through both classroom instruction and computer lab activities. Every lesson follows Uolo’s research-based WEBS framework, which simplifies teaching methodologies and enhances lesson delivery, making learning more engaging and impactful for students.
• Sharp Lesson Planning: Each lesson plan focuses on specific sub-learning outcomes within a chapter and are designed for delivery within the stipulated class or lab time.
• Real-life and Application-based Questions: Additional questions that link Computer Science to real-life contexts and assist teachers to develop learners' conceptual understanding and application skills.
• Support and Detailed Solutions: In-depth solutions for in-class and post-class activities to reinforce learning.
Uolo partners with K-12 schools to bring technology-based learning programs. We believe pedagogy and technology must come together to deliver scalable learning experiences that generate measurable outcomes. Uolo is trusted by over 15,000+ schools across India, South East Asia, and the Middle East.
ISBN 978-93-49697-76-8