
The Brewhouse: Boiled Wort Production 4
OVERVIEW
Sweet wort is produced during mashing and then run off to the brew kettle. The kettle heating source can be activated once the wort fills and covers the thermal heating element(s). The wort is heated and then boiled for a proscribed time. Unlike the lautering and wort runoff processes, which are mainly mechanical, the kettle boil changes the wort’s flavor composition and color. Different materials can be added during the course of the boil, including hops, sugars, finings, yeast nutrients, and so on. Volatile compounds are removed in the kettle boil vapor. Browning and flavor development reactions, called Maillard reactions, also occur during the boil. The kettle boil proceeds to its desired conclusion, and then protein particulates (trub) accumulate and are removed in a separation process. From there the clarified hot wort is cooled to a safe temperature for the addition of yeast and aerated to encourage the yeast to begin growth and fermentation.
Wort Boiling
■ What are the objectives of the kettle boil?
The wort boiling operation is performed in the brew kettle, and this may have a combined function as a trub separation tank. The kettle must have a heating source to bring the wort from about 77° C to 100° C (170° F to 212° F), at sea-level elevation, within about 15–20 minutes of filling and then continue the boil for 60 minutes or more. The heating source for the boil can be steam, direct gas fire, or electric. The global movement away from fossil fuels means that heating may trend toward electrical heat sources, such as immersion heaters, for smaller-sized brew kettles. Mashing converts starches into sugars and picks up the colors and flavors of the malts (among other components), and lautering is more of a mechanical process that extracts the sugars along with the malt color and flavors. The brew kettle, however, is a vessel that will, in many ways, further develop wort (and beer) flavor. The kettle
boil operation has several goals, and they all have to do with the mixing and heating of the collected wort:
● Concentration of the wort sugars
● Complete malt enzyme shut down so no further starch conversion occurs
● Effective sterilization of the wort (some bacterial spores that survive the boil will not live in beer)
● Extraction and isomerization of hop alpha acids for hop bitterness
● Extraction of flavorful hop oils
● Browning (Maillard) reactions between the wort sugars and proteins, contributing to flavor and color development
● Volatilization of unwanted flavor components, especially the vegetal-tasting dimethyl sulfide (DMS) that comes from the malt
● Coagulation of malt proteins to clarify the wort and form trub
● Acidification of the wort, which is shown by a drop in pH
The brew kettle must be kept clean and functional so its heating surfaces remain free of fouling and able to efficiently transfer heat energy. CIP of the brew kettle is based on how many brews have been processed and, in back-to-back brewing, it may require cleaning at more frequent intervals than the rest of the brewhouse vessels. Brew kettle CIP procedures are robust and intensive, as they deal with difficult-to-remove cooked-on soils requiring higher temperatures, higher chemical concentrations (with oxidizer additives), and longer circulation times than for other brewhouse tanks. See the SOP for brew kettle cleaning procedures in Volume 4, Chapter 4.
■ What are the safety considerations for the brew kettle?
Wort develops a dense foam as it first comes to a boil. If an open-door kettle process is used, this hot foam presents a very real safety hazard.
Note: Boilover foam from the brew kettle is boiling hot and can cause serious burns to the brewer. Never turn your back on the open door of a boiling brew kettle!
Most brew kettles are designed with about 30% freeboard, which is a headspace above the surface of the liquid up to the bottom of the access door that helps contain the foaming. Most larger brew kettles are now designed for closed-door boiling, but it is still common for brewpub and small-craft brewhouse kettles to keep the swing-out access top door open during boiling to help create a draft and draw boiled-off vapor up the kettle vent stack. However, an open door creates a potentially hazardous situation. Boilover injuries are extremely painful and entirely avoidable with some care and engineering (Caldwell, 2022). For kettles with an open-door design, installing an automatic boilover detection system is highly recommended. This system uses a moisture detection sensor set halfway between the bottom of the kettle door and the full kettle wort surface. If the sensor gets wet from wort foam, it will switch off the kettle heat source and signal an alarm or light to alert the brewer, who can then safely address the boilover and reset the system.
The use of an antifoam additive is also recommended and should be used when boiling the wort in addition to the automatic boilover detection system. Antifoam, which is silicone, mineral oil, or hop based, is added as the kettle is filled. It helps keep wort foam from forming, therefore reducing or eliminating the boilover danger, but only if the brewer remembers to add it. The antifoam is removed from the wort in the trub sediment. The combination of these two methods will help keep you and your brewers out of the burn unit.
■ How is the kettle vapor vented?
Brew kettle venting can take a few different forms:
● The brew kettle vent stack can be routed directly out of the building, with or without the use of an extractor fan. An extractor fan is installed when the natural draft is not strong enough to draw out the kettle vapor. The in-line fan is mounted in the vent ducting and helps to form a negative pressure in the kettle to draw out vapor. Care should be taken when sizing the fan, as too much draw can cool the wort surface and affect the kettle boil efficiency.
● In some areas the beautiful aromas of a boiling wort are not appreciated by the brewery’s neighbors. In these situations, a condensation system is required so the kettle vapors are not routed out of the building but instead condensed with cold water and sent to an interior drain.
● In more advanced brewhouse designs, heat exchangers capture the energy from the kettle vapor and use it to heat a hot water tank. The hot water is then used to preheat the next batch of wort to go into the brew kettle. This method includes a prerun tank to hold the wort from the mash runoff until the kettle’s previous brew is emptied. It is then heated through a heat exchanger using a combination of recovered hot water energy from the previous boil and plant steam, as it fills the kettle at a boil-ready temperature.
The boiling wort vapor is loaded with DMS, as well as other volatile compounds, so the kettle venting system must have a way to capture and keep any vapor condensate from dripping from the stack and back into the wort (Fig. 4.1). The captured stack condensate is sent to a drain. DMS has a cooked-corn, trashy vegetable character, and its reduction drives the length and vigor of the kettle boil. Try smelling and tasting some of the stack condensate to see what DMS and other boiled-off compounds taste like and why a boil of sufficient intensity and length is necessary.
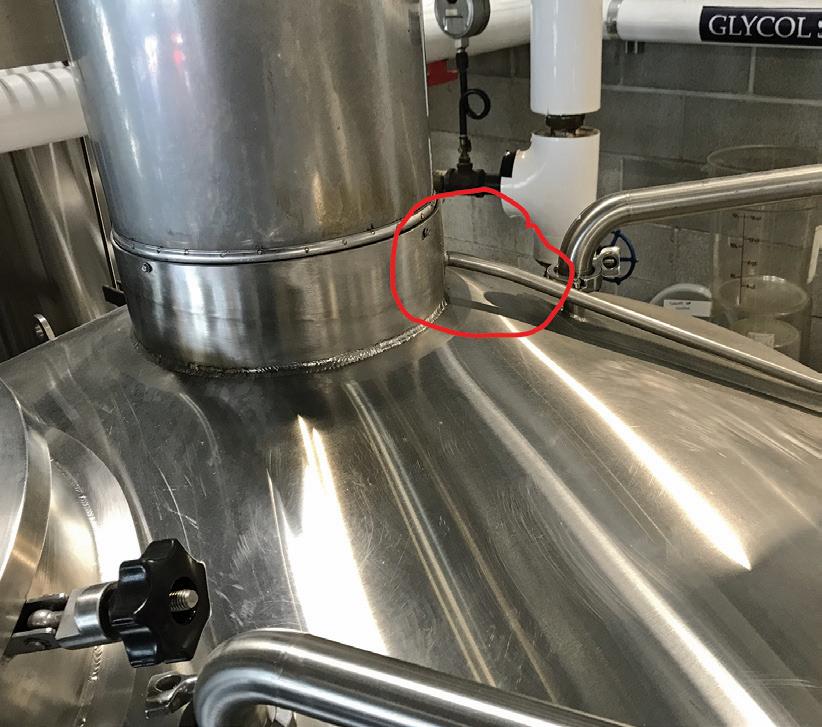
FIG. 4.1. A kettle stack condensate trap (circled in red) designed to keep condensed vapor from dripping back into the boiling wort. (Courtesy Breakside Brewing Co. Photo by K. Ockert—© MBAA.)
■ How long should wort in the brew kettle boil?
There is a lot going on in the kettle boil, which has many goals and objectives, as outlined above, that take time and energy to achieve. The minimum kettle boil duration is the length of time the wort needs to accomplish those goals. However, boil timing is commonly dictated by the formation and reduction of DMS to an acceptable level. DMS is generated from the thermal breakdown of a precursor called S-methyl methionine (SMM). SMM is formed during the germination phase in malting. In the kilning phase, much of the SMM is broken down into free DMS, which is volatilized and eliminated. However, a certain amount still remains in the malt. Lighter-colored base malts are kilned with less intensity and retain more of the SMM than darker-colored base malts. A pilsner malt generally has a higher residual SMM content than a pale ale malt (Bamforth, 1998). DMS can also be formed during fermentation by some yeast strains using another precursor formed in malting called dimethyl sulfoxide (DMSO), which is discussed in Chapter 5.
The flavor threshold for DMS is about 30 parts per billion (µg/L). Some amount of DMS is part of the normal beer flavor profile, and in many European lagers it plays a more prominent role, ranging from 30 to 100 ppb. But DMS tastes offensively vegetal at levels higher than 100 ppb. Unless this taste in your beer is desired, it’s considered an off-flavor that must be removed during the kettle boil. Luckily, DMS is quite volatile, and given enough time and intensity, it will boil off in the kettle vapor.
The type and design of the kettle-heating system, the efficiency of the boil to form the DMS from the SMM precursor, and the amount of precursor present in the malt will determine the minimum length of time the kettle needs to boil. More complete DMS formation and removal in the brew kettle will result in fewer issues downstream. Advanced brewing systems may have automated heating programs designed for maximum DMS formation and removal and are on the short side of kettle boil time requirements, 50–60 minutes. These dynamic boiling designs use programmed variations of low boiling to generate DMS and then full boiling to vaporize it away.
Typical smaller craft brewing kettle systems, many using a direct-fired kettle, are less efficient at DMS removal and typically need 90 minutes of boil time. Depending on the kettle design and vaporization efficiencies, the kettle boil time may be reduced by inserting a DMS conversion rest into the program, such as the following:
● Full boil for 30 minutes
● Shut off kettle heat for a 10-minute DMS conversion rest
● Full boil for 30 minutes
The method for shortening the kettle boil time outlined above must be trialed and tested to ensure the system is capable of the desired amount of DMS reduction needed to meet the flavor requirements of the beer.
In addition to DMS removal, the boil also concentrates the wort to the original extract (OE) target the recipe is trying to achieve. A kettle boil might go even longer than 90 minutes if the brew has a very high OE target. Highly dilute worts or those above an OE of 20° Plato may need extra time to vaporize water and concentrate the sugars beyond that needed for DMS removal alone. Wort boiling in excess of 2–3 hours is sometimes seen for very high OE worts used to make imperial styles and barleywine.
■ Why is the evaporation rate important?
The amount of water boiled off is an indicator of the boiling efficiency of the brew kettle. Highly engineered brew kettle systems targeting energy reduction are capable of reducing DMS, with total evaporation rates of 4% over a 50–60 minute boil. However, in most craft brewery brew kettles a good rule of thumb is 5% per hour, which translates into about 7.5–8% evaporation for a full 90-minute boil. This should provide enough intensity to generate and volatize DMS, as well as to achieve the other goals of wort boiling. It is best practice to monitor the evaporation rate to ensure the kettle heating is functioning within expectations. A reduction in the normal evaporation rate may indicate fouled heating surfaces, a restriction in steam input, or a failing kettle burner or immersion heater.
The percent evaporation per hour can be calculated using this equation:
% evaporation per hour = [(Starting volume – Ending volume)
÷ Starting volume × 100] ÷ Hours boiled
■ Can wort be overboiled?
Too much boiling takes up production cycle time, wastes energy, and may have negative impacts on the wort. The boil needs to be long enough and vigorous enough to form and vaporize DMS (and other volatiles) to acceptable flavor thresholds, but too long or too vigorous a boil can impart undesirable consequences, including the following:
● Formation of compounds called carbonyls that can darken color and adversely affect shelf life.
● Excessive removal of proteins, called coagulable nitrogen, that are part of trub formation but are also needed for head formation and retention. Boiled wort should have a coagulable nitrogen content of about 20–40 mg/L (Kunze, 2019).
The thermal exposure index of wort is based on the amount of thiobarbituric acid (TBA) present. TBA is an indirect indicator of flavor stability and shelf life. A higher TBA indicates lower flavor stability. Laboratory congress wort, which is unboiled, is the starting basis for tracking thermal exposure and should have a TBA below 14; wort before boiling is usually between 20 and 22, and wort after boiling should be less than 45. TBA can rise to 60 in the whirlpool rest and then fall to about 30 in the fermented beer (Kunze, 2019).
Well-engineered kettle systems use less energy input, generate less shear force, and have shorter total boil times. This helps to lower the TBA in the beer, resulting in better head retention and flavor stability. It is worth exploring methods to reduce the time and intensity of your brew kettle boil.
■ When is the kettle heat applied?
The kettle-heating source, be it steam, direct fire or electric, can be activated after the wort has sufficiently covered the heating element. This avoids a dry-firing condition that will not only burn and scorch the wort but can damage the stainless steel heating
surface as well. If the kettle is steam heated, wait until the wort has fully covered the jackets or heating calandria by a few centimeters or inches. If it is direct fired, then a few centimeters or inches of wort must cover the hot spot on the kettle floor, and if designed with a flue gas sidewall chamber, the sidewall height should be covered as well. This is dependent on the design but could be as much as 46 cm (18 inches) from the kettle floor. If the kettle is electrically heated, make sure 5–10 cm (2–4 inches) of wort covers the electric heating element to avoid burning it out.
The wort may contain small amounts of starches that survived the enzyme conversion rests during mashing and wash into the wort runoff. Keeping the kettle temperature at about 80° C (176° F) during wort collection ensures there is enough active alpha-amylase left to break down these remaining starches. If the brewer wants to continue diastatic enzyme activity in the kettle—for example, in making a brut style or whiskey wash—heating above 70° C (158° F) can sometimes be delayed to allow for maximum starch conversion. In most cases heating can continue throughout the wort collection, so the wort can be rapidly brought to a boil within a short time after the kettle full volume is achieved. The kettle should have a thermometer port, or thermostat display, to show the wort temperature as the kettle fills and heats.
■ What is kettle full?
Kettle full is when the collected wort reaches its desired full-kettle volume. At that time wort collection is ended. Depending on how the kettle-heating program is managed, the wort may have already come to a boil. However, maximum heat is applied at kettle full, and a full rolling boil should be achieved within 10–15 minutes. After a rolling boil has been established, any sugar and mineral additions should be made. When the wort is well mixed the kettle volume, initial gravity, and pH samples should be taken to ensure the brew has hit its target preboil specifications. It’s a good opportunity to taste the wort again and make sure it’s normal for that recipe and brand. The wort at this stage will be sweet but more diluted than the first wort from the initial runoff. The flavor and aroma should still have the bready, caramel-candy, or roasty flavors seen in the first wort, and it will normally have some of the grain-derived DMS and grassy flavors and aromas that will boil off. The color will be paler than the final beer but will deepen slightly during the kettle boil.
■
How is kettle volume measured?
Determining the kettle full volume involves a reasonable measurement of how much wort has collected in the brew kettle. Ideally, this is done with a full-flow, magnetic “mag” flow meter from the outlet of the wort runoff pump (Fig. 4.2). Alternatively, the kettle may have a calibrated heat-resistant sight glass where the volume can be clearly read directly. But the measurement can also use the time-honored “dipstick” method. As seen in Volume 1, Chapter 6, “Brewery Equipment Selection and Design,” the total volume of a vertical tank is the volume of the tank bottom and top plus the volume of the vertical tank shell. For a brew kettle the tank top volume can be disregarded. Knowing the tank bottom volume and converting the shell into volume units per height units, such as liters per centimeter or gallons per inch, you can calibrate a dipstick to measure the contents of the kettle.
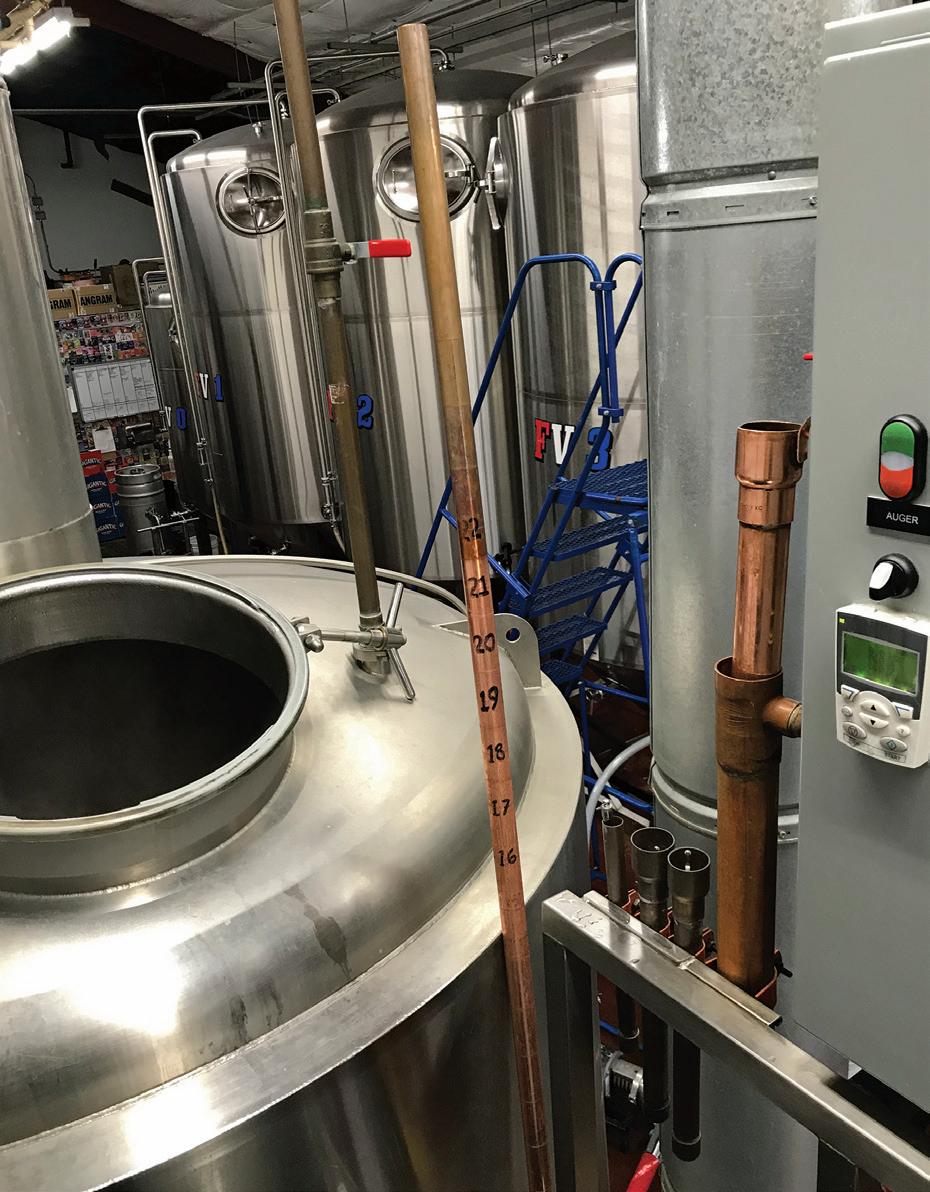
To use a dipstick, you first need to know some volume metrics of the kettle, which can be gleaned from the manufacturer’s specifications or calculated from its inside dimensions. The volume of the kettle bottom (conical, dished, or sloped) must be determined along with the volume per vertical unit—that is, liters per centimeter or gallons per inch—up to a reference point to use when inserting the dipstick. A common reference point is the bottom of the access door. The stick itself can be wood, copper, or stainless steel, or it can be a measuring tape, but it must have markings to measure the reading in inches or centimeters or in volume (gallons, barrels, or hectoliters) (Fig. 4.3). The dip is made either by inserting the stick all the way to the bottom of the kettle and noting the measurement (wooden sticks work well for this method because they moisten and leave a mark) or by inserting the stick along the bottom of the kettle access door and letting it just touch the surface of the collected wort and taking a reading of where the markings meet the bottom of the door. Depending on the calibration of the stick, the measurement is either read directly in volume (hectoliters or barrels) or used in a calculation of liters per centimeter (or gallons per inch).
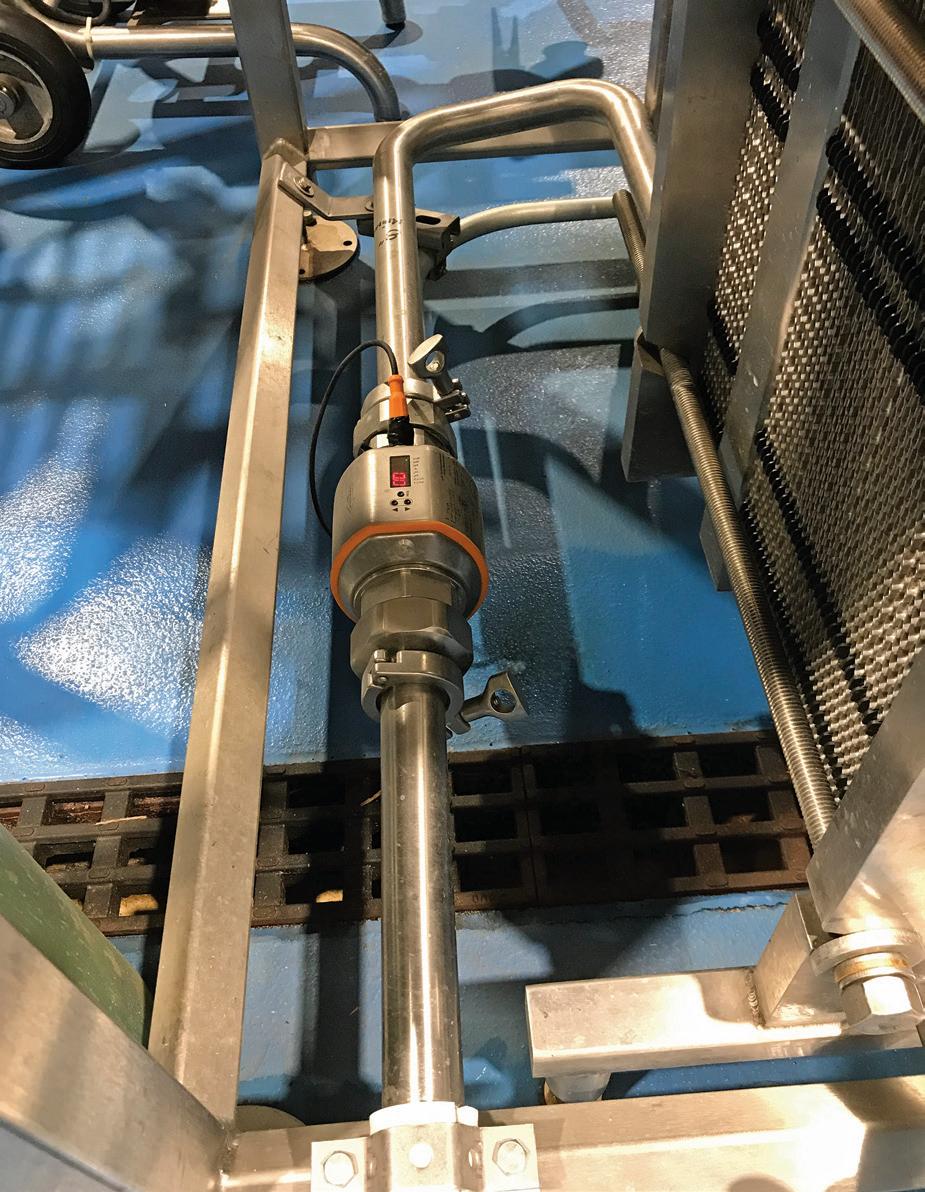
This application is on the wort heat exchanger, but a mag meter is also useful on the wort runoff line from the mash tun to the kettle. (Courtesy Hammer & Stitch Brewing Co.
FIG. 4.2. A magnetic “mag” flow meter measures both the rate of flow and the total volume of the wort.
Photo by K. Ockert—© MBAA.)
FIG. 4.3. A dipstick used to measure the brew kettle volume. (Courtesy Gigantic Brewing Co. Photo by K. Ockert—© MBAA.)
If using the surface of wort method, you must compensate for the difference of the access door bottom to the top of the tank sidewall and then subtract that amount to determine the net reading.
Example:
A 13 hl (11 bbls) working-capacity kettle is direct fired with a 1.2 m (4 feet) inside diameter. This means it has a radius of 0.6 m (2.0 feet). It has a straight wall height of 1.5 m (5 feet) and a 1% sloped bottom of 10 mm/m (1/8 inch/ foot). The total volume of the tank includes the sloped bottom and the vertical sidewall shell (again, we will ignore the volume of the tank top for a brew kettle measurement).
To calculate the volume of the sloped bottom:
Slope height = (10 mm/m × 1.2 m diameter) = 12 mm (0.5 inch), or 0.012 m
The volume of the sloped bottom is the volume of the cylinder at the slope height divided by 2:
Volume of the sloped bottom = 3.14 × (1.2 m)2 × 0.012 m) ÷ 2 = 0.03 m3 (1.1 feet3) and 0.03 m3 × 1,000 L/m3 = 30 L (8 gal.)
The volume of the straight shell of the tank is
Volume = 3.14 × (0.6 m)2 × 1.5 m = 1.7 m3 (60 feet3) and 1.7 m3 × 1,000 L/m3 = 1,700 L (449 gal.)
The volume per length for the straight shell is
1,700 L ÷ 150 cm = 11.3 L/cm or 449 gal. ÷ 60 inch = 7.5 gal./inch
The total tank volume (not including the tank top volume) is Tank volume = 17.3 hl (14.6 bbls)
Using the complete wort dip to the bottom method, we calibrate the stick to allow for the kettle bottom slope height so the reading already accounts for the bottom volume. The reading is converted into liters or gallons and then into hectoliters or barrels. If the kettle is a dished- or cone-bottom tank, then take the measurement to where the dish or cone meets the sidewall and add in the bottom volume.
Using the top of wort method in the example, you place the dipstick or measuring tape at the wort surface and take the reading where it meets the bottom of the door. You then subtract the height of the sidewall to the access door to get a net reading from the top of the straight wall to the surface of the wort. For example, if the distance from the bottom of the access door to the top of the straight wall is 10 cm (4 inches), you want to subtract 10 cm (4 inches) from any reading to determine the net measurement. This is then converted to a liquid volume measurement by multiplying by the appropriate volume per length, such as liters per centimeter or gallons
per inch. Finally, to get the volume of wort collected, subtract the net measurement volume from the total kettle volume.
Note: Turn off the kettle heat source before taking any measurements.
Using any of the above methods, the reading would be interpreted as “hot”—that is, 104% of the room-temperature wort measurement—because the wort will be close to or at boiling when the measurement is taken. The measurement can then be converted into a room-temperature, or “cold,” reading by multiplying by 96%.
Kettle Hopping
■ When should kettle hop additions be made?
Traditionally, and in much of the brewing going on today, hops are added at the beginning of the boil. The first hop addition helps to stabilize the boiling action and reduces additional wort foam formation, as well as efficiently isomerizes alpha acids for bitterness. This is usually, but not always, a bittering hop addition with a high alpha acid content variety. The hop aromas from that addition are expected to volatize and boil off, leaving only the bitter isomerized alpha acids behind. There might be an addition in the middle of the boil for more bitterness and some added aromatic flavors and then a late hop addition toward the very end of the boil to contribute more to the aromatic flavoring than bitterness.
There are, of course, no rules on when hops are added or how much bitter or aromatic flavor they will contribute to a particular recipe. Some craft brewers don’t add hops to the brew kettle boil at all. You, as the brewer, set your own recipe in that regard. For kettle hopping, it’s good practice to weigh out the hops during the wort runoff period and stage them neatly in order by the kettle so they are ready when needed. Likewise, other kettle additions such as mineral salts, yeast nutrient, zinc sulfate, and/or kettle finings (Irish moss) should be weighed out and ready. Use designated, color-coded, and labeled buckets or containers for these ingredients so they will not be mistakenly used for cleaning chemicals. A timer can be of great assistance in reminding you when to make kettle additions (Fig. 4.4).
■ What is
late hopping?
Late-hop additions can be made to maximize postkettle hop aromas. Late-hop additions avoid brew kettle evaporation, when much of the hop’s aromatic oils can be lost. If the aroma from the kettle stack smells like hops, then those flavors are not staying in the wort. Late hopping has been around for a long time and normally utilized whole-cone hops, but some process changes have adapted it for the use of pelleted hops.
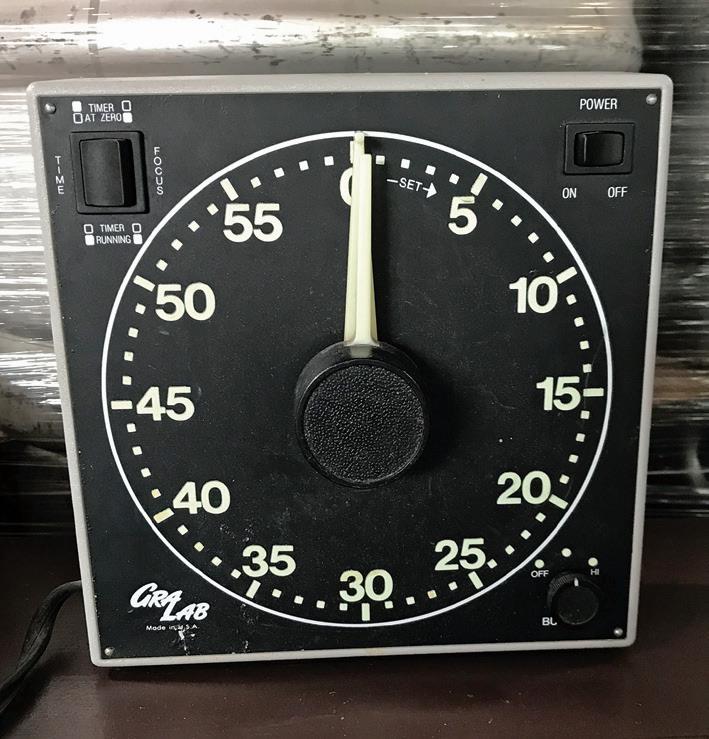
FIG. 4.4. A brewhouse timer to help ensure certain operations or additions are performed on schedule. (Courtesy Montavilla Brew Works. Photo by K. Ockert—© MBAA.)
FIG. 4.5. A hop back tank for separating the whole hops used in the kettle boil. (Courtesy Gigantic Brewing Co. Photo by K. Ockert—© MBAA.)
Two methods of late hopping are as follows:
1. Hop strainers. Hop backs and strainers, also called hop jacks, have been around since brewers started adding whole-cone hops to wort in the brew kettle. The mission of these devices was primarily hop and trub removal, but their use diminished with the advent of the whirlpool tank and pelleted hops. However, they have enjoyed a resurgence with craft brewing, where many brewers use hops more for flavor and aromas than for bitterness.
● Hop back. The classic hop back is a brewhouse tank with a slotted false bottom that receives the entire brew, settles out, and is then pumped to the wort-cooling system (Fig. 4.5). The trapped whole-cone hops in the emptied tank are later swept out manually or with a rotating plow through a side access door to a receiver that may also be used for spent grain, and the blend is fed to cattle. The tank is comparable in design to a mash-lauter tun, and the process of removing the spent hops is very similar to graining out. Unboiled whole-cone hops can be added while the hot wort is in the hop back to add extra flavor. This technique is still practiced in some craft breweries.
● Hop strainer. In an effort to speed up whole-cone spent hop removal, a strainer system was devised to remove hops from the wort during the transfer out of the brew kettle. Early craft brewers adapted this system so that wort made with pellet hops could be whirlpool separated first and then fed through the strainer, which was loaded with a fresh charge of aromatic whole-cone hops. The hot wort would flow through the cone bed and pick up additional hop flavors on its way through the wort-cooling system. There are several designs of hop strainers, but most use a container made from stainless steel punch plate screen where the hops are loaded and a distribution wand to send the wort evenly through the hop bed before it leaves the tank. Figure 4.6 shows a vertical cone bottom design. Many of the early U.S. West Coast India pale ales (IPAs) were brewed using this method, and the technique is still in wide use.
2. Whirlpool hopping. A late-hop brewing technique developed using pelleted hops exclusively to make very aromatic, but not necessarily heavily bitter, IPA styles is called whirlpool hopping. This method is performed post kettle boil and uses little or no kettle hop addition, sometimes reserving the full charge of pelleted hops to be added at the start, during, or after the whirlpool transfer. This will be discussed in more detail later in this chapter.