
4 minute read
Photoshop – v20 Updated for 2019 (Part 2) continued …


The regular Frame Tool in the tool’s palette looks like a rectangle with diagonal crossed lines. To access the Frame Tool rst select it from the tool palette (shortcut key K) then at the top of your workspace just under the main menu select either rectangular or elliptical. Now simply click and drag the desired shape onto your canvas, it doesn’t matter at this stage about the size and positioning, both can be changed later. Now you can simply drag an image from your personal library, from a different layer, or from another opened image into the frame and it should resize to t. At this point the image may be much larger than the frame but it will only show within the connes of the frame. If the picture to be included is a layer, then drag its layer icon onto the frame layer icon within the layer’s palette. Double click within the frame using the frame tool to select the frame for moving or resizing. Double click again to select the image for moving or resizing within the frame. Double clicking toggles between frame selection and image selection. To replace an existing image in a frame simply drag in a new image from your library or layer and it will automatically replace the existing image.
Most people will be aware that to create a `Normal Text Frame’ we simply draw a box/frame using the text tool, then type into the frame whereupon the text can be formatted as required i.e. size, alignment, italic, bold, blend styles etc. You can of course simply click on the canvas with the text tool to start typing if you don’t need a text box.

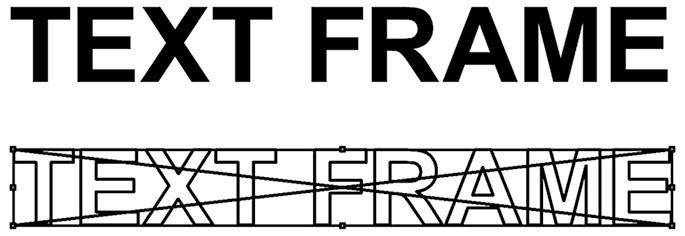
The text at the bottom of page XXX was created using the new `Frame Tool’ with different colours, several different coloured strokes, a texture, and drop shadows applied. First select the normal `Type Tool’ then click on the canvas, Lorem Ipsum will automatically appear, but this will disappear when you start typing. In the example above TEXT FRAME has been typed in bold black. Now right click on the text layer in the layers palette and choose `Convert to Frame’ from the options menu. Your text will now appear as a skeleton outline with diagonal cross lines within a Frame. As before any image from your personal library, another layer, or an opened image can be dragged and dropped into this frame. It will appear on the text element only, in the case of our example on page 45 I used a `Gradient Layer’ entitled `Spectrum’. This provided the multi colours for demonstration purposes but any image or photograph you wish can be used.
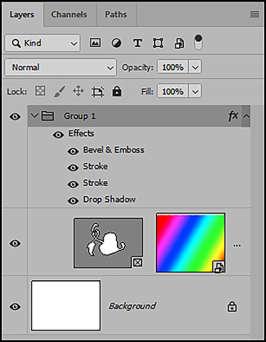
Shapes are treated the same as text. Choose a shape from the shapes library or create your own, create the shape on the canvas. Size and position are not important as both can be changed later using the double click technique described earlier. Right click on the shape layer in the layer palette then choose `Convert to Frame’ from the options menu. You will now see a skeleton outline of your shape. Drag and drop any image onto the `Frame’, in this shape example (Hedera2) I also used a `Gradient Layer’ entitled `Spectrum’. At this point you cannot add layer style blending modes directly to the frames layer, Photoshop will not let you. To add layer styles, you must rst apply a `Clipping Group’. To do this select the frame’s layer in the layer’s palette then click on the `New Group’ icon at the bottom of the layers palette or use shortcut keys Ctrl + G. This will create a Clipping Group and place your `Frame’ containing either text or shapes into the group. By double clicking on this group layer in the layers palette the Layers Styles Blending options will open to allow you to apply any style you wish i.e. gradients, drop shadows, bevel and emboss, textures, strokes etc.
Note: the frequent alternative English Colour or American Color spelling used throughout this article depending on what’s being described.
October 2019
5 -6 October
RPS National AV Championship
Leeds Trinity University
Closing date for entries: 13 September
Contact: howard.bagshaw@ntlworld.com
5 October CEMRIAC Jessops Rose Bowl AV Comp
Judge: John Holt
18- 20 October
Gruppo Fotograco Garbagnatese 3rd International AV Competition
Judges: Lorenzo De Francesco; Walter Turcato; Richard Brown
19- 20 October
Irish Photographic Federation's 7th International Audio Visual Competition.
Closing date for entries: 15 September
Judges - Howard Bagshaw & Ron Davies. Contact: ipfavgroup@gmail.com
31 October
Closing Date for AV Makers South Africa themed competition “Celebration”

Contact: Jeff Morris avmakerssouthafrica@gmail.com
29 November to 1 December Great Northern AV Festival Hough
Publication Information
AV News is published quarterly by the AV Group of the Royal Photographic Society. It is distributed free to Group members and is available to others for an Annual Subscription of £22 in the UK, £25 in Europe and £27 elsewhere – contact David Neal at: davidneal@talktalk.net
Copy Deadlines
27th September
27th December
27th March
27th June
Publication Dates
1st November
1st February
1st May
1st August
Please note that the copy deadlines are the absolute latest. To ensure publication in the next issue please send copy as early as possible.
Any items concerning Audio Visual and Multimedia are welcome, including reviews, technical details, events, photographs, letters and queries. All contributions should be submitted to the Editors at: magazine@avnews.org.uk
The views expressed are solely those of the contributor and not necessarily those of either the Editors or the RPS AV Group.
Distribution: AV News is forwarded to RPS AV Group members using the labels produced by the RPS Membership Department in Bath. Any member not receiving their copy should contact Bath. However, the Secretary will be pleased to post single copies to those members who have failed to receive them.
Copyright: All rights reserved. No part of this publication may be reproduced, stored in a retrieval system or transmitted in any form or by any means without prior permission of the copyright holder.
Printed By Mensa Printers, Arundel Lane, Shefeld. S1 4RF


