


A PRACTICAL GUIDE FOR BIRD FOCUSED POULTRY FARMING 2022EDITION copyrightprotected
POULTRY SIGNALS
Credits
Poultry Signals
Editor
Jan Hulsen, Vetvice® Groep
Authors
Monique Bestman
Marko Ruis
Jos Heijmans
Koos van Middelkoop
Final editing
Ton van Schie
English Translation
Agrolingua
Photography
Photography Cover: Marcel Bekken
Photography (unless credited otherwise)
Louis Bolk Instituut, Livestock Research Wageningen UR, GD
Other photographs:
Alpharma (107bl, 107br), Aviagen (88bl, 88br), C. Bennet (44r), Marcel Berendsen (back cover b, 4, 8b, 9tr, 11t, 24t, 24b, 25, 26r, 27tl, 34br, 34l, 45br, 45t, 48l, 48tr, 49 (6,7), 54b, 55tl, 56, 57br, 58bl, 58bm, 58br, 59, 60l, 70tl, 73br, 90, 97bl, 97br), C. Berg (81r), Bloemendaal Eierhandel (65mr), Ron Jöerissen (57bl), Henk Heidekamp (54t), Interbroed leghennen (50, 51, 61mr), Berry Lott (85ml, 85mr), Jac Matijssen (14l), Bastiaan Meerburg (93m), Frank van Merle, Aviagen (89), Koos van Middelkoop (78tl), Pas Reform (44l), Henk Rodenboog (86br, 86bl, 87tr), Schippers BVBA (101br), Arthur Slaats (77bl, 77br, 82), Hilly Speelman (36t), Rob van Veldhuizen (93b), Vencomatic (7lm, 33, 69b, 76b), Verbeek (94b), Ron Verdel (39ml), Zonne-Ei-Farm B.V (7t) b= bottom, t = top, m = middle, l = left, r = right

Illustrations
Marinette Hoogendoorn
Design
Dick Rietveld, Erik de Bruin, Varwig Design
Special thanks to:
Peter van Agt, Marleen Boerjan, Pieter Bouw, Mijndert van den Brink, Hilko Ellen, Rick van Emous, Marrit van Engen, Teun Fabri, Thea Fiks, Niels Geraerts, Arjan Gussinklo, Jan van Harn, Wim Hoeve, Jan Hulsen, Ron Jöerissen, Ingrid de Jong, René Kieftenbelt, Gerjan Klok, Cécile Korevaar, Marinus van Krimpen, Pieter Kruit, Jan en Marcel Kuijpers, Ferry Leenstra, Sander Lourens, Jac Matijsen, Monique Mul, Bert van Nijhuis, Kees van Ooijen, Wim Peters, Dr. David Pollock, Bianca Reindsen, Berry Reuvekamp, Henk Rodenboog, Jorine Rommers, Piet Simons, Arthur Slaats, Alex Spieker, André van Straaten, Otto van Tuil, Cor van de Ven, Jan-Paul Wagenaar, Ruud van Wee, Sible Westendorp.
Roodbont Publishers B.V.
P.O. Box 4103 7200 BC Zutphen The Netherlands
T +31 (0)575 54 56 88 E info@roodbont.com I www.roodbont.com
Hoofdstraat 24 3972 LA Driebergen The Netherlands
T +31 (0)343 52 38 60 E info@louisbolk.org I www.louisbolk.org
P.O. Box 65 8200 AB Lelystad The Netherlands T +31 (0)320 23 82 38 E info.livestockresearch@wur.nl I www.livestockresearch.wur.nl
P.O. Box 9 7400 AA Deventer The Netherlands T +31 (0)900 1770 E info@gdanimalhealth.com I www.gdanimalhealth.com
The authors and publisher have compiled this publication with the greatest care and to the best of our knowledge. However, the authors and publisher do not accept any liability due to damage of any kind resulting from actions and/or decisions based on this information. No part of this publication may be duplicated, photocopied, reprinted or reproduced in any way without prior written permission from the publisher.
© Roodbont Publishers B.V., 2022
ISBN 978-90-8740-079-8
copyrightprotected
1 Seeing more by looking more closely 8 Pick up the signals9
Using the signals10 Know yourself12 What she wants13 Bird behaviour14 Anatomy18 Senses20 Chicken sounds21 Checking individual birds22
2 The chicken and her environment 24
Ideal home 24 Choosing a systgem that works for you25 Moving in 26 Perches 27 Litter 28 Climate under control 30 Effective temperature 31 Air 32 Light 33 Dust 34 Home on the range 36 The facts 37 How do you get them outdoors 38 Gimme shelter 39 Bad behaviour and problematic pests40 Covered range or winter garden 41
3 Rearing hens 42
The early days 43 Quality of day-old chicks 44 Assessment at 16 weeks 45 Light 46
Teaching good behaviour in aviaries47 Vaccinations 48 The right way to vaccinate 49 From small to big in 18 weeks 50
4 Laying hens 56
Schedules aren’t written in stone 56
The ideal curves 57
Feed and feed management 58 Feed and light 59 Feeding in hot weather 60 Deficiency signal: eating feathers 60 What to look out for in feeding systems 61 Water 62 External egg quality 64 Internal egg quality 66 What makes a nest attractive? 68 Avoid floor eggs 69 Gear management towards nesting peak70 A second laying period? 71
copyrightprotected
Feather pecking during rearing 52 Beak treatment 53 Smooth transition 54
Pecking, feather pecking and cannibalism?71
Difficult to reverse 72 Feather pecking 73 Preventing feather pecking 74 Cannibalism 75
5 Broilers 76
Checking the chicks on arrival 77 Ventilation 78 Distribution of the chicks in the house79 Assessing your birds 80 Signals from manure 82 Poor litter 83 Feed signals 84 Drinking 85 Weak chicks 86 Identifying causes of death 87 Broiler parent birds 88
6 Health 90
Disease signals 91
Biosecurity outside the house 92 Biosecurity in the house 93 What seems to be the trouble? 94 Gastrointestinal problems 95 Respiratory diseases 96 Egg production problems 98 Locomotion organs disorders 100 Sudden increase in mortality 101 Summary of the main diseases 102
Viruses 102 Bacteria 105 Gut parasites 107 Worms 108 Red mites 110
Keywords 112

Introduction 4
Contents
Seeing more by looking more closely
If you only look at technical aspects such as laying percentages and egg quality, growth or feed and water consumption, you run the risk of missing important signals and being overtaken by events. You can pick up these signals from the chickens themselves and from their appearance, behaviour, manure and eggs.
Use all your senses. Even before you enter the poultry house, you’ll hear whether the hens sound different. Stand outside the door for a moment; don’t go inside straight away. When you go in, you’ll smell whether there is a problem with the manure or the ventilation. Use your eyes and ears to see and hear how active the birds are and whether they are reacting more, less or differently to your arrival than usual. Also use your senses to observe the heat and cold in the poultry house. Every irregularity needs to be attended to.
Farm blindness
You can only recognise irregularities if you know what is normal. You will learn what is normal by observing as often and as objectively as possible.
In a nice healthy flock you will want to identify irregularities as soon as possible so as to avoid problems.
But be aware of the dangers of farm blindness. Farm blindness is when you see the situation on your own farm as the norm. Limit farm blindness by talking to colleagues and advisers. Act on critical comments.
Poultry Signals 8
CHAPTER 1
Limit farm blindness by talking to colleagues and advisers.
copyrightprotected
Picking up the signals
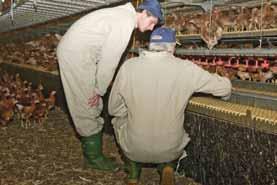
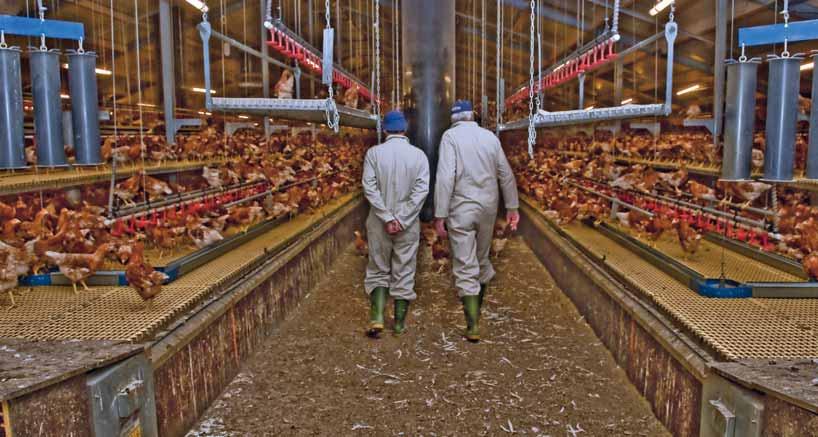
You can pick up a lot from a flock while you are cleaning, collecting floor eggs and scattering grain. But make sure you also do some inspections without doing something else at the same time. You will be more aware of the signals because you are giving the hens and their environment your full attention. So don’t combine an inspection with another activity like cleaning, collecting floor eggs or scattering grain. Activities -but also moods - detract from this. You will also disrupt the hens’ behaviour, causing relevant signals to be lost. The chickens will also react less to your presence if you come into the house more often without doing anything specific. An inspection is a tour of the whole house. Make sure you pay attention to all the birds. So look everywhere: front, back, middle, bottom, top.
Look from flock to chicken
Start your inspection by observing the whole flock. How are they spread out in the space? How are they using the different parts of the house? Are they avoiding certain places, maybe because the climate is bad there (draught, cold)? Try to spot the differences between birds. Are they uniform? How do they differ? In alertness, condition or in another way? Pick up birds that seem different and take a closer look. If you discover an irregularity, see whether it is an incidental case or a signal of a bigger, underlying problem. Also pick up some birds at random and assess them. Irregularities are not always immediately evident.
Things you observe in detail can only be properly assessed in their context. So look from chicken to flock as well. Sometimes you will need to take a step back to be able to see things better.
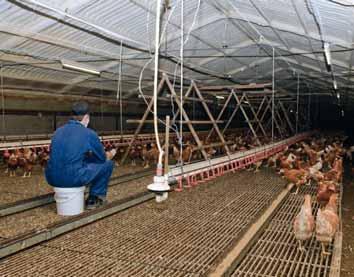
Put a chair in the house and sit on it for a few minutes at regular intervals to observe the birds. Only then will you pick up on any irregular behaviour.
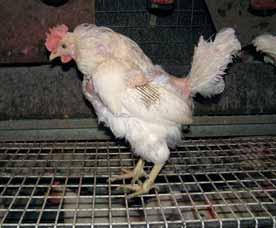
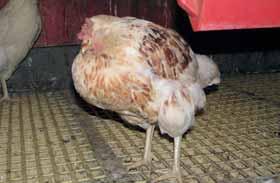
This hen is not healthy and is a source of trouble. Take this animal out of the flock.
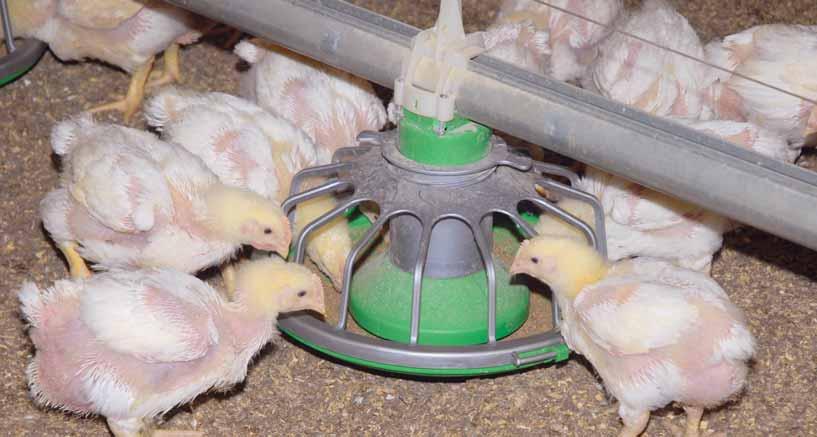
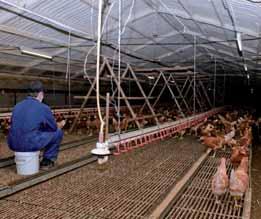
Watch the chain feeder and make sure all the birds go to feed and that there are none that keep running back and forth. All the hens must be able to feed.
Chapter
9
1:
Seeing more by looking more closely
copyrightprotected
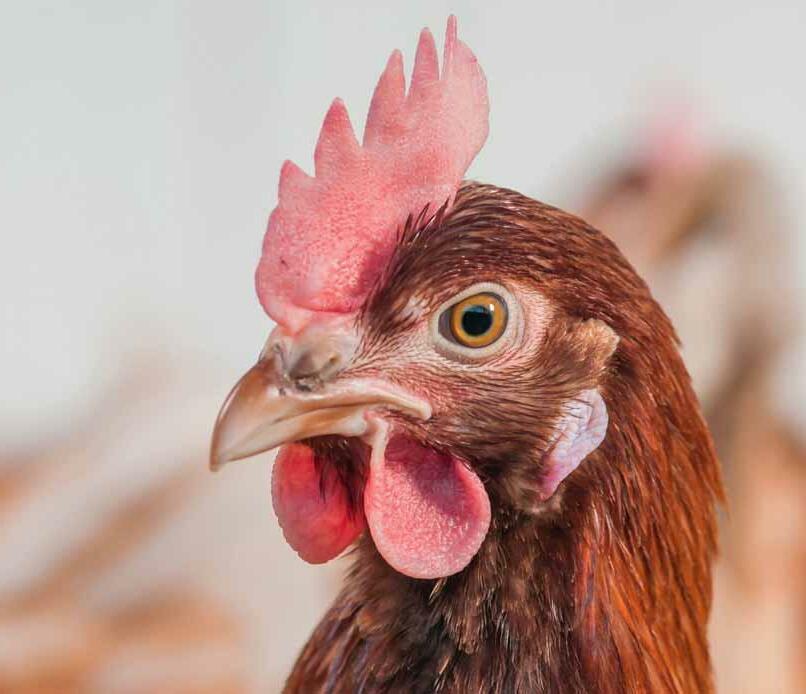
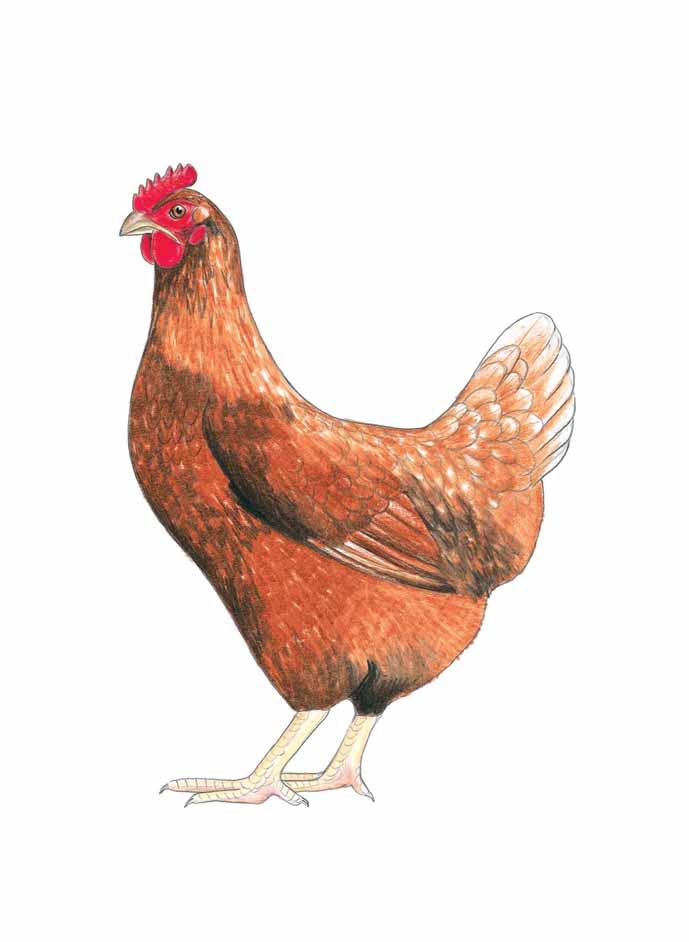
Anatomy
When you talk to your advisor or vet, try to use the correct terminology to avoid confusion. To be able to observe irregularities, you first need to be able to recognise a normal bird.
3 6
1 7 11 12 18
6 7 8 9 10
beak nostrils comb ear earlobe wattles hackle neck back shoulder 2 13
10 8
copyrightprotected
breast wing preen gland tail vent belly shank foot pad claw nail 14
16 17 19 20
18
1 2 3 4 5
11 12 13 14 15 16 17 18 19 20
Exterior 4 5 9 15
Skeleton
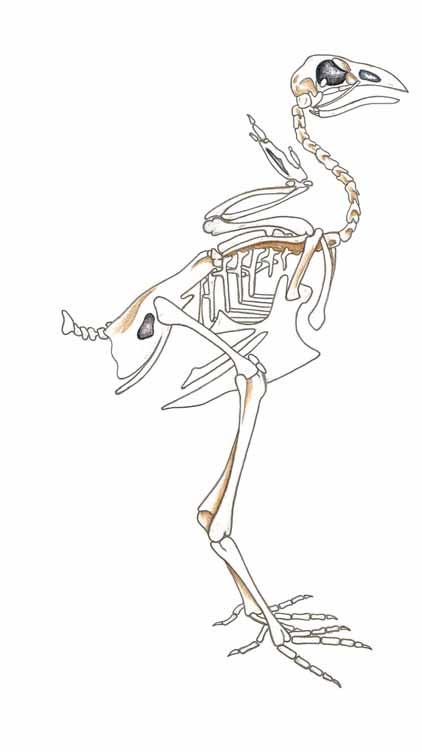
cranium eye socket nasal cavity nostrils cervical vertebrae dorsal vertebrae radius metacarpus ulna humerus pelvis
tailbone ischium pubis femur fibula tibia hock joint metatarsus sternum clavicle
Chapter 1: Seeing more by looking more closely 19
1 2 3 4 5 6 7 8 9 10 11
12 13 14 15 16 17 18 19 20 21
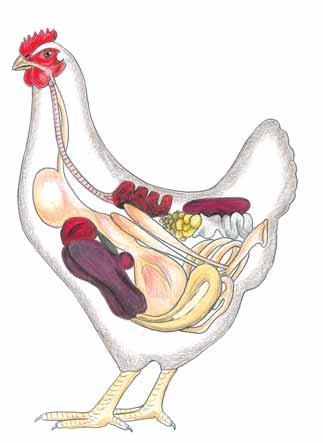
4 21 20 19 17 3 1 5 7 9 8 10 11 12 6 2 13 14 15 16 18 Organs 1 2 3 4 5 6 7 8 9 lungs caecum ovaries kidneys oviduct vent rectum small
duodenum 10 11 12 13 14 15 16 17 18 pancreas
16 15 11 14 12 17 13 18 1 2 3 5 4 6 7 8 10 9 copyrightprotected
intestine
liver gallbladder spleen heart crop trachea proventriculus gizzard
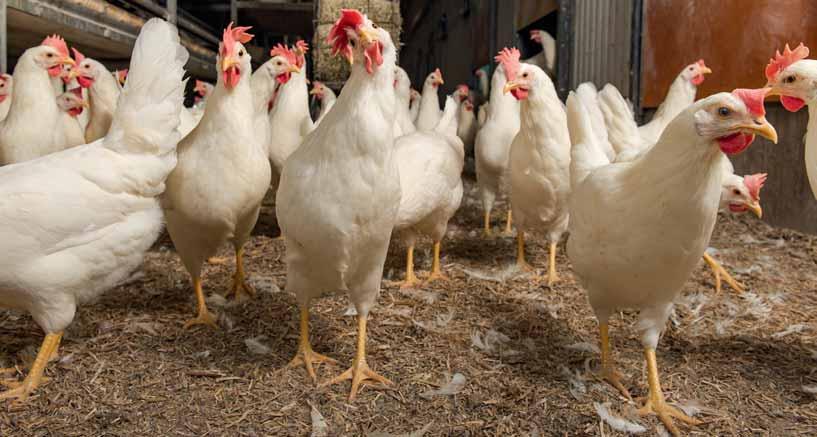
The chicken and her environment
Cage or floor: there is a world of difference between the two. With caged chickens, it’s mainly the farmer who calls the shots. In non-caged systems the hens determine what happens and you, the poultry farmer, have to respond accordingly. You can control their behaviour with food, water, light and other factors.
Ideal home
The chicken prefers her living environment to be divided up so that there is a separate area for each activity: resting, laying eggs, scratching, eating and drinking, dust bathing. For resting, laying eggs and dust baths she needs quiet places where she won’t be disturbed by other chickens coming and going.
A healthy living environment naturally also includes the right temperature and the right amount of light, air, food and water.
Good management requires thinking about things from the hen’s point of view and looking out for them properly.
These perches are at the top of the house where there are no other facilities. The resting chickens are not disturbed there, so they can get real peace and quiet.
Poultry Signals 24
CHAPTER 2
copyrightprotected
Choosing a system that works for you
The choice of a husbandry system is not a purely financial one. There are many other factors involved, such as how much time you have and what sort of jobs you like to do. There is no unequivocally ‘good’ or ‘bad’ system. Compare the various systems and consider the objective pros and cons of each one, but also think about what you yourself regard as pros and cons.
Downsides of switching to alternative
1. Floor eggs
2. Dehydrated hens
3. Hens that start moulting from a lack of feed and water
4. When something goes wrong the consequences are more serious. With an alternative system, an infection can spread through the entire poultry house more quickly, for example.
Driving licence
‘If keeping caged chickens is like cycling, keeping chickens in a floor system is like driving a car, and keeping aviary chickens is like driving a lorry. You need a pilot’s licence to keep organic chickens.’
A poultry farmer
Differences between husbandry systems
Points to consider with non-caged systems
As a poultry farmer you have less leisure time because the work is less easy to delegate to others
When something goes wrong the consequences are more serious You must be more aware of the behaviour of your birds and know how to respond to it
You must spend more time in the poultry house with the hens, so it is more hands-on The laying phase must follow on seamlessly from the rearing phase; consult your supplier about this.
Ventilation systems work differently in non-caged housing: • fewer chickens, so less heat is generated
• more sensitive to weather influences
• with a range, ventilation based on underpressure is not possible.
Infections spread faster in a house with non-caged chickens than in a caged system because the chickens spread the germs all over the house.
This table is of course mainly theoretical. As a poultry farmer you must also be committed to a particular method of keeping chickens. If you keep chickens in an alternative system without really believing in it, you are asking for trouble.
Cost price
Labour
Operational safety Leisure time
Animal health Dust Ammonia in house Food safety Natural behaviour Image
Cage/ enriched cage ++ ++ +/++ + + + ++ -- -
Colony housing ++ + ++ ++ + + + ++-
Traditional floor system +/+/+ + +/-+/+ +
Rating: ++ very good, + good, +/- average, - poor, -- very poor
Aviary + +/+ +/+/-+/+/+ +
Freerange+/---++ ++
Organic -+ /---++ ++

Chapter 2: The chicken and her environment 25
copyrightprotected
Tips for looking after the new arrivals
Make sure that there is food and water in the poultry house before unloading the hens.
Put the new hens in the laying house in the morning, ideally near the feeder and drinker. You might like to leave the lights on longer on the first day.
Make the feeding and drinking water regime the same as in the rearing house, and coordinate feeding times. The first delivery of feed in the laying house should ideally be the same as during the last weeks in the rearing house. Don’t switch from coarse to fine feed.
Make the lighting and the lighting times the same as in the rearing house. To prevent delays and lower production, the light strength and day length should be no less than at the end of the birds’ time in the rearing house. A sudden increase in light intensity will make the birds nervous.
Encourage activity and movement by walking through the house at irregular times. For a few days after the chickens arrive, chase them off any levels without feed or water to prevent individuals from going hungry or thirsty.
In the evenings, go into the shed to pick up the chickens off the ground and put them into the system. This also prevents hens from laying floor eggs.
Use step slats to make it easier for the hens to get in and out of the system.
Make sure that the shed is at the right temperature (18°C) and that there is plenty of litter.
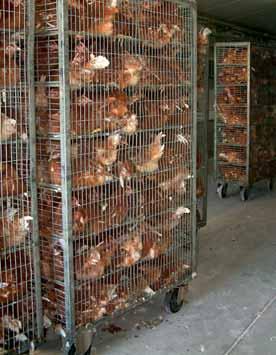
Know how many hens you are getting and know their age. Examine the weight and the uniformity of the hens carefully. What stage of moulting are they at?
Release the hens in the system or let them get out of the crates themselves.
Check the distribution of the animals in the poultry house.
Moving in
Moving to a new home is very disruptive for the birds, so it is important to do all you can to help them settle in quickly. Think of it like friends coming to visit: you would also offer them a nice cup of tea and a biscuit in a comfortable room. The same applies to how you welcome your new hens. After a long journey they are arriving at their new home. Make it quiet and comfortable. For example, make sure they can find everything easily and that the temperature is right. The better you do this, the more likely you are to have a good cycle and the less likely you are to have problems. In effect, you are simply continuing to rear the birds. You only become a laying hen farmer when the first egg is laid; until then you are a rearerjust as a woman only becomes a mother when she has her first baby.
18°C is a comfortable poultry house temperature. Warm up the poultry house if necessary before the hens arrive. After all, the hens have not eaten for a while and will get cold more quickly, risking getting off to a poor start.
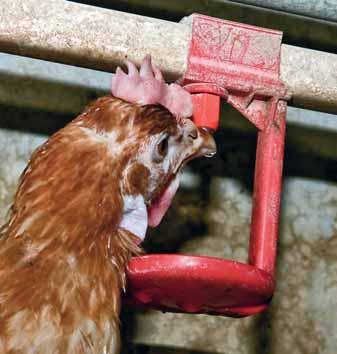
must be similar to the system in
drinking water system
house. If you have a nipple drinking system, Make sure the drip is visible so the birds recognise it as a water source. The colour of the nipple might play a role as well, so you could also use some nipple in the ‘rearing colour’.
Poultry Signals 26
The
in the rearing poultry house
the laying poultry
copyrightprotected
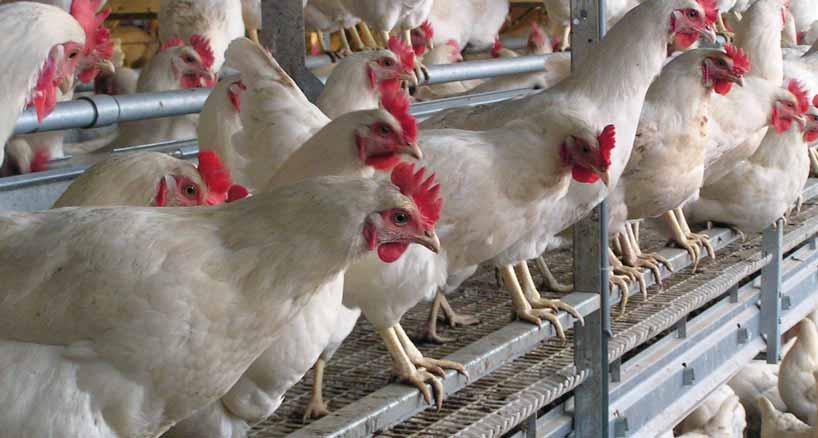
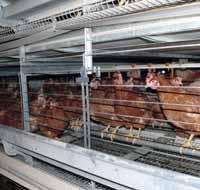
Perches
Chickens naturally like to rest and sleep high up to keep out of the reach of predators. In addition, conflicts between hens are resolved sooner if the hens can take refuge on perches. This makes for a calmer environment. A minimum of 15 cm of perch length per hen is required by law (or 18 cm on organic farms). Perches made of plastic or metal are very hard-wearing and stay very clean. Wooden perches soon get soiled with manure and are a breeding ground for red mites.
The top perches fill up first: if they don’t, you have a housing problem.
Right: rounded top edges and enough width to support the toes.
Positioning the perches
Perches in cages must not get in the way or prevent the hens from walking on the slats. Perches must be at least 6 cm above the slats to allow eggs to roll under them.
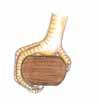
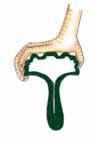
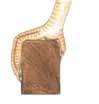
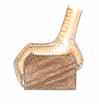
Older chickens can suffer from a softening of the breastbone. The breastbone also becomes porous as a result of calcium, phosphorus or vitamin D3 deficiency. Under these circumstances sitting on a perch can cause the breastbone to become deformed.
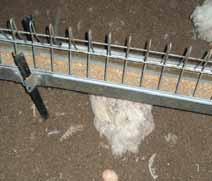
Wrong: a round profile is difficult to grip. It’s also too thin, so it provides insufficient support and encourages extra nail growth.
Right: round edges and enough width to support the toes.
Wrong: too thin, so there is no support for the toes.
Wrong: too thin, so there is not enough support for the toes.
Not all perches are appropriate. The best shape is flat on top with rounded edges. This gives the chicken a good grip.
LOOK THINK ACT LOOK-THINK-ACT
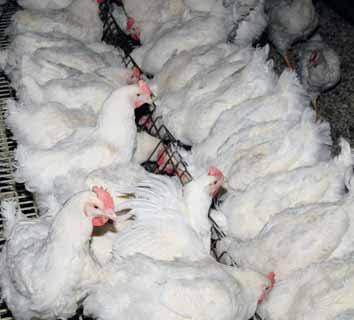
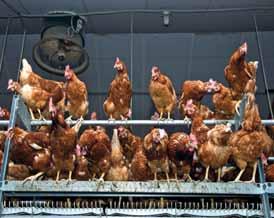
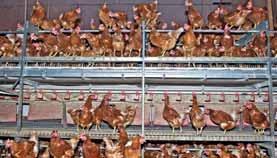
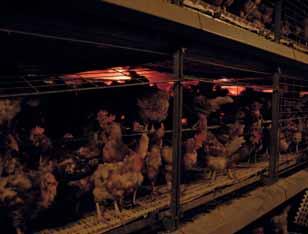
A night light for chickens?
This photograph shows a dark aviary house with only the system lights on. This is a good way of enticing the hens into the system for the night. You can do this in two ways: firstly by using dimmable lighting, and secondly by switching off the lights in groups, from the bottom to the top of the system and finally the lure lights at the very top. Make sure these lights are above the resting places so that they actually lure the chickens onto the perches. You don’t want all the hens to move up to the lamps, so don’t leave them on too long.
Chapter 2: The chicken and her environment 27
copyrightprotected
Laying hens
Laying percentage and egg weight depend on the breed of hen and the feed. The ideal weights for eggs for the table are sizes M (53-63 g) and L (63-73 g). XL is also fine provided the shells are of good quality. You can make the best returns from eggs if you take market demand into account.
Schedules
aren’t
written in stone
Don’t apply schedules blindly. Look in particular at the development of the chickens. For example, give the chickens extra light if they have shed all their feathers. If they have been reared well, this will be at weeks 17 and 18, but this is not written in stone. You want the hens to come into lay at the same time. So make sure that as many as possible have the same body weight and are in top condition when you put them in the laying house.
Keep in regular contact with the rearer. If there are a lot of hens at the same stage of development, you can manage them well with feeding and lighting programmes. So fewer hens will come into lay early or late. Flocks that come into lay early are often un-
Eggs are the main source of income on a laying hen farm. But all sorts of things are involved in achieving a high laying percentage and good quality eggs.
stable and worn out before their time. They take in too little feed, their body weight is too low, the weight of the eggs is too low, the quality of the eggshells is poor, they have poor laying persistence, higher mortality and a greater risk of bad plumage.
Tip
An extra week of laying gives you more benefits than a week shorter rearing period. So don’t let your chicks be delivered before 17-18 weeks of age. Remark: hens kept on floor systems should have sufficient time (1 week) to get used to their new environment, this is not an issue at cagesystems.
Poultry Signals 56
CHAPTER 4
copyrightprotected
The ideal curves
Egg production is well under way at around 20 weeks, and the peak laying percentage is achieved at around 28 to 30 weeks. The egg weight should grow quickly to 60g at 30 weeks, after which it will gradually increase by about 0.1g per week. Follow the laying percentage, feed and water intake and egg weight carefully, and intervene if production lags behind or starts to dip too soon. A uniform flock of sufficient weight gives the best chance of eggs of the right weight at the start of the laying period and is also easier to manage. If you leave a flock in rearing for a week longer (18 instead of 17 weeks) they will have had more time to recover from the vaccinations and build up good resistance. They will therefore perform better under stress (transport from rearing to laying farm). You can also stimulate the hens with light slightly later, so the first eggs will be laid later and will therefore be heavier.
If the egg weight stays low, check the health of the flock and the feed quality. Also watch the weight development of the hens. During the first 10 production weeks, weigh the hens once a week at the same time of day. Automatic weighing is even better because it saves work and provides an accurate picture of the hens’ weight during the entire cycle.
If disease is not a factor, adjust the feed. Discuss this with your feed supplier. For example, more methionine and linoleic acid can influence the weight of the egg. Make sure the eggs do not get too heavy (if so, reduce the methionine and linoleic acid). Because of the risk of feather pecking, don’t restrict the feed.
What to look out for in a laying cycle
From first eggs to laying peak:
• If the laying percentage or food intake remains low, provide richer feed (fishmeal, milk powder). Let the birds empty the feeder at least once every three days.
First weeks after setting up:
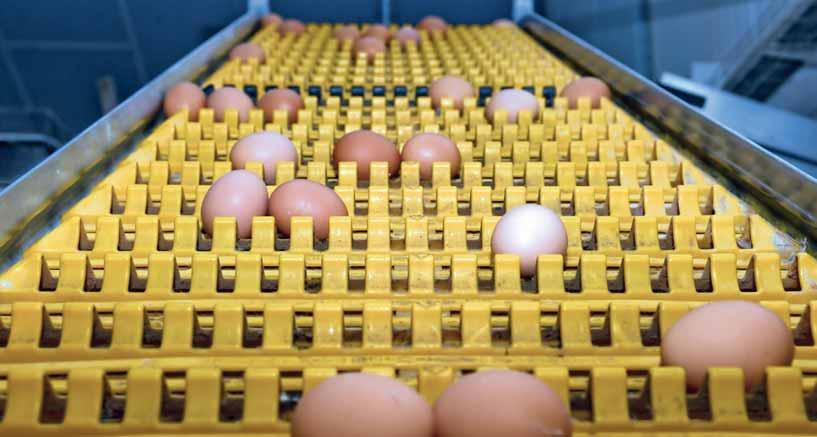
• Open the nests when the first egg is laid (this will be a floor egg).
• Collect floor eggs regularly (every 1-2 hours after the light is switched on).
After laying peak:
• The heavier the egg, the more the shell quality de-teriorates. Switch over to the ideal feeding phase in good time and provide extra calcium (chalk or limestone) and phosphate if necessary.
(weeks)
The flock with the green line is doing well, as the curve has a clear peak above 90%. The flock with the red line is doing less well. A poor peak and a too low laying percentage for the whole period which could not be prevented. Up to week 22 everything seemed fine...
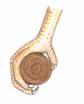
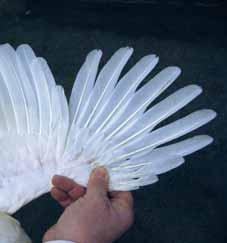
Moulting as a signal
What do you assess at the start of a new flock? Body weight, uniformity and age do not say everything about the development of the hens. The moulting stage of the hens also tells you a lot. The number of moulted wing feathers is a measure of the physical development of the hen. See also page 45.
Note the primaries from outside to inside. They have a flowing form in terms of length. This hen has moulted all its feathers. She is more than is sufficiently developed to be able to lay.
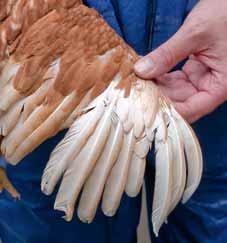
The two feathers on the far right are older and still have to be moulted. This hen is not sufficiently developed and is not yet laying any eggs. The difference between already moulted feathers (rounded) and not yet moulted feathers (pointed) is clearly visible.
Chapter 4: Laying hens 57
70 80 90 100
20 30 40 50 60 70 Age
30 40 50 60
Laying %
copyrightprotected
Broilers
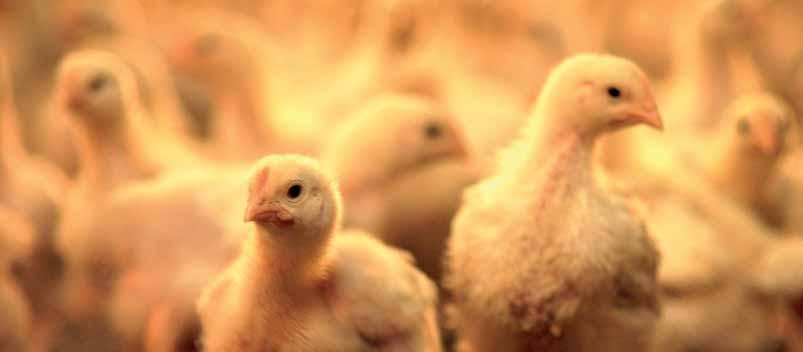
Broilers are bred for fast growth and development of plenty of breast meat. After seven days a good chick will weigh four times its initial weight. Its start in life plays a major role in how the cycle develops. Every breed has its own guidelines with regard to behaviour and care needs.
Their behaviour, water and feed intake and loss rates are indications of how the chicks are doing.
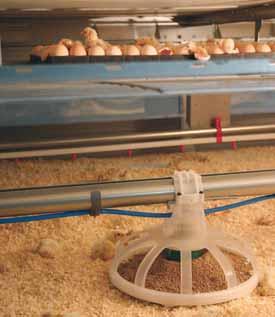
When the chicks come out of the delivery box, some of the chicks are already 48 hours old. Handling them in the hatchery, transporting them and placing them in the house causes stress. Four hours after they are set up in the house, the temperature of the litter should be between 35 and 37°C and the chicks will want to start feeding and drinking. Within 12 hours of setting them up, provide the chicks with a dark period of four hours to calm them down.
In the patio system, the hatching eggs are placed in the broiler chick house three days before the eggs hatch. The advantage of this is that the chicks do not have to be transported after hatching and can start feeding straight away.
76 Poultry Signals
CHAPTER 5
copyrightprotected
Checking the chicks on arrival
Body temperature
On arrival, feel whether the chicks are hot or cold. Feel the feet and skin against your lips: this is the best way to feel the temperature. Repeat this when the chickens have been in the house for a couple of hours. If they are still cold, increase the temperature by a few degrees.
Comfort signals in day-old chicks
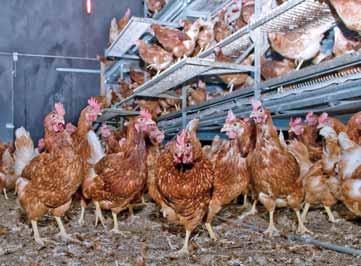
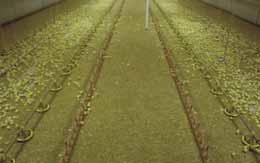
After being released, the chicks have to get used to their new environment before they go exploring. So it is normal for them to sit still for a while to begin with, but after about four hours they should start spreading out, exploring and feeding. If they do not, the litter or the air in the house is too cold. Cold will get them off to a bad start. If they are sitting too close together on the first day, they will keep doing that if you don’t react. This sows the seeds for poorly developed birds, resulting in uneven flock uniformity. If they stay sitting close together, they will also overheat. Try to spread out the chicks as soon as possible after their arrival by increasing the temperature and dimming the light slightly.
If young chicks all press up against the wall, it is too light. If the chicks are too cold, they will cheep loudly.
See also chapter 3 for information on assessing day-old chicks.
Spreading out in the first hours
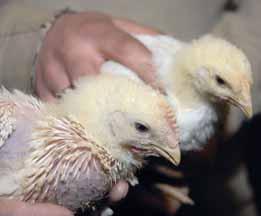
roosters and hens
Young roosters and young hens differ in weight. So when you weigh them manually you will know what you are holding. With older chicks, you can tell by the comb what sex they are. The rooster’s comb has big teeth and is slightly rounded. The teeth on the hen’s comb are more saw-like and the comb is upright. Rooster chicks also develop their feathers slightly less quickly and have a short tail.
Tip
Get the chicks to spread out more in the house by walking from front to back and tapping on the wall. The chicks will be attracted by the sound and will disperse better.
77 Chapter 5: Broilers
Differences between
Rooster (left) and hen (right)
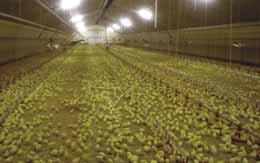
Four to six hours after being released, the chicks will start to spread out.
The chicks in this house have spread out well in the 24 hours since they were released.
copyrightprotected
A chicken can only perform optimally if it is healthy. Sick animals have less desire to eat and drink even though they need extra energy to boost their natural defences. Producing proteins for growth and egg production therefore takes a back seat as survival is their priority. Consumption of trace elements and vitamins increases in diseased birds.
Don’t only call the vet if there is a problem, but also to keep your finger on the pulse and make other arrangements before something goes wrong.
Disease always costs money. Besides the cost of lower production (growth, eggs, development) you also have to pay for the treatments: the direct cost of the drugs used and the indirect cost of waiting for drug residues to disappear from meat and eggs.
Unsaleable eggs are one of the costs of disease.

Poultry Signals 90 CHAPTER 6 Health
copyrightprotected
Disease signals
Diseases always manifest themselves in symptoms, and Poultry Signals are perfect for this. Identifying a disease therefore starts by being able to assess health properly. As soon as you have a good image of a healthy chicken in your mind, it is easier to pick up on subtle changes (see also chapter 1). So start with the disease signal: what does it tell you, and what is causing it? Use your senses: look, listen, smell and feel.
Categorising diseases
As soon as you identify a symptom, categorise it in a main group. This makes it easier to make a diagnosis because you can often rule out a number of diseases.
Signals that can help you identify symptoms are: the gastrointestinal system the breathing organs the laying organs (egg production) the musculoskeletal and nervous system. the skin and plumage
There are also acute diseases with a high mortality rate.
One size doesn’t fit all
The annoying thing is that one symptom doesn’t always lead you straight to a particular cause. You need to recognise several signals to be able to identify a disease. Conversely, you may also find that one disease can have various symptoms, so it may not be easy to narrow down.
Besides their main symptom, respiratory problems, diseases like avian flu and Newcastle disease can also cause lameness and diarrhoea, so they fit into several different groups.

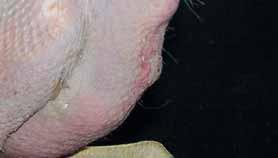
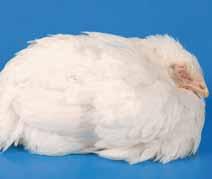
Symptoms of disease: hunched up, eyes shut, feathers fluffed out.
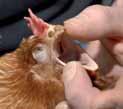
This rearing hen is breathing through its open beak because of a respiratory inflammation.
This broiler mother bird is lying hunched up with raised feathers. Her eyes are shut, she is taking virtually no notice of her surroundings and she does not get up to feed. She is very poorly.
Chapter 6: Health 91
Sick birds tend to hide.
copyrightprotected
Disease signals in pictures
keeping chickens. You are
far more important factor than you think.’
POULTRY SIGNALS

A practical guide for bird focused poultry farming
Not all poultry farmers maximise the full potential of their birds. This applies equally to laying hen farmers and broiler farmers. For a good performance during the production period, the house has to be equipped and managed correctly and efficiently. But how do you know that what you are doing is right? Your chickens continuously send out signals: about their health, how well they know their way around their surroundings and whether they feel happy and comfortable.
Do you recognise the signals your chickens are giving? And do you know what to do if, for example, there are too many floor-laid eggs or if the chicks are spilling too much feed? Do you know the difference between abnormal, runny droppings and healthy caecal droppings? And how do you recognise thirsty chickens when the flock has just been set up?
If you recognise the signs that point to potential problems, then make sure you are armed with information to take the appropriate steps to get your flock back on track. And the things you should take into account if switching from caged to free ranging birds. A lot can be achieved using ventilation, lighting and different routines. But to do so, you must know all the ins and outs of your own farm and be able to asses the impact these changes will have on your animals.
Poultry Signals® presents practical knowledge of animaloriented poultry farming in an easy, accessible format.

Poultry Signals® is a practical guide that shows you how to pick up the signals given by your animals at an early stage, how to interpret them and which action to take.
www.livestockresearch.wur.nl www.roodbont.comwww.gdanimalhealth.com www.louisbolk.org
‘The equipment in the house is just a small part of
a
copyrightprotected
