As the heat wave fades and the air turns just a bit cooler, I hope you’re enjoying pumpkin-spiced moments and the anticipation of the holiday season ahead. Fall has always been my favorite time of year - growing up in Arkansas, the changing leaves and golden hues made everything feel magical.
Since our last print, the housing market has continued to limp along. Talk of the Fed lowering rates briefly pushed mortgage rates down in anticipation, but they soon climbed again. These mixed signals highlight the “in-between” nature of today’s market,not the frenzy of a boom, but far from a full freeze.
You may have heard whispers of a housing recession or a looming wave of foreclosures. The data simply doesn’t back that up. The factors that drove the 2008 crash just aren’t present today. While we’ve seen some price corrections since the pandemic run-up, most homeowners still have significant equity. In fact, today’s housing stock is the strongest it has ever been: buyers purchased under tighter lending guidelines, with stronger credit, larger down payments, and historically low mortgage rates. To put it in perspective—last month in all of San Diego County, there were just three foreclosure sales and three short-sale closings.
WHAT DOES FALL MEAN FOR YOU?
FOR BUYERS: This season could be your moment. Unlike past years when bidding wars were the norm, you now have leverage. Motivated sellers may take your offer more seriously, and you have room to negotiate terms, timing, and repairs. Don’t be afraid to write the lower offer—this is the market where those conversations can happen.
FOR SELLERS: Aspirational pricing simply won’t fly right now. The key is strategic pricing paired with thoughtful preparation. If you’re aiming for a spring sale, fall is the perfect time to get your home show-ready and capture those breathtaking sunsets and views. If you’re curious how today’s market has affected your home’s value, just scan the QR code on this page.
We hope to see you at our 2nd annual Chili Cook Off on October 30th, more information can be found in this issue. Be sure to check out the all of the fun events the resort has planned as well.
If you’d like to talk through where the market may be headed in the next 90–180 days, let’s connect for a Curiosity Meeting. No pressure, no strings—just good conversation to help you make your next move a strong one. Give us a call at 760-591-9008.
Mary Maloney, USN Veteran Owner & Team Leader
Lake & Coast Real Estate
Dear Reader,
As the seasons shift from summer’s sizzle to fall’s cozy embrace, we’re excited to bring you an edition filled with warmth, comfort, and inspiration.
We kick things off with a true starter — sourdough starter, to be exact. On our cover is Susie, the owner of Susie’s Sourdough, a local mom who transformed her love of baking into a thriving cottage food business. She’s proof that when you rise to the occasion, passion can turn into profit and it’s possible to turn dough into dollars from your home kitchen.
In this issue, you’ll find a family-friendly end-of-summer bucket list to help celebrate the transition of the seasons with fun activities for all ages. To make your home feels snug inside and out, we’ve included DIY projects designed to cozy up your living spaces.
For those who feel they have a book waiting to be written, we’ve packed in encouraging tips to help you finally put pen to paper and begin your publishing journey. Parents will also find guidance on laying the groundwork for kids’ handwriting success and strategies to help little ones navigate big emotions with care.
And of course, no fall edition would be complete without recipes. From hearty dishes that fill your kitchen with the aromas of the season to nocook tailgating treats and frosty sweets that carry a hint of chill — there’s something for everyone’s table.
Finally, a heartfelt thank-you to realtor Mary Maloney for her support in making it possible to highlight local moms and families.
Have an idea for a future story? We’d love to hear from you!
Email us at Heather@MomsTown.com or Mary@MomsTown.com
With love, Heather & Mary
Heather@MomsTown.com OR Mary@MomsTown.com.
ON THE RISE with Susie's Sourdough
Susie Briggs FOUNDER
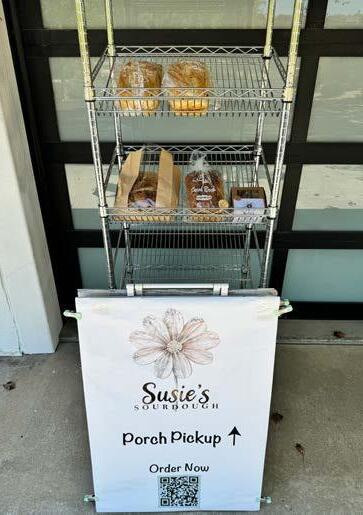
From the cozy hum of her home kitchen, the smell of fresh-baked bread and sweet pastries drifts into the neighborhood — a sure sign that Susie Briggs, owner of Susie’s Sourdough is hard at work. She started out baking just for her family and friends, but over time and with encouragement she launched her cottage food business and started selling her baked goods to the community. With her signature sourdough loaves, melt-in-your-mouth cookies, and irresistible pastries, Susie is proving that your homefront can be your storefront. This month, we’re proud to feature Susie on the cover of MomsTown, sharing her journey, her inspiration, and her advice for other moms ready to turn their business ideas into reality.
Q: Susie, take us back to the beginning — what inspired you to start baking and selling sourdough breads, pastries and cookies from your home kitchen…
A: With four hungry kids at home, baking started as a necessity rather than a passion. Over time, though, I fell in love with it. Friends of my kids would rave about my baked goods when they came over, and with encouragement from family and friends, I began selling to the broader community. I committed to making everything from scratch with the finest ingredients, operating from the peace of my home to bring authenticity to my cottage bakery.
Q: What is it about baking — especially sourdough — that you love the most and how has that passion shaped the way you run your business?
A: I love baking sourdough for two main reasons:
1. It’s more fun than Legos® or Play-Doh® — and that’s saying something!
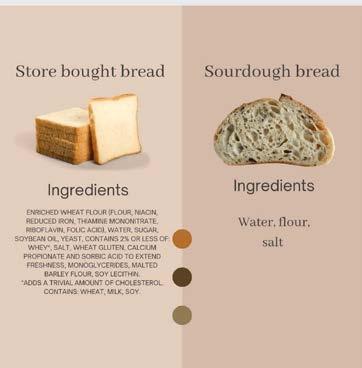
2. It’s healthier than store-bought bread.
Sourdough is more than just food; it’s an art form blended with science and a complex, yet delicate, process that brings me joy and peace. With just three ingredients—flour, water, and salt—there are thousands of possible combinations by tweaking feeding ratios, fermentation times, hydration levels, temperatures, or flour types. The possibilities are endless, and my drive to improve with every bake fuels my passion. It’s a never-ending competition with my own creativity, and seeing others enjoy my creations adds to the joy.
Sourdough’s fermentation makes it easier to digest, aligning with a growing movement toward simpler, healthier diets. For thousands of years, bread was naturally leavened with wild yeast and bacteria. Today, many store-bought breads contain additives like processed oils, sugars, dough conditioners, and preservatives—some even banned in other countries. It’s no surprise that many gluten-intolerant customers tell me they can enjoy my bread without issues!
Q: What were some of the biggest challenges you faced when turning your home baking into a licensed cottage food operation, and how did you overcome them?
A: Turning my home kitchen into a licensed cottage bakery was a steep learning curve. I spent countless hours researching recipes, sourcing high-quality ingredients, upgrading equipment, and carving out a dedicated baking space. It took over a year to get everything right — and the process taught me patience! I even had to train our family dog, Buddy, to stay out of the new bakery space. His company was super sweet, but the risk of his fur flying around wasn’t. With persistence and support from my family, I navigated these hurdles to create a perfect environment where I could bake that has exceeded even my own expectations.
Q: How do you balance baking, running a business, and family life — and what’s your secret to staying sane when it all gets busy?
A: Staying very active keeps me grounded. I walk constantly, play pickleball regularly, and rarely sit still. Movement clears my mind from the chaos of dough and business demands. With my adult children transitioning to independence, I’ve gained more mental space to focus on sourdough, which also helps me juggle everything while staying sane.
Q: How has our local community responded to Susie’s Sourdough, and what role do your customers play in your success?
A: The community’s support has been incredible. Neighbors, friends, and their networks were key to launching my products. At a week-long event at my daughter’s school, I sold out of Sourdough Bâtards and Cinnamon Rolls daily, sparking a surge in orders and subscriptions. My customers’ kindness in spreading the word has been vital to my steady growth.
Q: What's next for Susie’s Sourdough — are there new products, events, or goals on the horizon?
A: I’m always experimenting. Some ideas flop, but others shine — it’s all trial and error. Recently, I added a delicious Sourdough Shokupan (Japanese Milk Bread) to my offerings based on a customer’s request and I’m planning on adding even more variety, including seasonal items like Sourdough Cinnamon Rolls for the holidays. My goal is to keep spreading love and joy through my baking while connecting with the community.
Q: What advice would you give to other moms who dream of starting their own cottage food operation from home?
A: Don’t overthink it — just start! Your mind can be your biggest obstacle. If I can do it, so can you. Focus on mastering a single item that you enjoy making the most before adding other products. Then, build a solid business plan — my husband’s MBA helped me there. If you have young kids and work from home, though, consider waiting; the flour and salt will still be there when the time is right.
Finally, how can customers find you?
Please visit www.susiessourdough.com to schedule a porch pickup on Wednesdays or Saturdays, 10 AM – 4 PM. often offer free samples on those days, so drop by! Contact me at info@susiessourdough.com to let me know you’re coming.
I’d also like readers to know that every loaf I bake is made with love and care — because to me, it’s not just about food, it’s how I was designed to connect with my family and community.
Moms who write
You’ve been carrying a story in your heart for years — maybe it’s a novel, a children’s book, a travel blog, or a memoir. Perhaps you’ve thought, “One day I’ll write it.” Here’s the truth: that day can be today. Writing from home is possible, fulfilling, and yes, it can even become a career. You don’t need perfect circumstances — you just need the courage to start. Here are 10 tips to help you launch your writing journey with confidence and joy.
1. OWN YOUR IDENTITY AS A WRITER
You don’t have to be published to call yourself a writer. If you write — even a little each day — you’re already one. Claim the title and let it fuel your commitment.
2. START SMALL, DREAM BIG
Begin with short projects like blog posts, essays, or journal entries. These small wins build your confidence and skill while keeping your bigger book ideas simmering.
3. MAKE WRITING TIME SACRED
Block out regular writing time — even 20–30 minutes a day — and treat it like a non-negotiable appointment. Early mornings, nap times, or evenings can all work if you protect the space.
4. CREATE YOUR WRITING CORNER
A cozy corner with your laptop, a notebook, and a favorite mug can inspire more than you think. Surround yourself with things that spark creativity.
5. WRITE FIRST, EDIT LATER
Don’t let perfectionism stall you. Get your words down and let them be messy — editing is where the magic happens.
6. EXPLORE DIFFERENT AVENUES
Writing isn’t just books. Consider travel writing, parenting blogs, local magazine articles, or children’s stories. Each genre teaches you something new and opens doors to more opportunities.
7. READ WIDELY AND OFTEN
The best writers are great readers. Read in your chosen genre and beyond to understand pacing, voice, and structure.
8. JOIN A WRITING COMMUNITY
Whether it’s an online group, a local workshop, or a moms’ writing circle, connecting with other writers keeps you motivated and accountable. We belong to an active community of self-publishers. If you’re interested in knowing more about the community we belong to, just drop us a note at either Mary@MomsTown.com or Heather@MomsTown.com and put “Writing Community” in the subject line.
10 TIPS TO LAUNCH YOUR WRITING CAREER FROM HOME
9. LEARN THE PUBLISHING PATHS
Today’s writers have options: self-publishing, traditional publishing, and hybrid models. Research what fits your goals and budget. Platforms like Amazon KDP make self-publishing accessible from your kitchen table.
10. CELEBRATE EVERY MILESTONE
Finishing a chapter, hitting a word count, or sending your first submission — each step forward is a victory. Treat yourself for showing up to the page.
Remember: Writing doesn’t require perfect quiet or endless hours. It’s built in small, consistent moments where you choose to create instead of waiting for inspiration to strike. Your voice, your perspective, and your stories matter.
So— write the book you’ve been carrying.
Share your thoughts in a blog.
Capture the magic of travel in words.
Spin a children’s tale that will make bedtime magical.
Most of all, have fun. The joy of writing is in the doing, and the world is ready to hear what you have to say.
LAYING THE FOUNDATION for writing
Learning to write is one of the defining milestones of early childhood, but it doesn’t happen all at once. Children build writing skills over time, from indecipherable scribbles to writing letters and words. While children progress at their own pace, families can help foster early writing development.
Dr. Lauren Loquasto, senior vice president and chief academic officer at The Goddard School, and Dr. Sonia Cabell, professor of reading education at Florida State University and member of The Goddard School’s Educational Advisory Board, provide this insight and guidance for families.
EARLY WRITING MILESTONES
Writing begins in early toddlerhood, around 18-24 months. The earliest developmental milestone is when children scribble on paper with a crayon.
By 2-3 years old, children often draw shapes and narrate their writing. Parents should show genuine interest to help build confidence and interest. Ask your children to read what they write, as this helps make the connection that marks on paper represent thoughts and ideas. It’s not expected for children younger than 3 to write identifiable letters. Instead, encourage them to make marks on paper without constraint, allowing them to freely express themselves.
Around ages 3-5, children begin to move from writing (making marks) to handwriting, which is the formalized motion of making numerals and letters in recognizable forms. It’s vital for parents to value their children’s writing no matter what appears on the paper and provide opportunities for them to regularly engage in writing. Children at this age tend to write letters in different ways. It’s common, for example, for letters to appear backwards or from right to left. These are not causes for concern; this is a natural part of the development process.
WRITING SUPPORTS READING (AND VICE VERSA)
Reading and writing skills develop in tandem, reinforcing each other. Through writing, children experiment with how written language works, learning English moves from left to right and top to bottom. By estimating spelling – using their knowledge of letter shapes and sounds to attempt to write words – they are beginning to break the code of reading. Moreover, when children are composing stories, they are supporting comprehension and oral language growth, which are critical for reading development.
ENCOURAGE WRITING AT HOME
Make writing part of everyday life. While ensuring paper and writing utensils are accessible is a start, materials alone won’t spontaneously create writing experiences. Children naturally want to engage with things they see, so parents and older siblings should serve as writing models. For example, when writing a grocery list, ask your children to write their own lists. When you’re writing a thank-you note, have them write their own.
The development of fine motor skills is also essential. One way to do this is provide tools like chopsticks or tongs that require them to use their forefinger and thumb in a pinching motion; this strengthens the hand muscles that are used to write. Also encourage play with small toys like blocks or beads that engage the hands in different ways. As fine motor skills improve, it becomes easier to grip writing utensils and write for extended periods.
WRITING TOOLS
From apps to workbooks, countless tools and resources tout their ability to help children learn to write. Be wary. Typing on a tablet or computer is no substitute for learning to write by hand. Multiple studies have shown that writing – not typing – better promotes cognitive and literacy development.
Avoid activities like workbooks that require repetitive writing of letters over and over, as this inhibits creativity and experimentation. These activities can cause children to fear making mistakes, which can lead to anxiety, frustration and a loss of interest. The best tools are often the simplest: a small writing utensil (not big or bulky; children have small hands and need appropriately sized utensils) and a blank piece of paper.
Remember, children develop at their own pace. Provide encouragement and focus on effort, not perfection.
To watch a writing webinar featuring Loquasto and Cabell and access additional parenting resources, visit the Parent Resource Center at GoddardSchool.com
Gratitude is more than just good manners — it’s a mindset that can shape how kids see the world. When children learn to appreciate what they have, they grow up more resilient, empathetic, and optimistic. And while gratitude may feel like something that “just happens” around Thanksgiving, it’s really a year-round skill that’s best taught in small, everyday moments.
1. LEAD BY EXAMPLE
Kids learn most by watching the adults in their lives. Make gratitude a habit in your own daily routine — whether it’s saying “thank you” to the barista, telling your spouse you appreciate dinner, or mentioning one good thing that happened in your day. When children see gratitude in action, they naturally mirror it.
2. CREATE A GRATITUDE RITUAL
Build a small moment of thankfulness into your family’s routine. This could be sharing one thing you’re grateful for at dinner, keeping a family gratitude jar where everyone drops in notes, or having a quick “gratitude moment” before bedtime. Consistency makes it stick.
3. USE THE “WHY” BEHIND THANKS
Encourage kids to go beyond a quick “thank you” by explaining why they’re thankful. Instead of just saying, “Thanks for helping me,” they might say, “Thanks for helping me with my homework because it made it easier to understand.” This deepens the connection between action and appreciation.
4. ENCOURAGE GIVING BACK
Gratitude grows when kids experience the joy of giving. Look for age-appropriate ways they can help others — donating toys they’ve outgrown, baking cookies for a neighbor, or helping pack food at a local drive. Acts of service help kids understand that kindness flows both ways.
5. SPOT THE EVERYDAY BLESSINGS
Teach kids to notice the small joys — a sunny day after rain, a friend sharing a snack, a family pet snuggling beside them. Pointing out these moments builds an awareness that gratitude isn’t just for big events or gifts; it’s for the little things that make life sweeter.
Raising grateful kids doesn’t mean they’ll never have moments of wanting more — that’s natural. But with steady guidance and practice, they’ll develop an outlook that helps them navigate life with appreciation rather than entitlement. And that’s a gift that will serve them well long after childhood.
TEACHING KIDS GRATITUDE
everyday ways to raise thankful hearts
There’s something magical about fall — the crisp air, the rich colors, the scent of cinnamon and apples drifting through the house. It’s a season that invites slowing down, spending time together, and making memories that last long after the leaves have fallen. Whether your family loves outdoor adventures, cozy indoor activities, or a mix of both, here’s your ultimate fall bucket list to enjoy every moment.
1. VISIT A PUMPKIN PATCH
Pick pumpkins right from the vine, snap family photos, and enjoy hayrides or corn mazes while you’re there.
2. HOST A BACKYARD BONFIRE
Roast marshmallows, make s’mores, and tell stories under the stars. Bonus: Bring out cozy blankets and mugs of hot cider.
3. GO ON A LEAF HUNT
Take a neighborhood walk to collect colorful leaves, then use them for crafts or press them into a scrapbook.
4. BAKE A FALL DESSERT TOGETHER
Try apple pie, pumpkin bread, or cinnamon rolls — the house will smell amazing, and the kids will love helping.
5. HAVE A COZY MOVIE NIGHT
Pick a family favorite, make popcorn, and add blankets and pillows for a snuggly night in.
6. EXPLORE A LOCAL FARMERS MARKET
Find seasonal produce like squash, apples, and pears, and let the kids choose something new to try.
7. TAKE A SCENIC DRIVE
Look for areas with fall foliage and plan a day trip to enjoy the view (and maybe stop for pie on the way home).
8. MAKE HOMEMADE CARAMEL APPLES
Get creative with toppings — crushed cookies, mini chocolate chips, or drizzle with white chocolate.
9. VISIT A FALL FESTIVAL
Many towns host festivals with crafts, food trucks, music, and kidfriendly activities.
10. DECORATE THE PORCH
Let the kids help arrange pumpkins, mums, and a fall wreath for a festive welcome.
11. TRY A NEW SOUP RECIPE
A pot of butternut squash or chicken noodle soup makes for a perfect family dinner on a chilly night.
12. HAVE A PAJAMA DAY
Pick a rainy weekend morning to stay in PJs, eat pancakes, and play board games.
13. GO APPLE PICKING
Find a local orchard and fill a basket — then bake something delicious together.
14. DO A FAMILY VOLUNTEER PROJECT
Rake leaves for an elderly neighbor or collect canned goods for a local food bank.
15. PLAN A NATURE HIKE
Bring a thermos of cocoa and see what wildlife you can spot.
16. CREATE A GRATITUDE TREE
Write what you’re thankful for on paper leaves and hang them on a branch displayed in a vase.
17. WATCH A HIGH SCHOOL FOOTBALL GAME
Bundle up, cheer loudly, and enjoy the community spirit.
18. TRY A NEW CRAFT
Make pinecone bird feeders, painted pumpkins, or homemade candles.
19. HOST A CHILI COOK-OFF
Invite friends or family, make a few batches of chili, and vote on the favorite.
20. END THE SEASON WITH A PHOTO ALBUM
Print your favorite fall photos and make an album to remember the season.
This year, let your family’s fall bucket list be about more than checking off activities — make it a celebration of connection, gratitude, and the simple joy of being together. Whether you do all twenty or just a few, you’ll create moments your family will cherish for years to come.
R EDUCING YOUR HOME'S VULNERABILITIES to wildfire
Don’t wait for smoke on the horizon to prepare for a wildfire. While hot temperatures, dry conditions and strong winds increase wildfire threat, taking small manageable steps – like creating a noncombustible 5-foot buffer around your home – can significantly reduce its risk of ember ignition.
As fiery bits of debris, embers can travel miles ahead of the main fire front and often find vulnerable areas, including roofs; vegetation; landscaping; wood, wicker or plastic furniture; dried leaves; and other yard debris, making them the No. 1 reason homes ignite during wildfires.
To help homeowners take the guesswork out of wildfire prep and protect what matters most, experts at the Insurance Institute for Business & Home Safety (IBHS) developed science-based guidance to reduce your home’s vulnerability and risk of ignition.
CHECK AND MAINTAIN YOUR ROOF
More than 90% of U.S. homes already have a Class A fire-resistantrated roof. However, if your roof is made of wood or other non-rated materials, replace it with a Class A roof to reduce fire risk. Also, regularly clear the roof of leaves, needles and other debris.
In addition, replace plastic or PVC gutters with noncombustible metal options, such as aluminum or steel, and regularly clear gutters and downspouts of all vegetative debris, which can provide fuel for embers to land on and ignite. When ignited, this debris could expose the fascia, roof and attic to flames.
ESTABLISH
A CRITICAL 0-5-FOOT
NONCOMBUSTIBLE ZONE
From the curb to just a few steps from the front door, lush lawn, native plants and healthy trees are part of a wildfire-prepared yard. However, the area closest to your home, a 5-foot buffer, often called “Zone Zero,” is key to keeping embers at bay without any material in this area to ignite.
In fact, a study from IBHS and ZestyAI found property owners who clear vegetation from the perimeter of their home can nearly double the likelihood of it surviving a wildfire.
This doesn’t mean you need to leave this area barren; in fact, a wildfire-prepared landscape is beautiful, green and safe.
Design your yard with healthy trees, plants and grass up to the last few steps to your home. In the last 5 feet, top landscape pavers or river rocks with ceramic flowerpots or noncombustible planters that can easily be moved on Red Flag days – which indicate weather conditions are optimal for wildfire spread – for a beautiful setting that also acts as a fire-resistant buffer. Trees overhanging the zone can serve as a connective path for fire to travel from the yard to the house. Trim them to prevent this risk as well as reduce debris accumulation on the roof, gutters and at the base of exterior walls.
Don’t forget to give the same care to your backyard. Just like looking in from the front curb, native landscaping, including trees and plants, as
well as privacy fences, can extend all the way up to just a few steps from the back of your home. In the 5-foot area nearest your home, create an outdoor living space with hardscaping and add patio furniture, planters and other decor – choosing materials like ceramics and wrought iron that won’t burn.
PROTECT EXTERIOR FEATURES
Vents are weak points where embers can enter your home or build up and ignite materials inside. Install flame- and ember-resistant vents or retrofit existing vents – including attic, soffits, wall and crawlspace vents as well as roof openings – with 1/8-inch, corrosion-resistant metal mesh. Also ensure dryer vents have functional louvers or a self-closing flap to block embers.
Looking around your yard where blowing leaves gather is a good way to visualize the places embers can collect like at the base of a home’s exterior walls. Ensure at least 6 inches of vertical, noncombustible material at ground level (and above decks or patios) below your siding to prevent ember ignition. Materials can include exposed concrete foundation, fibercement siding, brick, stone, stucco or metal flashing.
No longer just a threat for western states, these mitigations can reduce wildfire risk in communities across the country. Homeowners in certain states can use this system of mitigation actions to receive a Wildfire Prepared Home designation.
Find more wildfire mitigation guidance by visiting wildfireprepared.org
STEPS FOR MAINTAINING
and hot water heater, vaulted ceilings, a double sided fireplace, additional built-ins, an oversized two-car garage and a quiet location within the highly sought-after Windsor Rose neighborhood—without the burden of HOA fees. Watch your mailbox for an invitation to the Launch Party of this stunning
A clean stove is not just about aesthetics; it’s also about functionality and safety. Grease and food residue can become a fire hazard and affect the taste and quality of your food if not properly managed.
Regular maintenance is key to keeping your stovetop sparkling. After each use, wipe down the surface to prevent grime buildup. Then periodically – once a week, if possible – give it a more thorough cleaning with this step-by-step guide.
1. Ensure your stove is off and completely cooled before cleaning to avoid damage to the stove and cleaning tools.
2. For gas stoves, carefully remove the grates, burners and drip pans and soak them in warm, soapy water.
3. Use a soft cloth or sponge to wipe down the surface and remove food particles and loose debris.
4. Apply a mild, non-abrasive stove cleaner — either commercial or a DIY solution consisting of water and baking soda, vinegar or soap – generously to the surface.
5. Use a non-abrasive scrubber or soft cloth to gently scrub the surface. For tougher spots, sprinkle baking soda then spray with vinegar. Let it fizz and sit for a few minutes before scrubbing.
NO GRILL
a clean stovetop no
Tailgating season is in full swing, but not everyone has time (or space) to fire up a grill before kickoff. Whether you’re hosting friends in your driveway, tailgating without a truck or trying to simplify game-day prep, you’re not alone.
According to Paul Zahn, entertaining expert, fall is the perfect time to rethink the traditional tailgate menu.
“You don’t need a grill to impress your guests — you just need the right mix of crowd-pleasers, portability and no-fuss presentation,” Zahn says. “It’s all about creating a vibe that feels fun and elevated, without requiring hours in the kitchen.”
The makers of Hormel Gatherings products — known for their ready-to-serve party trays loaded with premium meats, cheeses and crackers — tapped Zahn to share his five go-to tips for building a no-cook tailgate spread that scores big.
1. Lean Into Local Favorites
“I love anchoring my events with a theme and what better way to celebrate your team than creating food and drinks that pay homage to them and their states,” Zahn said. “I’m talking hometown eats with a twist.”
For instance, Virginia ham fans can stack mild cheddar and honey ham between two crispy crackers, hit it with mustard and boom: instant ham-andcheese bite. Bonus points for pairing with a local brew.
2. Make It Portable and Shareable
“No one wants to juggle a plate and a beer,” Zahn says. “Think grab-and-go.”
He loads up Hormel Gatherings trays and gets creative: caprese skewers with tomato, basil, mozzarella and salami, or “jar-cuterie” — mini jars layered with meats, cheeses and crackers. It’s a creative way to serve charcuterie without the mess, and guests love the grab-and-go convenience.
3. Sweeten the Deal
“A sweet treat always buttons up your tailgating fun so dessert is a must-have,” says Zahn, “but keep it bite-size.”
His go-to is mini doughnuts in football-themed cups with whipped cream and team-colored sprinkles. Or go seasonal with apple cider doughnuts, pumpkin cookies or mini pies.
6. Wipe down the surface again with a clean, damp cloth to remove any residue.
7. Dry the stovetop thoroughly with a soft cloth.
Find more tips and tricks for keeping your home neat and tidy at eLivingtoday.com
4. Don’t Forget the Bevs “I love creating signature cocktails for events but no one wants to be mixing and muddling drinks when tailgating with friends,” Zahn says. “Make your cocktails the night before so you can actually enjoy the party.”
He preps mason jars of team-themed drinks (a Bloody Mary if your colors are red and black) and loads them in a cooler with sparkling waters, canned cocktails and local beers.
5. Go Big on Chips and Dips
“Dips are a no-cook crowd-pleaser, and they’re perfect for tailgating,” Zahn says.
He serves guac, hummus and buffalo ranch with tortilla chips, pretzels and veggie sticks in single-serve disposable cups — no double-dipping, no mess.
Tailgating without a grill doesn’t mean compromising on flavor or fun. With the right no-cook lineup — and a few strategic shortcuts anyone can host a winning party this season.
For more ideas, visit HormelGatherings.com
STRESS LESS, SNACK SMARTER this back-to-school season
If back-to-school season feels more overwhelming than exciting, you’re not alone. Between adjusting schedules, planning meals and organizing school supplies, it’s easy for families to feel the pressure this time of year.
With the right strategies and simple routines, you can reduce the chaos and make it a smoother, healthier experience for the whole family.
These registered dietitian-approved ideas can help!
SET THE TONE WITH A FAST & EASY BREAKFAST Getting kids motivated in the morning is no small task. Start the day with upbeat, energizing music and a nourishing meal like Breakfast Taquitos paired with Yo Quiero’s Grab & Go Guacamole, Bean Dip and Salsa, to help kids focus and make the morning routine feel more like a dance party.
SKIP THE SANDWICH AT LUNCHTIME If your kids are tired of sandwiches — and you’re tired of wasting time on food that comes back half-eaten — try a quick and easy option that balances fiber, protein and good-for-you carbs like these Ham, Cheese and Apple Wraps made with JAZZ Apples.
END THE LUNCHBOX
STRUGGLE Use colorful bento boxes to keep packed lunches organized and visually appealing. Use blueberries from Consalo Family Farms to create Blueberry Gummy Snacks a better-for-you alternative to packaged treats that you won’t find left untouched at the bottom of lunchboxes.
CHANGE THE SNACKING GAME WITH DIPS While many a baby carrot and celery stick has found its way home from school lunchboxes untouched, adding Mini Cucumber Veggie Dips featuring Nature Fresh Farms Lil’ Chills Mini Cucumbers to afterschool snack trays can make all the difference.
PREVENT THE AFTER-SCHOOL MELTDOWN WITH SMART
SNACKS School days are long, and kids often come home hungry. Keep them satisfied and stable by setting out an After School Snack Board featuring Sunset Sprinkles Snacking Tomatoes, cheese cubes, fruit and whole-grain crackers.
STOCK UP ON CONVENIENT SNACKS Snacks that don’t require peeling, chopping or anything resembling effort like single-serve, Grab-and-Go Snacks from Del Monte, which come in flavors including Mixed Fruit, Mango Pineapple and Cherry Mixed Fruit, make it easy to choose something healthy without the drama.
CAPTURE AN EASY
WEEKNIGHT WIN You don’t need to spend an hour cooking dinner to get something satisfying on the table. Weeknights are hectic, so focus on go-to meals that are fast, flavorful and kid-approved like these Barbecue Cheeseburger Folded Quesadillas featuring caramelized Shuman Farms Vidalia Onions
TRY A HEALTHY EVENING
TREAT Kids want something sweet after dinner, but many traditional desserts are loaded with added sugars. These Mandarin Popsicles made with Bee Sweet Citrus Mandarins are a fun way to satisfy that craving while sneaking in fruit.
Together, these health-conscious brands are backing the Healthy Family Project back-to-school campaign with a shared goal: inspire better habits and give back where it counts. Through a collective donation to the Foundation for Fresh Produce’s K-12 programs, they’re helping support nutrition education in schools across the country. Because when fresh thinking meets real collaboration, families win.
Visit HealthyFamilyProject.com to find more recipes that help families pack healthier lunchboxes, fuel busy afternoons and make more produce a part of everyday life.
EVERY DAY WAYS TO KEEP
brain sharp
Staying in shape goes beyond physical fitness – keeping your brain health top of mind is crucial for your overall well-being, too. To sharpen your mind, consider these everyday ways for prioritizing brain health.
To help homeowners take the guesswork out of wildfire prep and protect what matters most, experts at the Insurance Institute for Business & Home Safety (IBHS) developed science-based guidance to reduce your home’s vulnerability and risk of ignition.
STIMULATE YOUR MIND
While “exercising” typically refers to running, walking or biking, remember you can give your brain a workout as well. Provide a boost for your brain with easy and enjoyable activities like reading, puzzles, math games like sudoku or artistic challenges such as drawing or crafting.
EAT HEALTHY FOODS
Establishing a strong foundation for brain health can start in the kitchen by preparing healthy foods. Adding whole grains, fish, legumes, healthy fats and fruits and vegetables, including grapes and leafy greens, can encourage better brain wellness.
Research suggests grapes help maintain a healthy brain. UCLA researchers, in a human study of elderly subjects with mild cognitive decline, found consuming 2 1/4 cups of grapes every day preserved healthy metabolic activity in regions of the brain associated with early-stage Alzheimer’s disease.
This Walnut Sunflower-Crusted Salmon with Honey-Lemon Grapes is a flavor-packed way to add California grapes to the menu while simultaneously supporting brain and heart health. Salmon, rich in omega-3s, is topped with a crunchy walnut-sunflower seed crust for a savory, nutty bite. Pair with juicy grapes and onions marinated in honey and lemon for a burst of sweetness and tang to balance the rich salmon in this nutritious meal.
PRIORITIZE MENTAL HEALTH
Reducing anxiety may be easier said than done, but it starts with healthy everyday habits. Practice mindfulness by meditating or simply turning off distractions like social media. Get outside for fresh air or find a hobby you enjoy. Join a support group, reach out to loved ones and, if you feel you’re experiencing negative mental health systems, talk with a mental health professional.
EXERCISE REGULARLY
Reducing anxiety may be easier said than done, but it starts with healthy everyday habits. Practice mindfulness by meditating or simply turning off distractions like social media. Get outside for fresh air or find a hobby you enjoy. Join a support group, reach out to loved ones and, if you feel you’re experiencing negative mental health systems, talk with a mental health professional.
Find more information on the connection between grapes and heart health, and discover more nutritious recipes, by visiting GrapesfromCalifornia.com
HONEY-LEMON MARINATED GRAPES
2 tablespoons extra-virgin olive oil
3 tablespoons lemon juice
1 tablespoon honey
1 tablespoon fresh basil
1/4 teaspoon sea salt
freshly ground pepper, to taste
3 cups halved red Grapes from California
1/2 cup thinly sliced red onion
1 small handful arugula
SALMON
3/4 cup walnuts, chopped
2 tablespoons roasted, unsalted sunflower seeds
2 teaspoons honey
2 teaspoons spicy brown or Dijon mustard
1/4 teaspoon sea salt
4 salmon fillets (6 ounces each)
Heat oven to 350 F and line baking sheet with parchment paper or lightly oiled foil.
To make honey-lemon marinated grapes: In medium bowl, whisk oil, lemon juice, honey, basil, salt and pepper, to taste. Stir in grapes, onion and arugula; set aside.
To prepare salmon: In small bowl, stir walnuts, sunflower seeds, honey, mustard and salt until thick paste forms.
Place salmon on prepared baking sheet, skin side down, and press equal amounts walnut mixture over surface of each. Bake 20 minutes, or until salmon flakes easily with fork.
Set salmon on plates; using slotted spoon, spoon marinated grape and onion mixture over salmon and around plates.
Nutritional information per serving (this recipe makes 4 servings): 640 calories; 39 g protein; 31 g carbohydrates; 41 g fat (58% calories from fat); 7 g saturated fat (10% calories from saturated fat); 95 mg cholesterol; 390 mg sodium; 3 g fiber.
ANSWERS TO YOUR dinnertime dilemmas!
Rescue your loved ones from a dinner rut with a simple solution that answers “what’s for dinner” with an exciting, flavorful meal. These Lasagna Rollups require just one pan, making both cooking and cleanup a breeze on busy weeknights.
To mix it up even further, try adding spinach or mushrooms, swapping out ricotta for cottage cheese or any number of personal preferences.
per serving)
8 lasagna noodles
1 pound hamburger meat
1 tablespoon garlic powder
1 tablespoon onion powder
15 ounces ricotta cheese
1 teaspoon rosemary (optional)
1 jar marinara sauce
2 cups mozzarella cheese, divided
In pot, boil noodles according to package instructions. Drain under cold water and set aside.
In same pot, brown hamburger meat then add garlic powder and onion powder. Mix in ricotta cheese; rosemary, if desired; marinara sauce; and 1 cup mozzarella cheese.
Heat oven to 350 F.
Line baking dish with layer of hamburger sauce. Line cooled noodles on cutting board or parchment paper. Add hamburger sauce to each noodle and roll. Place lasagna rollups, seam sides down, in dish. Cover with remaining hamburger sauce and sprinkle with remaining mozzarella cheese.
Bake 20 minutes.
Turn hectic weeknights into simple, enjoyable evenings at the dinner table with a secret weapon: rotisserie chicken. Versatile, delicious and likely to leave leftovers for later in the week, it’s a perfect solution for Rotisserie Chicken Ravioli to keep your loved ones on schedule during the school year. Find more family dinner ideas from Cookin’ Savvy at Culinary.net.
1 package (25 ounces) cheese ravioli
1 rotisserie chicken or leftover chicken
1 head broccoli
1 tablespoon garlic powder
1 tablespoon onion powder
1-2 cups chicken broth
1 jar alfredo sauce
Cook ravioli according to package instructions and set aside.
Cut up rotisserie chicken, using as much as desired. Cut broccoli into bitesize pieces or smaller.
In pan over medium heat, heat chicken through. Add garlic powder and onion powder. Deglaze pan with 1 cup chicken broth then add alfredo sauce and broccoli.
Pour in remaining broth if sauce is too thick. Stir in cooked ravioli and heat through 2-3 minutes.
Bake 20 minutes.
Fall in San Diego County can deliver a lot of hot days and there are still plenty of moments that are cause for celebration and get togethers with family and friends. For your family, however, perhaps the best memories of the closing days of summer are those casual times spent together enjoying cool, creamy treats.
Whisk strawberry kefir, oats, chia seeds, beetroot powder, vanilla and maple syrup until smooth. Allow to sit 5 minutes then whisk again to prevent clumps.
Refrigerate at least 2 hours, or overnight.
Top with sliced strawberries, walnuts, nut butter or favorite toppings.
ice pop sticks
1 container (16 ounces) Maple Hill Vanilla Greek Yogurt
1/2 cup sprinkles
Line baking sheet with parchment paper.
Line halved bananas on prepared sheet. Slide ice pop stick into each banana halve.
Pour Greek yogurt into medium bowl and mix until creamy. Dip each banana into Greek yogurt until fully coated. Top with sprinkles.
Freeze 1-2 hours, or until Greek yogurt hardens.
Stun your family and guests with a delicious dessert that’s as easy to make as it is to eat. This no-bake French-Style Cheesecake with Strawberries from Cookin’ Savvy is a perfect summer treat for sharing with your nearest and dearest, and you can swap out strawberries for any berry of choice to make it your own.
of
1 row vanilla cream cookies, plus additional for topping 1/2 stick butter, melted
2 cups chopped strawberries, plus additional for topping 1 tablespoon powdered sugar
Crush cookies and mix with melted butter. Place in bottom of 9-inch springform pan and pat down until smooth.
With hand mixer, mix cream cheese and 1 cup powdered sugar. In separate bowl, using hand mixer, beat heavy whipping cream, sugar and vanilla until formed into whipped cream.
Mix cream cheese and whipped cream. Mix remaining powdered sugar with chopped strawberries.
Pour half cream cheese mixture on top of crust in prepared pan. Spread evenly with spoon. Pour strawberry mixture on top and spread evenly with spoon. Top with remaining cream cheese mixture and spread evenly with spoon.
Refrigerate at least 3 hours, or overnight, before serving. Garnish with additional crushed cookies and strawberries.
TIPS
For thicker crush, double cookies and butter. Substitute desired berries for strawberries.
Recipe courtesy of “Cookin’ Savvy” Servings: 4-6 (1 rollup
2 cups Maple Hill Strawberry Kefir
4-5 bananas, cut in half
Recipe courtesy of “Cookin’ Savvy” Servings: 4-6
Recipe courtesy
“Cookin’ Savvy”
CREATE A COZY OUTDOOR SPACE with a backyard firepit
A firepit can serve as a warm and inviting backyard retreat, perfect for roasting marshmallows for s’mores or stargazing while wrapped in cozy blankets. Before you can share time around the firepit with loved ones, however, consider these tips to elevate your outdoor space.
CHOOSING THE RIGHT DESIGN
When it comes to building a DIY firepit, the design you choose can significantly impact the aesthetics and functionality. From classic stone pits to modern metal designs, the options are nearly endless. Think about the size and shape as well. Circular designs are traditional and encourage conversation while square or rectangular pits offer a more contemporary look.
GATHERING MATERIALS AND TOOLS
Essential materials include bricks, stones or metal parts for the structure, as well as gravel or sand for the base. Fireproof materials are a must to ensure safety and longevity. You’ll also need tools such as a shovel for digging the base, a level to ensure even construction and adhesive or mortar for binding materials together. Depending on your design, you may require a metal fire ring, grill grate or mesh cover.
KEEPING SAFETY IN MIND
Safety should be your top priority when building and using a backyard firepit. Always place your firepit at least 10 feet away from any structures, trees or flammable materials. Make sure the area is clear of dry leaves and other debris that could catch fire. Consider installing a spark screen to prevent embers from escaping and always keep a bucket of water or fire extinguisher nearby.
ENHANCING AMBIANCE WITH SEATING AND LIGHTING
Creating a cozy atmosphere around your firepit involves more than just the fire itself. Comfortable seating is essential for making your outdoor space inviting. Choose weather-resistant chairs, benches or DIY log stools arranged in a circle to foster conversation. Ambient lighting from string lights, lanterns or solar-powered path lights can elevate the mood and extend the usability of your firepit into the evening. Consider adding citronella candles or torches to keep insects at bay while enhancing the ambiance.
Visit eLivingtoday.com to find more ideas to enhance your living spaces.
5 TIPS TO HELP ANXIOUS DOGS find their calm
Just like humans, pets experience anxiety due to various triggers such as loud noises, changes in their environment or separation from their owners. Understanding the root cause of your pet’s anxiety is the first step in coping.
Common signs of anxiety in pets include excessive barking, destructive behavior, pacing and restlessness — especially when experiencing separation or environmental stress. By recognizing these signs early, pet parents can take proactive steps — including these ideas from Oh Norman!, the pet wellness brand co-founded by “Big Bang Theory” actress and animal advocate Kaley Cuoco — to help their furry friends overcome anxiety and live calmer, happier lives.
PRACTICE DESENSITIZATION TRAINING
Desensitization training involves exposing your pet to anxiety-inducing stimuli in a controlled (and gradual) manner. Start with short departures if your pet experiences separation anxiety and gradually increase the length of time you’re away to help your pet become more comfortable being alone. Pairing these departures with positive reinforcement, like treats or favorite toys, can help create a positive association.
HARNESS THE POWER OF FAMILIAR SCENTS
In your absence, leaving behind a worn t-shirt or blanket that smells like you can be soothing for anxious pets. A familiar scent can provide a sense of security and reassurance, reducing anxiety levels.
CONSIDER SCIENCE-BACKED, VET APPROVED SUPPLEMENTS
For pets needing extra support, science-backed supplements like Oh Norman’s Calm the Eff Down! can help anxious pups. The all-natural daily supplement — developed with board-certified veterinary specialists — combats stress from separation, vet visits, travel and fireworks.
“I love seeing my dogs get super excited, but sometimes they need to effing chill,” Cuoco says. “Having a vet-approved natural supplement that calms stressed-out dogs gives me peace of mind. only want to give my dogs something that is safe and effective, so Calm The Eff Down has been a game changer. I’m so proud of this product!”
In fact, the supplement has been shown to reduce activity in anxious dogs by almost 20%, according to data collected via Tractive, a leader in GPS tracking
and pet health insights, monitoring activity, sleep, barking and resting heart and respiratory patterns, signaling a step forward in addressing pet anxiety through nutrition and smart technology.
“We’ve always known Calm the Eff Down! makes a real difference for anxious dogs but seeing that impact measured in the data confirms our formula is making a measurable, positive change in dogs’ lives,” says Oh Norman! CEO Katie Hunt.
PROVIDE MENTAL STIMULATION
Regular mental stimulation can help reduce anxiety for some pets. Try introducing interactive toys, puzzle feeders and other engaging activities to keep your pet’s mind occupied and help prevent boredom-induced anxiety.
INCREASE PHYSICAL ACTIVITY
Exercise, such as daily walks or play sessions, helps release pentup energy and promotes relaxation. Prior to departing, give your pet some extra attention by playing a game of fetch in the backyard, spending some time at your local dog park or going for a walk on a new trail.
To find more pet health resources, visit ohnorman.com
ORGANIZING BEFORE THE HOLIDAYS clearing the way for joy
brought to you by MomsTown
The holiday season should feel like a time of joy, not chaos. Yet, for many moms, the months of November and December bring a whirlwind of decorating, shopping, cooking, and hosting — often layered on top of an already full schedule. The good news? A little intentional organization now can set the stage for a calmer, more joyful holiday season.
1. START WITH A CLEAN SWEEP
Begin by tackling the most lived-in areas of your home — the kitchen, family room, and entryway. These are the spaces that will see the most action when guests arrive or when the kids are home on break. Clear countertops, sort through mail piles, and donate or toss anything that’s been sitting out for too long. Even 15 minutes a day spent decluttering makes a difference.
2. EDIT SEASONAL DÉCOR
Before you pull out your holiday decorations, go through your fall items and decide what you love and what can be donated. The same goes for winter and holiday décor — if it no longer fits your style, takes up too much space, or hasn’t been used in years, let it go. Fewer items mean less to unpack, set up, and store later.
3. MAKE SPACE IN THE KITCHEN
A holiday-ready kitchen isn’t just about clean counters — it’s about functional storage. Take a weekend to go through your pantry and fridge. Toss expired items, group baking supplies together, and restock basics like flour, sugar, spices, and broth. This prep will save you from last-minute grocery store runs when you’re in the middle of baking cookies or hosting a dinner.
4. STREAMLINE YOUR CALENDAR
Pull out your planner or open your digital calendar and map out key dates — school performances, work parties, holiday markets, and family gatherings. Once you see everything in one place, you can make intentional choices about what to attend and where to say “no.” Protecting white space on your calendar is just as important as adding events.
5. PREP GUEST SPACES
If you’re hosting overnight guests, now is the time to refresh linens, clear closet space, and add small touches like extra toiletries or a bedside lamp. Doing this early keeps it stress-free and gives you time to replace or repair anything before visitors arrive.
By getting organized before the holiday season kicks in, you’ll not only reduce stress — you’ll create space for the moments that matter most: unhurried meals, cozy evenings, and the joy of being present with the people you love. This year, let your preparation be the gift you give yourself.
HOLIDAY PREP CHECKLIST
Clear the clutter now so you can enjoy the season later!
DECLUTTER MAIN SPACES
• Spend 15 minutes a day clearing counters, tables, and entryways.
• Donate or toss unused items.
EDIT SEASONAL DÉCOR
• Keep only what you love and use.
• Donate decorations that no longer fit your style.
• Write down school events, work parties, and gatherings.
• Choose what’s most meaningful to attend.
• Block “white space” for rest days.
REFRESH GUEST SPACES
• Wash linens and fluff pillows.
• Clear closet and drawer space.
• Add guest touches: toiletries, bedside lamp, water glass.
BONUS TIP:
Start early! Tackling one category a week makes holiday prep feel effortless — and leaves more time for joy.
THE ART OF COZY
brought to you by MomsTown
As the days grow shorter and the air turns crisp, our homes naturally become our favorite place to be. Fall is the season to slow down, savor the moment, and create a space that feels warm, inviting, and comforting — without a complete makeover or a big budget. With a few small changes, you can transform your home into a cozy retreat for you and your family.
1. LAYER IN WARM TEXTURES
Cozy is as much about how a space feels as how it looks. Add throw blankets to your sofa, drape a soft shawl over your favorite chair, and layer rugs for extra warmth underfoot. Swap out lightweight summer pillows for ones with chunky knits, faux fur, or velvet covers. These tactile touches instantly make a room feel snug and inviting.
2. LET THERE BE (SOFT) LIGHT
Lighting is key to creating atmosphere. Replace bright overhead bulbs with warm-toned LED or Edison bulbs, and add table lamps or floor lamps to create pools of soft light. Candlelight — real or batteryoperated — adds a gentle glow and a sense of calm. In the evenings, dimming the lights can signal to your body it’s time to unwind.
3. BRING NATURE INSIDE
Fall’s beauty doesn’t have to stay outdoors. Decorate with seasonal elements like small pumpkins, acorns, pinecones, or autumn leaves in vases. A simple bowl of fresh apples or a vase of sunflowers can add warmth and a pop of color to your space.
4. APPEAL TO THE SENSES
Cozy isn’t just visual — it’s sensory. Use essential oils or simmer pots with cinnamon, cloves, and orange peel to fill the air with comforting aromas. Keep a kettle handy for tea or hot cocoa, and choose playlists or background music that make you feel relaxed and happy.
5. CREATE COMFORT ZONES
Carve out small spots in your home that invite relaxation. It might be a reading nook by the window, a soft corner in the bedroom with a plush chair, or a basket stocked with puzzles and board games in the family room. These micro-spaces encourage slowing down and enjoying the moment.
Cozy isn’t about perfection — it’s about how your home makes you feel. By making a few small changes, you can turn your everyday spaces into havens of warmth, comfort, and connection. This fall, let your home wrap you in the simple pleasure of cozy living.
Here’s your Cozy Living Checklist in the same style as your “Organizing Before the Holidays” sidebar — perfect for a cut-out or pull-out box in MomsTown.
COZY LIVING CHECKLIST
Small changes for a big comfort boost at home
LAYER WARM TEXTURES
• Add throw blankets to sofas and chairs.
• Swap light pillows for chunky knits, faux fur, or velvet.
• Layer rugs for extra softness underfoot.
SOFTEN THE LIGHTING
• Use warm-toned LED or Edison bulbs.
• Add table and floor lamps for gentle light.
• Light candles (real or battery-operated) for ambiance.
BRING NATURE INSIDE
• Decorate with pumpkins, pinecones, and autumn leaves.
• Display a bowl of fresh apples or seasonal flowers.
ENGAGE THE SENSES
• Diffuse essential oils like cinnamon or clove.
• Try a stovetop simmer pot with orange peel and spices.
• Keep tea, cocoa, or apple cider ready for chilly evenings.
CREATE COMFORT ZONES
• Make a reading nook with a cozy chair and good lighting.
• Stock a basket with puzzles, games, or favorite books.
• Set up a soft corner for quiet time or family connection.
BONUS TIP:
Cozy isn’t about spending big it’s about layering comfort, light, and warmth so your home feels like a hug.