8 minute read
What Is Really Going on with Bees? Or


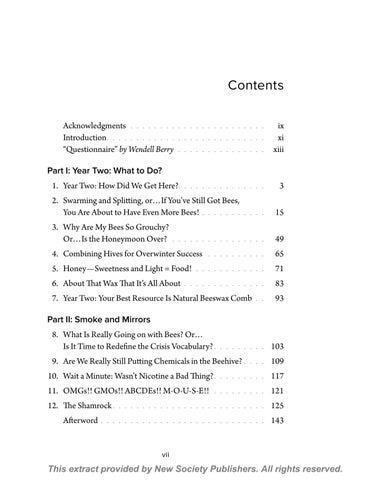
Figure 1.4. A fondant feeder must suspend the fondant where the bees can access it.
Credit: Christy Hemenway.
Figure 1.5. This fondant feeder supports the fondant with 1/2-inch hardware cloth.
Credit: Maury Hepner.

born in fall and are anatomically different so they can live through a cold winter but did very little foraging—are dying off pretty rapidly. New bees are being born. Nectar and pollen may or may not be scarce, thanks to whatever the weather is doing.
Welcome to April, known for being “the cruelest month in beekeeping.” How heartbreaking it can be to see bees in January, and in March perhaps, but then, thinking all is well, discover in April that the hive is dead. It’s entirely possible that a hive may overwinter, but then not overspring. (And yes, sometimes we make up words in beekeeping to get across what we mean...)
It’s likely that the new beekeeper is doing one of two things at this point: Either celebrating success or mourning a dead-out hive. Of course we would much rather see a thriving hive come through a cold winter with flying colors, but if this was your first winter, and you are mourning the loss of your first hive, fear not—all is not lost!
Consider where you were last spring, such a short time ago, with an empty top bar hive, waiting for your first bees. Today you have some precious things: a year’s worth of knowledge and experience; and something else—bars of naturally drawn beeswax honeycomb, wax that was made by bees, for bees. If you did not use any toxic treatments in your hive, then your natural wax comb is incredibly clean, containing only those environmental toxins that were brought in during the season by your foraging bees.
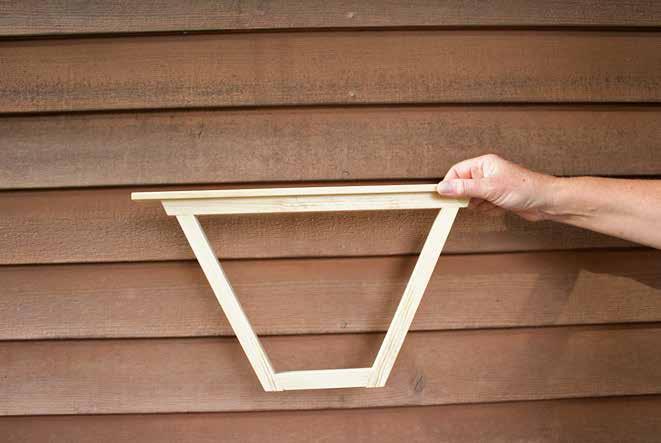
One of the most important things you can do in the way of letting bees act in accord with their natural systems is to leave the making of the wax entirely up to them. Commercially available wax foundation has been tested and found to be contaminated with the persistent pesticides and chemicals that were purposely introduced into the hive by beekeepers, and plastic foundation is, Figure 1.6. Foundation wax. Credit: Christy Hemenway.
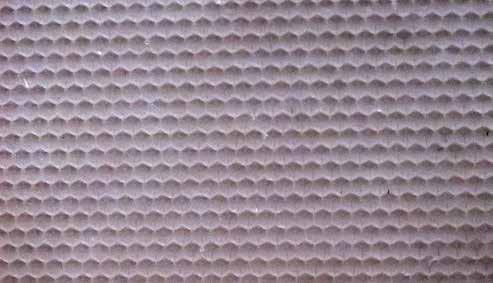
well, plastic. You’ve probably heard me say this before, but the truth bears repeating: For the bees, “It’s all about the wax.” Because wax building is resource-intensive for a new package of bees—and, of course, there are a million other variables and opportunities for failure in the first year of a top bar hive—it’s really worth appreciating just what your bees actually did accomplish, even if they did not overwinter. They left behind this precious gift of natural comb. So yes, let’s mourn the loss of your bees, but let’s also celebrate this new and very important resource. Let’s take a look at these two different scenarios and plot a path forward for this new season. If your hive succumbed to the stresses of winter, your next steps are fairly straightforward, even if somewhat uninspiring. They include cleaning dead bees out of the hive, Figure 1.7. Fresh white comb. Credit: Dana Gray. diagnosing any disease symptoms that might exist and resetting for new bees. Note that this task list does not include destroying the existing comb! You may be uncertain about the condition or cleanliness or safety of reusing the comb, since now it looks so much different than when it was first drawn by the bees. Fresh, white, beautiful honeycomb is a long way from dark brown brood comb that may even contain bee carcasses. So Figure 1.8. Freshly capped honeycomb. Credit: Christy Hemenway. what should it look like?


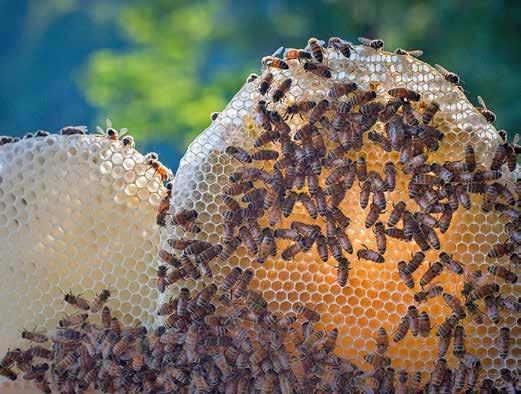
Beeswax comb starts out white, and it is very soft and extremely fragile. It has just been excreted fresh from the wax glands in your bees’ bellies. Over time, things happen that alter this ethereal beauty: the wax hardens, it oxidizes, it yellows, it turns brown. The bees walk on it, staining it with pollen, nectar and propolis resins. They store honey and pollen in the cells, and the color changes again, affected by the elements that make up the honey and pollen. But brood comb changes the most; it actually turns brown. This is due to the part brood comb plays in the life cycle of the bees—that magical moment when the bee pupae, capped inside their tiny hexagonal cells, spin a very thin silk cocoon around themselves as they begin their metamorphosis from grub-like larvae to newly hatched honeybees. When the bees hatch from their cells, these cocoons are left behind, causing the brood comb to become dark brown. We humans tend to associate brown with dirty, but brown does not equal dirty in this case! Brown is good, and from the bees’ point of view, the browner the better. Brown brood comb is the perfect anchor for a new hive of bees. It also works beautifully for luring a swarm into your swarm
Figure 1.9. Brown brood comb.
Credit: Christy Hemenway.
trap should you decide to do that. In any case—don’t destroy the natural wax comb your bees have made.
If you have doubts about disease issues, consult your state apiarist, local extension agent and/or and experienced beekeepers. You don’t want to perpetuate a disease problem. But you sure don’t want to waste all the hard work done by your first year’s bees either.
Another opportunity is also at hand: It’s much easier to make a change to your hive when there are no bees in it! Take advantage of this time to resolve any design issues you found with your hive. Changes to bottom boards, entrances, roofs, legs and observation windows are all much simpler to implement with no bees in the box! If you should decide to make a major changeover in your top bars, to which the comb is attached, again, do not destroy your first-year bees’ comb. It can be removed from the old top bars and rehung from new ones. The bees are quite capable of reattaching it to the bar.
Here’s how to rehang the combs. (You may recognize this from page 87 in The Thinking Beekeeper: A Guide to Natural Beekeeping in Top Bar Hives.) Carefully cut the comb from each of your old bars. Try to cut a reasonably straight line across the top edge, as you will want to have as straight a surface as possible touching the new bars’ comb guides.
Then for each bar that needs to be rehung: • Cut two 1/2-inch wide strips of some slightly stretchy fabric. (T-shirt material works well for this.) They need to be a little more than twice as long as your comb is tall, or twice as tall as your hive is deep. • Have on hand 4 flat-head thumbtacks. They work better for this than push pins because they do not stick out so far as to get in the way of the top bars when you put the bars back into the hive. • Tack two fabric strips to the underside of the top bar. Turn the bar over on your work surface, placing it with the tacks down and the fabric strips extended toward you. • Lay the piece of comb down on top of the fabric strips, as near to the top bar as possible.
• Bring the other ends of the fabric strips up and over the comb, and attach them to the underside of the top bar as well, using the other 2 tacks. Adjust if needed so that the comb is touching the bar when you lift it.
Tips This method supports the comb from below. The fabric strips will act as a sling, supporting the weight of the comb and holding it aligned with the top bar. The weight of the comb can cause wires or string that have been used to “sew” the comb to the bar from above to cut through and the comb to drop off. This is especially true if the comb is fresh and soft.
Space the strips for each bar as necessary to provide the best support; this will be based on the size and shape of each individual comb.
Avoid using bulky things (such as plastic hair clips) that force the top bars apart, as this will change the all-important spacing of the combs in the brood nest. A working top bar hive needs to have all its bars touching each other, with no gaps in between, and no way for the bees to access the space above the top bars.


Figure 1.10. The sling method of rehanging broken comb.
Credit: Christy Hemenway.
This sling method can also be used to correct a cross comb problem, or to reattach a comb that has collapsed off the bar due to heat or other factors. Comb collapse can best be avoided by giving your bees nothing but a dry wooden top bar to build from. The bees do the best job of attaching their comb to the bars that way, without any other input. Applying wax to the top bars is often linked to a comb collapse.
If your hive overwintered and is thriving in April, you have very different concerns than you did last year. Your next steps include a food check and a brood check, to be confident that things are on track. Then what? Now you should be thinking: Swarm alert! It’s become more common in recent decades for colonies started from packages to swarm during their first year. It is even more likely—probable, in fact, and important—that a colony will swarm in their second year.
So let’s move on—we’ll cover the details of your second-year bees and their reproductive process in Chapter 2.