15 minute read
5. Honey—Sweetness and Light = Food


Honey —Sweetness and Light = Food! 5
Honey is a magical elixir. Sweeter than most anything on Earth, versatile in cooking, potent for healing, delightful in tea and the only food that is known for never spoiling or going bad...this amazing product of the hive is one of nature’s marvels.
Bees produce honey to be consumed as food, especially during winter. It is absolutely crucial to their survival during the time of year when there are no flowers to forage among to collect nectar and pollen.
Honey is the product of a long-standing relationship between flowers and bees. Flowers need to be pollinated to reproduce; bees need food. The flowers have devised all sorts of interesting ways to attract bees and other pollinators in order to move their pollen around, and the bees use the nectar they gather from the flowers to make the ambrosia we call honey.
All of this activity is what causes the plants to make food for us as well...and the number of important connections this creates between bees and humans and our food system and agricultural methods is mind-boggling!
It is the bees’ ability to make more honey than they require to live on that beekeepers exploit when they harvest honey. This makes it
incumbent upon us as beekeepers to be circumspect about how we manage this finite and precious resource. Taking honey from the bees should be done thoughtfully and conservatively. There is little long-term advantage to anyone, especially the bees, if the beekeeper removes all of the bees’ natural food and replaces it with a nutritionally poor substitute such as sugar syrup, or worse, high-fructose corn syrup.
Taking this long view, we often say, “It’s not about the honey, Honey— it’s about the bees.” Healthy bees make honey without being forced to, provided the beekeeper supports their natural systems and does not manipulate the bees in detrimental ways.
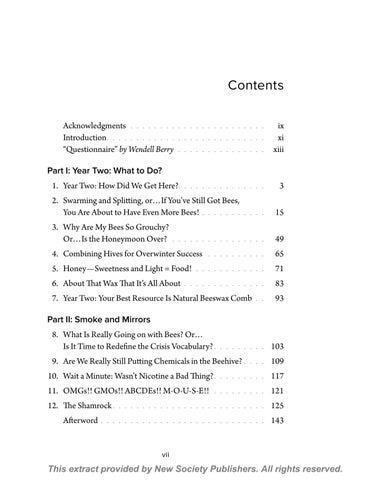
Figure 5.1. Bees capping cells filled with ripe honey.
Credit: Ben Sweetser. How Much Honey Do the Bees Need to Make It through the Winter? I spent a long while observing top bar hives and top bar hive beekeepers before I decided there was a reliable answer to this question. And it still depends, of course, upon many factors that are specific to your location: the most obvious being the size of the colony, and the length and severity of the local winter.
The bees’ ability to store honey is also impacted by the length of the foraging season or bloom, the weather during that season, the amount of forage in their locale and the health and vigor of the colony. After combining my own experience in Maine with that of other successful top bar hive beekeepers throughout the US and
abroad, it seems fair to say that 6 to 8 full bars of capped honey will sustain a top bar hive through a “typical” winter. A colony that has that much honey likely also has several bars of brood comb that have been backfilled with honey as well, and together, this seems to do it.
Typically a top bar hive beekeeper waits until the spring of the hive’s second year to harvest honey, leaving the bees as much of their own natural honey as possible to overwinter on for their first winter. This is a good practice to follow, since honey is, after all, what honeybees need to eat to get them through the winter! In their first year, a new colony has plenty to contend with just to get started as a colony and prepare to survive that first winter.
But in the spring of their second year, if there is still honey in the hive, and there are blossoms in the field, one might be so bold as to consider some of the bees’ surplus honey to be your own reward. And such a superior honey it is, too. Honey produced by healthy bees doing their own thing on their own clean natural wax is some of the cleanest and healthiest and best honey you could ask for. It’s also as local as it can get,
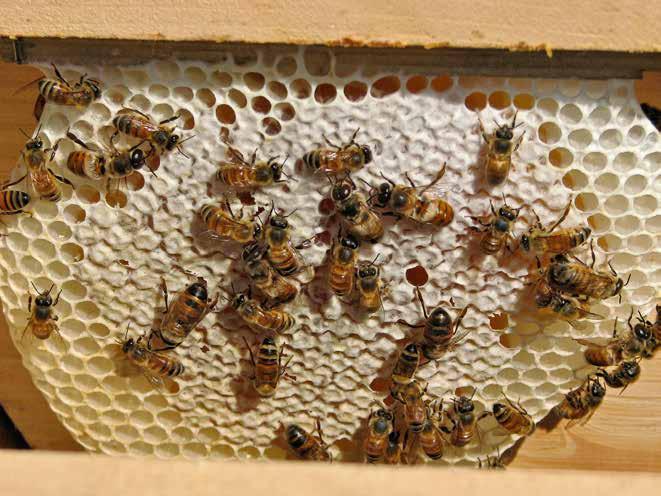
Figure 5.2. Capped honeycomb is ready for harvest! Credit:
Christy Hemenway.
being from bees that live in your own backyard. And if you don’t heat it when you harvest it, then it remains as full of rich natural goodness as it can possibly be.
Yes!!! A Harvest! So let’s say your hive has come through the winter with flying colors, and even survived April, that cruelest month in beekeeping, and now you are back into bee season. There is plenty of forage, and there is capped honey still in the hive as well. It’s spring, probably May, possibly June; it will depend on where you live. This is the time of the year when it makes the most sense to remove honey from your hive.
The season still stretches out before you. Harvesting a moderate amount of honey at this time allows the bees to replace their stores during the summer foraging season. Harvesting most of the hive’s honey late in the season deprives the bees of their stores at a time when they cannot reliably replace them, and too often this is the reason beekeepers must feed to prevent starvation.
Getting the Honey out of the Hive So how do you get the honey out of the hive? Gather up an appropriate container that is large enough to hold a fully drawn comb and has a tight-fitting lid. If you prefer to keep your harvest as cut comb honey, be sure that your container is large enough for the combs to lie flat without bending or breaking. You will also need a good sharp knife. If your top bar hive tool is a long, straight-bladed knife, then that’s a good tool to use for this purpose. Wear your protective gear. Remember, you are removing their life’s work and their winter food supply—perhaps it’s understandable if they are a bit defensive about your presence in their hive.
Choose the combs for your harvest judiciously. Choose the lightcolored combs that the bees made for honey storage, not their brown brood comb. Remove only bars with all (or as close to all as possible!) the honey capped. Nectar that is not yet capped has a moisture content that is higher than honey, and this can cause the honey to ferment after

harvesting. Not that uncapped nectar or even slightly fermented honey is necessarily a bad thing for human consumption, but it tends to expand in the jar after bottling, which can lead to leaks and a sticky mess, or even broken jars if it is stored for any length of time.
Remove the bar you’ve chosen to harvest from the hive. Hold the comb over your hive, and use a bee brush or a handful of grass to brush the bees from the comb.
Saving Honeycomb on the Bar for Winter Bee Food You might want to remove some bars of honey in anticipation of it being surplus, but wait to remove it from the top bar in order to see whether the bees might need it later in the season, during a summer nectar dearth or in preparation for winter. If you leave the comb attached to the top bar, it is a simple matter to place it back in the hive if the bees should need it.
Since the bars in a top bar hive must all touch in order to maintain the proper spacing, and they must all be in place at all times to prevent your
Figure 5.3. These are baby bees—not honey. Don’t harvest
them! Credit: Christy Hemenway.

Figure 5.4. Remove the honeycomb from the bar. Return the
bar to the hive! Credit: Christy Hemenway.
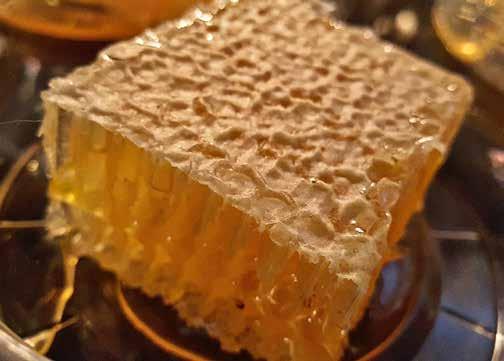
Figure 5.5. Gorgeous cut comb honey. Credit: A & R Verbeek. bees from building comb down from the inside of the roof, you should plan to have some spare top bars on hand.
Harvesting Cut Comb Honey Use a sharp knife (AKA your hive tool) to cut the comb away from the bar. Place it gently in the container. Be sure to always cut away from yourself as you remove the comb from the bar, as the knife may jump a bit as it cuts through the comb, and it can seriously damage beekeeping gloves and fingers.
Replace the top bar in the hive while offering a word of thanks to the bees. Repeat this process for each bar that is appropriate to harvest at this time. Be sure to put the lid on your container between choosing bars, as the bees will certainly be interested in going in after their food, AKA your harvest!
To store cut comb honey, remove the comb from the hive, cut it carefully from the bar and simply cut it into pieces that will fit the container(s) you have in mind for storing it. Choose something unique and attractive for an impressive presentation. You can add some liquid honey to the container as well, if you like.
Oh, the taste of honeycomb fresh from the hive! An amazing sweet sum-
mer treat, comb honey can be eaten just as it is. A chunk of comb honey melting across a piece of warm toast is one of the most amazing things to come from a beehive.
Liquid Honey Harvesting liquid honey from a top bar hive is typically done via a simple method called “crush and strain.” This low-tech method of collecting honey in its liquid form means doing just what it says—crush the wax combs and strain the honey.
A Gold Star Honey Harvest Kit is made from two 5-gallon buckets and their lids. This is large enough to accommodate approximately six combs at a time. The bottom bucket acts as the collector bucket. Drill a 4-inch hole in the center of its lid. Install a honey gate in the side of this bucket as close to the bottom as possible; it will make bottling the honey much easier.
The top bucket will hold the strainer and the honeycombs that you are preparing to crush. Drill a series of approximately 18 half-inch holes in concentric circles within a 4-inch circle in the center of the bottom.
When the top bucket is placed on the lid of the collector bucket, the holes in the bottom of the top bucket will align with the large hole in the lid of the collector bucket. The honey will drain through the strainer and into the bottom bucket.
Now you need a strainer. In the case of a 5-gallon bucket, a commercial paint strainer bag will work nicely. They are available in the paint department at the hardware store. The strainer will line the bucket, and is fine enough to strain out beeswax and bee parts, while allowing the honey and its beneficial pollen to pass through.

Figure 5.6. A Gold Star Honey Harvest Kit makes it easy to harvest liquid honey.
Credit: Brian Fitzgerald.
Important Note: Do not heat honey during the harvesting process. Heat destroys the beneficial enzymes and nutritional elements of the honey, and affects its desirable qualities, such as smell, taste and color.
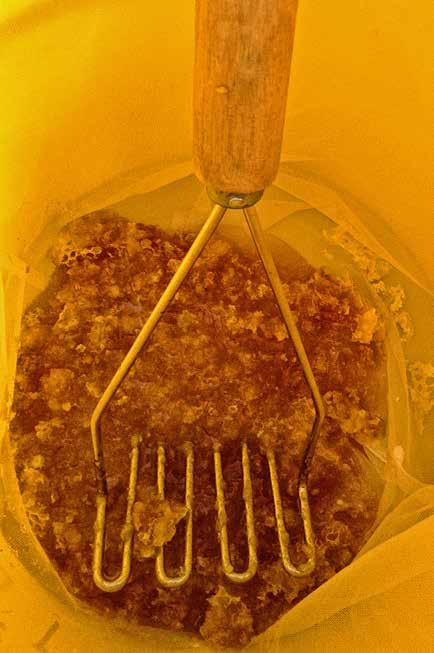
Figure 5.7. All the cells containing honey must be
broken open! Credit: Christy Hemenway.
Do not use a microwave oven to warm crystallized honey, especially if it is in a plastic bottle. Also do not set the jar in a pan of water still boiling on the stove—that will pasteurize the honey, as discussed earlier.
Next you need to crush the combs. Add the harvested combs to the strainer in the top bucket, one at a time. Crush the comb with a potato masher, a wooden spoon or simply squeeze pieces in your hand. Avoid using anything sharp that can cut or puncture the strainer bag. After completely crushing all the combs, put the lid on your top bucket and set the honey harvest kit in a comfortably warm place. Let gravity do its work. This can take the better part of several days.
That’s all it takes to harvest liquid honey. Be sure to stir and turn the contents of the strainer bag to help the honey drain. As a final effort, you can twist the top of the strainer bag and squeeze it to force out as much of the remaining honey as possible.
Let the honey sit in the bucket for a day or two. You may find that some “foam” will rise to the surface. The foam is perfectly edible but is not usually bottled with liquid honey, especially if the appearance of the honey is of concern.
Now the honey is ready to be bottled. Glass containers are best for storing honey. Glass is clean, benign and does not impart any taste to the honey, as plastic can. And unlike plastic, glass is heat resistant. Should the honey crystallize, a common and harmless occurrence especially in the wintertime, it can be made liquid again by setting the glass jar in a pan of hot water.
Now that the honey has been harvested, you will find yourself with a strainer containing a mass of crushed and broken pieces of beeswax. Rinse the wax in the strainer under room temperature running water to remove as much of the remaining honey as you can. At this point the wax is ready for rendering (discussed in the next chapter). Store it in your wax box until you’re ready to render it.
Benefits of Crush and Strain Harvesting Harvesting honey by the crush and strain method is simple and low-tech. The honey is not heated, nor is it forced through an ultra-fine strainer. This method retains the important healthful benefits of pure natural honey, including pollen, which is what gives honey its own special terroir—that particular set of characteristics such as taste, color and smell—that is specific to the locale where it was made.
The natural clean beeswax harvested by the crush and strain method has multiple uses. Clean beeswax from an untreated hive is superior for making personal care or cosmetic items, such as lip balm or hand creams; any oil-based herbal preparation is thickened by adding beeswax. Beeswax is also used for making beeswax candles, far superior to paraffin candles.
Honey as Allergy Medicine Those who suffer from a pollen allergy may find relief from their symptoms by eating local honey. This is why locale is so important when it comes to honey; only honey produced where the allergy sufferer lives will have been made from the flowers that cause the allergy. This means your backyard honey is a powerful natural antidote for pollen allergies.
It is important not to strain the honey through a filter so fine that this very important ingredient, the pollen, is removed. The filter does not need to be any finer than what is required to remove stray bee parts and crushed wax, typically 600 microns.
Honey for Healing Wounds Honey applied to a cut, scrape or burn can help it heal more quickly and lessen scarring. Of course it’s also very sticky, so you’ll need to cover it with a bandage.
Why Does the Honey Look Different throughout the Year? The appearance of capped honey can vary throughout the season. Variations in color are caused by the different nectar sources the bees were foraging on. It can be as light and clear as water or as dark as a good stout. Early in the season, honey is typically light and clear, somewhat thin and tends to crystallize quickly. Figure 5.8. Honey can help heal wounds and Later in the season, it is often darker, thicker burns. Credit: Christy Hemenway. and stronger in taste. You could literally follow the progression of what is in bloom in your area by tracking the changes in color and taste of the honey your bees are making from local nectar gathered from what is currently blooming.

Dry Cappings Versus Wet Cappings When the bees have evaporated the moisture from the nectar stored in the honeycomb cells to the level where it is considered ripe honey (approximately 18%), they then cap the cells. This is like putting a tiny wax lid on each cell. The cappings are described as dry or wet. A dry capping has a tiny airspace behind the cap, so the honey does not touch the back of the cap, and it looks like a dry white wax lid, with no sign of the liquid inside. In a wet capping, the ripe honey touches the back of the wax cap, causing the color of the liquid honey to show, and giving a translucent, glossy or wet appearance.

Feeding Honey to Your Bees It would seem like a no-brainer to feed honey to bees, especially as opposed to feeding them sugar syrup. However, there is a potential risk involved. If you are a treatment-free beekeeper, and you are able to feed your bees honey that you are certain comes from a hive never treated with antibiotics to prevent American Foulbrood (AFB)—perhaps from your own treatment-free hive—this is a fine idea.
However, honey harvested from hives that have been treated for AFB may contain the spores that cause AFB, even though the hive was unaffected and showed no symptoms. This could cause your bees to contract AFB, one of the deadliest and most contagious of bee diseases. Be very, very confident about the source of any honey you choose to feed to your bees.
Figure 5.9. Dry cappings appear white and opaque. Wet cappings are more translucent, and you can see the color of the honey. Credit:
Christy Hemenway.
This ebook is distributed by Ogden Publications. All rights reserved. No part of this ebook may be copied or sold.