47 minute read
You Are About to Have Even More Bees


Swarming and Splitting or If You’ve Still Got Bees, You Are About to Have Even More Bees! 2
Welcome to Bee Season #2. If you’ve made it through April, you’re officially into your second year with your top bar hive. So what are your bees going to get up to now? They already have comb built from last year, there’s brood in the hive as well as honey, it’s warm out, and there’s plenty of forage. The next thing on your bees’ minds is...the making of more bees. So let’s talk about swarming and splitting, and let’s start with a definition.
swarm, noun \'swo˙rm\ a: A great number of honeybees emigrating together from a hive in company with a queen to start a new colony elsewhere; b: A colony of honeybees settled in a hive
Most importantly, swarming is the reproductive mechanism of honeybees; and secondly, it is one of the bees’ primary motivations, the driving force behind much of what they do.
At some point, Hollywood got hold of the word swarm, and they made it into a scary thing for the movies. Beekeepers who depend upon honey for their living don’t like the fact that their honey-making forces get divided roughly in half. The incredible energy generated when a swarm departs its original hive can be both awe-inspiring and a little
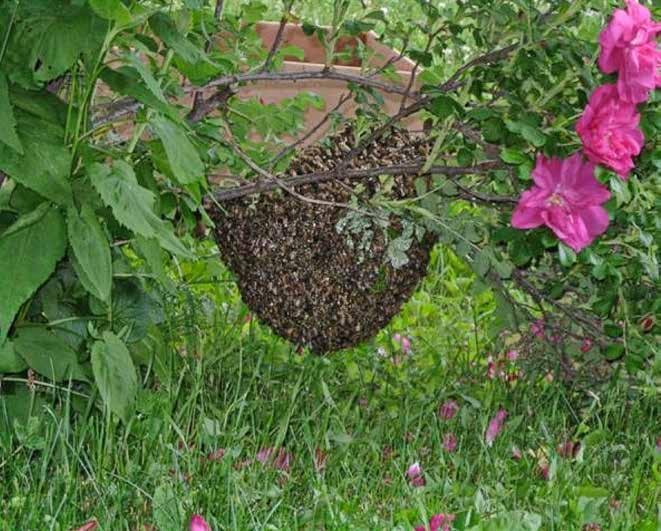
Figure 2.1. This swarm was like a gift—very close to the ground!
Credit: Christy Hemenway.
frightening. In any case, whether you were hoping it would happen or hoping it wouldn’t, a swarm is a special event.
I think of it as a “Congratulations, I’m sorry” event. Why? Because it is the reproductive mechanism of honeybees: it’s when one colony of bees decides it is big enough and bad enough to turn itself into two colonies. It also means that your bees were strong and healthy and successful enough to make more bees. To that one can only say, “Congratulations!” There’s no need to think of swarming as a loss of your bees because, in reality, it means more bees.
It does mean that the population of the original hive is reduced, divided roughly in half. To that, one could say, “I’m sorry.” (I wouldn’t say that, but one could.) The point I’m making is that swarming is a very important part of the bees’ natural life cycle, and they need us to support that system rather than attempt to thwart it.
So know this: If you’re coming out of winter and you’ve got bees, you are about to have more bees. (Congratulations!) But, since so many top
bar hives are urban backyard beehives, it’s important to know and understand the swarming process and what it means for you and your neighbors should your hive swarm.
Signs of Swarm Preparation by the Bees When your bees are preparing to swarm in order to reproduce, you will see the following signs of their preparations in your early season inspections.
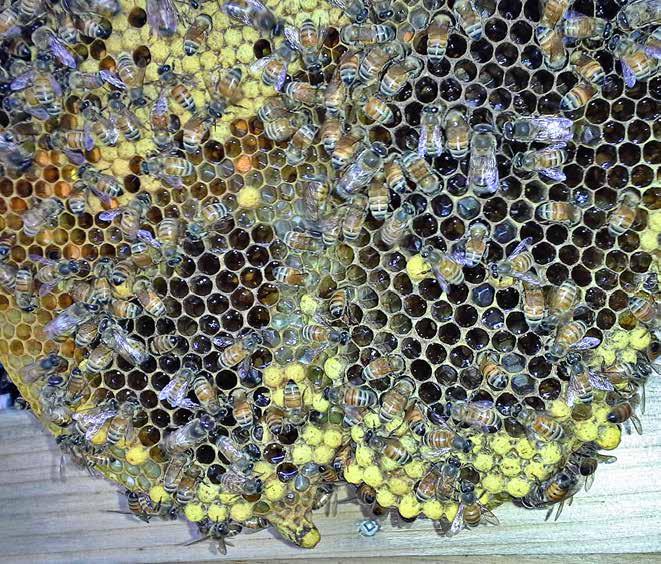
Workers A hive prepared to swarm will have built up a large, strong population of female bees. The female bees are called workers, and they’ve been working hard. Many of your top bars will have had comb filled almost entirely with worker brood. What a beautiful sight! (Congratulations again!) The cappings of worker brood in the pupal stage are very slightly raised but flat and fibrous in appearance.
Drones Another healthy sign of an imminent swarm is the raising of drones, the male bees. You will see drone-sized brood cells being drawn out. These

Figure 2.2. A worker bee (top) and a drone (below) face off at the hive entrance. Credit: PM Oakley.
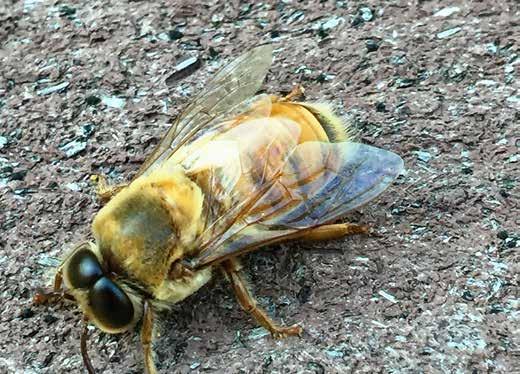
Figure 2.3. The eyes of drones are huge—they cover their whole face, and touch at the top! Credit: Ben Sweetser.
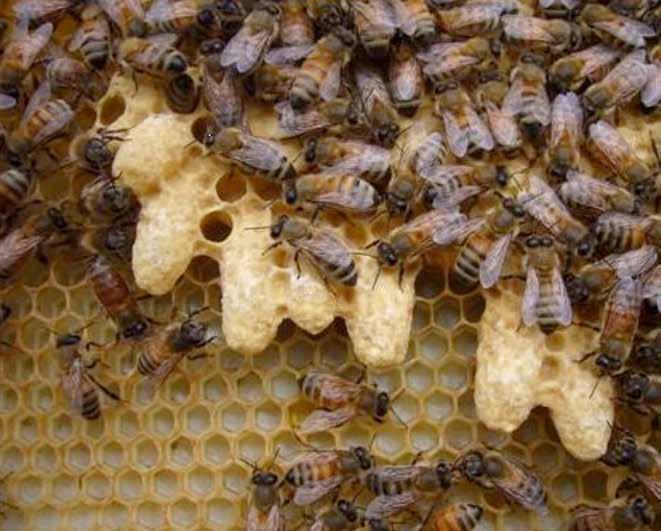
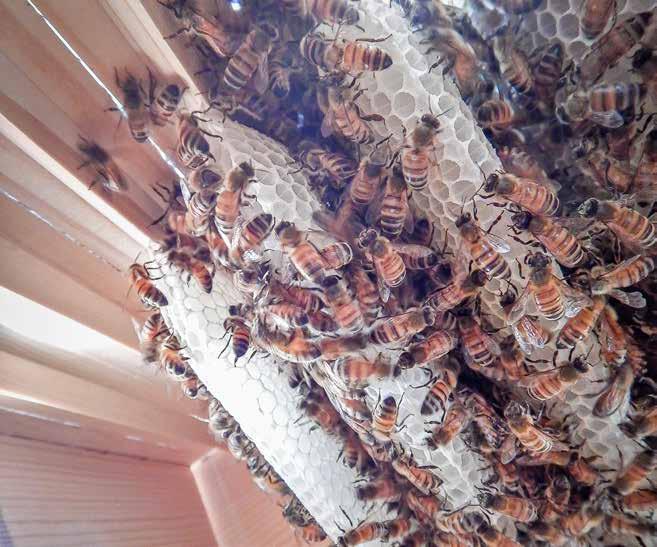
Figure 2.4. Classic swarm cells on the edge of natural comb. The top one has hatched.
Credit: Jim Fowler. cells are larger than the worker-sized cells. When the bees draw their own natural wax, without the use of foundation, they are more easily able to do this when and where they need drones. Sometimes the bees reuse existing drone cells, sometimes they remake existing comb into drone cells, and sometimes they draw out drone cells in brand new wax. They are usually located in clusters scattered among worker brood cells, often at the edges of comb. In the pupal stage, the cappings of drone bees are very distinctive. Unlike the flat worker bee cappings, drone cappings are dome-shaped. They look a bit like crunchy puffed cereal. (Yay! Drones!)
Queen Cells A queen bee is raised in a very different cell from the cells of worker bees and drone bees. Worker and drone brood are both raised in cells that, when the comb hangs down as it naturally would in the hive, are oriented horizontally. But a queen cell must be oriented vertically. Swarm queen

cells are built on the edges of the comb. An advantage of natural wax comb drawn from a top bar with no wooden frame surround is that the edges of the comb are readily accessible to the bees. This is important for the making of queen cells. The wooden frame of a Langstroth hive gets in the way of the bees making these cells; you will see them struggling to make queen cells drawn awkwardly over the edges of the wooden frame. (And once again, congratulations are in order here!)
Queen Cups A queen cup is the beginning of a queen cell. Rounder, shallower and less developed than a full-blown queen cell, it looks almost like they are practicing, or just “getting ready to get ready.” Sometimes it’s hard to tell whether the bees are completely serious about swarming because they may make and then destroy numerous queen cups throughout the season. When the bees have committed to swarming, the queen will lay an egg in the queen cell, even in what may have been just a queen cup, and very soon the bees will draw out the cup, to complete a full queen cell surrounding that egg.

Figure 2.5. A worker bee investigates a queen cup.
Credit: Ben Sweetser.
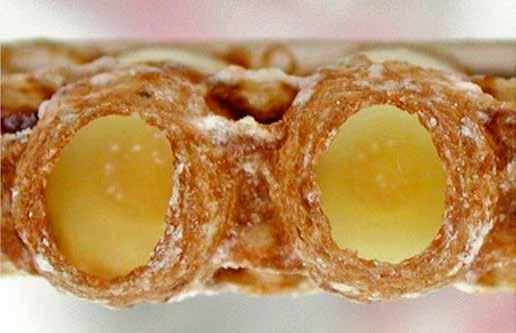
Figure 2.6. Queen cells with larvae. Credit: Christy Hemenway.
Figure 2.7. A brood nest filled with nectar prevents the queen from laying and is an early indicator of swarming!
Credit: Dave Freytag. Nectar-packed Brood Nest Probably one of the most confusing indications of imminent swarming is the backfilling of the brood nest with nectar. In conjunction with this, you will see the amount of new brood drop significantly, as nectar now fills the cells the queen would otherwise lay eggs in. This leaves a lot of nurse bees with nothing to do; at the same time, it reduces the size of the brood nest. The brood nest must become small enough that it can be cared for by the population of the remainder hive, in order for the hive to swarm. This reduction in size can take a full brood cycle. When you see the brood nest is filling with nectar, know that the hive’s attention will soon be focused on making queen cells for swarming. A nectar-packed brood nest gives you advance notice of a reproductive swarm.
When the brood nest is packed full of nectar, the queen is unable to find a place to lay her eggs. She is spending a great deal of her time running all around the hive, looking for empty cells but finding none. This
frantic search causes her to lose weight, making her slimmer and better able to fly, while also making it more difficult to spot her.
Preventing Swarming Preventing swarming at any cost is not the goal. There have historically been such practices as clipping the queen’s wing(s) or destroying queen cells when the bees make them. These generally end in dismal failure. Clipping a queen is an attempt to prevent her from flying; the logic being that if the queen cannot fly with the swarm, then the bees will not swarm. This is a fallacy. It is typical that the existing mated queen flies with the swarm. But if the existing queen cannot fly, there is nothing to prevent the swarm from changing the timing, and departing with one of the newly hatched virgin queens. Do not destroy the queen cells you see your bees making. If you do this, and the bees swarm anyway, which is likely, you will simply leave the remainder hive queen-less.
Instead, think ahead! Prepare to have more bees by working with their natural behavior, but preempt the actual swarm by performing a split. Do regular inspections 7 to 10 days apart early in the season. Remember that two weeks is all it takes for a hive to hatch a new queen. Remember, too, that managing the swarm impulse appropriately will require having additional hives on hand, or aspiring beekeepers waiting in the wings. Do your best to stay ahead of your bees’ needs.
Slowing the Swarm Impulse May Stop It Bees choose the timing of the swarm in response to a complex combination of factors. The primary reason for bees to swarm is to reproduce, to create another thriving colony of bees. One factor that helps bees develop the confidence to swarm is that their hive cavity has become full. This lends credence to their feeling that they are large and robust. So being crowded, even if they are a small colony, can factor into the swarming process. The top bar beekeeper can work with this behavior by increasing the space the bees are occupying or by expanding the brood nest, thus reducing the bees’ sense that they have filled their space.
Increasing Their Space If your bees have filled all the space between the two follower boards or between the hive end and a single follower board, but your top bar hive still has empty bars, then it is easy to increase the space the colony is occupying. You simply add more blank top bars into the newer end of their brood nest, moving the follower board towards the end of the hive.
If every bar in their space has comb built on it, then they definitely need more space! Having 2 or 3 (at most 4) open bars available at the new end of a hive that is actively building up will give them more room to grow. Be conservative here, since more than 4 bars available encourages them to cross-comb, locking the bars together. Cross-combing quickly becomes a disaster in a top bar hive, making it impossible to inspect it.
Opening the Brood Nest Adding space directly into the brood nest is known as opening the brood nest. Add 2 or 3 blank bars into the newer end of the brood nest, alternating the empty bars with existing combs. The size of the colony will help you determine how many bars to add. This encourages the bees to go back to work building wax to draw comb in the empty space, and it gives the queen more space to lay eggs. This helps to create the sense that they are not so large as they might have thought. If you catch them before they start to build queen cells, this technique can effectively work to slow them down; it may even stop them. If need be, you can repeat this process again as the season progresses. Adding blank bars in this way is somewhat disruptive to the colony, since the bees build each comb to fit specifically against the comb next to it, so be conservative here as well. Add only one blank bar between two existing combs, and don’t add more than three blank bars each time you do this expansion.
Preempting the Inevitable Swarm Another way of managing the swarm impulse is to preempt it—to allow the swarming process to progress naturally, but catch it before the swarm
actually flies, and to purposely decrease the number of bees in the hive by dividing the hive.
Preempting a swarm is responsible urban beekeeper behavior. Frightening your next-door neighbors doesn’t make for a happy or safe environment for you or your bees. Letting your bees swarm may also mean that they choose a new home that does not welcome them. A swarm moving into the wall or the roofline of your neighbor’s house is rarely a desirable event.
If you live in a densely packed urban or suburban area, the sensation a swarm can cause is a very good reason to take timely, thoughtful steps to work in concert with this natural process. Or maybe you want to intentionally increase the size of your apiary. That’s another good reason. Or perhaps you are actively seeking to pay it forward by helping another beekeeper get started with bees. That’s a great reason too! In any case, by understanding what your bees are doing, you can support and protect their natural reproductive process and fulfill some of your own goals as well.
How to Split Your Top Bar Hive The best way to preempt a swarm is to split the hive in question. Let’s say you inspected your hive today and saw that it is chock full of bees, and there is plenty of brood in all stages: eggs, larvae and pupae. You may or may not be seeing a few dry queen cups; you may or may not see some drone brood. It’s likely this hive is in its second (or third or even more) spring, though it is possible that it could be a flourishing first-year hive. The season is early, the weather is warm, and the nectar is flowing. Congratulations! You are about to have more bees—why not have them on purpose?
Or...maybe today’s inspection showed multiple queen cells along the edges of the combs that are fully drawn, or capped, and a burgeoning population of bees, along with a brood nest full of nectar where there should be baby bees. Congratulations! You have successfully procrastinated to
Interchangeable Equipment
I cannot emphasize enough how important it is at this point to have interchangeable hive equipment. Splitting hives requires that the top bars and the comb of the source hive will fit into the hive body of the receiving hive. This will make the split a simple process—easy on you and easy on your bees.
If the top bars that your booming hive has been building on won’t fit into the hive you want to move the split into, you will be out of luck, or you will find yourself hacking and slashing brood-filled comb to make things fit.

Figure 2.8. Interchangeable equipment is important! The Gold Star top bar will fit all top bar hives having an upper hive body width of
15 to 16 inches. Credit: Christy Hemenway. the point where you are about to have more bees by accident! (What? You weren’t ready? Ack!) The swarm may be a bit of an accident on your part, but you can still work with the process.
Whatever your situation, finding yourself with more bees can be either a very welcome thing or a very scary thing. It is helpful if you are knowledgeable about the bees’ intentions, informed about the natural process of swarming and in tune with your own needs as a beekeeper.
Splitting a hive means just that. Begin with a thriving hive, with plenty of brood and bees, and divide it. Usually it divides in two, but sometimes, with an especially booming hive, you may be able to create three or even four new colonies.
Have on hand the additional equipment you will need. This means an empty top bar hive that is compatible with your existing equipment. Since you are preparing in advance, you have likely already made room for expansion, with a site chosen and the hive ready and waiting. If not, you will need to make arrangements for this as well.
It is often the preparedness of the beekeeper that determines the type of split that gets done. Interestingly, the easiest of splits is also the earliest and the most intentional.
The Walkaway Split— for the Prepared Beekeeper At this stage, with a full and thriving hive that is showing no signs of imminent swarming, you are a prime candidate for splitting your hive in
the simplest way there is, a walkaway split. We call it that because you can simply split them, and then walk away. The bees can take care of things from there.
A walkaway split is an early split. This beekeeper is working toward the goal of increasing the number of hives in their own apiary, or providing bees for other beekeepers. A walkaway split requires that the source hive be sizable and thriving fairly early in the season, and it takes intentional and proactive action by the beekeeper. It needs to be done early in order to happen before the bees decide to swarm. This beekeeper must be able to recognize that the hive is strong enough for splitting, yet has not begun swarm preparations on its own. For this reason, it is likely to be a second-year hive or older. Older hives that have overwintered will be larger and better established earlier in the season than most first-year hives can manage, especially those started from package bees.
A walkaway split is an easy split because it does not require searching through the hive to find the queen, or capturing her in order to relocate her to one hive or the other. Catching and/or moving a queen can be risky: she may get injured or killed. Since the bees are not yet intent upon swarming when this split occurs, there are no queen cells, so there are no worries about how you divide up the brood bars, and no need to worry about which hive contains the existing queen.
Why It Works It is the bees’ natural ability to create a queen bee from a worker bee larva that makes this split work. This allows the beekeeper to perform this split quickly and easily, and without having to know where the original queen wound up.
There is one very important requirement when doing a walkaway split: Both colonies absolutely must have the resources it takes to raise a new queen, i.e., combs containing three-day-old larvae. Without them, the bees will be unable to raise a new queen, and you will soon find yourself with a laying worker in a queen-less colony.
Figure 2.9. A nuc box is super useful for moving or storing combs. Credit:
Christy Hemenway. How to Do It Inspect the hive with an eye toward taking an inventory of its contents: How many total bars of comb are there in the hive? How many combs contain open brood in the larval stage? How many bars have capped pupae soon to emerge? How many bars of honey? Are you certain that there are no queens already started? Be sure to examine the edges of the combs, where swarm cells are typically found. If you find unanticipated swarm cells, you will need to change your technique for splitting to what we call the Procrastinator’s Split, as described next.
Knowing what you have to work with, you can now carefully divide the source hive by moving half the brood and food to the split hive and leaving half in the source hive. Do what you can to maintain the order in which the combs were originally built. Be aware that, on any given bar, you may be moving your queen, so be very cautious when handling the combs. It’s a good practice to have a nuc box on hand when performing any split, to carry the combs you plan to move to the new hive. That way you are not carrying unprotected bars of comb across your bee yard, potentially dropping the queen and killing her by stepping on her.

Since it is difficult to accurately gauge the age of a young larva, and since it is so important that both colonies have what they need to make a replacement queen, another good practice when inventorying and dividing resources is to be sure that both hives have combs that contain open brood in all stages, both eggs and larvae. Availability of Drones or... When the Boys Are
The Procrastinator’s Split or “Oops! I Wasn’t Ready for That!”
Any time a colony needs to make a queen, she must fly to mate. At the time of the split, drones must be available to mate with the new queen. This means that splitting is tied to your local season. Pay attention to what your own hive is doing; if you don’t see any drones being raised in your hives yet, then When we call a beekeeper a procrastinator, we it’s too early to do a split! mean that in the nicest way, of course. What with work schedules, weather, vacation time and all the things that need doing in the summertime, the bees sometimes get ahead of the beekeeper. But if your bees have already begun preparations to swarm, you need to handle things accordingly. The timing makes all the difference.
So you’ve finally “gotten around to” doing a full bar-by-bar inspection of your hive. It’s been a few weeks, and frankly, they look great! You have many combs, covered with many bees, and you see plenty of eggs, larvae and capped worker brood. You also see some drones and drone brood. On the edges of some combs, you see...“Oh, no! Are those queen cells?”...It’s likely that they are indeed queen cells, and these cells may already be capped, or they may contain a developing queen larva resting in a shiny pool of royal jelly. If the cells are just tiny cups, and “dry,” meaning they don’t contain a larva, you may still be able to slow the swarm impulse by opening the brood nest, as described earlier.
But queen cells, on the edge of the combs, capped or containing a larva are signs that say a swarm is definitely on its way. Congratulations!
So now what? Well, a split is still a good plan, but now it’s a little more complicated. One of the challenges of this situation is that the beekeeper who is most likely in this predicament is probably a relatively
Figure 2.10. This colony has made many queen cells—they are really hedging their bets!
Credit: Internet poster.
new beekeeper, one who is still learning to spot the queen and recognize the signs of swarming, and here they are with a swarm about to happen. This beekeeper often has no empty equipment on hand either, so where will the new colony go? It’s always challenging when you find that you have more bees than you have boxes.
This impending swarm may also set up a conflict for the beekeeper: what if you didn’t want more hives? Perhaps you don’t have room, or perhaps you don’t have time, or perhaps your town has an ordinance governing how many hives are permitted in your location. You are about to have more bees, but they need a new home! This situation is ideal for helping to launch another top bar hive beekeeper in a very supportive way. Between the two of you, the split can be performed, and the new colony moved to the new beekeeper’s apiary—helping someone else get started with bees raised on natural wax, while relieving you of the need to manage more hives when your own apiary is already as full as you can stand.
Why It Works The events unfolding in the source hive are what the bees would do naturally. They have built up to the point that they are confident that they have what it takes to turn themselves into two hives. The swarm impulse is strong and important, and even if the beekeeper wasn’t prepared for it, the bees certainly are. They’ve created everything they need to reproduce: brood, food, and queen cells. It is the beekeeper’s task to divide those resources appropriately. In addition, this split requires that the beekeeper be able to locate and move the queen. If the queen and all the queen cells wind up in the same hive, the other hive will suddenly find they need to start over making a new queen when they thought they had several in the works. It’s likely this will cause a worker bee to begin laying eggs, this is known as having a “laying worker,” a difficult situation to correct.
How to Do It Begin like you would any other split—with an inventory of the contents of the hive. Pay attention to the total bars of comb, how many bars have brood (both open and capped), as well as honey and pollen stores. Make a special note of the bars that have queen cells on their combs. You can mark these by writing on the top bar with a pen, or sticking a pushpin into the wood. All the bars with queen cells must be housed together in the same hive after performing the split. This will affect the bars of brood and food that can be moved.
While you are going carefully through the hive and making notes, be on the lookout for the queen bee. Figure 2.11. Queen in queen catcher. Credit: Christy Hemenway.

Figure 2.12. This colony is preparing to depart as a swarm. Don’t confuse this activity with bearding.
Credit: Dave Freytag.

The safest way to perform this split, which means moving lots of bars around as well as finding and moving the queen, is to find the queen and safely contain her in a queen catcher or queen cage until the chaos is over. Then you can calmly release her back into the hive. Using a queen catcher is a good way to protect your queen. You simply squeeze its handles to open it wide, maneuver it to where the queen walks into it and carefully let it close, trapping her safely inside.
Divide the hive’s resources as nearly in half as you can, allowing for the requirement to keep all the swarm cells in one hive. Carefully move the bars you’ve earmarked to go into the new hive by putting them directly into that hive, or by using a nuc box to hold them while they are being transported to their new home. Again, do your best to respect the original order of the combs in each case, as the bees build their comb according to where they are located and what they will be used for, so the less disruption to that order, the better.
The Honeymaker or If/Then Split— “IF They Get Serious About Swarming, Then I’ll Split Them.” This beekeeper would really rather that their bees made more honey than make more bees. Bees who are not devoting their energies to swarming have more bees available to focus on gathering nectar and turning it into honey. This beekeeper will also be well-versed in identifying the appearance and behaviors that indicate swarming. They’ve inserted blank bars into the brood nest to open it up and slow down the swarm impulse, as discussed earlier. If the bees prove uncooperative about staying home to make honey, then the beekeeper can be a bit philosophical about it, choosing to shrug their shoulders and work with supporting the bees’ swarm impulse.
Why It Works It works for the same reasons the Procrastinator’s Split works: The events unfolding in the source hive are what the bees would do naturally. They build up to the point that they are confident that they have what it takes to turn themselves into two hives.
How to Do It This split is much like the Procrastinator’s Split, except that events have transpired to this point with the beekeeper’s knowledge. This beekeeper is ready to split the hive because the bees have shown that they are truly committed to swarming. Otherwise the beekeeper would likely not have split them at all, in the interests of there being more surplus honey to harvest.
While you are going carefully through the hive and making notes, be on the lookout for the queen bee. Just as you would with the Procrastinator’s Split, which means moving lots of bars between hives, your smartest bet is to find your queen and safely contain her in a queen catcher or queen cage until the split is complete, then release her back into the colony that has no queen cells. A queen catcher is a very easy way to protect
your queen. You simply squeeze its handles to open it wide, maneuver it to where the queen walks into it and carefully let it close, trapping her safely inside.
Splitting into the Same Hive or How to Buy Yourself Some Time In the event you have no aspiring beekeeper waiting to receive your bees and no extra empty hives, a Gold Star top bar hive gives you the ability to split the hive and house both colonies in the same hive box.
Why It Works The Gold Star hive, which is a side center entrancehive, has three entrances located in the center of the long side, the front of the hive. It has a single entrance located at each end of the back of the hive. It includes two follower boards, which can be used to manage the hive body in different ways. These features make the hive very versatile should you need to use it to house two colonies.
How to Do It Like you would for any of the splits we’ve discussed, inventory the contents of the hive. Divide resources equally, managing them as needed, based on whether there are queen cells or not. Place the two colonies in opposite ends of the hive. Then place the follower board(s) in the center, positioning them so that they allow access through the front entrances for one colony, but not for the other.
The colony that contains the queen cells should occupy the half of the hive that will continue to have access to the front doors, the doors they are accustomed to using, since this is the colony that would stay behind. The other colony, where the existing queen resides, will occupy the opposite end of the hive, and this colony will use the rear entrance at that end, simulating a move to a different location, as if they had swarmed naturally.
Be aware that this is only a temporary solution, since it limits the amount of space that the bees can expand into, but it can certainly buy
you some time while you either acquire additional equipment or find another beekeeper with interchangeable equipment.
Pay specific attention to the weather and to the nectar flow while you have two colonies living in the same hive. In this configuration, there is no space to put a feeder for either colony. This can create a starvation problem should you find yourself in a serious nectar dearth. You may need to feed outside the hive to help prevent this, which increases the risk of robbing, or hurry to get one of the colonies moved into a hive box of its own.
Other Details Concerning Splits...
What About the Genetics? After considering the logistics of splitting your hive, you’re likely wondering, “Wait a minute—which hive gets which queen?” Good question. In a natural swarm, it is typically the existing mated queen that flies away with the swarm and begins the work of building up from scratch in the new location. The new queen hatches in the original/source hive, flies to mate and then returns to the source hive and begins laying eggs to repopulate it.
By this reasoning, the colony that contains the existing mated queen is the logical choice for moving to a new hive. The source hive will soon be a well-populated hive with a new queen, and would remain in the original location.
Consider this though—the original beekeeper may prefer to keep the original queen. After all, her genetics are known and likely desired. The new queen remains an unknown until she has successfully mated and returned to the hive, and begun laying eggs. How to counter this? Ideally, the beekeeper has the ability to move the original/source colony with the original queen—not far, but away from the original location—so that the bees have the sense of having flown. Otherwise there is some risk that the bees will swarm anyway, having already been involved in preparations to swarm.
If you are splitting into the same hive box, you use the same logic. The remaining half of the hive, which will contain the queen cells, will
stay where they were, and will continue to use the original “front door” entrances, in the center of the long front side, and approximately onehalf of the hive. The follower boards are placed in the center, positioned to allow access through the front of the hive by the bees that will remain in the old location. Place the follower boards so the bees that are using the front entrances have no direct access to the other end of the hive. The half of the colony that would have swarmed, the one that includes the existing mated queen, is housed on the other side of the follower boards, and they use the entrance on that end of the rear of the hive.
Where Did All the Foragers Go? Or...“Where’s All the Activity?” When splitting a hive, it’s important to be aware of the final disposition of the field force, or foraging bees. After a hive is split, the field bees keep on doing what they had been doing—foraging—from where they had been doing it, the original or remainder hive.
Bees know their home as a particular “place in space,” or GPS coordinates, if you will. They are not oriented to the appearance of the hive, but to its location. If you move the source hive, they will continue to return to the original location of the hive, even though it is no longer there. Because of this, the hive that contains the original queen, which you will move to a different location, will have very few foragers, as they will all join up with the hive in the original location.
Since the existing queen is still laying and brood is continually hatching, this imbalance will eventually sort itself out naturally, but the lack of activity can be nerve-wracking, especially if the hive is not heavy on food stores. There are some ways the beekeeper can help counteract this imbalance. The first, and simplest, is to move lots of bees into the hive containing the original queen. If the split is done in late afternoon or early evening, more of the bees will be in the hive, so this is easier to accomplish. Gently shake or brush bees from the combs into the original hive.
Another option is a bit like pulling a bait and switch on the bees. After the split has been done, give the bees a day or two to settle and reorient to their new location. Then switch them. Move the original hive back into
the original location and let it collect some of the field force. A day later, move each hive back to its desired location.
The Integrated Pest Management Aspect of Swarming So why do we put all this emphasis on being in favor of swarming, and splitting, and increase and managing more bees? One reason is that swarming naturally causes a break in the brood cycle.
A lack of brood is a serious setback for the varroa mite, which requires the open brood cells of the honeybee occupied by larvae in order to start their reproductive cycle. The adult female mite begins this life-cycle phase by sneaking down inside an open brood cell and hiding beneath the larva floating there in a shiny little puddle of royal jelly. She waits for the cell to be capped, then begins laying her eggs.
In the remainder colony—the one that stays behind and must make a queen—there are no eggs being laid, and the existing brood is hatching out daily. The new queen must hatch, fly to mate, successfully return to

Figure 2.13. (above and right) Varroa are ubiquitous. Occasionally you will see them on the backs of the
bees. Credit: Ben Sweetser.

the hive and begin laying eggs. This takes approximately 28 days. By that time, all the brood in the hive will have hatched, and there will no longer be open brood available in the hive for the female mite to lay eggs in. In a natural swarm, the colony that flies with the mated queen leaves behind all their existing brood and must begin building their hive from scratch. So for the colony that flies, there is no brood for varroa to breed in. The less brood there is in the hive, the fewer cells available for the varroa mite to breed. This is therefore a good way to control varroa without Figure 2.14. A “baton” swarm. Credit: Christy Hemenway. using chemical treatments. Dare I say it again...? Congratulations! The swarm impulse is strong and biologically important to healthy bees. Managing swarm behavior by working proactively with the bees to preempt the process before they actually fly retains the advantages of natural swarming and avoids most of the disadvantages.

How a Beekeeper-Induced Split Differs from a Natural Swarm When the beekeeper splits their hive, the colony that would naturally fly to a new location and begin building their hive from scratch does not get the opportunity to do that. The queen of that colony continues laying eggs in the combs that the beekeeper moved with that colony, so there is no break in the brood cycle for this colony. One method of compensating for this disadvantage is to purposely create a break in the brood cycle by caging the queen. This is detailed in Chapter 3 and 12.
Overwintered = Survivor Stock This new queen is the offspring of the older, proven queen. If the hive that is being split is a second-year hive, then both queens and both colonies now stand a good chance of overwintering again, helping to propagate locally raised survivor stock in your local area. Congratulations!
Hurrying a Walkaway Split The time it takes for the bees to replace their queen can be alarmingly long, especially in a climate with a very short growing season. Artificially replacing the queen can decrease the time it takes for a colony to recoup after a split, bridging a timing gap that might otherwise spell disaster for the hive as the local foraging season comes to an end.
Unlike the timing of the natural queen replacement that occurs with swarming, or with preemptive splits that support the bees making their own queen, the beekeeper performs this manipulation. It is tied to reproduction and the multiplication of hives, but bypasses the natural break in the brood cycle that occurs when the queen is replaced naturally by the bees.
Why It Works Bees move the queen’s pheromones throughout the hive by touching each other as they move within the hive. The level of queen pheromone in the hive dissipates very quickly if she is removed. With the loss of the queen and the subsequent drop in pheromone level, the bees rapidly become aware that they are without a queen and go into queen replacement mode within hours.
When the hive realizes they are queen-less they also become more receptive to a new queen and are therefore less likely to reject and kill a new queen, if one is provided.
How to Do It Prepare to perform the split. Have a mated, caged replacement queen in hand to prevent any unforeseen circumstances in obtaining her. Perform
Figure 2.15. A swarm in the air. Credit: Gold Star customer. the split as previously described, and then wait 24 hours before installing the new queen. Utilize the slow-release mechanism of the queen cage to allow the bees to adapt and accept the pheromone of the new queen. If she has not been released from the queen cage in three days, hold the cage deep down inside the hive and remove the screen, releasing her directly into the hive.
What If I Missed the Signs of Swarming? Drones, queen cups, queen cells, nectar in the brood nest, a crowded hive...all these things taken together are indicators that you will soon have a swarm of bees issuing from your hive. If you didn’t see it coming, or take preemptive action to intercept them, that swarm will soon be flying off to start a new colony in a location of their choosing. What a sight to see that will be! Thousands of bees will take to the air all at once, in a large funnel cloud, making a phenomenal sound—sometimes described as a low-flying airplane, sometimes as a distant freight train, sometimes as a nearby blow-dryer. It’s amazing the amount of noise these tiny insects can make.

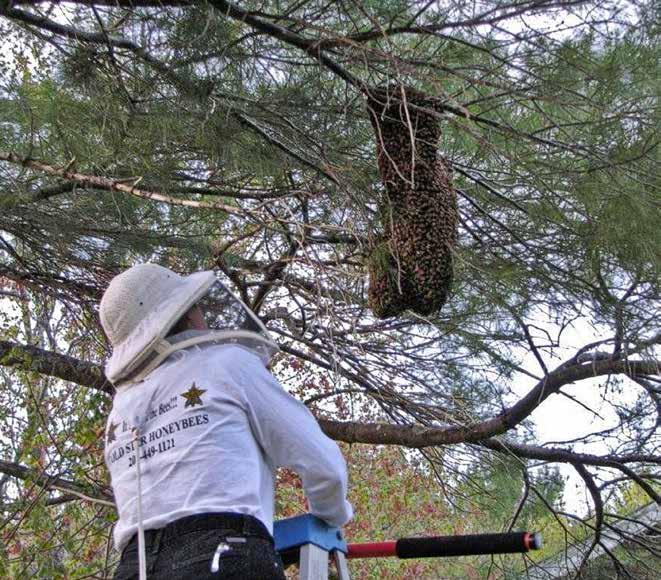
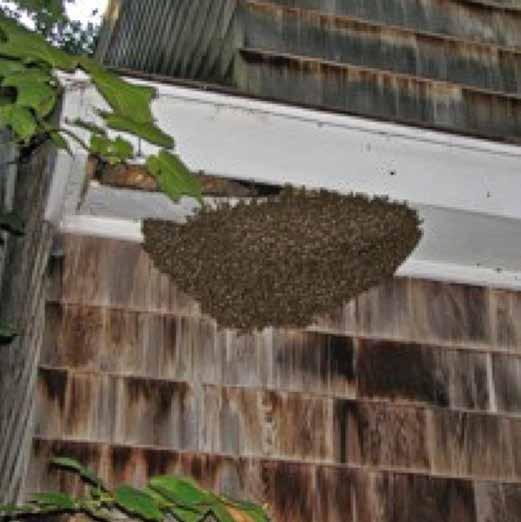
They will fly as a group to an interim bivouac location and gather there in a tight cluster—a ball of bees. This is when bees and beekeepers often find themselves in the news. To see this many bees together, acting in concert outside their hive, is admittedly a bit sensational. With the increased public awareness of bees in these troubled bee times, it gets a lot of attention. You’ve probably seen news stories of bees swarming on cars, mailboxes, tree branches, storefront windows, bicycle kickstands... just to name a few. Maybe a swarm is the reason you now find yourself keeping bees!
The ironic thing about the drama caused by a swarm of bees is that while a swarming colony of honeybees looks amazing, it is when the bees are swarming that they are most docile. One reason for this is that, before they flew from the hive, they had filled their bellies to the brim by gorging on their honey stores, and so they are a bit logy on this flight. Another reason is that they are in a very fragile situation, striving to complete this part of the swarming process successfully. They are on their way to starting a new home in a new cavity. They are not protected by a physical structure; they are not out foraging to gather more nectar or pollen; they are simply clustered tightly together in a special sort of way—and they are quite still, almost dormant. Another reason for their docility is that they have none of the precious resources that bees fight hardest to protect. When hanging in a ball from a tree branch, they have nothing—no brood and no food—to defend. So, aside from their need to stay together and be accompanied by their queen, not much is of interest to them, least of all humans.
While all this swarm behavior is happening, 300 to 500 scout bees will have fanned out in the local area, searching for an appropriate cavity for the swarm to move into. According to Dr. Tom Seeley in Honeybee Democracy, an appropriate cavity would be about 40 liters in volume, have an entrance of approximately 3 square inches and be located 15 feet or more above the ground. The dynamics of the decision-making process that is occurring at this point in the hive’s life cycle are beautifully detailed in Dr. Seeley’s book, based on his years of researching swarms
and their behavior. Through a process of dancing on the surface of the hive—communicating information about the size, location and suitability of the possible new location—the bees choose which cavity the scout bees have located that they will move into. Having decided, the swarm will “rev up” and fly off en masse to their new home; this happens very quickly, taking only a couple of minutes. Once there they will begin again to create a thriving colony of honeybees.
Catching a Swarm So...your bees have swarmed. Or someone else’s bees have swarmed, and you got the phone call because everybody knows you’re keeping bees because you’ve been talking about it so much. The bees are outside the hive and hanging in a ball from a branch or a fence rail, or under the eaves of your house or wherever they chose to stop on their way to their new digs. So there’s a swarm on the loose. Now what do you do?
Hopefully you have been preparing for this moment since you got your first bees, knowing that bees are striving to do just what they have done—swarm—to make more bees. If you have, then (Congratulations!) you very likely prepared by having an empty hive available, waiting for these new bees.
Now your challenge is to interrupt their home search process and introduce them into the new home of your choosing. This isn’t complicated, but it does need to happen quickly. Bees may only stay in their swarm cluster for a short time (sometimes minutes, often only a few hours), while making the official choice of new location. Knowing this, many beekeepers that are interested in collecting swarms of bees keep a “swarm kit” at the ready. This allows them to respond quickly to swarm calls from concerned citizens, emergency personnel, pest control companies and others who need a prepared and knowledgeable beekeeper to collect some bees.
The contents of a mobile swarm kit might include: • A bee-tight container. Often this is a cardboard box, but it could be a bucket or any other container with a lid. It does not need to be
airtight; in fact, you may want to add some ventilation by taping a piece of screen securely over a hole in the side of the container. • Masking tape • Your bee veil • Step ladder (Caution is advisable when the swarm’s location requires a ladder. Even though a swarm is generally very docile, being startled by the sting of an accidentally crushed bee may cause you to lose your balance and fall. A broken leg can make beekeeping difficult, so “bee” careful!) • Lopping shears • Small hand trimmers • Extendable tree trimming saw, especially one with a hook on the end • Sheet or tarp • GPS or map or directions to the location of the swarm • Cell phone • Camera • Piece of cardboard • Bridge for walking swarms found on the ground into your container
Capturing the swarm is usually fairly simple. The swarm cluster is made up of bees hanging on tightly to other bees. Only those that are actually clinging to the surface that the cluster is hanging from are holding onto anything besides other bees. You have only to hold the box or other container below the swarm cluster and jar them loose. That’s pretty easy to do in the case of a branch. Use your fist to strike the branch and the force of that impact is usually enough to cause the entire ball of bees to fall into the box. Be ready for the weight of the bees when they fall; a swarm can weigh several pounds, and the shock of their weight can cause you to lose your grip on the box if you aren’t prepared for it.
Sometimes a swarm is wrapped around a “y” in a tree (gnarly old apple trees are notorious for this, it seems), and no amount of you jarring or knocking the branches is going to dislodge them. In such cases, having a piece of cardboard that you can use to gently scrape along the branch,
Figure 2.16. Collecting a swarm can mean climbing some very tall ladders!
Credit: Gold Star customer.
Figure 2.17. Collecting a swarm into a “hightech swarm collector”— a cardboard box.
Credit: Gold Star customer.

causing clumps of bees to fall into the container you are holding below, is very helpful. If the property owner is not dismayed by you cutting or trimming the branches of the tree, this can simplify the process.
Placing a tarp or sheet on the ground beneath any swarm can be helpful if part of the cluster winds up falling. Getting bees out of grass is difficult, so if they drop onto a sheet you can simply use it to gently gather them up and empty them into your container. If you encounter a swarm of bees on the ground, be sure to look up—above those bees—because you may find that the ones on the ground fell from a swarm cluster that is hanging above.
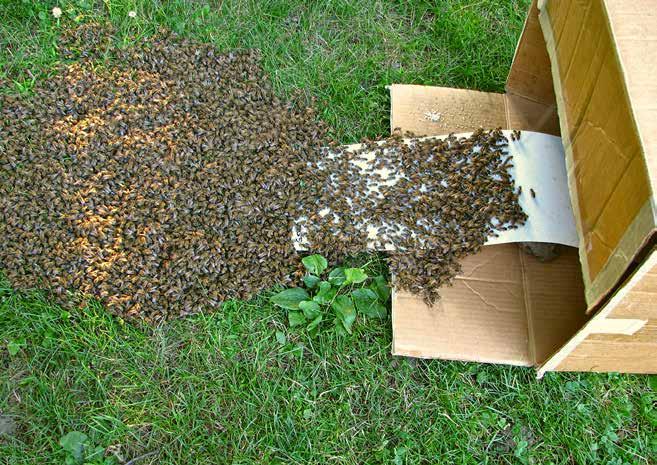
One method of getting bees out of the grass is to create a bridge. Many materials can work for this purpose. I’ve had success with the piece of white plastic used as a mite counting board in Gold Star hives, but a simple stick can also work. Place one end of your bridge in the cluster of bees on the ground, the other end at or near the entrance to your box. It’s uncanny the way the bees will “march” across the bridge into the box, saving you the difficult task of trying to pick them out of the grass.
Figure 2.18. Swarms that fall to the ground will “march” over a makeshift bridge into a swarm box. Credit:
Christy Hemenway.
Swarms that cluster on a vertical surface, such as a building or a vehicle, can be gathered by using a flap of the lid of your swarm box. Gently wiggle it in between the bees and the surface. Once the cluster of bees is in your box or other container, you must be certain that the queen is amongst them. If you are fortunate enough to see her there, that answers that question, but spotting a queen in a mass of bees at the bottom of a box can be a bona fide challenge. However, the bees will tell you what you need to know. Spend some time Figure 2.19. You can use the flap of a box to gently nudge observing, watching the bees that bees into your swarm collector. Credit: Christy Hemenway. are inevitably in the air at this point. If the queen is inside the box, the stray bees will fly to the box and rejoin the cluster. If she is not, she is likely still at or near the original location of the swarm. In that case, the stray bees will begin to gather there again, and bees inside the box will leave to fly back there. That’s your cue that you need to make a second attempt to gather the queen along with the rest of the cluster. Ten minutes of watching the bees will make it pretty clear. When you are convinced the queen is in the box, along with as many of the flying bees that you have the patience to wait for, close up the container and secure its lid. For closing a cardboard box, I have found that masking tape is better than duct tape. It sticks better, which is definitely what you want. Having your swarm box begin to leak bees while you are transporting them in your car, or while it is sitting in your house as you prepare their new home, or while you are waiting for their new beekeeper to collect them is definitely not a good thing!
Installing the Swarm in Their New Hive When you get the bees to their new home, installing them into the hive is fairly simple, especially compared to the detailed process of installing a package. Have the hive ready and waiting—lid removed, top bars out. Bonk the box firmly on the ground. This will cause the bees to drop to the bottom of the box. Hold the box over the hive and open the lid. Carefully pour and shake the bees into the hive. Since your queen is loose in this mass of bees, do your best to be certain that all the bees fall into the hive and not onto the ground. Stepping on the mated queen of a primary swarm would be a poor beginning! Put the top bars in place over the bees and put the hive lid on.
Recombining Hives or...No Dinks! Sometimes a small colony of bees will swarm despite their size. This may leave the beekeeper with two small colonies, neither one robust enough to do well on its own. In this case, it makes sense to recombine the two by capturing the swarm if possible and simply installing it right back into the original hive, from whence it came.
For the beekeeper who wants to increase the number of hives in their apiary, this seems counter-intuitive, but it is a better plan to support one large thriving hive than to fuss and worry over two dinks, neither of which has a good chance of survival, especially through winter.
Swarm Trapping or...Another Way to Get Free Bees If you are interested in increasing the size of your apiary, one way to go about that is to set up a swarm trap. This is a container such as a nuc box—a small version of your top bar hive—that can be hung in a tree, or placed in a location likely to be favored by a passing swarm. It should be equipped with several top bars that match your existing hive equipment. Locate the swarm trap where you can easily monitor it for activity, so that you will notice if a swarm moves into it.
Just as you do when starting a new top bar hive, you’ll want to have a piece of brood comb inside your swarm trap to attract and to help anchor
Figure 2.20. Bees building bars of comb.
Credit: Dana Gray (top), A & R Verbeek (bottom).
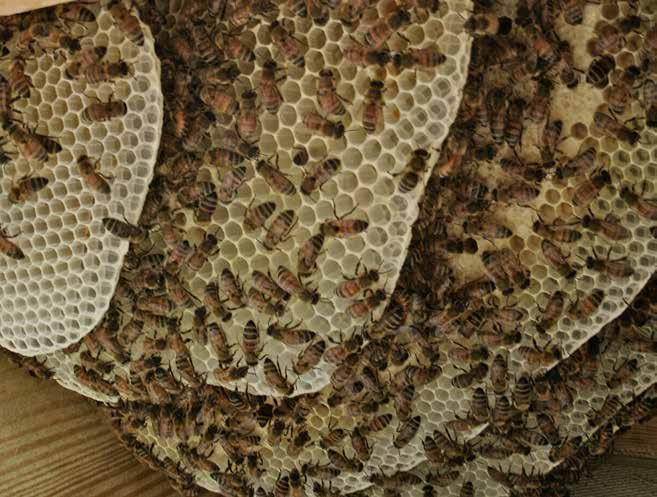
the swarm. Either use bars that have comb attached or wire a piece of comb to one of the bars. Dribble a few drops of lemongrass essential oil on the interior wood of the swarm trap as an additional lure.
Be aware of two important factors regarding swarms caught in this way. First, a swarm is very organized; the bees in the swarm are all the right ages for all the jobs that need to be done when starting a brandnew hive. This means that there will be plenty of bees in the swarm that are of wax-building age. Swarms can build comb faster than you can say “Bzzzzzt!” I have seen a swarm build 22 full bars of comb in 17 days. In another case, they built 17 bars in 14 days. That’s more than one full bar per day. So be ready! It’s astonishing to watch, and the difference between a swarm and package will amaze you.
The second important factor is that the source of the swarm is likely to be unknown to you. This means the bees may be treatment-free, or they may not. They may be natural-sized bees, or they may have come from a hive using larger “standard-cell” foundation, meaning they are larger bees. Large-cell bees can size down, but they will first draw comb that is a bit bigger than the typical 4.9 mm that is considered the natural size of a honeybee brood cell. The vigor and organization of a swarm and their ability to build up quickly is a plus, but this may be offset by the bees’ exposure to chemical treatments or the possibility of disease. Be aware of these things when installing swarms in an apiary already occupied by natural-size, treatment-free bees.
This ebook is distributed by Ogden Publications. All rights reserved. No part of this ebook may be copied or sold.