FOR NORTHERN WIDE PLANK ENGINEERED PREFINISHED FLOORS
IMPORTANT:
WE REQUIRE THAT YOU READ AND UNDERSTAND THIS INFORMATION COMPLETELY PRIOR TO RECEIVING/INSTALLING A NORTHERN WIDE PLANK FLOOR SINCE IMPROPER INSTALLATION CAN VOID THE WARRANTY. BY FOLLOWING THESE INSTRUCTIONS AND GUIDELINES YOU WILL ENSURE TO HAVE AND ENJOY THE PRESENCE OF OUR BEAUTIFUL FLOORS FOR YEARS TO COME.
OWNER/INSTALLER RESPONSIBILITY
DO NOT UNWRAP YOUR NORTHERN WIDE PLANK FLOORING PRIOR TO INSTALLATION. ACCLIMATION IS NOT REQUIRED, PROVIDED THAT THE JOB SITE MEETS THE RECOMMENDED ENVIRONMENTAL CONDITIONS.
NEVER APPLY TAPE DIRECTLY TO THE FLOOR SURFACE.
Carefully inspect ALL material prior to installation for defects. Materials installed with visible defects are not covered under warranty. Remember – Wood is a natural product that can vary in colour, grain, and contains natural characteristics that vary from plank to plank and is to be expected. We do not warrant against these natural variations from plank to plank or variations from sample to plank.To avoid dramatic variation mainly caused by ageing, it is recommended that installation be completed from the same lot. Remember – If you are not satisfied with the flooring prior to installation, contact Northern Wide Plank or your dealer – DO NOT INSTALL the flooring. Accepting or rejecting the material must be done on full shipment of quantities only, not bundle by bundle or plank by plank. The material is manufactured to exceed industry standards (ANSI/HPVA EF 2009).
NOTE: As every floorboard differs in colour, the individual Northern Wide Plank floorboard can, therefore, constitute a visual orientation aid only.
• Prior to installation, the installer and owner must ensure that the work environment and subfloors meet or even exceed minimum specifications listed in this installation guide.
• Maintain temperature between 15-24°C (59-75°F) and humidity of 35% - 55% RH.
• Prior to installation, the installer and owner should conduct a final inspection of grade, manufacturing and finish quality of boards to ensure that the floor conforms to the purchased product. Care should be taken at this time to remove particular characteristics you do not desire. Northern Wide Plank Flooring Inc. declines responsibility for any costs incurred when plank(s) with visible defects have been installed.
• Once installed, any board is considered as having been accepted by the installer and owner, even if the owner is absent at the time of installation.
• The use of stain, filler, or putty stick for the correction of minor defects during installation should be accepted as normal procedure.
• Standard trade practice allows for up to a 5% margin of error for natural imperfections and manufacturing defects. When ordering, add at least 5% to the actual square footage needed, for cutting and grading allowance.
NOTE: Angle installation causes greater cutting losses, allow for at least 10%. For reclaimed wood flooring allow for 10% for extra selection.
• Cork/acoustic underlayment with Woodstikk19 double glue down if sound reduction is required.
• Non-abrasive towels for hand and tool cleaning
• Trowel recommended by the adhesive manufacturer as tooth size is important for ensuring optimal plank adherence to the subfloor. B11 (23/48) or 1/4”x3/16” V-notched trowel
GLUE AND NAIL / STAPLE DOWN INSTALLATION (ABOVE GRADE ONLY)
• 30mm (1-1/4”) Staples (minimum)
• Power drill and 1/16” [1.5 mm] bit
• Compressor
• Finishing nails 1-1/2” [38 mm]
• In-line regulator
• Flooring screws
• Pneumatic Nailer / Stapler
• Woodstikk 10 600ml adhesive and dispenser or Woodstikk 19 adhesive and recommended trowel B11 (23/48) or 1/4”x3/16” V-notched trowel
CAUTION: IMPROPER USE OF A POWER NAILER CAN MARK THE SURFACE OF THE FLOORING.
NOTE: NORTHERN WIDE PLANK CANNOT BE HELD RESPONSIBLE FOR ANY FLOOR DAMAGE RESULTING FROM THE USE OF INADEQUATE TOOLS OR ADHESIVE, DIFFERING FROM THOSE RECOMMENDED. ALL THE INSTALLATION MATERIAL MUST BE AT THE RECOMMENDED ROOM TEMPERATURE PRIOR TO THE INSTALLATION OF 15°C (60°F) TO 24°C (75°F).
3 / JOBSITE INSPECTION & PREPARATION
It is the installer/owner’s responsibility to ensure that the job site conditions and jobsite subfloor are environmentally and structurally acceptable prior to the installation of any hardwood flooring. Northern Wide Plank Flooring Inc. declines any responsibility for failures or deficiencies of hardwood flooring resulting from or related to sub-floor, subsurface, or job-site environmental conditions. All substrates must be clean, flat, dry, and structurally sound.
• Hardwood floor installation should be the very last step of any construction or renovation project.
• Exterior grading should be complete with surface drainage offering a minimum slope of 150mm (6”) in 3000mm (10’) to direct the flow of water away from the structure. All gutters and downspouts should be in place.
• All outside doors and windows must be in place. All concrete, masonry, plastering and other “wet” work must be complete and thoroughly dry.
• Northern Wide Plank engineered flooring products may be installed below, on or above grade level using recommended installation methods in this guide.
• Crawl spaces must be a minimum of 600mm (24”) from the ground to underside of joists. A ground cover of 8mm
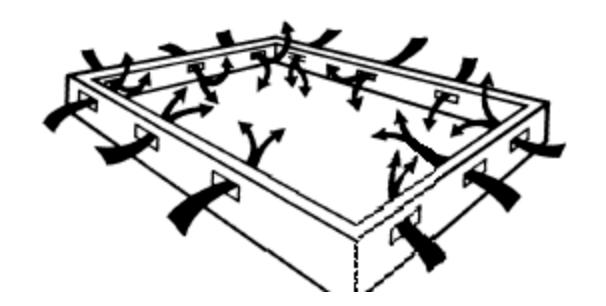
• Polyethylene film is essential as a vapour barrier with joints lapped 200mm (8”) and taped. The crawl space should have perimeter venting equal to a minimum of 1.5% of the crawl space square meters. These vents should be properly located to foster cross ventilation (see figure 1). Local regulations may prevail.
• To avoid any moisture-related damages, subfloor must be dry and basements and crawl spaces must be dry and well ventilated.
• For below grade installation, ensure that foundations, concrete slab or any adjacent objects are thoroughly leak proof.
• Do not install Northern Wide Plank flooring boards in full bathrooms.
• Permanent HVAC should be on and operational a minimum of 5 days and maintained between 15-24°C (59-75°F) and a relative humidity of 35%- 55% prior to delivery, during, and forever after installation of the flooring.
• If HVAC is not possible at the time of installation the environmental conditions must be at or near normal living conditions between 15-24°C (59-75°F) and at the average yearly relative humidity for the area.
FIGURE 1
SUBFLOOR PREPARATION AND RECOMMENDATIONS FOR ALL INSTALLATIONS
• Subfloors must be clean and free of dirt, curing compounds, sealers, drywall mud, paint, wax, grease, urethane, or other materials that may affect the integrity of the flooring material or adhesives used to install the flooring.
• All subfloors and subfloor systems must be structurally sound and must be installed following their manufacturer’s recommendations. Local building codes may only establish minimum requirements of the flooring system and may not provide adequate rigidity and support for proper installation and performance of a hardwood floor. Whenever possible install the planks perpendicular to the floor joists for maximum stability.
• Our warranties DO NOT cover any problems caused by inadequate substructures or improper installation of said substructures.
• The subfloor must be flat, meeting a minimum of 3/16” within 10’ or 1/8” in 6’.
• Concrete subfloors - Grind high spots or use a Portland-cement based levelling material (minimum compressive strength 3000 psi) to fill all low spots. Follow the levelling compound manufacturer’s instruction. Levelling compounds must be allowed to thoroughly cure and dry prior to the installation of wood flooring.
• Wood subfloors - Sand down high spots and fill the low spots with a levelling compound or other material approved for use under wood flooring. For glue and nail/staple down applications, staples must be able to penetrate for holding power. Make sure wood subfloor is screwed down solid and secure, and nothing loose. Ensure that there is proper expansion space (1/8”) between the wood subfloor panels.
SUBFLOOR MOISTURE CHECK
The recommended wood flooring adhesive may be used for above, on, and below level applications and on all common substrates. Concrete subfloors should be tested for moisture prior to installation in three locations tests per 1,000 square feet of surface area and one additional test for each 1000 square feet thereafter. For slabs on grade and below grade, include a test location within three feet of each exterior wall. Wood subfloors should be tested for moisture at several locations in the room – a minimum of 20 per 1,000 square feet – and average the results. Document all results. A high reading in one area indicates a problem that must be corrected. Pay special attention to exterior and plumbing walls.
Acceptable conditions for above, on, and below grade applications are:
CONCRETE:
• Less than 1.4kg (3lbs)/ 95m2 (1000’sqft) /24 hrs on a calcium chloride test.
• No greater than a reading of 4.5% on a Tramex Concrete Moisture Encounter (moisture meter).
• RH testing using In-Situ probes/sensors (ASTM F 2170-02): Results should not exceed 75% RH.
WOOD:
• Test wood sub floors and wood flooring for moisture content using a pin-type moisture meter. Take readings of the subfloor – minimum of 20 readings per 1000 sq. ft. and average the results.
• Wood Substrates must have a moisture reading of less than 12% when using a suitable moisture meter and differential between boards and subfloor must be less than 4%.
If it exceeds these limits, DO NOT install the flooring. New concrete slabs require a minimum of 60 days drying time before covering them with a wood floor. (They must be fully cured). To correct any subfloor problems concerning moisture, either wait until the subfloor dries to meet specifications or use an appropriate moisture barrier.
4 / RECOMMENDED SUBFLOOR SURFACES
CONCRETE SUBFLOORS
Concrete slabs should be of high compressive strength (Minimum 3000 psi) and constructed to prevent groundwater from permeating the concrete. Engineered hardwood flooring can be installed on, above, or below grade. In addition, it can be installed over above-ground, suspended concrete floors. The suspended concrete must be a minimum of 1 ½ inches thick and must be structurally sound. The exception to this is lightweight concrete (which usually contains high amounts of gypsum) having a density of 100 pounds or less per cubic foot. Test for lightweight concrete by using a nail to scratch the surface of the concrete. If the concrete crumbles or turns to powder, it is not sound and you should NOT install hardwood flooring.
WOOD SUBFLOORS
Subfloor panels should conform to U.S. Voluntary Product Standard PS1-07, Construction and Industrial Plywood and/or US Voluntary PS 2-04 and/or Canadian performance standard CAN/CSA 0325.0-92 Construction Sheathing. Other CSA standards also apply.
ACCEPTABLE PANEL SUBFLOORS: TRUSS/JOIST SPACING WILL DETERMINE THE MINIMUM ACCEPTABLE THICKNESS OF THE PANEL SUBFLOORING.
• On truss/joist spacing of 16” o/c or less the industry standard for single panel subflooring is minimum 5/8” 19/32”, 15.1 mm) CD Exposure 1 subfloor panels, 4x8 sheets.
• On truss/joist spacing of more than 16”, up to 19.2” (488mm) o/c, the standard is nominal ¾” (23/32”, 18.3 mm) T&G CD Exposure 1 Plywood subfloor panels, (Exposure 1) or nominal ¾” 23/32”, (18.3mm) OSB Exposure 1 subfloor panels, 4’x8’ sheets, glued and mechanically fastened.
• Truss/joist systems spaced over more than 19.2” (488mm) o/c up to a maximum of 24” (610mm) require minimum 7/8” T&G CD Exposure 1 Plywood subfloor panels, (Exposure 1), or minimum 7/8” OSB Exposure 1 subfloor panels, 4’x8’ sheets glued and mechanically fastened – or two layers of subflooring or brace between the truss/joist in accordance with the truss/joist manufacturer’s recommendations and with local building codes. Some truss/joist systems cannot be cross-braced and still maintain stability.
• For existing wood floors install new flooring at right angles to the existing flooring.
• Do not install over particle board, existing glue down or floating hardwood floors.
CORK/ACOUSTIC UNDERLAYMENT: (GLUE DOWN ONLY)
Install the cork/acoustic underlayment according to the manufacturer’s instructions. The cork/acoustic underlayment must be fully adhered to the subfloor. Cork underlayment should be of pure granulated cork combined with a polyurethane binder with a minimum density of 11.4 lbs. per cubic foot and not to exceed 13 lbs. per cubic foot.
5 / PRE INSTALLATION PREPARATION
JOB PREPARATION
• Plan your project by making an installation sketch.
• Determine the installation starting point. Is it one regular- shaped room, a number of rooms with landings, or rooms on one floor, including a hall or main room? Think about how to get the most out of your project and have a balanced aesthetic
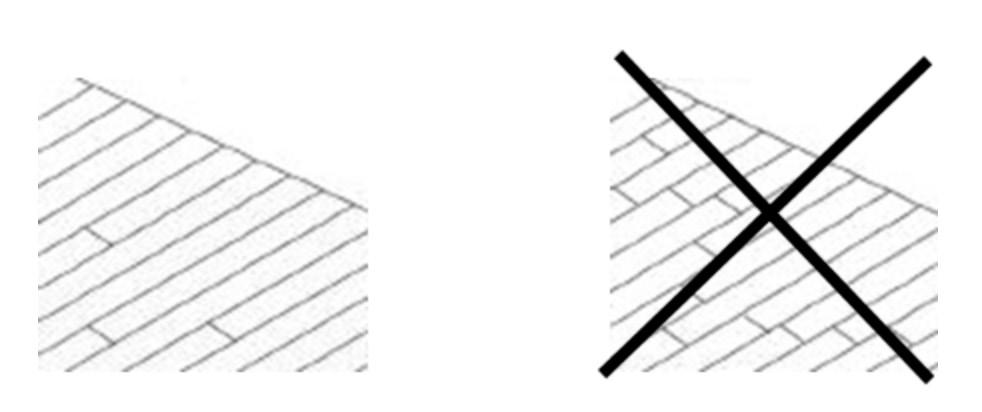
• Choose the floorboard direction. It is strongly recommended you install boards at a 45° or 90° angle to the joist direction (not applicable for installation directly on concrete).
Inspect the Flooring:
Inspect material for colour, finish, milling, and grade. Hold out pieces that may not be acceptable once installed.
PLEASE NOTE:
We do not accept responsibility for any costs incurred when plank(s) with visible defects have been permanently installed.
Undercut Door Casings:
Remove all mouldings and wall-base and undercut all door casings with a hand or power jam saw using a scrap piece of flooring as a guide.
Important!
Presorting Prior to Installation:
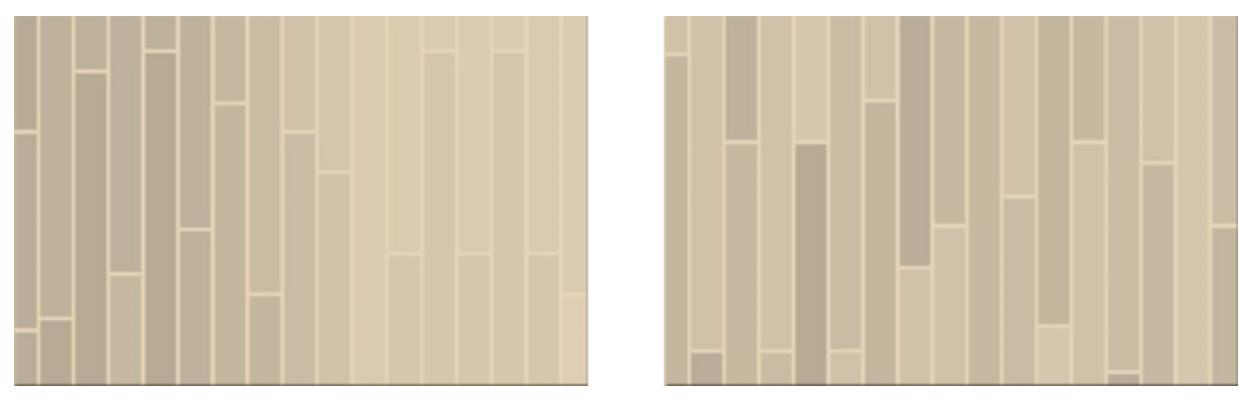
Natural colour variations of each individual plank reflect the variation of nature. Prior to installation, it is particularly important to sort the individual planks by colour. Do this by opening several bundles flooring at a time, from different parts of the shipment. In doing this, it is possible to deliberately influence the overall appearance of the room, depending on how the boards are sorted. If the floorboards are installed by merging the colour gradually, the result is an even homogenous effect, while a more dramatic look is created when bright and dark planks are deliberately mixed. As a result it is possible to create diverse effects depending on how the floor planks are installed.
MERGING COLOUR
DELIBERATELY MIXING COLOUR
Match Transition Moldings:
For best appearance blend all transitions and moldings to planks that have similar color and graining. Set them aside for use as needed.
Layout of Flooring:
“Racking the Floor”. Whether you choose to install the floor by the glue down or glue and nail/staple down method, start by cutting or selecting four to five planks in random lengths, differing by at least 600mm (24”). As you continue working across the floor, be sure to maintain the 600mm (24”) minimum between end joints on all adjacent rows (See Figures 2 & 3). Never waste material; use the leftover pieces from the fill cuts to start the next row or to complete a row.
Expansion Space for Northern Wide Plank Engineered Hardwood Floors:
Due to the construction of Northern Wide Plank hardwood floors, we recommend an expansion gap of 1/8” to allow the wood to react to changes in ambient humidity. The expansion gap will either be hidden by the baseboards and quarter rounds, which will be nailed to the walls and not the floor. If baseboards are very thin or if there are no quarter rounds, you may hide the expansion joints by removing a strip of drywall, the thickness of the flooring, at the base of the wall.
RANDOM WIDTH FLOORS
As most ARTIFAX Genuine Reclaimed Wood Floors are supplied random width, it is important that the installer/ owner obtains a tally sheet of the actual footage of each size/width that has been received to the jobsite as there is no repeating pattern implied or guaranteed. If the tally hasn’t been obtained, then Northern Wide Plank Flooring should be contacted and a tally will be provided. From the information on the tally sheet, the random pattern should then be planned out prior to installation of the product to avoid running out of any particular size. Do not install the flooring in such a pattern (3,4,5,3,4,5, etc…) or you will run out of one of the appropriate widths before the installation is complete.
Tip: you can plan ahead to use more narrow planks in smaller rooms and wider planks in larger or more prominent rooms.
• Install your floor under good lighting conditions. This lets you balance board length and color variations in the wood.
• Open several bundles at a time to mix the planks and ensure that flooring characteristics are evenly distributed over the entire floor.
• Take precautions to not damage the finish. For example, place tools and the flooring hammer on a protective mat during installation. Vacuum frequently to eliminate sawdust and abrasives.
FIGURE 2
FIGURE 3
6 / GLUE DOWN INSTALLATION (RECOMMENDED METHOD)
Glue down installation guidelines, applicable for 15mm (5/8”) - 21mm (3/4”) thickness.
Radiant heat subfloors - Glue down installation only.
Note: Prior to specifying or installing over radiant heated floors please contact a Northern Wide Plank flooring consultant and refer to separate instructions for installation over underfloor heating.
Below level?
A concrete slab is considered below grade when any part of the slab is below ground level, for example, walkout basements are below grade! Install flooring with full spread of Woodstikk 19 (formerly Gekko Woodstikk18) Adhesive according to the manufacturer’s specifications.
Before you begin using the following instructions, please refer to the previous Pre-Installation Job Prep information.
STEP
1 – GETTING STARTED
• Select a starter wall. It is recommended to start the installation along an exterior wall; it’s more likely to be straight and square with the room.
• Measure out from the wall the width of two planks plus a (1/8”) expansion gap and mark each end of the room and snap your chalk line.
• Secure a straight edge inside the chalk line before you spread your adhesive to ensure alignment, which is a critical part of the installation. This prevents movement of the planks that can cause misalignment.
• Check along wall to make sure there isn’t too large of a gap.
STEP 2 – SPREADING THE ADHESIVE
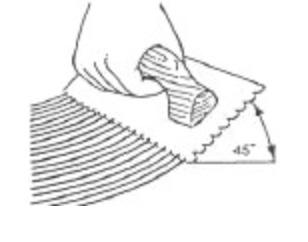
• Using the recommended trowel ( B11 (23/48) or 1/4”x3/16” V-notched trowel) at a 45° angle (See Figure 4) to get the proper spread of adhesive applied to the subfloor is important; doing so will produce a proper and permanent bond. Improper bonding can cause loose or hollow spots.
• Spread adhesive from the straight edge out about 750mm. Working in small sections is helpful for this method as it will allow you to reach across the adhesive to install the wood flooring without putting any weight on it and will ensure proper transfer of the adhesive to the wood flooring.
FIGURE 4
Note: Change the trowel every 185m2 (2000’sqft) to 275m2 (3000’sqft) due to wear down of the notches. This assures you always get the proper spread of adhesive.
• Temperature and airflow across the adhesive can have an effect on the open time of the adhesive. The Adhesive will have a longer open time in areas of low humidity and will have a shorter open time in areas of high humidity. (See Adhesive label for further information).
6 / GLUE DOWN INSTALLATION (RECOMMENDED METHOD)
STEP 3 – INSTALL YOUR STARTER ROWS
Install the first row of starter planks with the tongue side of the plank facing the straight edge and secure into position (make sure the first row of starter planks have a full tongue to ensure you end up with straight rows).
NOTE: Make sure the planks used for the starter row have full tongues. Proper alignment is critical. Misaligned starter rows can cause side and end gaps to appear in proceeding rows of flooring. When you have the starter rows complete, you can begin the next row.
STEP 4 – JOB COMPLETION
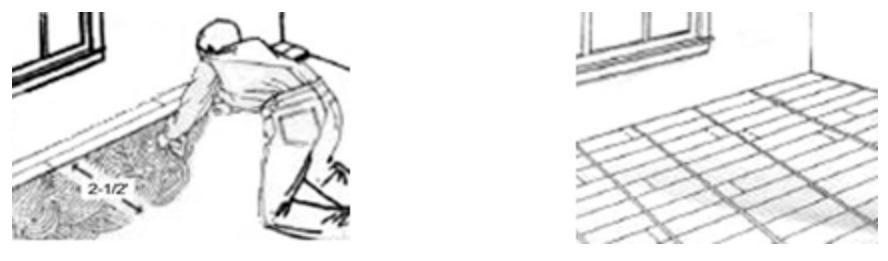
• Once the starter rows are secure, spread 750mm (2.5’) of adhesive along the length of the room (See Figure 5). Never spread more adhesive than can be covered using the open time recommendation listed in the instructions on the adhesive label. If the adhesive has skinned over remove dried adhesive and trowel new adhesive.
• Place tongue into groove of planks and press firmly into the adhesive. Never slide planks through adhesive. Never install planks further than you can comfortably reach.
• As you continue working across the floor try to maintain a 24” minimum space between end joints. Randomly install different lengths to avoid a patterned appearance.
NOTE: Use caution when using a rubber mallet to butt material together, as it can burnish the finish and cause marring.
• Test for proper bond by occasionally lifting a board and looking for good coverage (90%), and then replace it into the adhesive.
• Clean any adhesive off the surface, as you work, before it cures using a non-abrasive towel.
• As you approach the end wall it may be necessary to cut the width of the last row – be sure to allow for the expansion space along the end wall. Once the final cuts are made set planks into place.
• After the floor is complete remove the straight edge and complete installation in the same manner. Use pry bar to fit last row of boards into place and be sure to leave minimum required 1/8” expansion gap.
• Restrict light foot traffic for a minimum of 10-12 hours and wait 24 hours before permitting moving of furniture onto the floor.
• Clean any wet adhesive from the flooring with a lightly dampened clean cloth. If the adhesive has cured, you may remove it with a plastic scraper and dry, non-abrasive towel, taking care not to damage the finish.
• Flooring that is not flat should be weighted to apply pressure to installed sections while the adhesive is still active (app. 30–60 min.) to ensure proper contact between the flooring and substrate. Use protective padding to avoid damage to the floor surface. When installing unfinished wood flooring, wait a minimum of 72 hours before sanding.
6 / GLUE DOWN INSTALLATION (RECOMMENDED METHOD) CONT’D
FINAL INSPECTION:
After the floor has been cleaned, inspect the floor for nicks, scratches, gaps or planks that may have moved during installation, as well as any other imperfections that need attention. Touch up nicks and scratches with touch-up products. In typical climates, the new floor can accept foot traffic within 24 hours. In areas where additional curing time is required, more time may be needed.
NOTES:
• Never work on top of the flooring when installing with the glue down method.
• If used, always remove the 3M 2090 blue masking tape within 4 hours of applying, otherwise the tape may form a permanent bond that can remove the finish.
• When used, acoustic underlayment must be glued down over subfloor prior to gluing down boards using a premium multipurpose adhesive.
• Extremely precise board milling may require use of tapping block for better tongue and groove fit.
• Row to row installation requires that no glue seeps into grooves at any time for perfect tongue and groove fit.
FIGURE 5
FIGURE 6
GLUE & NAIL / STAPLE DOWN INSTALLATIONS, APPLICABLE FOR 15MM (5/8”) - 21MM (3/4”)
THICKNESS. (ABOVE GRADE ONLY)
BEFORE YOU BEGIN USING THE FOLLOWING INSTRUCTIONS, PLEASE REFER TO THE PREVIOUS PREINSTALLATION JOB PREP INFORMATION.
Northern Wide Plank flooring products may be installed over wood subfloors using staples or nailing cleats and Woodstikk 19 (formerly Gekko Woodstikk18) Adhesive or Woodstikk 10 adhesive. When installing Northern Wide Plank flooring products by nailing or stapling, it is necessary to use the proper type of flooring stapler or nailer.
STEP 1 – SETTING UP
• You must staple or nail 25-50mm (1”-2”) from the ends and every 100-150mm (4”-6”) along the edges. This will help insure a satisfactory installation.
• It is best to set the compressor PSI at 35-40 kg (77-88lbs) to keep the staples from going through or breaking the tongues. Improper stapling techniques can cause squeaks in the floor. Adjustments may be necessary to provide adequate penetration of the nail or staple into the nail bed. You want it flush in the nail pocket. Use a scrap piece of flooring material to set tools properly before installation.
• Spread Woodstikk 19 (formerly Gekko Woodstikk18) Adhesive (using B11 (23/48) or 1/4”x3/16” V-notched trowel) or apply Woodstikk 10 adhesive, just prior to nailing flooring in place. This will help prevent squeaks and resist movement of your floor.
• Keep in mind there is no complete moisture barrier system for staple or nail down installations.
STEP 2 – LAYOUT THE JOB
• Select a starter wall. It is recommended to start the installation along an exterior wall; it’s more likely to be straight and square with the room. Measure out from the ends of your starting wall, the overall width of the plank (face board width + the space needed (1/8”) for expansion) and mark both ends. Where possible, lay the flooring at a 90° angle to the floor joists.
• Make a chalk line along the starting wall using the marks you made.
STEP 3 – BEGINNING INSTALLATION
• Place the planks with the tongue facing away from the wall and align the groove along your chalk line. Spread or apply adhesive prior to using brads or small finishing nails to secure the first starter row along the wall edge 25-50mm (1”-2”) from the ends and every 100-150mm (4”-6”) along the side. Counter sink the nails and fill with filler that blends with the flooring installed. Place the nails in a dark grain spot in the board. The base or shoe molding will cover the nails when installed, after completion of the installation.
• Blind nail at a 45° angle through the tongue (See Figure 7). Nail 25-50mm (1”-2”) from the ends and every 100-150mm (4”6”) along the sides. It will be necessary to blind nail the next 2 rows. A Stanley BT35 brad nailer with 25-35mm (1”-1 3/8”) brads can also be used to blind nail and no pre-drilling is needed.
NOTE: PROPER ALIGNMENT IS CRITICAL. MISALIGNED STARTER ROWS CAN CAUSE SIDE AND END GAPS TO APPEAR IN PROCEEDING ROWS OF FLOORING.
7 / GLUE & NAIL / STAPLE DOWN INSTALLATION
STEP 1 – SETTING UP
• Continue the installation using the recommended adhesive and engineered wood flooring stapler or nailer, using staples or nailer cleats recommended. Nail or staple the flooring 25- 50mm (1”-2”) from the end and every 100-150mm (4”-6”) along the edge tongue. Make certain the tool is adjusted properly to ensure that the fastener is at the proper angle and is flush within the nail pocket. As you continue working across the floor try to maintain a 24” minimum space between end joints. Randomly install different lengths to avoid a patterned appearance.
• If needed use a tapping block to help engage the boards together until the tongue-and-groove is flush and tight and no gaps are present between adjacent planks.
NOTE: Never use a rubber mallet or hammer directly on the flooring to engage the tongue-and-groove. This can damage the flooring and/or finish.
• As you approach the end wall it may be necessary to cut the width of the last row – be sure to allow for the expansion along the end wall. Once the final cuts are made set planks into place.
• The last few rows will need to be fastened by hand. To fasten the final planks into place, you must either manually blind nail and/or face-nail through the surface on the final planks. Drill pilot holes at a 45-degree angle to the floor and blind nail using l” finishing nails. Alternatively, drill pilot holes in the face every 6” (try to drill holes in darker portion of the wood) and install with 1” finishing nails. Countersink nails and fill with appropriate colored wood filler – remove excess filler from surface with a clean rag and proper cleaner.
FINAL TOUCHES
IMPORTANT NOTE: IF USED, ALWAYS REMOVE THE 3M 2090 BLUE MASKING TAPE WITHIN 4 HOURS OF APPLYING THE TAPE. ALWAYS WAIT 10-12 HOURS TO RESUME LIGHT FOOT TRAFFIC AND 18-24 HOURS FOR REGULAR TRAFFIC AFTER INSTALLATION TO ALLOW PROPER CURE TIME FOR GLUE.
• Install transition pieces -i.e. – thresholds, t-moldings, baseboards and quarter round. Nail moldings to wall, not the floor.
• Sweep or vacuum floor
• Inspect final floor for nicks – Contact Northern Wide Plank for approved touch up materials.
• Clean the floor with the correct hardwood floor cleaner and complete initial maintenance in accordance with Northern Wide Plank Maintenance & Care instructions
• Unused material should be left with owner and stored in a dry place in case of future repairs are needed.
• Use plywood or hardboard when moving heavy appliances or furniture across the floor.
FLOOR PROTECTION DURING CONSTRUCTION
After installation, if you choose to protectively cover the floor, cover the floor completely, since some floors are light sensitive and uncovered areas may change color. Use a covering material with a vapor permeance (perm rating) of 1 perm or more (tested in accordance with ASTM E-96) to avoid trapping moisture/vapor on or within the floor. Our recommended product for floor protection is NWP Plank Liner which has a self adhesive backer eliminating the need for tape to hold it in place. Vacuum and clean the floor thoroughly to remove abrasive debris before covering with the floor protection product to avoid damage to the floor. Any covering that is not our Plank Liner should be taped, using a low-adhesion tape, to base or shoe moldings. Do not tape to finished flooring.
Once all construction work is done and floor protection covering is removed please refer to the appropriate floor Maintenance & Care Guide for initial and regular care & maintenance.
FLOOR CARE AND MAINTENANCE
Please refer to the appropriate Cleaning & Care instructions supplied specifically for the Northern Wide Plank floor you have purchased. If you haven’t received the correct instructions, please contact Northern Wide Plank or go to www.northernwideplank.com to obtain them.
NATURAL WOOD COLOR CHANGES
A Northern Wide Plank floorboard is an entirely natural product and as a result after a certain period of time, natural color changes can occur. Depending on the intensity in which the floor is exposed to the sun, lighter wood turns darker while darker wood typically becomes lighter (especially during the first 3-6 months).
If you have questions, we encourage you to contact the Northern Wide Plank Service Team at any time.
CURRENT VERSION: JULY 25, 2025 REPLACED VERSION: SEPTEMBER 8, 2022
5930 LLOYDTOWN/AURORA ROAD, SCHOMBERG, ON 877/763/6169 INFO@NORTHERNWIDEPLANK.CA