Siew Ling, Alvyn Eng and Tommy Wong | Singapore Teachers’ Academy for the aRts
Content
A. P.2 Narratives of Creative and Collaborative Processes B. P.15 Models of practices
C. P.17 Challenges and overcoming them D. P.18 Key learning E. P.20 Resources
Prelude
This is a special compilation of narratives, reflections, and thoughts from music teachers who have been involved in putting together virtual performances during the COVID-19 pandemic.
Putting up a virtual performance for the first time can be daunting and challenging, yet these virtual performances filled a void created from the absence of music-making in a period of isolation and social-distancing. Music, as we believe, must continue in our lives. And music-making can take place anytime, anywhere, and in different forms.
This publication offers insights into the different processes of putting together virtual performances by revealing the creative and collaborative workflow told by participants who have helped pioneer a virtual edition of Friends in Concert.
Perhaps their sharing of their creative pathways and experiences can collectively forge new understandings of music-making, and therefore, inspire new ideas for music teaching.
Narratives of Creative and Collaborative Processes
We interviewed a few participants of Friends in Concert 2020. They shared their processes and reflections. From their transcripts, we re-constructed their narratives so that the events were presented in chronological order. These narratives, titled by their performances, were focused on the collaborative and creative processes in which the respective virtual performances were put together. Some of these include reflections for music teaching. We hope these narratives could benefit our music teaching community through a closer look into the experiences of preparing for virtual performances, the diverse ways of expressing musical ideas, and the technicalities involved, which could then grow some insights for music teaching.
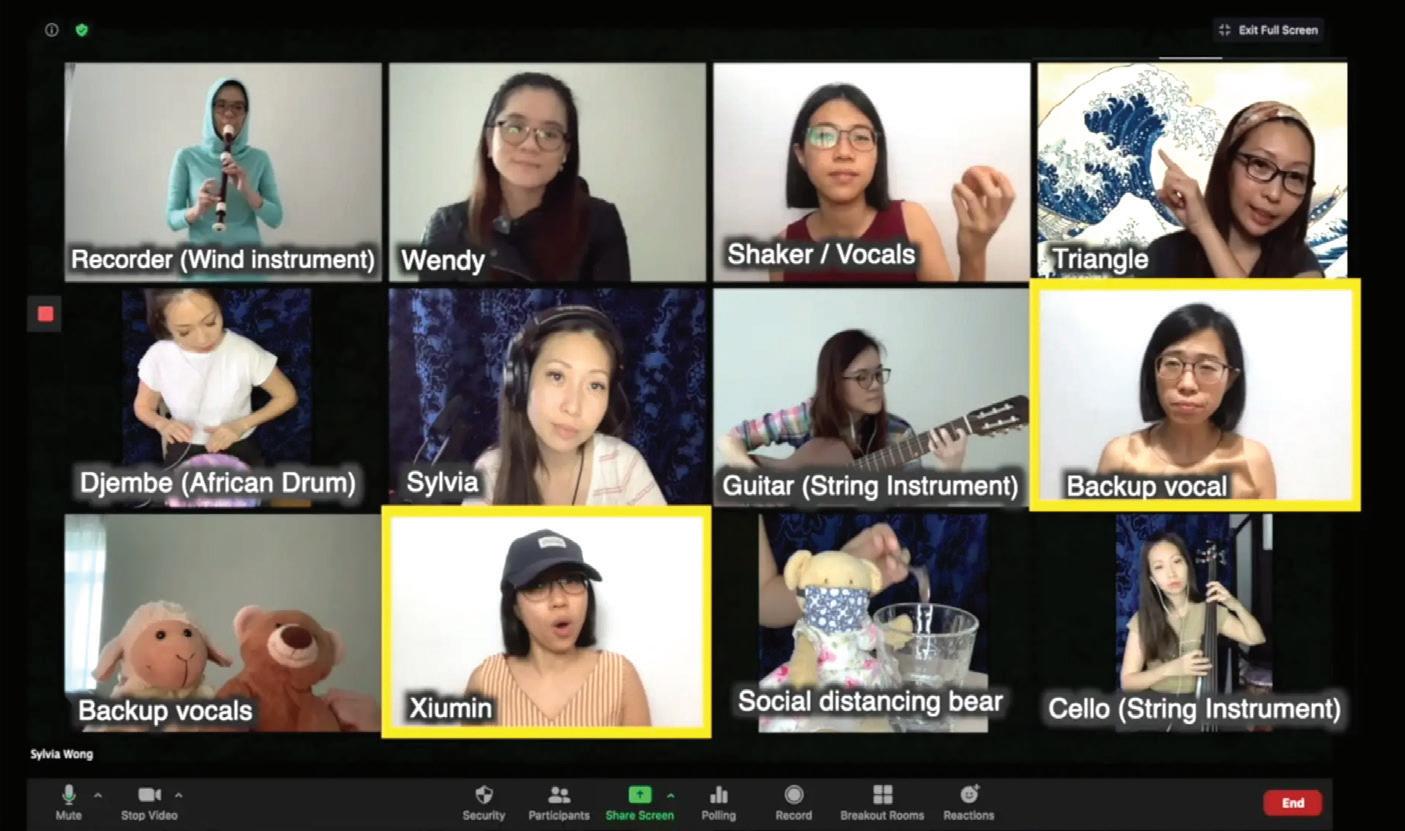
Perspective from Sylvia Wong
Performance at: https://vimeo.com/445153457
THE PROCESS
1
Unstructured Imaginings
Our first meeting was quite unstructured. We just brainstormed and let our creativity lead. It was good because it allowed us to explore every possibility that we were thinking of. We started thinking of the instruments we had at home – djembe, piano, and guitar. We also explored using household items to make instruments. And we asked ourselves, ‘with these instruments, what kind of ensemble could we put together?’
4
2
The Concept
We talked about how during home-based learning (HBL), we found that the teaching community seemed to be stronger because we had to rely on one another a lot more for resources. We all thought that it was a good idea to come up with something that would help encourage the teaching fraternity to come together and work for something in common. So, we decided on ‘Stand by Me’ because it was quite meaningful and popular as well.
3
More Experimentation
Having decided on the song, we agreed to meet again in three or four days. Meanwhile, we would be experimenting with different instruments to see what timbres, parts or arrangements we could come up with individually.
Playing to Our Musical Strengths
We met online again and tried to come up with something that we were all comfortable with. One of us was good at jazz arrangement so she volunteered to arrange the different vocal parts. For me, I came up with the rhythm, some harmonies and the chords, and shared these with our guitarist.
5
Creating a Backing Audio Track
Using GarageBand, I came up with a backing track, like a skeletal kind of structure which included the metronome because we needed our various recordings to be synchronised.
Adding Audio Parts
7 8 6
One of us used her synthesiser to add vocal parts. She then sent it to us so that we could learn the parts. She also suggested for us to listen to the parts and look at the notes at the same time so that we could remember the parts better. That was very effective. We followed the backing track with the synthesised vocal parts and then we recorded our voices and instruments over them. We would inform one another via WhatsApp when we completed our recordings. We had a shared Google drive and parked the completed audio recordings there.
Working with Video
As my teammate worked on cleaning up the audio, I used the backing track to synchronise the videos. The shared drive allowed us to work concurrently and we saved time.
Video Concept
I was thinking, in a perfect world, all musicians should be able to jam on Zoom without worrying about latency. I suggested doing a video based on the Zoom format. One of us added the idea of representing different students during Zoom lessons. So, we decided on the concept of doing a video that depicted a Zoom session with us portraying our students as musicians playing together.
REFLECTIONS FOR TEACHING
Building a Safe Online Environment on Friendship and Trust
It helped that we were already friends before we started this project. I also realised that this was quite important because we trusted one another. I was never worried that my teammates would change my audio or do something that I might not be comfortable with.
I was not sure whether the students might feel the same way if they were submitting a video recording of themselves. Even in Zoom meetings, sometimes they were a little shy about showing their faces. During HBL, I initially thought they were just being difficult. But I came to realise that some of them might not be comfortable with showing their face online.
I would make sure that students submitted their assignments on a safe platform. SLS is pretty safe. Padlet should only be used by students to submit audio recordings as there is no password protection. My school leaders also reminded us to avoid having students submit graded assignments online because we could not be sure if they were the students’ work.
Technical Tips
Hold the microphone close to the mouth to avoid capturing too much background noise
Use earphones when singing to a backing track, so that the sounds from the backing track would not leak into the recording
Check the camera angle (e.g. faces can be seen clearly) before starting on video recording
Use two devices simultaneously (one to record the audio and the other to record video) to capture both in one take to save time
Theme from Super Mario Bros. Perspective from
Jacobe Lim
Performance at: https://vimeo.com/447765855
THE PROCESS
1
Decision on Theme
When we first started, many discussions were centred on themes and we were searching for pieces. When we finally decided on Mario, I re-arranged the piece for our ensemble.
3
Audio Recording
2
Guide Track
In Sibelius, I exported an mp3 with metronome markings and metronome clicks, sent out the parts, and we started to practise. The individual practice time was long. We had to play strictly according to the metronome clicks.
We did the audio recording first. So, once we had a recording, we sent the recording to the group and then we would listen to one another’s. The tuning was set to A=442 Hz.
So, when we came together, we listened to one part, and then we discussed. If the sound was not ‘okay’, we would adjust the individual parts and record them again. Fortunately, the first round of recording was somewhat satisfactory and hence we decided to work with that.
4
Audio-editing
What was Helpful!
It helped that we came from a common background as band members. We kind of understood what it meant to breathe and move together. So, if you watch the clip, you would realise that there were some movements that we did together. They were not rehearsed; we did not say that we must move or breathe in that manner as we were playing. But it all came from that basic foundation that we built as band members. I guess that helped.
I stitched the separate mp3 recordings together. We had four tracks and mixed them in GarageBand. I used Adobe Audition to boost some of the audio quality, adjust the EQ, and fix the latency.
A lot of editing was done to improve the audio quality due to the pickup of the sound by the computers and use of different recording devices – one of us was using a normal vocal mic, and two of us were using recording condensers.
I worked on the video with Adobe Premiere Pro. There was a first draft that had very little theming because it was just putting the clips together. But later, there were some skits that members decided to do together.
5 6 7 Video
The Video Concept
It was a very simple story of what the teacher and students would go through in a day, influenced by our experience with the Circuit Breaker. We wanted to encourage students and teachers, so one way was to share the common challenges that we faced. So, that was how the story came about. The storyboarding and much of the script was written and choreographed by members.
Video-Editing and Scripting
I did another draft of the video to match the theme. I rearranged, other members helped to develop the script. When the arrangement was done, they listened to it, aligned and adjusted the story accordingly. I guess that was how it evolved. It was going on simultaneously, and a lot of times by intuition.
REFLECTIONS FOR TEACHING
Adaptation
I think one of the most important lessons was learning to adapt. I felt that this is something we have to teach the students. A lot of concerts were cancelled this year and it was rather heart-breaking to announce to the kids. For me, I also had to deal with the disappointment of not being able to perform live at my first Friends in Concert. But we turned it into something enjoyable. We looked at the situation and we worked our way around it. And I thought that is a very good experience to share with the students how we, as teachers, also went through and learnt about adaptability.
Technical
I tried the idea of recording with my band students. I had the flute section to record a short clip. Two of them played something and I pieced it together as a section. I used it as a tool for them to listen to one another. I commented, “this part is out of tune”, “this part’s pitching is incorrect”.
On Teachers’ Day, the students made a clip on their own. They came together to play a few bars and sent it to me as a gift. I thought that was interesting as they picked up the skill online and basically just used a simple headphone recorder and phone receiver to record the clip. We started the process, then students got it done on their own, and it became a very valuable lesson for them.
And also, because we could not do live performance in the classroom during music lessons, I organised students into small groups of five to record in corners of the classroom. After the students completed the recordings using their handphones, I put them up on Google classroom so that we could all watch them together.
Can You Hear Me? Perspective from
Gracia Lim
Performance at: https://vimeo.com/448767727
THE PROCESS
13 Understanding Singing Conventions
With our mentor, there was plenty of emphasis on the consonants and vowels. He talked a lot about breath marks; there were certain parts that you would need to take quick breaths so that it sounds like a longer phrase.
Making a Useful Demo
A demo was produced by our mentor, and given to us for our practice. There were both separate (alto, soprano) and combined parts.
I felt that it was not enough to just listen to the track given to me. We have lost the feel of singing in the choir and the only way to have the choral singing experience is when your backing track is all layered. I guess that is what singing is all about. You can’t just be focusing on your parts, without listening to others.
What I did was to create alto and soprano enhanced parts where the alto and soprano parts are significantly louder. So, whoever is doing their recording can listen to the accompaniment and the two other vocal parts. These were then shared with the group.
2
Understanding Good Recording Practice
Our mentor also had to teach us how to do a good recording. An example would be to place our microphone inside a cupboard and singing into it. Some of us are also not aware that the sound of the air-con could interfere with the recording or the use of the mics. We also learnt that a basic handphone microphone is better than the earpiece microphone.
4Individual Recordings
The recordings were all done by us individually. For my recording, I had many drafts as it was challenging to find moments at home to record. Even walking sounds outside the room from family members get recorded. I had to wait until there were lesser activities at home before I could record.
Putting together
We uploaded our recordings to Dropbox and I was very thankful for the help with sound editing.
5 6
Visual Hand-Signing
In our song, we wanted to include hand-signing in the visuals as well. We realised that there were different versions and we had to synchronise.
The Process with another Virtual Performance Project, Engaging-with-Songs (EWS)
I enjoyed the Engaging-with-Songs (EWS) virtual performance experience probably because I was working amongst friends whom I am very familiar with.
We were having fun experiencing and experimenting with the Acapella App. It was also much easier to handle, with only two or three vocal parts, rather than 7-20 parts in a virtual choir.
There was also a mutual understanding that whoever is able, will record first with the app. There was less pressure. If we publish, we publish. Because it is more for our memory.
We experimented quite a number of times as well. I tried to get the harmonising right. We kept reflecting.
I am interested in learning to harmonise. So, this app provides the opportunity to learn it.
I listen to the original track singer and try to mimic or try to see how I can do it in my way. I find it quite fun.
We started off using the seven days free trial but we ended up subscribing.
REFLECTIONS FOR TEACHING
I asked my students to video record themselves too. I called their parents to tell them about this. And for all those who submitted their recordings, I’d say, “I know how you struggled”. Kids who participated in some other recordings also told me, “Ms Lim, it’s so tough!” I would say, “yeah, I know”. I am not just a music teacher; I am also a performer and I have that shared experience with my students. I can see myself appearing in the same video as my kids.
For my band, we created a video. I was overwhelmed with emotions when I saw the video. For nine months, I had not seen my kids in the room. I remember going to the Band room to have my e-CCA, but there were no kids in front of me. I missed the Band sessions. I do not know how the kids would react when they see the video, but I hope they have this sense of being grateful, and learnt that when things are taken away from them, we can still make do and be resilient, flexible and adaptable at the same time. These are the hidden lessons.
“Every teacher, a CCE teacher” is true, especially in this COVID situation because you need to step up for the kids. All of us are experiencing unique circumstances. And, for adults like us, we are also struggling. But how do we step up to show our students that as we struggle, we make beauty out of ashes?
Heal the World Perspective from Carene Choy
Performance at: https://vimeo.com/448770069
THE PROCESS
1
Initial Idea
Initially, we wanted to try making videos like the ones we saw on YouTube. Therefore, our lead member suggested the song ‘Heal the World’. We thought that it was a suitable song to sing then, during the Circuit Breaker. She asked one of our colleagues to play the piano accompaniment. We got the guiding track with instructions ready, and we recorded our voices to see how we can piece things together.
3
2
First Recording
After the first round of recordings, and after stacking everyone’s voices together, it sounded very messy, as there were emphases on different words. I guess we didn’t know how we should follow the soundtrack given to us.
Considering Options to Virtual Performances
Our mentor listened to the audio we had done and gave us different options for the virtual performance: whether we just wanted still pictures with our voices; or a virtual choir style.
4
Enhancing Accuracy
Our mentor gave us some suggestions on how we could improve our pronunciation, the way we sang, and how we were supposed to sing in a more pop-ish style rather than choral style. He encouraged us to follow the track as closely as possible. He also provided us with the score so that we could refer to it for the rhythm since, in the first try, our rhythm was not very accurate.
5
Listening to Reference Track
For the second guiding track, our lead member sang the melody so that we could follow her singing as our guide while recording our voices. We each used two devices: one to listen, one to record. We sang in unison at the end of the song.
7
Post-Production
6
Recording Closely to Demo
For the second video, with everybody following the demo more closely, it sounded slightly better.
We uploaded our videos and/or audio tracks onto Google Drive once we were done, and I compiled them.
I extracted the audio from the video and worked on the audio first to make sure the music sounds good. I added a little bit of reverb and delay to make it sound slightly better, then a little bit of auto-tune where required, as well as balancing the voices. I experimented. If I was unsure, I searched for YouTube tutorials or asked for help. I used Logic Pro for the audio-editing, and DaVinci Resolve for the video-editing.
When I had edited a version, I would let our lead member look through the video, to get comments and feedback on how to improve the audio or the video-editing. For the second round, there were about four to five rounds of edits before the final version. The discussion was done over Zoom.
A Different Experience
Putting up a virtual performance feels very different. Singing to a camera and alone in a room feels weird and awkward because you are doing it alone, and you do not know what others are doing. You cannot hear one another or see how others will react. But in a live performance, it is done differently. Good or not, it can only be done once. However, in a recorded performance, it is different. I think people might be stressed trying to create a good recording.
Beacon of Hope Perspective from Tan Weida
THE PROCESS
1 3
Writing the Song
We decided to work on a song that one of our group members started writing previously. She had written one verse and a little bit of a chorus. So we penned the second verse and the second chorus together as a group, taking reference from the original verse/chorus.
2
Harmony
As music teachers, we wanted to do something more. So, we looked at some of the other chord progressions such as from the music we heard on the radio and experimented with them, playing them on a guitar and singing our melody over them. We decided on the chord progression as a group. This was before the circuit-breaker so we were able to do this face-to-face.
Instrumentation
After deciding on the chord progression, we worked on the instrumentation. We needed to find something that could play to our strengths. We talked about other instruments that we wanted to include, such as the bass guitar and bells. We transcribed the melody and the chords on a notation software and wrote the parts – bass, keyboard, bells, and so on using Musescore. We then exported it as a MIDI file and used the virtual instruments in GarageBand to further arrange the music that we had. With GarageBand’s virtual instruments, we could hear our music as if it was being played by a full band. Then, we added some drum patterns using the drum loops. With GarageBand, we had, at our disposal, a wide range of virtual instruments to choose from in addition to physical instruments we possessed such as the guitar or Cajon.
4 5
Producing the Audio
After I had the backing track ready, I sent it to my group. They sang over it, recorded it, and then they sent it back to me. We stitched the recordings into one mp3 file.
Producing the Video and Story
We also wanted to add some kind of a story into our video. One of the things we wanted to bring across was the appreciation for the teachers in our lives. That’s why we called our song, “Beacon of Hope”. The first verse is about our teachers impacting us. The second verse is about how we, as teachers, could impact our students. We discussed what we could weave in to make the storyline more complete and how to present the item in the form of a music video.
We decided to video record ourselves lip-syncing to the tracks. We then used these video recordings to produce the full music video version of our song. I sent many drafts of our music video via WhatsApp for my teammates’ feedback and then amended the music video accordingly.
REFLECTIONS FOR TEACHING
I hope for my students to understand that music is not just about being able to play the piano or the recorder. Music videos, like ‘live’ performances, are forms of music presentation. Musicians usually put in much time and effort to practise their stagecraft and presentation skills. Video-editing skills might be less commonly associated as being part of musicians’ essential skill-sets, but I think it would be beneficial for musicians to have a working understanding of how the processes of video-editing and audio production contribute towards the whole experience of the viewer. Therefore, one of my key takeaways from participating in FIC Online would be gaining a new perspective on how video-editing and audio production skills could become more relevant for musicians, as well as music teachers, in the new normal post-COVID.
Dance of Yao x When You Believe Perspective from Chua Siew Ling
THE PROCESS
1
Deciding on the tunes
We had in mind to perform the Chinese tune from ‘Dance of the Yao People’. And we wanted a mashup to give a surprise to the listener. So, we explored other tunes and one of them was ‘When You Believe’ from the Disney movie The Prince of Egypt because it was similar to ‘Dance of the Yao People’.
2
The structure as Starting Point
Having the tunes in mind, we discussed the structure of our arrangement. We drew up a plan on Google Docs, as we discussed over Zoom, of how many bars one was to play the theme and how we could develop this into a piece.
We also decided on having an ostinato rhythm from Bolero by Ravel. It would be like Ravel’s theme-andvariations concept, framed in three parts.
Backing Track
One member came up with a percussion backing track comprising several layers of percussion beats using the Bolero rhythm. I then recorded the tune using a MIDI controller into GarageBand. And so, we had a demo track for our members to cue where members could enter with their melodies.
Audio-Recording
So, we listened to the backing track on our earphones and then we played and recorded our parts as mp3 files. Members audio-recorded themselves individually and WhatsApp-ed or emailed their recordings to me, and I put them together.
5
Making an Arrangement of Audio-Recording
As a consolidator, I had to make certain decisions on the arrangement first. I stitched all the mp3 files together using BandLab, including the first percussion track. I realised that each of us needed to follow the beat of the backing track more strictly because all minor inaccuracies seemed ‘amplified’ in a recording.
6
Listening and Feedback
As I began to put them together for members to listen, one member commented, “we interpreted the beat differently!” Also, some of us did not quite tune our instruments to ‘Concert A’ and because of that, the recording felt ‘messy’. So, intonation was another issue.
8
Negotiating Musical Details
At first, when we put everything together, the music had no sense of reaching anywhere. It was just everybody’s parts. Our mentor gave some suggestions on how we could build the intensity. Also, all of us were having different ideas, whether we should have a build-up similar to Ravel’s Bolero, or a different kind of build-up. There were many interpretations. Hence, the meeting was useful for us to come together to negotiate our ideas.
We agreed to record some more parts. We documented our ideas into Google Docs once again, indicating with greater detail where the instruments would play at each section, the articulation, the dynamics, the mood or emotions we wanted to create at each point.
Video Recording
Finally, when everyone was satisfied with the arrangement on the audio recording, each of us video-recorded ourselves as we listened to the audio. I asked members to give me more than one shot of themselves from different angles so that there could be more visual possibilities. I then used Filmora to zoom in or out, crop or pan the views as I put the video recordings together.
7
Discussing the Arrangement
We met over Zoom again and screen-shared everybody’s parts on BandLab. And then we discussed, muted some parts, shifted some parts to explore how different parts would sound together. As we developed the texture together, we decided how we wanted to shape the music, and to create contrasts and surprises. So, we were listening together on BandLab, with different versions that were possible, and with all the improvised parts.
Re-recording and Re-working the Arrangement
After everyone sent me their recordings the second time, I put them into BandLab according to our discussion. As the recordings come in, I mixed down the tracks and sent them over WhatsApp to my group.
Members would comment over WhatsApp what they felt could change, and a few even offered to re-record some parts. As we listened, members also decided to improvise other parts besides playing the melody, such as providing a counter-melody or harmonising another part. I continue to digitally edit the parts to correct for intonation and to sync the parts better.
Video Concept
The visual considerations were very much influenced by the musical structure. We had an opening improvised Dizi section on a free tempo, so we had images of the different parts of the Dizi slowly being revealed in the opening of the video. Certain visual effects like transitions and filters were also used to play up the effects of the transitions in the music.
Deciding on a Title
So, the musical structure itself was the narrative of our music. We did not have a storyline. But we were thinking about coherence and making it interesting. Coming up with the title was right at the end of the process to make sense of what we had done. I think the titling part was very interesting because everyone had different ideas – some wanted a humorous title, a few just wanted it to be straightforward, others wanted the title to incorporate the titles and ideas of the previous pieces we had drawn from.
REFLECTIONS FOR TEACHING
Creativity in Responding to Musical Challenges
Because we all had very different ideas, it was stimulating. Changing one section affects another. For example, one section initially sounded beautiful for its simplicity because the prior section had a messy, intricate texture and complex sonic materials. So, when we tidied that messy section, the beautiful section somehow sounded less sublime! Hence, opportunities for improvisation and re-arrangements could also be stimulating for our students, challenging them to respond to musical problems as they present themselves in the process of arranging and composing.
Multi-modal Literacy for Music Teaching
Putting together the video for our virtual performance stirred something in me. Visuals provided visual understandings while sounds provided sonic understandings. So how do we piece them together to tell a ‘story’ through a video? It seems that some media literacy would be useful for us as music teachers since music is inherent in our media diet.
Also, the media that our children are exposed to is different from our times. For example, our young are interested in anime and TikTok, which are generally in short episodes. From the viewers’ perspective, the sense of accomplishment could be high because one could watch so many episodes in a short time. And there could be a sense of moving through the story very quickly, like in games.
So, if we have some understanding of media literacy and connection with the media that our young are engaged in, we might gain another perspective to relate to and help our young. For example, understanding the language of music in videos, understanding how our young can be engaged, and using multiple modalities to design learning experiences.
Reflections and Thoughts
MODELS OF PRACTICES
Here are a few models of the creative workflow which participants have shared.
Model 1
shared by Jermain Cho (wind trio)
Performance at: https://vimeo.com/447765855
1. Meet online to get to know one another and split up the work
2. Each person records their parts
3. Parts are shared to one main person to stitch it together while others contribute in other areas
Model
2
shared by Joel Yeo (mixed band)
Performance at: https://vimeo.com/448411478 and https://vimeo.com/449981918
1. Discuss and find a workable piece of music
2. Come up with a suitable arrangement
3. Record the audio
4. Mix tracks on DAW
5. Record the video
6. Video-editing to piece the whole item together
Model 3
shared by Gin Chan (vocal ensemble)
Performance at: https://vimeo.com/448767727
1. Knowing one another’s vocal tone within their voice type (soprano and alto)
2. Brainstorm on how the video scene would look like
3. Sharing of music files and guidance by mentors
4. Producing a storyboard for the video scene
5. Stitching the video scene together
Model 4
shared by Tan Shi Ying & Rena Wong (duet)
Performance at: https://vimeo.com/449577028
1. Zoom discussion with the mentor
2. Distribution of roles (audio-editing, video-editing) & discussions on presenting the performance on video (aural, visual, costumes)
3. Recording (including outdoor shots) & retakes
4. Giving feedback to each other and discussion with mentors
Model 5
shared by Allen Losey (mixed band)
Performance at: https://vimeo.com/449093648
1. Zoom discussion with mentor and team to decide song and approach
2. Setting up a google doc to plan out parts
3. One member to start on a guide track
4. Rest of members to add in parts
5. One person to put it together
6. Adjustments and re-recording parts
Model 7 shared by Siti Maisarah (original song)
Model 6 shared by Tan Xi Ling (percussion ensemble)
Performance at: https://vimeo.com/445126124
1. Weekly sub-group meetings (according to music parts)
2. Large group meeting with mentor & learning about percussion techniques
Performance at: https://vimeo.com/448784003
1. Brainstorming together to write an original song
2. A musical arrangement using Musescore and GarageBand
3. Vocal recording for the song
4. Attending virtual mentoring sessions to improve the arrangement
5. Attending PD on video-editing
6. Filming respective parts for the music video
7. One member to edit video
USEFUL PARTS OF THE PROCESS
A lot of discussions on the genre of music that we wanted to present, and some of our members shared videos of arrangements that inspired them.
Su Juen
We discussed many sessions on Zoom on which part we have to sing and we went to practise the parts shared.
Dawn
Journey was like an “inquiry-based” learning experience for all.
Irene
Challenges and Overcoming Them
We focus on the musical and technical challenges in the processes that are unique to virtual performance, and the solutions shared by participants.
OVERCOME BY CHALLENGES
Different levels of technical competence on instruments
1. Allocating the parts based on levels of readiness
Syncing in the recording
1. Complete the audio first, before each member video-records while syncing to the audio
2. Getting everyone to play at the same tempo consistently
3. Having a master or reference track done
4. Members to record their parts with reference to one another
5. Tweaking the arrangement e.g. having solos/pair
6. Reassigning parts
Different audio & video quality from members
1. Use editing software to enhance sound/ effects through trial and error with active listening, experimentation and intervention
Time
1. Work on a timeline for individual parts and video-editing
2. No ‘perfect’ time, just do it and accepting that recordings can never be perfect
Key Learning
We focus on advice given by participants.
WORKING AS A TEAM
“Communication is of essence. Teamwork, dedication, and trust are crucial. The success hinges delicately on the dynamics of the team and trust that everyone has something to contribute collectively. It takes a certain boldness to push ourselves forward with rigour, at the same time balancing that delicate musicality and much-needed practicality, and flexibility in the performance to see to the success of the production.”
“Relations/friendship and the journey/experience is the key in education and what must be taken care of - and is the essence and spirit of what friends-in-concert is about.”
“Each one of us can be an asset in the ensemble no matter where our starting point is”
“Being open to feedback is key as well…”
EMBRACING THE PROCESS
“Key learning is primarily in developing a good workflow in producing video and audio. Realising that for video and audio mixes, precision is required at a much higher level than live performances…”
“To be open to new experiences, having good clear communication with fellow performers, being patient with oneself, and to be ready to make adjustments.”
“Not overthinking or overplanning but instead, just have a rough plan and then dive straight into the production of the music. This less structured and slightly more organic approach to making music as a group can sometimes bring about interesting musical realisations and performances!”
“As artists, it often helps for us to go beyond our comfort zones and try something beyond our area of specialisation - especially in a world of multi-media, where we deal with multi-modal art”
“Most importantly, enjoy the process and the opportunity to make music with other like-minded musicators.”
TEACHING APPLICATIONS
“Music-making on ICT allows other forms of expressions (including drama and even visual arts)”
“Giving very specific instructions to ask for recordings from students, such that it is achievable with minimal parental help via the online platform”
“… to have a proper document to organise and plan … This can be done in a table form in Word Document, where I can indicate various details such as the BPM, chords within the lyrics, who sings which parts, etc. If I were to conduct a lesson that includes group music-making for Primary 5-6 students, I can introduce such documents, with proper scaffolding for students to plan their group performance. This is a very effective way to help students to visualise how their performance is going to be like.”
EDITORS’ FINAL THOUGHTS
4
The reflections have led to articulations of systematic steps and models of workflow, and potential challenges and solutions when creating or facilitating virtual performances. These could guide future efforts for curating virtual performances and to facilitate musicmaking in the classroom.
The creative processes typically spanned across a few months. Although many of the groups experimented in a seemingly haphazard way, the performances were a result of careful deliberations made over time, created with an open mind to possibilities, and through collaborative efforts where members contributed with their strengths. In the classroom, music teachers could consider giving time and space for these creative and collaborative processes to take place and be open to varied creative workflows.
5 3
Many of the groups spoke about friendships and trust. Similarly, music teachers could also create a friendly and safe environment that is conducive for creative work in their music classes.
Besides musical skills, the creative music-making efforts have also led to opportunities for the development of other skills such as adaptability, communication, social and technical skills. We can observe how such creative activities could offer teachable moments and provide authentic learning opportunities for our students as part of their holistic education. 1 2
Finally, the experiences of putting up virtual performances have given us a deeper understanding of new literacies afforded by technology, and how musical expressions can be conveyed through different media and forms. Experimenting with and growing an understanding of these new forms of expressions can empower our musician selves and artistry in our music classes.
Encore: Resources
1a) Choosing and Priming Your Recording Environment https://vimeo.com/427644859/9271e6bead
1b) The Recording Process https://vimeo.com/427646032/44be3c3a0d
2a) Mixing your tracks: panning https://vimeo.com/427648981/031fb3016f
2b) Mixing your tracks: setting levels https://vimeo.com/427655572/5d4f2bc4ae
2c) Mixing your tracks: equalisation https://vimeo.com/427988242/a846fd4ece
2d) Mixing your tracks: reverb https://vimeo.com/428403341/cbadf74560
2e) Mixing your tracks: delays https://vimeo.com/428405073/a746b7a219
3) Editing and producing a video of your virtual performance https://vimeo.com/427646580/0af521f58b
4) Creating music through sampling with GarageBand iPhone https://vimeo.com/428438119/60260ee4dd
5) Planning vocal parts for a backing track of sampled sounds https://vimeo.com/428438065/3a1dffe9d6
6) Screen recording for iPhone https://vimeo.com/428438034/bd3bd39748
7) Recording and producing on Acapella app https://vimeo.com/428437983/42687d8a5d
8) Producing a virtual performance with video editor https://vimeo.com/428437894/a09ef4e084
9) Editing sounds from a virtual performance with BandLab https://vimeo.com/428437799/7d862cad1b
The above videos are also located as Micro-Learning Units in OPAL2.0