Director of Client Success Matthew Frizalone hello@remindermedia.com
OPERATIONS
Vice President of IT Thomas Setliff
Vice President of Finance Shana Lebofsky
Director of Projects Kelsie Schmall
Director of Business Intelligence Daniel Gallaway
Director of Manufacturing Shannon Mosser
Director of HR John Keogh hr@remindermedia.com
Good to Be Home is published by ReminderMedia. For more information about Good to Be Home magazine, please visit us at www.remindermedia.com, email us at info@remindermedia.com, or call us at 866-458-4226. All rights reserved.
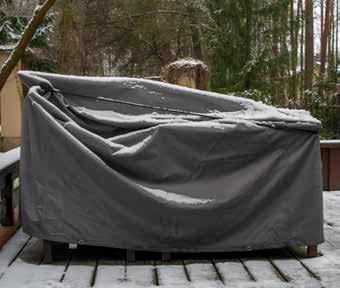
SAFEGUARD your outdoor items
written by: FAITH FIORILE
From your cherished grill to your cozy patio chairs, you likely understand the importance of regular cleaning and maintenance to keep your outdoor pieces in good condition. But as the seasons change, there’s another essential step to take: protecting them from the elements. By storing or covering them properly, you can avoid future hassle and expense and enjoy them for years to come.
COVERS
You don’t want your pricey investments to deteriorate due to corrosion, fading, or dirt accumulation, and high-quality covers can go a long way toward preventing such issues. Choose a fabric that offers water resistance and sun protection, such as polyester, and look for a denier (weight) of six hundred or higher to ensure that your selections are thick enough to withstand seasonal weather—if they're too thin, they may rip under a barrage of wind and precipitation.
Speaking of wind, it can easily blow your covers right off, so opt for ones with adjustable straps or an elastic hem to allow for a personalized fit, better enabling them to remain securely in place. And don’t overlook the importance of air vents to help circulate air and keep mold and mildew at bay, which can be a problem in damper climates.
STORAGE
If you’re wary about leaving your equipment outside even with covers, relocating it to a shed or garage can provide extra protection from the elements. Just make sure to avoid stacking when possible since the pressure could cause bending or breaking over time, especially with furniture that’s on the older side. It might also be a good idea to keep everything elevated off the ground in case water creeps in after a storm.
Ultimately, the best strategy may be a mix of these two approaches depending on your specific items. Combine thoughtful cover usage with proper storage practices, and you’ll keep your outdoor living space looking pristine year-round.
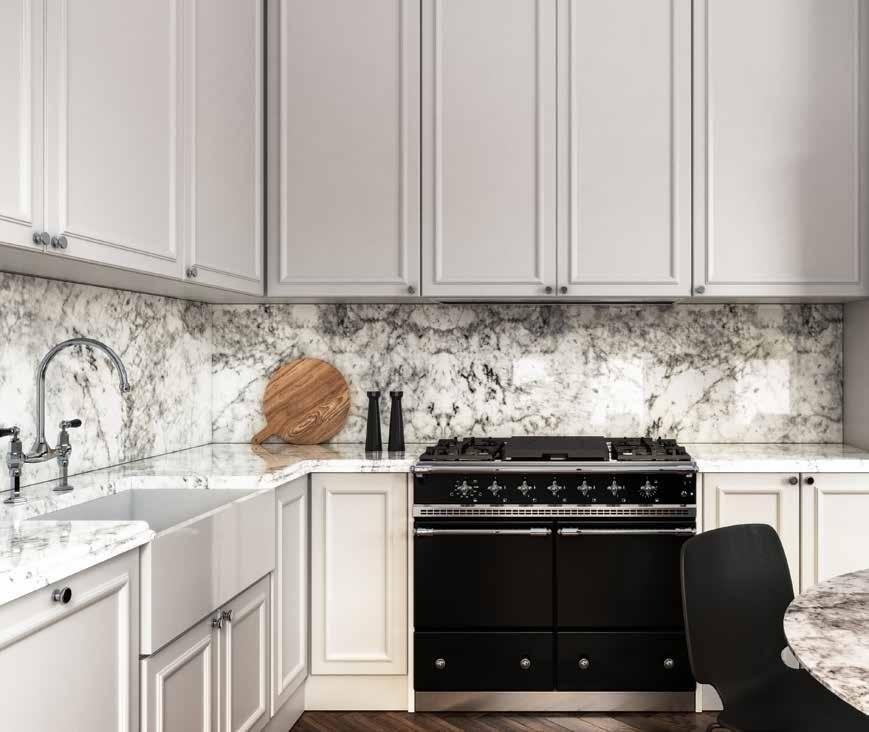
Rethinking the Kitchen Backsplash
written by: ANDRE RIOS
When it comes to stylish kitchen design, minor touches can offer the greatest impact. Take your backsplash, for example. Beyond serving the purpose its name indicates—protecting your walls from spaghetti sauce, wayward vegetable juice, and other messes—this feature adds significant texture, color, and sheen to its surroundings. The right backsplash can even tie separate visual elements of the space together for a cohesive, wellcurated appearance. If you’re curious about how to fill this blank canvas in a new kitchen or thinking of upgrading your current materials, look no further than these four gorgeous options.
Warm and welcoming stone
The trend of continuing the countertop into the backsplash shows no sign of leaving. This approach creates a clean, consistent visual motif, minimizing the total number of materials that comprise your kitchen.
But we could be seeing less of certain types of stone, including sterile gray-and-white Carrara marble and monochromatic quartz.
Rather than selecting a stark surface, opt for a warm-hued one with notes of blush pink or sunny yellow, such as Rosa Portugués marble. Such a colorful option will pair nicely with naturally finished wooden cabinetry and flooring as well as bronze or gold fixtures, bringing out their warm tones for a cozy, entertaining-friendly ambience.
Deep, dark slabs
For even more dramatic results, consider going dark, cool-toned, and intense with your stone backsplash, carrying an opulent material like blue sodalite marble across your work surfaces and walls. While dark kitchens were once scoffed at as too bold or moody, they’re now appreciated for their mature sophistication. However, be sure to design around deep tones wisely: choose high-gloss paint finishes and fixtures wherever possible to catch more light, then use softer neutrals elsewhere for contrast— think white oak flooring or pure-white wall paint. The resulting visual balance will heighten the effect of your stone backsplash, showcasing it as a stunning focal point.
Avant-garde paint
Painting your backsplash could be one of the most unique ways to imbue your kitchen with enviable style. It will break from the expected, add intrigue to a potentially simplistic design, and exhibit an appealing work of art right at eye level. But think beyond solid-colored paint, letting your imagination run wild by freehand painting or stenciling geometric patterns, floral designs in tropical shades, or other avant-garde elements. If you’re seeking inspiration, look to your favorite artists or social media muses for wonderfully wild ideas. And to work without fear of your results being permanent, apply peel-and-stick wallpaper you can simply paint over. This will also save you the trouble of priming and applying multiple layers in the future—especially should you intend to sell your home.
Metallic tile
Of course, if you’d prefer to just glue on backsplash tile and call it a day, you have plenty of suitable options. Resist choosing classic ceramic or glass ones, though, venturing beyond the ordinary by going for metal instead. After all, this material is likely already present in your kitchen’s faucets, large appliances, cabinet hardware, and light fixtures. Plus, leaning into a metallic concept can subvert the expectations of a typical kitchen, lending this central room of the home surprising, cutting-edge characteristics. For example, timeless tin ceiling tiles make for a stunning backsplash, while eye-catching penny tiles in a copper finish give walls a wonderful texture. To balance the effect, add some soft decorative touches to the room, including potted herbs and colorful canisters. Such decor will provide warm contrast to these cold metal surfaces without concealing their bold facades.
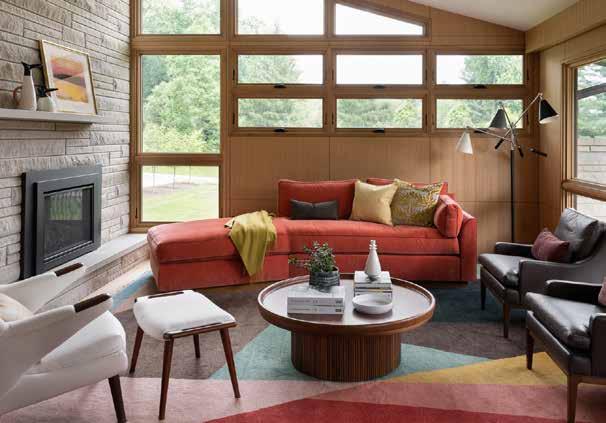
midcentury meets modern IN THE MIDWEST
interview with: SUSAN YELEY written by: MATTHEW BRADY photography by: SARAH SHIELDS
Indiana-based interior designer Susan Yeley discusses how she made a cozy yet dated home more functional and contemporary for a Bloomington family.
Was your path to design straightforward?
It was more of a beautiful zigzag. I was dual English/ Spanish major in college and went to graduate school at the University of Chicago for philosophy and religion.
While doing the latter, I accepted an unpaid internship at the Merchandise Mart, a furniture-and-fabric showroom, just to see what the design world was about.
Soon after, I took a job at a high-end residential firm before moving back to Bloomington and gradually starting my own.
You use the term “Bloomerangs” to describe Bloomington natives who return to the area. What makes them unique? First and foremost, they’re easygoing people you’d want to be friends with. I like to call them unicorn clients because they’re very trusting of designers’ expertise yet also bring great taste and a sense of fun, wanting their spaces to be interesting.
The wife for this project actually grew up on the same street as the house we worked on—it belonged to friends of her family when she was a child. She and her husband had moved to New York but wanted a home base here to be closer to loved ones. The job itself took a few years: they weren’t initially planning on doing any extensive architectural changes, but we continually delved into the possibilities together. It was a
privilege to tackle their entire home, which gave us the opportunity to make it cohesive through the color palettes and materials. As a result, the rooms flow together, adding a whole other level of joyfulness. It was a terrific collaboration overall; I felt like we were gifted these clients.
Was it challenging to balance the old with the new, especially considering the wife’s history with the house?
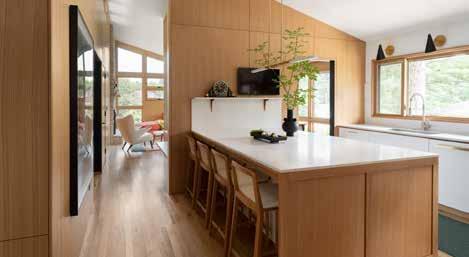
Actually, it was fun trying to figure out how to maintain its history while also making it livable and functional in the 2020s. After all, we live differently than people did in the midcentury— we’re more casual, for instance, and are willing to admit that we clean and cook.
Regarding the latter, the house had a terrific little breakfast nook where someone could make dinner and then take it out to the dining room. However,
these folks love to entertain, so we opened up the kitchen into the hallway behind it and made the nook a space for the fridge and microwave.
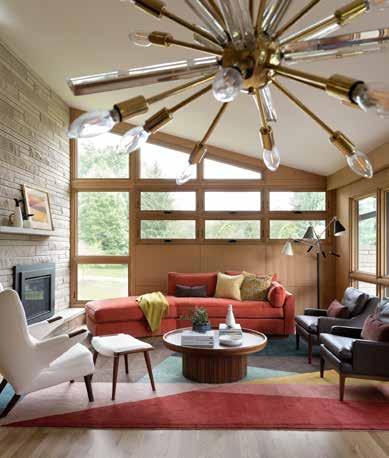
The living room really stands out. What steps did you take to modernize it? We took down the existing paneling that was on many of the house’s walls and added white oak throughout, which is perhaps best showcased in the living room. The original was very midcentury but not great quality. We carefully replaced it with numbered paneling that had to be installed in chronological order because the grain is continuous—that was a bit tricky, but it turned out well. We also added windows so more light would shine in.
As far as the furniture, the couch is distinctive because it’s angled, featuring a custom-designed wedge that gets a little wider as it extends toward
the fireplace so people can put their feet up. Fortunately, the couple didn’t want a TV in the room, enabling us to leave the fireplace as is and make the space conversation focused.
You mentioned light, which is ample throughout. How did it inform your design decisions? Light is one of the worst things for textiles because it fades upholstery.
In the living room, the angled windows adjacent to the fireplace face south, allowing sunlight to pour into the space, so we put a light-filtering film on them. Also, since the painting above the fireplace is a pastel, we enclosed it in museumlevel glass for protection. Similar considerations were made in the bathrooms, both because of the light and the humidity.
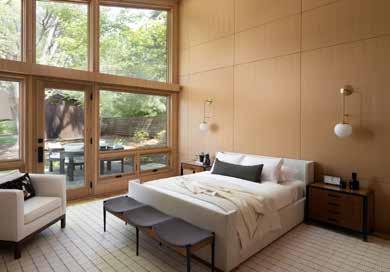
The main bedroom has tremendous height, yet it seems very comforting. Would you explain how you achieved that? You nailed the problem: no one wants a bedroom that makes them feel like they’re in the Library of Congress lobby. We kept this room’s shell but gutted the rest and added the windows, which mimic the originals in the living room.
In addition, the armoires along the wall serve as the closet; they have tons of storage space yet only go up eight feet, bringing the eye down. The paneling on the walls also adds a warm touch, making the space feel not quite so grand and lofty while evoking cozy midcentury vibes.
Tell us how you went about updating the basement:
Much of our town is built on limestone, so basements here tend to get wet. But these clients ensured that theirs was dry and clean, making it easy to work down there.
We installed new stairs and shelving and, because the husband works in film, added a huge screen. We also wanted it to be an extra space for visitors to use, hence the big green sectional in front of the TV and the full-sized tulip table, which can be pulled over for eating breakfast or having a cup of tea away from the chaos that might be happening in the kitchen. Overall, it turned into a great little living space. Personally, I don’t like being in basement rec rooms, but I’d want to hang out in this one.
You’ve said that you value understated perfection. Would you elaborate?
One of my favorite things about this part of the country is the understated accessibility that many people here
hope to achieve as a reflection of their values, regardless of their financial situation or taste. In the twentieth century, for instance, many designers created what I call mullet houses, places that are all business up front and a party in the back. This house is a good example:
it has a beautiful architectural line, but you can’t tell from the street how luxurious it is and the level of craftsmanship it has. So there’s a certain thoughtfulness in such design—we are really artful and purposeful in our work yet don t necessarily want to shout it from the rooftops. Even though this quality may not be unique to the Midwest, it’s certainly associated with it.
This year marks your firm’s twenty-year anniversary. What does that mean to you? It’s still fun work to do, and I don’t just mean the design. When you own your own company, you do a little bit of everything: shopping, designing, marketing, networking, finances, etc. And it continues to be very satisfying to work with clients and feel the impact the results make in their lives.
For more info, visit susanyeleyhomes.com
dirt-free Gardening
written by: LAUREN KIM
Imagine stepping into your kitchen and plucking freshly grown basil leaves, tender greens, or aromatic flowers right from your counter or windowsill. Hydroponic gardening, a soil-free technique for cultivating plants that has gained popularity in recent years, offers a convenient and economic way to grow your own oasis either indoors or outdoors. Discover how it all works along with key tips for getting started.
The basics
A time-tested method that’s been used for thousands of years, hydroponics is effective because plants actually need only a few essentials to thrive: air, nutrients, water, and light. And vegetation can get all the oxygen, food, and hydration it requires from a nutrient-rich water solution just as well as it can from the soil in a garden plot. This approach is also quite versatile—you can start a system almost anywhere, from a small space on your kitchen countertop to your front porch. Even better, it’s remarkably efficient, often yielding more crops and requiring less water than its dirtbased counterpart. One notable downside, though: you may find it more difficult to grow vegetables like potatoes or carrots that develop deep roots.
Hydroponic kits
Ready to give this technique a try? You can get started indoors by purchasing a premade system complete with everything you may need, including a garden container, a growing medium to support your vegetation and its roots, liquid plant food, and full-spectrum LED bulbs to mimic natural light. Your setup will also likely provide fast-growing seeds, such as lettuce and herbs like parsley and dill, to offer quick results. Some may even have smart alerts to let you know via an app when your plants need water or nutrients, providing virtually fail-safe gardening. You can find several such kits at various online retailers, or visit your local garden center to see what options that may provide.
While they are great for beginners, all-in-one hydroponic products do have their limitations. Perhaps the biggest is their smaller size, meaning they are ideal for cultivating shorter-growing greens and herbs but aren’t as suitable for tall, slow-growing plants like tomatoes and cucumbers.
Vegetation can get all the oxygen, food, and hydration it requires from a nutrient-rich water solution just as well as it can from the soil in a garden plot.
Build your own
Once you’re comfortable with hydroponic gardening, you can expand your hobby or take your efforts outdoors by constructing your own system. A good beginner-friendly method to try is the one pioneered by horticulturist Dr. Bernard Kratky in the 1990s. Unlike complex operations that contain moving parts, this passive approach doesn’t rely on electricity or a pump to provide plants with oxygen. Instead, they are suspended in a growing medium, such as net pots, where their roots just touch a nutrient solution, receiving oxygen from the natural air gap that forms between them as the liquid level drops upon being absorbed.
There are many Kratky-style gardens you could build, but the simplest may come from YouTube gardener Mike VanDuzee of Keep on Growin’, who uses plastic buckets, pool noodles, water, and liquid plant food to cultivate everything from microgreens to zinnias. He begins by cutting the noodles into five-to-six-inch sections to hold his plants and using a two-inch hole saw to drill round openings around the sides of a lidded plastic bucket, spacing them at least four inches apart. He then puts the noodle pieces into these holes, planting the seedlings into the pieces and leaving one hole empty so he can regularly check the water level with a finger.
After construction is done, it’s just about regular maintenance. When he can no longer reach the water, VanDuzee will prepare a
following the instructions on his liquid plant food package, and refill the bucket to the previous water level, allowing the plants’ roots to absorb both nutrients and oxygen as they grow. He notes that another perk of his method is that the bucket’s lid and foam-filled openings are effective at preventing pests like mosquitos from getting inside. Additionally, if you need to accommodate even more crops, you can make a second hydroponic bucket and stack it on your first.
Once you begin hydroponic gardening and see your plants thrive, you may never again want to spend your days digging in the dirt. With this simple method, you can relax while still enjoying fresh veggies and flowers all season long and beyond.
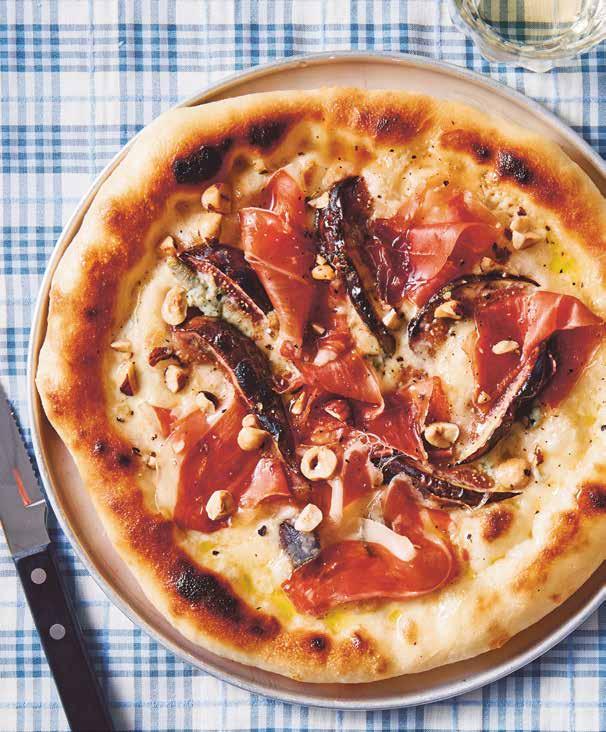
In autumn, we often welcome back the warmth of baggy sweaters, wool gloves, thermal socks, and steaming-hot food and drinks. Concerning the latter, one of the most tantalizing options on a cool fall night is pizza. And thanks to these recipes from the Pizza Night cookbook, you can create a delicious, diverse array of pies this season—even the dough is homemade!
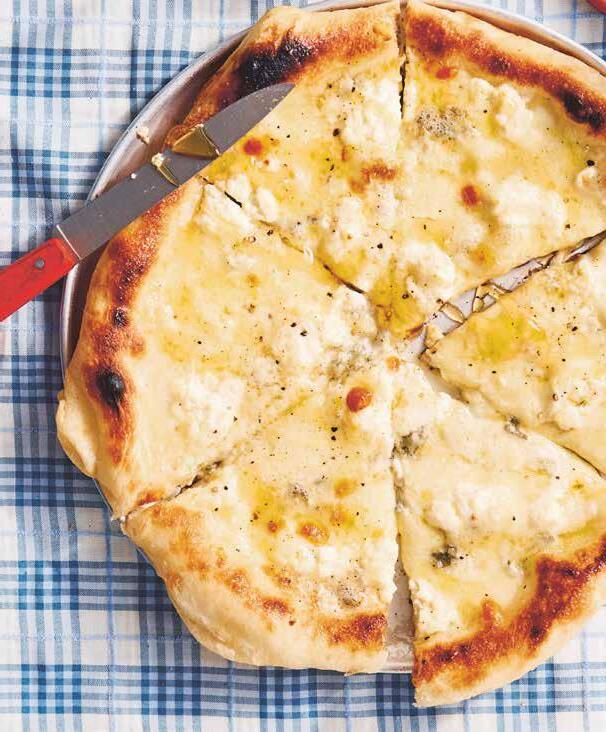
Quattro FORMAGGI
Pizza around THE HEARTH
• 8 oz. Neapolitan pizza dough ball (see recipe on page 28)
• 1 teaspoon extra virgin olive oil
• 2¼ oz. fior di latte, torn
• 2¼ oz. ricotta, drained
• 1¾ oz. gorgonzola, crumbled
• 1¾ oz. provolone, sliced or grated
• Salt flakes
Makes one 9½ in. pizza
4. Season the pizza with salt and pepper, and drizzle with a little honey for a delicious, sweet hit. instructions: ingredients:
• Pepper
• Honey, for drizzling
SCAN THE QR CODE for the full cookbook.
1. Place a pizza stone on the bottom rack of the cold oven. Set the oven to its highest temperature (ideally 500°F fan-forced) and preheat for 1 hour.
2. Following the Neapolitan pizza dough instructions, use your hands to press, pat and stretch the dough ball out to form a 9½ in. circle. Lightly brush the dough with the olive oil and scatter the cheeses evenly over the top.
3. Carefully transfer the pizza to the hot pizza stone and bake for 8–10 minutes, until the crust is golden and cooked through, and the cheese is melted and bubbling.
Recipes excerpted from Pizza Night by Deborah Kaloper.
• 8 oz. Neapolitan pizza dough ball (see recipe on page 28)
• 1 teaspoon extra virgin olive oil
• 6 basil leaves
• 2¾ oz. fior di latte, torn
• 1¾ oz. gorgonzola, crumbled
• 2 small figs, quartered
• 3–4 thin slices prosciutto
• Honey, for drizzling
• 1 tablespoon chopped and toasted hazelnuts
Makes one 9½ in. pizza
1. Place a pizza stone on the bottom rack of the cold oven. Set the oven to its highest temperature (ideally 500°F fan-forced) and preheat for 1 hour.
2. Following the Neapolitan pizza dough instructions, use your hands to press, pat and stretch the dough ball out to form a 9½ in. circle. Drizzle with the oil and top with the basil leaves, fior di latte, gorgonzola and quartered figs.
3. Carefully transfer the pizza to the hot pizza stone and bake for 8–10 minutes, until the crust is golden and cooked through, and the cheese is melted.
4. Top the pizza with the prosciutto and drizzle with a little honey. Finish with the hazelnuts and a little black pepper, and serve.
BBQ CHICKEN
instructions: ingredients:
• 8 oz. Neapolitan pizza dough ball (see recipe on page 28)
• ⅓ cup shredded roast chicken
• ½ cup barbecue sauce of your choice
• 1½ oz. smoked mozzarella, shredded
• 1½ oz. gouda, shredded
• ½ oz. small red onion, sliced
• 8 slices pickled jalapenos
• 1–2 tablespoons ranch dressing
Makes one 9½ in. pizza
1. Place a pizza stone on the bottom rack of the cold oven. Set the oven to its highest temperature (ideally 500°F fan-forced) and preheat for 1 hour.
2. Following the Neapolitan pizza dough instructions, use your hands to press, pat and stretch the dough ball out to form a 9½ in. circle.
3. Mix the chicken and ¼ cup of the barbecue sauce together. Spread the remaining barbecue sauce over the dough and top with half the mozzarella, half the gouda, and all of the chicken. Scatter over the red onion, jalapeno and remaining cheese.
4. Carefully transfer the pizza to the hot pizza stone and bake for 8–10 minutes, until the crust is golden and cooked through, and the cheese is melted and bubbling.
5. Remove from the oven, drizzle with the ranch dressing and serve.
Neapolitan PIZZA DOUGH
ingredients:
• 1 lb. 2 oz. 00 pizza flour or bread flour, plus extra if needed and for dusting
• 2 teaspoons caster (superfine) sugar
• 1¾ teaspoons fine sea salt
• 1 teaspoon instant dried yeast
• 11 fl. oz. lukewarm water
• 3 teaspoons extra virgin olive oil, plus extra for greasing
Notes: This is a high hydration dough, so it is wet and sticky compared to a drier bread dough.
Depending on room temperature, proving can take up to 4 hours.
Do not use a rolling pin to shape your pizza dough, as this will deflate it.
instructions:
Makes 1 lb. 15 oz. dough or four 9½ in. pizzas
1. To use a stand mixer, attach the dough hook and combine the flour, sugar, salt and yeast in the bowl. In a separate bowl, combine the water and olive oil. Turn the mixer to low speed, slowly add the water and oil and mix for 2–3 minutes, until the dough forms a rough ball. Rest the dough for 1 minute, then mix for another 1–2 minutes, until a smooth ball forms. If the dough seems too wet and sticky (see Notes), add another tablespoon of flour and mix for a further 1 minute to combine.
2. To mix the dough using your hands, combine the dry ingredients in a bowl. Combine the wet ingredients in a separate bowl, then use your hands to incorporate the wet and dry ingredients together. Transfer the dough to a lightly floured surface and knead for about 8 minutes, until a soft, smooth dough forms, and shape into a ball.
3. Place the dough in a lightly oiled bowl, cover tightly and allow it to rest in a warm place for about 2 hours, or until doubled in size (see Notes).
4. Divide the dough into four equal portions. Using your hands, shape each portion into a ball and place on a lightly oiled tray, then cover and allow to rise for at least 3–4 hours, until doubled in size.
5. Alternatively, for a slow rise that will increase the flavour of the dough, follow the instructions above, but place the portions of dough in individual lightly oiled airtight containers, with room to rise. Seal and refrigerate overnight, or up to 3 days. Allow the dough to rise for 4–6 hours, until doubled in size.
SHAPING THE DOUGH
Sprinkle a work surface with flour, place a dough ball on top and lightly dust with a little more flour. Place your hands (see Notes) in the centre of the ball and push and stretch the dough out to a 9½ in. circle. Take care to not deflate the air bubbles in the outer ½–¾ in. edge, as these will create a beautifully aerated crust.
Your dough is now ready for topping and cooking.
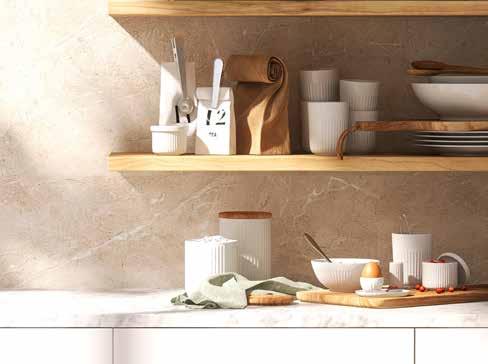
CREATING A PEACEFUL JAPANDI HOME
written by: LAUREN KIM
For those seeking a serene home enriched with lush greenery, natural accents, and global influences, the Japandi decorating style offers a perfect solution. By combining the elegance of Japanese sensibility with the coziness of Scandinavian design, you may discover just what you need to create an effortlessly harmonious and beautiful space.
EAST MEETS WEST
Japandi design first emerged hundreds of years ago when Scandinavian designers traveled to Japan and became drawn to the culture’s emphasis on simplicity, natural materials, and wabi-sabi—a philosophy that finds beauty in imperfection and impermanence. This concept resonated with the Scandinavian one of hygge, which embodies a sense of comfort and
contentment through minimalist design. Married together to create Japandi, these East and West influences remain at the heart of the style’s aesthetic, emphasizing handcrafted, antique, thrifted, or repurposed pieces alongside natural textures. The result? A well-balanced and inviting atmosphere that’s rooted in both serenity and warmth.
CREATING THE AESTHETIC
Perhaps the best part of this decorating approach is how easy it is to incorporate into your own living spaces. Just follow these three key principles for an ideal Japandi environment.
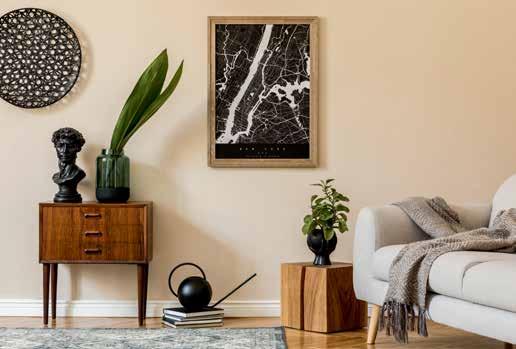
Remain mostly neutral
While both Scandinavian and Japanese designs embrace muted color palettes, they do so in somewhat opposite directions: the former favors lighter tones such as white and cream and the latter darker, earthy ones such as charcoal gray and olive. Japandi interiors tend to lean more Japanese in this
area for a sophisticated feel, but don’t be afraid to mix hues— doing so can create a complementary look for maximum effect.
For instance, you could paint three of your living room walls a soft white and the fourth a smoky black to create a striking accent wall. Or if you’d prefer to avoid painting, focus on your decor; hanging a floating white oak shelf and adorning it with a cast-iron teapot and matching black teacups would be the perfect way to craft a stunning focal point without it being too visually dominating.
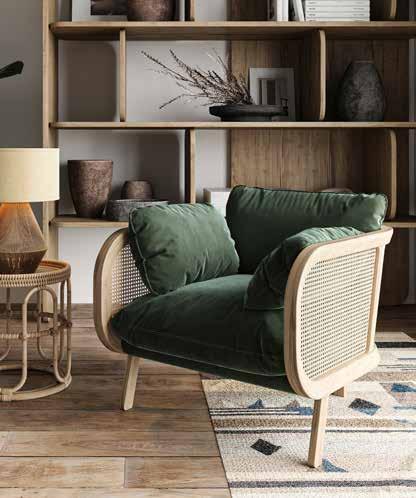
Go natural
Another avenue is to bring the outdoors in, which can not only infuse your spaces with vibrant color but also encourage an affinity with nature—essential to both halves of Japandi design. Begin by introducing a few carefully chosen houseplants, such as a delicate fern or bamboo palm. Besides a touch of style, research shows that greenery can help reduce stress, boost mood, and even improve air quality. Feel free to go as big or as small as you like, placing a tall plant next to your couch to draw the eye upward or a small one in the middle of your dining table as a centerpiece. And be mindful of your pots as well! Follow the previous principle, opting for a neutral look like sleek black ceramic to let your plants pop.
To further cultivate a respect for the natural world, seek locally sourced items that bring a sense of authenticity and support sustainable practices. Whether you add a landscape painting or
a handwoven basket from an artisan near you, such pieces will further elevate the aesthetic you’re aiming for while helping to reduce your carbon footprint.
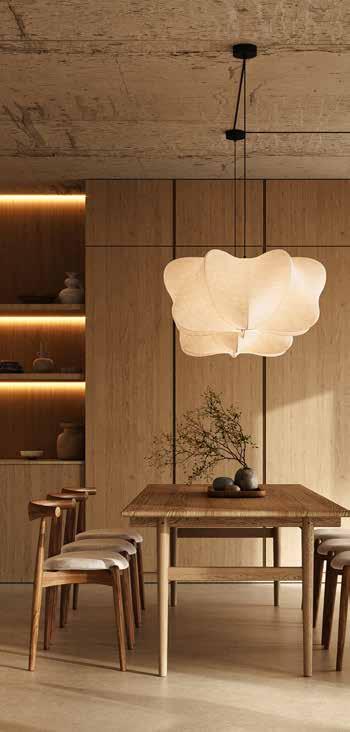
Adopt minimalism
Spaciousness and order are key aspects of Japandi design, so look for opportunities to simplify your spaces and incorporate clean lines. Furniture is a great way to achieve this. You could acquire, for instance, a low-profile sofa for your living room or a basic pine bed frame with a cotton duvet for your bedroom. Or switch out your lamps or light fixtures for ones with a geometric flair, such as an inexpensive frosted-glass pendant light ensconced in an oak circular frame. A linen lampshade with a wooden tripod for a base is also a good option to add a bit of diffused light to any room.
While the thoughtful placement of a few wellchosen items can help develop the ambience you seek, you don’t necessarily need to go out and buy something new. Simply cutting back your decor can be equally effective, furthering an environment that’s free from visual distractions. And if you have a lot of clutter, acquire an understated cloth bin to keep it hidden away for a tidier vibe.
As you incorporate Japandi into your home, consider how it can bring elegance and a sense of calm into your life. By choosing mindful materials and embracing imperfection, you can create spaces that uplift your spirit all while looking amazing.
PAJAMAS, BOOKS, and BEDTIME BLISS
interview with: JAMIE DYCE written by: MATTHEW BRADY photography courtesy of: PAJAMA PROGRAM
Pajama Program executive director
Jamie Dyce discusses the importance of healthy sleep for children and how her nonprofit helps foster it.
How bad are sleep issues today, especially for children? Healthy sleep can be tough for anyone. There are so many challenges already, but when you throw in others like poverty, housing, and family instability, it’s really disruptive to a child’s sleep routine. They might share a bedroom or a bed (or have no bed at all), and people might come and go at all hours, keeping them in a constant fight-
or-flight mode. Living in urban environments with increased light noise and pollution just makes it worse.
There’s also a general lack of understanding about how many hours a night of sleep a child actually needs. We’re so used to hearing about eight being the magic number, but for young children, that’s not nearly enough—in fact, some need fourteen hours or more. If they don’t get what they require, it’s setting them up for long-term health consequences. The members of our Good Night Advisory Council, our team of sleep-health experts, would even argue that slumber is more important than nutrition because you can go a few days without eating but can’t survive that long without sleeping.
When did your organization start addressing this issue? In 2001, our founder, Genevieve Piturro, was working in New York City and volunteering at local shelters in her spare time. One night, she was reading to the kids when bedtime arrived, and they just shuffled off to their respective sleeping arrangements in their clothes. With that shelter's blessing, she started bringing pajamas with her whenever she went, and the idea took off. Scholastic heard about the work she was doing and offered storybooks for her cause. We have been collecting and providing pajamas and books for children in places like social service agencies and shelters ever since.
What inspired your organization’s Good Night Bill of Rights? I was attending a Harvard Business School program where one of the professors had us ponder why our nonprofits existed. It suddenly hit me like a ton of bricks that a child doesn’t have to earn a good night; it’s something that’s their right. I brought the idea back to my team, and we created our Good Night Bill of Rights, five principles of what kids deserve regarding sleep. They reflect our values as an organization: we want all children, as well as the adults in their lives, to have a good night’s sleep.
How important is it for a child to have a bedtime routine? It’s vital, especially for those experiencing so much uncertainty in their lives, to have even a small routine before going to sleep. It serves not only as a reminder that it’s time to wind down and go to bed but also as a dedicated moment when the adult and child can bond. We contend that the twenty-four-hour day actually starts at bedtime because everything else that follows hinges on how well it went.
What does a new, warm pair of pajamas provide to children psychologically? I love this question. We only collect new items, which ties into the concept of dignity—everyone inherently wants, and should have, something new instead of just receiving hand-me-downs.
Plus, even the youngest child grasps something special about pajamas; they’re essential to emotional security, especially at bedtime. Being able to switch into them means shedding the stress of the day, and it feels like a warm hug. And that’s true for anybody, regardless of age.
After all, when you walk through the door after a long workday, what’s the first thing you want to do? Change into something comfy. Doing so makes you feel like you can exhale.
That said, kids eventually outgrow their pajamas as well as their books. What happens then? That’s why when I became executive director in 2017, my vision was to expand our reach by developing sleep-health education for adults and raising more awareness and visibility around our overall mission. We’ve since created caregiver programming, opened three brick-and-mortar centers, and worked to deliver our virtual programming anywhere in the country. In doing so, we’re able to make an even greater impact in helping ensure the best sleep possible for kids.
For more info, visit pajamaprogram.org
Understanding Home Equity
written by: ANDRE RIOS
A home is more than a place to live—it’s a valuable asset that has tremendous potential to affect the financial opportunities available to you, shape your future decisions, and help you build wealth over time. Naturally, then, identifying where you stand can provide a clear snapshot of your family’s monetary health. Check out the basics of home equity, and learn how you can better sow value that you could reap down the road.
What is it?
In a nutshell, home equity is the difference between the market value of your home and the amount you owe on your mortgage. Each payment you make reduces the principal balance of your loan, thereby increasing your held value in the property. So if it is currently worth $400,000 and you owe $250,000 on your mortgage, your equity is $150,000. This figure represents the portion of your home that you truly own.
The calculation
As you can see, the equation for assessing your home equity is simple, but determining the relevant numbers may take some legwork. You’ll first need to identify what your home is worth. For a simple and easy solution, you can utilize a free online home value estimator and then compare that to your mortgage balance on your latest statement. This will give you a rough estimate of your equity, which you can use to gauge how you may be able to tap into it or weigh the benefits of selling soon.
retiring. This requires determining your home’s fair market value. Doing so is more of an art than a science since it depends on both objective qualities, like your home’s square footage and number of bathrooms, and subjective ones, like how desirable your neighborhood is. Specialists of this art form include home appraisers and real estate agents, who can run a comparative market analysis to estimate your property’s worth based on recent sales in the area.
That said, you should acquire a more accurate number before making major financial decisions based on this asset—such as taking out an equity-based loan or
However, building equity doesn’t simply equate to paying down your mortgage. After all, your home’s value is not a fixed figure but a continuously fluid one. It may go up, for example, due to household improvements or limited available properties in your zip code. Conversely, it may diminish because of increased traffic noise or serious damage like roof leaks. This makes it wise to calculate your equity periodically to stay in tune with your financial situation, even if you aren’t presently preparing to sell.
The path to boosting equity
Because your home equity depends on two figures—your mortgage balance and the property’s fair market value—the key to enhancing it is taking steps to both decrease the former and increase the latter. Here are the two major approaches to accelerating your equity growth.
Making extra mortgage payments
Paying more than your minimum amount due or making additional lump-sum payments can cut down your principal at a quicker pace. You could also refinance to a shorter-term mortgage, such as by switching from a thirty-year term to a fifteen-year term. This will generally result in higher monthly payments, but it will slash your total interest paid over time and may ultimately expedite your route to 100 percent equity. Talk to your mortgage broker or a financial adviser for personalized guidance.
Investing in enhancements
While many factors affecting your home’s worth may be out of your control, you can still make a significant difference by investing in certain improvements. According to Zonda’s 2024 Cost vs. Value Report, some of the greatest ROI investments include installing a new garage or entryway door, upgrading to manufactured stone siding, and undergoing a moderate kitchen remodel. Consider discussing your options with a real estate agent to ensure that you make appealing choices that augment your home’s desirability. Additionally, stay on top of regular maintenance and conduct timely repairs to preserve your home and prevent value depreciation.
The potential of equity
As a major financial asset, your home equity can be accessed and leveraged in numerous ways. For one, when you sell your home, it will translate into profit, which you can apply toward your next residence. Many retirees also choose to downsize and put the leftover dollars into other investments.
But you don’t have to wait to sell to take advantage of your equity. For example, if you’re in need of cash, you can borrow against it through a home equity loan or home equity line of credit (HELOC). The resulting
funds can be used for any expense you like, such as home improvements or education. Just be sure to avoid overborrowing to safeguard your property.
As a homeowner, nurturing and managing your home equity is an essential component of financial planning. Whether you’re considering selling your home, planning renovations, or simply exploring your investment opportunities, having a clear understanding of this asset can empower you to make wise decisions.
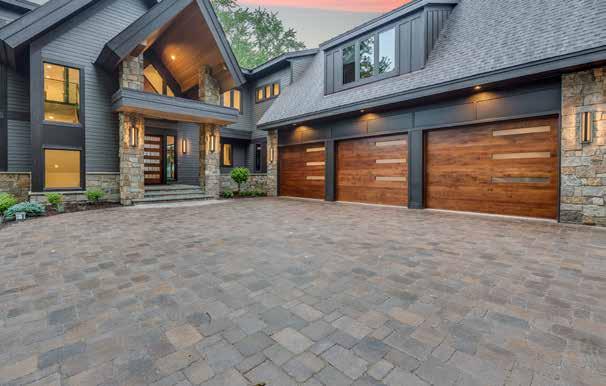
Which Garage Door Is Best for Your Home?
Choosing a garage door may not seem like an exciting decision, but it can completely affect the appearance of your home. It’s the first thing visitors see, so you want it to be both functional and stylish. Though there are many possibilities available, here are three common ones that fit these requirements to a T.
Raised panel
This option is popular among homeowners who prefer a door that is durable and dependable while also offering a traditional look. It’s made largely of steel and designed to last, keeping your garage secure and safe. The only drawback? Steel can dent if hit, and those panels may require a little TLC over time to preserve their beautiful appearance. But if you want a timeless alternative that won’t break the bank, this is the one for you.
Carriage house
For an easy way to add charm and character to your home, consider a carriage house door, which lends an
written by: FAITH FIORILE
old-world, barnlike vibe. With hinges and hardware that scream “rustic elegance,” it is perfect for houses with a country or vintage ambience. You can select from a variety of materials, though keep in mind that wood—a classic choice—may be more expensive. Even still, the investment may be well worth it for the great curb appeal it provides.
Contemporary
On the flip side, a contemporary garage door achieves a sleek, modern look thanks to its glass panels, clean lines, and minimalist style that exudes refinement. Just note that it may not provide the best insulation and security depending its material. With the right assets to supplement these downsides, however, this option can be just what you need to make a bold statement.
At the end of the day, your ideal garage door will be determined by what works best for your home and lifestyle. Whether you want timeless tradition, rustic charm, or futuristic flair, there’s one out there that will look great and serve you well.