GETTING STARTED WITH


ROSTERED TEACHER
June 2025
This guide walks you through the first things to do— accessing your account, exploring your materials, and setting up your classes—so you can get started quickly and smoothly.
ROSTERED TEACHER
June 2025
This guide walks you through the first things to do— accessing your account, exploring your materials, and setting up your classes—so you can get started quickly and smoothly.
This guide is for teachers whose accounts and classes are automatically rostered through a Single Sign-On system (such as ClassLink, Clever) or a Learning Management System (LMS) (such as Canvas, Moodle, Schoology, or Brightspace).
Your classes, student accounts, and resources have already been set up for you. This guide will help you log in, explore The KWL Hub platform, and get started with the materials. Whether you’re brand new or just need a refresher, you’ll find quick tips and answers to common questions to help you make the most of your teaching tools.
Let’s get started!
An activity in The KWL Hub is an interactive exercise within the course content, designed for independent practice or as part of an assignment. Activities can be auto-graded or teacher-graded, and to record the score, the activity must be included in an assignment. These activities can be used to reinforce learning, assess progress, and encourage further exploration.
A set of interactive activities that teachers can select and organize to support student practice. Assignments can be sent to students, tracked for completion, and scored, with results recorded in the teacher’s gradebook. Teachers can customize assignment settings, including availability dates, due dates, and the number of allowed attempts.
These assignments are recorded in the teacher’s gradebook upon student submission. Once assigned, they appear in the Assignments section of the student’s account.
Designed for practice only, ungraded assignments do not track completion and are not recorded in the gradebook. Students can access their ungraded assignments in the Classwork section.
The Course Player is the area of The KWL Hub where teachers and students access digital course content, including textbook materials, multimedia resources, and interactive activities. It serves as the central space for engaging with lessons.
An online platform your school uses to organize classes, share materials, assign work, and track student progress. Examples include Canvas, Schoology, and Google Classroom.
SINGLE SIGN-ON (SSO):
A secure login system that lets you access multiple apps and platforms using one set of credentials, usually provided by your school or district. This means you only need to sign in once to get into all your approved tools. Examples include Clever and ClassLink.
To begin using The KWL Hub, you’ll need to:
• Log in to your teacher account
• Verify that you have access to the correct materials for the school year
• Assign book content to your students
Follow the steps in this “Getting Started” section to ensure you’re ready for a smooth start to the school year.
How you log in to The KWL Hub depends on how your school or district has set up your access. Below are links to guides for each common integration method. If you don’t see your setup listed, please contact your school administrator or your sales consultant for assistance.
• How to access The KWL Hub via Canvas
• How to access The KWL Hub via Clever
• How to access The KWL Hub via Google Classroom
• How to access The KWL Hub via Moodle
• How to Access The KWL Hub via Schoology
❗ Important: Please do not create a new account on your own. To access your classes and materials, you must log in through your school’s Single Sign-On (SSO) system or Learning Management System (LMS).
When you log in for the first time, you will be prompted to accept the privacy policy. Click on “I Agree to Klett World Languages Privacy Policy” to proceed.

❗ Note: If you do not click on this blue bar, the system will log you out each time you try to log in.
You can access our privacy policy at any time.
Once you’re logged in, check that you have access to the correct programs and levels for your courses. You should see your assigned books and teacher materials in your dashboard. If anything is missing or doesn’t look right, contact your administrator or sales consultant as soon as possible so we can resolve it before classes begin.
Click on the blue bar “I agreed” to proceed.
The next step is to assign the book(s) to your classes. Assigning the book allows the students rostered into your class(es) to access the book materials as well as complete any assignments you create on The KWL Hub. To assign the book to your class(es), follow the steps below:
Go to Content
Click on Assign Books
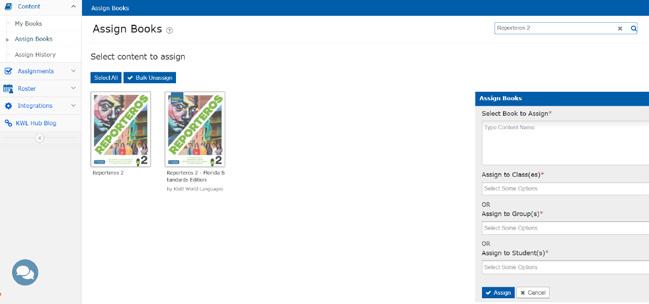
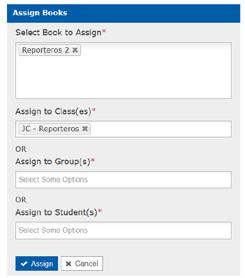
Select the book you want to assign. The title will appear in the Assign Books panel on the right of your screen.
In the Assign to Class(es) box, select the class or classes from the dropdown list. You can add multiple classes if needed.
❗Note: Bear in mind that your classes are automatically synchronized with your SSO or LMS. If you don’t see your classes, please contact your IT administrator. Please do not create any classes or students manually.
❗ Important: If a student joins a class after the book has already been assigned to the class, you will need to manually assign the book to them. To ensure all students have access to the content, we recommend reassigning the book to the entire class.
❗ Important: Only assign the book to classes that need it. Assigning content uses student licenses held by your school/district.
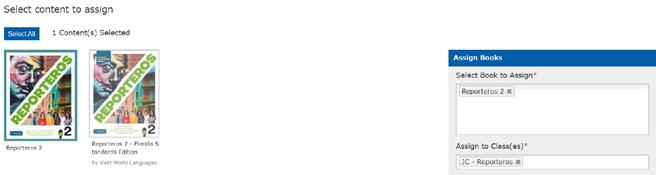
Confirm that the book title and selected class(es) are correct, then click Assign
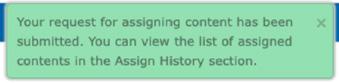
You will see the message: “Your request for assigning content has been submitted.” Your students will now be able to see the book under My Books when they log in.
❗ Important: If you receive the error message: “You have already exhausted the maximum number of users to which this content can be assigned,” please contact your school or district admin. This means all licenses for that book have been used.
Below is a quick guide to help you create assignments. For a detailed walkthrough, visit the full assignment guide on the KWL Support page under Teacher Resources for Assignments
There are two ways of creating assignments. From the Assignments section and from the Interactive Content:
2.1 CREATING ASSIGNMENTS FROM THE ASSIGNMENTS SECTION
Click on Assignments on the left-hand side menu..
Click on Create Assignment
Click on + Create New Assignment to create a new assignment.
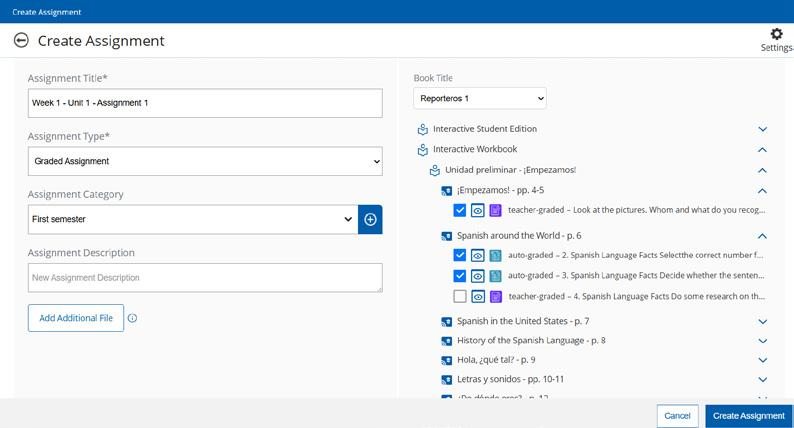
Enter an Assignment Title
Choose an Assignment Type from the drop-down menu (Graded Assignment or Ungraded Assignment). Please note that ungraded assignments are intended for practice, and their completion cannot be tracked. No grades or records will be stored in the gradebook for ungraded assignments
You can also create an Assignment Category, which will help you organize and filter assignments in the future. By default, no categories are created, but you will be able to select from those you create in the drop-down menu. For a complete guide on adding and managing categories, visit the Add Categories to Assignments section on the KWL Support page.
The Assignment Description field is optional.
Select a Book Title to view and choose activities for the assignment.
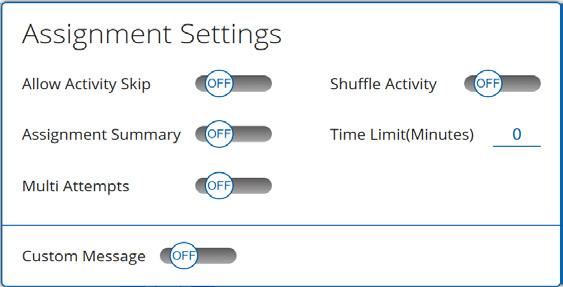
To add multiple attempts and other features, click on the gear icon ⚙ in the upper right-hand corner for Assignment Settings. For a complete guide on how to set the settings, visit the Assignments Settings Guide on the KWL Hub Support page.
To attach optional file(s) from your computer to the assignment, click “Add additional file”. You can add up to 5 files with a maximum size of 50 MB per file.
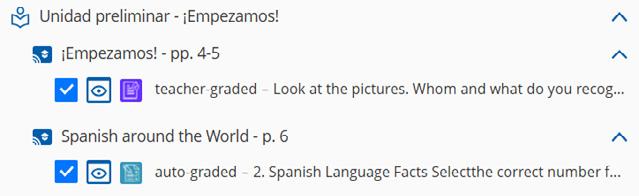
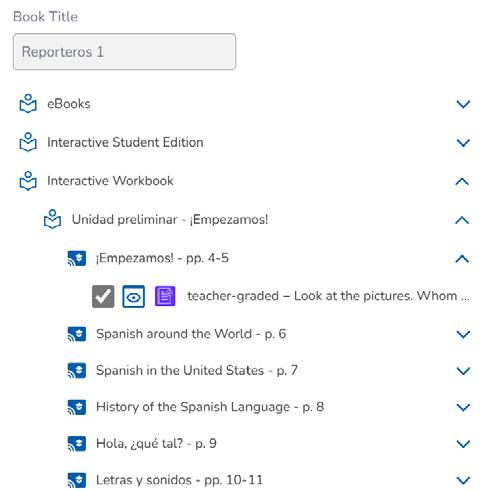
Once the Book Title is selected, all its sections will appear at the bottom. By clicking the arrows on the right (^ ˅), all assignable activities will be displayed. The unit and lesson names are shown on the left.
☑ To select an activity, check the checkbox on the left.
�� Use the eye icon to preview an activity.
Please note that activities can be either auto-graded or teachergraded. This information is displayed on the left of each activity.
Click “Create Assignment” to save the assignment.
❗ Important: Creating an assignment does not automatically assign it to your classes. Use the “Assign” feature to assign it to a class
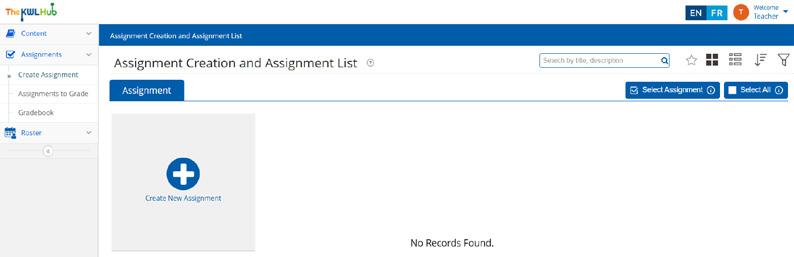
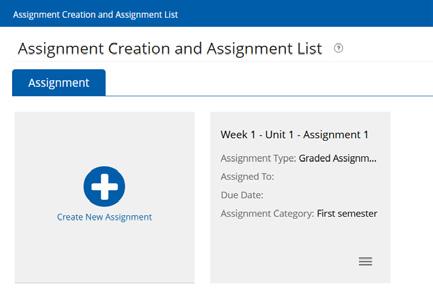
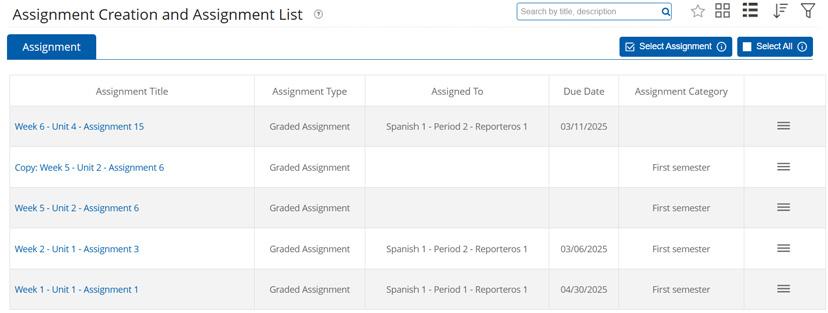
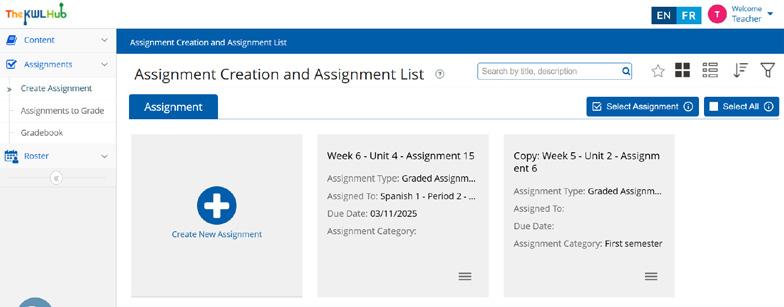
Once you have created an assignment, you can view it in the Assignment Creation and Assignment List. The next step is to assign the assignment to your class(es).
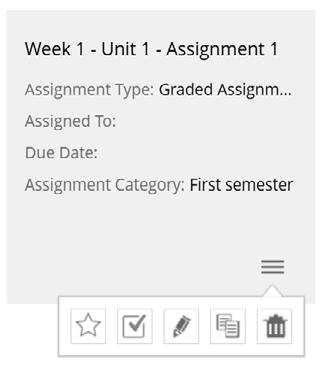
Click on the hamburger menu displayed at the bottom right of the assignment.
Click on the ☑ “Assign” button.
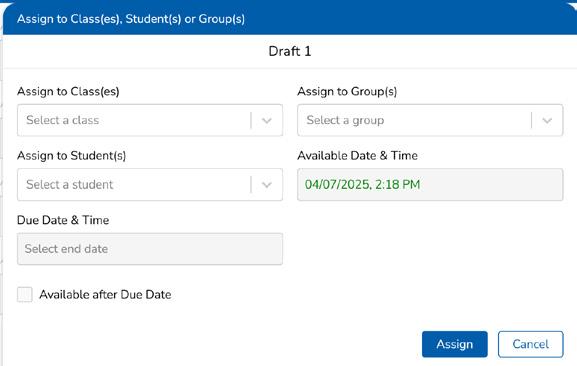
Select the class(es), group(s), or student(s) you need to assign the assignment to by typing the name of the class, student or group in the corresponding field.
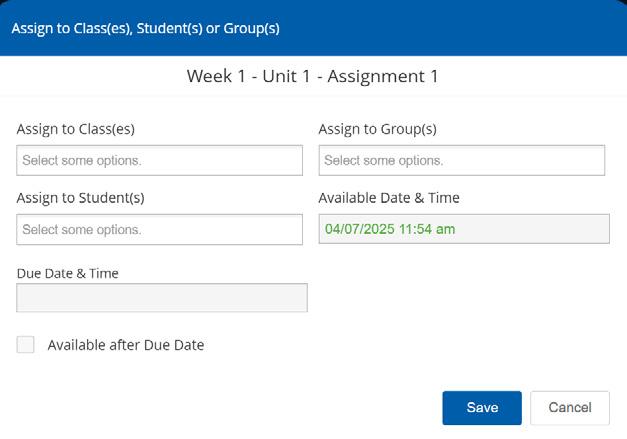
⏳ Select the “Available Date & Time”. This is the date and time on which the assignment will be available for students to complete. Please note that assignments will not appear in the students’ accounts until the available date & time.

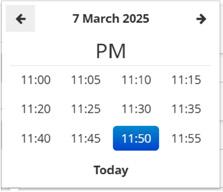
⏳ Select the “Due Date & Time”. This is the date and time the assignment will close for students. Leave this field blank for an open due date.
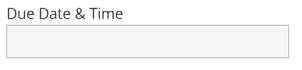
❗ Note: The due time is divided into 5-minute blocks. The latest possible time for an assignment is 11:55 PM.
�� Pro Tip: If your students haven’t completed the assignments by the due date, you can reassign the assignment to that individual student at a later time.
To allow all students to access and complete the activity after the due date, Check the Available after Due Date box.
If this box is not checked, the students will not be able to access the assignment after the due date.
When you click on the Available after Due Date box, the system provides an option to apply a penalty percentage for submissions made after the selected due date.
Click Assign to save the settings and assign the assignment to the selected class(es), group(s), or student(s).
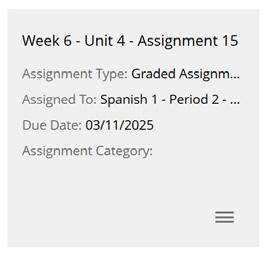
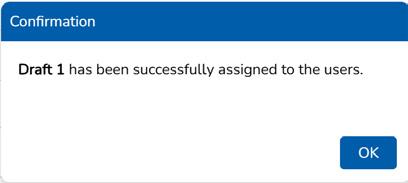
You can now see the class the assignment is assigned to, along with the due date:
�� Pro Tip: To get an extended view of the assigned classes and other assignment details, change from grid view to list view. You can modify the view or display of the assignments by clicking on the grid/list icon.
Bear in mind that once the assignment has been assigned, it is not possible to edit the assignment, change the assignment category, or change the settings of the assignment.
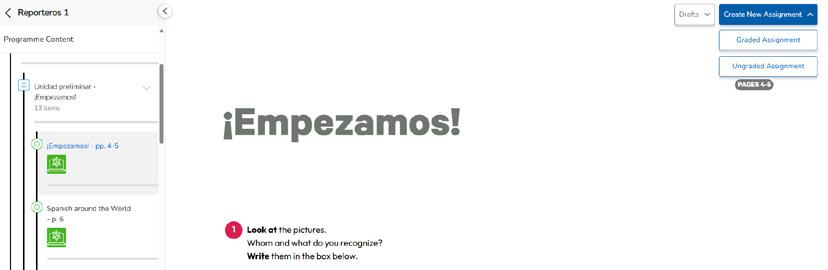
Open the interactive workbook or textbook and navigate to the activity you would like to assign.
Click on Create New Assignment.
Enter an assignment title and choose an assignment type Graded Assignment or Ungraded Assignment. Please note that ungraded assignments are intended for practice, and their completion cannot be tracked. No grades or records will be stored in the gradebook for ungraded assignments.
Enter an Assignment Title.
You can also create an Assignment Category, which will help you organize and filter assignments in the future. By default, no categories are created, but you will be able to select from those you create in the drop-down menu.
The Assignment Description field is optional.
To add multiple attempts and other features, click on the gear icon ⚙ in the upper right-hand corner for Assignment Settings. For more information on the Assignment Settings, jump to the Create Assignments section in this document or view the complete Assignments Settings guide on our KWL Hub Support page
To attach optional file(s) from your computer to the assignment, click Add additional file. You can add up to 5 files with a maximum size of 50 MB per file.
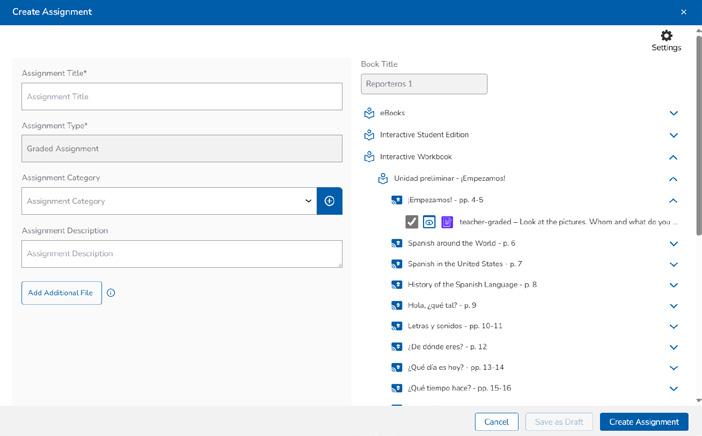
The Book Title can’t be changed, as it corresponds to the interactive content from which the assignment is being created.
The selected activities (indicated by the checkbox on the right) correspond to those displayed in the interactive book. You can unselect an activity to exclude it from the assignment. To add activities from other content areas, expand the desired resource and select the appropriate activities as needed.
�� Use the eye icon to preview an activity.

Please note that activities can be either auto-graded or teacher-graded. This information is displayed on the left of each activity.

You can click Save as Draft to save and continue working on this assignment or Create Assignment to move forward with setting assignment options and assigning to your class(es).
2.4 ASSIGN ASSIGNMENTS FROM INTERACTIVE CONTENT
If you click on Create Assignment you will be able to assign the assignment directly from the Interactive Content viewer.
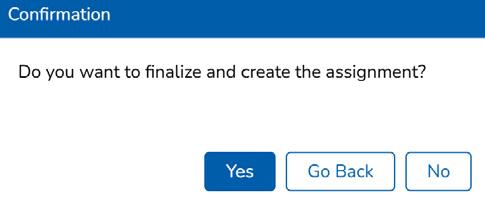
A confirmation box will appear to help you finalize the assignment. Click Yes to move forward or opt to go back to the interactive content.
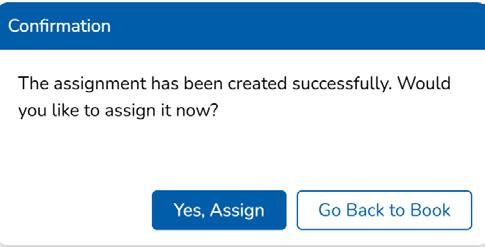
A second confirmation box will appear to help you move forward with assigning to your classes. Click Yes, Assign
After your assignment has been created, if you want to assign it at a later time you can select Go Back to Book Your newly created assignment can be found later in your Assignment List
You will receive a confirmation message and you will be able to keep viewing the content.
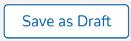
If you click Save as Draft, the assignment will be saved as a draft and can be edited later in your session.
You can access the draft by clicking on Drafts in the interactive book.
❗ Note: Drafts are only saved during your current KWL Hub session. Any unsaved work that is not part of an assignment will be lost when you log out or exit the KWL Hub. Be sure to save your work before leaving!
�� Pro Tip: Want to save your work for later? Create an assignment and leave it unassigned—this allows you to return, make changes, and finalize it before sharing with your students.
Here’s a quick overview to help you navigate The KWL Hub with ease.
Need more details? Check out the full Teacher Guide on The KWL Support page for a step-by-step walkthrough.
The chatbot is a virtual assistant powered by Artificial Intelligence, designed to provide immediate answers to your questions about the platform. It will serve as a valuable resource using The KWL Hub.
For quick solutions, simply type your question in the Chat Bubble located in the bottom-left corner.
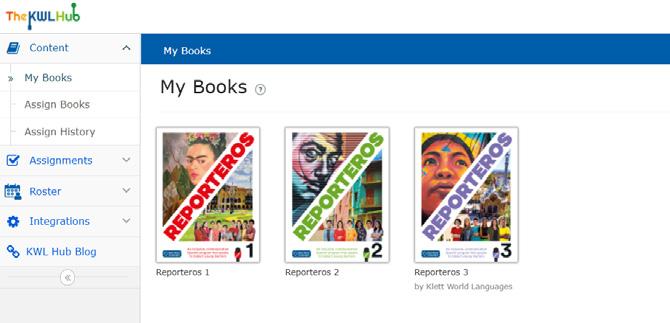
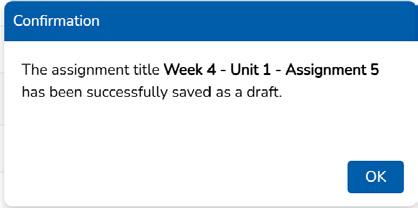
Once logged in, the My Books dashboard will be displayed by default.
All the books you have access to will be displayed on this dashboard. By clicking on the book, you will open the Course Player.
Want to see the Course Player? Jump to the �� Course Player Guide section within this document for more details.
In the “Assignment Creation and Assignment List” section, you can manage existing assignments and create new ones
Need more information on creating assignments?
Revisit the �� Creating and Assigning Assignments section within this document.
Check out the Teacher Resources for Assignments support page.
This section displays assignments awaiting teacher feedback, including teacher-graded activities that students have submitted.
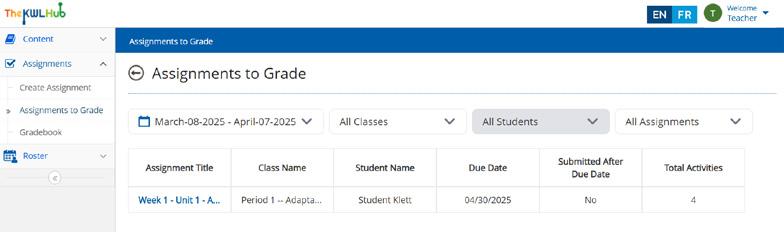
You can filter the list of assignments to be graded by date, class, student, or assignments. To ensure your assignments appear, double-check your filter settings and confirm that the selected date range includes the assignment’s creation date.
Want to see more information about grading assignments? Check out Teacher Resources for Assignments
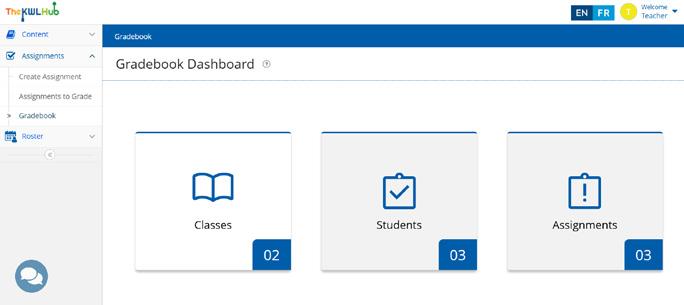
This section provides access to the grades of all your students, allowing you to view, track, and manage their academic progress.
To learn more about the Gradebook, including how to override grades and exporting for your records, check out the Gradebook Teacher Guides
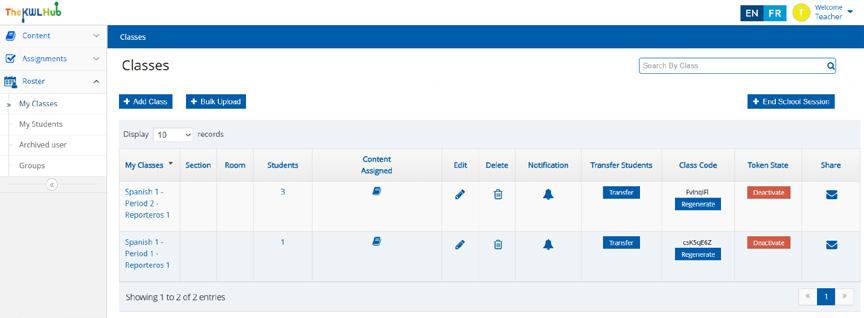
In My Classes, you’ll see all the classes linked to your teacher account.
These classes are automatically created through your school or district’s integration with its student information system. Because of this setup, you won’t be able to manually add or delete classes. If something doesn’t look right, like a missing class or incorrect roster, please reach out to your IT administrator for assistance.
In My Students, you’ll see all students rostered to your classes.
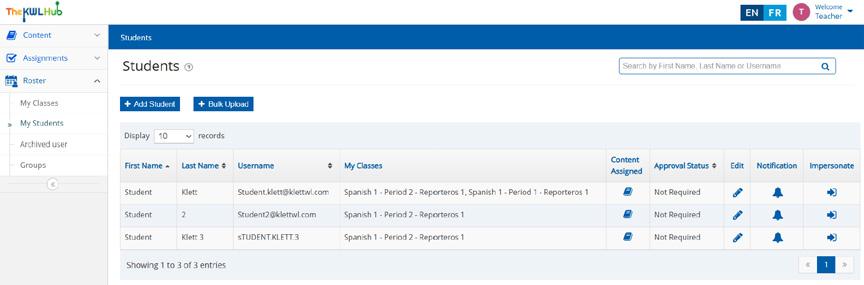
The student rostering process will vary depending on your integration method:
• Clever and ClassLink: No action is required. Students are rostered automatically by your school or district’s IT administrator. Your class list will update as students are added or removed from your SIS.
• Schoology, Canvas, and other LTI integrations: Students must launch The KWL Hub from within your LMS to be rostered into your class.
• In Canvas, the launch link appears in the Assignments section.
• In Schoology, it appears in Materials.
❗Note: If you can’t see the launch point for your students, please contact your IT administrator.
Once a student clicks the launch link, they will be automatically added to your class. The student process mirrors the teacher process; students should log in to The KWL Hub the same way you do, via the LMS.
• Google Classroom: When you logged in for the first time, you were prompted to sync your Google Classroom classes. If you need to update or re-sync your classes later:
1. Log into your KWL Hub account.
2. Click Integrations from the left menu.
3. Click Google Classroom.
4. Click the green Start Sync button.
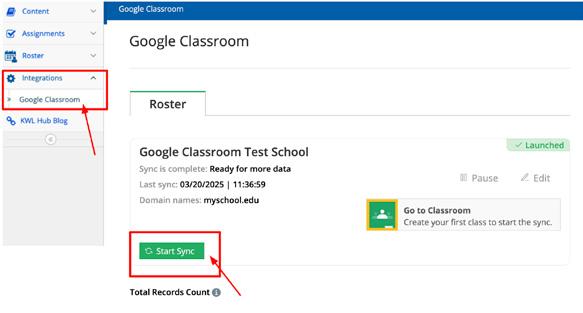
You will be directed to the sync page where you can adjust which classes you’d like to connect and sync.
To access integration-specific guides, see Getting Started with Integration
If you’re unsure of how to guide students through the rostering process (for LTI integrations like Canvas or Schoology), or if something doesn’t look right–like a missing student or an incorrect roster–please reach out to your IT administrator for support.
Need help managing students? Check out the Impersonate Students feature guide for help with impersonating students.
In Groups, you can view all the groups you have created. Groups are useful when a subgroup of students is needed across different classes. They allow you to create specific assignments for selected students. When assigning an assignment, you can assign it to a specific group instead of the entire class.

Check out the Creating a Group article for detailed guidance.
The Course Player is where you have access to all the digital materials and resources included with your book title, i.e. eBooks, Interactive editions, Assessment Program, and Resources. This section will help you make the most of the interactive features available within the Course Player:
• eBooks
• Interactive books
• Assessment Program
• Resources
❗Note: the content components displayed in your account may vary depending on book title and product tier purchased.
To access the Course Player, click on the desired book from your main dashboard page on The KWL Hub. To return to the main dashboard at any time, click the arrow (<) at the top left of the Program Content Menu.
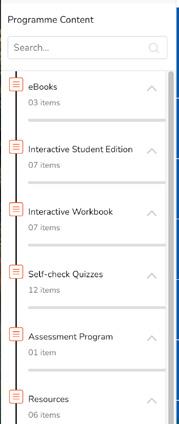
On the left side of the screen, you have the Program Content Menu, which allows you to toggle between the content components included in your book title: i.e. eBooks, Interactive Student Edition, Interactive Workbook, Interactive Activities, Self-check Quizzes, Assessment Program, Resources.
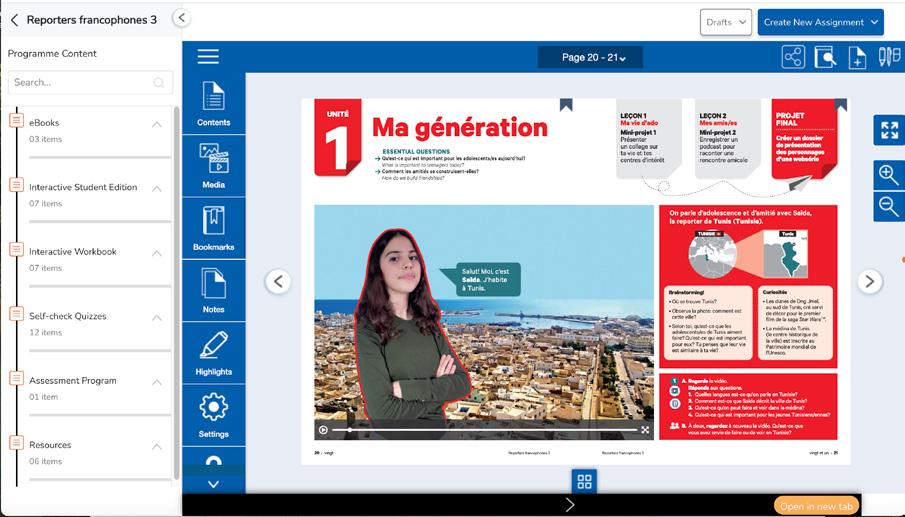
Program Content Menu
To view content, click on the content item listed in the menu or click the arrow to expand the content component.
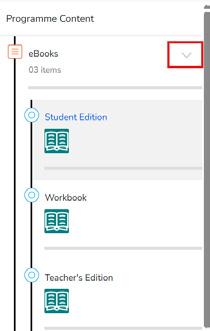
The “eBooks” content area includes the enriched eText books available with your program. The eBooks allow you to browse all the pages of the book and provide easy access to corresponding resources such as video, audio, and differentiation worksheets.
Want more information about how to use the eBook? Jump ahead to the eBook Player section
The Interactive Books and Interactive Activities allow users to complete activities directly online. Most exercises are auto-graded, providing immediate feedback and a score. Teacher-graded activities are sent to the teacher’s gradebook for review and feedback.
Activities from the Interactive Textbook and Interactive Workbook can be assigned by the teacher or completed independently by the student.
��Tip: Remember that you can create and assign assignments directly from the interactive content. Jump back to the Create assignments from Interactive Activities section to see how.
Interactive Quizzes are quizzes that can be completed by students directly online. These quizzes are autograded, and students receive immediate feedback and a score automatically upon submission.
Teachers must assign interactive quizzes in order to make them available to students.
To assign interactive quizzes, teachers may use the Create New Assignment feature found directly in the content viewer or go to the Assignments section and create / edit an assignment to add the desired interactive quiz.
Self-check quizzes are auto-corrected assessments for grammar and vocabulary in each unit. Students have access to these quizzes by default in their accounts. They can complete self-check quizzes to help determine their understanding of each topic. Student scores for unassigned self-check quizzes are not recorded or sent to the teacher.
To record a student score on a self-check quiz, it must first be assigned by the teacher.
To assign self-check quizzes, teachers may use the Create New Assignment feature found directly in the content viewer or go to the Assignments section and create / edit an assignment to add the desired interactive quiz.
The complete assessment program is available to teachers in the Assessment Program content area,
including an array of adaptable assessment options such as lesson exams, integrated performance assessments, assessment rubrics, answer keys, audio & video scripts, midterm/final exams.
❗Note: Assessments for each program will vary. For questions about your assessment program, please contact your sales consultant.
• Assessments can be downloaded in various formats. Check the file type to see if a resource is available as a PDF, Word document, or within a ZIP folder.
• Audio files for assessments are also available for download.
• Videos are accessible to teachers via a non-shareable link but cannot be downloaded due to copyright restrictions.
The Resources content area contains links and files for the resources that are available for your program. Files are available for download as a Zip folder or as PDF or Word files.
��Tip: Explore the resources during your lesson planning phase. Download what you need and save it to your computer or cloud storage for easy access later. You can always return to The KWL Hub to download materials again as needed.
These resources are available to both teachers and students. They include project rubrics, audio files, grammar and vocabulary supplements, and more.
Links for the grammar tutorial videos may be found here. Videos are available to teachers and students via a non-shareable link. Due to copyright restrictions, videos are not downloadable. Grammar tutorial videos that correspond to topics in the textbook can also be found and played directly from the eBook.
Teacher resources are only available to teachers. These include answer keys, audio files and scripts, standards correlations, resources for lesson and course planning, and more.
Additional resources, which vary by program, can be found in the Resource content area, including:
• Differentiation worksheets
• Heritage worksheets
• Videos with Closed Captions
• Grammar Tables
• Vocabulary Videos
• Pronunciation Videos
• and more!
The eBook player allows you to navigate through eBooks and access media resources directly in the content viewer. It also contains tools to facilitate notation, bookmarking, searching, and direct linking to pages of the eBook.
Navigation
Contents
Click to expand the contents of the book: view a list of units and lessons
Menu
Minimize or Expand the control menu within the eBook.
Go to Page Type in the page number and press Enter on your keyboard.
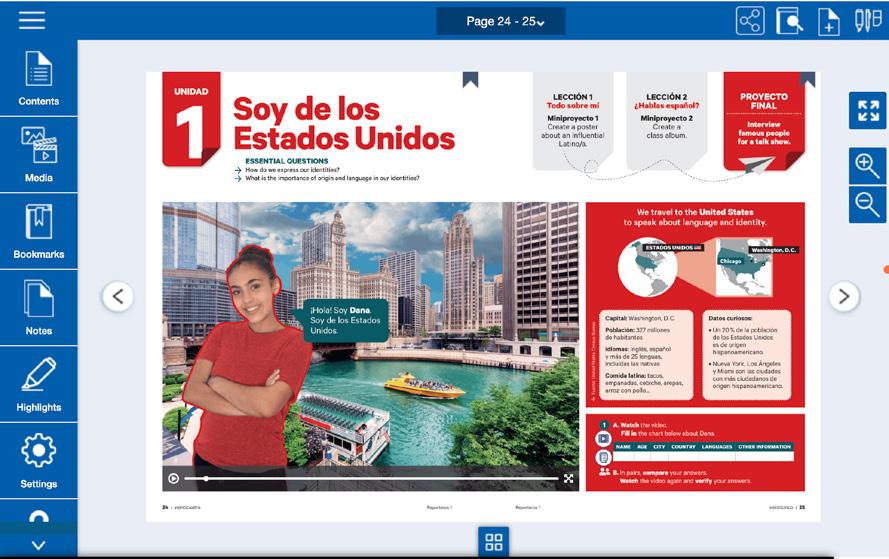
You can find links to audio and video files in this menu.
• Audio and Video hotspots: Click the audio or video icons on the eBook pages to play the resource directly from the page.
• Transcript hotspots: Click the transcript icon on the eBook pages to open the transcript in PDF format in a new tab.
• Differentiation and Heritage Worksheets: Worksheets, when available, are linked at the top of the page. Click the worksheet icon to open the resource in PDF format in a new tab.
• Rubric Hotspots: Click the rubric icon to open the associated assessment rubric in PDF format in a new tab.
• Extra Materials (Activities): Additional downloadable activities that are mentioned in the textbook are linked on the eBook page. Click the document icon to open these resources in a new tab as PDFs or Word files.

The Bookmarks menu shows a list of bookmarks added in the eBook. They are sorted by Date or by Page Number. From the list, click on the desired bookmark to navigate directly to that page.
• Add a bookmark: click the ribbon icon at the top left corner of the book page. The ribbon will turn red indicating that the bookmark has been added.
• Remove a bookmark: click the red bookmark icon to remove it. The ribbon will turn gray indicating that it has been removed.

The Notes menu shows a list of all your notes. They are sorted by Date or by Page Number. From the list, click a note to navigate directly to that page.
• Add Note: Click the add note icon from the top panel.
• Then click anywhere on the page where you want the note to be created. OR Select text on the page where you want the note to be created. Then click the add note icon from the top panel.
• View, Edit, or Remove a note: click the note icon on the page. This allows you to view it, edit or remove the note.

The Highlights menu shows a list of all your highlights. They are sorted by Date or by Page Number. From the list, click a highlight to navigate directly to that page.


• Add a highlight: Select text on the eBook page to be highlighted, and click on the highlighter icon that appears in the top panel. Click the desired highlight color and then Save.
• Edit or Remove a highlight: Click the highlighted text to open the Highlight box. To change the color, click on the desired color and then select Update. To remove the highlight, select Remove.
Settings
Page view: toggle between a 1-page view and 2-page view.
Help
The Help menu shows how to use the eBook, including the top panel, left menu, and keyboard shortcuts.
Share link
Click the share icon from the top panel to generate a URL for the current page. This link can be shared with other users of the same book title to direct them to a specific page. If the user is not logged into their KWL Hub account, they will be prompted to login first.

Search
Type your search keyword. From the list of results, select the items you want to navigate to.

Click on the icon to select different drawing tool options. You can select either pen, highlighter, or eraser. Please note that text marked with this highlighter will not save in the Highlights Menu.
• To view markings made with drawing tools, click the tools icon.
• To hide markings, click on the X to close the tools.
• To remove markings, use the eraser tool. The eraser options allow you to Erase Drag, to selectively erase highlights or scribbles, or Erase All, to erase scribbles and highlights all at once.
Once you’re familiar with the core features of The KWL Hub, you’ll be ready to explore additional tools and advanced options.
The links below highlight commonly used functions that will you help get most out of the platform. For a comprehensive rundown of all the features at your disposal, check out the full Teacher’s Guide on The KWL Support page.
• Assignment Settings
• Setting the number of attempts
• Adding a custom message
• Resetting Student Attempts
• Grading Assignments
• Duplicating & Deleting Assignments
• Gradebook: All you need
• First steps with the Gradebook
• Using Gradebook Filters
• Gradebook views: Class Summary, Student Summary, Student Detail
• Color coding (student scores)
• Not Assigned vs Not Attempted
• Importing & Exporting grades
• FAQs about the Gradebook
• Managing Students
• Impersonating students
• Deleting students
• Moving students between classes
• Edit a student profile
You’re now equipped with the tools and knowledge to navigate The KWL Hub with confidence. As you continue exploring, remember that support is always available.
For additional guidance, check out the �� FAQs below and visit our KWL Hub Support page for more resources. If you need further assistance, don’t hesitate to reach out to our support team. Happy teaching!
Use your school’s Single Sign-On portal (like Clever, ClassLink) or your LMS login (Canvas, Schoology, etc.) to access the platform. Look for the app icon or link provided by your school.
Contact your school’s IT department or LMS administrator to confirm the app is enabled for your account.
Rosters usually sync automatically overnight or weekly depending on your school’s schedule. If a student is missing, check with your school’s roster administrator.
Rostering is managed centrally via your LMS or student information system, so you cannot manually add or remove students in the platform.
Have the student try logging in through the same LMS or SSO portal you use. If issues persist, direct them to your school’s IT help desk.
Find the full Student Guide on The KWL Hub Support page.
Once logged in, you will find your books on your main dashboard. Click the book to open the course player and access your materials. If you can’t find your books on your main dashboard, please contact Support.
Assignments can be accessed via the Assignments section. Click Assignments in the left menu and go to “Create Assignment” to view the full list of created assignments.
I CAN’T SEE THE ASSIGNMENTS BUT MY STUDENTS SAY THEY SUBMITTED THEM.
This is likely because the assignment was created as ungraded. Ungraded assignments are designed for practice only—they do not track completion and do not appear in the teacher gradebook. If the assignment included any teacher-graded activities, the assignment will appear in “Assignments to Grade” until you score the assignment. Once you score the assignment, the grade will appear in your gradebook.
You can manually override student scores from the Gradebook. Go to the student summary report and click on the pencil icon to edit grades.
Your classes and rosters will update with the new term. You may want to export grades or student work if needed before data is cleared.
Start with your school’s IT department or LMS support team. You can also reach out to our KWL Support Team.
NEED ADDITIONAL SUPPORT? WE’VE GOT YOU COVERED!
• Technical Support: For troubleshooting and platform-related questions, our tech support is ready to assist.
• Sales Consultant: Reach out to your sales consultant for guidance on materials and resources.
• Elevio Support Articles: Explore our KWL Hub Support Page for step-by-step guides and FAQs on using The KWL Hub.
For immediate assistance, visit our support page or contact us directly–we’re happy to help!