

Focal Points
The Magazine of the Sierra Club Camera Committee
India
Tiger Safari
Chair
Programs
Treasurer
Membership
Editor
Communications
Meetup
Instagram Outings Outings
SCCC Leadership
Joe Doherty
Susan Manley
Ed Ogawa
Joan Schipper
Joe Doherty
Velda Ruddock
Ed Ogawa
Joan Schipper
Joan Schipper
Alison Boyle
joedohertyphotography@gmail.com
SSNManley@yahoo.com
Ed5ogawa@angeles.sierraclub.org
JoanSchipper@ix.netcom.com
joedohertyphotography@gmail.com
vruddock.sccc@gmail.com
Ed5ogawa@angeles.sierraclub.org
JoanSchipper@ix.netcom.com
JoanSchipper@ix.netcom.com
AlisoniBoyle@icloud.com
Focal Points Magazine is a publication of the Sierra Club Camera Committee, Angeles Chapter. The Camera Committee is an activity group within the Angeles Chapter, which we support through the medium of photography. Our membership is not just from Southern California but is increasingly international.
Our goal is to show the natural beauty of our world, as well as areas of conservation concerns and social justice. We do this through sharing and promoting our photography and by helping and inspiring our members through presentations, demonstration, discussion, and outings.
We have members across the United States and overseas. For information about membership and/or to contribute to the magazine, please contact the editors or the membership chair listed above. Membership dues are $15 per year, and checks (payable to SCCC) can be mailed to: SCCC-Joan Schipper, 6100 Cashio Street, Los Angeles, CA 90035, or Venmo @CashioStreet, and be sure to include your name and contact info so Joan can reach you.
The magazine is published every other month. A call for submissions will be made one-month in advance via email, although submissions and proposals are welcome at any time. Member photographs should be resized to 3300 pixels, at a high export quality. They should also be jpg, in the sRGB color space.
Cover articles and features should be between 1000-2500 words, with 4-10 accompanying photographs. Reviews of shows, workshops, books, etc., should be between 500-1500 words.
Copyright: All photographs and writings in this magazine are owned by the photographers and writers who created them. They hold the copyrights and control all rights of reproduction and use. If you desire to license one, or to have a print made, contact the editor at joedohertyphotography@gmail.com, who will pass on your request, or see the author’s contact information in the Contributors section at the back of this issue.
https://angeles.sierraclub.org/camera_committee
May/June 2025

4 India: Tiger Safari Adventure
I always seemed to be going to some part of southern Africa, seeing lions, leopards, elephants and other iconic wildlife. So, a safari to India to see tigers in the wild was something I’d been thinking about doing for a long time. By
Beverly Houwing
COLUMNS
19 How To: Digitize Film with your Camera By Joe
Doherty
28 My Worst Mistake By SCCC Members
Beverly Houwing poses for a selfie at Brúarfoss in Iceland.
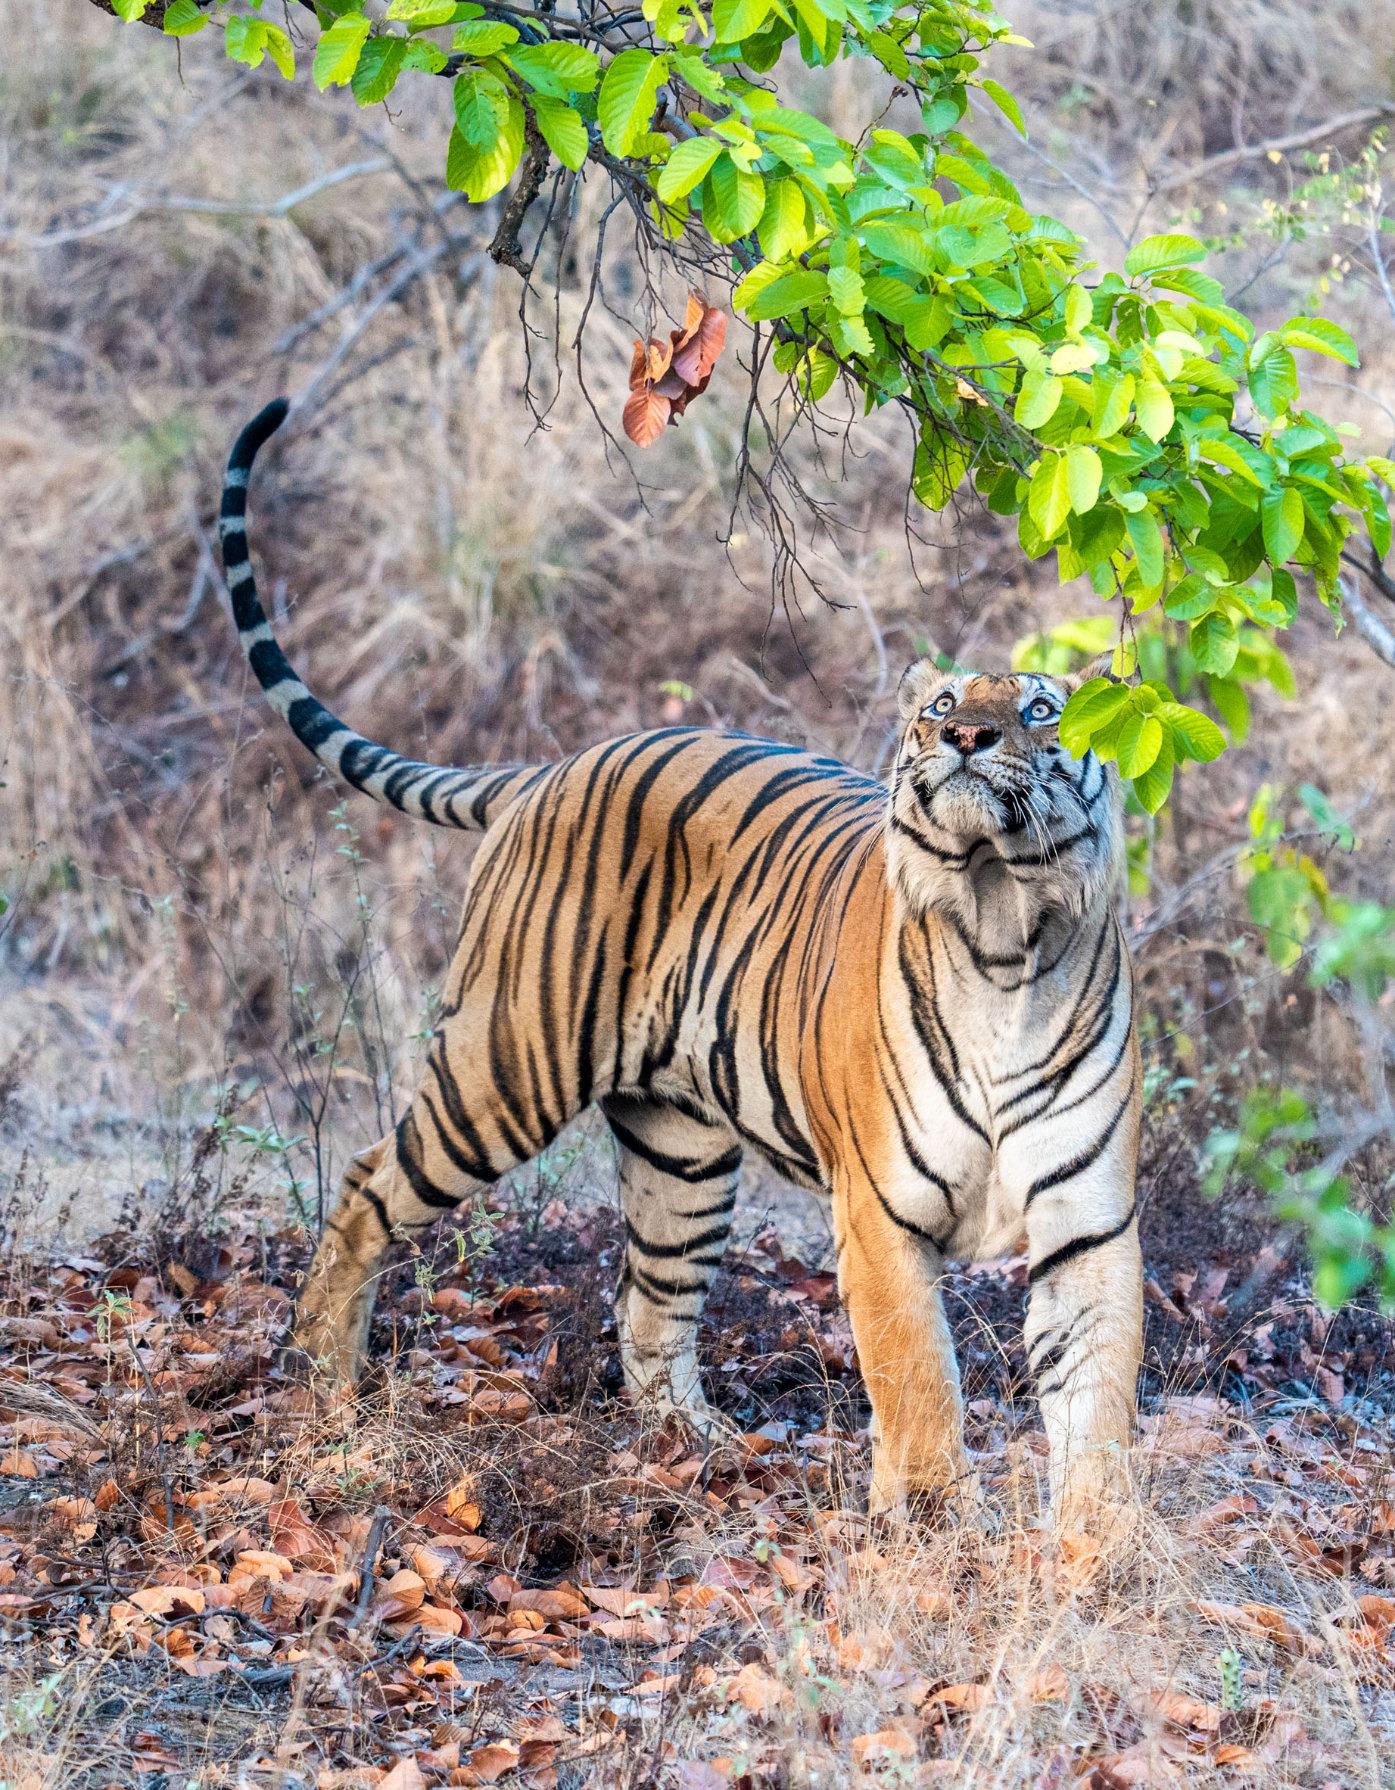
Cover Photo: Tiger 142 out for a hunt at Panna Tiger Reserve © Beverly Houwing
From the Chair
I’m a firm believer that travel broadens the mind. Through exposure to different people, cultures, and landscapes, we learn empathy and respect while engaging creativity and curiosity. It’s quite an amazing thing.
Velda and I are returning from a three week trip through the Pacific Northwest, the Yukon, and Alaska. Our traveling companions varied from place to place, and for the last six days we’ve been in a diverse tour group of about forty people. Not too diverse, though. We were mostly retired, mostly Caucasian, and mostly married couples. There were more than a few retired military, quite a few from “red” states, some medical professionals, and one college professor.
This was not a stereotypical package tour. We did not lounge poolside and sip umbrellaladen cocktails. It was seven days and six nights of travel, with Denali as the penultimate destination. In nearly every place we stopped two themes came to the forefront: the indigenous peoples, and the effect of the rest of us on the landscape. In public discourse these are lines of partisan division. On this trip nobody argued about them. There was no presentation of alternative facts, no arguments in favor of strip mining. I found it refreshing.
It might have happened because we were distanced from our home turf and were being exposed to these complicated issues in very concrete ways. The banks of the Yukon River near Dawson, for example, are piled high with hundreds of acres of large river rock from dredge mining. The shore is nearly sterile, and streams that teemed with fish in 1895 are now mostly lifeless. In Denali, by contrast, the region remains in its natural state due to a century-long commitment to keep it that way.
While most people cannot get to these places, as photographers we can do our best to take them there. We can show them the wins and losses of the environmental movement, get them to care about a place, or at least understand it a little bit better.
Our cover story by Beverly Houwing is an example of how photography can be used this way. She was drawn to photograph the tigers for many reasons, but what she’s come back with is a story of the determined conservation and preservation of a species through the establishment of reserves. There is still conflict, whether car-to-car or pressure from the surrounding communities, and that is presented as well. I think it’s fair to say the Beverly’s travel has broadened my mind. This issue also contains a one-off piece (for now) on photographic mistakes. The brainchild of Mike Caley, it’s a different genre for our magazine and could be repeated in the future. What topics would you like to see explored this way?
I’ve written an article on digitizing film that was prompted by Alison Boyle’s interest in the subject. It’s more technical than my usual how-to column, as I’ve tried to cram everything into the pages that I thought would be needed to jumpstart a digitizing project.
I hope to see you in June for the Members Show. Details are on the facing page.
Joe Doherty from Anchorage, AK

Semi-Annual Members’ Show
June 12, 2025 via Zoom
From travel to tabletop, from archival to ephemeral, please join your fellow SCCC members and show them what you’ve been working on. Register at the link below.
https://us02web.zoom.us/meeting/register/smBltfm8THier770ZBLisA
Upload images to this folder.
https://www.dropbox.com/request/unabz4BoEy0kzBOPfPlJ
Please upload no more than 10 of your images for the member show to this folder. (Screen sharing is disabled to prevent Zoom bombing.) Images should be jpg, 2000 pixels on the long side, in the sRGB colorspace. If you want to show them in a particular order, add a two-digit sequence to the beginning of each file name (i.e., "01" "02" "03" etc.).
Lake McDonald at Glacier National Park © Alan Jacknow, from the December 2024 Member Show

India: Tiger Safari Adventure
Text and Photographs by Beverly Houwing

Tigers!
I visited India many years ago. I even went to a tiger preserve, Sariska. I did not see a single tiger on that visit. My other trips to India were more focused on culture, temples and monuments. I always seemed to be going to some part of southern Africa, seeing lions, leopards, elephants and other iconic wildlife. So, a safari to India to see tigers in the wild was something I’d been thinking about doing for a long time.
As luck would have it, a Southern California group in a sold-out Indian tiger trip suddenly had an available space. I grabbed it and made it work – literally squishing it between a trip to Iceland and Zambia.
The trip was in early April. It was successful –we saw many tigers – and a lot of fun, but it was a completely exhausting experience. I’ll go into that later.
But first, let me tell you about our successes.


A tiger stalks across the road just outside Dhikala Forest Lodge in Corbett National Park.
A female tiger and her three cubs cooling off in the late afternoon at a watering hole.

Early mornings are the best time to see leopards out at about at Panna Tiger Reserve.

A tiger walking along the river bank in Corbett National Park.

� We visited three different parks in India: Jim Corbett National Park, Panna Tiger Reserve, and the Bandhavgarh Tiger Reserve.
� We saw a total of twenty-two tigers, including a mother that had four two-monthold Cubs (we saw two of them!).
� We also encountered three leopards, and an elusive small cat called a “Jungle Cat.”
� Other interesting and uniquely Indian mammal species we saw included sambar deer, spotted deer, langur monkeys, boar, guar bovine, and Asian elephants.
� If you’re a birder, you would thoroughly enjoy visiting Indian parks. There are over 600 bird species there. It was a pleasure to take a break from looking for tigers to just enjoy the birds. I found it
especially interesting to see how many species I’m familiar with in Africa that have an Indian counterpart. Examples include beeeaters, kingfishers, drongos, rollers, and bulbuls.
The national parks and reserves in India are set up a quite differently than they are in Africa, where you can typically stay inside the park. In India, almost all accommodation is outside the national park. The exception is the Jim Corbett National Park, where there are a total of five lodges within the park boundaries. However, a stay is limited to a maximum of three nights to ensure that as many guests as possible can enjoy this unique experience.
Our first stop was the Jim Corbett National Park, at the Dhikala Forest Lodge, which is located the deepest inside the park. It is one
Pairs of Plum-headed Parakeets congregate near their nests in Bandhavgarh Tiger Reserve.
of the most scenic parks in India with thick green forests where the canopy of trees arcs across the roads. It has a wide river and large, open, grasslands with numerous wild Asian Elephants.
Jim Corbett was born July, 25 1875 of English ancestry in India. He grew up spending much of his childhood exploring the wilderness amidst dense jungle and developed a deep knowledge of it. Over the years he became a good hunter as well as wonderful naturalist. He was also a pioneer conservationist and played a key role in the establishment of present Jim Corbett National Park. It has the highest number of tigers, with 252 living inside the reserve.
Panna Tiger Reserve was our second stop.
Panna has an interesting conservation history. Their tiger population had been completely wiped out before 2009, and the government of the state of Madhya Pradesh wanted to

repopulate this wildlife conservancy area. Because there are other national parks within their territory the states can operate autonomously. They were able to take tigers from within their jurisdiction and repopulate tigers once again in Panna.
Between 2009 and 2015 seven tigers were introduced. These came from different parks, including Bandhavgarh National Park, Kanha National Park, and others, ensuring the maximum genetic diversity. There currently are over 90 tigers. Now that a healthy population has been established, the offspring of these tigers are no longer given numbers. They’re basically stopping with a three-digit level of identifying the generations, only tracking the first two generations with their unique numbering system,
For instance, we saw tiger 142. This is the offspring of “tiger number 1” from the originally transplanted tigers and the 2nd cub

A Green Bee-Eater snapping up a gnat in Panna Tiger Reserve.
A Common Kingfisher catches a minnow in Corbett National Park.

prevalent throughout all the parks in India.
Peacocks are


Asian Elephants grazing the open grassland (top) and traversing the dense forest (bottom) in Corbett National Park.
within her 4th litter. A large 500-plus pound male, “tiger number 663,” is the offspring of “tiger number 6” from the originally introduced group to Panna. That tiger had 6 litters and he is the 3rd cub of that last litter.
Our final stop was in Bandhavgarh National Park. It is one of the most popular, and, as a consequence, it was the most crowded park.
It was not unusual to have 25 to 30 vehicles vying for an optimal position at a tiger sighting.
The terrain here is more mountainous. Corbett and Panna are both surrounding a large river and have large open forests and grassy areas. In Bandhavgarh you’ll find more streams, many small and large pools of water

fed by springs and deep gorges dividing the landscape. Roads thread through dry forests and over steep mountainous terrain. Here the animals are spread out in different areas and in more isolated groupings.
Being distributed throughout Bandhavgarh, large herds of sambar deer sustain a healthy tiger population of close to 150 big cats. These deer are very adapted to the water and are often wading in deep pools to cool off, get a drink, and sometimes even feed on the grasses that grow below the surface. It’s not uncommon to see these deer with their heads submerged for quite a while, and then suddenly pull up with a mouthful of long green tendrils.
Another adorable inhabitant in all the parks we visited are the gray langurs, also known as the Hanuman langur or leaf monkey, a species of Old World monkeys native to the Indian subcontinent. Unlike the macaques they are highly social, sweet natured and not
aggressive. The macaques were constantly trying to raid tourist vehicles for food or anything else. The langurs were always relaxed, curious and made no attempts to approach people. It was fun to just park at a large langur family group and observe their interactions.
Another unique thing about India is that many parks are divided into “zones,” and your game drive allows you to drive only within a particular area. However, if you can obtain an All-Day Pass, it has distinct advantages, allowing you to enter and leave the park a bit earlier and later to get an edge on the crowds, as well as allowing access to multiple zones during your drive.
Bandhavgarh National Park limits the area that the public has access to, with only 20% open for visitors and 80% as a restricted conservation area. This must make it a relief for the wildlife in those locations. They were
Tiger 142 brings her cubs to drink and cool off in the Ken River at Panna Tiger Reserve.
able to escape the chaotic traffic mess caused by the onslaught of tourist vehicles.
This brings us to some of the issues we faced on this trip.
Game drives in India are a very different experience than those that happen in most African parks. This is a big contrast to African parks, that are either more remotely located or in a private conservancy that limits the number of visitors or the number of vehicles that can stand at a sighting. With a large local population and easy access to these parks there are loads of cars at the Indian tiger reserves. Although they are operated by national park drivers and accompanied by official guides, it still becomes a total free-forall at a tiger sighting.
The smaller jeeps which make up most of the safari vehicles, and sometimes larger game drive vehicles are constantly cutting each other off and occasionally colliding. Guides and drivers get into non-stop screaming arguments with each other over who should move and where - even when there is literally no room to do so.
As those of you who have gone on a safari know, you always need to be up early because animals are most active before the day heats up. In India, that was an understatement. Every day on the trip we were up at 4 a.m. to access the park and be at the front of the queue at the gate. It was an absolute madhouse because so many jeeps were competing to get into a good position and see

Massive tiger 663 gets up after a relaxing soak in a watering hole at Panna Tiger Reserve.

An Asian Elephant enjoying a good dust bath in Corbett National Park.

a tiger before the rest of the crowd showed up. It was like someone waved a checkered flag at a grand prix the way these vehicles took off from the entrance already trying to pass each other to see the first tiger and get a prime spot at the sighting.
The heat was another issue. Our coolest day was probably in the high 90s (around 9899°F) and most other days it was closer to 107°F, making it even more oppressive. The afternoon drives were especially challenging because we had to wait in the sun for an hour for the gates to open.
Still, the sweltering weather did sometimes make tigers easier to find. They were often resting in the river or a pool of water, trying to stay cool.

Our last day in Bandhavgarh was exciting. One of the vehicles in our group clipped two others trying to reposition for a better view of a tiger at the end of the day. Then, suddenly, our car got bashed into by yet another vehicle. Remarkably, all these dents and collisions seem to be handled rather quickly and amicably amongst the local guides and drivers.
Please know, I don’t want to discourage anyone from visiting India and seeing tigers in the wild. It’s a truly remarkable experience. You just need to know what you’re in for with the lack of an “exclusive,” and occasionally an uncivilized, safari experience. Just try to relax and enjoy seeing those tigers!

A langur cuddles her baby in Panna Tiger Reserve.
A langur galloping down the road in Corbett National Park.


A very special sighting of a mother with 2 of her 4 young cubs in Bandhavgarh
Tiger Reserve.
Sambar deer pulling vegetation up from the bottom of a pool at Bandhavgarh Tiger Reserve.
Langur monkeys high up in a tree catch the attention of a tiger.
Digitize Film With Your Camera
By Joe Doherty
Why digitize?
What do we do with our photographs? In recent issues of Focal Points, Peter Bennett has written about myriad ways to identify and archive important documents and photographs, and create repositories of local and family history (see “Preserving Your Life’s Work,” Focal Points Jan/Feb 2025 and March/April 2025). My own columns about making books touched on similar themes. I discussed the process of creating something tangible with our photographs, something that can be shared, something that outlives us (see “How to Make a Book,” Focal Points May/June 2024 and Sept/Oct 2024). For
both Peter and myself, the archives include a great deal of film.
In this column I discuss how to incorporate film into your archive by using a camera to digitize it. I have thousands of rolls of film from the age of thirteen through my years as a working photographer, and I’ve long been on the lookout for a quick, inexpensive, and high quality method for converting these to digital, to make them available again.
Equipment needed
I have used a dedicated film scanner, a couple of flatbed scanners, and a camera to digitize my film. The camera is by far the best

My Nikon D850 and 55mm Micro-Nikkor f3.5 lens on the film duping rig. This is built from scrounged parts. The film carrier can handle both film strips and mounted slides.
solution available today for 35mm film, and is what I will discuss in this column. I will continue to use the flatbed for 6x6 and larger film.
The first thing you need is a camera that provides you with a raw file. You will make adjustments to the digital image that include color correction and subtle corrections to highlights and shadows, and for that you need dynamic range and color space flexibility. I use a Nikon D850, but my Nikon D600 (2012) would be perfectly adequate. I recommend a fullframe camera, so that your digital images are roughly the same size as your 35mm film. If you do not anticipate making large prints, though, a less than full-frame camera should be just fine.

It’s very important to clean the film as best possible before digitizing, with brushes, compressed air, and film cleaning solution.
You will also need a lens that is designed to shoot macro, and has a reproduction ratio of at least 1:2. I recommend against using a lens that can shoot close-up but is not a dedicated macro (like a Nikon 28-300). You need a lens that is sharp from corner-to-corner, with no barreling, pincushioning or chromatic aberration. The one that I use is a 55mm f3.5 Micro-Nikkor from the 1980s. You can find them on eBay for less than $100. I worked in a commercial lab making slide dupes, and it’s the lens we used. It is still unmatched. I also have an extension ring that allows me to focus close enough to make 1:1 reproductions, but some people use a bellows.
A film holder that is parallel to the camera body comes next. These take many forms, from lens attachments to copy stands, and there are many price points. What you’re
looking for is a system that makes it easy to do your work on a repeatable basis. If the film stage is not rigidly aligned with the camera, you might want to get a longer lens (like a 105mm) to make it easier to keep the film plane parallel.
Behind the film you need a diffuse and highquality light source. It needs to be diffuse in order to evenly light the film. The last thing you want is a hotspot in the center of the image. If you are digitizing color film, you will also want a light source with a high Color Rendering Index (CRI). The maximum value is 100, and a CRI above 90 is considered excellent. Once upon a time we took great care to get the colors right on film, and I want to make sure that the digitizing process is a faithful rendering or our efforts. I have


The back of the camera on my digitizing rig. On the left is a black and white negative, on the right is a color slide. The red color is “focus peaking” in Live View, which is useful to make sure that the film plane is in focus. The “F2” next to the shutter speed shows the aperture on my manual lens is closed down two stops.
used my iPad as a light source, but it was fiddly so I purchased a dedicated unit.
My rig is a collection of old and new parts. It has a camera rail attached to an ancient Nikon Slide Copying adapter, with a modern light source from Negative Supply. If I was to buy a rig today, I’d order a Negative Supply kit from Freestyle Photo & Imaging Supplies in Hollywood (see link at end of column). The options are numerous, from a simple out-of-the-box setup to complicated pickyour-part arrangements to suit your needs and your budget.
Software needed
Most of what I shot in the last 50+ years has been black and white negative or color slide
film. To digitize these you don’t need anything more sophisticated than Adobe Lightroom. I have software for my flatbed scanner (SilverFast) that is excellent, but it doesn’t match the speed and quality I get from my camera and Lightroom.
If you are digitizing color negative film the best I can recommend is Negative Lab Pro. I have found it frustrating to use, but others swear by it. I will be discussing color slides but not negatives in this column.
Creating the raw file
Experiment with a sample image to dial-in your physical setup. This could take many iterations before you are comfortable. Set the ISO to your camera’s base (100 on my
D850). Open your lens to its widest aperture (e.g., f3.5) to focus without depth-of-field and put film in the film holder. Align the camera so that the image is almost but not quite filling the frame when in focus. I use the “focus peaking” option on my camera to help me get the image sharp. Now stop the lens down (f8 is a good choice as it’s often the sharpest aperture), and adjust the shutter speed to create a good overall exposure.
When making the exposure be vigilant of camera shake. Exposures using a lightbox will be on the long side (1/2 to 1/10 sec), and even with the sturdiest rig you might get some vibration. I use a cable release and put the camera in live view mode, which locks the mirror out of the way.
Keep in mind that you will have an absolute black (the frame around the film) and an absolute white (the light coming through blank spots in the film), and expose accordingly. Make a few bracketed exposures, take them to your computer, and see if you need to make adjustments. Are they in focus from edge-to-edge? Is there keystoning? Is the histogram of the image area (not the border) in the middle or at the left or right side?
Alternatively, you could tether your camera in Lightroom and see the results in real time. This will also allow you to remotely trigger the camera, reducing camera vibration, and store the image in a Lightroom catalog on your computer. This will also drain your camera battery, so be sure to have a fullycharged spare handy. One drawback of tethering is that it is slower than writing directly to the memory card. Even with a fast cable it can take a minute for a 90mb file to load onto the laptop. I consider this great for setting up and experimenting, but when you begin to scan many images it’s best to write directly to the storage card on your camera.
Once you’re satisfied that the above is working correctly, you want to set the white balance. This can be done in-camera (check your manual) or afterward during processing. If the latter, take a picture of the light source without film in the carrier, adjusting the shutter speed to achieve a gray image. Then use that exposure in Lightroom to set white balance using the dropper. This is especially important with slide film, as you want the light to be as neutral as possible.
Then prepare the film for digitizing. Clean the film with the obsession of a dog chewing a bone. Brush the dust off of it. Use compressed air to blow off what’s left. Use film cleaner and a cotton swab to wipe off years of grime and fingerprints. Then use the compressed air again before making a visual inspection of the surface of the film. This might seem like a lot, but it’s nothing compared to the aggravation of spotting 100 tiny dust motes in Lightroom.
Finally, make an exposure. Or make many exposures. If in doubt, bracket your exposures to provide yourself with maximum flexibility during processing.
Importing the raw file
I initially import everything to a folder called “Scans.” It’s an easy place to find them when I begin the process of keywording, rating, titling, captioning, and applying all of the other metadata to the file. Then, if appropriate, I move the images within Lightroom to relevant subfolders. How you organize into subfolders isn’t terribly important, only that it makes the files easier to retrieve. I organize them into folders by era and subject (e.g., “1972-77/camping”).
Be sure to use keywords. Lightroom’s strength is its catalog of metadata, and the most important metadata is the keyword. If you are scanning in order to curate your


The scanned black and white negative (left) and the same image with inverted tone curve (right). To invert the tone curve, grab the points at the end of the lines and move them vertically to the opposite corner. There are three main features to the histogram. The negative carrier (black frame on the left) is the dark area on the left of the histogram. Unexposed film around the image (white on the left) is the spike on the right of the histogram. The central part of the histogram is your image on the film.

Using the tone curve, set the white and black points on either side of the main part of the histogram. Then bend the curve to set the global contrast and response curve of the image. By bending the curve, it is possible to simulate different paper and developer combinations that were used in the old days.
images, you should begin to organize them into Collections as well. If you do one or both of these, later projects that involve these images will be easier to execute.
Processing the raw file
Black and white negatives require a little work to process, but a significant part of it can be delegated to a Preset. Select the raw file in the Develop module, and change the Profile to Monochrome. This will remove any tint in the film or the white balance introduced during the digitizing process. You can add color later if you want (e.g., sepia toning).
The next step is to invert the Tone Curve. By default the Tone Curve line runs from the bottom left corner to the top right corner of the square. You want to flop those positions. It can get a little tricky, but grab the point at the top right corner and drag it down to the bottom right. Your screen will go black. Then grab the point at the bottom left corner and drag it all the way to the top left. You should now see a positive image. I suggest that you make a preset at this point, to save these two adjustments (Profile and Tone Curve). Do this by hitting the “+” in the Preset panel, and label it as you wish. The preset can now be applied to other scans at import.

You will notice the large white border and the thin black border. The white border is where the film holder blocked light from getting to the lens in the digitizing process, and the black border is the unexposed film around the photograph. (Your film holder may not produce a black border; I recommend finding one that will.) These represent the black and white points of your file. Move the corner points in the Tone Curve to set these black and white points, and note that the area between these on the histogram is the information digitized from your negative. That’s your photograph.
From here you can process the image like you might normally, including cropping and removing dust spots. I prefer to use the Tone Curve to make global adjustments, and to use masks to make local adjustments. If you use the sliders, keep in mind that everything is backwards. Increasing exposure will make the image darker, for example.
You might want to add some color back into the image, to simulate a favorite paper like Agfa Portriga Rapid. To do this switch to the Grading Panel and add the colors you prefer. Select the Shadows wheel, set Hue to 60 and Sat to 10, then do the same for the Midtones and Highlights wheels. This will add a light warm cast to the image. Change the hue for all three to 220 to get a slightly colder cast. Experiment.
Color Slides
Processing color slides is much, much easier. Set the Profile to Adobe Color or Adobe Neutral, then use the Tone Curve to set the black and white points and adjust contrast. If you have set the white balance correctly (either in-camera or in Lightroom), the image on your screen should be a faithful rendition of the slide. Use the global and local adjustments just as you would with a photograph straight from your digital camera.
Venice Canals, 1976 (Detail). With a good lens on the digitizing camera it is possible to capture all of the tonality, detail, and grain of the original negative. The whole photograph could easily be printed 20x30

1976.
The Venice Canals,
A few notes about slides. First, the slide frame (cardboard or plastic) obscures between 5% and 10% of the image. You may want to consider removing the film from the frame, especially if there are things near the edge or that are cut off by the frame (like feet). Buy some white gloves before doing this. Second, slide film (and especially Kodachrome) is “thicker” than negative film, and you might get sharper results if you digitize the images upside-down, with the emulsion part of the slide facing the camera. Just make sure to flop it back to normal during processing.
Finally, keep in mind that slides in their frames are not the same distance from the lens. You will need to refocus when switching between the two. It’s best to do all of one type before moving on to the next.
One of the great things about digitizing slides is that the dynamic range of modern cameras is much greater than any slide film. The digitized file easily captures all of the information in the slide. Why is this important? In the old days we made “dupes” (duplicate slides). These were used when the original was too valuable to leave the archive, or if copies were needed for multiple outlets (like a slide show). Dupes were always inferior to the original. We used to joke that to make a dupe look exactly like the original, you had to make two dupes and throw away the original.

There is no degradation of quality when you digitize. The image is of equal quality to the original, and with modern techniques we can extract information from the original film in ways that was rarely possible before. You can bring new life to your oldest images.
Negative Supply 35mm kit at Freestyle Photographic in Hollywood
Isuzu Impulse craned into place on a Sunset Strip billboard. 1982.
My Worst Mistake
A collection of stories by SCCC members about the worst photography-related event that’s ever happened to them.
Mike Caley
In 1972 I was backpacking from Tuolumne Meadows along the John Muir trail to spend a night on top of Half Dome. All day long planes flew overhead for some unknown reason on that clear June day. Around dusk we made it on top of Half Domeand immediately realized what the planes had been for. The entire valley parallel to the one we had been hiking was still burning but mostly smoldering.We had had no idea of the nearby danger because we had been upwind to the fire.Unable to sleep on the unyielding granite and too tired to continue reading "The Lord of the Rings, Two Towers,"I got up in the middle of the night and walked over to view the smoldering valley below. Haunting and unmistakably, Mordor lay at my (hairy) feet. The black moonlit devastation with isolated trees still burning surrounded by glowing red embers through the wispy low hanging red and white smoke was only missing Sauron. So you ask what is my worst camera experience? I didn't have one with me!53 years later with camera(s) always in hand I am still hoping for another glimpse of Middle
Earth, like one that has forever been seared into my memory.
John Fisanotti
My most disastrous photo accident happened on a bus trip through the Canadian Rockies sponsored by the Sierra Club Angeles Chapter in 2013. The plane flight to Calgary, Alberta and the bus travel dictated that I go with a stripped-down complement of camera gear. And wouldn’t you know it, this accident occurred the morning of the first day of a one-week long trip, thereby impacting the entire trip.
On that first morning, we visited Moraine Lake, one of the iconic locations in the Canadian Rockies. After getting my shots of this worldfamous view, I headed up the trail to photograph the lower of the two Consolation Lakes, nestled against a backdrop of glacier clad peaks. The most photogenic viewpoint at the lake is from the shore looking across the water at the mountains on the opposite side of the valley. This shore, I discovered is a giant talus pile of rocks,
typically one to three feet across. This made walking, standing, and stabilizing a tripod a real challenge. It didn’t help that the tripod I brought was my “travel tripod” which was suitably unsuitable for the job – its only merit was its small size and weight. Due to the rocky shore, there was no level place for the legs of the tripod. I did my best, perching it precariously at the water’s edge. At one point, I turned away to get something out of my photo backpack, which was lying on a nearby rock – and then I heard it – splash! Yep, my tripod had pitched over into the lake, taking my Nikon D800 body with the 24-70 Nikkor lens with it.
Immediately I retrieved the camera from the water, and, in a panic, turned it on to see if it still worked. The information screen on top showed all the usual information - whew! But my relief lasted only an instant because a second later, the screen went blank, never to respond again. As I learned later, in discussing this with the camera repair technician, by turning on the camera with water still inside the electronics, I shorted the motherboard, resulting in a $400 repair bill when I got home. I learned I should have removed the battery and allowed the camera to dry before energizing the camera. Had I done so, I might have been without the camera for perhaps
only a day or so. Fortunately, I did bring a second D800 body with me so I could continue shooting.
But I had another problem. Moisture had infiltrated the 24-70m zoom lens, and while all the lens functions appeared to work normally, the myriads of little water droplets that had condensed on an inner element of the lens, meant all photos had a soft, romanticized unfocused appearance. Once back at the town of Banff I went to a camera store and they gave me a bag of desiccant packs to try and absorb the moisture in the lens. I even tried using the in-room hair dryer back at the hotel. But nothing I did removed the moisture from inside the lens. Like the camera body, this lens also ended up at the repair shop after the trip to remove the internal moisture. Because I was traveling light, I did not have any alternate lens with me in the 24-70 range. For the rest of the trip, I had to choose between either a 20mm prime, or my 70-200 telephoto zoom. You won’t find any “normal” shots, of my trip. You also won’t find that tripod among my gear, as I trashed it as soon as I got home and bought a respectable Gitzo carbon fiber model.
The one thing I was thankful for was that the water was clean, glacier fed freshwater, not corrosive salt water.
Thirty years earlier, I lost a camera to corrosion after exposure to sea water on a trip to Kaui, but that’s another story.
Susan Manley
Playboy Mansion Mishap. Many, many years ago I bought my first 35mm camera. It was a 2-pound Minolta. I also played tennis in charity tournaments. I was invited to the finals at Hugh Hefner's Playboy Mansion. I went to the tournament with my husband and took my new camera. I had a blast taking photos of many celebrities in attendance. And my husband took a photo of me with Hugh Hefner and Elke Summer. When I got home, I was eager to develop the film. To my dismay, when I took the film out of the camera, I discovered I did not properly thread the film on the spools -so I had no images! Although I was disappointed that I didn't get any photos, it was an important lesson to always be prepared and to double-check everything.
Gabriel range, Mount Baldy. I had planned to summit by way of a trail I thought might have interesting subject matter. I also I wanted to make some images in B&W. This was back in predigital days when I was heavily invested in medium format cameras. I decided to take along my Mamiya C220. I had used it on several Camera Committee outings and typically made color images using 120 format roll film. This time I would use a Kodak B&W film which I could develop myself.
On arriving at the section of the trail where it starts to gain altitude seriously, I stopped to catch my breath and load the camera with a roll of film. Anyone who has used medium format roll film (no sprocket holes) knows that there is a strip of black backing paper co-rolled with the film strip to protect it from light during loading and unloading the camera. Loading and unloading was routine for me as I had probably done it a hundred times.
Steve Anderson
It was one of those years when our local mountains had a decent amount of snow and when Spring came I wanted to climb our highest spot in the San
Continuing up the ridge, the sky was a dark azure and a stiff wind was blowing across the ridge. I used the whole roll to capture hopeful images of strange outcrops, gnarly pine trees, and wispy clouds. I reached the summit in time for a late lunch and admired amazing clear views. On the way home I felt fairly confident I had captured some
unique views and was excited about the subsequent negatives. However, when I got back to my darkroom and was separating the paper from the film in order to load the developing tank reel, something didn’t feel right. Of course I didn’t want to risk fogging the film even with a safety light to see what the problem might be, so I proceeded to develop the film as usual. Several minutes later at the stage where I could pull off the wet film from the reel, my heart sank when I was astonished to see nothing but blank film where some kind of images should have been. This could only mean one thing- the film was never exposed. To this day I will never know for sure how things had gone astray. Somehow the backing paper was reversed and it had covered every bit of film, preventing exposure. I was trying to make images on black paper! I was so embarrassed that I’ve never told anyone about this incident until now! And it only happened that one time. Having now switched to digital, I can say that I won’t have that kind of embarrassment again!
onto hard surfaces? The seasoned vat of D76 developer that I left uncovered too long and it oxidized? Those were all really terrible.
But I think the worst took place when I was 16 years old. I was traveling to Europe with a group of high school students for a 30-day eight-country tour. I had spent months planning what equipment to bring, how much film, what case to carry it in (something that doesn’t look like a camera bag), even the laws about shooting in public places.
I had a Pentax Spotmatic camera with a 28mm, 50mm, and 135mm lenses, and a 2x teleconverter. I borrowed a hotshoe attachment that allowed me to use Kodak Flashcubes. I had a very small (12”) tripod, and I hand-rolled 30 rolls of bulk Ektachrome film. My parents drove me to the airport and walked me inside. I said my goodbyes at the gate, and they returned to the car, to find my Pentax with the 50mm in the back seat.
Joe Doherty
Which story is the worst? The Hasselblad full of beach sand? The roll that I put through the camera twice? The multiple lenses that I have dropped
I discovered my mistake almost immediately,, and bought a new Yashica at Orly Airport. It cost me one-half of my spending money for the trip. A telegram from my parents was at the hotel. They had already shipped my Pentax to Paris, where it would arrive a week into the trip. Air France was closed when I went to pick it up.
Peter Bennett
The section of Los Angeles River that flows through the Sepulveda Basin Recreation Area is the most natural looking part of the LA River as it is the only soft-bottomed section that was never concreted. Other soft-bottomed areas, such as the Glendale Narrows, that winds through the Elysian Valley, were attempted to be concrered as a flood channel, but the water table was so shallow that it made it difficult to pave over.
If you ever get a chance to kayak along the river in the Sepulveda Basin, it is a wonderful way to transport yourself far away from the noise and traffic of Los Angeles. Surrounded by overgrown trees, dense foliage, and exotic river birds, it’s easy to forget you’re still in the middle of the city.

Los Angeles River, view from Balboa Blvd
Opposite: Solo cloud over the Sepulveda Dam

Peter Bennett


Waterfall just upstream of Balboa Blvd
Accumulated trash near Balboa Blvd


Above: Under the Balboa Blvd Bridge
Below: Kayaking upstream in the Sepulveda Basin
Peter Bennett


Above: Turkey Vultures
Below: Lone Duck near Burbank Blvd Bridge
Peter Bennett

Snowy egret and black-necked stilt near the Sepulveda Dam
Larry Miller
I took these photos during a day trip to Figueroa Mountain in the Los Padres National Forest on April 25. They illustrate the gradual recovery of the mountain from the Lake Fire of 2024.


Larry Miller

Butch Mazzuca


Butch Mazzuca


John Fisanotti
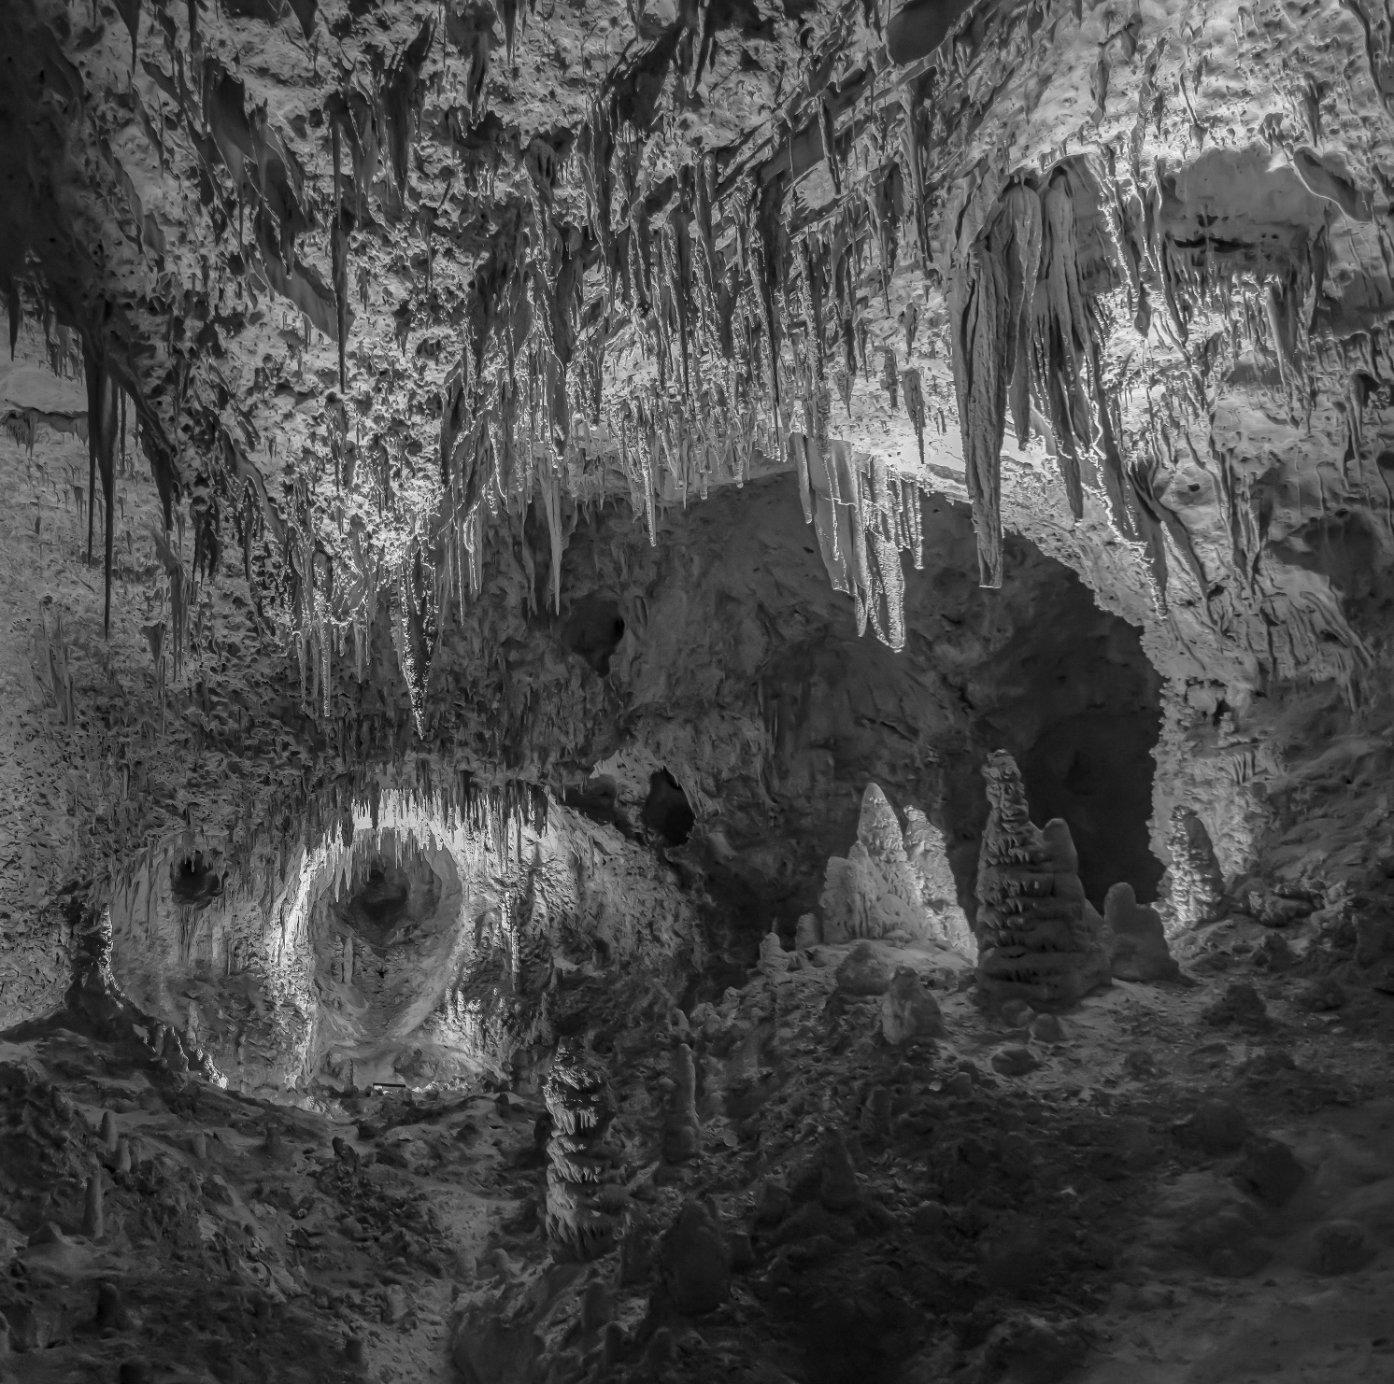
This month I am submitting photos from a visit in 2024, to Carlsbad Caverns National Park. Here are a few notes about the photos:
• All were hand held using a full frame mirrorless camera with in camera vibration reduction turned on.
• The photos were shot using Aperture Priority, set at f/2.8 and an ISO 3200.
• I turned off auto focus and instead I focused manually.
• I found the images readily converted to black and white as seen in some of the examples I submitted.

This image was taken with a 12mm fisheye lens on a full frame camera. All others were with a 20mm lens.


This is a five-frame panorama, and each frame is the compilation of a three shot HDR image (EV -1, 0 and +1.)
Focal Points Magazine May/June 2025
John Fisanotti

John Fisanotti

John Fisanotti


Rebecca Wilks

Detail - juniper berries and yellow flowers, Grand Canyon National Park.

A pink dawn over the Panamint Range reflected in a pool at Badwater Salt Flats, Death Valley National Park
Rebecca Wilks

Soft light on Mesquite dunes, Death Valley National Park.
Shot with long telephoto and focus stacked in Helicon Focus.

Rebecca Wilks

Grand Canyon sunrise near Desert View

Detail with mud cracks, Badwater Basin, Death Valley National Park
Rebecca Wilks

Sunset behind canyon layers, Desert View area, Grand Canyon National Park
Velda Ruddock

The wet and wise mossy ones at the Hoh Rainforest


Above: Music at Sol Duc Velda
Below: Story telling at Tatlanka Trading Post, Alaska

It's the little thing at Hoh Rainforest

Velda Ruddock

Joe Doherty
We have been traveling in Alaska and Canada for the past two weeks. Along the way I did some experiments in long exposure and multiple exposure.

The gateway at Canada Place, Vancouver.
Opposite: Borrowing from an abstract mural in Vancouver to create another piece of abstract art.


Velda in Skagway, Alaska. Up to 10,000 cruise ship passengers disgorge here every day.
Joe Doherty
Steve Anderson
Steve has explored the natural landscape of the San Gabriel range as well as the High Sierra using conventional film and digital photography for decades. He has self-published four photo books available through Blurb.com.
His interest in making personally significant contributions to theenvironmentalmovement started in college then expanded into becoming a life-time member of the Sierra Club and an Outings Leader. He has been a member of the Mono Lake committee for more than 40 years and was Chair of the Camera Committee for 5 years.
Steve's images haveappeared in Sierra magazine, Images of the West, A Portrait of Bodie, the Angeles Chapter Schedule of Activities covers, and the Camera Committee's Focal Points. He has shown work in local galleries, art shows, and was the San Gabriel Mountains National Monument Artist-inResidence in 2015. Some of his monochrome images in Mono Lake Committee's literature weresignificantin helping to save Mono Lake. sandersonimagery@outlook.com www.pbase.com/spanderson
Peter Bennett
Born and raised in New York City, Peter picked up his first camera and took his first darkroom class at the age of twelve.
Peter spent many years working as a travel photographer, and in 2000 started his own photo agency, Ambient Images. In 2015 he formed Citizen of the Planet, LLC, devoted exclusively to the distribution of his stories and photographs that focus on a variety of environmental subjects.
Peter’s editorial work has appeared in many publications including the New York Times, Time, Newsweek, National Geographic, Sunset Magazine, Los Angeles Magazine, and New York Magazine. His prints hang in the California State Capitol, California Science Center’s permanent Ecosystem exhibit, and many other museums, private institutions, and collector’s homes.
He has also worked with a numerous local environmental organizations over the years including FoLAR (Friends of the LA River), The Sierra Club, Greenpeace, Heal the Bay, 5 Gyres Institute, Algalita Marine Research Foundation, Communities for a Better Environment, and the LA Conservation Corps.
Peter has been an instructor for over fifteen years at the Los Angeles Center of Photography, and for years led their Los Angeles River Photo Adventure tour.
Michael Caley
Michael Caley was drawn to photography as a teenager, during backpacking trips to Yosemite, where he was inspired by the work of Ansel Adams. Today Michael’s dramatic landscape and wildlife photography are a natural extension of his long career as an architect and his many trips to the Eastern Sierras, Joshua Tree NP, the western United States and five trips to Africa. His work has been exhibited in several different venues including a 2010 solo exhibit at The G2 Gallery in Venice, CA. He can be reached at mcaleyaia@aol.com
Thomas Cloutier
Thomas Cloutier has been with SCCC since 2001, and he has been contributing to Focal Points Magazine since that time.
Cloutier’s interest in photography coincides with his interest in travel and giving representation to nature landscapes. His formal education in photography comes from CSU Long Beach. At present Cloutier is a volunteer at CSU, Long Beach where he taught Water Colors and Drawing at the Osher Lifelong Learning Institute (OLLI), designed for Seniors over 45. He also is a docent at Kleefield Contemporary Museum CSU Long Beach. He is Liaison for the Art And Design Departments for a scholarship program for students at CSU Long Beach, Fine Arts Affiliates, FineArtsAffiliates.org.
Cloutier at cde45@verizon.net
Joe Doherty
Joe grew up in Los Angeles and developed his first roll of film in 1972. He has been a visual communicator ever since.
He spent his teens and twenties working in photography, most of it behind a camera as a freelance editorial shooter.
Joe switched careers when his son was born, earning a PhD in Political Science from UCLA.
This led to an opportunity to run a research center at UCLA Law.
After retiring from UCLA in 2016, Joe did some consulting, but now he and his wife, Velda Ruddock, spend much of their time in the field, across the West, capturing the landscape. www. joedohertyphotography.com
John Fisanotti
John was a photography major in his first three years of college. He has used 35mm, 2-1/4 medium format and 4x5 view cameras. He worked briefly in a commercial photo laboratory.
In 1980, John pivoted from photography and began his 32-year career in public service. He worked for Redevelopment Agencies at four different Southern California cities.
After retiring from public service in 2012, John continued his photographic interests. He concentrates on outdoors, landscape, travel and astronomical images. Since 2018, he expanded his repertoire to include architectural and real estate photography.
John lives in La Crescenta and can be contacted at either: jfisanotti@sbcglobal.net or fisanottifotos@gmail.com
http://www.johnfisanottiphotography.com http://www.architecturalphotosbyfisanotti.com
Beverly Houwing
Beverly Houwing loves traveling and photography, which has taken her to 80 countries and every continent. Most often she visits Africa since she loves spending time in remote wilderness locations where there is lots of wildlife and unique landscapes. Her images have been featured in numerous Africa Geographic articles, as well as in Smithsonian and the Annenberg Space for Photography exhibits. Her photographs have also been used for promoting conservation by many non-profit organizations, including National Wildlife Federation, National Parks Conservation Association, Crane Trust, National Audubon Society and Department of the Interior. Beverly is an Adobe Certified Instructor, so when she’s not out on a photography adventure she conducts training on their software programs and does freelance graphic design and production work.
Susan Manley
Susan Manley has more than 45 years of experience as a photographer. She became motivated to pursue her hobby after winning top prizes in a photo contest at the L.A. Open golf tournament. Since then she has received recognition in local and international competition.
Her career consisted mainly of writing and shooting a wide variety of public relations and photojournalism photos as well as publishing for a government Communications Department. She was called to Washington DC for approximately one year.
Since she retired 15 years ago, she switched her focus to nature photography, shooting mostly landscapes and wildlife in North America. She believes in ethical photography, putting the well being of wildlife before a photo and not baiting or calling. She is an advocate for the importance of conservation and climate change.
With her photo travels she has met and become friends with many wonderful people with similar interests.
Larry Miller
Larry used his first SLR camera in 1985 to document hikes in the local mountains. In fact, his first Sierra Club Camera Committee outing was a wildflower photo shoot in the Santa Monica Mountains led by Steve Cohen in 1991. Since then the SCCC has introduced him to many other scenic destinations, including the Antelope Valley California Poppy Reserve, the Gorman Hills, and Saddleback Butte State Park.
Larry’s own photography trips gradually expanded in scope over the years to include most of the western National Parks and National Monuments, with the Colorado Plateau becoming a personal favorite.
Photography took a backseat to Miller’s career during the 32+ years that he worked as a radar systems engineer at Hughes Aircraft/Raytheon Company. Since retiring in 2013, he has been able to devote more time to developing his photographic skills. Experiencing and sharing the beauty of nature continues to be Larry’s primary motivation.
lemiller49@gmail.com
John Nilsson
John has a fond memory of his father dragging him to the Denver Museum of Natural History on a winter Sunday afternoon. His father had just purchased a Bosely 35mm camera and he had decided he desperately wanted to photograph one of the dioramas of several Seal Lions in a beautiful blue half-light of the Arctic winter. The photo required a tricky long exposure and the transparency his father showed him several weeks later was spectacular and mysterious to John’s young eyes. Although the demands of Medical School made this photo one of the first and last John’s Dad shot, at five years old the son was hooked.
The arrival of the digital age brought photography back to John as a conscious endeavor - first as a pastime enjoyed with friends who were also afflicted, and then as a practitioner of real estate and architectural photography during his 40 years as a real estate broker.
Since retiring and moving to Los Angeles, John continued his hobby as a nature and landscape photographer through active membership in the Sierra Club Angeles Chapter Camera Committee, as well as his vocation as a real estate photographer through his company Oz Images LA. The camera is now a tool for adventure!
www.OzImagesLA.com
Velda Ruddock
Creativity has always been important to Velda. She received her first Brownie camera for her twelfth birthday and can’t remember a time she’s been without a camera close at hand. Velda studied social sciences and art, and later earned a Masters degree in Information and Library Science degree from San Jose State University. All of her jobs allowed her to be creative, entrepreneurial, and innovative. For the last 22 years of her research career she was Director of Intelligence for a global advertising and marketing agency. TBWA\Chiat\Day helped clients such as Apple, Nissan, Pepsi, Gatorade, Energizer, and many more, and she was considered a leader in her field.
During their time off, she and her husband, Joe Doherty, would travel, photographing family,
events and locations. However, in 2011 they traveled to the Eastern Sierra for the fall colors, and although they didn’t realize it at the time, when the sun came up over Lake Sabrina, it was the start of them changing their careers.
By 2016 Velda and Joe had both left their “day jobs,” and started traveling and shooting nature – big and small – extensively. Their four-wheeldrive popup camper allows them to go to areas a regular car can’t go and they were – and are –always looking for their next adventure.
www.veldaruddock.com
VeldaRuddockPhotography@gmail.com
Rebecca Wilks
Photography has always been some kind of magic for Rebecca, from the alchemy of the darkroom in her teens… to the revelation of her first digital camera (a Sony Mavica, whose maximum file size was about 70KB)… to the new possibilities that come from her “tall tripod” (drone.)
Many years later, the camera still leads Rebecca to unique viewpoints and a meditative way to interact with nature, people, color, and emotion. The magic remains.
The natural world is Rebecca’s favorite subject, but she loves to experiment and to do cultural and portrait photography when she travels.
Rebecca volunteers with Through Each Other’s Eyes, a nonprofit which creates cultural exchanges through photography, and enjoys working with other favorite nonprofits, including her local Meals on Wheels program and Cooperative for Education, supporting literacy in Guatemala.
Rebecca’s work has been published in Arizona Highways Magazine, calendars, and books, as well as Budget Travel, Cowboys and Indians, Rotarian Magazines, and even Popular Woodworking.
She’s an MD, retired from the practice of Obstetrics and Gynecology and Medical Acupuncture. She lives in the mountains of central Arizona with my husband and Gypsy, the Wonder Dog.

The Parting Shot
© Beverly Houwing