[4] Attaching and detaching the rotary WARNING - Perform attaching and detaching the rotary on a flat place. Take special attention if attaching or detaching the rotary at night with well lighting facility. - When reversing the tractor for attaching the rotary, keep people stay away from the tractor and rotary. - In adjusting a rotary, Apply the parking brake of the tractor, stop the engine and move all speed shift levers to neutral position whenever adjusting the rotary. - Never get under the rotary.
Never put hand or foot under the rotary. It may cause an injury.
- Never raise the rotary with installing only one side lift link. - Be sure to stop the engine whenever removing or installing the PTO drive shaft.
It may cause an injury.
CAUTIONS - When you store the rotary, lower the skid, put on a flat place and put a support to prevent from falling down. - Install PTO shaft cover on the tractor if PTO drive is not used. - When an additional implement is equipped, install balance weight as required to maintain stability.
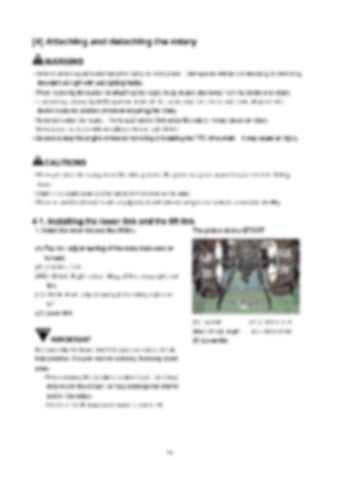
4-1. Installing the lower link and the lift link 1. Install the lower link and the lift link.
The picture shows EF393T.
(A) Top link: adjust leaning of the rotary backward or forward. (BL) Lift link, Left (BR) Lift link, Right: adjust tilting of the rotary right and left. (C) Check chain: adjust swing of the rotary right and left. (D) Lower link (A) Top link (BR) Lift link, Right
IMPORTANT
(D) Lower link
Set correctly the lower link hole position and a lift link hole position. If it was not set correctly, following faults arise. - When moving the position control lever, the rotary may touch the tractor, or may damage the tractor and/or the rotary. - The drive shaft may cause noise or come off.
13
(BL) Lift link, Left (C) Check chain


