
4 minute read
Cooling system, cleaning

from Volvo Penta TAD1240GE TAD1241GE-VE TAD1242GE-VE, TWD1240VE Group 22-26 Workshop Manual_381897674

Part no.: 1141658-3
1
Drain the cooling system, see “Cooling system, draining”.
2
NOTE: If the cooling system is cleaned regularly by draining and refilling with a rust-protection fluid, less cleaning additive or simply flushing with pure water may be sufficient.
3
Flush the cooling system with fresh water.
4
Fill the cooling system with radiator cleaner, item no. 1141658-3 (see instructions on package).
Then run the engine up to normal working temperature and allow it to run for at least another 2 hours.
NOTE: Alternatively, fill the system with 15–20% concentrated coolant and drain it out after 1–2 days’ operation.
5
Drain the cooling system and then flush it out with a mixture of neutralizer, part no. 1141658-3 (see instructions on package).
6
If any contamination remains, repeat the cleaning until the system is free from contamination.
7
When the cooling system is completely free from contamination, fill with fresh coolant. In areas where Volvo Penta concentrated coolant is not available, use water with a corrosion protection additive.
NOTE: Mix the correct volume in advance to be sure that the system is filled.
Charge air cooler, changing (TAD)
1
Open the main switch(es) and check that there is no power to the engine.
2
Drain the cooling system, see “Cooling system, draining ”.
3
Remove the radiator assembly, see “Radiator, changing”.
4
Remove the fan cowling (10 bolts) from the charge air cooler.
6
Install the fan cowling (10 bolts) on the new charge air cooler.
7
Install the charge air cooler on the radiator.
8
Install the radiator, see “Radiator, changing”.
9
Add coolant according to specifications. See “Technical data TAD1240GE, TAD1241GE/VE, TAD1242GE/VE, TWD1240VE”.
NOTE: Mix the correct volume in advance to be sure that the system is filled.
Release
Charge air cooler, changing (TWD)
1 Open the main switch(es) and check that there is no power to the engine.
2 Drain the cooling system, see “Cooling system, draining
3
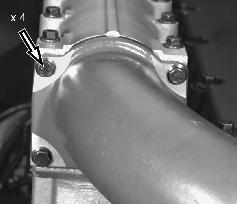
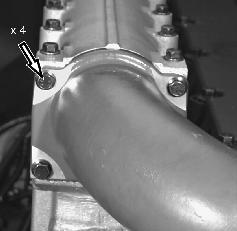
Remove the water pipe connectors on the ends of the charge air cooler.
7
Lift out the charge air cooler element.
NOTE: The charge air cooler element is heavy. If no lifting device is available, avoid injury and damage by having two persons ready to lift the charge air cooler element.
8
Carefully clean the contact surfaces. Install a new gasket on the charge air cooler and install the new charge air cooler element.
NOTE: The charge air cooler element is heavy. If no lifting device is available, avoid injury and damage by having two persons ready to lift the charge air cooler element.
9
Remove the cover from the charge air cooler.
Reinstall the cover on the charge air cooler. Use a new gasket.
Torque the bolts in two steps as described below:
Step 1. Insert all bolts and screw then down into contact with the surface.
Step 2. Torque the bolts to 20 ± 2 Nm (15 ± 2 ft-lbf) in the order shown in the diagram.
13
Add coolant according to specifications. See “Technical data TAD1240GE, TAD1241GE/VE, TAD1242GE/VE, TWD1240VE”.
NOTE: Mix the correct volume in advance to be sure that the system is filled.
14
Start the engine and perform leakage and functional checks.
Charge air cooler, leakage test (TAD)
Special tools: 9996662, 885231, 885232
Checking test equipment
1
Remove
4
Check that the knob on the reducing valve (A) is turned all the way counter-clockwise and connect 9996662 to a compressed air source. Open valve (B) and adjust the reducing valve (A) until the pressure gauge shows a pressure of 100 kPa (14.5 psi).
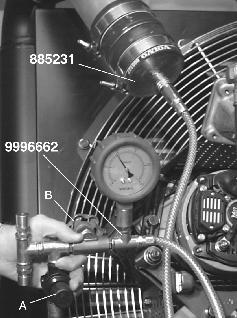
NOTE: The knob on the reducing valve can be locked by pressing in on the knob.
NOTE: Always follow the applicable safety rules. 2
Close valve (B). If the pressure does not fall within two minutes, the equipment is considered reliable.
Remove
Check that the valve on the reducing valve (A) is turned all the way counter-clockwise and connect 9996662 to the nipple on pressure plug 885231.
6
Connect 999662 to a compressed air source. Open valve (B) and adjust the reducing valve (A) until the pressure gauge shows a pressure of 100 kPa (14.5 psi). Close valve (B).
7
If the pressure does not fall within two minutes, the charge air cooler and the connections are tight.
NOTE: If the pressure falls, check that there is no leakage at the connections to the charge air pipe. Spray or brush water with a little detergent added around the connections to determine if they are leaking.
8
If the pressure falls and the connections are not leaking, the charge air cooler should be replaced with a new one. Repeat the leakage test to be sure that the charge air cooler is leaking.
9
After the leakage test is complete, shut of the compressed air supply, turn the knob on the reducing valve (A) fully counter-clockwise and release the compressed air.
10
Remove the leakage tester 9996662 and the pressure plug 885231. Reinstall the charge air pipe on the intake pipe using new gaskets and tighten the clamp.
11
Remove the pressure plug 885232. Reinstall the charge air pipe between the turbo compressor and the connection and tighten the clamp.
12
Start the engine and perform a leakage check.
Charge air cooler, cleaning
Part no.: 1141658-3
1 (TWD)
Drain the cooling system, see “Cooling system, draining.”
2
Remove the charge air cooler, see “Charge air cooler, changing.”
3
Clean the charge air element/cooler on the outside. Rinse the air passages with fresh water. Clean the inside with cleaner part no. 1141658-3 and blow dry with compressed air (or allow to stand and drain).
(TWD)
Alternatively, the entire cooling system can be filled with 15-20% concentrated coolant and drained after 1-2 days of operation. Then remove the charge air element and clean the air passages separately as required.
4
Rinse out the charge air cooler with neutralizer part no. 1141658-3 and blow dry with compressed air (or allow to stand and drain).
5
Reinstall the charge air element/cooler.
6 (TWD)
Fill with coolant as specified. See “Technical data TAD1240GE, TAD1241GE/VE, TAD1242GE/VE, TWD1240VE”.
NOTE: Mix the correct volume in advance to be sure that the system is filled.
7
Start engine and perform functional and leakage checks.


