
3 minute read
Group 23 Fuel System Design and Operation

from Volvo Penta TAD1240GE TAD1241GE-VE TAD1242GE-VE, TWD1240VE Group 22-26 Workshop Manual_381897674

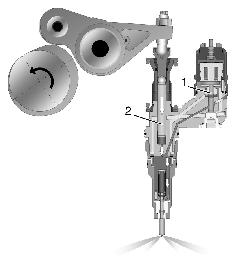
Injection phase
The injection phase begins when the fuel valve (1) closes. The cam on the camshaft continues to press the piston (2) down via the rocker arm and injection takes place as the passage through the fuel valve is closed. The injection phase continues as long as the fuel valve (1) is closed.
Pressure release phase
Injection stops when the fuel valve opens and the pressure in the injector falls below the opening pressure of the atomizer.
The fuel flows through the open valve, through the injector hole and out through the fuel passage.
Note that it is the position of the fuel valve (closed or open) which determines when injection begins and ends.
The duration for which the fuel valve is closed determines the quantity of fuel injected on each pump stroke.
Repair instructions
Control module (EDC III), changing
9
Start the engine and perform a leakage and functional check.
Fuel system, draining
1
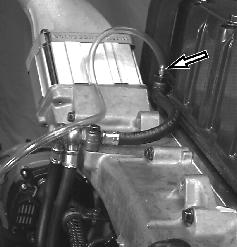
Clean carefully around the cylinder head vent nipple and fuel filter bracket draining nipple.
3
Open the vent nipple on the cylinder head. Allow fuel to drain into a container.
NOTE: For fuel filter, changing. Only perform steps 1–3 in the fuel draining procedure. 4
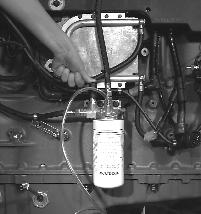
Connect a plastic hose to the fuel filter bracket draining nipple and open the nipple (2).
When the fuel has finished flowing out, open the vent nipple (1) on the fuel filter bracket and allow the fuel to drain into a container.
NOTE: Be careful when handling fuel and make sure that it is disposed of properly.
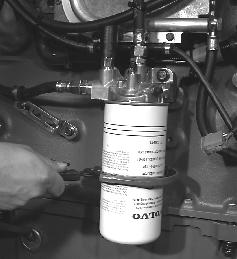
Fuel filter, changing
NOTE: Do not fill the new filter with fuel before installing as there is a risk of contamination entering the system and causing running problems or damage.
1
Clean around the fuel filter.
2
Drain the fuel filter, see “Fuel filter, draining”.
3
Spread a thin layer of engine oil onto the gasket and install the new fuel filter. Tighten the fuel filter according to the instructions on the filter.
Bleed the fuel system at the filter, see “Fuel system, bleeding”. 7
Run the engine at fast idle for about 10 minutes to evacuate any remaining air from the system. Perform a leakage and functional check.
Remove the filter using an appropriate filter wrench.
4
Clean the filter contact surface on the filter housing.
Fuel pump, changing
Clean
Remove the fuel pump.
Clean the contact surface on the transmission plate.
NOTE: Spread a thin layer of graphite grease around the O-ring on the drive shaft before installing the fuel pump.
Check that the new fuel pump drive shaft fits into the transmission. Install the fuel pump with a new gasket and apply thread tape to the bolt (1).
NOTE: The bolt (1) comes with thread tape, see fuel pump packaging.
Connect fuel lines 1, 2 and 3 with new gaskets.
6
Bleed the fuel system and filter, see “Fuel system, bleeding”.
7
Run the engine at high idle for about 10 minutes to evacuate any remaining air from the system.
8
Carry out a leakage and functional check.
Fuel pump, rebuilding
The instructions below refer to the parts locations numbers shown in the figures.
Check all parts for damage and wear. Always replace any parts that are damaged or worn. Parts that are not replaced must be cleaned very thoroughly.
Special tools: 9996626, 9995028
Otherspecialequipment:9986173,9986177
The instructions below refer to the parts locations numbers shown in the figures above.
Install a new gasket (5).
8
Press in the inner and outer seals (3 and 2) for the pump drive shaft with pin 9995028.
The inner seal should be pressed down to the bottom and the outer seal flush with the housing.
NOTE! The seals should be positioned with their sealing lips away from one another.
Dip the pump impellers (6 and 8) in diesel oil and insert them into the housing.
9
Check that the gasket (5) is seated properly in its groove and bolt the housing back together.
10
Install the valves (4 and 7). Use new sealing washers.
11
Insert protective plugs into the openings of the fuel pipes.
Fuel system, bleeding
Clean the vent nipples on the cylinder head and on the fuel filter bracket.
Open
Remove the hose and replace the protective cap on the bleeder nipple.
NOTE: When changing the fuel filter only, no further bleeding is necessary.
Run the engine at fast idle for about 10 minutes to evacuate any remaining air from the system. 6
Perform a leakage and functional check.


