• Thank you very much for reading the preview of the manual.
• You can download the complete manual from: www.heydownloads.com by clicking the link below
• Please note: If there is no response to CLICKING the link, please download this PDF first and then click on it.
CLICK HERE TO DOWNLOAD THE
Foreword
We would like to welcome you to the ever-growing number of people who own a Challenger tractor; people who appreciate quality. We are proud of every tractor that leaves our factories, each being technically advanced and of a high quality.
This Operator Instruction Book contains the specifications for your new tractor. Please ensure that all operators read the instructions and follow them carefully. This will allow you to benefit from a long service life with complete safety and peace of mind. The pages that follow contain vital information on your tractor; please read them carefully.
Your Challenger dealer will guarantee you quality servicing and will provide you with all the assistance you need. When it comes to servicing, remember that your dealer knows your tractor best and that he wants you to be completely satisfied.
Please leave this Operator Instruction Book in the tractor if resold. The subsequent owner will need the information it contains.
All information and specifications in this Book are up to date at the time of publication. However, our ongoing policy to improve our products obliges us to reserve the right to make alterations at any time without notice.
Please note that this Book relates to several models and refers to both standard and optional equipment. You may therefore find details relating to equipment that is not fitted on your tractor.
Challenger, Beauvais
CONTENTS
Chapter 1
TRACTOR IDENTIFICATION
Chapter 2
INTRODUCTION - SAFETY INSTRUCTIONS AND WARRANTY
Chapter 3
INSTRUMENTS AND CONTROLS
Chapter 4 OPERATION
Chapter 5
SERVICING AND ADJUSTMENTS
Chapter 6 SPECIFICATIONS
Chapter 7
ACCESSORIES AND OPTIONS
Appendix CONVERSION TABLES
Index
Chapter 1
TRACTOR IDENTIFICATION
CLICK HERE TO DOWNLOAD THE COMPLETE MANUAL
• Thank you very much for reading the preview of the manual.
• You can download the complete manual from: www.heydownloads.com by clicking the link below
• Please note: If there is no response to CLICKING the link, please download this PDF first and then click on it.
CLICK HERE TO DOWNLOAD THE
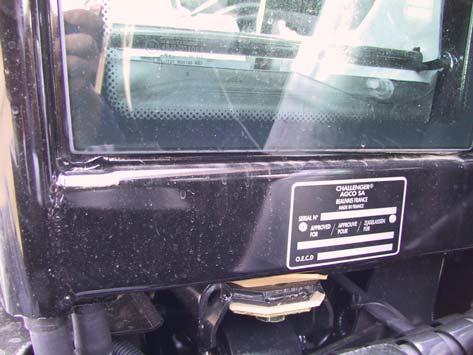
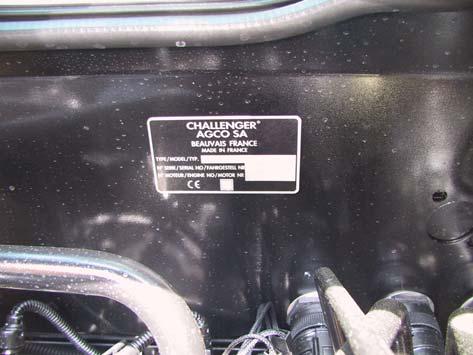
1.1 - SERIAL NUMBER
IMPORTANT: PLEASE QUOTE THE SERIAL NUMBER OF YOUR TRACTOR IN ALL CORRESPONDENCE WITH YOUR DEALER OR AGENT.
Registration plate (according to country)
Name plate with serial number (according to country).
TRACTOR RECEIVED FROM: (tick one of the following) .............FACTORY
..............OTHER DEALER (transfer)
Chapter 2
INTRODUCTION - SAFETY INSTRUCTIONS AND WARRANTY
CONTENTS
2.1-INTRODUCTION.
2.1.1Pre-delivery inspection, commissioning at the user’s premises and warranty
2.1.2Warranty procedure.
2.1.3Using the tractor in another region
2.1.4Servicing after the warranty period.
2.2-SAFETY - SYMBOLS AND TERMS.
2.3-TRACTOR AND IMPLEMENTS
2.4-MAXIMUM TRAVEL SPEEDS
2.5-NOTE TO THE OPERATOR
2.6-DANGER, WARNING AND CAUTION.
2.7-DECALS
2.8-SAFETY PROCEDURE
2.8.1Ensuring proper operation.
2.8.2Observe the following instructions
2.9-PROTECTION.
2.9.1Cab
2.9.2Damage to ROPS cab
2.10-PREPARING FOR SAFE OPERATION.
2.10.1Know your equipment.
2.10.2Protect yourself.
2.10.3Use
2.10.4Equipment check.
2.10.5Clean the tractor
2.10.6Protect the environment
2.11-SERVICING THE TRACTOR.
2.12-START.
2.12.1Warn personnel before starting.
2.12.2Mount and dismount safely.
2.12.3Start safely.
2.12.4Follow recommended start-up procedures.
2.12.5Test the controls
2.12.6Starting fluid
2.13-WORKING SAFELY
2.13.1Make the right moves.
2.13.2Safe operating practices
2.13.3Safety of bystanders
2.13.4Risk of overturning
2.13.5To avoid overturning
2.13.6To prevent rear overturning.
2.13.7Emergency handbrake.
2.13.8Other risks.
2.13.9Implements and attachments
2.13.10Tractor towing.
2.13.11Road use
2.13.12Highway code
2.14-SAFETY - AFTER OPERATION
2.15-DESCRIPTION OF DECALS.
2.1 - INTRODUCTION
The Safety chapter in the Operator Instruction Book highlights certain basic safety-related situations which may be encountered during the operation and normal servicing of the tractor and provides the information needed to handle these situations. This chapter SUPPLEMENTS any safety instructions given in other chapters of this book.
It may be necessary to take additional precautions, depending on the equipment used and the working conditions on the site or in the servicing area. AGCO can under no circumstances exercise direct control over the commissioning, operation, inspection, lubrication or servicing of the tractor. It is therefore YOUR responsibility to take suitable safety precautions in such areas.
NOTE: This book is published and distributed worldwide and the availability of the equipment indicated, whether on the basic tractor or as accessories, may vary according to the country in which the tractor is used. To find out which equipment is available in a given region, contact an AGCO dealer.
The purpose of this book is to allow the owner and the operator to run the tractor safely. Providing they follow the instructions carefully, the tractor will give many years of service in the AGCO tradition.
Commissioning the equipment on the user's premises enables the dealer to ensure that these operating and servicing instructions are properly understood. Always consult the dealer if there is any part of this book that you do not understand. It is important for these instructions to be understood and followed.
Daily servicing should become a routine, and a logbook of operating hours should be kept.
When new spare parts are required, it is important to use only AGCO original spare parts. AGCO dealers supply only genuine original parts and can offer advice concerning their fitting and use.
The use of lower quality parts may cause serious damage. Customers are advised to only purchase their spare parts from an approved AGCO dealer.
Due to the considerable variation in operating conditions, it is not possible for the manufacturer to formulate complete or absolute assertions in its publications concerning the performance or operating methods of its machines or accept liability for any loss or damage which may result from such assertions or possible errors or omissions.
If the tractor is to be used in abnormal conditions which could cause damage (use in deep water or in paddy fields for instance), you should consult your AGCO dealer to obtain special instructions to prevent the warranty from becoming void.
These tractors are designed only for usual farming activities (intended use).
Use for any other activity is considered to be contrary to the intended use. AGCO disclaims all liability in the event of material damage or physical injury resulting from improper use, the consequences of which shall be borne by the user alone.
Conformance with and strict adherence to the operating, servicing and repair requirements specified by AGCO are also vital elements of the intended use.
These tractors must only be used, serviced and repaired by personnel who have full knowledge of their specific features and are aware of the applicable safety rules (prevention of accidents).
Customers are strongly advised to contact an AGCO dealer in the event of after-sale problems and for any adjustments which may be necessary.
2.1.1 - Pre-delivery inspection, commissioning at the user’s premises and warranty
When selling new products to its dealers, the manufacturer provides a warranty which, subject to certain conditions, guarantees that the goods are free from defects in material and workmanship. Since this book is published worldwide, it is impossible to detail the exact terms and conditions of warranty that apply to a retail customer in any particular country.
Purchasers of new AGCO equipment should therefore request full details from their supplying dealer.
In accordance with the manufacturer's policy of continuous improvement of its products, alterations to the specifications of machines may be made at any time without notice. The manufacturer disclaims all liability for discrepancies which may occur between the specifications of its products and the descriptions thereof contained in its publications.
The dealer is required to carry out certain activities when supplying a new AGCO tractor. These consist of carrying out a full pre-delivery inspection to ensure that the tractor supplied is ready for immediate use, and providing full instructions to the user in the basic principles of operation and servicing of the tractor. These instructions will cover instruments and controls, and routine servicing and safety precautions. All persons who will be involved in the operation and servicing of the tractor should be present when these instructions are given.
NOTE: AGCO disclaims all liability to any claim resulting from the fitting of non-approved parts, accessories, implements or equipment or unauthorised modifications or alterations.
2.1.2 - Warranty procedure
Correct commissioning on the user's premises and routine servicing help to prevent breakdowns. However, if operating problems do occur during the warranty period, follow this procedure:
Immediately inform the dealer you purchased the tractor from, stating the model and serial number. Do not delay, as even if the defect is covered by the original warranty, the coverage may no longer apply if the repair is not carried out immediately.
Provide the dealer with as much information as possible. The dealer will need to know how many hours the tractor has been in service, what type of work it is used for and the symptoms of the problem.
It should be noted that routine servicing operations such as tuning, brake and clutch adjustment and the supplies used for the tractor servicing (oil, filters, fuel and antifreeze) are not covered by the warranty.
Warning concerning spare parts
Parts other than AGCO parts are likely to be of lower quality. AGCO disclaims all liability in the event of loss or damage arising as a result of such parts being fitted. The manufacturer's warranty may also become void if such parts are fitted during the normal warranty period.
2.1.3 - Using the tractor in another region
Only the AGCO dealer from whom the tractor was purchased is liable for the protection provided by the warranty. Any repairs should, wherever possible, always be carried out by this dealer. If, however, the owner moves to another region or if the tractor is to be used temporarily at a location a long way from the dealer from whom it was bought, it is advisable to ask this dealer for the name and address of the AGCO dealer closest to the new address and arrange to have any obligations remaining to be fulfilled under the warranty transferred to this dealer.
If the customer leaves the region covered by the original dealer without having taken these steps, the new dealer will offer its services if needed, but may invoice them at the normal rate unless:
•the customer has clearly stated that the warranty period has not expired, and •the repair dealer has been given the possibility of taking the necessary steps with the selling dealer.
2.1.4 - Servicing after the warranty period
During the warranty period, all servicing and repair work must be carried out by the AGCO dealer, who will carefully carry out detailed checks of the progress and performance of the new tractor.
To obtain best results from an AGCO tractor, it is important to continue regular servicing and periodic inspection after the warranty has expired. All major overhaul work on the tractor must be carried out by a local AGCO dealer. An experienced technician will detect any problems which may arise between one overhaul and the next.
Mechanics regularly follow training courses to update their knowledge of the product and servicing and repair techniques, and the use of special modern implements and equipment for troubleshooting. They receive regular Service Bulletins and have access to all the workshop manuals and technical publications required to carry out repairs or servicing in accordance with the quality standards required by AGCO.
CLICK HERE TO DOWNLOAD THE COMPLETE MANUAL
• Thank you very much for reading the preview of the manual.
• You can download the complete manual from: www.heydownloads.com by clicking the link below
• Please note: If there is no response to CLICKING the link, please download this PDF first and then click on it.
CLICK HERE TO DOWNLOAD THE
2 . INTRODUCTION -
2.2 - SAFETY - SYMBOLS AND TERMS
This Safety Alert Symbol means CAUTION! BE ALERT! YOUR SAFETY DEPENDS ON IT!
SAFETY is paramount! Why?
•ACCIDENTS DISABLE AND KILL
•ACCIDENTS ARE COSTLY
•ACCIDENTS CAN BE AVOIDED
2.3 - TRACTOR AND IMPLEMENTS
The tractor is a source of power - Mechanical - Hydraulic
•On its own, the tractor is of little practical value. Only when used in conjunction with an implement or other equipment does it become a working unit.
•This instruction book has been compiled to explain the safe working practices that are associated with basic tractor operation.
•It does not cover all operation and safety instructions relevant to the implements and equipment that may be fitted at the time of tractor delivery or later.
•It is essential that operators use and understand the relevant instruction books relating to these implements and equipment.
The safety alert symbol identifies important safety notices on machines, safety signs, in manuals or elsewhere. When you see this symbol, be alert to the risk of personal injury or death. Follow the instructions in the safety notice.
2.4 - MAXIMUM TRAVEL SPEEDS
DANGER: Road use of agricultural tractors is subject to speed restrictions depending on the bulkiness of the equipment and weight of the transported load. Consult the regulations in force in the relevant countries.
2 . INTRODUCTION - SAFETY
2.5 - NOTE TO THE OPERATOR
It is your responsibility to read and understand the Safety chapter in this book before starting your tractor. Follow these safety instructions step by step throughout your working day.
When reading this chapter, you will notice that illustrations have been used to highlight certain situations. Each illustration is numbered and the same number appears in the text, in parentheses. The number is placed at the end of the written text that refers to the illustration.
Remember that you alone are responsible for safety. Good safety practices protect not only you, but also bystanders. Study the features in this book with care and make them an integral part of your safety programme. Keep in mind that this Safety chapter concerns only the type of machine you have just purchased. Also note all the usual protective measures which should be taken when working and, above all -
REMEMBER THAT SAFETY DEPENDS ON YOU. YOU CAN PREVENT ACCIDENTS WHICH COULD CAUSE SERIOUS INJURY OR DEATH.
2.6 - DANGER, WARNING AND CAUTION
Whenever you see the words and symbols shown below used in this book or on decals, you MUST apply their instructions as they concern personal safety.
DANGER: This symbol, accompanied by the word DANGER, indicates an imminent danger, which, if not prevented, may result in DEATH OR VERY SERIOUS INJURY.
WARNING: This symbol, accompanied by the word WARNING, indicates a potential danger, which, if not prevented, may result in DEATH OR SERIOUS INJURY.
CAUTION: This symbol, accompanied by the word CAUTION, indicates a potential risk, which, if not avoided, may result in MINOR INJURY.
IMPORTANT: The word IMPORTANT is used to identify special instructions or procedures which, if not strictly observed, may cause damage to, or destruction of the machine, the procedure being undertaken or the surroundings.
NOTE: The word NOTE is used to highlight particularly interesting information that might enable more efficient or convenient operation or repair.
2.7 - DECALS
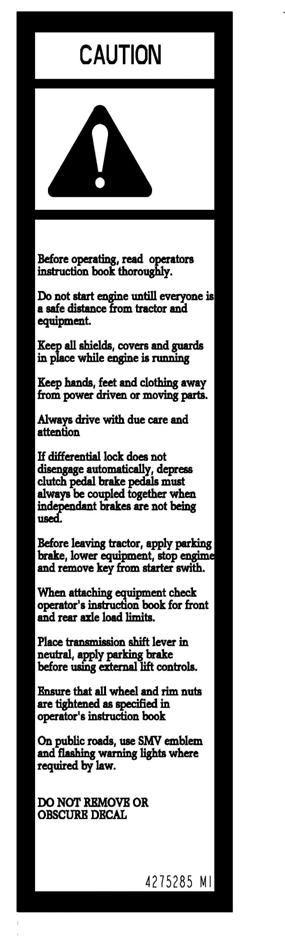
WARNING: DO NOT REMOVE OR OBSCURE decals indicating Danger, Warning, Caution or Instruction.
Replace any Danger, Warning, Caution or Instruction decals which are illegible or missing. Replacement decals are available from your dealer in the event of loss or damage. The actual location of these safety decals is illustrated at the end of this chapter.
If a second-hand tractor has been purchased, refer to the illustrations at the end of this book to ensure that all the safety decals are in the correct position and are legible.
2.8 - SAFETY PROCEDURE
2.8.1 - Ensuring proper operation
For proper operation of an agricultural tractor, you must be a qualified and approved operator. To be qualified you must understand the written instructions supplied in this manual, have training in how to operate the tractor and know the safety rules and regulations applicable to the job.
Some regulations specify that no one under the age of 16, for example, may operate power machinery. This includes tractors. It is your responsibility to know what these regulations are and to observe them in the operating area or situation.
These regulations include, but are not limited to, the following instructions for safe tractor operation.
WARNING: The operator must not drink alcohol or take any medication that may affect his concentration or coordination. If taking medication, whether prescribed or not, the operator must seek medical advice with regard to his ability to operate machinery safely.
2.8.2 - Observe the following instructions
• DO NOT ALLOW children or unqualified persons to operate the tractor. Move unauthorised persons away from the work area.
•Always wear your seat belt securely fastened.
•Where possible, avoid operating the tractor near ditches, embankments and holes. Reduce speed when negotiating turns and slopes and on rough, slippery or muddy surfaces.
•Stay off slopes that are too steep for safe operation.
•Watch where you are going, especially at row ends, on roads and around trees.
•The passenger seat is only intended for short periods of use.
•Do not allow children to use the passenger seat.
• DO NOT PERMIT others to ride on the tractor or the implement unless an approved passenger seat is fitted.
•Only hitch equipment to the drawbar and recommended hitch points and never above the centre line of the rear axle.
•Operate the tractor smoothly - avoid jerky turns, starts or stops. When the tractor is stopped, apply the handbrake securely. Lower the implement and remove the ignition key.
• DO NOT MODIFY OR REMOVE any part of the equipment and DO NOT USE attachments unless they are properly adapted to suit your tractor.
2.9 - PROTECTION
2.9.1 - Cab
The ROPS (Roll Over Protective Structure) has been designed for this tractor series and meets all the legal safety and sound requirements.
The ROPS conforms to the various international safety standards. The ROPS must NEVER be drilled or modified to enable installation of accessories or implements. Welding components is NOT PERMITTED. DO NOT ATTACH chains or ropes to the main frame of the ROPS for pulling purposes.
If additional controls or displays are to be added to the operator's area, contact your AGCO dealer for information.
The ROPS and the seat belt are effective in reducing injuries during overturn accidents. Wearing the seat belt is an important part of this protection.
•Always wear your seat belt and ensure it is correctly adjusted.
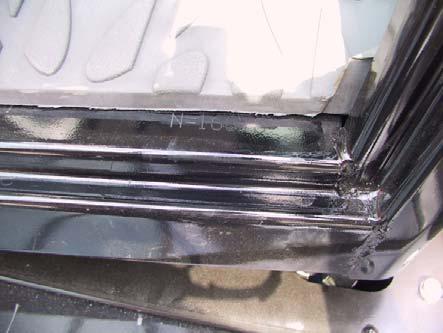
•Check the seat belt for damage. A damaged seat belt must be replaced (Fig. 1).
2.9.2 - Damage to ROPS cab
If there has been an accident with the tractor or if the tractor has overturned, the ROPS must be replaced, NOT repaired.
DO NOT USE the tractor if the ROPS has been damaged.
2.10 - PREPARING FOR SAFE OPERATION
2.10.1 - Know your equipment
It is important to know the tractor and how to operate all its accessories, implements and additional equipment. It is also important to know how to use all the controls, gauges and dials, and to know the rated load capacity, speed range, braking and steering characteristics, turning radius and operating clearances.
Remember that rain, snow, ice, loose gravel, soft ground etc. can change the performance of the tractor.
In poor conditions, slow down and be extra careful, and engage four-wheel drive if fitted.
Study the DANGER, WARNING and CAUTION safety symbols on the tractor and all the information signs.
READ THIS OPERATOR INSTRUCTION BOOK CAREFULLY BEFORE STARTING THE ENGINE.
CONSULT THE BOOK BEFORE YOU START WORK (Fig. 2).
IF THERE IS SOMETHING IN THE BOOK YOU DO NOT UNDERSTAND, ASK SOMEONE (for example your dealer) TO EXPLAIN IT TO YOU.
This book covers general safety practice for agricultural tractors. It must always be kept with the tractor. For extra copies, contact your AGCO dealer.
Fig. 1
Z2-529-05-03
Fig. 2
Z2-530-05-03
•Check for loose, broken, missing or damaged parts. Ensure everything has been properly repaired. Ensure that all safety devices are in place.
•Check that the seat belt is in good condition. A damaged seat belt must be replaced.
•Ensure that implements and equipment are properly installed and that the tractor and implement PTO (rpm) ratios are correct.
•Check the condition and pressure of tyres (absence of cuts and bulges). Replace worn or damaged tyres. Check that the hand and foot brakes are operating correctly. Adjust if necessary.
•Check the oil level. Top up the oil if necessary.
•Perform all servicing procedures outlined in the Servicingand Adjustments chapter in this book.
•Check that the PTO shaft locking devices are engaged.
•Check that the tractor PTO guard and the shaft guards are in place and operating correctly.
•Check the tractor and implement hydraulic circuit. Ensure any damaged or leaking parts are repaired or replaced.
WARNING: Fuel or hydraulic fluid under pressure can penetrate the skin or eyes and cause serious personal injury, blindness or death.
Fluid leaks under pressure may not be visible. Use a piece of cardboard or wood to detect leaks. DO NOT USE YOUR BARE HANDS. Wear safety goggles for eye protection. If any fluid penetrates the skin, seek medical advice within a few hours from a doctor familiar with this type of injury, as surgery will be necessary (Fig. 6).
Before applying pressure to the fuel or hydraulic circuit, ensure that all connections are tight and that lines, pipes and hoses are free from damage. Relieve the pressure before disconnecting fuel or hydraulic circuits.
Make sure that all hydraulic circuits are correctly installed and not crossed.
WARNING: Liquid cooling circuits build up pressure as the engine temperature increases. Stop the engine and let the circuit cool before removing the radiator cap.
•Check the engine cooling circuit and add coolant if required.
2.10.5
- Clean the tractor
•Keep work surfaces and engine compartments clean.
•Before cleaning the machine, always lower implements to the ground, place transmission in neutral, engage the handbrake, stop the engine and remove the ignition key.
•Clean footsteps, pedals and floor. Remove grease or oil. Brush away dust and mud. In winter, scrape away snow and ice. Remember - slippery surfaces are hazardous.
•Remove or put away implements, buckets, chains and hooks.
2.10.6
- Protect the environment
•It is illegal to pollute drains, water courses or soil. Use authorised waste disposal facilities, refuse tips or garages providing facilities for the disposal of used oil. If in doubt, contact your local authority for advice.
Fig. 5
Z2-532-05-03
Fig. 6
D-58 42A
2.12.4 - Follow recommended start-up procedures
Follow the start-up procedures recommended in the Operation chapter of this Operator Instruction Book. This chapter includes normal starting, cold starting and the use of starter fluids.
2.12.5 - Test the controls
After starting, check all gauges and lights once again. Make sure everything is functioning correctly. If the tractor does not respond correctly when each control is operated, DO NOT USE the machine until the fault is rectified.
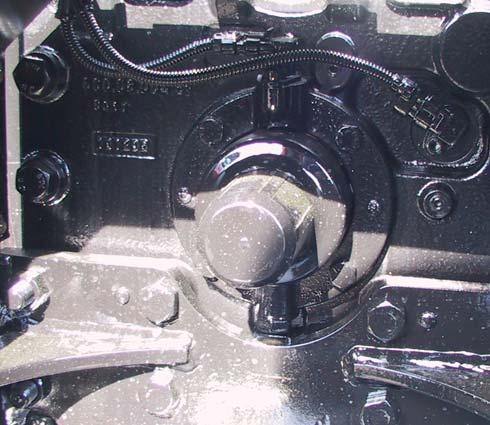
Ensure that the starter solenoid cover is still in position.
2.12.6 - Starting fluid
WARNING: It is very important that you read and follow the instructions on the label before using starter fluid. DO NOT use aerosol cans of starter fluid on tractors with the thermostat connected to the electrical system. Ether combined with thermostat can cause an explosion with damage to engine, personal injury, or both.
Handle starter fluid carefully. Starter fluid must only be used in conjunction with an ether-start aid fitted as original equipment by the manufacturer or installed by the dealer as an accessory. In cases of tractors being fitted with glow plugs or a thermostat, these must be removed prior to the installation of an ether-start aid (Fig. 9).
If aerosol cans of starting fluid are to be used, the thermostat must be disconnected. Remove the wire from the thermostat which will be found on the manifold. Tape the end of the wire to prevent an electrical short circuit.
2.13 - WORKING SAFELY
2.13.1
WARNING: An unbalanced tractor could overturn and cause injury or death.
Make sure that front frame counterweights, wheel weights and wheel ballasts are used as recommended by the manufacturer. DO NOT add extra counterweights to compensate for an overloaded tractor; it is advisable to reduce the load. Keep all parts of your body inside the cab while operating the tractor.
- Make the right moves
Ensure that the tractor is ready for the work to be carried out. Make sure you know the tractor nominal load capacities and never exceed them. Ensure that any equipment or implements you intend to use DO NOT EXCEED the load rating of the tractor. Ensure that the ratio between the tractor and implement PTO speed is correct.
Keep in mind that tractors are designed to operate on uneven, unpaved, bumpy or sloping surfaces. Operating conditions can reduce the amount of weight you should carry or pull.
2.13.2
- Safe operating practices
•Operate the controls smoothly - do not jerk the steering wheel or other controls.
• NEVER get on or off a moving tractor. Keep a firm grip on the steering wheel at all times, with your thumbs clear of the spokes when driving the tractor.
•Make sure you have adequate clearance in all directions for the tractor and implement.
• DO NOT play with a tractor or equipment. Use only for the intended purpose.
• ALWAYS OPERATE the controls from the driver's seat.
•Before getting off, always disengage the PTO, lower all attachments and implements to the ground, set the tractor to neutral, activate the ParkLock, stop the engine and remove the ignition key. Z2-535-05-03
Fig. 8
Fig. 9
WC1952
12
Fig. 13: Do not operate near the edge of ditches or banks. The distance from the edge should always be equal to or greater than the height of the bank, to prevent it from collapsing.
•When driving down a slope, use the throttle control to slow the tractor engine and choose the same gear ratio as used when climbing a slope. Shift into gear before you start downhill.
•Engage four-wheel drive (if fitted) to enable four-wheel braking.
WARNING: DO NOT disengage the clutch or attempt to shift gear after you have started downhill.
•The tractor is less likely to overturn if you drive up or down a steep slope rather than driving across it.
•Avoid steep slopes whenever possible. If this is not possible, avoid holes and dips when driving downhill. Avoid stumps, stones, bumps and raised areas when driving uphill. Keep the tractor behind the shear line when working close to ditches or banks (Fig. 13). Avoid ditches, embankments and river banks which might give way.
13 S-1031
2.13.5 - To avoid overturning
•Set the wheel track at the widest appropriate setting for the work being carried out.
•Lock the brake pedals together before driving at transport speed.
•Reduce speed according to the operating conditions. If the tractor is fitted with a front-end loader, carry the bucket and load as low as possible.
•Make wide turns at reduced speed. Do not let the tractor bounce. You may lose steering control.
•Do not pull a load that is too heavy for the tractor. It could run down the slope or the tractor could jack-knife around a trailed load.
•Do not brake suddenly. Apply brakes smoothly and gradually.
•If you must drive on a steep slope, avoid turning at the top of the slope. Slow down and turn in a wide turning circle. Drive straight on uphill or downhill slopes and never drive across them. Keep the heavier end of the tractor facing towards the top of the slope when driving up and down it.
•If a tractor fitted with lateral implements is used on a steep slope, the implement must always face up the slope. Do not raise the implements. Keep them as low to the ground as possible when crossing a slope.
•When towing a load at transport speed, lock the drawbar in the centre position and use a safety chain.
•DO NOT use the tractor to round up farm animals.
2.13.6 - To prevent rear overturning
WARNING: Hitching to the rear axle or any other point above the swinging drawbar can cause a rear overturn.
• DO NOT PULL anything using the top link connection or from any point above the rear axle. Always use an approved AGCO drawbar and only use a lockable drawbar pin.
•High hitching can cause rear overturn, which may cause serious injury or death. Only hitch loads to the drawbar.
•Only use a three-point linkage drawbar when stays are fitted to keep the drawbar in the down position.
•Use front counterweights to increase tractor stability when towing heavy loads or to counterbalance a heavy, rear-mounted implement.
•Start forward slowly and gradually increase your speed. DO NOT reverse or release the clutch. If the tractor is attached to a heavy load or immovable object, the wrong gear ratio may cause the tractor to overturn.
•If the front end of the tractor starts to lift, reduce your speed and, if necessary, disengage the clutch. Z2-538-05-03
Fig.
Fig.
2 . INTRODUCTION - SAFETY INSTRUCTIONS AND WARRANTY
•If the tractor is bogged down in mud or frozen to the ground, DO NOT ATTEMPT to drive forward. The tractor could rotate around its rear wheels and overturn. Lift any attached implement and attempt to REVERSE. If this is not possible, tow the tractor out with another vehicle.
•If you get stuck in a ditch, REVERSE, if possible. If you must go forward, do so slowly and carefully.
•A bare tractor or a tractor with rear-mounted attachments should turn around and travel forward downhill.
•A tractor with a loaded front-end bucket should reverse downhill. Keep the loader bucket as low as possible.
•Always keep the tractor in gear when going downhill. DO NOT ALLOW the tractor to coast with clutch disengaged or transmission in neutral.
2.13.7 - Emergency handbrake
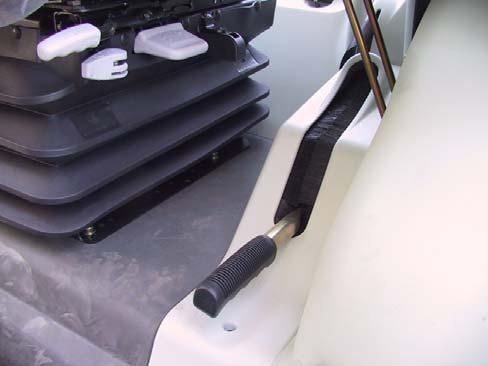
IMPORTANT: If the brakes fail and in an emergency situation, use the emergency handbrake located to the left of the driver (Fig. 14)
DANGER: Do not use the emergency handbrake as a parking brake. For the parking brake, use the steering wheel ParkLock brake control.
IMPORTANT: If the brakes fail, contact an approved AGCO dealer to resolve the problem.
2.13.8 - Other risks
•Ensure that the PTO shield (1) is in place when the PTO driveline is not in use (Fig. 15).
•Before attaching, detaching, cleaning or adjusting PTOdriven implements, disengage the PTO, stop the engine, remove the ignition key and make sure that the PTO transmission shaft has stopped.
•Ensure that all the PTO shaft guards are in place and check the presence of all safety decals (Fig. 16).
•Ensure that everyone is clear of the machine before engaging the PTO. For stationary PTO operation, place the gear lever in neutral, engage the handbrake and chock the wheels of the tractor and the implement.
•When operating mobile PTO-driven equipment, DO NOT leave the tractor seat until the PTO is disengaged, the transmission is in neutral, the handbrake is engaged, the engine is off and the ignition key is removed.
• DO NOT use PTO adapters, reducers or extensions as they extend the PTO coupler and universal joint out beyond the protection offered by the guard.
Fig. 14
Z3A-780-07-04
OIB-06-02033
Fig. 15
Fig. 16
Z2-541-05-03
DANGER
2.13.9.1 - Safety measures when towing
•For trailed equipment WITHOUT brakes, DO NOT tow this equipment:
-at a speed exceeding the speed limit in force in the relevant country,
-at a maximum load higher than that indicated on the name plate.
•For trailed equipment WITH BRAKES, DO NOT tow this equipment:
-at a speed exceeding the speed limit in force in the relevant country,
-at a maximum load higher than that indicated on the name plate.
NOTE: The tractor requires the correct trailer braking equipment to be installed and connected to the equipment.
Stopping distance increases with speed and weight of trailed loads and on hills and slopes.
Towed loads with or without brakes that are too heavy for the tractor or are towed too fast can cause loss of control. Keep in mind the total weight of the equipment and its load.
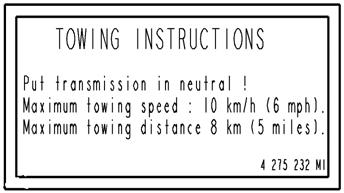
2.13.10 - Tractor towing
Refer to Chapter 4.
WARNING: Towing: the following instructions MUST be followed when towing:
If the engine is not running:
•Maximum towing speed 10 kph.
•Max. towing distance 8 km.
If the engine is running:
Towing speed is identical to that of a trailer without brakes at the speed authorised by legislation in force in the country concerned.
2.13.11
- Road use
Take the following precautions before using the tractor on a public road.
•Observe all national laws and local regulations in force relating to tractor use.
•Lock the brake pedals together.
•Place all implements in transport position and lock into place.
•Place all implements in their narrowest transport configuration.
•Disengage the PTO and differential lock.
•Make sure any required clearance flags or hazard warning lights are in place and in working order.
•Clean all reflectors and road lights, front and rear, and ensure they are in working order.
•Ensure that the tractor and equipment are fitted with emergency warning triangles and other markings recommended to improve visibility when driving on roads, unless otherwise indicated (Fig. 19).
2.13.12 - Highway code
When operating the tractor on a public road, the following precautions must be taken.
WARNING: NEVER allow any passengers to ride on the tractor or trailed equipment.
•Familiarise yourself with the road you will be travelling on.
•Turn on hazard warning lights when travelling on roads, day or night, unless prohibited by law.
•Take care when towing a load at transport speed, especially if the trailed equipment is NOT fitted with brakes.
•Observe all local or national regulations regarding the permitted road speed for a tractor.
•Exercise extreme caution when transporting on snowcovered or slippery roads.
•Wait for traffic to clear before entering a public road.
•Beware of blind intersections. Slow down until you have a clear view.
• DO NOT attempt to pass at any intersection.
•Slow down for turns and curves.
•Make wide, gentle turns.
•Signal your intent to slow, stop or turn.
•Shift to a lower gear before going up or down hills.
•Keep the tractor in gear at all times. Do not coast with the clutch disengaged or transmission in neutral.
•Stay out of the path of oncoming traffic.
•Drive in your correct lane, keeping as near to the curb as possible.
•If traffic builds up behind you, pull off the road and let it pass.
•Drive carefully. Anticipate what other drivers might do.
•When towing a load, start braking sooner than usual and slow down gradually.
•Watch out for overhead obstructions.
• Make sure that the load does not obscure hazard warning or transport lights.
Fig. 19
Z2-544-05-03
2 . INTRODUCTION -
2.14 - SAFETY - AFTER OPERATION
Whenever stopping, bring the tractor to a complete halt, apply the handbrake, disengage the PTO, place the Power Shuttle lever in neutral position, lower the implement to the ground, stop the engine and remove the ignition key BEFORE leaving the seat.
DANGER: Reverse shuttle control: Before leaving your seat, you must move the reverse shuttle control to NEUTRAL.
Remove the ignition key if the tractor is to be left unattended.
IMPORTANT: ParkLock electro-mechanical brake control: Engage the control in the locked position (closed padlock symbol) with the engine running and before leaving the operator's seat.
2 . INTRODUCTION - SAFETY INSTRUCTIONS
2.15 - DESCRIPTION OF DECALS
CAUTION
High pressure steam and hot water. Remove filler cap with extreme care.
Located on top of the bonnet (access to radiator cap)
CAUTION
Before working on the tractor, disconnect negative leads to all Battery.
CAUTION
Before removing any battery, disconnect all negative leads before positive leads.
Located on the battery cover.
WARNING
Keep all shields, covers and guards fastened in place while engine is running.
CAUTION Beware hot parts.
Located on the right- and left-hand sides of the bonnet
CAUTION
Always disengage PTO and stop engine before attaching or detaching PTO shafts or working on PTO driven equipment. Always fit PTO cover when PTO is not in use.
WARNING
Do not stand between tractor and equipment when operating controls.
Tow only with MF approved tractor drawbar or hitch.
Located at the rear of the tractor
Located to the left and right of the radiator.
CAUTION
TO AVOID POSSIBLE TRACTOR OVERTURN, TOW ONLY FROM THE DRAWBAR OR LOWER LINKS OF THREE POINT HITCH.
Located on the fenders to the rear of the cab
Located on the front windscreen
Located on the RH inner column of the cab
Located on the RH inner column of the cab
Located on the accumulator.
2 . INTRODUCTION - SAFETY INSTRUCTIONS AND WARRANTY
CAUTION
Before working on the tractor or removing this cover, disconnect negative leads to all Battery.
WARNING
Do not short across starter terminals to start engine. Never start engine while standing on the ground. Start engine only with start key from operator's seat, ensuring that gearbox and PTO are in neutral with parking brake applied.
Located on the starter motor.
Located on the inner side of the righthanded door.
WARNING
If tractor is overturning, hold onto the steering wheel. Do not leave seat.
Located at the rear of the instructor seat.
Located on the fenders to the rear of the cab
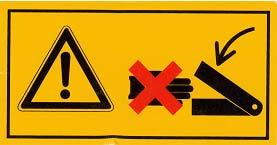
Front linkage decals
WARNING: Read the Operator Instruction Book before starting work. DANGER: Avoid being caught by moving parts
Chapter 3
INSTRUMENTS AND CONTROLS
3.1-INSTRUMENT PANEL (FIG.1) .
3.2-INDICATOR LIGHT PANEL
CONTENTS
3.2.1Control indicator lights for functions in use (Fig.5).
3.2.2Incident and handbrake control indicator lights (Fig.6).
3.3-CONTROL DISPLAY.
3.4-DOT MATRIX SCREEN
3.5-PEDALS
3.6-RIGHT-HAND CONSOLE.
3.7-LEFT-HAND CONSOLE
3.8-SEAT.
3.8.1Adjusting the multifunction armrest position
3.9-STEERING WHEEL.
3.10-UPPER CONSOLE
3.10.1Air-conditioning system.
3.10.2Manual air-conditioning system
3.10.3Automatic air-conditioning system (optional).
3.11-SUN VISOR
3.12-ROOF HATCH.
3.13-BODY
PANEL
3 . INSTRUMENTS AND CONTROLS
3.1 - INSTRUMENT PANEL (FIG.1)
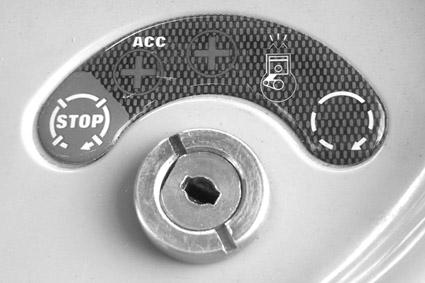
1.Starter switch (see details in Fig.2).
2.Control unit (see detail in Fig.3).
This assembly comprises the direction indicator, windscreen wiper, front windscreen and rear window washer and horn.
3.Steering wheel adjustment (see details in Fig.24).
4.DOT MATRIX controls (see details in Fig.10 ).
5.Parameter display selector switch (21 Fig.4).
6.Main light switch.
7.Hazard warning lights indicator light and control switch.
8.Direction of travel and reverse shuttle control lever.
9.Electro-magnetic brake control (ParkLock option).
Starter switch details (Fig.2):
1.Stop.
2.Contact position to be used for electrical equipment when the engine is not running.
3.Contact position to be used for electrical equipment when the engine is running.
4.Preheating (wait for instrument panel indicator lights to go out on the instrument panel).
5.Start-up.
NOTE: The tractor runs with the key in position (3); to disconnect all electrical equipment fully, the key must be moved back through the accessory position (1) to the stop position (2).
CLICK HERE TO DOWNLOAD THE COMPLETE MANUAL
• Thank you very much for reading the preview of the manual.
• You can download the complete manual from: www.heydownloads.com by clicking the link below
• Please note: If there is no response to CLICKING the link, please download this PDF first and then click on it.