9 minute read
MAINTENANCE INTERVALCHART


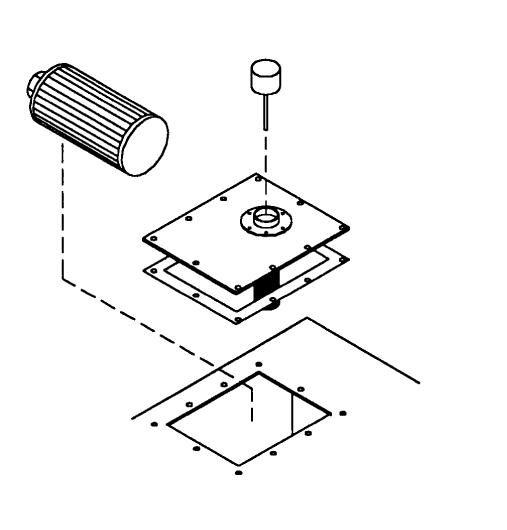
2.Carefully pull the outer element out of the housing.
Never remove the inner element unless it is to be replaced. 3.Clean out any dirt built up in the housing. Leave the inner element installed during this step to prevent debris from entering the engine intake manifold. 4.Use a trouble light inside the new outer element to inspect for bad spots, pinholes or ruptures. IMPORTANT: NEVER use an element that is damaged. Severe engine wear and eventual failure can result if dirt gets through a hole in the element. Cleaning the outer element is not recommended. NOTE: Replace the inner element only if it is visibly dirty or if the outer element has been replaced three times. Before removing the inner element from the housing, clean out any dirt built up in the housing. Leave the inner element installed during this step to prevent debris from entering the engine intake manifold. Remove the inner element.
5.Check the inside of the housing for any damage that may interfere with the elements. 6.Be sure that the element sealing surfaces are clean. 7.Insert the element(s), making sure that they are seated properly. 8.Secure the cover to the housing with the three clamps. 9.Check the hose connections and make sure they are all clamped and tightened properly. NOTE: Keep spare elements on hand to eliminate down time.
CHANGE FUELFILTER
NOTE: For proper replacement procedures refer to the engine manual for your machine.
Fuel Bleeding Procedures
When the fuel filter is removed and replaced, or the engine runs out of fuel, air must be bled from the system. Refer to the engine manual for proper bleeding procedures. NOTE: Only an authorized engine dealer can perform warranty service on the engine.
Diesel Fuel Injectors
Whenever faulty or plugged injectors are indicated, see your authorized engine dealer.
Diesel Injection Pump Timing
Whenever injection pump timing, or other pump service is indicated by abnormal engine operation, contact your engine dealer.
Adrain plug is provided in the bottom of the fuel tank for removing condensation and other foreign materials. Open the plug and allow water and fuel to drain into a container until only clear fuel is flowing from the tank.
Service Every 1000 Hours or Yearly
CHANGE TRANSMISSION OIL AND FILTER
Operate the machine long enough to warm up the transmission oil. Shut down the engine. Access to filter and drain plug is from underneath the machine. Proceed as follows:
1.Remove the drain plug and drain old oil. Replace the drain plug.
IMPORTANT: DO NOT discharge oil onto ground. Catch and dispose of per local waste disposal regulations. 2.Remove and discard the oil filter. Wipe the sealing surface on the transmission with a clean cloth.
Apply a thin coat of clean oil to the new oil filter gasket. Hand tighten.
3.Refill the transmission with new oil, see lube chart page 45. IMPORTANT: DO NOT OVERFILL! lf the oil level is too high, oil foaming, excessively high oil temperature and oil leakage at the seals could result.
4.Start and run the machine long enough for the oil to circulate and warm slightly. Recheck the level with the dipstick.
Drain, flush and refill the cooling system as follows:
1.Loosen the radiator cap to its stop. This will release any system pressure. Remove the cap when all pressure is bled off.
2.Open the radiator drain cock. Remove the water jacket drain plug from the engine block. When all coolant is drained, flush the system with clean fresh water. Allow the flush to drain completely.
3.Replace all drain plugs and tighten the radiator drain cock. Clean the cooling fins in the radiator with water pressure or steam.
WARNING
Remove the radiator cap only when the engine is cool, or painful burns could result.
IMPORTANT: Fill the cooling system with a low-silicate ethylene glycol base coolant mixed with quality water and supplemental coolant additives (SCAs) suitable for heavy-duty diesel engines. See your engine manual for additional information.
4.Inspect the radiator cap seal before installing it.
Replace it if it appears to be damaged. The 10 PSI (70 kPa) pressure cap and engine thermostat work in conjunction with each other to maintain proper engine cooling.
NOTE: Check the engine temperature gauge every minute or two after coolant has been changed. Air pockets can form and it may be necessary to refill the cooling system after a short period of use, as the air will naturally bleed out of the system.
CHANGE HYDRAULIC RETURN FILTER ELEMENT
WARNING
When servicing the hydraulic system, lower the boom to the ground.
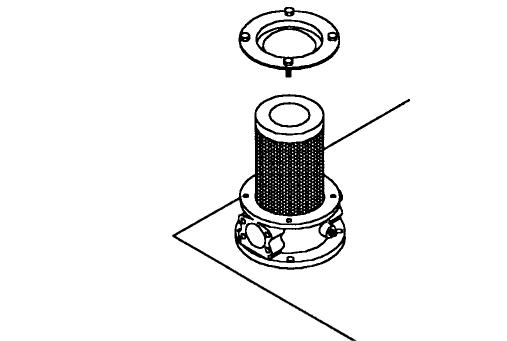
This element is a cartridge type accessible from a housing on top of the hydraulic reservoir. Initial replacement is after the first 100 hours. See illustration. Remove the top cover of the housing. Remove the element and discard. Insert the new element into the housing and replace the cover.
Housing Top
Filter Element
Filter Housing
TOPOF RESERVOIR
Reservoir Filter Removal
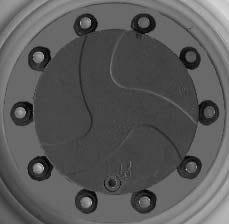
CHANGE AXLE DIFFERENTIAL AND PLANETARYOIL Differentials
Fill Plug Check Plug
Drain Plug
1.Remove the three drain plugs and drain out the old oil. Replace the drain plugs (see illustration).
2.Remove the check and fill plugs. Fill the differential with oil as specified, see lube chart page 45.
When the oil flows out the check hole, replace the plug. Wait 10 to 15 minutes and repeat this process until the axle is full. Repeat this procedure with the other axle.
The hubs have one plug each used for draining and filling (see illustration).
1.Position the wheel until the oil level arrow points down. Remove the drain/fill plug and allow the oil to drain out. Replace the plug.
Plug in drain position.
2.Re-position the hub so the oil level arrow is horizontal. Fill with fresh oil as specified in the
LUBRICATION chapter. When the oil runs out, install the drain/fill plug. Repeat this procedure on the three remaining hubs.
CHECK ALTERNATOR AND FAN BELT CONDITON
Refer to the engine manual for proper belt tension adjustment and replacement procedures. If the belt shows wear or cuts, it should be replaced. Order replacement belt from your engine dealer.
CHECK EXHAUST SYSTEM
Examine the muffler and tail pipe for possible holes. Re-tighten any loose clamps and make sure the manifold outlet gasket is not leaking.
Service Every 2000 Hours or Two Years
CHECK HYDRAULIC SYSTEM RELIEF PRESSURES
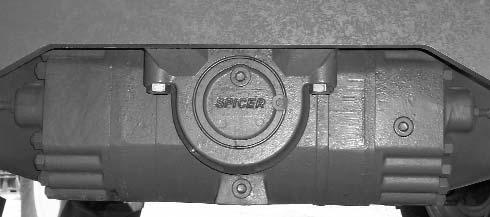
Pressure settings for relief valves are pre-set at the factory. Three test ports are provided under the front hood access cover.
Test ports under access cover.
Before conducting any test port pressure checks, check the engine RPM. Engine speed must be 800 RPM at idle and 2500 to 2550 RPM at high idle.
Steering Relief Pressure
Plug a 3000 PSI (207 bar) oil-or liquid-filled gauge into the test port labeled ”SP”. Cramp the steering fully to the right or left. The gauge should read 2000 PSI (138 bar).
Joystick and Parking Brake Release Pressure
Plug a 1000 PSI (70 bar) gauge into the port labeled “JP”. With the engine running, the gauge should read 400-425 PSI (27-29 bar).
Main Relief Pressure
Plug a 3000 PSI (207 bar) oil-or liquid-filled gauge into the test port labeled “MP”. Fully retract the boom over the relief valve. The gauge should read 3000 PSI (207 bar).
CHANGE HYDRAULIC RESERVOIR OILAND STRAINER
Clean all dirt and debris from around the top of the reservoir, especially around the access cover. See illustration on following page, use the following procedure:
Wash or blow off all particles collected on the magnetic drain plug.
IMPORTANT: DO NOT discharge oil onto ground. Catch and dispose of per local waste disposal regulations. 2.Remove the access cover and wash the inlet screen with clean solvent. Remove the sump filter strainer from the bottom inside of the reservoir. Wash it also. If the strainer has any damage, holes, etc., it should be replaced.
3.Flush out the bottom of the tank with clean hydraulic oil. Re-install all cleaned components and put the access cover back on the reservoir with a new gasket. Clean the filter/breather cap.
Element
Fill Cap Dipstick
Access Cover
Gasket
TOPOF RESERVOIR
Hydraulic Reservoir Sump Strainer Removal
IMPORTANT: Hydraulic fluid and filters should be replaced any time contamination is present before the normally scheduled change.
WARNING
Escaping hydraulic oil under pressure can have sufficient force to penetrate the skin. Before applying pressure to the hydraulic system, be sure all connections are tight and lines and hoses are not damaged. Use a piece of wood or cardboard to search for suspected leaks. If injured by escaping hydraulic oil, see a doctor familiar with this type of injury at once or gangrene may result.
STORAGE
If the Telescopic Handler will not be operated for a long period of time, prepare and store it using the following procedure:
Before Storage
Perform the following prior to placing the machine in storage: 2.Lubricate all grease fittings as described on page 46.
3.Change engine oil. 4.Apply grease to all exposed hydraulic cylinder rod areas.
5.Disconnect the battery cable clamps and cover the battery or remove the battery from the machine and store it separately. 6.If the ambient temperature (at any time during the storage period) is expected to drop below freezing, make sure the engine coolant is either completely drained from the radiator and engine block or that the amount of anti-freeze in it is adequate to keep the coolant from freezing. Refer to the separate engine manual provided for anti-freeze recommendations and quantities.
During Storage
1.About once each month, connect the battery and check all fluid levels to make sure they are at the proper level before starting the engine.
2.Start the engine and allow it to run until it warms up and then move the machine a short distance to help relubricate the internal parts. Run the engine until the battery has a chance to recharge and then shut it off.
IMPORTANT: If it is desired to operate the hydraulic cylinders at this time, BE SURE to wipe the protective grease (and any adhering dirt) from the cylinder rods prior to starting the engine. After operating, BE SURE to recoat the cylinder rods with grease if the machine is to be returned to storage.
After Storage
After removing the machine from storage and BEFORE operating it, perform the following:
1.Change engine oil and filter to remove condensation or other residues.
2.Wipe off grease from cylinder rods. 3.Lubricate ALLgrease fittings.
4.Review and re-familiarize yourself with all safety precautions as outlined through out this manual. 5.Follow the starting and warm-up procedures as outlined in Chapter 4 of this manual.