5 minute read
Tire Inflation Procedure


Warning
Do not increase the inflation pressure beyond 35 psi.
Otherwise, the tire could explode during inflation, causing serious injury or death. Do not damage the inflated or partially inflated tire.
Otherwise, the tire could explode, causing serious injury or death. Make sure that the tire is correctly seated on the rim before inflating. Otherwise, the tire could explode, causing serious injury or death.
DO NOT inflate a tire that has had a complete loss of air. If the tire has lost all air pressure, have a qualified tire mechanic service the tire.
To add air to a partly inflated tire, use the following procedure:
1. Use an air hose with a remote shutoff valve and a self – locking air chuck.
2. Stand behind the tread of the tire and make sure all persons are away from the side of the tire before you start to add air.
3. Inflate the tire to the recommended air pressure. DO NOT inflate the tire more than the recommended pressure.
NOTE: Tires can be inflated 28 kPa (4 psi) over maximum recommended in chart when tractor is used for heavy draft operation and ground compaction is not a problem.
Wheel Mounting Torques
Front Wheel Disc to Axle Hub Bolts
..................83 to 93 N•m (65 to 69 Lb•ft)
Rear Wheel Disc to Axle Hub Bolts
..............118 to 132 N•m (87 to 98 Lb•ft)
IMPORTANT: Check the wheel bolts and nuts after the first 10 hours of operation and again after every 100 hours of operation. Also do this procedure any time the wheel or rim is removed.
NOTE: The front wheel of tires must always be assembled with the valve side out.
When putting the wheels on the axle, make sure that the tires rotate in the correct direction.
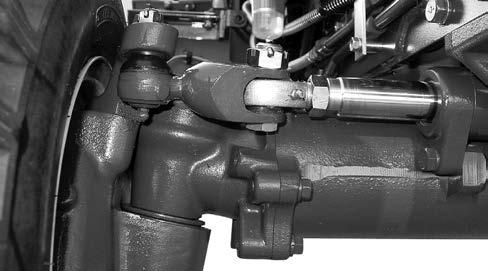
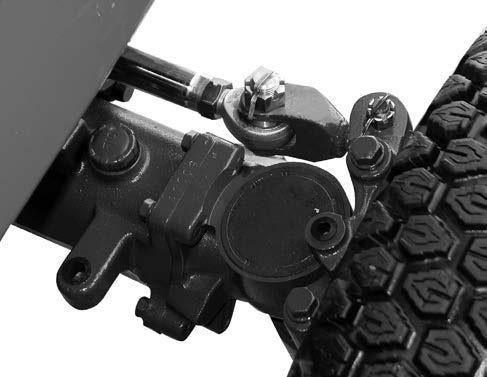
TOE-IN ADJUSTMENT
TO CHECK THE TOE-IN, USE THE FOLLOWING PROCEDURE:
1. Put the tractor on ground and the wheels in the straight-ahead position.
2. Place chalk marks at points A on the centerlines of both front tires at the same height as the centerline of the hubcap.
3. Measure the distance (L1) between the chalk marks at points A.
4. Move the tractor forward a distance equal to one-half revolution of the front wheels.
5. The chalk marks will now be at points B. Measure the distance (L2) between the chalk marks at points B.
6. The figure of L1 minus L2 is the toein. Make sure the toe-in is adjusted properly. If not, adjust the toe-in.
TO ADJUST THE TOE-IN, USE THE FOLLOWING PROCEDURE:
Adjust the rods to be equal the dimensions A on both side.
1. Loosen the lock nut at the rod end.
2. Turn the rod end to shorten or lengthen.
3. Lock the lock nuts.
Tightening torque ............147 to 166 N•m(109 to 123Lb•ft)
Tire Size Combinations
Your Tractor must use front and rear tire combinations that are correctly matched. The use of recommended tire combinations will give maximum tractor performance, extended tire and reduced wear on drive train components.
IMPORTANT: The tire size combinations shown below are specified to provide matched ground speeds of the front and rear tires. Mixing worn and new tires or tires of different diameters or loaded radii can give incorrect ground speed match. When replacing tires, consult your Dealer.
Tractor Ballast
Ballast for your tractor includes front-end weights, rear wheel weights and liquid ballast in the rear tires. Front-end weights improve the steering characteristic when heavy hitch loads cause a movement of tractor weight from the front to the rear wheels. Rear wheel weights and adding liquid to the rear tires increase traction by putting weight on the driving wheels.
IMPORTANT: The Maximum operating weight of tractor should not exceed the following values. The operating weight of tractor includes the weight of tractor, ballast weight and implement.
Front Axle
....................................1200kg (2646lbs)
Rear Axle
....................................1200kg (2646lbs)
Total
....................................2000kg (4410lbs)
Front End Weights
Front-end weights can be mounted on the front-end bracket of the tractor with locking bolts and nuts. The weights, locking bolts and nuts are available from your Dealer. A maximum of three weights at 22 kg (49 lbs) each can be installed, depending on implement application and soil conditions.
Use front-end weights as needed to provide effective steering control and front end stability and to achieve maximum operating efficiency and tractor filed performance.
NOTE: When you have too much ballast installed on the tractor, you will see the clear shape of the tire tread in the ground which is an indication of no slippage. With too little ballast, the tire tread marks will not show because of the tire slippage.
Lubrication And Maintenance
The tractor is adjusted before shipment; however, wearing and slacking are caused along its use. Perform inspection and readjustment periodically and replace parts which exceeded its service limit to maintain the tractor in optimum condition at all time.
WARNING: For burn, fire and injury accident prevention.
When cleaning and performing inspection, adjustment, and maintenance, park the tractor on wide flat place, apply parking brake, lower the implement, and stop the engine to stop the movement of all parts before performing the work.
Wait until the engine cools down before performing inspection and maintenance of the engine and its surroundings.
When cleaning and performing inspection, adjustment, and maintenance with the implement lifted, set the flow control grip to the <FIX>, make sure that the implement does not lower, and place stand under the implement. Place all the covers back to where removed before starting the engine.
Request the inspection and maintenance to the dealer for parts not listed in the below periodical inspection and maintenance list. Check and read the operator`s manual for the proper usage of the implements before using implements on the tractor.
WARNING: When raising your vehicle
Use the appropriate jack to lift up the chassis from the ground.
Park the tractor on safe, hard and flat ground. Jack may be falling down if working on unstable ground such as the slope or soft ground and it will be cause of injury.
Before jacking up the tractor, stop the engine and apply the park brake securely. Keep the tractor stationary by placing wheel stoppers at front and behind of tires.
Lower the implement to the down position when the tractor is required to jack up while attaching the implement on it.
Be careful not to get under the tractor or vibrate the chassis when jacking up the tractor. Be careful not to jack up more than requires. Tractor gets unstable if it is jacked up too high. Using method of the jack varies from product to product. Use the jack by the proper method in accordance with the individual operator`s manual.
Support at the axle when the jack is used.
Periodical Inspection And Maintenance List
Perform inspection and maintenance referring to the “Periodical Inspection and Maintenance List” so that the correct functions are performed and the safe condition is maintained at all times. This “Periodical Inspection and Maintenance List” is referential. Adjust as necessary in case of errors.
MARK Y: Yearly or 1000 Hours, Whichever occur first.
AY: Yearly or as needed.
Note 1: Consult your Dealer.
Note 2: Replace element after 10 cleanings or yearly.
Note 3: Apply gear oil.
NOTE: Contact the dealer when disposing any machinery or parts.
·For waste disposal
·Dampening or incineration of wastes causes environmental pollution and may be subjected to punishment according to the law.
-When draining waste fluid from the equipment, use a drip pan.
-Do not drain on the ground, river, lake, or ocean.
-Contact the dealer and dispose according to the laws and regulations when disposing or incinerating waste oil, fuel, coolant (antifreeze), refrigerant, solution, filter, battery, rubbers, and other hazardous materials.