6 minute read
Fuel System


Clean Diesel Fuel
Diesel Fuel should be poured so that no sediment can enter the tractor fuel tank whilst it is being filled. Fuel storage facilities should allow for the periodic removal of sediment from the bottom of the storage tank.
The Diesel fuel filters will remove any sediment still present in the fuel and ensure that the fuel reaching the injection pump and injectors is free of impurities. The fuel filter should be serviced regularly to ensure maximum engine reliability.
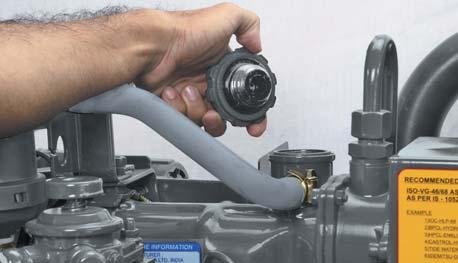
Bleeding the Fuel Filter
The presence of air in the fuel can cause fuel stoppages. The air should be completely bled so that the tractor operates satisfactorily. Loosen air bleeding screw (B) on fuel filter and push hand primer (A) down till you get the flow of fuel free of air from air bleeding screw. Retighten the screw (B).
Bleeding the Fuel Injection Pump
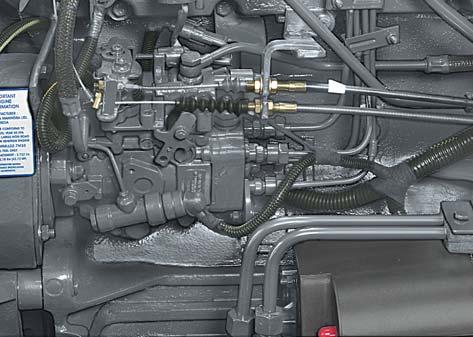
Loosen the High-Pressure pipes at the nozzle end. Operate the hand primer (A) on fuel filter till you get a streamline flow of fuel from the High-Pressure pipes. Retighten the High-Pressure pipes and start the engine. Observe till the engine runs smoothly and then shut-off till further use.
Escaping hydraulic diesel fluid under pressure can penetrate the skin causing serious injury. Do not use your hand to check for leaks. Use piece of cardboard or paper to search for leaks. Stop engine and relieve pressure before connecting or disconnecting lines. Tighten all connections before pressurizing lines.

If any fluid is injected into the skin obtain medical attention immediately or else, serious injury may result.

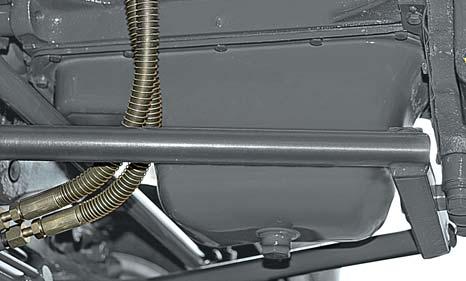
Fuel Tank and Fuel Pipes
Fill the tank each time the tractor finishes the days work. This prevents condensation inside the fuel tank. Check regularly to ensure all fuel pipe unions are tight and in good order. Ensure that vent hole provided on fuel tank cap is not choked. Water or dirt settled in the bottom of fuel tank should be drained daily, before starting the engine by loosening the drain cock till clean diesel flows.
Tamper Proofing
Calibration of Fuel Injection Pump calibration plays a vital role in Engine performance and hence the same shall not be disturbed by unauthorised persons. In order to prevent tampering, a tamper-proof arrangement is provided on Fuel Injection Pump consisting of SPECIAL SEALS (C). Any FIP related work should be carried at Mahindra / BOSCH authorised dealership.
Fuel Filter
This filter provides clean, moisture free fuel for the injection process. A hand primer is provided to manually remove excess air from the fuel filter and fuel lines.
Major Components:
•Hand Primer
•Air Bleeding Screw
•Fuel Filter
Fuel enters the filter at inlet (A) and flows through the filter element separating water if contents before flowing through outlets (B) to the fuel injection pump.
Since water and contaminants settle at the bottom of the sediment bowl, a drain plug (i.e. Adaptor cum Water Sensor) is provided.
Drain water from the fuel filter when water level indicator in instrument cluster glows on.
To drain water from fuel filter, unscrew the water sensor in anticlockwise direction by hand. Rotate only 1 to 2 turns by hand. Place a small tray to collect water or water and diesel emulsion. Tighten water sensor by rotating clockwise. Tightening torque 2 to 3 Nm or hand tighten and fix connector (C).
Servicing the fuel filter
1.It is recommended to replace the fuel filter every 500 hrs.

2.To remove Filter, unscrew the filter (D) from adaptor (E).
3.Check O'rings of fuel filter for any crack / damage. Smear oil on the new O'ring before installation.
4.Assemble the new filter. Do not over tighten.
5.Clean Water Sensor to remove sludge and retighten to filter.
6.Prime the system and bleed the filter. Tighten the bleeding screw.
NOTE : Drain water once in a week or earlier if water contamination is excessive. Continued driving with water accumulation in fuel filter will cause damage to fuel pump / other fuel system components.
NOTE : Replace fuel filter at the recommended period or whenever it gets clogged. Discard the old filter and do not repair or clean the filter. Always fit the spin-on filter dry.
Oil Level Check :
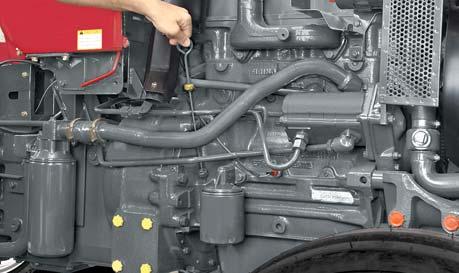
Check engine oil before starting the engine.
1.Remove dipstick gauge (A) provided on the right hand side of the crankcase.
2.Oil level should be between the two marks provided on the dipstick (A).
Never allow to let the oil level drop below the ‘Lower’ mark. Add only recommended grade of oil (15W40).
Engine Oil Filter
The life of engine depends upon clean oil being circulated to its bearings. In the normal course of engine operation the lubricating oil undergoes changes which produce harmful by-products. The purpose of the oil filter is to separate and remove dirt and other injurious foreign materials from the oil and prevent these from being circulated in the engine.
The oil filter element should be replaced after every 200 hrs. of operation or whenever engine oil is changed.

Changing Spin On Filter
1.Ensure that engine is stopped before changing filter.
2.Unscrew the oil filter (B).
3.Prime the new spin-on filter with clean oil.
4.Screw the new filter to the adapter.
5.Move the Hand and foot throttle to engine “Idle” position.
6.Start the engine, check the oil pressure gauge to see whether the lubricating oil is circulating through the Engine.
7.Inspect the oil filter for oil leaks.
Oil Change
Change engine oil after every 200 hrs. of operation.
1.Ensure that the engine is stopped before changing oil.
2.Remove the drain plug (C) provided at bottom of oil sump.
3.Allow the oil to drain at least for five minutes. All the oil can be drained out when engine is still warm.
4.Now reinstall the drain plug (C). Service the oil filter as explained below.
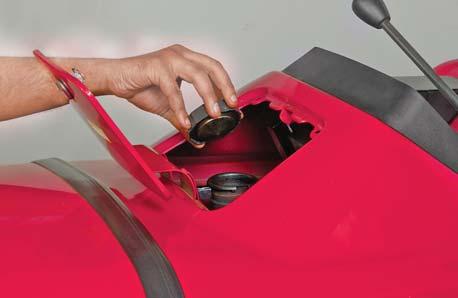
5.Remove the oil filler cap (D) to expose the oil filler neck.
6.Refill the oil sump slowly by recommended grade of oil (15W40) from the oil filler neck.
7.Clean and place the oil filler cap (D) again. Stop the engine immediately if Oil pressure is not recorded within 10 seconds of engine starting or Leakage is observed. Get the cause identified and rectified before proceeding further.
Note : Engine oil and filter element must be changed after initial 100 hrs. of operation in new tractor or whenever major overhaul of engine is carried out and subsequently after every 200 hrs. respectively.
To avoid delays, we recommend that you carry extra filter elements on hand so that replacements can be made at the correct time. The filter is located on the right-hand side of the crankcase.
Filling oil consumes time. Allow sufficient time for the oil to settle down in crankcase.
Battery Maintenance Cleaning
Battery terminals must be kept clean and tight. The cable terminals will corrode and interfere with battery performance unless regularly checked. A light smear of petroleum jelly on the terminal posts and connections will help to resist corrosion. Occasionally remove the connections and clean the terminal posts with wire wool or emery cloth, smear with petroleum jelly and reassemble. Wash the battery top with warm water and soda. Ensure that none of this solution gets into the battery cells. Finally rinse with plain water. The vent holes in the filler caps should be open at all times.
Servicing
If the battery shows need of charging it must be given immediate attention. Keeping the battery fully charged not only preserve its life but makes itself available for instant use when needed.
When replacing the battery the earth cable must be connected to the negative (–) terminal and the battery cover secured in its correct position.
Do not, under any circumstances, allow an electric spark or open flame near the battery, during or immediately after charging. Do not lay steel tools across the terminals, as this may result in a spark or a short circuit which could cause an explosion. Be careful to avoid spilling electrolyte on hands or clothing.
Effect of Low Temperatures
Battery capacity is greatly reduced in cold condition which has a decided numbing effect on the electrochemical action of the battery. Taking 100% of cranking power at 80ºF then at 32ºF, only 65% and 00F only 40% cranking power is available.
If your tractor is not to be operated for some time during winter months, it is advisable to remove the battery and store in a dry place where the temperature will not fall below freezing point. Maintaining the electrical system in good working order will enable the alternator to provide the current needed necessary to keep battery fully charged thus ensuring maximum efficiency of the electrical devices.
Ensure that the terminals are clamped tight, and the battery is securely fastened down in the battery tray.
Do not over-tighten.
When the alternator is charging, an explosive gas is produced inside the battery. Do not use an exposed flame and do not smoke while checking the battery.
Before working on any part of the electrical system disconnect the battery ground cable. Do not reconnect this cable until all electrical work has been completed. This will prevent short circuits and damage to electrical units.
Electric storage batteries give off a highly inflammable gas when charging and continue to do so some time after receiving a steady charge
Note : Contact 'Exide' Dealer for Warranty.
Website : www.exideworld.com
Phone : 1 - 800 - start it