26 minute read
Attachments


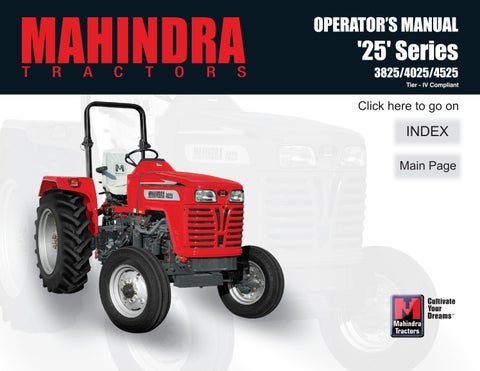
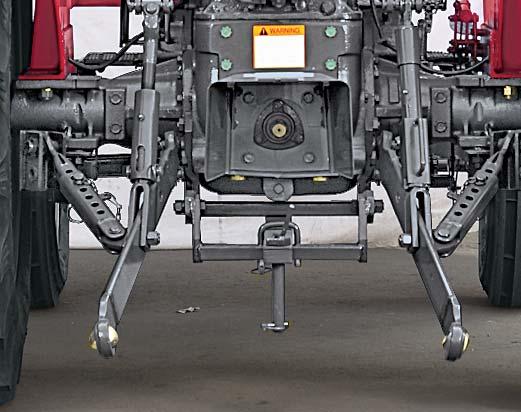
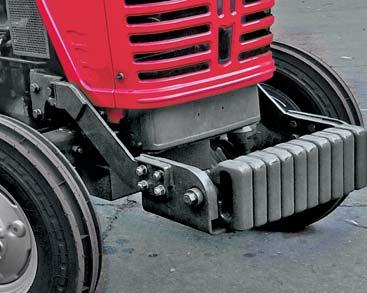
Swinging Drawbar
Tractor can be equipped with a drawbar for connecting to pull behind implements. It can swing from side to side. Certain heavy equipment such as a loaded single axle trailer can place excessive strain on the drawbar. Strain is greatly increased by rough road and high speed.
The drawbar must be locked in center position when
1.Operating a drawbar pulled PTO driven implement.
2.Towing implements / Trailers on road or field.
Using Swinging Drawbar
1.Remove “U” bolt (A).
2.Shift to the drawbar (B) to next hole as desired.
4.Lock the “U” bolt (A).
5.See your implement operator’s manual for drawbar positions.
Attaching PTO Driven Implement
1.Turn Key to “OFF” position.
2.Disengage the PTO lever.
3.Position the drawbar according to the requirement of implement and drive line.
4.Attach implement to tractor before connecting PTO driveline. Raise Hitch upwards if it is not to be used.
5.Rotate PTO shield (C) upward for clearance.
6.With the engine still OFF, turn the shaft slightly by hand if necessary to line up splines. Connect driveline to PTO shaft. Pull out on shaft to be sure drive line is locked to PTO shaft.
7.Place PTO shield in downward position.
Rear roll-over can result if pulling from wrong location on tractor. Hitch only to drawbar. Use 3 point hitch only with implements designed for its use, not as a drawbar.
Try to balance the load primarily on the implement wheels. Avoid overloading the drawbar. Add Jerrycan weights for improved stability. Engage the clutch smoothly, avoid jerking and use brakes cautiously to avoid jackknifing.
Always secure the drawbar to prevent swinging when transporting equipment or when operating any but ground engaging equipment.
Do not pull from the lower links with the links above the lowest position. Always use the drawbar or lower links in the lowered position for pull-type work, otherwise the tractor may overturn rearwards.
Jerrycan Weights
To obtain additional level of traction and stability, these weights are provided as an optional fitment. With loader application on the tractor, these weights are to be removed. However the weight mounting bracket shall not be removed and can be used for towing purpose.
For procuring “Jerrycan Weights” if required contact your Mahindra Dealer.
Wheel Weights
The drawbar pull of the tractor can be increased by the addition of weight to the driving wheels, either by adding cast iron wheel weights or by use of liquid in the tires. Should the tractor tires wear excessively due to wheel slippage, increase the traction by adding weight to the rear wheels.
If increased drawbar pull is required to suit different applications and conditions, only experience can indicate the correct amount of extra weight required, it may be sometimes necessary to use both cast iron wheel weights and liquid ballast.
For procuring weights if required contact your Mahindra Dealer.

Adjustment of Front Wheel Tread
Adjustment of the front axle extension allows variation of the tread in 4” increments from 48” to 56”. The axle can be off-set in 4” increments as required.
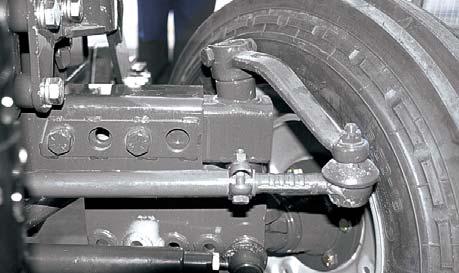
Milled in the tie rod are adjustment grooves, which give adjustment to correspond with the axle extension settings. Whenever the axle extensions are altered the tie rod and toe-in must be re-set. It is to be noted that the track width may vary with change in the front tire size.

To adjust the front wheel tread, raise the front end of the tractor and remove bolts holding the axle extension pieces. Remove the tie rod nut and bolt and pull out the axle extensions.
Move the axle extensions to the required position and adjust the tie rod to the corresponding position. Replace bolts in holes selected and tighten the axle extensions. Replace the tie rod bolt and tighten.
# For Front tire size 6 x 16
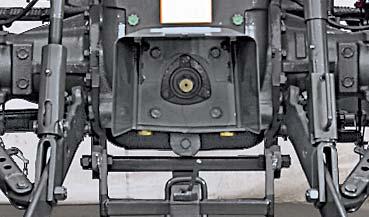
Adjustment of Rear Wheel Tread
The track of the rear wheels of 12.4/13.6 x 28 can be adjusted from 56” to 76” by assembling the rim in different positions as shown in illust. Track changes from a setting of 56” to 60” and 72” to 76” are made without changing the wheels to the opposite side of the tractor, whereas tracks of 64” to 68” necessitate reversing the wheels to the opposite side of the tractor.
NOTE : An arrow is marked on the side wall of the tire, which must always point in the direction of forward rotation to obtain maximum traction.
Adding Liquid Weight
Tractor tire can be 80% filled with liquid as follows.
1.Raise the wheel. Rotate the tire until the valve, stem is at 1’O Clock position.
2.Remove the valve core housing and screw on the adapter.
3.Force liquid into the tire from a tank placed at least five feet higher than the tractor tire, or by using a compressor and pressure tank filled with water.
4.When the liquid has reached the required level, remove the adapter, screw in the valve core and inflate to the recommended pressure.
Inflation
Keep tires properly inflated to the pressure as shown in the Chart below. Under inflation will damage tire cord and may cause the tire to slip on the rim and tear out the tube valve stem. Over inflation results in excessive slippage, causing rapid tire wear. Air pressure should be checked once a week with an accurate low pressure gauge having one pound graduations. Air pressure should not be allowed to drop or exceed the recommendations.
Always see that the tire valve caps are in place and screwed tight. The caps prevent loss of air through the valve core. Further, they prevent debris from entering and damaging the valve core and air chamber in the tires.
Exceptions (Rear Tires only)
When plowing with a moulded plow, the left hand or land wheel should be inflated to 2 p.s.i. lesser than right hand or furrow wheel.

Note : Where ambient temperatures are likely to fall below freezing point use calcium chloride solution, methanol for antifreeze. The instructions and recommendation shown below should be followed in order to secure maximum life and efficient service from pneumatic tires.
Maximum recommended load carrying capacity per tire w.r.t it’s size & ply rating at varied air pressures.
NOTE : Load can be increased by 20% without increasing inflation pressure if the Tractor is operated at speed upto 16 Kmph.
Care of Tires
Cuts in tires should be repaired immediately. If neglected, it will decrease the tire life. Avoid stumps, stones, deep ruts and other hazards. Keep tires free from oil and grease as both destroy rubber. After using the tractor for spraying, wash off any chemicals that may be left on the tractor and tires.
Tire Inflation Pressure
FrontRear
Field1.7 (20)1.2 (12)
Road(As per load)(As per load)
Refer Table - ARefer Table - A
Shipping Tractors Equipped with Pneumatic Tires
When tractors are transported on a carrier, inflation pressure should be as follows to make possible rigid blocking and to prevent bouncing.
Front - 36 psi
Rear - 30 psi
Tire Protection during Storage
When not in use the tractor should be stored where the tires are protected from light. Before storing the tractor clean the tires thoroughly. Jack up the tractor so that the load is off the tires when it is to be out of service for a long period. If it is not jacked up, the tires should be inflated at regular intervals. Before putting the tractor in service, always inflate tires to the correct operating pressures.
Do not load tires beyond their rated capacity.
Mounting Tires on the Rim
After mounting a new or old tire on the rim, inflate it to 30 p.s.i. pressure to seat the tire bead on the rim flange and to prevent the tire from creeping and shearing off the valve. Then deflate or inflate tire to correct operating pressure.
Inflating or servicing tires can be dangerous. Whenever possible, trained personnel should be called in to service or install tires. In any event to avoid the possibility of serious or fatal injury, follow the safety precautions below:
Upon receiving your tractor, check the air pressure in the tires and recheck every 50 hours or weekly.
When checking tire pressures, inspect the tires for damaged tread and side walls. Neglected damage will lead to early tire failure.
Inflation pressure affects the amount of weight that a tire may carry. Do not over or under inflate the tires.
Never attempt tire repairs on a public road or highway.
Do not inflate a steering tire above the manufacturer’s maximum pressure shown on the tire or beyond the maximum shown in the tire pressure and load Table - A. If tire is not marked with the maximum pressure.
Never inflate a traction tire (any rear tire) over 35 psi (2.4 bar). If the bead does not seat on the rim by the time this pressure is reached, deflate the tire, relubricate the bead with a soap/water solution and re-inflate. Do not use oil or grease. Inflation beyond 35 psi with unseated beads may break the bead or rim with explosive force sufficient to cause a serious injury.
After seating the beads, adjust inflation pressure to the recommended operating pressure. Do not re-inflate a tire that has been run flat or seriously under-inflated until it has been inspected for damage by a qualified person.
Torque wheel to axle nuts to specification after reinstalling the wheel. Check nut tightness daily until torque stabilizes. Ensure the jack is placed on a firm, level surface.
Ensure the jack has adequate capacity to lift your tractor.
Use jack stands or other suitable blocking to support the tractor while repairing tires.
Do not put any part of your body under the tractor or start the engine while the tractor is on the jack.
Never hit a tire or rim with a hammer.
Ensure the rim is clean and free of rust or damage. Do not weld, braze, repair or use a damaged rim. Do not inflate a tire unless the rim is mounted on the tractor or is secured so that it will not move if the tire or rim should suddenly fail.
When fitting a new or repaired tire, use a clip on valve adapter with a remote gauge that allows the operator to stand clear of the tire while inflating it. Use a safety cage, if available.
Before Starting The Tractor
1.Clean the tractor.
2.Make all prestart checks according to preventive maintenance schedule.
3.Check coolant level in Radiator & oil level in engine, transmission, steering and hydraulics.
4.Check fuel level in fuel tank.
5.Ensure all the tires are properly inflated as per the load conditions.
6.For operator’s maximum comfort, adjust seat suspension as per the operator’s weight. Also adjust seat position forward or rearward as per operators convenience to operate all controls and switches.
7.If, necessary, ballast the tractor.
8.Adjust wheel tread, if necessary.
9.Adjust stabilizer and three point linkage.
Starting the Tractor
1.Move the controls as under : a.High-Low Range selection lever in neutral. b.Speed shift lever in neutral. c.PC and DC levers in lowermost position. d.PTO lever in neutral. e.Auxiliary valve lever in neutral position if incorporated.
2.Turn the Key to ON position and observe the Intake manifold heater to glow for 42 seconds.
3.Turn the starter key in clockwise to engage the starter and hold in this position till the engine fires. When released, the key springs back to the “ON” position.
4.Idle the Engine for 1 to 2 minutes before driving it. If required, warm-up the engine at suitable speed. For faster warm-up, raise the engine rpm to approx. 2000. The starter safety switches are provided on the High-Low Range selection system and PTO lever. The tractor can be started when High-Low Range selection lever is in neutral and PTO lever as well in neutral.
Never push or tow the tractor to start the engine. Doing so may overstress the drive train.
Do not crank the starter continuously for more than 30 seconds to avoid starter motor failure.
Stopping the Engine
a.Idle the Engine for 1 to 2 minutes.
b.Turn the Key to “OFF” position.
Do not use starting fluid. Tractor is equipped with intake manifold heater.
NOTE : It is normal for the engine to be louder and have bluish-white exhaust smoke during engine warm-up. The amount of smoke depends on the temperature of air entering the engine.
In cold weather, idle the engine and warm-up for 5 minutes at approx. 2000 rpm before loading.
Driving the Tractor
With the engine running and the clutch in disengaged position, engage High-Low Range Selection Lever and Speed Selection Lever to their appropriate desired positions. Free the parking brake. Slowly release the clutch and set the tractor in motion.
During the field operations, assistance in making sharp turns can be gained by applying pressure to the independent foot brake pedal of the side to which the turn is to be made.
The brakes can be latched together to act simultaneously by means of the brake pedal latch.
Do not attempt to start the engine while standing beside the tractor, because serious injury or death would occur.
Always sit on the operator’s seat.
Always latch the brake pedals together when tractor is not being used in field.
Do not apply load on tractor at low engine rpm. Always apply heavy loads at full throttle rpm of engine.
If the tractor is being used after long storage, care must be taken to prime the engine by cranking the engine for at least 5 seconds without firing the engine.
To avoid firing of engine while cranking, remove the electrical connection to FIP solenoid and crank the engine.
If the engine stalls while operating under load, start engine immediately to prevent abnormal heat build up in engine.
Operating the Tractor
1.Before starting the tractor ensure parking brake is engaged, place the P.T.O. lever in the “OFF” position, hydraulic control levers in downward position, remote control valve levers and transmission in neutral.
2.Do not apply load on tractor at low engine speeds. Always apply heavy loads at full throttle rpm of engine.
3.Do not start the engine or operate controls while standing besides the tractor. Always sit on the tractor seat when starting the engine or operating controls.
4.PTO and Transmission Neutral switch
In order to prevent accidental starting of the tractor in gear, safety switches are provided. The starting system of the tractor is connected through switches on HighLow Range Selection System and PTO lever. These become operative to complete the starting circuit only if the transmission is in neutral position and PTO lever disengaged. Do not bypass the safety Key Switch. Consult your Mahindra tractor Dealer if your Safety starting switch malfunctions.
5.Avoid accidental contact with the gear shifter lever while the engine is running. Unexpected tractor movement can result from such contact and may cause accident.
6.Do not get off or climb the tractor while it is in motion.
7.Shut off the engine and apply the parking brake before getting off the tractor.
8.Do not operate tractor in an enclosed building without adequate ventilation. Exhaust fumes can cause death.
9.Do not park the tractor on a steep slope.
10.If power steering ceases to operate, stop the tractor immediately.
11.Pull only from the swinging drawbar or the lower link drawbar in the down position. Use only a drawbar pin that locks in place. Pulling from the tractor rear axle carriers or any point above the rear axle may cause the tractor’s front end to lift and the tractor to turnover.
12.Always use hydraulic position control lever when attaching equipment / implements and when transporting equipment. Be sure that the hydraulic couplers are properly mounted and will disconnect safely in case of accidental detachment of implement.
13.Do not leave equipment / implements in the raised position.
14.Use the turn signal lamps and slow moving vehicle (SMV) signs when driving on public roads during both day and night time, unless prohibited by law.
15.Dim tractor Head lamps when meeting a vehicle at night. Be sure the Head lamps are adjusted to prevent blinding on the eyes of oncoming vehicle operator.
16.Emergency stopping instruction : If tractor fails to stop even after application of brakes shut off the engine while the tractor is in gear and clutch engaged.

A careful operator is the best operator. Most accidents can be avoided by observing certain precautions. Read and take the following precautions before operating the tractor to prevent accidents. The tractor should be operated only by those who are responsible and instructed to do so.
The Tractor
1.Read the operator’s manual carefully before using the tractor. Lack of operating knowledge can lead to accidents.
2.Use an approved rollover bar and seat belt for safe operation. Overturning of a tractor without a rollover bar can result in death or injury.
3.Do not remove ROPS (Roll Over Protective Structure). Always use the seat belt.
4.Be aware that fiber glass canopies do not give any protection.
5.To prevent falls, keep steps and platform cleared of mud, oil and debris.
6.Do not permit anyone but the operator to ride on the tractor. There is no safe place for extra riders.
7.Replace all missing, illegible or damaged safety signs.
8.Keep safety signs clean of dirt and grease.
Driving the Tractor
1.Watch where you are going especially at row ends, on roads, around trees and low hanging obstacles.
2.To avoid rollover, drive the tractor with care and at speeds compatible with safety, especially when operating over rough ground, crossing ditches or slopes, and when turning at corners.
3.Lock the tractor brake pedals together when transporting on roads to provide proper wheel braking.
4.Keep the tractor in the same gear when going downhill as used on uphill. Do not coast or free wheel down hills
5.Any towed vehicle and/or trailer, whose total weight exceeds that of the towing tractor, must be equipped with its own brakes for safe operation.
6.When the tractor is stuck or tires are frozen to the ground, back out to prevent roll over.
7.Always check overhead clearance, especially when transporting the tractor.
8.Do not engage the High-low Range Shift lever while the tractor is in motion.
9.The “balancing” of the braking system should be checked every week, or whenever the tractor is taken on the road after working extensively or when one brake is used more often than the other. If this precaution is not taken an accident may occur. Hand brake should only be used for parking purpose.
10.When driving on wet, icy or graveled surfaces, reduce speed and be sure tractor is properly ballasted to avoid skidding and loss of steering control.
Servicing the Tractor
1.Keep the tractor in good operating condition for your safety. An improperly maintained tractor can be hazardous.
2.Stop the engine before performing any service on tractor.
3.The cooling system operates under pressure which is controlled by the radiator cap. It is dangerous to remove the cap while the system is hot. First turn the cap slowly to stop and allow the pressure to escape before removing the cap entirely.
4.The fuel in injection system is under high pressure and can penetrate the skin. Unqualified persons should not remove or attempt to adjust fuel injection pump, injector, nozzle or any part of the fuel injection system. Failure to follow these instructions can result in serious injury.
5.Keep open flame away from battery or cold weather starting aids to prevent fire or explosions.
6.Do not alter or permit anyone else to modify or alter this tractor or any of its components or functions.
7.Ensure all electrical connections are secure and clean.
8.Ensure that no connection in the charging circuit, including battery, is broken while engine is running.
9.Observe correct polarity when refitting the battery or when using a slave battery to start the engine.
10.Do not short the Alternator output leads to check its working.
Operating the PTO (Power Take Off)
1.When operating PTO driven equipment, shut off the engine and wait until the PTO stops before getting off the tractor and disconnecting the equipment.
2.Do not wear loose clothing when operating the power take-off or near rotating equipment.
3.When operating stationary PTO driven equipment, always apply the tractor parking brake and block the rear wheels from front and rear side.
4.To avoid injury, always move down flip part of PTO shield do not clean, adjust or service PTO driven equipment when the tractor engine is running.
5.Make sure the PTO master shield is installed at all times and always replace the PTO shield cap when the PTO is not in use.
Rops
1.Never attach chains or ropes to the ROPS for pulling purposes; this will cause the tractor to tip backwards.
2.Always pull from the tractor drawbar.
3.Be careful when driving through door openings or under low overhead objects. Make sure there is sufficient overhead clearance for the ROPS.
4.If the ROPS is removed or replaced, make certain that the proper hardware is used to replace the ROPS and the recommended torque values are applied to the attaching bolts.
5.Always wear your seat belt if the tractor is equipped with a ROPS.
Transporting Tractor on a Trailer
1.Drive machine forward onto a trailer.
2.Lower any attachments to trailer deck.
3.Lock the parking brake.
4.Stop the engine.
5.Remove the key.
6.Fasten tractor to trailer with heavy-duty straps, chains or cables. Both front and rear straps must be directed down and outward from the tractor. Trailer must have signs and lights as required by law.
7.Cover the silencer outlet with water proof material to avoid entry of foreign material.
Towing
1.Hitch the towed load only to the drawbar. Lock the drawbar and pin in place.
2.Before descending a hill, shift to a gear low enough to control tractor travel speed without having to use the brake pedals to brake the tractor and installed attachments.
3.Try to balance the load primarily on the implement wheels. Avoid overloading the drawbar. Add Jerrycan weights for improved stability. Engage the clutch smoothly, avoid jerking and use brakes cautiously to avoid jackknifing.
4.Use 3 point hitch only with implements designed for its use, not as a drawbar.
1.Pull PTO “ON-OFF” rearward to OFF position.
2.Disengage differential lock.
3.Place Range shift lever in neutral
4.Place Speed shift lever in neutral.
5.Connect L.H & R.H brake pedals together to slow down or brake the tractor.
Diesel Fuel
1.Keep the equipment clean and properly maintained.
2.Under no circumstances should gasoline, alcohol or blended fuels be added to diesel fuel. These combinations can create an increased fire or explosive hazard. Such blends are more explosive than pure gasoline in a closed container, such as a fuel tank. DO NOT USE THESE BLENDS.
3.Never remove the fuel cap or refuel the tractor with the engine running.
4.Do not smoke while refuelling or standing near fuel.
5.Maintain control of the fuel filler pipe when filling fuel.
6.Do not fill the fuel tank to capacity. Allow room for expansion.
7.Wipe up spilled fuel immediately.
8.Always tighten the fuel cap securely.
9.If the original fuel tank cap is lost, replace it with Mahindra approved cap. A non-approved cap may not be safe.
10.Do not drive equipment near open fire.
11.Never use fuel for cleaning purposes.
12.Arrange fuel purchases such that winter grade fuel are not held over and used in the spring.
Note : It is suggested that after repairs if any of the safety decal/sign is peeled/damaged, the same must be replaced immediately in interest of your safety.
DO’S - For Better Performance
DO-Ensure that all safety shields are in place and in good condition.
DO-Read all operating instructions before commencing to operate tractor.
DO -Carry out all maintenance tasks without fail.
DO -Keep the air cleaner clean.
DO -Ensure that the correct grade of lubricating oils are used and that they are replenished and changed at the recommended intervals.
DO -Watch the oil pressure warning light and investigate any abnormality immediately.
DO -Keep the radiator filled with clean anti-freeze mixture. Drain the system only in an emergency and fill before starting the engine.
DO -Ensure that the transmission is in neutral before starting the engine.
DO -Keep all fuel in clean storage and use a filter when filling the tank.
DO -Attend to minor adjustments and repairs as soon as necessity is apparent.
DO -Allow the engine to cool before removing the radiator cap and remove the radiator cap slowly.
DO -Shift into low gear when driving down steep hills.
DO -Latch the brake pedals together when driving on a highway.
DO -Keep draft control lever and position control lever fully down when not in use.
DO -Visit Dealer for adjustment on Injector pressure. Adjust if required.
DO -Keep the auxiliary valve levers in neutral (N) when not in use if auxiliary valve is incorporated.
DONT’S - For Safe Operation
DON’T-Run the engine without the air cleaner.
DON’T-Start the tractor in high idle.
DON’T -Start the tractor in an enclosed building unless the doors and windows are open for proper ventilation.
DON’T -Operate the tractor or engine while lubricating or cleaning.
DON’T -Allow the tractor to run out of diesel fuel otherwise it will be necessary to bleed the system.
DON’T -Tamper with the fuel injection pump. If the seal is broken the warranty becomes void. Tampering with the injection pump may constitute an EPA violation. Significant fines could apply.
DON’T -Allow the engine to run idle for a long period.
DON’T -Run the engine if it is not firing on all cylinders
DON’T -Ride the brake or clutch pedal. This will result in excessive wear of the brake linings, clutch driven member and clutch release bearing.
DON’T -Use the independent brakes for making turns on the highway or at high speeds.
DON’T -Refuel the tractor with the engine running.
DON’T -Use draft control lever for lifting of implements
DON’T -Start the engine with the P.T.O. engaged.
DON’T -Use the hand throttle while driving on roads.
DON’T -Run cold engine at full throttle.
DON’T -Operate the power steering when the oil level is below the minimum level in the reservoir.
DON’T -Run the tractor if the power steering system is damaged. In this condition, contact the Dealer.
DON’T -Park the tractor on a gradient with transmission gear engaged and with no parking brake.
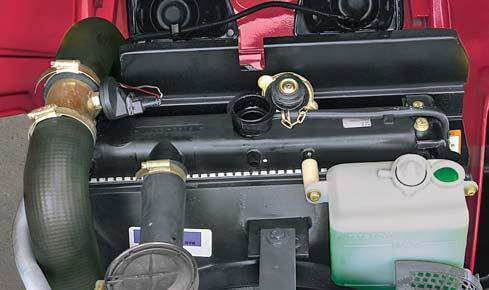
Cooling System
The cooling system consists of :
A.Radiator
B.Recovery Bottle
C.Hoses & Connections
D.Thermostat
E.Belts
F.Water Pump
G.Fan
To ensure an even temperature within the engine, the cylinder head and cylinder walls of the engine are water cooled. This water is in turn cooled in the radiator. The water is circulated from the radiator to the engine and back through the radiator by means of a water pump.
Radiator
The radiator consists of a cluster of hollow tubes enshrined into a number of fins and enclosed at both ends vide a Top Tank and a bottom tank.
Air sucked by Fan passes through the radiator fins thereby cooling the coolant flowing through radiator tubes. The fins should be kept clear of mud or dirt accumulation. Over heating may be caused by bent or clogged radiator fins. If the spaces between the radiator fins become clogged, clean them with compressed air or coolant blown from engine side.
Radiator Cap
A pressurised radiator cap is provided which is set at 13 psi (0.9 kg/cm2) pressure. This cap ensures better cooling and avoids loss of coolant due to evaporation. It also reduces corrosion in engine sleeve & crankcase, hence it is strongly recommended that the engine should not be run without radiator cap. Also ensure that rubber gasket is intact & perfectly sealing the system pressure.
Recovery Bottle
When the engine is in operation, certain amount of coolant passes out of the radiator overflow pipe. This coolant is not allowed to escape into the atmosphere and captured into a recovery bottle.
When the engine is not operating and the coolant cools down, certain amount of coolant comes back into the radiator from surge tank. The surge tank thus helps to prevent loss of coolant.
Thermostat
This device prevents coolant circulating through the radiator until the engine reaches its operating temperature. With the thermostat closed, the coolant circulates only through the engine block.
It is important that if the thermostat is defective, do not attempt to repair it, replace with new. When installing a new thermostat, ensure the valve is facing upward. The thermostat operating temperature is 180 0F (820C).
When straightening bent fins be careful not to damage the tubes or to break the bond between the fins and tubes.
The cooling system operates under pressure. It is dangerous to remove the radiator cap while the system is hot.
Always turn the cap slowly to the first stop, and allow pressure to escape before removing the cap completely.
Do not run the engine when the cooling system is empty, and do not add cold coolant or cold antifreeze solution if the engine is hot.
Coolant Check : Coolant level should be 2" below the radiator neck. Use clean water and rust preventive solution (Antifreeze in cold conditions). A maximum of 50% antifreeze with 50% water is recommended.
Do not run the Engine without Thermostat Valve.
Water Pump
The water pump is provided with a sealed bearing. Adjusting or greasing will not be necessary.

Block Heater
In order to improve cool starting ability of tractor, new radiator outlet hose with heater introduced. It heats engine water in cold ambient temperature and helps to start the engine easily.
Hose Connections
Check periodically to ensure all the connections are in good order and the clips are tight. A leaking connection results in loss of coolant and thus engine efficiency.
When using antifreeze in the cooling system, it is absolutely essential to have efficient connection so check these and should there be any doubt as to their serviceability, renew.

Fan & Fan Belts
A 7 Blade plastic fan is mounted on water pump and is driven vide fan belt by the main drive pulley. While the engine is in operation, the fan sucks air through the radiator core.
Slippage of belt on pulley can cause over heating. The Fan belts shall always be dry and free from oil or Grease. Incorrect belt tension results in its rapid wear.
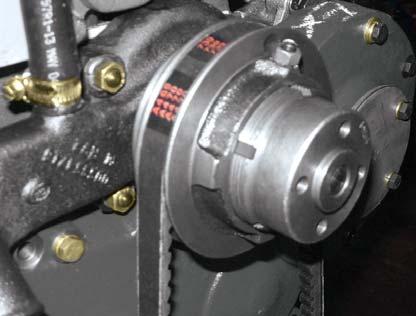
Belt Tension Adjustment
The belt tension is correct when the belt can be depressed without much effort by the thumb, 3/8 to 1/2 inch. midway between the two pulleys.
1.Turn the fan until the setscrew (B) can be reached then loosen the setscrew.
2.Screw the flange (A) towards the fan belt to tighten or away from the fan belt to slacken.
3.When the tension is correct, lock the flange by means of the setscrew, ensuring that the setscrew is in one of the slots in the pulley hub.
Belt Replacement
1.Loosen the setscrew (B) then screw the flange (A) as far as possible from the fan belt.
2.Ease the fan belt off the crankshaft pulley.
3.Work the fan belt over the fan blades, (a slot is provided at the bottom of the fan cowl for this purpose), until the belt is between the fan and the radiator.
4.Remove the fan belt from the top between two blades of the fan.
5.Feed the new fan belt, from the top, between two of the fan blades until it is between the fan and the radiator.
6.Work the fan belt over each fan blade in turn, using the slot provided in the fan cowl, and onto the crankshaft pulley.
7.Adjust the fan belt tension as previously detailed.
Draining the System
Two drain plugs must be opened. One is on L.H. side of crankcase and one on radiator bottom tank. To speed up draining, remove the radiator cap. Ensure that the drains are not clogged. Close the taps after draining is complete.
Cleaning out Dirt and Sludge
Drain cooling system as directed above. Fill the cooling system with solution of water (90%) and ordinary baking soda (10%) by volume.
Do not refit the radiator cap. Operate the engine until the coolant is hot. Drain, flush with clean water and refill with a rust inhibitor or anti-freeze solution.
Adding Coolant to the System
Allow the engine to cool if it is hot.
1.Open the Hood.
2.Remove the radiator cap.
3.Fill the radiator from fill neck (A) with clean coolant upto a level approx. 2" (5cm) below the radiator neck.
4.Start the engine and let it idle to remove air from the system. Coolant level in radiator will reduce.
5.Slowly pour coolant into the radiator till the coolant level in radiator does not go down further.
6.Fill coolant in surge tank from fill neck (B) upto the Max level mark.
7.Refit the radiator cap.
8.Shut down the Engine.
9.Close the Hood.
Ensure that the filler cap is clean and free of dirt particles before replacing.
Cooling System Protection
A common cause of the engine overheating is a rust clogged cooling system. Rust causes overheating by interfering with circulation and cooling. The tractors are filled with a mixture of new low silicate antifreeze (50% - antifreeze - 50% water) with a rust inhibitor in it. Use of approved supplemental corrosion inhibitor along with ethylene glycol will add increased rust prevention, reduce scale formation, minimize cylinder wall erosion and reduce foaming or tendency to foam.
Antifreeze : There are numerous antifreeze products marketed today. Diesel engines are adversely affected by the additives added to protect the aluminum surfaces. Antifreeze suitable for diesel engines conforms to an industry recognised standards which limits silicates to 0.1%. Once silica-gel has formed it is very difficult and costly to remove.
Low silicate antifreeze is available through out the United States. We are listing below some low silicate antifreezes that meet GM 6038 M formulation specification. There may be other suppliers who can make available low silicate antifreezes.
Recommended change period : 1 year or when ever the radiator coolant is drained.
No.CompanyProduct
1.Texaco (1)2354 / 2055 Startex (Was JC-04)
2.BASF WYANDOTTE241-7
3.ShellShellZone-LS
4.InternationalI.H. Antifreeze Harvester
5.Old Water TradingFull Force
6.ConocoFleet Antifreeze
7.NorthernAll Weather Petrochemical(NPC 220)
NOTE
(with 13 psi (0.91kg/cm2) radiator cap)
Recommended change period : 1 year or when ever the radiator water is drained.
Adjusting The Valve Clearance
After the first 1000 hrs. the cylinder head bolts should be re-tightened to a torque as recommended. The bolt in the center should be tightened first and then work outwards. Check the valve clearance as given in specifications. Following this a further check should be made after every 1000 hrs.
1.Remove the valve housing.
2.Turn the engine until the No. 1 cylinder is at the top dead center of the compression stroke.
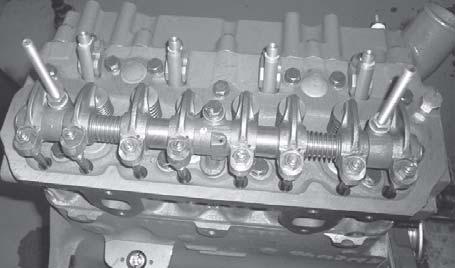
3.Loosen the locknut and adjust the screw in each valve lever so that the feeler gauge slips snugly between the ends of the valve lever and the valve stem.
4.Tighten the locknut and re-check the clearance.
5.Crank the engine for 2/3 revolutions in case of 3 cylinder engine in order to bring the TDC position of subsequent cylinder number as per the respective firing orders. Now adjust the valve clearance as explained earlier.
Repeat the process until clearance for each set of valves is adjusted.
Replace the valve housing and ensure that the valve housing gasket makes an oil tight seal with the cylinder head. Use a new gasket, if necessary.
Be accurate - use a feeler gauge for checking the valve clearance.

Air Cleaner
The important function of the air cleaner is to filter the air entering into combustion chamber so that no dust or chaff etc. enters the engine to cause abrasion and excessive wear. Thus it is most important that the air cleaner should have regular maintenance to continually and efficiently protect the engine from dust and other harmful substances. The air cleaner comprises of the following parts:
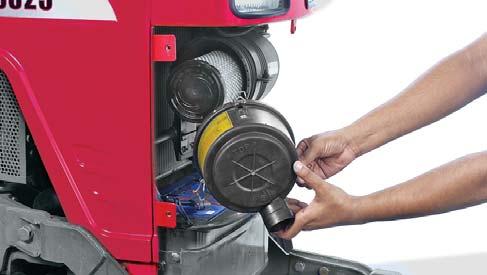
Body Air-Cleaner
This serves as the main frame for housing all parts associated with the air cleaner system.
Cyclopack or built-in Pre-Cleaner
The coarse dust particles are separated by the curved blades of the Cyclopack and get collected in the dust collector.
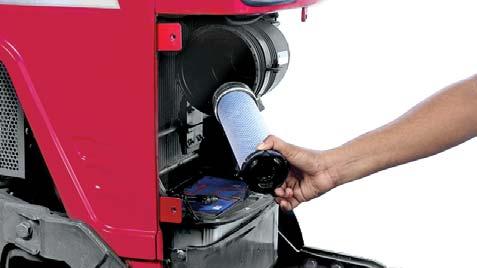
Paper element filter
Paper element filter screens the fine impurities. This has to be cleaned by compressed air during every service or earlier if required. The filter should be replaced after every 2 cleanings or 900 hrs. or earlier if required.
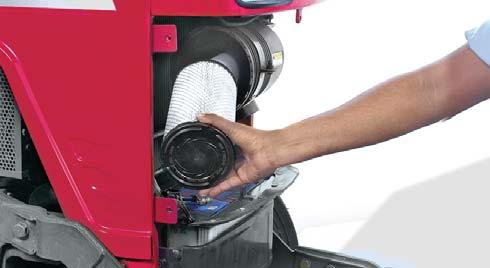
Safety Cartridge
Safety cartridge fits inside the paper element filter. It is a safeguard against uncontrolled dust entry into engine due to paper filter element rupture and also when the paper element is removed for cleaning
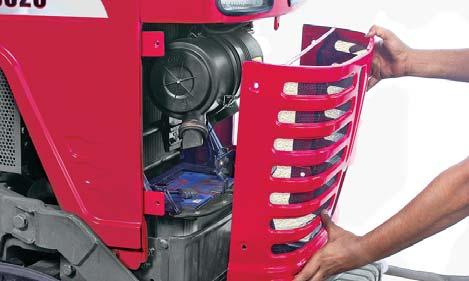
Dust Collector Bowl
It collects the dust and releases it automatically.
The following are the service instructions for the Air Cleaner assembly :
1.Check functioning of auto unloader of the dust collector regularly.
2.Paper element of air cleaner should be cleaned with compressed air every 300 hrs. or earlier if required.

3.Paper element of air cleaner should be replaced after every 2 cleanings or 900 hrs. or even earlier if required.
4.Safety Cartridge should be replaced after every 900 hrs. or earlier if required.
5.Assemble the air cleaner and refit the same on the Tractor ensuring all joints to be leak-proof.

6.After ensuring all fittings to be O.K., start the Tractor. NOTE : During every service of dry type air cleaner, the paper element should be cleaned with compressed air directed from inside to outside. Even after this if the element is found choked, replace it with a new one. Do not use dirty or damaged paper element as the impure air may severely reduce the engine performance/ life.
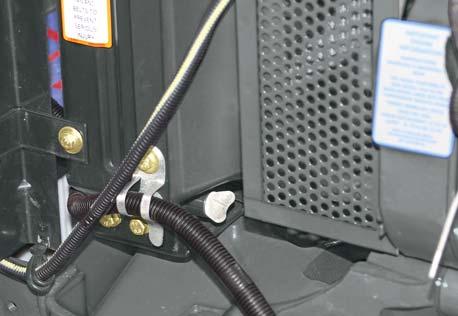
Hose and Clamps
Check Hose clamps for proper tightness.