4 minute read
DIAGNOSTIC CODE 3-5 (ADVANCED)


Test 37
Checking for wrong target, bad data file or V-MAC II module
1.Use the diagnostic tool (Pro-Link or PC) to display the engine model, data file part number and static timing.
2.Verify the following information: a.The engine model listed on the emissions plate agrees with the engine model displayed in V-MAC II. b.Initial (static) timing on the emissions plate agrees with the value displayed in V-MAC II. c.ECONOVANCE is approximately 5 inches long.
If the information matches but the timing is still too advanced, replace the V-MAC II module. Retest to be sure the problem has been corrected.
If the information does not match, V-MAC II is trying to use a data file which may not match the engine hardware’s capabilities (static timing and timing range). Change the hardware to match the hardware requirements of the data file and attach the proper emissions plate, or download the correct data file for this engine. Retest to be sure the problem has been corrected.
Test 42
Checking for a blocked oil drain holes and filters
1.Check the ECONOVANCE drain hole for blockage. Clean if needed.
2.Check the ECONOVANCE oil supply hole for blockage. Clean if needed.
3.Remove the secondary filter in the timing control valve body if equipped. Check the passage in the valve body for blockage. Clean the secondary filter if needed. Reinstall the secondary filter.
4.Clean the valve oil supply filter. Correctly install a new gasket. Reinstall the timing control valve. Retest to be sure the problem has been corrected. If the timing is still too advanced, replace the timing control valve and gasket.
If this test is being conducted at high idle, retest with the new timing valve.
If after retesting, the timing is still too advanced after the timing valve has been replaced, the ECONOVANCE seals should be replaced. The original timing control valve was not defective and should be reinstalled. Refer to the E7 Engine Service Manual for instructions on how to replace the ECONOVANCE seals.
DIAGNOSTIC CODE 3-5 (ADVANCED)
Test 47
Checking for a potential V-MAC II module problem
1.Replace the V-MAC II module with a new module, or with a module from another truck. DO NOT REPROGRAM THE MODULE AT THIS TIME.
2.With the timing valve still disconnected, run the engine at 800 rpm for at least 30 seconds and record the timing using the diagnostic tool (Pro-Link or PC).
If the timing on the diagnostic tool is the same as the static timing (within 1 degree), the original V-MAC II module was defective. Program a new V-MAC II module. Retest to be sure the problem has been corrected.
If the timing is not the same as the static timing, reinstall the original V-MAC II module. A potential flywheel problem exists. Call Service Engineering.
Test 72
Checking for improperly installed timing control valve gasket
1.Turn the ignition key to the OFF position.
2.Remove the timing control valve assembly from the ECONOVANCE.
3.Inspect the gasket for proper installation. If the gasket is installed properly, proceed to Test 144.
If the gasket is not installed properly, clean the valve oil supply filter. Correctly install a new gasket. Reinstall the timing control valve. Retest to be sure the problem has been corrected.
Test 144
Checking for blocked oil supply holes and filters
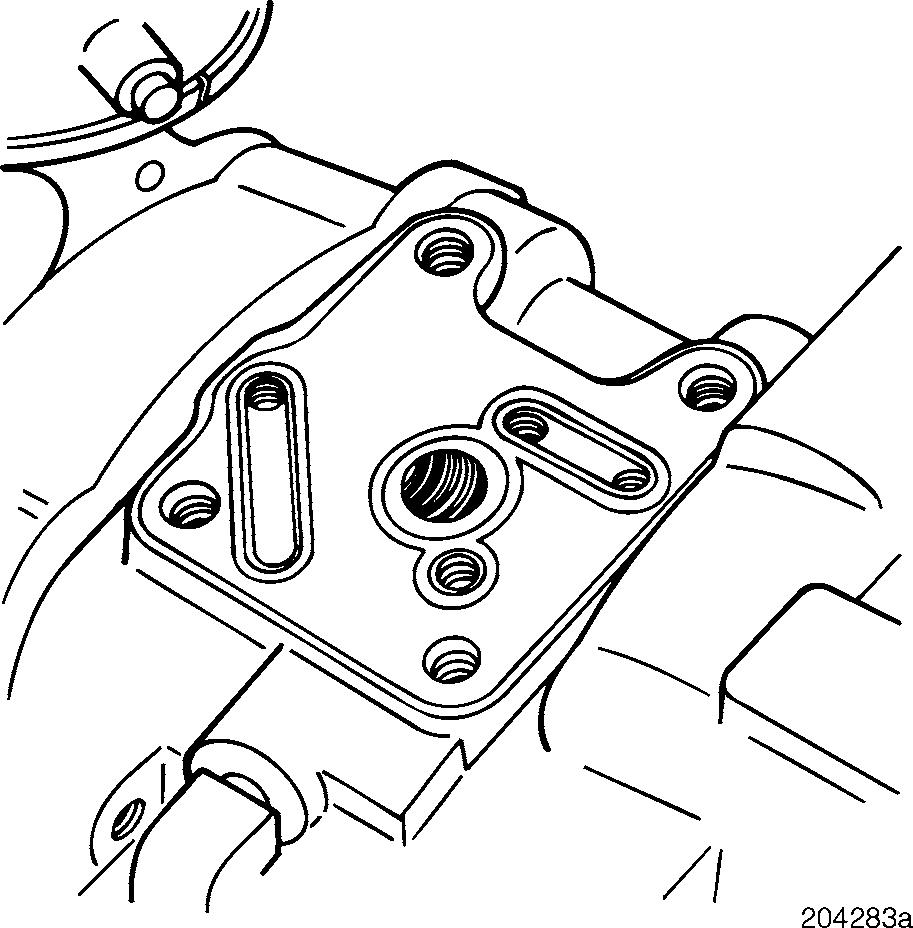
Figure 157 — Timing Control Valve Drain Holes and Filters
1.Check the ECONOVANCE oil supply hole for blockage. Clean if needed.
2.Clean the valve oil supply filter. Check that the supply passage way is clear.
3.Remove the secondary filter in the timing control valve body if equipped. Check the passage in the valve body for blockage. Clean the secondary filter if needed. Reinstall the secondary filter.
4.Correctly install a new gasket. Reinstall the timing control valve. Retest to be sure the problem has been corrected.
If the timing is still retarded and the pressure is much lower than the gallery pressure, replace the timing control valve and gasket. Retest to be sure the problem has been corrected.
DIAGNOSTIC CODE 4-1, 4-2 OR 4-3
DIAGNOSTIC
CODE 4-1, 4-2 OR 4-3
When performing electrical tests, it is important to wiggle wires and connectors to identify intermittent connection problems.
DIAGNOSTIC CODE 4-1, 4-2 OR 4-3
Test 1
Checking for an open, shorted or inactive sensor
1.Make certain that the ignition key is in the ON position.
2.Determine which fault the V-MAC II module has logged with regard to the MPH sensor. If the V-MAC II module logged a short (code 4-1), proceed to Test 2.
If the V-MAC II module logged an open (code 4-2), proceed to Test 3.
If the V-MAC II module logged an inactive condition (code 4-3), make sure the sensor is adjusted to the proper setting. For proper adjustment, turn the sensor in by hand until it bottoms. Then back it out exactly 1 turn. Torque the jam nut to 15 lb-ft (20 N•m). If the sensor is adjusted properly and the fault is still active, move the vehicle a short distance. If the fault is still active, replace the sensor and move the vehicle again. Retest to be sure the problem has been corrected.
Test 2
Checking for a short to ground
1.Disconnect the MPH sensor at the sensor connector.
If the V-MAC II module now registers an open (code 4-2), proceed to Test 4.
If code 4-2 is not active, proceed to Test 5.
Test 3
Checking for an open in the sensor
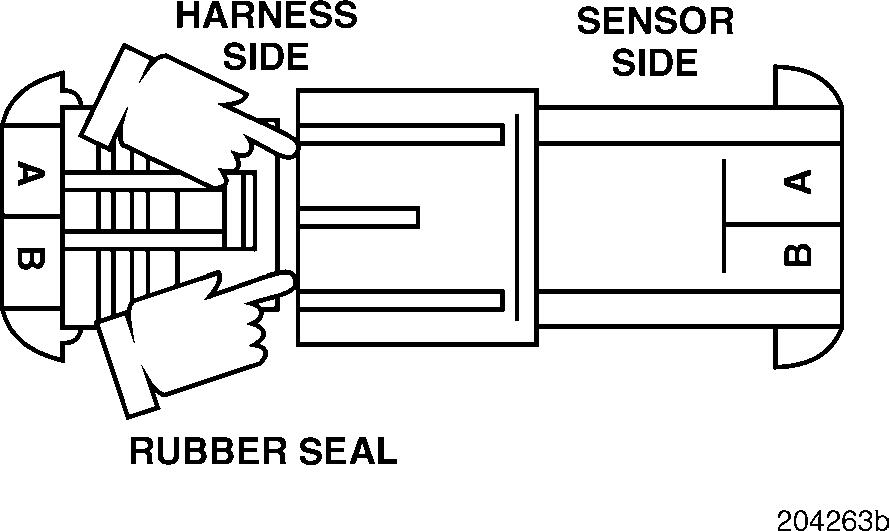
Figure 159 — Resistance between Pins A and B
1.Turn the ignition key to the OFF position and disconnect the MPH sensor from the harness.
2.Measure the resistance between harness connector pins A (the signal [+] line) and B (the ground [ ] line).
If the resistance is between 200 and 300 ohms, proceed to Test 6.
If the resistance is not between 200 and 300 ohms, repair the connector or replace the MPH sensor. Retest to be sure the problem has been corrected.