3 minute read
DIAGNOSTIC CODE 3-5 (BASIC)


Checking timing control
1.Connect a diagnostic tool (Pro-Link 9000 or PC) and select the monitoring mode to display engine timing status.
2.Run the engine at low idle for at least 30 seconds and record the timing status.
3.Run the engine at high idle and record the timing status.
If the timing status at both low and high idle is correct (the diagnostic tool will indicate that timing is OK), the timing is working properly under these conditions. If the complaint indicates that the timing fault was active recently, it may be necessary to recreate the situation in which the timing fault occurred for this diagnostic procedure to be effective.
If the timing status is too advanced (the diagnostic tool will display “++”) or too retarded (the tool will display “--”), proceed to Test 2.
Test 2
Checking for oil pressure from the deenergized timing control valve to the ECONOVANCE
1.Turn the ignition key to the OFF position.
2.Disconnect the timing control valve at the wiring harness.
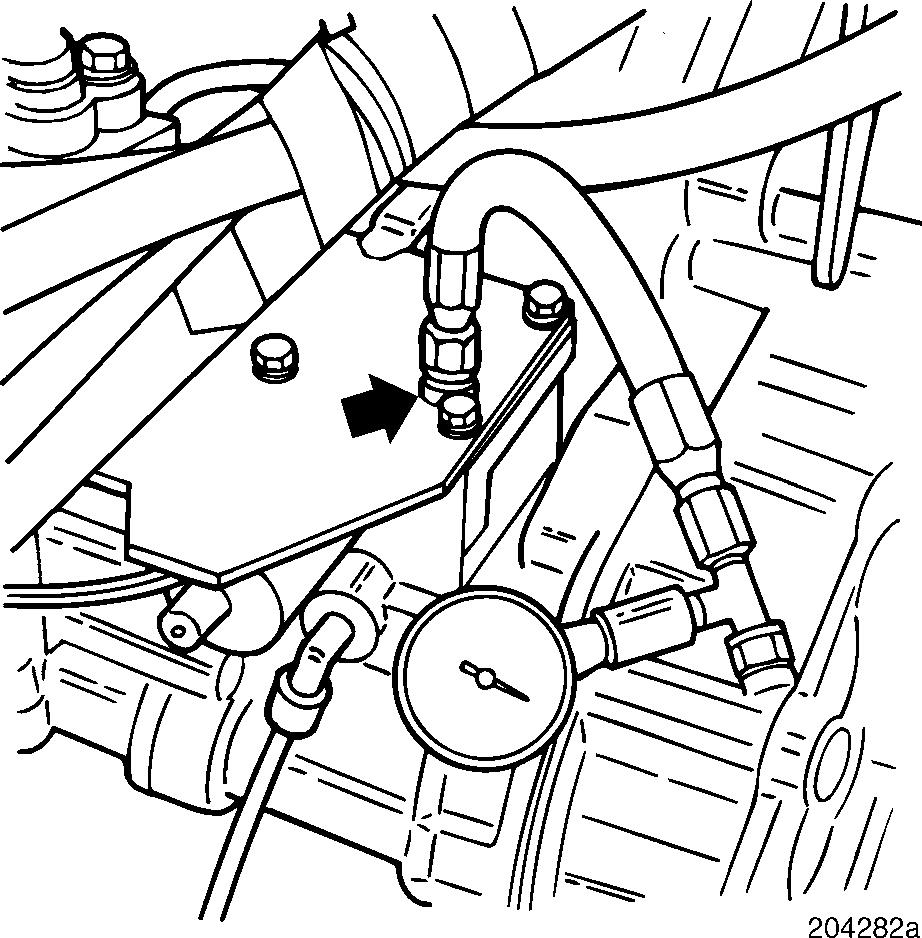
3.Remove the cap from the diagnostic port located on top of the timing control valve.
4.Connect a pressure gauge to the diagnostic port.
5.Start the engine and record the low idle oil pressure displayed on the gauge.
If the oil pressure on the gauge is 0, proceed to Test 4.
If the pressure on the gauge is not 0, proceed to Test 5.
Test 4
DIAGNOSTIC CODE 3-5 (BASIC)
Checking dynamic full retard timing
1.Connect a diagnostic tool (Pro-Link 9000 or PC). Select the monitoring mode to display engine timing.
2.Run the engine at 800 RPM for at least 30 seconds and record the timing.
If the timing on the diagnostic tool is the same as the static timing on the emissions plate (within 1 degree), proceed to Test 8.
If the timing is different from the static timing, check the RPM/TDC and TEM sensors for good connections and proper adjustment.
If, after checking the sensors, the timing on the diagnostic tool is more advanced than the static timing by more than 2 degrees, proceed to Test 9.
If, after checking the sensors, the timing on the diagnostic tool is more retarded than the static timing by more than 2 degrees, proceed to Test 9.
Test 5
Checking the timing valve retainer plate
1.Visually inspect the timing control valve for signs of oil leakage between the round valve body and the housing or from the wiring. If there is a leak, replace the entire control valve assembly.
2.If there is no oil leak, grasp the round valve body and attempt to turn it, applying light force.
If the valve body can be turned with light force, clean the front portion of the control valve and retainer plate and remove the plate. Examine the contact area of the plate and valve for signs of wear (DO NOT REMOVE THE VALVE FROM THE ASSEMBLY). If the valve is worn around the entire circumference, replace the complete timing control valve assembly. If only a portion of the valve circumference is worn, rotate the valve body so that the worn portion will not be touching a new retention plate. Install a new retention plate, using Loctite® 242 on the plate bolts.
If there is no oil leakage and the valve body cannot be turned with light force, proceed to Test 10.
Test 8
Checking for supply oil from the cylinder block to the ECONOVANCE
1.Turn the ignition key to the OFF position.
2.Remove the oil supply line running from the cylinder block to the ECONOVANCE housing oil fitting.
3.Install a tee fitting at the ECONOVANCE housing.
4.Attach a pressure gauge to one side of the tee.
5.Attach an Aeroquip line from the other side of the tee to the ECONOVANCE oil supply fitting.
6.Start the engine and check the low idle oil pressure displayed on the gauge.
If the oil pressure is greater than 5 psi, proceed to the Electrical Diagnostic Test Section.
If the oil pressure is 5 psi or less, STOP THE ENGINE IMMEDIATELY! Refer to the appropriate Engine Service Manual.
Test 9
Static timing check
1.Turn the ignition key to the OFF position.
2.Check the engine static timing.
If the static timing agrees within +/ 0.5 degrees with the number stamped on the engine’s emissions plate, proceed to Test 18.
If the static timing does not agree within +/ 0.5 degrees, proceed to Test 19.