8 minute read
3.HR (usage log) Screen List


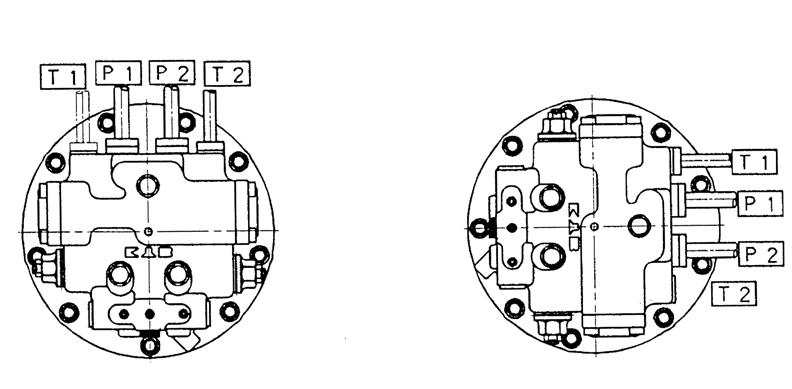
3. Piping configuration 1) Main pipe
Set up the main pipe of the motor in the horizontal position or in the upright position. (See Figure 28). If the pipe is set up below the horizontal position and left stopped for a long period of time, the hydraulic oil may leaks from and air may accumulate in the motor circuit, causing aeration or cavitation resulting in a malfunction such as runaway phenomena on starting the motor.
2) Drain pipe
The piston motor case must always be filled with hydraulic oil. Therefore, If there are two oil drain ports, use the upper one for drain piping (See Figure 28). If there is only one oil drain port, use it for piping.
1.Parking brake cannot be released due to the pressure in the motor case. In this case, brake dragging will occur, causing fatal damage to the parking brake functions. 2.The pressure rise in the motor case will cause damage to the oil seals and fatal damage to the piston motor section.
Important
Be sure to perform drain piping. Failing to do so may cause the following problems due to rising pressure in the motor case:
Perform drain piping using either T1 or T2. Perform drain piping using the upper port (T1 or T2).
Top
Bottom
Figure 28. Piping to the motor
Bottom
3) Piping work
The piston motor is sensitive to foreign matter in the hydraulic oil. Therefore, acid wash inside the pipes to thoroughly eliminate the foreign matter such as scales in the pipes before starting piping work. Be careful not to let any foreign matter, such as dust and sand, enter into the piston motor from pipe port section during piping work. Make sure to tighten each pipe with a torque specified in Table 16. If there are specifications defined by the manufacturer of the machine main unit, follow them.
Table 16. Tightening Torques for Pipe Ports
After piping work, flush inside the pipe line.
Pipe Port Name Port Size Specified Tightening Torque Port P1 and P2 PF3/4 372±20 N•m
Port T1 and T2 PF1/2 92.2±3.9 N•m
Port Ps PF1/4 22.6±1.0 N•m
12.Operation Check
After installing the new motor or the motor that had a maintenance check to the machine main unit and completing the piping work, perform an operation check using the following procedure before production run.
[1]Preparation for operation check
1. Feeding hydraulic oil into the piston motor case
Before performing an operation check, feed about 500 cc of hydraulic oil from the oil drain port of the piston motor into the piston motor case to prevent initial failure that could occur at the sliding sections of the piston motor. If a hand pump or a low capacity electric pump is used for feeding, then the pressure in the piston motor case should be 0.3 MPa or lower.
2. Checking the reduction gear lubricating oil
Use the feed, drain, and oil check port shown in Figure 23 to make sure that the specified amount of lubricating oil is in the reduction gear case.
How to check the amount of the lubricating oil in the reduction gear of the new motor
Remove the plug form the oil check port for lubricating oil and check to see whether the lubricating oil flows off. If the oil flows off, put the plug on the port and tighten to the specified torque. If the oil does not flow off, open the oil fill port and feed reduction gear lubricating oil until the oil flows from the oil check port. After oil feeding, put the plugs on the feed and oil check port and tighten to the specified torque.
Caution
As the lubricating oil, a given amount (3.5 L) of diamond hypoid gear oil 90 from Mitsubishi Oil has been fed by the factory setting.
Reduction gear lubricating oil Oil fill port
Lubricating oil level Reduction gear lubricating oil Oil check port
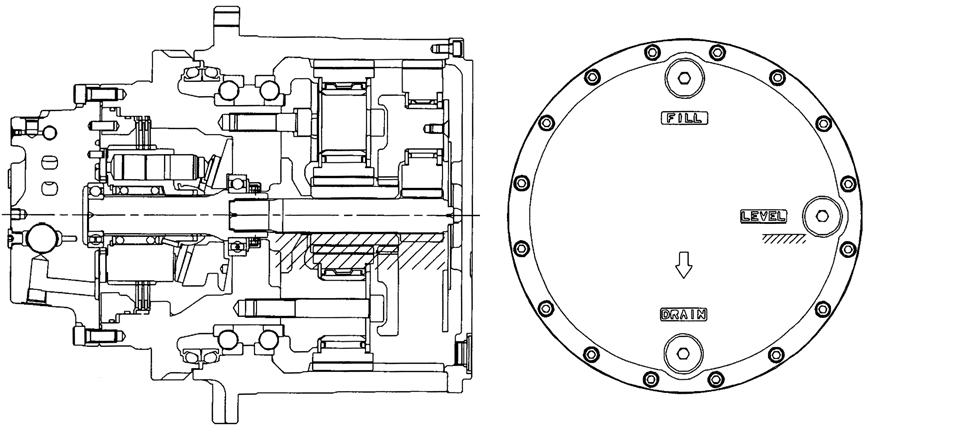
Reduction gear lubricating oil Oil drain port
Figure 29. Feed, drain, and check ports for the reduction gear lubricating oil and specified oil amount
[2]Operation check for the motor
Following the instructions in the operator’s manual for the machine main unit, slowly operate the machine and bleed off air from the motor circuit and the pipes.Start with a low speed rotation and repeat the operation of "C direction rotation, stop, A direction rotation, and stop" several times to check the operation. At this point of time, abnormal noise may come from valves or other parts due to the air left in the circuits but while repeating the operation at low speed, the air will be bled out and the noise will be stopped. If the abnormal noise stops and does not start again after repeating operations, then there is no problem and the motor can be used. If the abnormal noise does not stop after repeating operations, replace the motor because there may be a problem with it.
Check for any oil leaking from the motor, the pipe port sections, the pipe parts, and the equipment. If there is any oil leaking, tighten the bolts and pipe connections from which oil is leaking to the specified torque again.
After completing this check, rise the pressure for under-load operation and confirm that there is no abnormal noise or vibration coming from the motor.
• If there is oil leaking and pipes or other parts need to be tightened, make sure to stop the operation of the hydraulic equipment before starting the work. • Oil leaking should be checked for while the motor is under low pressure. If the pressure on the motor is high and there is oil leaking, oil blowing out will occur, resulting in a dangerous situation.
Important
13.Production Run
[1]Starting the motor
Start the motor by following the instructions for the machine main unit. [2]Managing temperature of the hydraulic oil during a production run
During a production run, pay attention to the temperature of the hydraulic oil. When the temperature of the hydraulic oil becomes too high, deterioration of the oil will be accelerated and a malfunction or breakdown of the hydraulic equipment will be caused. Therefore, during continuous operation, keep the temperature of the hydraulic oils between -10 and +80°C. However, if the cumulative running time with above 80°C is within 100 hours, the motor can operate at up to 95°C.
Important
When cumulative running time at over 80°C has reached 100 hours, be sure to replace the motor seal.
[3]Managing lubricating oil temperature during a production run
During a production run, the temperature of the lubricating oil will rise due to gear meshing, oil agitation, and parts sliding in the reduction gear. Running with high-temperature lubricating oil for a long period of time will cause earlier deterioration of the oil, shorter gear and bearing lives, and deterioration of the seal. Therefore, during continuous operation, keep the temperature on the surface of the reduction gear between -10 and +80°C (lubricating oil temperature: between -10 and +90°C).However, if the cumulative running time with a lubricating oil temperature of above 90°C is within 100 hours, the reduction gear can operate at up to 100°C.
Important
When cumulative running time at over 90°C has reached 100 hours, be sure to replace the reduction gear seal.
14.Maintenance and Inspection
Perform maintenance and inspection of the motor regarding the following items, as long as the motor has no problem in operation.
[1]Pre-operation Inspection
Perform a pre-operation inspection before starting the motor by using the information in Figure 30 and Table 17.
Table 17. Items and Tasks of a Pre-operation Inspection and Solutions
Inspection Item Inspection Task Solution
Oil leak from pipe parts
Oil leak from alignment surface Clean the pipe port section and check for oil leak from the section.
1.Piston motor
Clean the alignment surfaces of the piston motor (see Figure 24) and check for oil leak. If there is oil leaking, check to see whether the pipe ports have been tightened. If they have not been sufficiently tightened, tighten the pipe ports to the specified torque. In addition, check the oil amount in the hydraulic oil tank by following the instructions for the machine main unit. If the pipe ports are tightened enough, replace the pipe connections by following the instructions for the machine main unit. If there is oil leaking, check to see whether the bolts on the alignment surfaces are tightened. If the tightening is not enough, tighten bolts to the specified torque. In addition, check the amount of oil in the hydraulic oil tank by following the instructions for the machine main unit.
Leak of reduction gear lubricating oil 2.Reduction gear
Clean the alignment surfaces of the reduction gear (see
Figure 24) and check for oil leak. Clean the reduction gear floating seal section and check for oil leak. If the bolts are tightened enough, disassemble the motor and replace the seal by following the maintenance procedures. If there is oil leaking from the cover, remove the cover and apply liquid packing again by following the maintenance procedures. If there is oil leaking from the other parts, check the tightening for the parts. If the tightening is not enough, tighten them to the specified torque. If they are tightened enough, replace the seal. Check the amount of the lubricating oil in the reduction gear. If there is oil leak from the floating seal section, disassemble the reduction gear and replace the floating seal by following the maintenance procedures.
Plug looseness Oil leak check Bolt looseness check
Oil leak check
Oil leak check
Oil leak check
Oil leak check Bolt looseness check Pipe looseness Oil leak check
Bolt looseness check Plug looseness Oil leak check
Pipe looseness Oil leak check Plug looseness Oil leak check
Pipe looseness Oil leak check
Oil leak check Bolt looseness check
Plug looseness Oil leak check Plug looseness Oil leak check