Installation
HYDRAULIC TANK (See FIGURE 1.)
1. Fasten a chain or cable around the middle of the fender. Make sure the chain or cable is in the slot on the side of the fender. 2. Raise the fender to the lift truck. Align the dowels of the fender with the hole in the frame.
The hydraulic tank on the H16.00–32.00C (H360–650C, H370–700C) lift trucks is installed on the left–hand side running board. The hydraulic tank on the H36.00–44.00B (H700–920B) lift trucks is installed between the legs of the tilt cylinder mounts.
3. Install the bolts, washers and nuts that hold the fender to the frame. Tighten the nuts to 814 N.m (600 lbf ft).
Removal, H16.00–32.00C (H360–650C, H370–700C)
HOOD AND BALLAST COVER
1. Pull the handles and close the two shut–off valves at the hydraulic tank. Put plugs in the open holes. If necessary remove the drain plug at the bottom of the tank to drain the oil.
The hood and ballast cover can be removed from the frame. To remove the hood, remove the four nuts that hold each hinge bracket to the frame. Lift the hood from the frame. Align the hood as necessary during installation. To remove the ballast cover, remove the four capscrews that hold it to the frame. Lift the cover away from the frame.
2. Disconnect the lines for the pumps and the return lines. Put caps on the open lines. Put tags on the lines for identification. 3. Remove the capscrews that hold the top of the tank to the frame. Lift the tank from the frame. H16.00–32.00C (H360–650C, H370–700C)
H36.00–44.00B (H700–920B) 8670
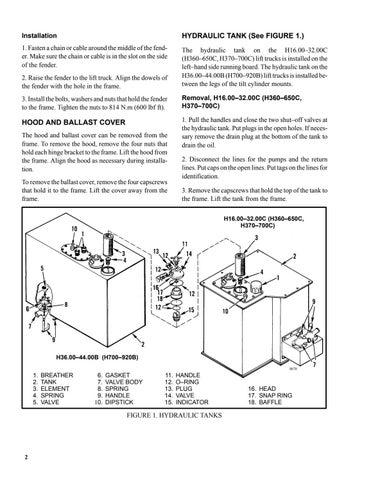
1. 2. 3. 4. 5.
BREATHER TANK ELEMENT SPRING VALVE
6. 7. 8. 9. 10.
GASKET VALVE BODY SPRING HANDLE DIPSTICK
11. 12. 13. 14. 15.
HANDLE O–RING PLUG VALVE INDICATOR
FIGURE 1. HYDRAULIC TANKS
2
16. HEAD 17. SNAP RING 18. BAFFLE
