OPERATION The operator is responsible for the safe operation of this equipment. Operators must be instructed in and be capable of the safe operation of the equipment, its attachments and all controls. Do not allow anyone to operate this equipment without proper instructions. This equipment is designed for a wide range of applications. The blade may be used for scraping, leveling, grading and backfilling. The rake may be used for loosening, leveling and clearing soil of debris. The blade or rake may be angled to windrow debris to the side for removal. DP5
Always wear relatively tight and belted clothing to avoid getting caught in moving parts. Wear sturdy, rough-soled work shoes and protective equipment for eyes, hair, hands, hearing, and head; and respirator or filter mask where appropriate.
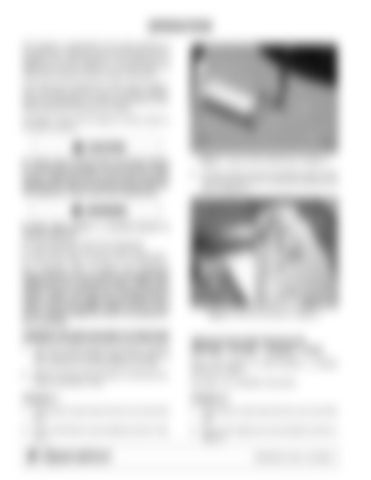
Figure 1. Lower Lift Arm Attachment, Category 1 3.
Connect tractor top link by inserting tractor clevis pin into top hitch point on RB frame assembly and secure (Figure 2).
Never allow children or untrained persons to operate equipment. Keep bystanders away from equipment. Never allow riders on power unit or attachment. A minimum 20% of tractor and equipment weight must be on the tractor front wheels when attachments are in transport position. Without this weight, tractor could tip over, causing personal injury or death. The weight may be attained with a loader, front wheel weights, ballast in tires or front tractor weights. Weigh the tractor and equipment. Do not estimate.
CONNECT BLADE OR RAKE TO TRACTOR 1. This rake or blade should be mounted on tractors with a maximum drawbar rating of 25 engine hp (18.7 kW) and not to exceed 2000 lbs (910 kg). 2. Adjust or remove tractor drawbar to eliminate interference with blade or rake.
DP7
Figure 2. Top Link Connection, Category 1
Optional Quick Hitch Bushing Kit (RB1060L, LR1060L - Category 1 Only) Quick hitch bushing kit (5WP1004653) is available through your dealer. See page 14 for installation instructions.
Category 1
Category 0
1. Place tractor 3-point lower lift arms over outer hitch pins.
1.
Place tractor 3-point lower lift arms over inner hitch pins.
2. Secure with Klik pin (not provided) as shown in Figure 1.
2.
Secure with safety pins (not provided) as shown in Figure 3.
8 Operation
5WPMAN0170 (Rev. 5/16/2008)


