TAILWHEEL ADJUSTMENT LR1060L (OPTIONAL)
5.
Install Klik pin and washer.
6.
To lower tailwheels, reverse the procedure. NOTE: Use a good multi-purpose grease on pivot tube and tailwheel every 8 hours of operation.
17
CLEANING 9
After Each Use
8
●
Remove large debris such as clumps of dirt, grass, crop residue, etc. from machine.
●
Inspect machine and replace worn or damaged parts.
●
Replace any safety decals that are missing or not readable.
CD6157-3
Periodically or Before Extended Storage 10
7
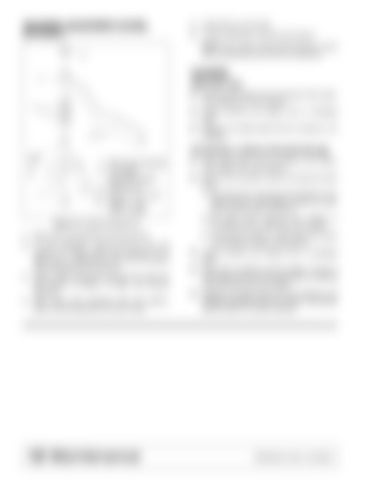
7. Wheel yoke assembly 8. 1/2" Height adjustment spacer 9. Tailwheel arm 10. Klik pin, 1/4 x 1-3/4" 17. Washer, 1.06 x 1.56" x 10 GA
●
Clean large debris such as clumps of dirt, grass, crop residue, etc. from machine.
●
Remove the remainder using a low-pressure water spray. 1. Be careful when spraying near scratched or torn safety decals or near edges of decals as water spray can peel decal off surface. 2. Be careful when spraying near chipped or scratched paint as water spray can lift paint.
Figure 10. Tailwheel Adjustment
3. If a pressure washer is used, follow the advice of the pressure washer manufacturer.
1. Raise rake until tailwheels clear the ground. 2. To raise tailwheels, remove Klik pin (10) and washer (17). Allow wheel yoke assembly (7) to slide down in tailwheel arm (9). Do not remove shaft completely from wheel arm. 3. Rotate height adjustment spacer(s) (8), align slot with groove at bottom of shaft, and remove spacer(s). 4. Slide wheel yoke assembly back into position; place removed spacer(s) over top of shaft.
12 Maintenance
●
Inspect machine and replace worn or damaged parts.
●
Sand down scratches and the edges of areas of missing paint and coat with spray paint of matching color (purchase from your dealer).
●
Replace any safety decals that are missing or not readable (supplied free by your dealer). See Safety Decals section for location drawing.
5WPMAN0170 (Rev. 5/16/2008)


