5 minute read
3.6 Lubrication and maintenance operations


3.6.5 Cleaning the hopper, outlets and conveyor
Before applying the anti-adherent solution remove gross dirt from the conveyor, material outlets and the hopper of the machine.
Clean the driver’s stand always on the machine which is parked on a flat and solid surface, with the machine engine and battery disconnecter off.
Cleaning procedure:
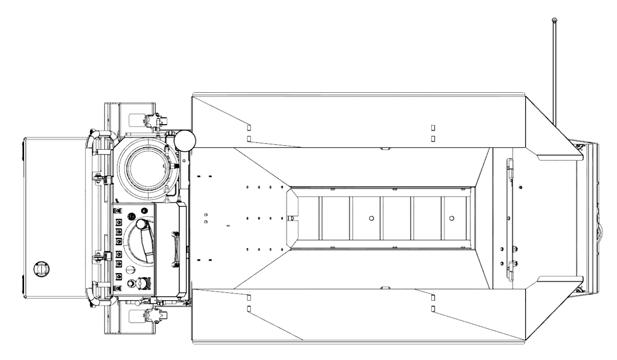
• Make sure the material hopper (1) is empty.
• Apply the anti-adherent solution on the material hopper (1), material outlets (2) and conveyor (3).
• Use a scraper to remove material residues from the material hopper walls (1).
• Use a scraper to remove material residues from the material outlets (2).
• Use a scraper to remove material residues from the conveyor (3).
• Start the engine.
• Activate the function of conveyor start by shifting the operating mode controller (17) to the lower position and the controller (18) on the main dashboard to remove dirt from the hopper area.
• After removing dirt from the hopper area disable the switch (18) and the operating mode switch (17) functions.
• Turn off the engine and disconnect the battery disconnecter.
• Apply the anti-adherent solution on the material hopper (1), material outlets (2) and conveyor (3).
Caution! There is a risk of injury during cleaning. Remove dirt from the hopper area using a scraper only with the engine and battery disconnecter off.
Use the prescribed protective equipment during cleaning.
Use the prescribed anti-adherent solution according to Chapter 3.2.4.
It is prohibited to use diesel oil instead of an anti-adherent solution.
3.6.6 Auger cleaning
Before applying the anti-adherent solution remove gross dirt from the augers.
Always clean the machine when it is parked on a flat and solid surface, the machine engine and the battery disconnector are off and the gas bottle is closed.
Cleaning procedure:
• Make sure the screed heating system is turned off.
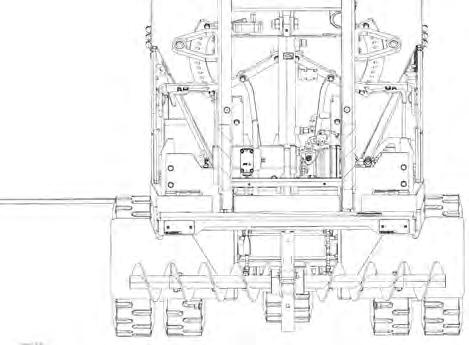
• Apply the anti-adherent solution on augers (1).
• Use a scraper to remove material residues from the augers (1) on both sides of the machine.
• Turn on the battery disconnector.
• Start the engine.
• Activate the function of auger start by shifting the operating mode switch (17) to the lower position and the switch (18) on the main dashboard to remove the dirt from the augers.
• After removing dirt from the augers disable the switch (18) and the operating mode switch (17) functions.
• Turn off the engine and disconnect the battery disconnecter.
• Apply the anti-adherent solution on augers (1).
Caution! There is a risk of injury during cleaning.
Caution! There is a risk of burns.
Remove dirt from the augers using a scraper only with the engine and battery disconnecter off.
Use the prescribed protective equipment during cleaning.
Always clean the machine when it is parked on a flat and solid surface, the machine engine and the battery disconnector are off and the gas bottle is closed.
Use the prescribed anti-adherent solution according to Chapter 3.2.4.
It is prohibited to use diesel oil instead of an anti-adherent solution.
3.6 Lubrication and maintenance operations
3.6.7 Test of burner ignition, flame position adjustment and spark plug maintenance
When testing the burner ignition, check the behaviour of the burners and the position of the gas flame.
The behaviour of the burners when ignited is correct if the burners ignite within a few seconds.
Unless the burners ignite within a few seconds, the ignition box stops further attempts for igniting the burners and interrupts gas supply.
Burner ignition test procedure:
• Open the access to the burners.
• Insert the key into the ignition box (11) in the position “0” and switch over to the position “I”.
• Set the key between position “I” and “II” and the engine glowing indicator lamp (24) will light up.
• Do not perform engine glowing for more than 15 s.
• Use the alarm horn (12) to signal that the engine is starting.
• Start the engine by turning the key to position “II”.
• Secure the screed against free fall.
• Set the maximum paving width on both sides of the machine.
• Turn the key in the ignition box (11) from position “II” to position “I”. The engine switches off.
• Switch on the gas screed heating system by moving the switch (13) to the upper position.
• Check that all burners are burning.
• Unless the burners start within a few seconds, switch off the gas screed heating system and perform a test of spark plugs, or have spark plug maintenance performed. Have the test and maintenance of spark plugs performed by an authorised service plant or qualified personnel according to the procedure given below.
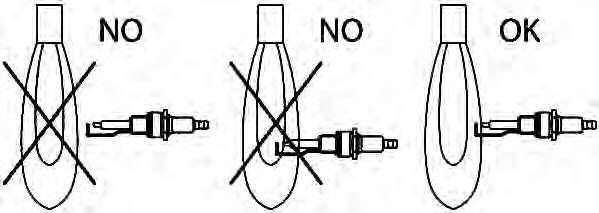
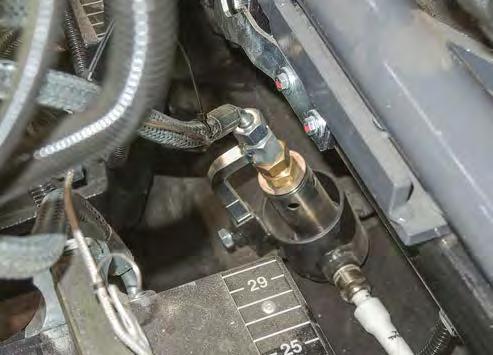
• Visually check the gas flame position on all burners (1). Perform the visual check through the burner pipe (2) and check their position with regard to the spark plug (3).
• If the gas flame is incorrect, have the flame position adjusted. Have the flame position adjusted by an authorised service or qualified personnel according to the procedure given below.
• Switch off the gas screed heating system by moving the switch (13) to the lower position.
• Close the access to the burners.
• Set the key between position “I” and “II” and the engine glowing indicator lamp (24) will light up.
• Do not perform engine glowing for more than 15 s.
• Use the alarm horn (12) to signal that the engine is starting.
• Start the engine by turning the key to position “II”.
• Set the minimum paving width on both sides of the machine.
• Unlock the screed and lower it to the ground.
• Turn the key to the position “0” and remove the key from the ignition box (11).
There is a risk of explosion. Do not smoke during machine operation. There is a risk of explosion or fire. Liquid gas can easily ignite. The machine must be equipped with a fire extinguisher. Have the fire extinguisher ready on the driver's stand at a place intended for this purpose.
Pay extra attention to potential gas leaks and in doubts, shut off the gas supply.
Check the tightness of the gas equipment, e.g. with a gas leak detector.
If you detect gas leakage, immediately shut off the gas bottle shut-off valve and have the gas equipment repaired by an authorised service plant or qualified personnel.
Follow safety regulations for handling gas bottles. There is a risk of burns. Use protective equipment. Have the test and maintenance of spark plugs performed by an authorised service plant or qualified personnel according to the procedure given below.
Spark plug function test:
• Insert the key into the ignition box (11) in the position “0” and switch over to the position “I”.
• Set the key between position “I” and “II” and the engine glowing indicator lamp (24) will light up.
• Do not perform engine glowing for more than 15 s.
• Use the alarm horn (12) to signal that the engine is starting.
• Turn the key to position “II” to start the engine.
• Secure the screed against free fall.
• Set the maximum paving width on both sides of the machine.
• Turn the key in the ignition box (11) from position “II” to position “I”. The engine switches off. Close the gas bottle shut-off valve.
• Switch on the gas screed heating system by moving the switch (13) to the upper position.
• Test the spark plugs for sparking and correct sending of the signal pulse.
• Switch off the gas screed heating system by moving the switch (13) to the lower position.
• Turn the key to the “0” position.
• Disconnect the battery disconnecter.