2 minute read
3.6 Lubrication and maintenance operations


3.6.22 Hydraulic circuit tightness check
Check the hydraulic circuit for leakage when the machine is parked on a flat and solid surface, the engine and the battery disconnector are off and the gas bottle is closed.
Hydraulic circuit tightness check procedure:
• Start the engine and let the machine run at idle speed for approx. 3 – 5 minutes.
• Turn off the engine.
• Open the right material hopper side cover (1).
• Open the engine bonnet (2).
• Check all parts of the hydraulic circuit in the engine compartment, in the hydraulic tank compartment, in the rear wheel drive and screed compartment to prevent leaks of the hydraulic oil.
- All fittings.
- All hoses.
- Hydraulic oil filter.
- Hydraulic pumps.
- Hydraulic motors.
- Vibration motors.
- Control blocks.
- Linear hydraulic motors.
- Hydraulic oil tank.
- Hydraulic oil cooler.
• In case of leaks, have the hydraulic system repaired by qualified maintenance and repair personnel.
• If you find any leaks on the hydraulic circuit:, have the repair performed by an authorised service plant or qualified personnel.
• Close the right material hopper side cover (1).
• Close the engine bonnet (2).
Check the hydraulic circuit for leakage when the machine is parked on a flat and solid surface, the engine and the battery disconnector are off and the gas bottle is closed. Wear the prescribed personal protective equipment when checking the hydraulic circuit tightness.
There is a risk of burns from the hot parts of the engine. There is a risk of burns from the hot parts of the screed. There is a risk of injury due to the fall of the screed.
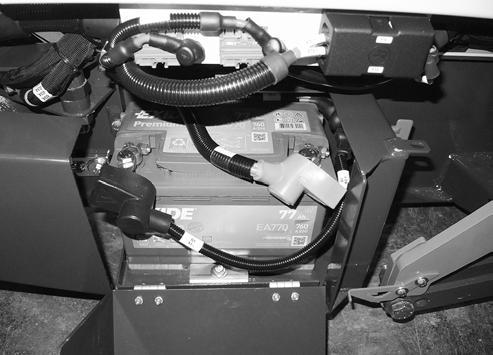
3.6.23 Battery check
Perform battery check when the machine is parked on a flat and solid surface with the engine and battery disconnecter off. The machine is delivered from the manufacturer with a maintenance-free battery.
If a maintenance-free battery is installed in the machine, it is not necessary to check the electrolyte level and refill the electrolyte for the entire service life of the battery. Perform battery charging as needed according to instructions of the battery manufacturer.
Note
A rest voltage on clamps is only checked on a maintenance-free battery. The battery cannot be refilled. If the rest voltage is 12.6 V and more, the battery is fully charged. If the rest voltage is below 12.4 V, the battery should be charged. After the battery is charged, leave it to stand for 2 – 3 hours and then measure the voltage again. It is recommended to mount the battery 24 hours after charging.
The rest voltage is the voltage measured at the clamps of the battery, which was at rest for at least 12 hours – it was not either charged or discharged.
Battery check procedure:
• Open the left material hopper side cover (1).
• Clean the battery surface.
• Measure the rest voltage of the battery, and charge the battery if required.
• Check the condition of the (+) pole, (-) pole and clamps.
• Clean the + pole, the - pole and the clamps.
• Apply a thin layer of grease on the clamps.
• Close the left material hopper side cover (1).
Note
In case of a long-term shut-down of the machine or its storage, dismount the battery and store it to be protected from frost. Charge the battery before and during storing and before mounting the battery on the machine.