7 minute read
6.3 Operating the Roller Operation

from Dynapac 275 DI TU Engine Asphalt Compactor DRA30 Operating & Maintenance Manual 4812333211 - PDF

1. Before the roller start-up, a pre-operational general inspection of the roller must be performed in accordance with those instructions previously mentioned and, in the instructions, found in section 7 - Maintenance
2. Make sure all operator console controls are either off or in the neutral position and all control console gauges read zero.
6. Make sure the throttle control is turned to low position
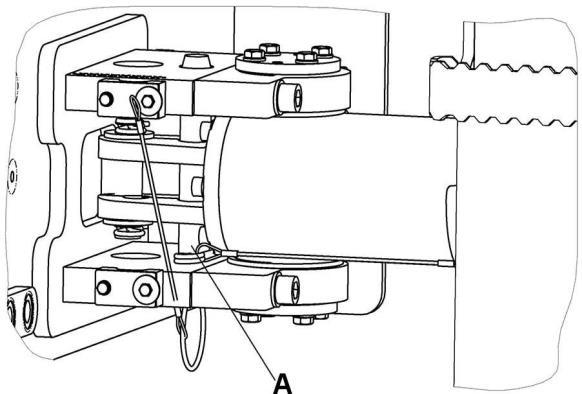
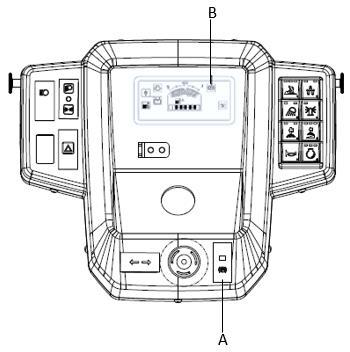
A Emergency stop
B FNR lever
C Ignition switch
D Throttle lever
3. Make sure the emergency stop button is not activated
4. The FNR must be in neutral position
5. Parking brake switch must be in engaged condition.
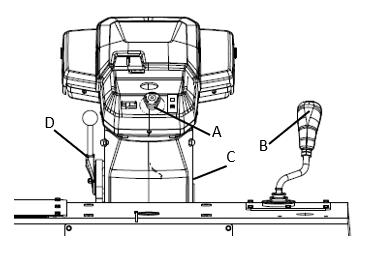
7. Set the vibration switch for Front or both drum selection on forward/reverse lever The operator must activate the work mode in key pad.
A
A Vibration Activation switch
B Drum Selection switch
N o t e As a general rule, do not operate the starter motor more than 30 seconds at a time without pausing to allow the starter motor to cool for at least 2 minutes. Overheating caused by excessive cranking will seriously damage the starter motor
8. Turn the ignition switch on, check all the warning lamps and then crank the engine
9. Allow the engine to warm up at idle speed for few minutes Warm up time should be extended when extremely low ambient conditions (cold weather) occur or when battery poweris depleted during initialstart-up.
10.Check the engine air cleaner indicator gauge to determine if the elements require servicing.
11.Make sure the parking brake is released and the parking lights goes off.
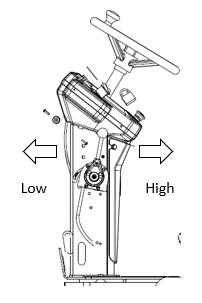
Vibration on One Drum
1. Activate the vibration selector switch to select vibration with the rear drum only, or with two drums
2. Vibration selector is activated through the switch in the FNR Lever.
3. In the lower position the vibration is activated on both drums.
4. In the upper position the vibration on the front drum is switched off.
Braking
Normal Braking
1. Turn the vibration off by pressing the vibration control button on the forward/reverse lever
2. Set the forward/reverse control to the neutral position and apply brake to stop the roller
N o t e In cold climatic condition braking distances can be longer than the normal distance
N o t e Never leave the operator platform without activating the parking brake
Emergency Braking
To hold the machine in a stopped position (parked), there is a mechanical parking brake on each drum drive motor The mechanical parking brakes are spring-activated and hydraulically released type brakes.
A Parking brake button
B Parking brake indicator
1. In case of emergency, push in the emergency stop knob, hold the steering wheel firmly and be prepared for a sudden stop The diesel engine stops
2. After emergency braking, reset the forward/ reverse lever to neutral position, pull out the emergency stop and activate the parking brake Restart the engine
Switching Off
1. Press the vibration control button to off position
2. Set the forward/reverse control to the neutral position
3. Turnthethrottlecontroltoforwardpositionand allow the engine to idle for a few minutes to cool
4. Press the parking brake button to activate the parking brake Always activate the parking brake before leaving the machine.
N o t e If the machine must be parked on a sloping surface, chock the drums with wedges to prevent any movement
5. Check instruments and warning lamps to see if any faults are indicated. Switch off all lights and other electrical functions
6. Turn the starter switch to the off position to stop the engine
7. Switch off the battery disconnector and remove the key
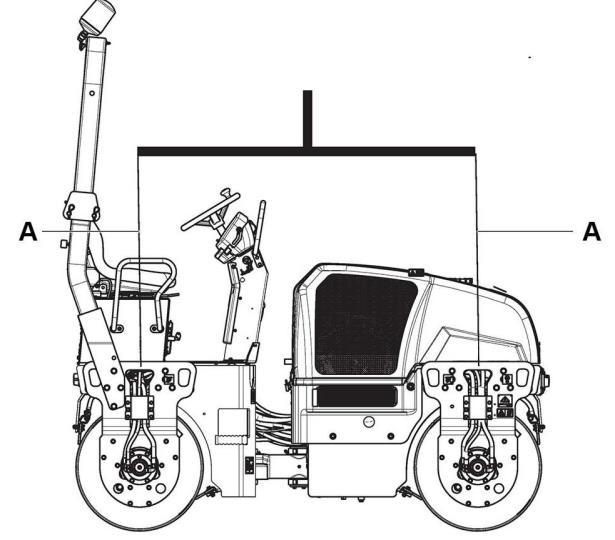
6.4 Lifting and Handling Locking the Articulation
N o t e Lock the steering joint, before lifting the roller.
1. Turn the steering wheel to the straight-ahead position.
2. Switch off the machine and activate the parking brake.
3. Pull down the galvanized lock bar from its holder and place it from underneath in the hole on the lower steering joint bracket
4. Press the bar until the upper end is visible in the hole on the upper steering joint bracket
5. Secure the bar with the lock pin.
N o t e Remember to refit the lock bar in its holder after operation
Lifting the Roller
• Use a crane/forklift to lift the equipment
• Pay attention when lifting and balancing the equipment.
• Seek a person to guide the way when lifting and moving the equipment.
• An experienced crane/forklift driver should drive the crane/forklift
• When lifting, add a pad at the joint of steel cable of the crane and the hook hole and secure the hole
N o t e The weight of the machine is shown on the lifting plate
Refer to section 4 - Specifications.
6.5 Towing the Roller
Towing Information
Proper equipment must be used to prevent damage to the vehicle and the roller during any tow. Follow the state and local laws applying to vehicles
If the vehicle is to be towed by a wrecker, use only equipment designedforthispurposefollowingthe instructions of the wrecker manufacturer A safety chain system must be used
Personal injury or death could result ! when towing a disabled roller incorrectly
Block the drums of the roller to prevent ! movement before releasing the emergency brake system or the disc brake in each drive motor must be disengaged mechanically, before the roller can be towed The roller can roll free if drum is not blocked
Follow the recommendations below to ! properly perform the towing procedure
Make sure to block the drums of the roller ! and reapply the emergency brake system before disconnecting from the towing vehicle
N o t e Maximum towing speed is 2 mph (3 Kmph)
Towing
The roller can be moved up to 300 meters (1,000 ft) using the instructions below.
N o t e Chock the drum to prevent the roller from moving when the brakes are hydraulically disengaged
Release the Brakes
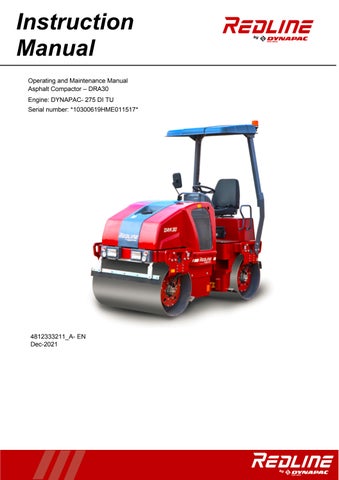
The disc brake in each drive motor must be disengaged mechanically, according to the following instructions, before the roller can be towed
1. Remove the center plug using a screwdriver.
2. Screw off the brake tool from its threaded fixing hole.Thenfixthebraketoolinthecenter hole by tightening the screw until it bottoms in the hole
3. Tighten the nut against the brake tool until it stops, indicating that the brakes are now disengaged
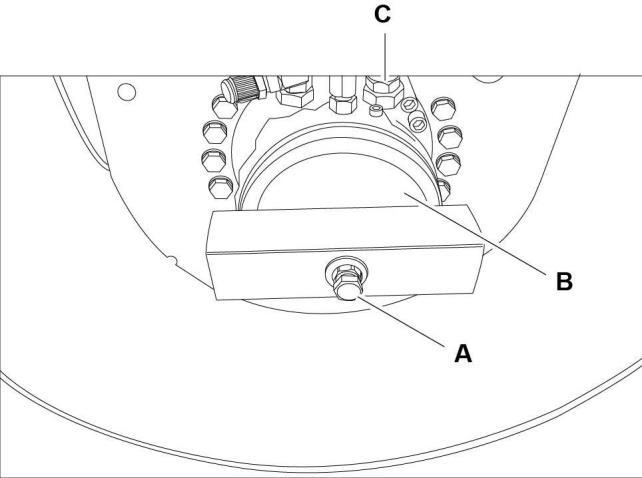
A Brake tool
B Fasteningscrew
C Disengagement nut
N o t e Make sure to secure the steering wheel to maintain a straight-ahead position
4. Slightly tap the plunger inside using a mallet
Engaging the Brakes
1. Screw out the nut again after towing
2. Screw off the brake tool and fit it back into its fixing holes
3. When machine is started, propulsion pump plunger will automatically come out.
4. Refit the center plug to counteract the information of rust inside the threaded hole
5. When towing/retrieving a machine, the towing device must be connected to both lifting holes. The pulling force shall act longitudinally on the machine Maximum total pulling force 130 kN (29225 lbf).
6.6 Transportingthe Roller Transportation Procedures Safety Precautions
Beforemovingtherolleronpublicroads,checkfor instructions and information with respect to traffic regulations regarding construction machinery.
The roller must be driven and transported only in accordance with the operating instructions
1. Whendrivingtheroller,observetheprescribed transport position, admissible speed, and itinerary
2. Do not attempt to drive unless knowledgeable and experienced
3. Always know the overall height, weight, width, and length of the roller Make sure there is sufficient clearance when crossing underpasses, bridges, and tunnels or when passing under overhead lines
4. When moving the roller on public access roads, obey all traffic regulations and make sure that proper clearance flags, lights, and warning signs, including the slow-moving vehicle emblem, are properlydisplayed Know your approximate stopping distance at any given speed Never turn corners at excessive speeds. Look in all directions before reversing the direction of travel
Operator Checklist
• Make sure to know the vehicle and its equipment and how to use it safely
• See that mirrors, and lights are clean and unobstructed
• Check for fluid leaks
• Check lights and reflectors
• Check oil and coolant levels.
Start Up
1. Before starting the engine, check inside, outside, and underneath the roller for people or obstructions.
2. Always horn before starting the roller to alert everyone in the area.
3. Check all the gauges (including fuel)
4. Check for excessive noise or vibration
Before Driving
1. Fasten the seat belts.
2. Adjust each mirror so that the side of the vehicle is visible in the side of the mirror closest to the vehicle This helps you determine the relation to objects seen in the mirror
3. Release the parking brake.
Securing for Loading
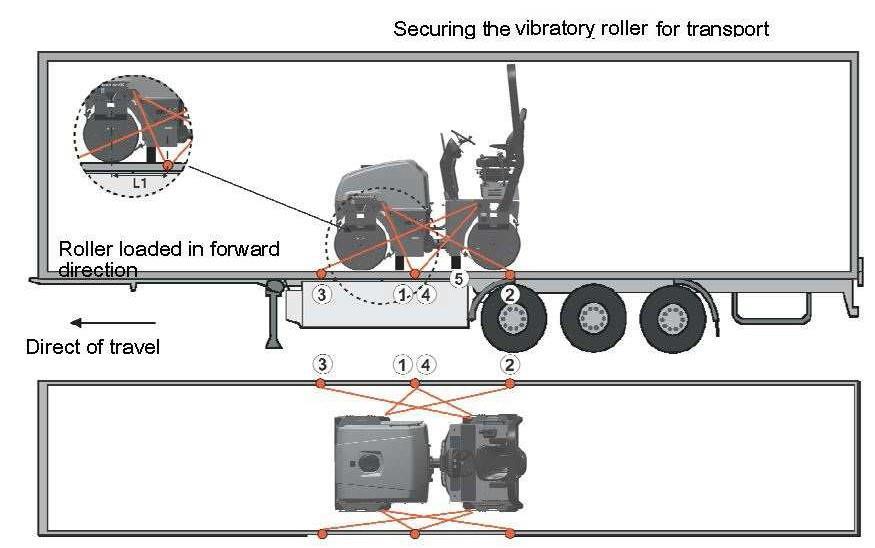
1,2 Double lashings, i e. one lashing with two parts secured to two different lashing mounts.
3,4 symmetrically located on the right and left sides
5 rubbers
The lashings' permitted distance interval in meters (1 - 4: Double lashings, LC at least 1 7 tonnes (1700 daN), STF 300 kg (300daN))
Double L1 - L2
Double L3 - L4 0,6 - 3,0 0,1 - 3,0
The distance L1 above is between points D and E. D is the projected point directly at right angles laterally in relation to the edge of the platform from the lashing mount C on the roller E is the lashing mount at the edge of the platform. L2 – L3 have a corresponding relationship.
6.7 Special Conditions
Cold Weather Conditions
• Refer to section 7 - 7.3 Refill Capacities/ Lubricants in the maintenance section for informationregardingcoldweatherlubricants, hydraulic fluids, coolants, fuel, and the like.
• Use winter grade diesel fuel for operation at sub-zerotemperatures.
• Be extremely careful when using cold weather starting aids Starting aids are very flammable and should only be used if needed
• Remove batteries and store in a warm area to about 68 °F (20 °C).
Hot Weather Conditions
• Monitor temperature gauges
• Keep cooling fins on radiator and oil cooler clean and free of accumulated dirt
High Altitude Conditions
• Be aware that engine power will be reduced
• Keep cooling fins on radiator and oil cooler clean and free of accumulated dirt
Long-term Parking
• Observe the following when storing the roller for short periods of time
• Remove the battery/batteries from the machine, clean and charge once a month
• Cover the air cleaner (Refer section 7Maintenance) or its opening with plastic or tape.
• Also cover the exhaust pipe opening This is to avoid moisture entering the engine.
• Fill the fuel tank completely full to prevent condensation.
• Fill the hydraulic reservoir to the uppermost level mark
• Empty the water tank completely to avoid fouling
• Lubricatethesteeringjoint bearingsandboth bearings on the steering cylinder with grease Grease the steering cylinder piston with conservationgrease Greasethehinges on the doors to the engine compartment and the cab. Grease both ends of the forward/ reverse control (bright parts)
• Change all lubricants and fluids that may have deteriorated with use
• Replace and secure all weatherproof covers