1 minute read
Steering Cylinder and Steering Joint

from Dynapac 275 DI TU Engine Asphalt Compactor DRA30 Operating & Maintenance Manual 4812333211 - PDF

The steering cylinder is located under the operator’s platform There is a grease fitting near the base and rod ends of the cylinder.
1. Turn the steering wheel fully to the left All four grease nipples can now be accessed from the right side of the machine
2. Wipe the grease nipples.
3. Grease each nipple with five strokes of the hand-operated grease gun. Make sure that grease penetrates intothe bearing If grease does not penetrate the bearings, it may be necessarytorelievethearticulationjointwith a jack while repeating the greasing process
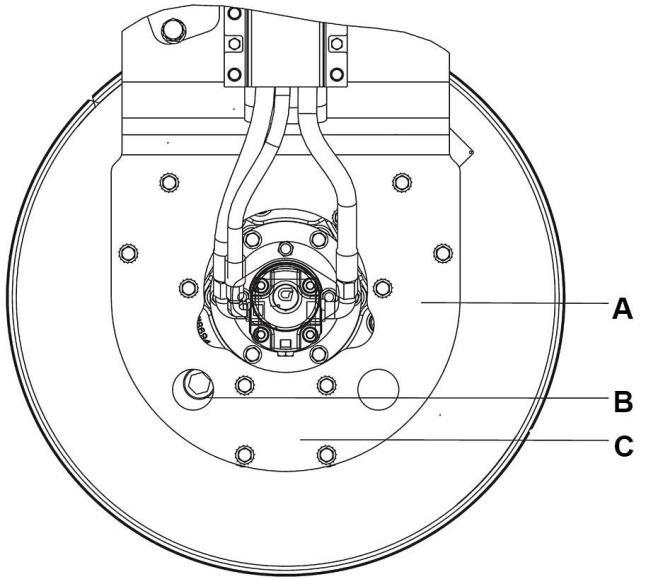
Drum - Oil Level
1. Run the roller slowly until the oil plug is opposite one of the inspection holes.
2. Unscrew the plug and check that the oil level reaches up to the bottom of the hole. Top up with new oil if necessary Use oil as per the lubricantspecification.
3. Cleanthemagneticoilplugfromanymetallic residue, and refit the plug.
A Filling
B Level check
C Drain
Controls
If the lever gets stiff after a prolonged period of use, remove the cover and lever and lubricate
Lubricate the forward/reverse lever in the engine compartment with a few drops of oil
Housekeeping
The complete roller must be given a weekly cleaning.Dailycleaningwillberequiredifmaterial is adhering to the roller working parts
1. Make sure the operator areas, steps, and grabrailsareclean Oil,grease,snow,ice,or mud in these areas can be slippery Clean thebootsofexcessmudbeforegettinginthe cab or on the roller operator platform.
2. Check the tower feed installation for debris buildup around the sheaves.
3. Thoroughlywashallfittings,caps,plugs,and the like with a nonflammable, nontoxic cleaning solution before servicing to prevent dirt from entering while performing the service
N o t e Protect all electrical components and control panels against entry of water or steam when using high pressure cleaning methods. Cover the fuel and hydraulic fill cap breathers located on each tank
4. After cleaning, check for defects in the air cleaner ducts a. Check intake for accumulation of debris that could restrict air flow b. Check air cleaner mounting hardware for security c. Check all hoses for cracks, chafing, or deterioration and replace at the first sign of probable failure