1 minute read
how to install the conveyor pans (image)..................................................... 4


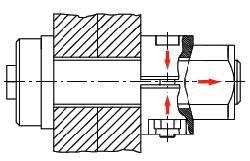
Retracting the wedge parts causes the nut to be pressed outwards and the screw bolt is tensioned.
IMPORTANT Tensioning the screw bolt
Mounting the clamping bolts: Push the washer onto the bolt. Push the screw bolt with washer through the holes of both flanges.
The clamping wedges come preassembled with two hex. head bolts.
The space between the wedges must be approx. 10 mm.
Space between wedges
Push the preassembled clamping wedges onto the screw bolt up to the flange so that the beveled surfaces point to the nut M72 which is fitted afterwards. The nuts of the bolted connection M24 must point outwards.
GREASE THE BEVELS WITH LUBRICATING GREASE B3 BEFORE FITTING NUT M 72 TO THE SCREW BOLT (SEE CHAPTER 6, SECTION “LUBRICATING GREASES AND PASTES”).
Fit nut M 72 onto the screw bolt until the bevels b of the clamping wedges contact the bevels a of the nut (see fig. 44). Hold the nut and tighten the hex. head of the screw bolt to a torque of approx. 700 Nm.