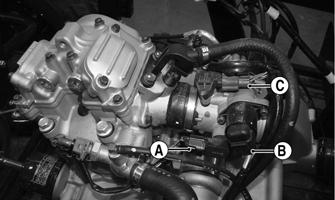
Periodic Maintenance/ Tune-Up Tighten all nuts, bolts, and cap screws. Care must be taken that all calibrated nuts, bolts, and cap screws are tightened to specifications. It is advisable to lubricate certain components periodically to ensure free movement. Apply light oil to the components using the following list as reference: A. Accelerator Pedal Pivot/Cable Ends B. Brake Pedal Pivot
PK096A
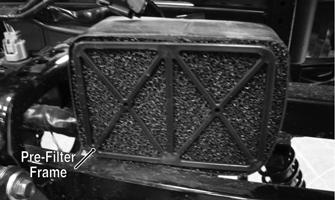
2. Wash the pre-filter thoroughly in warm, soapy water; then rinse and dry. 3. Install the pre-filter and frame; then secure with the two machine screws. Tighten securely.
C. Shift Cable SPECIAL TOOLS
A number of special tools must be available to the technician when performing service procedures in this section. Refer to the current Special Tools Catalog for the appropriate tool description. NOTE: When indicated for use, each special tool
will be identified by its specific name, as shown in the chart below, and capitalized. Description Compression Tester Kit Oil Filter Wrench Timing Light Valve Clearance Adjuster
p/n Common Tool Common Tool Common Tool 0444-255
NOTE: Special tools are available from the Service
Department.
Air Inlet Pre-Filter This vehicle is equipped with a pre-filter to filter dirt from the inlet air prior to reaching the main air filter. NOTE: The pre-filter is located above the front right wheel well under the front body panel.
Air Filter/Housing Drain The air filter inside the air filter housing must be kept clean to provide good engine power and gas mileage. If the vehicle is used under normal conditions, service the filter at the intervals specified. If operated in dusty, wet, or muddy conditions, inspect and service the filter more frequently. Use the following procedure to remove the filter and inspect and/or clean it.
CAUTION Failure to inspect the air filter frequently if the vehicle is used in dusty, wet, or muddy conditions can damage the engine.
NOTE: To access the air filter, the seat must be removed.
1. Remove dirt and debris from around the filter housing. 2. Unsnap the seven spring-clips and remove the air filter cover; then loosen the clamp securing the air filter.
1. To remove the pre-filter, remove the two machine screws; then remove the filter frame and filter from behind the inlet tube.
PK008A
3. Remove the Phillips screw to separate the air filter holders from the air filter. PK095
7