NOTE: Foam Aerosol Filter Cleaner and Foam
Periodic Maintenance/ Tune-Up
Aerosol Filter Oil are available.
5. Rinse off any remaining soap. 6. Remove any excess water from the element by matting with a towel.
Tighten all nuts, bolts, and cap screws. Make sure rivets holding components together are tight. Replace all loose rivets. Care must be taken that all calibrated nuts, bolts, and cap screws are tightened to specifications.
7. Allow the element to dry completely.
It is advisable to lubricate certain components periodically to ensure free movement. Apply light oil to the components using the following list as reference:
9. Squeeze the element to remove excess oil.
A. Throttle Lever Pivot/Cable Ends B. Brake Lever Pivot/Cable Ends C. Idle RPM Adjustment Screw
Air Filter The air filter inside the air filter housing must be kept clean to provide good engine power and gas mileage. If the ATV is used under normal conditions, service the filter at the intervals specified. If operated in dusty, wet, or muddy conditions, inspect and service the filter more frequently. Use the following procedure to remove the filter and inspect and/or clean it.
CAUTION Failure to inspect the air filter frequently if the ATV is used in dusty, wet, or muddy conditions can damage the engine.
1. Remove the seat and disconnect the breather hose; then remove the five screws securing the air filter housing cover.
8. Spray oil generously onto air filter and work the oil into the element.
CAUTION A torn air filter can cause damage to the ATV engine. Dirt and dust may get inside the engine if the filter is torn. Carefully examine the filter for tears before and after cleaning it. Replace the filter with a new one if it is torn.
10. Clean any dirt or debris from inside the filter housing. 11. Inspect the drain cap beneath the main housing for debris and for proper sealing. 12. Install the air filter and secure with the clamp; then install the air filter housing cover and secure with the screws. 13. Connect the breather hose; then install the seat.
Valve/Tappet Clearance To check and adjust valve/tappet clearance, use the following procedure. NOTE: Valve/tappet clearance specifications are for
room temperature (approximately 68° F). 1. Remove right footwell.
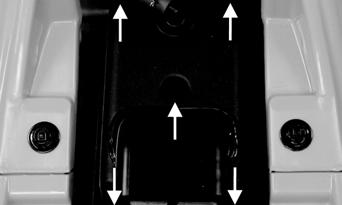
2. Remove the two cap screws and the two self-tapping screws securing the fan shroud; then remove the fan shroud.
KM032A
2. Remove the air filter housing cover; then pull the filter out. 3. Place the element in a pan larger than the element and spray all sides generously with cleaning solvent, let sit approximately three minutes. 4. In a pan larger than the element, with a mild detergent (dish soap) and water, wash all the dirt and oil off by squeezing the element not twisting it.
6
CD651
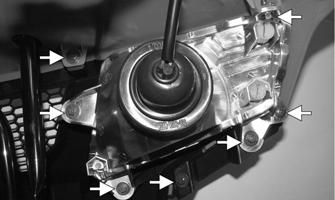
3. Remove the cap screws securing the AIS reed valve and reed valve cover to the valve cover. Note the different length cap screws and orientation of the reed valve as shown.