7 minute read
1.2 Installing


Protected by copyright . Copying for pivate or commerci al pur po s e s , i n p a r t r o r in w ho le, is not permitted unless authorised by Volkswagen AG. Volkswagen AG does notguarantee or accept any liabilit y wi th res pect t o t h e c o r r e c t n e ss o f in format ion in this document. Copyright by Volkswagen AG. Jetta 2005 ➤ Body Repairs - Edition 04.2009
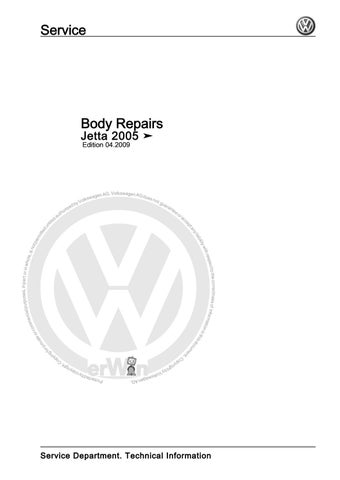
– Remove remaining material.
1.2.1 Preparing new part
Replacement part
Note
The replacement part is delivered without recesses for the tail light and without welding bolts. Making the recesses for the tail light and installing the welding bolts is described in ⇒ “1.2.3 Cutting out recesses for the tail light”, page 176 and ⇒ “1.2.4 Installing welding bolts”, page 178 .
♦ Cross panel ♦ Welding bolt -N 910 176 01- (qty. 8) ♦ 2K body adhesive -D 180 KD3 A2-
Protected by copyright . Copying for pivate or commerci al pur po s e s , i n p a r t r o r in w ho le, is not permitted unless authorised by Volkswagen AG. Volkswagen AG does notguarantee or accept any liabilit y wi th res pect t o t h e c o r r e c t n e ss o f in format ion in this document. Copyright by Volkswagen AG.
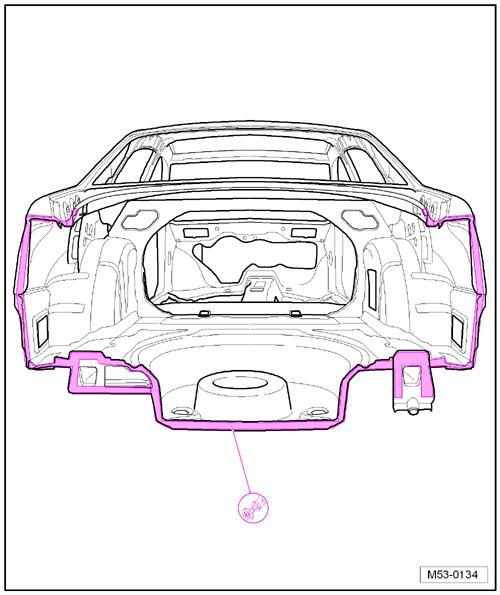
– Drill holes into side panel for SG plug weld seam, ∅ 7 mm. Jetta 2005 ➤ Body Repairs - Edition 04.2009

Protected by copyright . Copying for pivate or commerci al pur po s e s , i n p a r t r o r in w ho le, is not permitted unless authorised by Volkswagen AG. Volkswagen AG does notguarantee or accept any liabilit y wi th res pect t o t h e c o r r e c t n e ss o f in format ion in this document. Copyright by Volkswagen AG. Jetta 2005 ➤ Body Repairs - Edition 04.2009
Note
New part must be welded-in within 20 minutes or adhesion properties of adhesive will be impaired.
– Apply 2-K body adhesive -D 180 KD3 A2- in the area of the factory bonding.
1.2.2 Welding in
– Adapt new part to fit and secure in position when vehicle is standing on its wheels or positioned on a alignment bracket . – Check fit with add on parts. – Check rear cover closing function.
Protected by copyright . Copying for pivate or commerci al pur po s e s , i n p a r t r o r in w ho le, is not permitted unless authorised by Volkswagen AG. Volkswagen AG does notguarantee or accept any liabilit y wi th res pect t o t h e c o r r e c t n e ss o f in format ion in this document. Copyright by Volkswagen AG.
Note
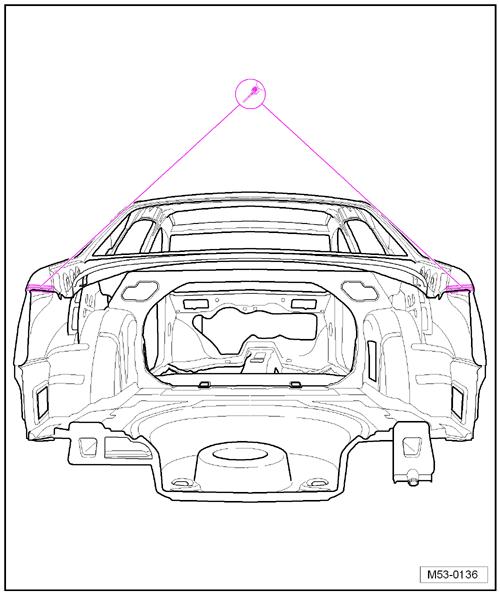
When welding tail light mounting with upper side panel use a “heat shield” to prevent damage to side panel paintwork.
– Weld in cross panel, RP spot weld seam and SG plug weld seam. Jetta 2005 ➤ Body Repairs - Edition 04.2009

Protected by copyright . Copying for pivate or commerci al pur po s e s , i n p a r t r o r in w ho le, is not permitted unless authorised by Volkswagen AG. Volkswagen AG does notguarantee or accept any liabilit y wi th res pect t o t h e c o r r e c t n e ss o f in format ion in this document. Copyright by Volkswagen AG. 1.2.3 Cutting out recesses for the tail light Jetta 2005 ➤ Body Repairs - Edition 04.2009
Note
– The dimensions for marking the recesses can be found in the table ⇒ page 177 . – Mark the recesses for the tail light and the guide.
Note
♦ Perform parting cut with pneumatic sabre saw -V.A.G 1523- or compact angle grinder -VAS 5167- . ♦ The front side of the recesses must be parallel to the road.
– Cut out the recesses.
Protected by copyright . Copying fo pivate or commer i al pur po s e s , i n p a r t r o r in w ho le, is not permitted unless authorised by Volkswagen AG. Volkswagen AG does notguarantee or accept any liabilit y wi th res pect t o t h e c o r r e c t n e ss o f in format ion in this document. Copyright by Volkswagen AG. Dimensions for the recesses for the tail light. Dimension mm a 26.6 b 15.0 c 105.0 d 20.0 e 30.0 f 9.3 g 9.5 h 9.6 c – Check fitting to tail light and guide. Note r To adjust the gaps for the tail light correctly, place washers be‐tween the tail light and the body if necessary.
Jetta 2005 ➤ Body Repairs - Edition 04.2009

Protected by copyright . Copying for pivate or commerci al pur po s e s , i n p a r t r o r in w ho le, is not permitted unless authorised by Volkswagen AG. Volkswagen AG does notguarantee or accept any liabilit y wi th res pect t o t h e c o r r e c t n e ss o f in format ion in this document. Copyright by Volkswagen AG. 1.2.4 Installing welding bolts Jetta 2005 ➤ Body Repairs - Edition 04.2009
– Adapt the securing strip -1- to the cross panel. – Align the securing strip in the recess of the rear lid and secure it.
Dimension a = 140 mm
Dimension b = 9 mm

Protected by copyright . Copying for pivate or commerci al pur po s e s , i n p a r t r o r in w ho le, is not permitted unless authorised by Volkswagen AG. Volkswagen AG does notguarantee or accept any liabilit y wi th res pect t o t h e c o r r e c t n e ss o f in format ion in this document. Copyright by Volkswagen AG.
Note
♦ Before adapting the guide -1-, cut out the recesses in the mounting plate ⇒ “1.2.3 Cutting out recesses for the tail light”, page 176 .
– Adapt the guide -1- to the mounting plate and secure it. – Check fit with add on parts. Jetta 2005 ➤ Body Repairs - Edition 04.2009

Protected by copyright . Copying for pivate or commerci al pur po s e s , i n p a r t r o r in w ho le, is not permitted unless authorised by Volkswagen AG. Volkswagen AG does notguarantee or accept any liabilit y wi th res pect t o t h e c o r r e c t n e ss o f in format ion in this document. Copyright by Volkswagen AG. Jetta 2005 ➤ Body Repairs - Edition 04.2009
Note
Only the left guide is depicted -2-. The depiction and work steps also apply to the right guide.
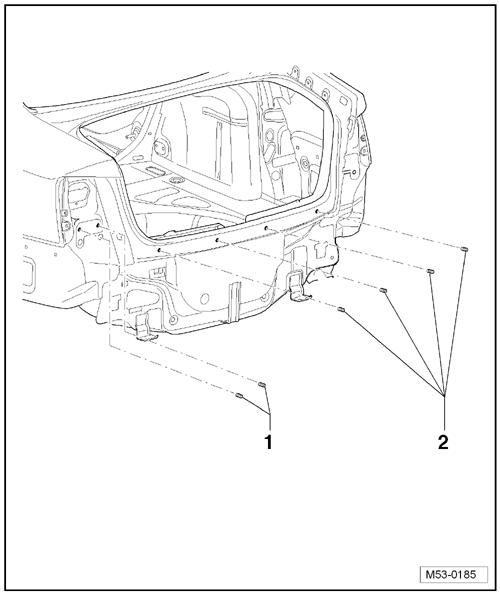
– Mark the positions where the welding bolts for the securing strip -1- and the guide -2- are to be welded on.
Protected by copyright . Copying for pivate or commerci al pur po s e s , i n p a r t r o r in w ho le, is not permitted unless authorised by Volkswagen AG. Volkswagen AG does notguarantee or accept any liabilit y wi th res pect t o t h e c o r r e c t n e ss o f in format ion in this document. Copyright by Volkswagen AG.
Jetta 2005 ➤ Body Repairs - Edition 04.2009
Note
The welding bolts for the left guide -1- and the securing strip -2- are depicted. Building up weld studs on the right side of the vehicle is done analogously.
– Weld the welding bolts for the guide -1- and the securing strip -2- onto the marked positions, butt weld.
Note
If it is not possible to weld on the welding bolts, holes can be drilled and pop rivets with seals -N 907 161 01- can be riveted in alter‐natively. In that case, speed nuts -N 907 088 01- should be used to fasten the guide and the securing strip instead of hexagonal combi bolts -N 910 189 01-