4 minute read
7.2 Installing


Protected by copyright . Copying for pivate or co merci al p r po s e s , i n p a r t r o r in w ho le, is not permitted unless authorised by Volkswagen AG. Volkswagen AG does notguarantee or accept any liabilit y wi th res pect t o t h e c o r r e c t n e ss o f in format ion in this document. Copyright by Volkswagen AG. – Remove remaining material. – Remove adhesive remains completely and grind adhesive surfaces back to bare metal. – Clean flange area of wheel arch so that it is free of dust and grease. 7.2 Installing 7.2.1 Preparing new part u Replacement part ♦ B-pillar subpart ♦ Moulded foam element m ♦ 2K body adhesive -D 180 KD3 A2– Transfer parting cuts to the new part and cut.
Jetta 2005 ➤ Body Repairs - Edition 04.2009

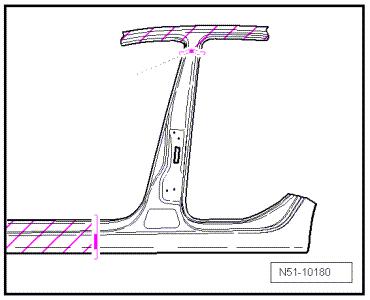
Protected by copyright . Copying for pivate or commerci al pur po s e s , i n p a r t r o r in w ho le, is not permitted unless authorised by Volkswagen AG. Volkswagen AG does notguarantee or accept any liabilit y wi th res pect t o t h e c o r r e c t n e ss o f in format ion in this document. Copyright by Volkswagen AG. 7.2.2 Marking area where no welding work may be carried out Jetta 2005 ➤ Body Repairs - Edition 04.2009
Note
♦ When welding in B-pillar, welding work must not be carried out in the areas marked on the illustrations for
“crash safety” reasons. ♦ The measurements given must be adhered to.
– Mark areas on outer B-pillar in which no welding may be car‐ried out.
♦ Dimension -a- = 45 mm
♦ Dimension -b- = 145 mm
7.2.3 Moulded foam elements
Follow repair instructions. Moulded foam element ⇒ General Information; Body Repairs, General Body Repairs ; General Notes; Moulded foam elements

Protected by copyright . Copying for pivate or commerci al pur po s e s , i n p a r t r o r in w ho le, is not permitted unless authorised by Volkswagen AG. Volkswagen AG does notguarantee or accept any liabilit y wi th res pect t o t h e c o r r e c t n e ss o f in format ion in this document. Copyright by Volkswagen AG. 7.2.4 Welding in – Place backing plate behind side panel parting cut.
Note
♦ Holes for door hinges in area -1- must remain free of adhesive. ♦ New part must be welded within 20 minutes, otherwise adhesive properties of adhesive will be impaired.
– In area -1- apply 2-K body adhesive -D 180 KD3 A2- (flat, sev‐eral beads, ∅ 3.5 mm). – In area -2- apply 2-K body adhesive -D 180 KD3 A2- (1 bead, ∅ 3.5 mm). – Adapt new part to fit and secure in position when vehicle is standing on its wheels or positioned on a alignment bracket . – Check fit with add on parts. Jetta 2005 ➤ Body Repairs - Edition 04.2009

Protected by copyright . Copying for pivate or commerci al pur po s e s , i n p a r t r o r in w ho le, is not permitted unless authorised by Volkswagen AG. Volkswagen AG does notguarantee or accept any liabilit y wi th res pect t o t h e c o r r e c t n e ss o f in format ion in this document. Copyright by Volkswagen AG. Jetta 2005 ➤ Body Repairs - Edition 04.2009
Note
Note that no welding work may be carried out in areas -1-.
– Weld in B-pillar, RP spot weld seam. – Weld in parting cut, SG stepped weld seam.
Protected by copyright . Copying for pivate or commerci al pur po s e s , i n p a r t r o r in w ho le, is not permitted unless authorised by Volkswagen AG. Volkswagen AG does notguarantee or accept any liabilit y wi th res pect t o t h e c o r r e c t n e ss o f in format ion in this document. Copyright by Volkswagen AG. – Establish remaining joint side member reinforcement, SG stepped weld seam. – Bead over wheel arch flange. – Wipe leaking adhesive off and seal wheel housing.

Jetta 2005 ➤ Body Repairs - Edition 04.2009