9 minute read
o1.2 Installing


Protected by copyright . Copying for pivate or commerci al pur po s e s , i n p a r t r o r in w ho le, is not permitted unless authorised by Volkswagen AG. Volkswagen AG does notguarantee or accept any liabilit y wi th res pect t o t h e c o r r e c t n e ss o f in format ion in this document. Copyright by Volkswagen AG.
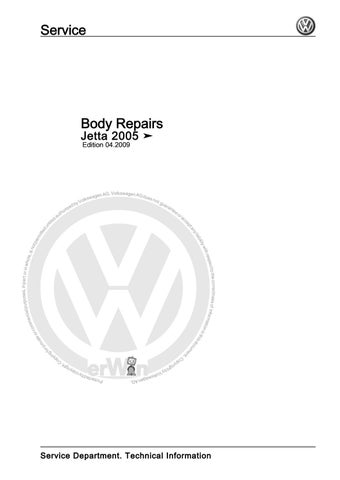
– Remove remaining material.
Note
♦ When removing the remaining material -1- from the roof, make sure that the side elements (roof side mem‐ber) -2- are not damaged. ♦ Do not use cutting disks or rough grinding disks.
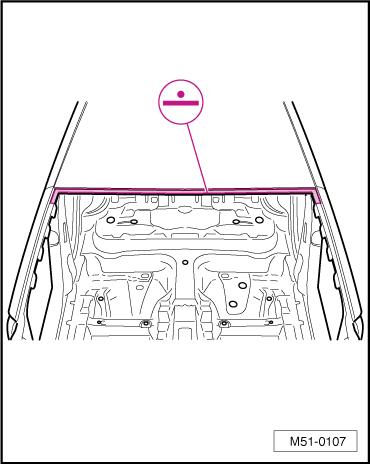
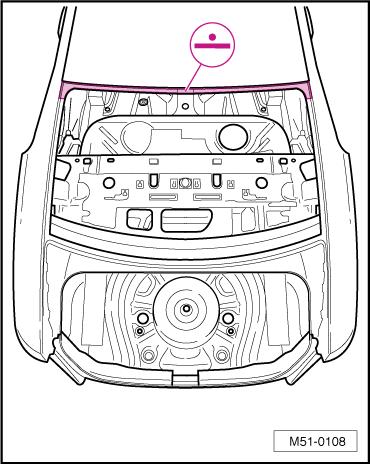
– Remove all adhesive residues and remaining sealing com‐pound from the front and rear roof cross members and the roof reinforcement.
– Restore paint structure.
1.2 Installing
1.2.1 Preparing new part
Replacement part ♦ Roof
♦ 1K assembly adhesive -D 190 MKD A3- (3 cartridges) Jetta 2005 ➤ Body Repairs - Edition 04.2009
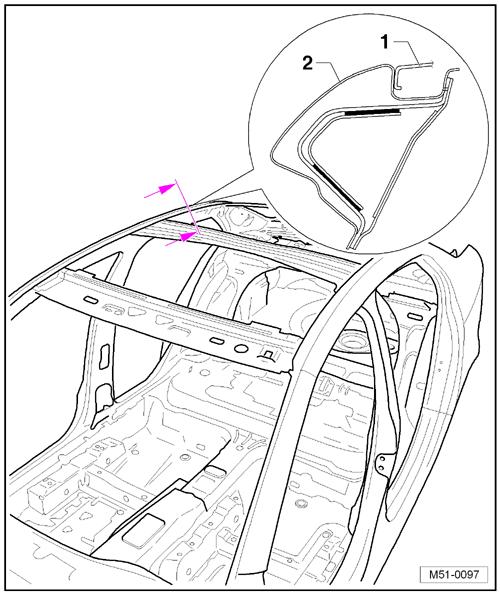
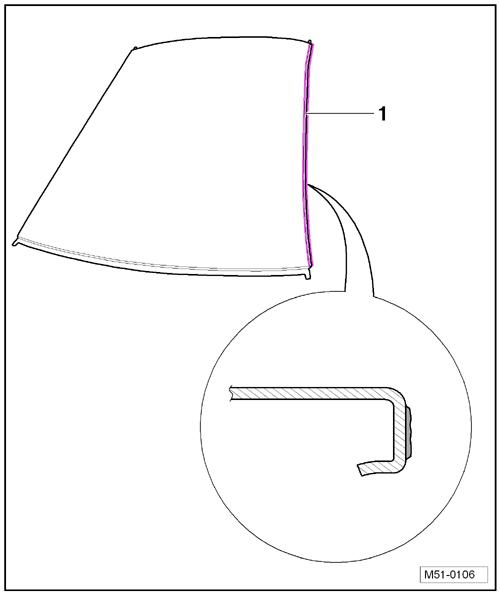
Protected by copyright . Copying for piva e or co merci al pur po s s , i n p a r t r o r in w ho le, is not permitted unless authorised by Volkswagen AG. Volkswagen AG does notguarantee or accept any liabilit y wi th res pect t o t h e c o r r e c t n e ss o f in format ion in this document. Copyright by Volkswagen AG. ♦ 2K body adhesive -D 180 KD3 A2- (2 cartridge sets) ♦ Adhesive sealant -AKD 476 KD5 05♦ Primer -ALN 002 003 04♦ Felt -533 867 910 BNote e ♦ Following repair sequence must be adhered to in order to en‐sure correct and long-lasting roof repairs. ♦ No filler should be applied to the bonding areas before the roof is bonded in position. m – Roughen bonding area on vehicle using fine abrasive paper (360 grade). – Grind back bonding area -1- on left and right of roof to bare metal. t This ensures that 2K body adhesive -D 180 KD3 A2- bonds well with bonding area. Jetta 2005 ➤ Body Repairs - Edition 04.2009
Protected by copyright . Copying for pivate or commerci al pur po s e s , i n p a r t r o r in w ho le, is not permitted unless authorised by Volkswagen AG. Volkswagen AG does notguarantee or accept any liabilit y wi th res pect t o t h e c o r r e c t n e ss o f in format ion in this document. Copyright by Volkswagen AG.

Jetta 2005 ➤ Body Repairs - Edition 04.2009
– As required, place approx. 6-10 felt pads -1- on roof frame on left and right-hand side. – Place roof on roof frame and check position of roof relative to roof side elements is correct (visual inspection).
Note
Check that roof is aligned correctly with the rear window and the windscreen.
Protected by copyright . Copying for pivate or commerci al pur po s e s , i n p a r t r o r in w ho le, is not permitted unless authorised by Volkswagen AG. Volkswagen AG does notguarantee or accept any liabilit y wi th res pect t o t h e c o r r e c t n e ss o f in format ion in this document. Copyright by Volkswagen AG. Jetta 2005 ➤ Body Repairs - Edition 04.2009
– Tension two securing belts (commercially available) across roof.
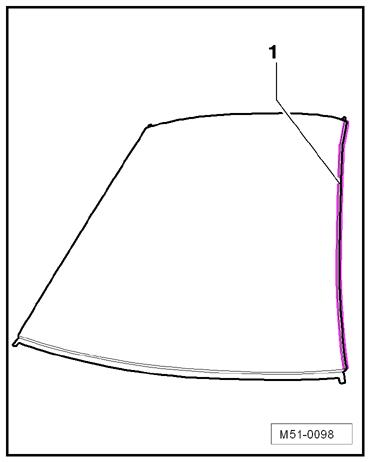
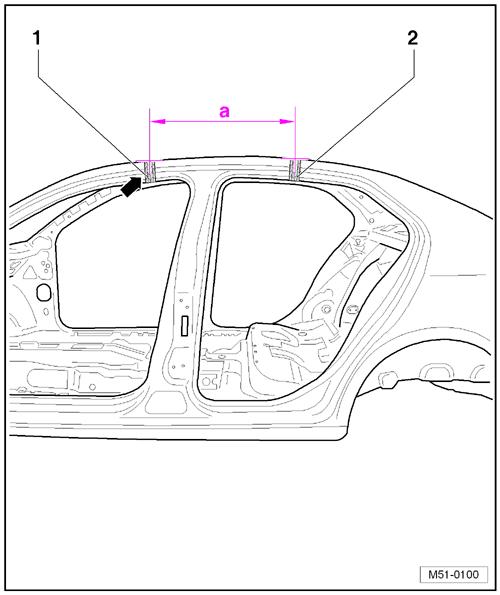
– Align front belt -arrow- with marking -1- in front door openings used for fitting front roof-top carrier system bars. – On both sides of vehicle, measure dimension -a- from marking -arrow- used for fitting front roof-top carrier system bars to‐wards rear and then mark this point on vehicle. Dimension -a- = 691 mm
– Tighten rear belt -2- at these markings.
Protected by copyright . Copying for pivate or commerci al pur po s e s , i n p a r t r o r in w ho le, is not permitted unless authorised by Volkswagen AG. Volkswagen AG does notguarantee or accept any liabilit y wi th res pect t o t h e c o r r e c t n e ss o f in format ion in this document. Copyright by Volkswagen AG. 1.2.2 Adjusting roof depth
Jetta 2005 ➤ Body Repairs - Edition 04.2009
By tightening and loosening the securing belts, you can determine dimension -a- to position roof deeper relative to roof side mem‐bers.
Dimension -a- = 3.5 + 0.5 mm
Note
The securing belts should not be tightened too much, otherwise the roof and/or roof side members could be damaged.
Protected by copyright . Copying for pivate or commerci al pur po s e s , i n p a r t r o r in w ho le, is not permitted unless authorised by Volkswagen AG. Volkswagen AG does notguarantee or accept any liabilit y wi th res pect t o t h e c o r r e c t n e ss o f in format ion in this document. Copyright by Volkswagen AG. Jetta 2005 ➤ Body Repairs - Edition 04.2009
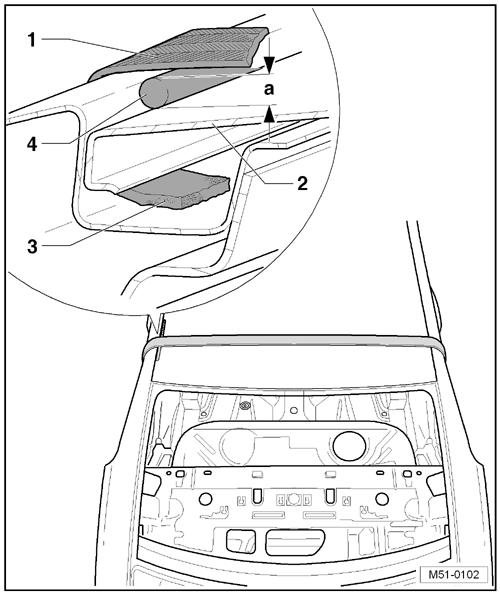
– Use a drill bit (∅ 3.5 mm) to check dimension -a- (drill bit -4must be able to slide between roof -2- and securing belt -1without much resistance). – If necessary, change felt pads -3- to adjust and improve roof alignment. – Remove roof again. – Clean bonding areas on roof and vehicle with silicone remover -LSE 020 100 A3- .
1.2.3 Bonding roof
Note
♦ The adhesive materials must be applied very quickly. ♦ Always observe the application time (pot life). ♦ Use pneumatic or electric cartridge guns to apply the adhesive materials.

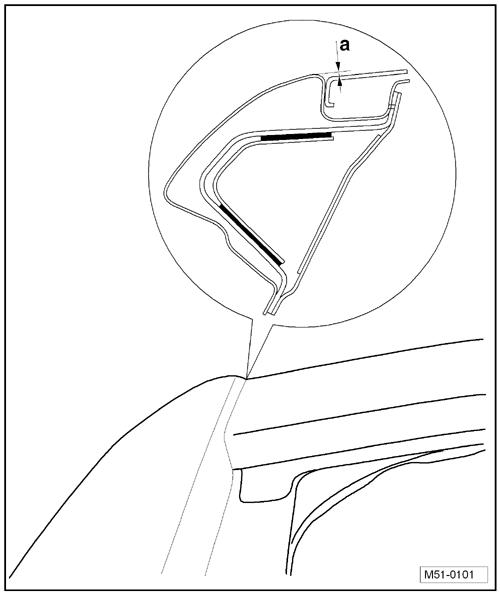
Protected by copyright . Copying for pivate or commerci al pur po s e s , i n p a r t r o r in w ho le, is not permitted unless authorised by Volkswagen AG. Volkswagen AG does notguarantee or accept any liabilit y wi th res pect t o t h e c o r r e c t n e ss o f in format ion in this document. Copyright by Volkswagen AG. – Cut approx. 2 mm off nozzle -B- to provide appropriate bead shape. – Apply 1-K installation adhesive -D 190 MKD A3- , using the pneumatic gun -V.A.G 1761/1- , onto the front roof cross mem‐ber -1-, the centre roof reinforcement -2- and the rear roof cross member -3- in the area of the factory bonding. Jetta 2005 ➤ Body Repairs - Edition 04.2009

Protected by copyright . Copying for pivate or commerci al pur po s e s , i n p a r t r o r in w ho le, is not permitted unless authorised by Volkswagen AG. Volkswagen AG does notguarantee or accept any liabilit y wi th res pect t o t h e c o r r e c t n e ss o f in format ion in this document. Copyright by Volkswagen AG. Jetta 2005 ➤ Body Repairs - Edition 04.2009
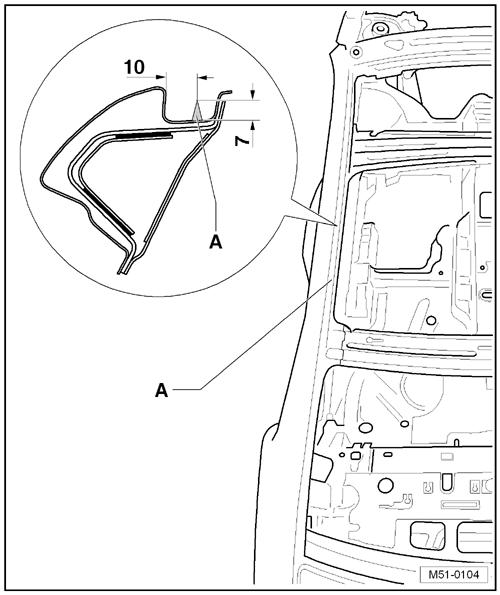
– Apply 1K assembly adhesive -D 190 MKD A3- -A- in area of roof member, using pneumatic cartridge gun -V.A.G 1761/1- . – Apply 1K assembly adhesive -D 190 MKD A3- -A- on the inner side of roof parallel to the left and right roof flange with the pneumatic gun -V.A.G 1761/1- .
Note
♦ The application time (pot life) of the 2K body adhesive -D 180 KD3 A2- is approx. 20 minutes. ♦ An assistant is required for the following work.

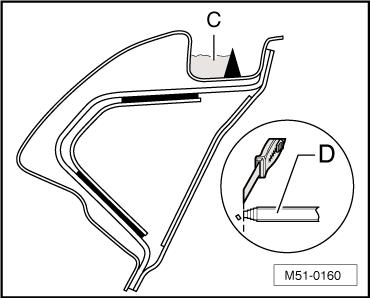
Protected by copyright . Copying for pivate or commerci al pur po s e s , i n p a r t r o r in w ho le, is not permitted unless authorised by Volkswagen AG. Volkswagen AG does notguarantee or accept any liabilit y wi th res pect t o t h e c o r r e c t n e ss o f in format ion in this document. Copyright by Volkswagen AG. – Cut the first step of the static mixer -D- off to achieve the cor‐responding bead cross-section. – Carefully operate the double cartridge gun -VAS 5237- without static mixer until the adhesive is discharged uniformly from both chambers of the cartridge connecter. – Then screw the static mixer onto the cartridge connector. – Apply the first 100 mm of adhesive to a piece of cardboard and only then begin to apply the adhesive to the vehicle. – Now fill area -C- with 2K body adhesive -D 180 KD3 A2- using double-cartridge gun -VAS 5237- . – Lightly coat the roof flanges -1- with 2K body adhesive -D 180 KD3 A2- . – Place roof in position immediately and align. – Secure roof to front window opening and rear lid opening using mole grips, and to centre section using securing belts. – Remove excessive adhesive at side of roof immediately using a cloth soaked in silicone remover -LSE 020 100 A3- . Jetta 2005 ➤ Body Repairs - Edition 04.2009
Protected by copyright . Copying for pivate or commerci al pur o s s , i n p a r t r o r in w ho le, is not permitted unless authorised by Volkswagen AG. Volkswagen AG does notguarantee or accept any liabilit y wi th res pect t o t h e c o r r e c t n e ss o f in format ion in this document. Copyright by Volkswagen AG. – Check roof depth dimension -a- for the roof ⇒ “1.2.2 Adjusting roof depth”, page 95 Note ♦ After bonding, the vehicle must stand on a level surface for 8...10 hours at room temperature (at least 15° C) so that the bonding components are able to harden (hardening time). ♦ No further work should be performed on the vehicle until the “hardening time” has expired. e 1.2.4 Welding in p – Weld roof to windscreen aperture, RP spot weld seam. Jetta 2005 ➤ Body Repairs - Edition 04.2009
– Weld roof to rear window aperture, RP spot weld seam. – Prime left and right-hand roof frame from inside with primer ALN 002 003 04- .
– Apply adhesive sealant -AKD 476 KD5 05- from above to fully seal off bonding seam -1-.
Protected by copyright . Copying for pivate or commerci al pur po s e s , i n p a r t r o r in w ho le, is not permitted unless authorised by Volkswagen AG. Volkswagen AG does notguarantee or accept any liabilit y wi th res pect t o t h e c o r r e c t n e ss o f in format ion in this document. Copyright by Volkswagen AG. – After painting, treat roof cavities -arrow- with cavity sealant AKR 321 M15 4- .

Jetta 2005 ➤ Body Repairs - Edition 04.2009