1 minute read
i10.2 Installing


Protected by copyright . Copying fo pivate or comm rci al pur o s e s , i n p a r t r o r in w ho le, is not permitted unless authorised by Volkswagen AG. Volkswagen AG does notguarantee or accept any liabilit y wi th res pect t o t h e c o r r e c t n e ss o f in format ion in this document. Copyright by Volkswagen AG. – Remove remaining material. p 10.2 Installing e 10.2.1 Preparing new part r Replacement part ♦ Longitudinal member (subpart) ♦ Cover plate for longitudinal member – Transfer parting cuts to new parts and cut out.
10.2.2 Welding in

– Adapt new part to fit and secure in position with vehicle stand‐ing on alignment bracket set . – Check fitting to adjacent components. – Weld longitudinal member parting cut all around, SG continu‐ous weld seam. Jetta 2005 ➤ Body Repairs - Edition 04.2009

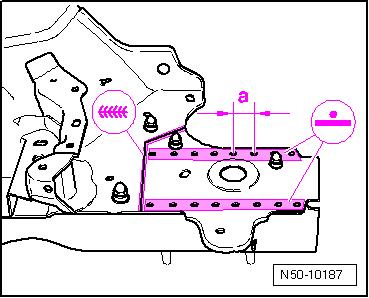
Protected by copyright . Copying for pivate or co merci al p r po s e s , i n p a r t r o r in w ho le, is not permitted unless authorised by Volkswagen AG. Volkswagen AG does notguarantee or accept any liabilit y wi th res pect t o t h e c o r r e c t n e ss o f in format ion in this document. Copyright by Volkswagen AG. – Recreate original joint, RP spot weld seam. Note Distance between weld points -a- approx. 35-40 mm – Weld cover plate parting cut, SG continuous weld seam. u 10.2.3 Shortening new longitudinal member with cover plate m – Shortening longitudinal member with cover plate ⇒ “9.2.3 Shortening new longitudinal member with cover plate”, page 82 – Install front bumper bracket. ⇒ “4.2 Installing”, page 62 Jetta 2005 ➤ Body Repairs - Edition 04.2009