13 minute read
Clinical

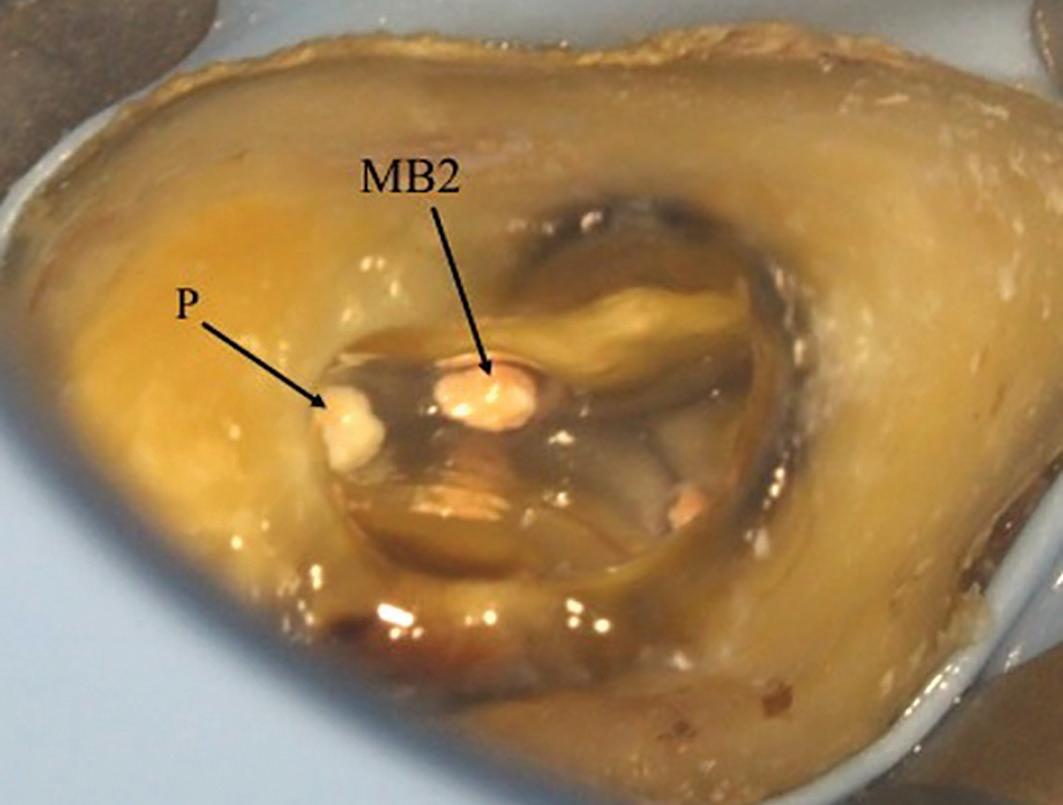
7a: MB2 orifice detected close to the palatal canal 7b: After obturation
of dentine, particularly in older patients. Therefore, the access cavity will need to be extended to remove this. In calcified cases, the MB2 may be slightly deeper apically. Piezo-electric ultrasonic tips or long-neck burs used in a slow handpiece are very useful removing the dentine shelf and searching for MB2. They allow good vision during
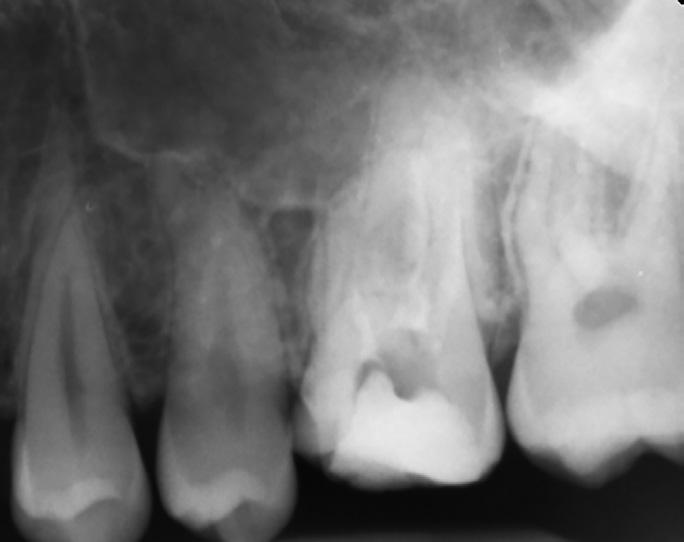
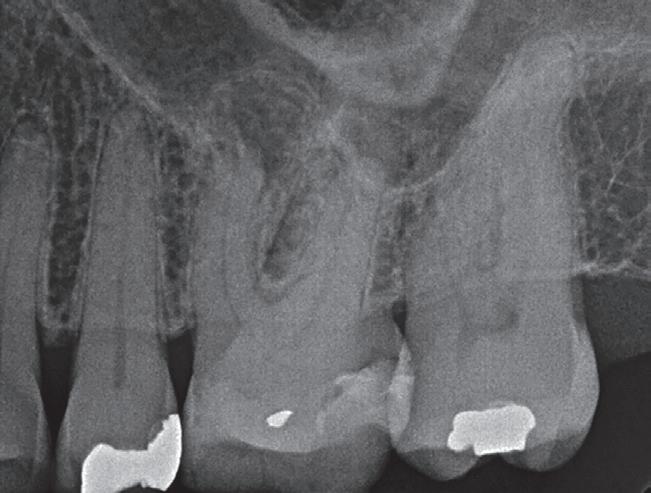
8a: Preoperative radiograph. The tooth had previously been accessed by the referral dentist. 8b: MB2 was located within the MB1 orifice (mesial wall). The microscope photograph was taken after the MB1 and MB2 have been fully prepared 8c: Master cone radiographs taken with a GP cone in MB1
8d: Master cone radiograph taken with cone in MB2 d) Midfill radiograph shows MB1 and MB2 are separate canals 8e: Postoperative radiograph 8f: Post-obturation photograph showing one MB orifice. A trough line can be seen where MB2 was searched for in its ‘typical’ location

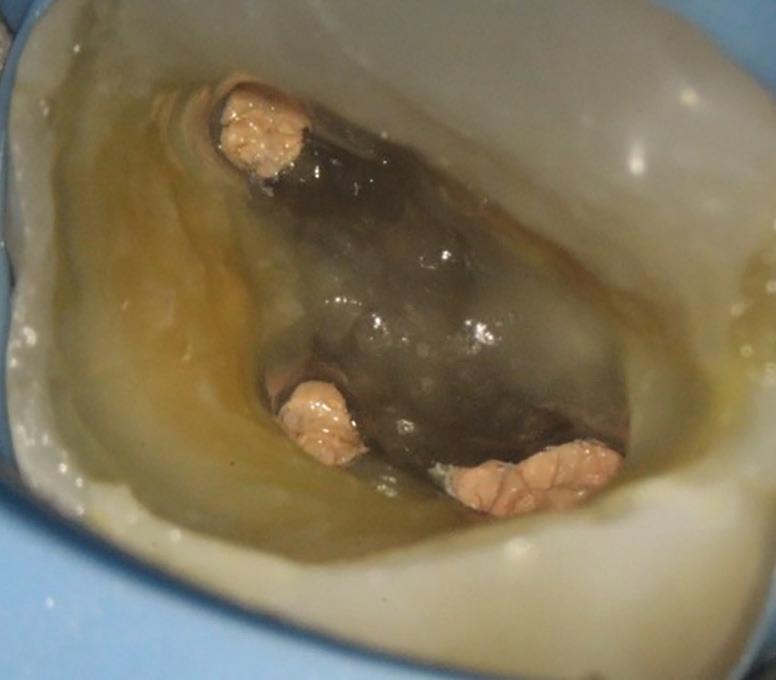
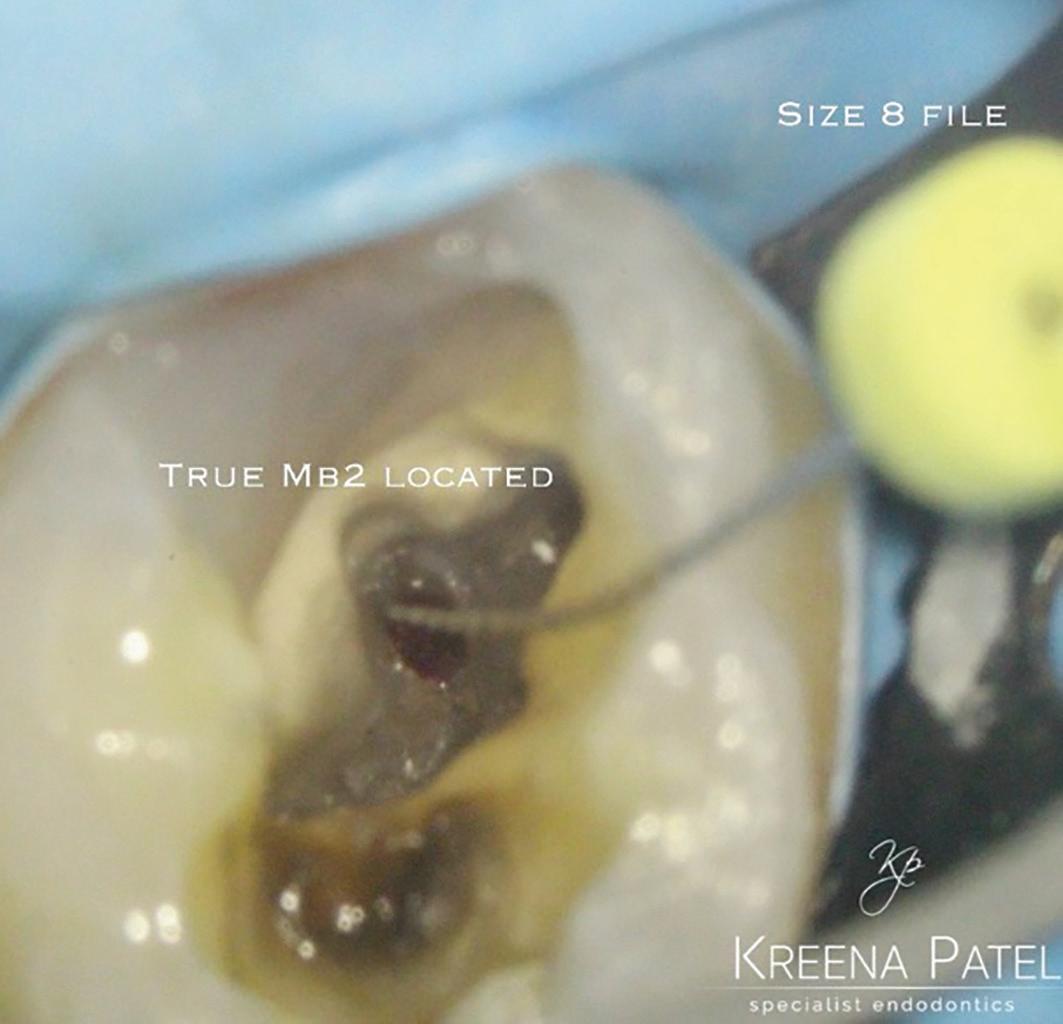
9a: Access regained: the GP point was removed to reveal the perforation on the pulp floor 9b: The true MB2 canal was located using a small hand file
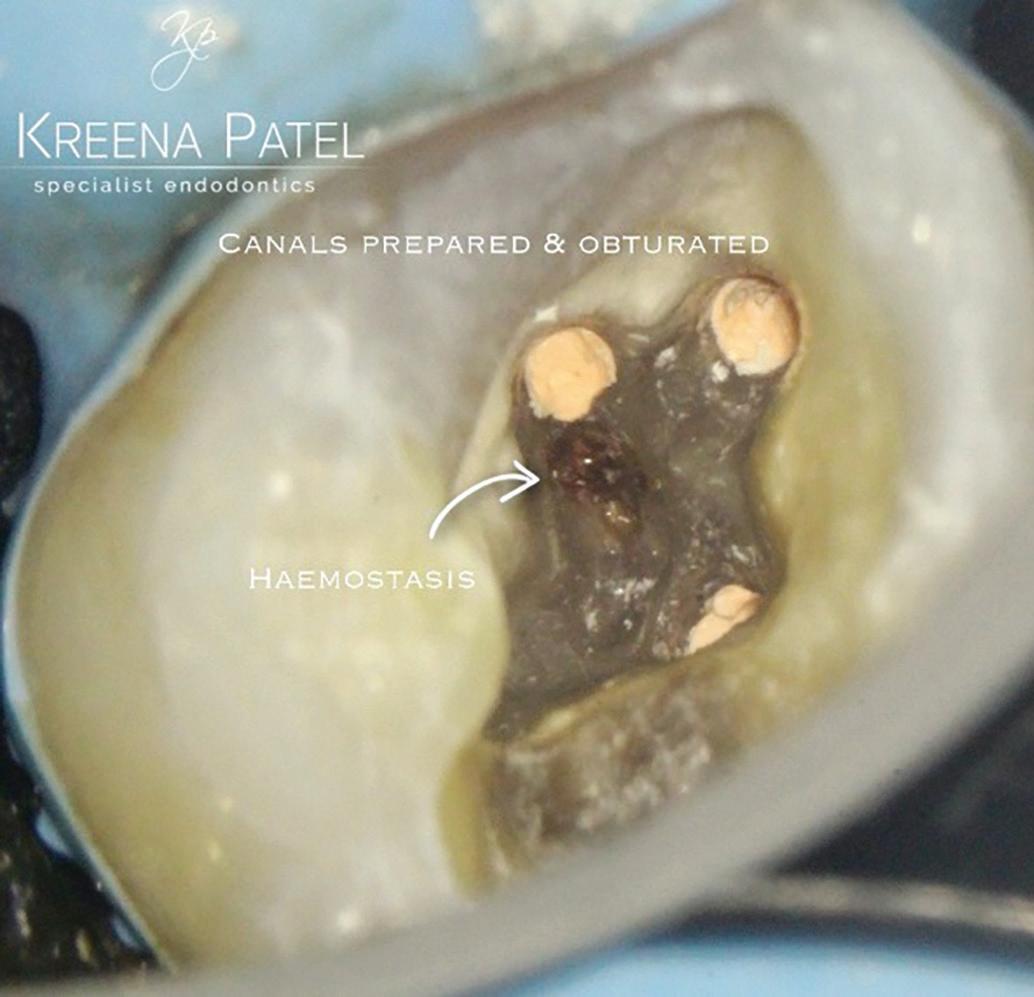
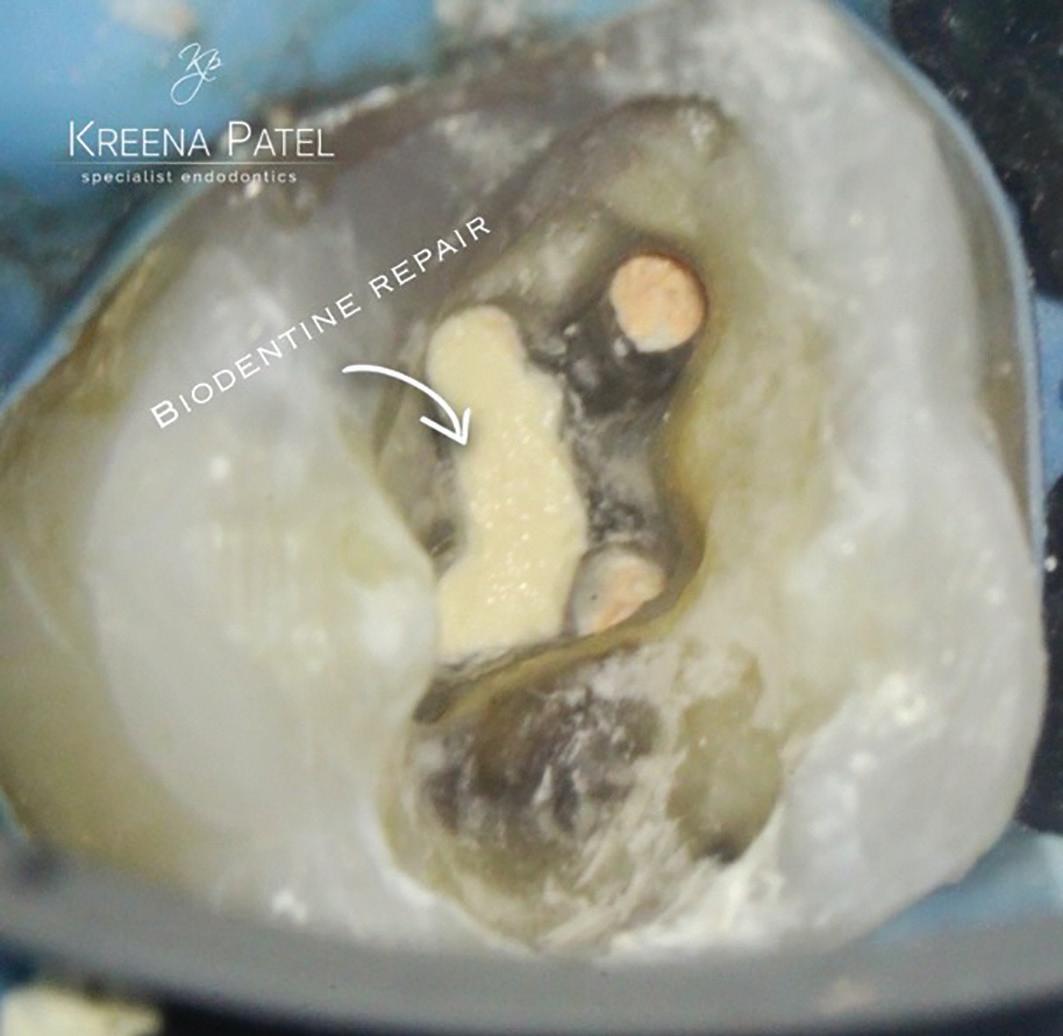
9c: Canals prepared and obturated 9d: Perforation repaired using Biodentine
preparation because the head of the handpiece does not obstruct your view. They also remove dentine and calcifications in a controlled manner so the preparation is more conservative. It is essential to preserve as much dentine as possible because it is quite easy to perforate the mesial wall or pulp floor when searching for MB2 (Figure 9).
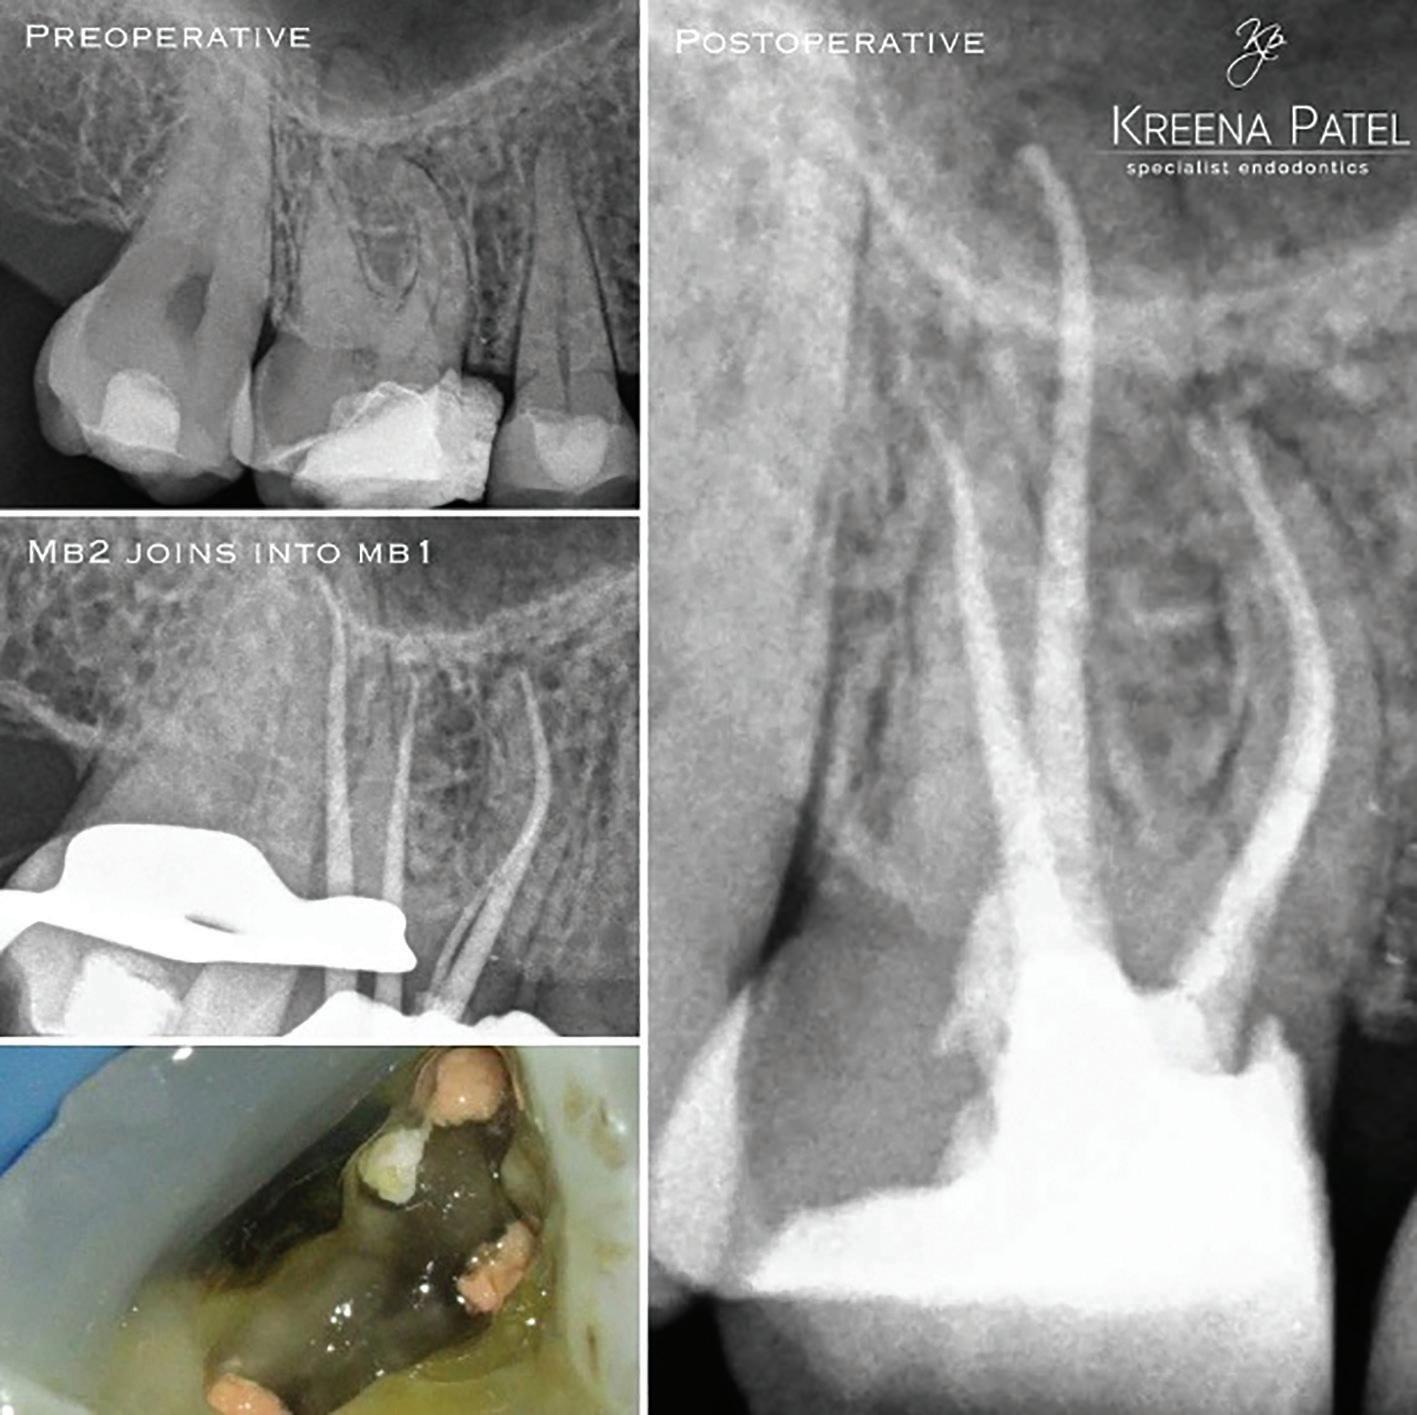
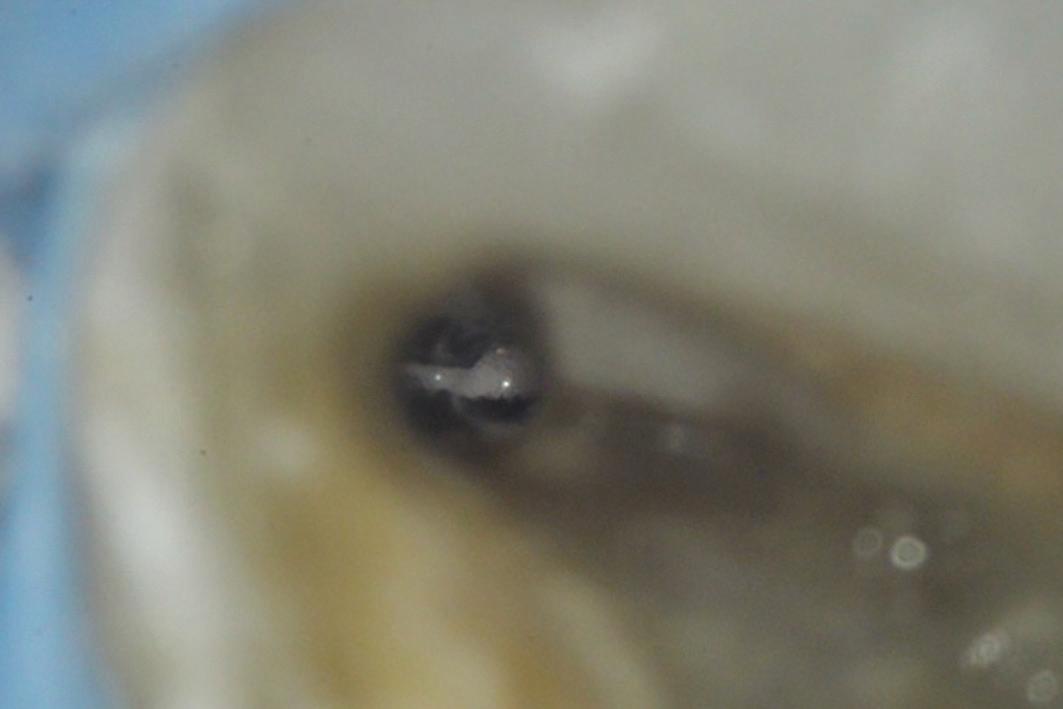
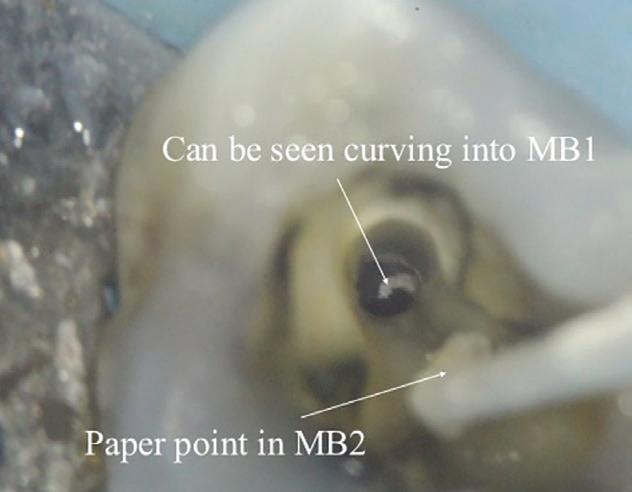
10a: Master cone shows MB2 joining MB1 10b: MB2 joins MB1 at an acute curvature (white arrow)
Instrumentation
I strongly advise fully preparing the MB1 canal prior to locating and instrumenting MB2. The MB2 often joins MB1 at a sharp angle, and it makes negotiation much easier if the MB1 is already enlarged (Figure 10).
Instrumentation of MB2 can often be difficult. The canal often has an abrupt mesial curvature in the coronal 1-3mm making it challenging to negotiate initially. I find that spending time initially gaining correct access and coronal flaring to gain straight line access can prevent ledges, which once formed are very difficult to bypass. Rotary orifice openers used in a brushing motion away from the furcation are very useful for this.
Small hand files (size 8-10) can then be taken further into the canal and a glide path formed prior to using rotary instruments. If at any point the hand file meets resistance the canal can be flared up to this point prior to taking precurved hand files back into the canal. The MB2 can be calcified in extensively restored teeth and older patients. Stiffer hand files and 17% EDTA solution can be very useful for these situations but care needs to be taken as it is also easy to ledge the canal using these.
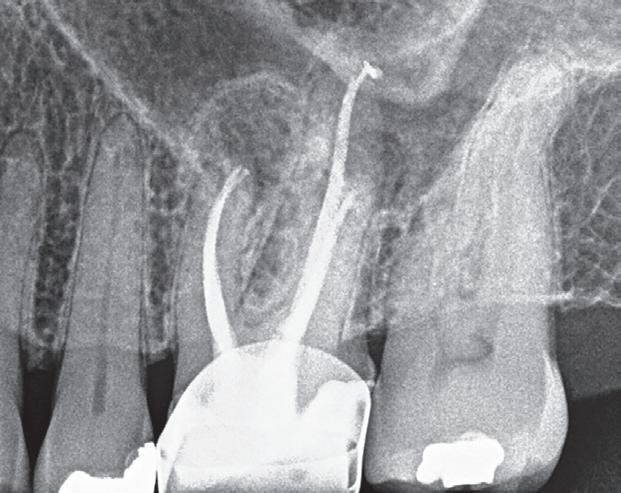
The MB root is a small root and a more conservative preparation of the MB2 is necessary to prevent unnecessary weakening and fracture long-term. I would recommend using a slightly less tapered (6%) rotary file for the final preparation. Some clinicians advise preparing MB2 to the level it joins MB1 to conserve dentine. However, in my experience I find the MB2 frequently joins MB1 but then separates into its own canal apically (2-1-2 morphology) (Figure 11). Therefore, I would recommend always preparing the MB2 to full length. Obturation of these complicated systems presents its own challenge and can only be done effectively using a warm technique.
Summary
Successful root canal treatment involves treating all the canals present. The MB2 has been shown to be present in most maxillary molars and the clinician should approach treatment of these teeth with this in mind. The MB2 is notoriously challenging to locate and negotiate, but with the correct magnification, light, equipment, knowledge and experience it can be treated predictably.
11a: Preoperative radiograph 11b: A paper point has been placed in MB2, and can be seen appearing in MB1 where the canals join 11c: Mid-fill radiograph showing the MB2 has a separate apical foramen from MB1. The MB1 &MB2 have a 2-1-2 morphology (2 orificesmerging into 1 canal – separating into 2 canals). The MB2 should always be fully instrumented because this anatomy is difficult to predict
11d: Postoperative radiograph 11e: Microscope photograph
References
LJ, Barrows MJ, BeGole EA, Wenckus CS (2002) Effect of magnification on locating the MB2 canal in maxillary molars J Endod 28(4):324-327
Blattner TC, George N, Lee CC, Kumar V, Yelton CD (2010) Efficacy of cone beam computed tomography as a modality to accurately identify the presence of second mesiobuccal canals in maxillary first and second molars: a pilot study. J Endod 36(5):867–870
Krasner P, Rankow HJ (2004) Anatomy of the pulp-chamber floor. J Endod 30(1):5-16 Parker J, Mol A, Rivera EM, Tawil P (2017) CBCT uses in clinical endodontics: the effect of CBCT on the ability to locate MB2 canals in maxillary molars. Int Endod J 50(12):1109–1115
Reprinted with permission by Endodontic Practice September 2020
Aesthetic two stage crown lengthening for altered passive eruption: A 25-year case report and review
André W van Zyl1 and Inus Snyman2
1 André W van Zyl: BChD, MChD. Private Practice Periodontist, Hermanus & Honorary Professor, Department of Oral Medicine and Periodontics, Faculty of Health Sciences, University of Witwatersrand.
ORCID Number: 0000-0002-7985-4054
2 Inus Snyman: BChD, PDD (Implantology), PGDipDent (Oral Surgery), PGDipDent (Implantology). Department of Periodontics and Oral Medicine, School of Dentistry, Faculty of Health Sciences, University of Pretoria.
ORCID Number: 0000-0002-8480-5361
Corresponding author:
André W van Zyl Private Practice Periodontist, Hermanus & Honorary Professor, Department of Oral Medicine and Periodontics, University of Witwatersrand, South Africa. Tel: +27(28) 3121510 E-mail: info@andrevanzyl.co.za
Introduction
Mucogingival abnormalities may involve lack of gingiva, excess gingiva, recession, shallow vestibule, abnormal colour and aberrant frenula (AAP Consensus 1999).1,2 Periodontal plastic surgery was a term introduced by Preston Miller in the early nineties to describe mucogingival or periodontal procedures dealing with aesthetics.3 It is of the utmost importance to understand that none of the conditions or procedures described in this article can be correctly diagnosed or treated until such time as all infection and inflammation have been resolved. There should be no gingivitis or periodontitis present.
Periodontists are often requested to correct an excessive gingival display or correct excessive exposure of teeth due to recession. Periodontal aesthetic surgery around natural teeth therefore involves either the removal of excess tissue in gummy smiles or the repair of lost tissue such as in recession. The former involves the procedure of crown lengthening or gingivectomy and the latter the treatment of marginal gingival recession by grafting. Crown lengthening is carried out either for aesthetic or functional purposes. Indications for crown lengthening include subgingival caries, crown or root fractures, altered passive eruption, short teeth, excessive gingival display, uneven gingival contours, cervical root resorption and short clinical abutment.4 This article will cover excessive gingival display (Altered Passive Eruption, APE) and the procedure of two stage crown lengthening only.
Crown lengthening (CL) may be achieved by either gingivectomy (removal of excess gingiva) or by removal of bone (ostectomy) and gingiva. It is essential to determine whether bone needs to be removed for lengthening. In the past this was done by doing bone sounding under local anaesthesia, which is a fairly invasive procedure. CBCT is now an alternative and not only can bone be assessed by this, but the soft tissue too, provided a soft tissue CBCT approach is used.5
CL is aimed at exposing more of the clinical crown of the tooth. There are various reasons why this may be desirable but for the purpose of this article we will focus on two of the main aesthetic reasons caused by APE: 1. A gummy smile where the teeth are not fully exposed and partly covered by gingiva (Figure 1) 2. An asymmetric gingival contour which is not aesthetic (Figure 2)
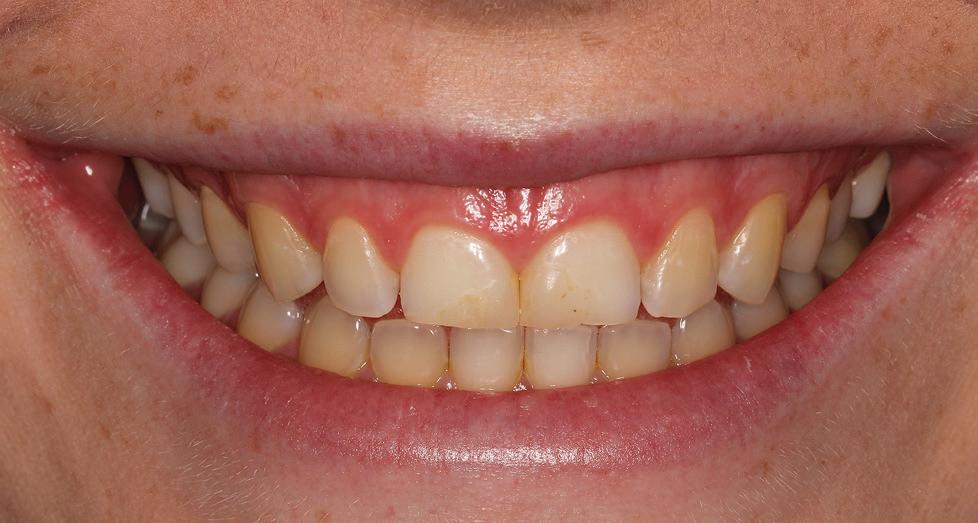
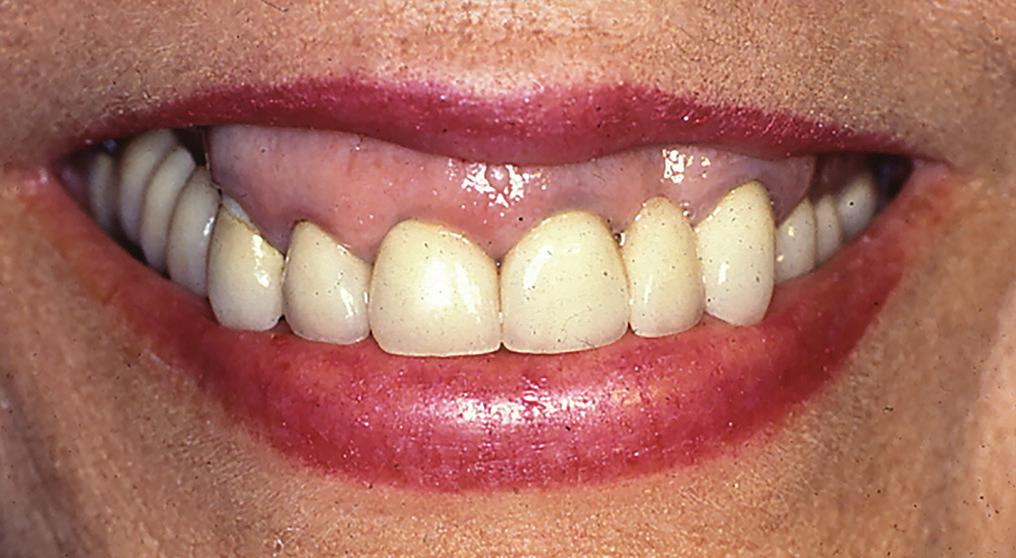
Figure 1: Gummy smile due to Altered Passive Eruption. Figure 2: Asymmetric gingival contour.
Figure 3: A gummy smile due to vertical maxillary excess where teeth are almost fully exposed.
It is important to be able to diagnose the underlying problem correctly before embarking on the procedure.
Altered Passive Eruption (APE)
It is important to note that excessive gingival display is not always due to APE, but may also be due to vertical maxillary excess, sometimes in combination with a high lip line (Figure 3).6,7
In a South African study it was found that Delayed Passive Eruption had a prevalence of 12%.8 Excessive gingival display is most often diagnosed as APE, but it may also be seen in drug induced enlargement and in plaque induced swelling.6 Passive eruption is the process that occurs after the tooth erupts into the oral cavity (the active eruption phase) and is the process where the gingiva slowly migrates apically to expose the anatomical crown.6 APE occurs when the gingiva does not reach its correct position and covers part of the clinical crown, giving a gummy appearance.6 It is not clear exactly when the physiological movement of passive eruption ends and thus, at what age a diagnosis of APE can be made.6 Coslett et al. reported that by the age of 18 -20 years, the majority of individuals have a mature dentogingival relationship.9
Multiple factors have been proposed as possible causes for APE. These include occlusal interference by soft tissue during the eruption phase, the presence of thick fibrotic gingiva, genetics, the presence of thick bone, orthodontic trauma and endocrine conditions.10
APE can be classified into two types, based on the position of the mucogingival junction in relation to the cemento-enamel junction.9 Type 1 APE is characterised by the mucogingival junction being apical to the alveolar bone crest, usually with a wide band of attached gingiva.6 This band of attached gingiva is usually wider that the generally accepted mean width of 3,0 - 4,2 mm in the maxilla and 2,5 - 2,6 mm in the mandible.6 In contrast, Type 2 APE is defined by the presence of a band of attached gingiva which falls within the normal mean width.6 In type 2 APE, the mucogingival junction is located at the level of the cemento-enamel junction, with the whole band of attached gingiva located on the anatomic crown.6 Both type 1 and type 2 APE, can further be subclassified into subgroup A or subgroup B.6 In subgroup A, the alveolar bone crest is located at the normal position, 1 – 3 mm apical to the cemento-enamel junction.6 Subgroup B refers to those cases where the alveolar bone crest is located at or coronal to the level of the cemento-enamel junction.6 Correct classification and diagnosis of each case is of critical importance before treatment commences. APE type 1 subgroup A may be treated with gingivectomy alone, whereas the authors recommend a two-stage crown lengthening approach for all other classifications.6 Whether the second stage surgery (gingivectomy) in a two-stage crown lengthening approach
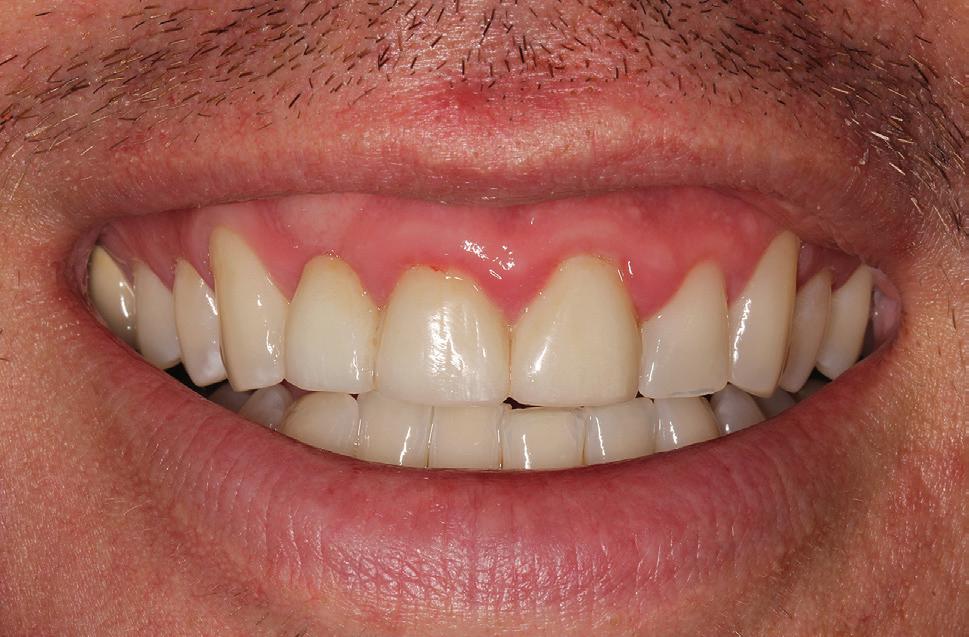
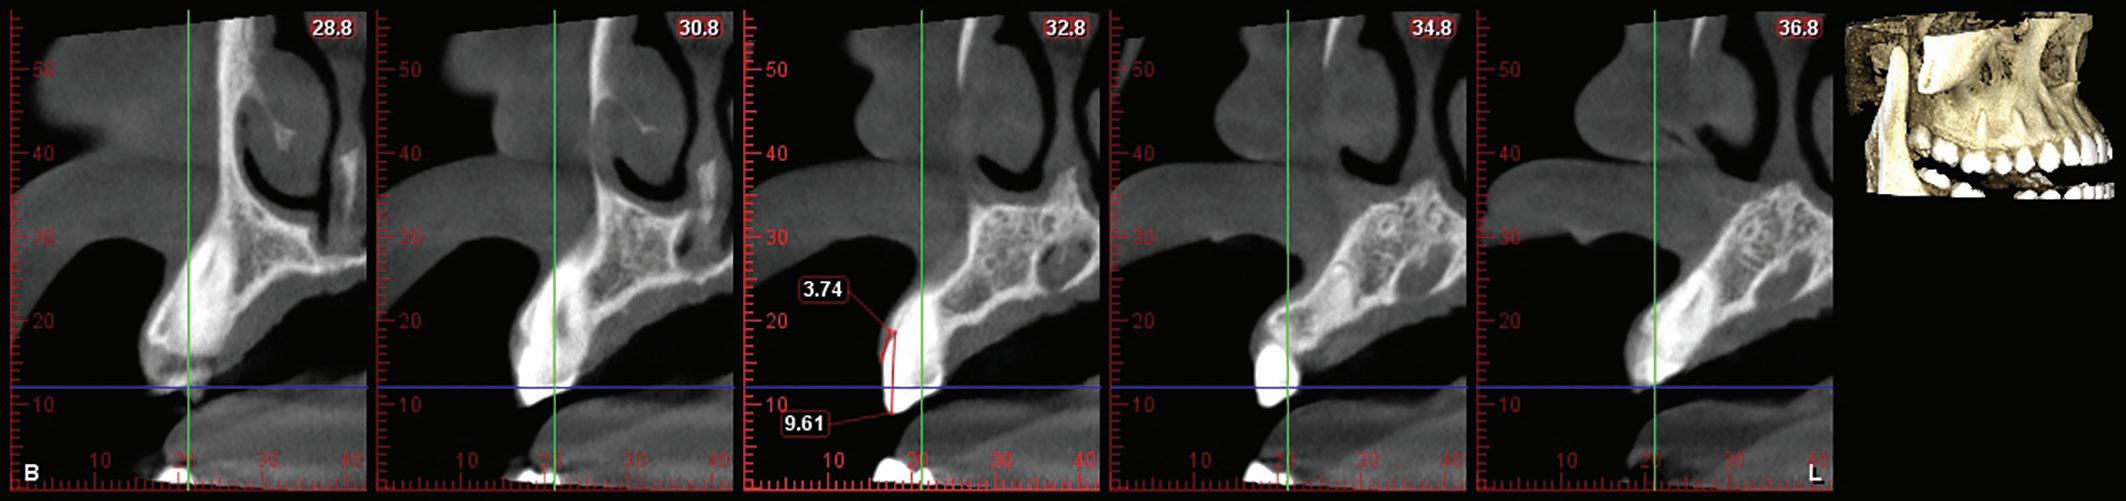
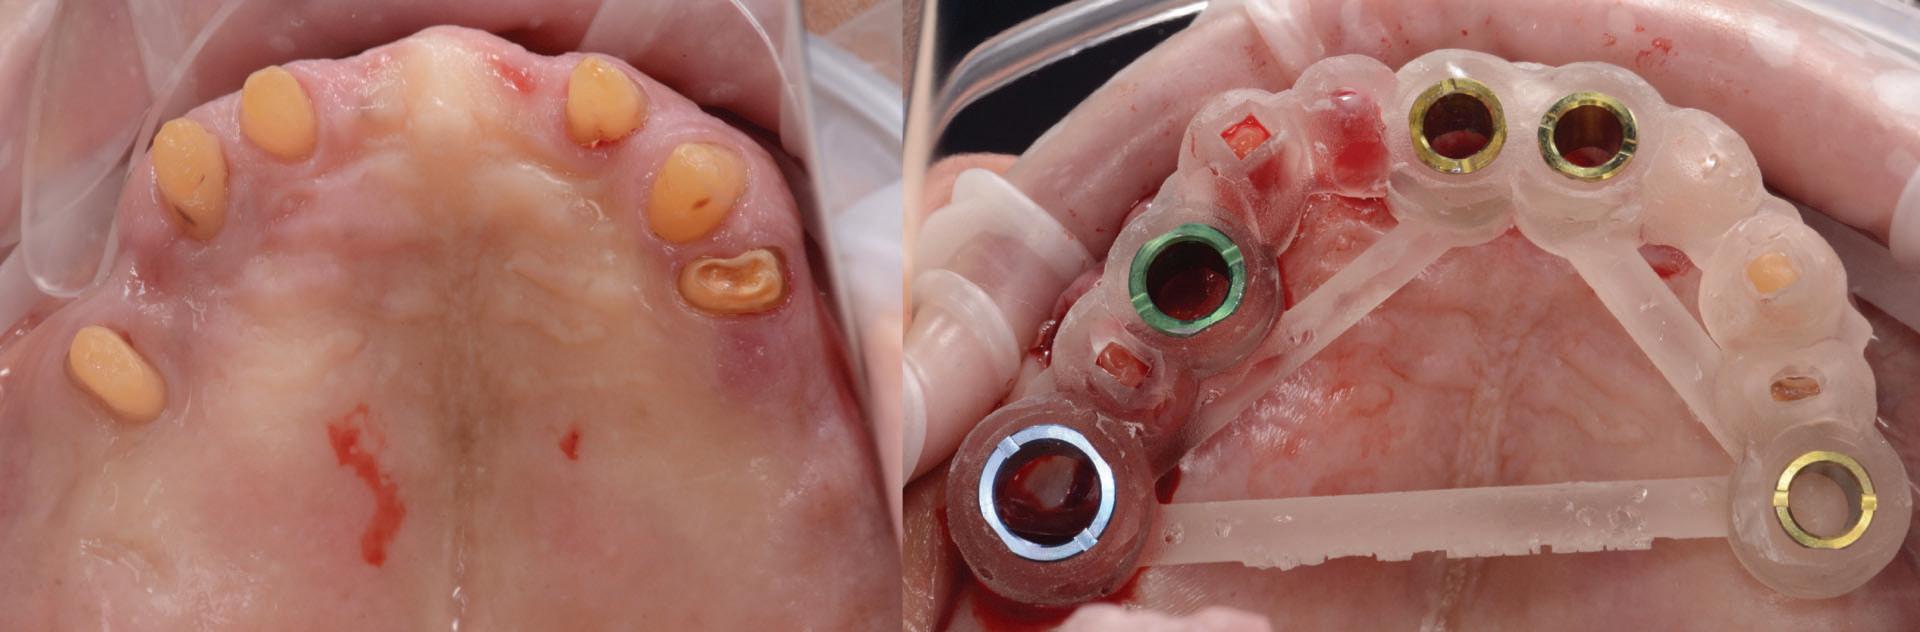
Figure 4: Soft tissue retraction allows for measurement of supra-crestal gingival dimensions.
is required, will be determined by the outcome after healing following the first stage surgery. It is the author’s experience that a second stage gingivectomy is often not required due to adequate recession after ostectomy. All patients are given the choice of the second stage and very few opt to have a second stage. Should the planning however involve crowning of the anterior maxillary teeth, it is for the restorative clinician to decided whether optimal lengthening has been reached.
Supracrestal attached tissues (biologic width) and dento-gingival complex
The term biologic width was recently replaced with the term supracrestal attached tissues.2,11 The physiological function of the supracrestal attached tissues is that of a protective barrier for the periodontal ligament and supporting alveolar bone.12 The supracrestal attached tissues include the junctional epithelium and connective tissue attachment, the average dimensions which were measured to be 0,97 mm and 1,07 mm respectively, yielding an average dimension of 2.04 mm for the supracrestal attached tissues.13 A more recent systematic review found similar mean values of the supracrestal attached tissues, reported as 2.15 mm - 2.30 mm.12 It is however extremely difficult, if not impossible, to clinically measure the dimension of the supracrestal attached tissues accurately. For this reason, we should rather rely on the dimension of the dento-gingival complex, which can be measured clinically or by soft tissue CBCT (Figure 4). The dento-gingival complex includes the sulcus depth, in addition to the junctional epithelium and connective tissue attachment. A study examining the supraosseous gingiva dimension (dento-gingival complex), found the mean dimension of the maxillary facial dento-gingival complex to rage between 3,71 ± 0.51 mm and 4,03 ± 0,41 mm.14
Disagreement still exists among authors with regards to the amount of ostectomy needed during crown lengthening procedures.6 The suggested distance between bone crest and cemento-enamel junction range between 1 - 3 mm and the suggested distance from bone crest to planned gingival margin is ≥ 3 mm.7,15 - 23 Therefore, it is reasonable to perform presurgical measurement of the dento-gingival complex in each patient, to determine the extent of bone removal during a crown lengthening procedure.
It has been shown that significant alterations can occur in the marginal periodontal tissue level from the day of surgery up to 12-months following healing.24 The greatest changes occur during the first 3 months after surgery.25 The coronal shift of the soft tissue margin during healing, also referred to as soft tissue rebound, is more pronounced in thick periodontal phenotypes, compared to thin phenotypes.24 For this reason, planning the extent of ostectomy should also take into consideration the patient’s periodontal phenotype.4 The term periodontal biotype was recently replaced with the term periodontal phenotype.2 Periodontal phenotype describes both the gingival phenotype (gingival thickness and keratinized tissue width) and the thickness of the buccal bone plate.11 Biotype refers to a group of organs which have the same genotype, whereas phenotype refers to the appearance of an organ based on a multifactorial combination of genetic traits and environmental factors.11 The phenotype, unlike genotype, can change over time or can be modified by means of clinical intervention.11
To further complicate treatment planning, the mere action of elevating a full thickness flap during crown lengthening, may cause marginal bone loss. Two clinical studies reported a mean crestal bone loss of 0,6 mm and 0,47 mm respectively, after full thickness flap elevation.26,27 If the surgeon did not plan for this additional bone loss, treatment may lead to unsatisfactory results such as exposed root surfaces or crown margins. It is thus clear that meticulous treatment planning should be performed before treatment commences.