17 minute read
Clinical


Figure 5: Surgical stent used to assess ostectomy levels. Figure 6: Floss can be cold sterilized and used intra-operative to assess symmetry in bone levels.

Two Stage Crown lengthening
The technique of performing a CL in two stages, with ostectomy and osteoplasty done in stage 1 and a gingivectomy, if indicated, in stage 2, is a predictable procedure with a low trauma impact to the patient. The alveolar bone is removed and shaped in the first procedure without any soft tissue removal and after a few months of healing, a second procedure of gingivectomy may be needed if there has not been sufficient gingival recession.
The classic procedure of crown lengthening is a single procedure, involving a simultaneous soft tissue contouring (excision) and bone removal (ostectomy). David Garber introduced the two stage crown lengthening in the early 1990’s, describing a procedure where the bone contouring is done in the first procedure and the gingival contouring in a subsequent procedure after a suitable period of healing.28 Removing gingiva (and bone) in one procedure in a perfect aesthetic symmetry is difficult and will harm the patient by reducing vital attached gingiva needed for long-term stability. In the authors’ experience, very few if any patients have enough gingiva to undergo excision during a crown lengthening. It may also prove difficult to achieve a thin feather edge to the marginal gingiva, which gives the most ideal aesthetics, when excising gingival tissue in a one stage procedure.
Bone contouring by itself, is a more controlled slow process, where different diamond burs are used to sculpt the bone and finish it in a thin feather edge- which in turn will induce a thin marginal gingival edge. Achieving perfect symmetry with this process is also easier due to the slow controlled removal of tissue whilst allowing measurements using either a periodontal probe, a surgical stent (Figure 5) and floss to do a quick check intra-operatively (Figure 6).
Before any periodontal aesthetic surgery for excessive gingival display can be planned, a simple decision-making tree can be utilized to determine the diagnosis and following from that the correct procedure can be selected (Figure 7):

Tooth measurements
The visible crowns of the anterior six maxillary teeth are important in the smile. Before any crown lengthening can be contemplated, the tooth sizes should be measured and documented in the file. Central incisor teeth are approximately the same size as the canines and in the range of 10-13mm, whereas lateral incisors are slightly smaller and in the range of 9-11mm.29
Case report: Two stage crown lengthening - a 25-year follow-up
A 34-year-old patient presented with a gummy smile (Figure 8) which was classified as altered passive eruption type 1B. The patient needed a full rehabilitation of the occlusion due to a deep bite, attrition on the palatal aspects of teeth 13-23 and loss of posterior occlusal stability. The patient had excellent plaque control, no periodontal disease and a non-vital 11 due to trauma a few years prior to consultation.
Radiographic examination revealed no alveolar bone loss and clinical probing depths varied from 1-3 mm.
The anterior maxillary teeth had over-erupted due to the attrition and lack of occlusal stability.
It was decided to perform a two-stage crown lengthening as it required extensive lengthening and the patient’s aesthetic expectations were high. After a wax-up, a surgical crown lengthening guide was manufactured to fit over the teeth (Figure 9) to give an indication of what would be required to restore the smile surgically as well as prosthetically. The stent was fitted in the patient’s mouth and a black pencil was used to block-out the incisal edges to simulate the final incisal edges and size of the teeth (Figure 10). This allowed a clear estimation of how much lengthening would be required. Photographs were taken and it was decided to do an ostectomy first, followed by a second stage of gingivectomy after 3-4 months.
Following administration of local anaesthesia, the ostectomy and osteoplasty was performed after elevating a full thickness buccal flap with no palatal flap elevation (Figure 11). The surgical guide served as a reference for the planned crown margins, to ensure adequate amount of ostectomy and to prevent future violation of the space to be occupied by the supra-crestal attached tissues. Deep interdental split thickness flap design allowed full access to the interdental bone for contouring. No interdental crestal reduction was done, mainly because it was not indicated

Figure 8: Altered passive eruption with a component of vertical maxillary excess, showing incomplete exposure of clinical crowns.

Figure 10: Surgical stent placed intra-orally with incisal edges blocked out using a black pencil. Figure 9: Surgical stent to indicate the new planned clinical crowns.


Figure 11: Full flap reflection with partial thickness interdentally, allowing access to buccal and interdental bone for ostectomy and osteoplasty.

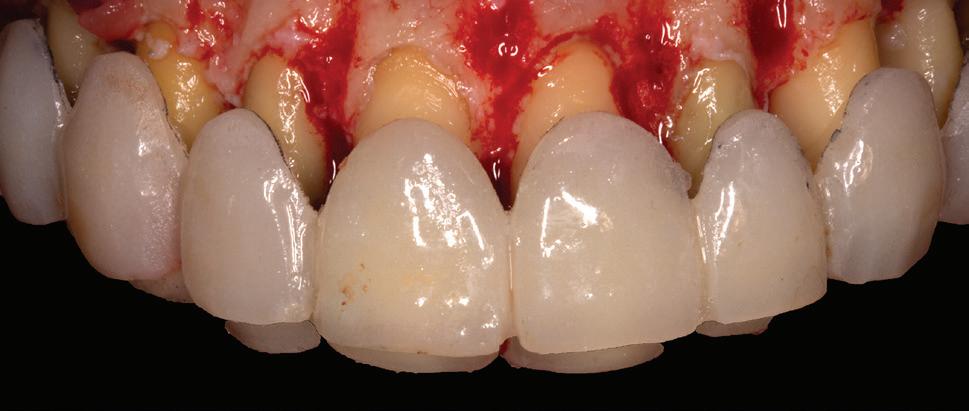
Figure 12: Closure of flap with vertical everting mattress sutures to allow for maximum soft tissue fill in embrasure spaces. Figure 13: Healing after 3 months showing 2-3mm of recession in a symmetrical pattern, following the bone contour.
Figure 14: Second stage gingivectomy after 4 months. Figure 15: Two weeks after second stage surgery, showing the extent of lengthening.
Figure 16: Six months after placing final crowns. Figure 17: 25 Years after surgery, showing stable gingival margins.


in this case, but also to prevent inadequate papillae fill in the gingival embrasure spaces after healing (Figure 11). Vertical everting mattress 6/0 braided sutures were used to close the flap with maximum embrasure filling with soft tissue (Figure 12). Although monofilament sutures such as nylon have less bacterial contamination potential, softer braided sutures are much more comfortable to the patient. Healing was uneventful and some lengthening was obtained with the recession that took place after ostectomy (Figure 13).
After 4 months, gingivectomy was done with scalpel, cauterization and thinning of the tissue by course diamond drills (Figure 14). This was possible due to the presence of a wide band of attached keratinized mucosa (altered passive eruption type 1). Two weeks later, healing shows extensive lengthening (Figure 15)
VITA In-Ceram® (VITA Zahnfabriek, Germany) all-porcelain crowns were placed after a further 4 months of healing and tissue maturation, with a good aesthetic outcome (Figure 16).
The patient was followed up at regular intervals and after 15 years the anterior 6 crowns (13-23) were replaced due to marginal fractures of the In-Ceram® crowns on the palatal aspects.
The periodontal tissues are stable at 25 years (Figure 17). This case demonstrates a stable long-term result of performing extensive aesthetic crown lengthening utilizing a two-stage surgical protocol with a predictable step-by-step treatment. This allowed full control and minimal loss of attached gingiva, due to at least 2-3 mm of lengthening obtained from the process of recession.
Acknowledgements
The authors would like to thank Dr. Callie Hamman, Prosthodontist, private practice, Durbanville, Cape Town for the prosthodontic concept, stent and crowns of the Case Report. as well as Dental Technician: Ian Robertson, Bellville, Cape Town

References
1. Prato GPP. Mucogingival deformities. Ann. Periodontol. 1999; 4(1):98-100. 2. Caton JG, Armitage G, Berglundh T, Chapple IL, Jepsen S, Kornman KS, et al. A new classification scheme for periodontal and peri-implant diseases and conditions–introduction and key changes from the 1999 classification. J. Periodontol. 2018; 89:S1-S8. 3. Miller JP. Concept of periodontal plastic surgery. Practical periodontics and aesthetic dentistry: PPAD. 1993; 5(5):15-20, 2; quiz 2. 4. Marzadori M, Stefanini M, Sangiorgi M, Mounssif I, Monaco C, Zucchelli G. Crown lengthening and restorative procedures in the esthetic zone. Periodontol. 2000. 2018; 77(1):84-92. 5. Januario AL, Barriviera M, Duarte WR. Soft tissue cone-beam computed tomography: A novel method for the measurement of gingival tissue and the dimensions of the dentogingival unit. Journal of esthetic and restorative dentistry. 2008; 20(6):366-73. 6. Mele M, Felice P, Sharma P, Mazzotti C, Bellone P, Zucchelli G. Esthetic treatment of altered passive eruption. Periodontol. 2000. 2018; 77(1):65-83. 7. Robbins JW. Differential diagnosis and treatment of excess gingival display. Practical periodontics and aesthetic dentistry: PPAD. 1999; 11(2):265-72; quiz 73. 8. Volchansky A, Cleaton-Jones P. Delayed passive eruption. A predisposing factor to vincent’s infection. J. Dent. Assoc. S. Afr. 1974; 29:291-4. 9. Vanarsdall R, Coslet J, Weisgold A. Diagnosis and classification of delayed passive eruption of the dentogingival junction in the adult. The Alpha Omegan. 1977. 10. Alpiste-Illueca F. Altered passive eruption (ape): A littleknown clinical situation. Med. Oral Patol. Oral Cir. Bucal. 2011; 16(1):e100-4. 11. Jepsen S, Caton JG, Albandar JM, Bissada NF, Bouchard P, Cortellini P, et al. Periodontal manifestations of systemic diseases and developmental and acquired conditions: Consensus report of workgroup 3 of the 2017 world workshop on the classification of periodontal and peri-implant diseases and conditions. J. Clin. Periodontol. 2018; 45:S219-S29. 12. Schmidt JC, Sahrmann P, Weiger R, Schmidlin PR, Walter C. Biologic width dimensions–a systematic review. J. Clin. Periodontol. 2013; 40(5):493-504. 13. Gargiulo AW, Wentz FM, Orban B. Dimensions and relations of the dentogingival junction in humans. The Journal of Periodontology. 1961; 32(3):261-7. 14. Perez JR, Smukler H, Nunn ME. Clinical dimensions of the supraosseous gingivae in healthy periodontium. J. Periodontol. 2008; 79(12):2267-72.
15. Cairo F, Graziani F, Franchi L, Defraia E, Pini Prato GP. Periodontal plastic surgery to improve aesthetics in patients with altered passive eruption/gummy smile: A case series study. International journal of dentistry. 2012; 2012. 16. Camargo PM, Melnick PR, Camargo L. Clinical crown lengthening in the esthetic zone. Journal of the California Dental Association. 2007; 35(7):487-98. 17. Rossi R, Benedetti R, Isabel Santos-Morales R. Treatment of altered passive eruption: Periodontal plastic surgery of the dentogingival junction. European Journal of Esthetic Dentistry. 2008; 3(3). 18. Dolt AH, Robbins JW. Altered passive eruption: An etiology of short clinical crowns. QUINTESSENCE INTERNATIONAL-ENGLISH EDITION-. 1997; 28:363-74. 19. Batista Jr EL, Moreira CC, Batista FC, de Oliveira RR, Pereira KK. Altered passive eruption diagnosis and treatment: A cone beam computed tomography-based reappraisal of the condition. J. Clin. Periodontol. 2012; 39(11):1089-96. 20. Ribeiro FV, Hirata DY, Reis AF, Santos VR, Miranda TS, Faveri M, et al. Open-flap versus flapless esthetic crown lengthening: 12-month clinical outcomes of a randomized controlled clinical trial. J. Periodontol. 2014; 85(4):536-44. 21. Levine R, McGuire M. The diagnosis and treatment of the gummy smile. Compendium of continuing education in dentistry (Jamesburg, NJ: 1995). 1997; 18(8):757-62, 64; quiz 66. 22. Claman L, Alfaro MA, Mercado A. An interdisciplinary approach for improved esthetic results in the anterior maxilla. The Journal of prosthetic dentistry. 2003; 89(1):1-5. 23. Abou-Arraj RV, Souccar NM, editors. Periodontal treatment of excessive gingival display. Semin. Orthod.; 2013: Elsevier. 24. Pontoriero R, Carnevale G. Surgical crown lengthening: A 12-month clinical wound healing study. J. Periodontol. 2001; 72(7):841-8. 25. Pilalas I, Tsalikis L, Tatakis DN. Pre-restorative crown lengthening surgery outcomes: A systematic review. J. Clin. Periodontol. 2016; 43(12):1094-108. 26. Donnenfeld OW, Marks RM, Glickman I. The apically repositioned flap–a clinical study. The Journal of Periodontology. 1964; 35(5):381-7. 27. Tavtigian R. The height of the facial radicular alveolar crest following apically positioned flap operations. J. Periodontol. 1970; 41(7):412-8. 28. Garber DA, Salama MA. The aesthetic smile: Diagnosis and treatment. Periodontol. 2000. 1996; 11(1):18-28. 29. Magne P, Gallucci GO, Belser UC. Anatomic crown width/length ratios of unworn and worn maxillary teeth in white subjects. The Journal of prosthetic dentistry. 2003; 89(5):453-61.
This article was published online in International Dentistry - African Edition in 2020

Stratified layering of composite restorations after the use of orthodontic aligners
Linda Greenwall1 and Robert Katz2
1 Dr Linda Greenwall, Specialist - Prosthodontics and Restorative Dentistry, London, UK
2 Dr Robert Katz, Specialist Orthodontics, London UK There is a trend towards minimally invasive aesthetic dentistry and ensuring that no healthy enamel is cut in the preparation of an enhanced smile.
This case illustrates the use of orthodontic aligners, whitening treatment in the aligners, and composite bonding using a stratified layering technique and the placement of glass ionomer restorations on the cervical erosion areas.
The use of aligners in orthodontics
The use of removable aligners has increased greatly over the last 18 years. In 1999, Align Technology addressed the demand for an aesthetic alternative to braces by developing an ‘invisible’ method of orthodontic treatment (Invisalign) that uses a series of computer-generated, clear, removable aligners to move the dentition (Kunicio et al, 2007). Align Technology reports that, since then, more than four million Invisalign cases have been undertaken worldwide.
Aligner popularity has increased in adult patients who do not want to wear fixed braces, as they find them more difficult to tolerate, due to their effect and impact on daily life (Bernabe et al, 2008). The simple idea that a clear aligner can be used to align and reposition teeth is appealing to adult patients.
Patients can remove the aligners for eating, brushing, flossing and important meetings, but can wear the aligners for most of the day (Joffe, 2003).
The aligners are usually comfortable and offer ease of use. They are made of polyurethane and are normally 0.75mm thick. Patients are asked to wear the aligners for two weeks and then change to the next number in the sequence of aligners.
Patient assessment
The orthodontist will normally undertake a full assessment of a new patient. Treatment options are enumerated and discussed.
While fixed orthodontic braces may move the teeth more predictably and quickly, many patients do not want to wear braces. They want the effects of the treatment without having fixed braces. It is often the preference of orthodontists to undertake fixed appliance therapy because it can be more predictable and, in some cases, the teeth can move quicker. However, patients are given all the treatment options to align their teeth and many choose to have clear aligners. There are now several aligner brands on the market that the orthodontist can choose.
A recent systematic review of Invisalign research by Lagravere and Flores-Mir (2005) found that no strong conclusions could be made regarding the treatment effects of Invisalign appliances. It is the personal selection of the orthodontist and their patient.

Figure 1: Retracted smile before treatment commenced. The patient was unhappy with the overlapping of the anterior teeth and wanted the teeth to be whiter. Figure 2: The results after Invisalign, whitening and restorative bondings.

Figure 3: Patient commenced upper and lower Invisalign treatment with orthodontist Dr Katz to improve the positioning of the teeth. Figure 4: While wearing the Invisalign aligners, the patient bleached with 10% carbmide peroxide to improve the shade of her teeth. This photo illustrates the whitening gel has started to work and starts on the incisal edges first and moved up to the neck of the tooth.

The computerised Clincheck
With Invisalign treatment, the number of aligners needed is assessed with a computer scan called Clincheck (Align Technology).
Each aligner is programmed to produce a precise movement on a tooth of about 0.15- 0.25mm (Vlaskalic et al, 2001).
The stereolithographic technology is used to fabricate custom aligners from an impression or an intraoral digital image scanned in the dental practice.
Patient compliance is mandatory to achieve good results with Invisalign. It is important for patients to wear their aligners for 22 hours a day or more (Malik et al, 2013).
Once the Clincheck is undertaken, the number of aligners needed is calculated and the position and location of the attachments determined. The attachments are fabricated from clear composite resin and are transferred onto the teeth with an attachment template. The attachments are removed at the end of treatment. Where interproximal enamel reduction (IPR) is necessary, this is calculated in the Clincheck.
Studies have been undertaken to assess the accuracy of the computerised Clincheck assessment. In a study by Houle et al (2017), the mean accuracy of posterior expansion planned with Invisalign for the maxilla was 72.8% and 87.7% in the mandible.
There are limited data on the amount of discrepancy between predicted and actual achieved movements with Invisalign (Krieger et al, 2012). In a prospective clinical study by Kravitz et al (2009), the mean accuracy of tooth movement in the anterior region was found to be 41% with Invisalign.
An internal study from Align Technology found that one should expect about 80% of tooth movement seen on Clincheck (Tuncay and Orhan, 2006).
A multidisciplinary case – which treatment first?
This case involved multidisciplinary treatment including orthodontic treatment, restorative treatment and aesthetic

Figure 5: Study models used to make the retainer after Invisalign treatment was completed. The aligner had to be fitted immediately after treatment started and before undertaking the restorative bonding to lengthen the upper right anterior. The technician made a stent so we knew how much length we needed to add. Figure 6: SDI Aura is applied onto the tooth to check the shade of the composite against the tooth after whitening. A test composite is placed onto the tooth at the very beginning of the bonding procedure prior to isolation so that the correct shade of composite is selected before the tooth dehydrates to a lighter shade. The translucent enamel shades are tested first. Here Aura E1 and E2 are being tested onto the transluscent incisal tip

Figure 7: SDI Aura is built-up in layers to look like natural enamel, starting with the placement of the enamel layer on the incisal and palatal edge. Lobes are created to give the effect of the mamelons and the translusceny at the tip. The lobes also help to determine the secondary anatomy and correct form and shape. The composite is always over built and the restoration reshaped and polished afterwards. Figure 8: The results after Invisalign, whitening and restorative bondings with SDI Aura on the upper right and left centrals. The composite is shaped and polished with discs, rubber wheels and then final polish with felt wheels and SDI polishing paste for the enamel lustre. As the Aura has the enamel as a microfill it can be polished to a high gloss afterwards. The dentine layer is a nanohybrid.
home whitening treatment (Figures 1 and 2).
Invisalign treatment was commenced first (Figure 3). After the teeth had moved significantly, when the central incisors had straightened and towards the end of treatment, tooth whitening was undertaken in the upper and lower aligners (Figure 4).
Once whitening was satisfactorily completed, new retainers were made from new study casts (Figure 5). Composite bonding was undertaken (Figures 6-8) to repair the worn and shorter incisal edges of the upper central incisors. This was followed by glass ionomer treatment placed in the lower cervical areas to reduce sensitivity.
Normally, class V glass ionomer restorations are placed first prior to commencing any treatment as this helps to reduce sensitivity during whitening and also reduce sensitivity of the orthodontic tray rubbing against the cervical area of the tooth.
However, it was decided that the erosion of the cervical areas was not an area of concern and so Invisalign ‘Each aligner is programmed to produce a precise movement on a tooth of about 0.15-0.25mm’ treatment was started first.
Whitening treatment was next followed by composite bonding and class V restorations. The cervical areas of the lower premolars became extremely sensitive during whitening, so after whitening and waiting for the bond strength to improve, the areas were restored with a lightcured glass ionomer restoration.