DENTAL

SOLUTIONS NOV / DEC 2022
NEW PRODUCTS SPOTLIGHT SURGICAL CONTENTS - CLICK CATEGORY TO VIEW ORTHODONTICS COSMETIC & RESTORATIVE PAIN CONTROL HANDPIECES INFECTION CONTROL CAD / CAM DENTAL EDUCATION HUB PREVENTATIVE ENDODONTICS INSTRUMENTS 3D PRINTING NEW PRODUCTS 04 14 10 55 38 65 76 06 32 12 62 42 72 79
As we reach the closing months of another whirlwind year, the November-December edition of Dental Solutions marks the final edition for 2022. Now with over 5000 reads of each edition and over 65% of our customer now interacting with this magazine, we are hoping you are finding the articles of benefit to you and your practice.
In this edition of Dental Solutions, checkout the latest new products from KaVo, Lunos,, Komet, SDI and 3 Shape as well as clinical articles from industry leading manufacturers.

Have You Completed Your CPD Activities?
November 30th 2022 marks the end of the current three year Continuing Professional Development (CPD) cycle within which dental practitioners are required to complete a minimum of 60 hours of CPD activities.
Over the last couple of years, the impact and restriction from the COVID pandemic has made it challenging for dental professionals to attend in person courses but has led to the rise of online education that can be viewed in the comfort of your own home or practice.
With the fast-approaching deadline Henry Schein wants to make sure you are aware of the DentalEducationHub. com.au which has hundreds of hours of free clinical CPD webinars that you can watch on demand, and with over 20,000 hours viewed since its inception in 2020, it is one of the most used educational platforms by dental professionals in Australia.
For details of upcoming and on demand online courses see page 12
DID YOU KNOW?
IN A LIFETIME YOUR MOUTH WILL PRODUCE ENOUGH SALIVA TO FILL TWO SWIMMING POOLS
CALUM COOGAN
 Communications
Manager
Communications
Manager
31300 65 88 22 ONLINE T V
Marketing
Digital & CX
NEW PRODUCT SPOTLIGHT
Henry Schein in conjunction with our global supplier partners are committed to sourcing and supplying the latest and highest quality products to support the advancement of dental professionals and patient care in Australia. Check out the latest editions to Henry Schein’s range, available online, or through Customer Care and your Relationship Manager.
The Lunos Product System from DURR Dental

Four reasons for brighter smiles with Lunos supragingival and subgingival air polishing:

1. Systematic prophylaxis. Fast, effective, and convenient in application For all prophylaxis specialists, dentists, hygienists and patients.
2. Premium prophylaxis solution with an extensive product portfolio ranging from handpieces to powder and pastes.

3. Meets the highest medical standards in terms of product performance and ingredients.
4. Low-pain treatment and maximum patient comfort Read more on page 82
KaVo Uniqa
Ergonomically perfected for practitioners thanks to the shortened base plate, the narrow backrest and the connection via the curve segment, even more comfortable for patients thanks to the new armrests and the adapted upholstery shape. Easy to touch thanks to the full-touch display on the dentist element with the intuitive operating concept for time-saving and smooth treatment processes, capacitive control panel on the assistant element with all the functions which are important for your assistance, acoustic signal for the parking position of the spittoon bowl to optimise the workflow. Read more on page 90

Hysolate Dental Dams from Coltene

HySolate Latex Dental Dam is made of pure, natural rubber latex and is powder free. Powder free, low protein Dental Dam is a simple and clever measure to reduce the risk of developing latex hypersensitivity. Latex Dental Dam provides strong retraction. HySolate Dental Dam is available in a comprehensive variety of colours and sizes (5”x5” (127 x 127 mm) and 6”x6” (152 x 152 mm)),
Read more on page 87
4
NEW PRODUCTS
Procodile Q from Komet
Q stands for heat The new Procodile Q file is heat-treated so that it can contribute even more effectively to a successful endodontic treatment. The heat treatment makes the file easier to bend while increasing the flexibility and safety.
Read more on page 86
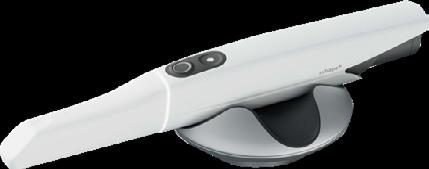
3 Shape Trios 5
Diagnocam Vision Full HD
TRIOS5Wireless
With the new KaVo DIAGNOcam Vision Full HD, everything literally “clicks”, because it enables three-in-one diagnosis with a simple push of a button.
KaVo’s new Premium intraoral camera offers an entirely new imaging concept for the dental practice. With the innovative 3-in-1 concept, intraoral, transillumination and fluorescence images are created in brilliant, Full HD quality.


Read more on page 94
Trios 5 is made to fit perfectly in every hand. It sets a new standard in infection control. The ScanAssist engine delivers precision scans effortlessly. Read more on page 88
DIAO from Komet
Efficiency, created from diamonds and pearls. More concentration of power, longer service life, better control
• A new generation of diamonds for preparations of unmatched quality.
• Concentrated power for exceptional durability
• Optimum control
• Rose gold color for easy recognition during everyday work at the practice

Read more on page 84
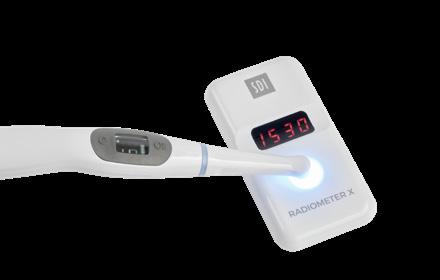
Radiometer X
Do you know if you are getting the right output from your LCU?
Dental curing units, or light-curing units (LCUs), are essential in dental offices; they are used daily in restorative dentistry, orthodontics and hygiene to cure resin-based restoratives, luting materials and sealants.
Read more on page 89
5henryschein.com.au NEW PRODUCTS
24
Intelligent.TheultimateTRIOS.• Next-levelergonomics.• Effortlessscantechnology.• Hygienicbydesign. ItTRIOS5ismadetofitperfectlyineveryhand. thesetsanewstandardininfectioncontrol.And effortlessly.ScanAssistenginedeliversprecisionscans Soyoucanconcentrateonthe excellentcarethatmakespatientscomeback. scanningscannedAutomaticallyVivid ThetechnologyTransmits3D Brainofthei700• SuperAccurate• SuperLight• SuperFast• JustLikethei700 TRIOSShare. Passthescanner,sharethepower. entireTRIOSSharetechnologyenablesyoutodigitizeyour scanner.clinicwithjustoneTRIOSwirelessintraoral WalkaroundwithonlyonewirelessTRIOSand useitoneveryPCinyourpracticeviayourWifinetwork.
COMBINED FORCES
ACCELERATED EVOLUTION
BioHorizons Camlog combines two families of implant solutions with proven track records in the demanding markets of America and Europe.

Implant dentists choosing the right brand or system to meet their patient’s needs have their work cut out for them. With over 150 dental implant companies out there offering a bewildering assortment of products, it can be a challenge narrowing down the field.
For those who just want to focus on the clinical task at hand, Henry Schein is offering a one-stop alternative with BioHorizons Camlog.
When BioHorizons™ and Camlog™ joined forces under the umbrella of Henry Schein’s Global Oral Reconstruction Group (GORG) in 2017, the merger brought together two world-class implant companies that originated from both sides of the Atlantic Ocean.
BioHorizons Camlog offers a consolid- ated portfolio of products from implant systems to restorative solutions; intelligent workflows to regenerative biomaterials. This evidence-based portfolio benefits from Henry Schein’s established local support network, including their comprehensive customer service team.

“We now have the confidence to say to the Australian clinician: “We have everything you need in one place,” says Kellie Paull, the National Surgical Business Manager at Henry Schein Australia.
“That’s because we have combined two amazing brands – each with a true global reach – with an extensive range of biomaterials.”
Star-spangled innovations
Born in the USA, BioHorizons™ was founded through research conducted at the University of Alabama in 1994 by Carl E. Misch, DDS, Martha Bidez, PhD and Todd Strong, COO of BioHorizons™. Steve Boggan joined in 1995 and later became the CEO.
Firmly entrenched in scientific re- search, BioHorizons™ produced several breakthrough proprietary technologies, including: the BioHorizons™

6 SURGICAL
addresses a wide range of dental bone grafting applications.
Today, BioHorizons™ is distributed globally in 90 markets including Asia, North America, South America, Africa, Australia, and Europe.
European flair
Founded in Germany, Camlog™ is one of Europe’s leading suppliers of dental implant systems, restorative components, regenerative and digital solutions.
The Camlog™ brand was first introduced in 1999 as a range of products –including the Camlog™ Cylinder-Line and ScrewCylinder-Line – with Altatec GmbH as the legal manufacturer.
Interestingly, Altatec was the new moniker given to EBERLE Medizintechnik in 1995. The latter is the original name of the German dental implant firm founded in 1988 by renowned dentist and oral surgeon Dr Axel Kirsch.
After several products bearing the Camlog™ name gained market prominence, it made perfect sense to use it as an overarching customer-facing identifier.

Standout Camlog™ products over the years include: Camlogs Screw Line Implant in 2002; Conelog Screw Line Implant in 2011; DEDICAM CAD/CAM prosthetic solutions and Camlog™ iSy Implants in 2013; and in 2019, Conelog Progress Line implant system designed to address immediate and Full Arch implant treatments was introduced.
The products are manufactured in state of the arts technology at its Wimsheim location.
Intercontinental spread Camlog™ and BioHorizons™ presented their newly formed partnership for the first time at the IDS 2019 in Cologne, Germany.
Behind the scenes, the two companies have been “strategically evolving” under Henry Schein’s Global Oral Reconstruction Group (GORG) since 2017.
Henry Schein is a FORTUNE 500 Company that thrives on providing dental practitioners solutions to help them work more efficiently and render quality care more effectively.
The formation of GORG is no exception, Kellie attests.
“The optimum user experience lies at the heart of what we do,” she says.
“Whether it’s a type of connection, material, thread design, leading to treat- ment protocol a particular patient need or situation, we’ve got you covered with a single brand.”
On the marketing front, a fresh logo and modern collaterals greet customers in a brand new website (www. biohorizonscamlog.online) showcasing all the products under the joint brand.
Products include implant lines such as: Tapered PTG, Tapered Pro, Tapered 3.0, Tapered Short, CONELOG™, and iSy.
“Whether you are a surgeon, prosthodontist or dental technician, our product portfolio can be tailored to

71300 65 88 22 SURGICAL
meet your specific preference,” Kellie explains.
“For overseas-educated Aussie dentists, you may either be more familiar with an American- or European-style implant system.
What’s special about BioHorizons Camlog is that it provides a versatile intercontinental menu of choices.”
“We offer evidence-based solutions for different concepts and requirements to cater to as wide a customer base as possible.”
Meeting of minds
The real intersection of the brands, how- ever, is taking place at the R&D level. The holy grail of any merger is the ability to harness the brains behind the success of each entity.
Both BioHorizons™ and Camlog™ have their R&D teams to thank for a steady supply of ingenious product output over the years.
With the two innovation minds now sharing the same passions in serving patients’ need, Kellie urges customers to stay tuned to “some exciting developments in coming years”.
As it stands, Aussie dentists can already look forward to BioHorizon Camlog’s wide selection of implant systems and established products for hard and soft tissue regeneration from a single source.


Henry Schein’s dedicated surgical team and massive support network is on standby to provide the necessary guidance.
“An implant practitioner typically keeps a few brands in their armamentarium, and not least because patient needs vary – it’s important that we are able to offer choice to our customers,” Kellie says.
“That said, with BioHorizons Camlog, we are providing customers with more than just another option on the market but also a go-to portfolio of dental implant solutions. “BioHorizons™ is already one of the most popular brands in Australia.

BioHorizons Camlog is simply taking the portfolio to a whole new level.
First published in the July/Aug 2022 edition of Australasian Dentist

8 SURGICAL VISIT OUR NEW WEBSITE BIOHORIZONS CAMLOG.ONLINE CLICK HERE


9henryschein.com.au AUSTRALIA’S LARGEST DENTAL EXCLUSIVE ONLINE BENEFITS • Speed up your consumable ordering • Select from over 30,000 products • Track & Trace deliveries • Ordering templates to save time & money • View your backorder status • Pay your account quickly Online • Inventory Management Solutions • Online Live Chat - to resolve any questions henry schein.com.au SCHEINING PRICES MAY Exclusive online only promotions every month Offers valid for May 2022 DIGITAL SOLUTIONS YOUR GO - TO SITE FOR EDUCATIONAL CONTENT AND COURSES • Webinars • Podcast • Clinical Videos • Henry Schein TV • Clinical Articles & News • Latest In-Person Events & Courses DENTAL EDUCATION HUB.COM.AU Clinical content from leading global dental manufacturers updated weekly AUSTRALIA’S LARGEST ONLINE STORE FOR TAKE ADVANTAGE OF THESE EXCLUSIVE BENEFITS • Speed up your consumable ordering • Select from over 30,000 products • Track & Trace deliveries • Ordering templates to save time & money • View your backorder status • Pay your account quickly Online • Inventory Management Solutions • Online Live Chat - to resolve any questions HENRY SCHEIN.COM.AU ONLINE DIGITAL SOLUTIONS
A
REVEAL CLEAR ALIGNERS


THE CLEAR CHOICE TO A BEAUTIFUL SMILE
industry experts.
of the world’s most innovative orthodontic appliances, Henry Schein® Orthodontics™
With decades of experience
Reveal, a state-of-the-art clear aligner with next-generation aesthetics, efficiency, and treatment

Case Description
Anterior crowding
year old male
Pre
Patient Chief Complaint
crowding
Treatment Planning
Distalization
Final Results
Number of
of
Treatment Notes
Initial
10
ORTHODONTICS
of teeth into the spaces created by Inter Proximal Reduction, IPR in posterior teeth
aligners: Upper 28 Lower 28 Duration
treatment: 14 months No attachments. No revisions
risk factors presented by the patient: none During-treatment complications: none Post-treatment assessment: grade 1 bone loss in lower anterior teeth
Anterior
creating some
delivers
predictability.
25
Treatment
crystal-clear aligner solution developed by
“Reveal is such an

comes close.” Dr Kasen Somana, Toorak, Victoria
Case Description
Narrow
it is a no brainer clear aligner system.


to keep clean. In this regard, no other aligner

Patient Chief Complaint
111300 65 88 22 ORTHODONTICS
upper arch, severe lower crowding 21 year old female Pre Treatment Treatment Planning Expansion of both arches Number of aligners: Upper 21 Lower 24 Duration of treatment: 12 months No attachments. No IPR. No revisions Final Results
Crowding and individual alignment of upper and lower arches Treatment Notes Initial risk factors presented by the patient: none During-treatment complications: none Post-treatment assessment: grade 1 bone loss in lower anterior teeth CASE BOOK CLICK HERE
easy system to adopt into daily practice that
Patients love the aligner material - it is super clear and easy
system


12 Explore over 270 hours of clinical and business related content all in one place with access to DENTAL EDUCATION HUB UPCOMING CPD COURSES YOUR FREE GO-TO RESOURCE FOR Dr Gordon Christensen Clinical Courses Dr. Gordon J. Christensen Access courses online until January 2023 Business Booster Panel Discussion Hosted by Mike Covey Wednesday 2 November FREE Webinar READ MORE READ MORE Insight Hyaku100 7 CPD Credit Saturday 18 February 2023 Why you should use Reveal Clear Aligners Dr Bruce McFarlane 1 CPD Credit | FREE Webinar Monday 7 November READ MORE READ MORE
Wöhrle


13dentaleducationhub.com.au DENTAL EDUCATION HUB to courses, webinars, podcasts and articles. View our upcoming courses and webinars below. COURSES AND EVENTS FOR DENTAL EDUCATION AND CPD Zirconia bio-design with KATANA Daniele Rondoni 1 CPD Credit | FREE Webinar Tuesday 8 November Learn how 3D printing is redefining chairside dentistry | VIC Jeroen Klijnsma 5 CPD Credits | $450 Wednesday 9 November READ MORE READ MORE Minimally invasive veneer preparation & full mouth rehabilitation Dr. Felix
1 CPD Credit | FREE Webinar Thursday 10 November Implant CPD ‘BITES’ WA Tabitha Acret 1.5 CPD Credits Thursday 17 November READ MORE READ MORE
RESIN CEMENTS
G-CEM ONE™
LinkForce® (dual-cured)

G-CEM Veneer® (light-cured)


for
lower than 2mm thick
14 COSMETIC & RESTORATIVE The selection of the optimal luting cement is vital to achieve an excellent result and long-term patient satisfaction. GC have a range of resin cements to offer solution to challenging clinical situations. Depending on the clinical situation, the first question you should ask yourself is: Should I CEMENT or BOND?
DUAL CURE OR LIGHT-CURED RESIN CEMENTS FOR YOUR INDIRECT RESTORATIONS Permanent Cementation Composite resin-based types of cement
UNIVERSAL self-adhesive resin cement • Efficient self-curing mode • Easy-to-use G-CEM
Adhesive resin cement • High adhesion • High aesthetics
Adhesive resin cement
restorations
• • High aesthetics • • Easy placement


15henryschein.com.au COSMETIC & RESTORATIVE Clinical
images courtesy of Dr Kazunori Otani, Japan
G-CEM ONE™ UNIVERSAL self-adhesive resin cement Simplification without compromise Choose G-CEM ONE, a dual-cure resin cement with high adhesive bond strength for daily procedures, which can also be used in challenging and non-retentive situations when applying the optional tooth primer**. + Flexible: Optional use of the tooth primer provides optimal bond strength in retentive and non-retentive indications
Easy excess removal with the option of tack curing
Long-lasting aesthetic results • Universal: reliable performance for any type of restoration including non-retentive ones (when using Adhesive Enhancing Primer) • Simple, moisture tolerant, ideal viscosity, easy access removal** • Reliable: efficient chemical polymerization even under opaque or thick restorations* **GC R&D, Data on file. # Miyazaki S (2020). Excellent curing properties: chemical polymerization and comfortable clinical practice compatibility of G-Cem ONE. Clinical Advance; 7:167-169. * Sato K, Arita A, Kumagai T (2019). Evaluation of Bonding Properties of Resin Cement in Self-cure Mode. J Dent Res (Spec Iss 98 A):1884 (https://iadr.abstractarchives.com/abstract/19iags-3163131/evaluation-of-bonding-properties-of-resin-cement-in-self-cure-mode)
G-CEM LinkForce®
Dual-cure adhesive resin cement
Strength and aesthetics in one system for all indications, all substrates. G-CEM LinkForce is the universal adhesive resin cement that is ideal to use whenever additional retention is needed and a must-have for all CAD/ CAM ceramic and hybrid ceramic blocks such as CERASMART270.
• Secure adhesion in all situations with only one system, three base elements:
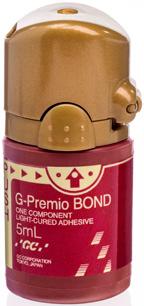
G-Premio BOND bonds to ALL Preparations
G-Multi PRIMER ensures a stable adhesion to ALL Restorations


G-CEM LinkForce provides a strong link in ALL Indications
• Efficient self-curing mode, useful for luting more opaque or thick restorations
• The universal, strong and dependable
to all your
COSMETIC & RESTORATIVE 16
solution
adhesive cementation challenges
Easy application of G-Premio BOND with or without prior etching
Light-curing of the thin adhesive (3μm) for optimal adhesion
One universal primer for stable adhesion to all substrates Easy seating and perfect adaption thanks to a very low film thickness
Clinical images courtesy of Dr Antonio Saiz-Pardo, Spain
G-CEM Veneer®
Light-cured adhesive resin cement
A versatile resin cement for easy luting of restorations up to 2mm thick.


G-CEM Veneer: a light-cured resin cement for high aesthetic demand restorations featuring Full-coverage Silane Coating (FSC) technology.


• Thixotropic consistency for easy placement of veneers and easy excess removal

• High filler rate of 69% (w/w) – for excellent wear resistance, bond and flexural strength^
• Its unique consistency allows it to have optimally balanced flow without the need for preheating the composite
• Four aesthetic shades to match every case with corresponding G-CEM Try in paste

171300 65 88 22 CLICK HERE COSMETIC & RESTORATIVE For further information
1. Easy dispensing 2. Thixotropic consistency easy removal of excess 3. Light-cured composite 4. High aesthetics over time Clinical images courtesy of Dr Javier Tapia Guadix, Spain (1) and Dr Olivier Etenne, France (2, 3 & 4) Click to view Dr.
Miles Cone
speaks on
G-CEM
ONE™ Part 2Part 1 Part 3 Part 4 CLICK HERE CLICK HERE CLICK HERE CLICK HERE
SENSE THE DIFFERENCE
KATANA™ ZIRCONIA YML
In July 2021, Kuraray Noritake Dental Inc. introduced KATANA™ Zirconia YML (yttria multi-layered). With KATANA™ Zirconia UTML, STML, and HTML PLUS already available, it is the fourth multi-layered zirconia in the company’s portfolio – and for dental technicians striving for simplification and standardization, it is the only zirconia they will need.

Its inner structure is different from the other options in that it features the next generation multi-layer technology with not only colour, but also translucency and flexural strength gradation. This makes KATANA™ Zirconia YML a true all-rounder covering every zirconia indication. While translucency and flexural strength gradation is key property differentiating KATANA™ Zirconia YML from other zirconia options within the KATANA™ Zirconia Multi-Layered Series, there are many factors that differentiate it from other materials in the market. One important point is its perfect adjustment to Kuraray Noritake Dental’s specialized products for polishing, staining, glazing and porcelain veneering. In order to learn more about the differentiating factors, we had a conversation with Antonio Corradi, Scientific Marketing Manager at Kuraray Noritake Dental.
Antonio Corradi, who should consider using KATANA™ Zirconia YML?
Offering strength and translucency exactly where needed in the blank, KATANA™ Zirconia YML is suitable for the whole range of indications from crowns to monolithic long-span bridges. With these properties, it is the perfect choice for anyone who would like to use one single zirconia for the production of any kind of ceramic restoration. Instead of playing with different blanks depending on the indication and patient-specific needs, the increasing fan base of KATANA™ Zirconia YML uses the same zirconia every time, and plays with the position of the restoration in the blank to make it particularly strong or translucent.
What are the finishing options available for users of KATANA™ Zirconia YML within the Kuraray Noritake Dental product portfolio?

Kuraray Noritake Dental offers a well-aligned portfolio of feldspathic ceramics for various finishing techniques. Purely natural aesthetics are obtained by full porcelain layering. The framework is milled from KATANA™ Zirconia YML and afterwards, different layers of CERABIEN™ ZR Shade Base Porcelain, Opacious Body, Body and Enamel Porcelain, Internal Stain and Luster Porcelain are applied and fixed in various bakes.
morphological corrections and final polishing, suitable products from Kuraray Noritake Dental like Noritake Meister Finish Point and Pearl Surface Z
available.
COSMETIC & RESTORATIVE
18
KATANA™ Zirconia YML: layers and their translucency and flexural strength values.
For
are
Translucent Strength Layer Layer Ratio 49% 750MPa Enamel 35% 47% 1000MPa Transition 15% 45% 1100MPa Transition 15% 45% 1100MPa Dentin 35%
However, a highly aesthetic zirconia like KATANA™ Zirconia YML usually does not require such a complex finishing approach. Instead, a micro cut-back on the vestibular side of the restoration or even a monolithic design with a thin or ultra-thin layer of (liquid) ceramics is sufficient. For the micro-layering approach, we offer a set of CERABIEN™ ZR Internal Stain and Luster Porcelain materials that are usually applied in a two-step procedure. The occlusal and lingual surfaces not covered by porcelain are merely polished e.g. with Pearl Surface Z. For the further simplified ultramicrolayering approach, CERABIEN™ ZR FC Paste Stain is the perfect choice. The liquid ceramic is able to create texture and a 3D effect on the monolithic surface without adding too much volume to call for a reduction of the zirconia.
An even more simplified approach is ultra-microlayering
monolithic surfaces with liquid ceramics such as CERABIEN™ ZR FC Paste Stain.
Which of these finishing approaches do you recommend to users of KATANA™ Zirconia YML?

All three approaches are suitable, and I think that ultra-microlayering is often the best option with a highly aesthetic zirconia, when weighing the time and effort involved against the aesthetics of the outcome. However, a dental technician should always take into account the indication-specific requirements and the needs of the patient (e.g. regarding treatment cost, time available and aesthetic demands), as well as the dentist for the selection of the appropriate material combination and finishing approach. A monolithic design finished with ultra-microlayering is definitely worth a try for those who start working with KATANA™ Zirconia YML!


Are there other materials in the Kuraray NoritakeDental portfolio that perfectly match KATANA™Zirconia YML?
For highly aesthetic zirconia like KATANA™ Zirconia YML, a simplified micro-layering approach is usually sufficient.
There are many additional products that are perfect for use with KATANA™ Zirconia YML. One such material is KATANA™ Cleaner, which removes saliva or blood from (zirconia) restorations and from prepared tooth structures after try-in. With its high cleaning effect, it is the ideal product for everyone striving for an optimized bond quality and streamlined adhesive procedures. For adhesive bonding carried out in the laboratory or in the dental office, different types of resin cements are offered by Kuraray Noritake Dental. As some dental practitioners might ask for recommendations regarding cement selection and restoration pretreatment, it is worth knowing these products and their range of indications. For KATANA™ Zirconia, we recommend using the self-adhesive resin cement PANAVIA™ SA Cement Universal for restorations with a retentive design and an adhesive cementation procedure with PANAVIA™ V5 for all other types of zirconia restorations.
19henryschein.com.au
on
Purely natural aesthetics are achieved with a complex combination of porcelains. COSMETIC & RESTORATIVE SBS OB-B-E Internal Live Stain Internal Live Stain Luster Luster LT1 ZrO2 0,4 mm ZrO2 0,4 mm FC Paste Stain > 10 microns ZrO2 0,8 mm
Crown & Bridges
Retentive Preparation
Veneers, Inlays, Onlays, Partial Crowns
NOT Retentive Preparation
Subgingival
Supragingival OR
Self-Adhesive Techique: PANAVIATM SA Cement Universal
Adhesive Technique: PANAVIATM V5
BONDING OR LUTING
Resin cement recommendations depending on the indication, preparation design and margin position.
What else differentiates KATANA™ Zirconia YML from similar materials?
Kuraray Noritake Dental is a true expert in the processing of dental zirconia. This profound knowledge has been leveraged to align the different layers within KATANA™ Zirconia YML with their varying yttria concentrations , so that shrinkage ratios and CTE values are harmonized, and a smooth transition from one layer to the next is achieved. This adjustment is only possible as an end-to-end in-house production process has been established, which provides full control over every detail. Unlike other companies purchasing readily mixed powder, Kuraray Noritake Dental uses natural ores to produce the required metal oxides and its own proprietary additive combination for powder production. In addition, an extremely meticulous pressing process is used to minimize the risk of contamination by airborne particles, and specific ingredients are added to increase blank stability.
All this leads to high-quality blanks without transition lines and impurities for well-balanced mechanical and optical properties, a high accuracy of fit, a brilliant surface quality and edge stability, and a high design flexibility users will love.
Why do you recommend KATANA™ Zirconia YML to potential users?
To my mind, the new material is definitely worth testing in the own laboratory environment. It offers many properties that have the potential to reduce the inventory and streamline procedures, without compromising the outcomes. Material selection is simplified, sintering may be accelerated, and finishing becomes a lot easier with the proposed techniques and adjusted materials. However, words alone are not enough to reveal the real difference, which can only be sensed when processing the material and creating impressive outcomes.
Kuraray Noritake Dental is a true expert in the processing of dental zirconia
ANTONIO CORRADI Scientific Marketing Manager Kuraray Noritake Dental

20
SEE RANGE COSMETIC & RESTORATIVE
AQUACARE AIR ABRASION TWIN UNIT
“Working with the AquaCare as part of my

gives me the confidence that my bonding is the best it can be.
Often excess hand piece oil can contaminate your cavity during preparation and if not removed can seriously compromise bond strength.
Prior to bonding, decontaminating the cavity with 27µm Aluminium Oxide will help to ensure that the cavity will be clean and oil free.”


 DR RICHARD FIELD

211300 65 88 22 COSMETIC & RESTORATIVE View AquaCare Online
Patient
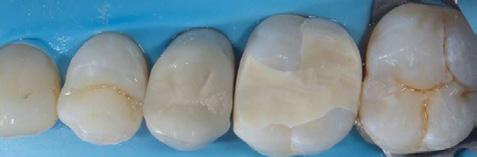
presented with food trapping medsial and distal to the Upper left 5. This was stemming from a poor medial and distal contact point from the adjacent defective restorations Isolation was achieved with Unodent non latex rubber dam.
Isolation was achieved with Unodent non latex rubber dam.
Direct composite was used to restore the Upper right 4 and 7 with a GIC core placed as a long term provisional on the upper right 6 in order to monitor pulp vitality prior to an indirect restorations.
The old restorations and caries was removed from the upper right 4 6 and 7 reviewing a carious pulp exposure on the upper right 6.
Cavities were cleaned with 27µm Aluminium Oxide using the AquaCare
unit to ensure bonding surfaces are clear of contaminants An MTA plug was placed as a means of direct pulp capping over the exposure on the upper right 6\
BDS
– Honours United Kingdom
daily routine


22 COSMETIC & RESTORATIVE Simplify your composite work using GC Modeling Liquid with your brush or instruments. With the right tools, a smooth and well-sculpted direct composite restoration is achievable, resulting in a nice aesthetic outcome. Using GC Modeling Liquid and a brush to adapt composites is a true game changer. MODELING LIQUID APPLY, SHAPE, SMOOTH, ENJOY
Images courtesy of Dr Javier Tapia, Spain
Apply the composite using your wetted instrument CLICK HERE Also great for posterior cases A round brush helps to build the cusps and refine the design of the fissures The brush can be used to adapt the material cusp by cusp GC Modeling Liquid and the brush aide to recreate the fissures and refine anatomy Apply, shape, smooth, enjoy! Direct Composite application just got easier with GC Modeling Liquid For further information Use wetted flat brush to adapt and shape composite Use a wetted round brush to sculpt Flat brush used to create smooth final layer
CLARENCE


23henryschein.com.au DR
TAM HBSc, DDS, FIADFE, AAACD Auckland, New Zealand GC COMPOSITE COMPANIONS G-AENIAL A’CHORD AND EPITEX EPITEX the ultimate interproximal finishing strip Indicated for contouring, finishing and polishing of interproximal composite, compomer and glass ionomer restorative surfaces and prophylactic cleaning. Initial Presentation and shade selection G-aeniall A’CHORD, A03, A02 and AE After isolation Removal of existing restoration ll Pre-crimped epitex, mlyar strip for building the palatal and proximal wall G-aenial A’CHORD, AE Application of G-aenial A’CHORD shade A03, A02 Essentia WM and G-aenial A’CHORD shade AE as final layer Immediately post operative Review after finishing and polishing CLICK HERE For further information
Images courtesy of Dr Clarence Tam, New Zealand
COSMETIC & RESTORATIVE
G-AENIAL A’CHORD


ADVANCED UNIVERSAL COMPOSITE WITH UNISHADE SIMPLICITY


24
THE
For further information Initial Presentation Lining
placed using G-aenial Universal Injectable, shade A2
Placement
of G-aenial A’CHORD, shade A2
Caries removal Placement
of EverX Flow, dentine shade
Post-operative
review, showing beautiful shade integration
Clinical
Images courtesy of Dr Yo-Han Choi, Sydney
CLICK HERE DR YO-HAN
CHOI
Sydney COSMETIC & RESTORATIVE
G -CEM VENEER


251300 65 88 22 For further information
LIGHT-CURING RESIN CEMENT FOR HIGH AESTHETIC DEMANDS WITH EASE OF PLACEMENT
Initial presentation, patient presented with a fractured 21 veneer and leaking, stained margins on cervical of the veneers
Old cement removed and preparations refined, retraction cord in place
Upon removal of veneers you can see failure of the adhesive cementation and associated leakage
Clinical Images courtesy of Dr Chee Chang
CLICK HERE
Hydrofluoric Acid etch applied to veneer
After Isolation and etching of veneer preparations, G-Premio BOND applied to preparation
G-Multi PRIMER applied
G-CEM Veneer (shade A2) applied
Final result showing six veneers adhesively bonded
Veneers seated
DR CHEE CHANG Sydney
COSMETIC & RESTORATIVE
ESTHETIC TREATMENT FOR CROWN & BRIDGEWORK


IN THE ANTERIOR REGION
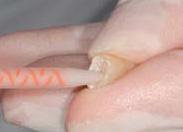
Esthetic treatment of severely damaged teeth (i.e. over 50% loss of tooth structure) for crown and bridgework in the anterior region requires tooth-coloured materials and a post to improve the retention of the core build up.
Glass fibre-reinforced or ceramic post systems are the first step in creating adequate retention for the subsequent core build up and all-ceramic crown. The question regarding which type of post should be given preference - ceramic or fibre reinforced, is a controversial subject in the literature. Glass fibre-reinforced posts have the distinct advantage of providing better distribution of the stress forces within the residual tooth structure due to their dentine-like modulus of elasticity. Adhesive cementation of the post to the endodontically treated dentine should increase the retention of the
The post was therefore cemented using ParaCore and ParaBond – a chemically cured adhesive. On the other hand, the core build up was cemented using ParaCore only – the contact surfaces can also be conditioned with adhesive when preparing the root canal. The crown was also cemented using ParaCore and ParaBond. The bond strength and flexural strength (composite is ideal for this) between the tooth, ParaCore, post and crown material should attain optimal values. Laboratory tests by Millar et al. 2008 demonstrated the validity of the theory behind the ParaCore System.

core build up and improve the distribution of stress forces during loading; thus preventing the risk of root fracture (Freedman et al. 2008).
From a pure mathematical standpoint, if fewer dissimilar materials are used for adhesive cementation, fewer varying interfaces will exist. Consequently, there will be fewer weak points created when restoring the tooth root with a post. The goal of the clinical case documented in this report was to cover all of the steps in the treatment using a single adhesive system.
Dye penetration tests produced evidence of an excellent seal and an optimal cement margin. This indicated more efficient bonding than other systems tested in this study.
The author surmised that the chemical adhesive was the key to the good test results.
This in turn points to the excellent properties of ParaCore in the required areas of application, such as post cementation, core build-up and contouring, and finally, cementation of the restoration.

26
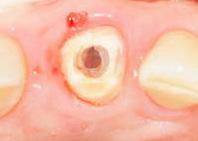
Fig 1: ParaCore Automix 5ml Introkit Fig. 2: Preoperative situation: trauma to tooth 21 with loose post/crown
Fig. 3: Preoperative situation with loose post/ crown
Fig 4: X-ray with ParaCore build-up
COSMETIC & RESTORATIVE
The use of one material for all three indications produces the desired “monoblock bond interface”. The clinical procedure of canal preparation, fitting of the post and cementation, etc. does not differ from other existing post systems. Treatment using only one material for all three indications enables a costeffective as well as time-saving procedure. Maximum stability is attained due to the resulting “monoblock bond interface”.
The procedure is demonstrated step by step in the following clinical case presented.


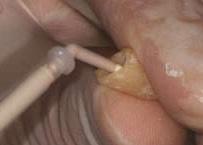
Due to a trauma-related incident to his anterior tooth 21 during his adolescent years, the patient had several prior treatment procedures performed and presented in the practice with a loose post crown (Fig. 2). There were no fracture lines visible on the x-ray with only a slight deviation of the prepared post canal inside the root canal (Fig. 3). This deviation was incorporated when the new post was fitted (Fig. 4). After the shade selection (Fig. 5) and preliminary impression (Fig. 6), the old crown with the metal framework and metal post, which was loose inside the root canal, were removed (Fig. 7–12). The root canal was then prepared using ParaPost Drill sizes in ascending sequence (Fig. 13+14). The prepared depth was measured using a periodontal probe (Fig. 15). The length of the Fiber Lux selected in this case had to be shortened (Fig. 16–18). After the preparation was completed, the root canal was cleaned (Fig. 19), and ParaBond adhesive was applied into the root canal and onto other contact surfaces (Fig. 20–25). Simultaneous conditioning of the contact surfaces eliminates re-application
Clinical tip: material stored in the refrigerator extends the working time, which can be particularly practical in summer. Following initial preparation, a temporary crown was fabricated using CoolTemp Natural (Fig. 35–38) and cemented using TempoSIL 2 (Fig. 39–41).
The temporary crown was easily removed during the second appointment (Fig. 42) with the preparation finalised afterwards (Fig. 43+44). A one-step impression was taken using AFFINIS PRECIOUS light for reproduction of very crisp detail, and AFFINIS heavy body tray material.
Both are addition-curing silicones (Fig. 45–48). After preparing the bite registration (Fig. 49+50), the direct temporary crown was relined (Fig. 51+52) and recemented using TempoSIL 2 (Fig. 53–56).
After completing all of the necessary preparations (Fig. 57–59), the all-ceramic crown fabricated by the dental technician was adhesively cemented using the ParaBond/ParaCore System (Fig. 60–66). Two shades are available for cementation, white and dentine. The advantages of this product become particularly evident with all-ceramic anterior crowns ensuring for perfect integration of the shade to the dentition.

After the fitting of the crown, excess residue was removed during the gel-like curing phase of the material (Fig. 67).
Excess residue can also be easily removed using a scaler, once the cement is completely cured. After checking the occlusion, treatment was complete and

of the adhesive during the core build-up. Use of a rubber dam, which is normally routine practice, was not required because of the clinical situation. The Root Canal Tip of ParaCore can be used for direct application into the root canal (Fig. 26). Once the post was positioned into the root canal (Fig. 27), it was secured into position using a curing lamp (Fig. 28). The core build up prepared using the freehand technique and completed using additional polymerization steps (Fig. 29–34).
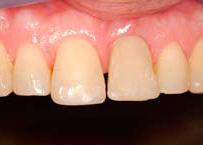
the patient left the practice with a new restoration (Fig. 68–71).
The instructions for use (step-by-step cards) supplied with the ParaCore System are simple and user friendly to ensure that these procedures are quickly integrated into your daily practice routine.
With ParaCore, one material is now available to accommodate all of the prescribed steps for cementation of an anterior crown using one material for a monoblock bond interface.
27henryschein.com.au
Fig. 5: Shade selection for the dental technician Fig. 6: Preliminary impression using AFFINIS putty super soft for the temporary crown
Fig. 7: Separation of the old bonded PFM crown using a Speedster S6 cross cut tapered fissure
Fig. 8: Auxiliary instrument to remove the crown (Aesculap crown remover lever)
COSMETIC & RESTORATIVE


28 Fig. 9: Old metal post without retention Fig. 13: Preparation of the root canal using the ParaPost drill sizes in ascending sequence Fig. 17: Shortening of the post using DIATECH diamond separating disc 918D-190-0.25 Fig 21: Removal of excess NRC from the root canal using a paper point Fig. 25: Air dry using a gentle stream of air for 2 seconds Fig. 29: Removal of the color-coded ring Fig. 10: Unscrewing of the old metal post Fig. 14: Prepared root canal Fig. 18: Shortened post Fig. 22: Air drying using a gentle stream of air for 2 seconds Fig. 26: ParaCore is applied directly into the root canal using the Root Canal Tip Fig. 30: Post seated into position Fig. 11: Removal of the old metal post Fig. 15: Measurement of the depth – depth may be increased by several millimetres Fig. 19: Cleaning and drying of the root canal Fig. 23: 1:1 mixed ratio of adhesive A+B is applied directly into the root canal and contact surfaces – 30 seconds Fig. 27: Positioning of the post Fig. 31: Freehand core build-up using the Root Canal Oral-Tip Fig. 12: Tooth 21 without a restoration Fig. 16: Trial seating of the selected post Fig. 20: Application of the non-rinse conditioner (NRC) – 30 seconds Fig. 24: Removal of excess adhesive from the root canal using a paper point Fig. 28: Light curing to accelerate the curing process Fig. 32: Contouring using a spatula COSMETIC & RESTORATIVE


291300 65 88 22 Fig. 33: Curing process is accelerated using light polymerisation, allowing for immediate preparation afterwards Fig. 37: Fabricated temporary crown Fig. 41: CoolTemp Natural temporary crown maintains its function Fig. 45: Retraction cord placed into the sulcus Fig. 49: Application of Jet Blue Bite onto the lower dentition for the bite registration Fig. 53: Filling up to 2/3 of the temporary crown with TempoSIL 2 dentine Fig. 34: Initial preparation of the core buildup using the DIATECH diamond FG879 014 10ML Fig. 38: Temporary crown is prepared using a handpiece and bur Fig. 42: Easy removal of the temporary crown during the second appointment Fig. 46: Syringing of the wash material AFFINIS PRECIOUS light body Fig. 50: Section of the bite registration Fig. 54: Cemented temporary crown with excess cement Fig. 35: Filling CoolTemp Natural into the preliminary impression Fig. 39: Filling up to 2/3 of the temporary crown with TempoSIL 2 dentine Fig. 43: Preparation of the core for the final impression using the DIATECH diamond FG 837R 012 8F Fig. 47: Intraoral impression using tray material AFFINIS heavy body Fig 51: Relining the temporary Crown with CoolTemp Natural Fig. 55: Excess residue is easily removed using a scaler Fig. 36: Repositioning the preliminary impression into the patient’s mouth Fig. 40: Cementation of the temporary crown Fig. 44: Completed prepared tooth 21 Fig. 48: Double mix impression Fig. 52: Seating the temporary crown onto the core for relining Fig. 56: Seated Cool Temp Natural temporary Crown COSMETIC & RESTORATIVE
G.


30 Fig. 57: Easy removal of the temporary crown without leaving any significant residue on the core Fig. 61: Air dry using a gentle stream of air for 2 seconds Fig. 65: Direct filling of the restoration with ParaCore dentine Fig. 69: Crown is relieved because of nocturnal bruxism by the patient Fig. 58: Cleaning the core Fig. 62: 1:1 mixed ratio of adhesive A+B is applied directly to the contact surfaces – 30 seconds Fig. 66: Positioning of the crown Fig. 70: Post operative restoration in situ Fig. 59: Silanization of the press ceramic crown according to the manufacturer’s instructions Fig. 63: Air dry using a gentle stream of air for 2 seconds Fig. 67: Excess ParaCore is easily removed during the gel phase Fig. 71: Post operative restoration in situ Fig. 60: Application of the NRC – 30 seconds Fig. 64: Shortening of the Root Canal Oral Tips using scissors to reduce the extrusion force Fig. 68: Examination of the occlusion DR. CHRISTOPH
HÜSKENS MED. DENT. OCTOBER 2009 View the ParaCore System on our websiteView the ParaCore 5ml Step by Step Card CLICK HERE CLICK HERE COSMETIC & RESTORATIVE
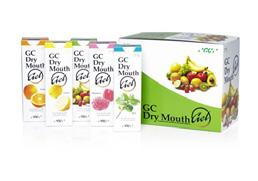
DRY MOUTH RELIEF
USING GC DRY MOUTH GEL
Many patients complain of having a dry mouth (xerostomia), and are seek in g all relief for this problem, but equa lly important, many dental pa t ients suffer from reduced production of saliva at rest (i.e. b etw een meals) and are not aware that they have lost the natural protection provided by saliva.
Regardless of the cause, the consequences of lowered saliva production at rest include an imbalance (dysbiosis) of the oral microflora, leading to a greatly increased risk of dental caries and oral fungal infe cti ons. Reduced saliva also increases the risk of root surface sensitivity and dental erosion (acid tooth wear), and compromises speaking and swallowing.
Many conditions can contribute to impaired production of saliva, including inadequate fluid intake in patients of any age due to increased loss of body fluid (e.g. due to caffeine, alcohol, mouth breathing, and strenuous exercise). Any substances which reduce t he flow of blood to the saliva glands (e.g. nico t ine), or tha t influence th e various centres within th e brain that c ontrol saliva production can also depre ss the production of saliva. Most illegal substances and their legal counterparts (including opioids for pain control, and medicinal cannabis) also have the same effect.
Over 200 prescription medications will al so reduce salivary flow, as can many autoimmune c o nditions (including those linked to rheumatoid arthritis), chronic blood-borne viral infections and medical interventions such as radiation therapy. When patients suffer from impaired production of saliva, it is not always possible to address the root cause, especially when it relates to the patient’s underlying medical condition. It then becomes important to use a product which can replace some of the functions of saliva and at the same time prevent consequences of reduced protection.
GC Dry Mouth Gel is a unique product designed specifically to maintain a neutral or near neutral pH in the mouth, using a buffer system. This design feature is missing from other dry mouth relief products on the market. A neutral oral pH is important for preventing mineral loss from the teeth, and for stopping the inevitable overgrowth of acid-tolerant bacteria and fungi which occurs when the oral pH falls.
One application of Dry Mouth Gel can provide up to 4 hours of relief from dry mouth. The gel can be applied
as often as needed and there is no limit on the number of times it can be used during the day. The gel is clear and forms an invisible protecting layer over the teeth and over the oral soft tissues to protect them and to provide comfort and relief from dryness. It does not stain the teeth or any prostheses or appliances that are present in the mouth.
Another important design characteristic of GC Dry Mouth Gel is that is compatible with topical CPP-ACP products, such as GC Tooth Mousse Plus, that are highly effective remineralising and desensitising agents. It can be used simultaneously with GC Tooth Mousse Plus, with the Dry Mouth Gel serving as a protective blanket for the oral tissues, and the Tooth Mousse Plus all as a protective layer for the teeth. In fact, many elderly patients who experience dry mouth have found that the combination of vanilla flavoured Tooth Mousse Plus and raspberry flavoured Dry Mouth Gel is very appealing, as it recreates the popular strawberry and cream taste. There are five different flavours in the range for patients to choose from (raspberry, mint, fruit salad, orange and lemon).
Using Dry Mouth Gel in the evening and then applying it immediately before retiring at night can reduce the likelihood of waking up during the night with a very dry mouth. As well, effective relief of dry mouth during the afternoon and evening makes it less likely that the patient will drink excessive amounts of water to try to keep their oral tissues moist. Overloading with water then leads to interrupted sleep because of the need to urinate during the night.
As well as being used to p rotect the t eeth, another c ommon and imp o rtant use fo r GC Dry Mou t h G el i s a s a replaceme nt for saliva beneath upper full dentures, where it provides the necessary cohesion for retention. The gel has two separate thickening agents (carboxymethylcellulose and carrageenan - a linear polysaccharide extracted from edible seaweed) that give it a suitable viscosity to replace saliva beneath dentures. By maintaining a neutral pH, the likelihood of Candida or other fungal species growing beneath the denture is reduced.
EMERITUS PROFESSOR LAURENCE WALSH Brisbane, Queensland

31henryschein.com.au 316
COSMETIC AND RESTORATIVE PREVENTATIVE
IDENTIFYING AND OVERCOMING
BARRIERS TO ORAL HEALTH-PROMOTING BEHAVIOURS
Having moved cities recently, I found myself consumed by planning and actioning my move at the expense of some aspects of my self-care.
Firstly, my splint, which was admittedly close to needing replacement after having bruxed my way through the tougher years of dental school, had vanished from my suitcase. Moreover, having noticed each of my patients’ GPs detailed on file at work, it dawned on me that I too should search for a medical professional to consult should the need arise.
Having found myself in unfamiliar territory, I was paralysed by indecision when it came to finding new healthcare practitioners. Will the dentist down the road resonate with my approach to dentistry? Will the clinic meet my standards of infection control? Will the local GP be in tune with women’s health issues? Having experienced this as a health professional myself, I can only imagine the barriers that preclude so many from accessing dental services until excruciating pain or embarrassment about one’s smile finally compels patients to adjust their priorities.
This can apply to people from a variety of demographics for whom life gets in the way of looking after oneself - as is the case for busy professionals, new parents and full-time carers - or to people who feel disconnected from services - for instance, those with limited health literacy, young adults who are unfamiliar with navigating healthcare systems independently, those (such as refugees) that have newly settled in an area and those who require access to culturally-appropriate care.
Understanding barriers to self-care is a crucial aspect of our job that is inherent in the biopsychosocial model that we practice.
Whether we see patients six-monthly or six-yearly, the key to their oral health lies in habits built and sustained at home. In an ideal world, we exist primarily to complement those regimes and need to do so with empathy and understanding.
Yes, the dentist who scares their patients into flossing may elicit some change in their behaviour, but I am a strong proponent of adopting a more compassionate approach. We also need to appreciate that some of our patients are fundamentally disadvantaged by their home environments. If they grew up only with soft drinks in the fridge, without anyone to book their dental appointments in childhood, or with relatives for whom oral care wasn’t a priority, they’ll need more support to develop health-reinforcing habits.
Even as dentists, our personal compliance with the messages that we advocate for may not be presently or historically perfect. We are human, after all. Every so often, I fall asleep with a full face of make-up, contacts in and teeth fuzzy from the sugar to which I succumb to sustain me on busy days at work. I’m constantly dehydrated, as I find myself without time to sip between patients. While twice-daily flossing may feel as natural as walking to my current self, my track record was far from perfect before I started dental school.

PREVENTATIVE
32
View the Colgate Range online CLICK HERE
I also neglected to bring my retainer on my semester abroad and I’m now, as with many of our orthodontic patients, plagued by the subtle relapse of my formerly perfect occlusion. However, as we mature and adopt a greater sense of selfresponsibility, one can hope that the greater trend that we follow involves predominantly healthpromoting behaviours.
We often see patients who admit to not having looked after themselves in their youth and present with extensive unrestorable caries, but it’s a pleasure to work with patients who are eager to turn over a new leaf and to learn how better to care for themselves.


While there may be something in a perfect onlay prep or a beautiful composite, seeing tangible change in patients’ mindsets, and the accompanying improvements in their oral hygiene, is arguably the most rewarding part of our job. If dentists are seen to advocate for and embody perfection, they may paradoxically deter their patients from improving their oral health, as the goals that they set can be perceived as unattainable. We need to be realistic in implementing manageable step-by-step approaches to improvements in oral health. We need to ensure that patients can walk into our clinics without feeling judgement. We also need to be better as a profession at acknowledging our own hypocrisies, starting with the elephant (chocolates) in the tearoom.

Bio

Emma, a founding member of the Colgate Advocates for Oral Health: Editorial Community, completed her Doctor of Dental Medicine at the University of Western Australia as the Australian Dental Graduate of the Year 2020. She is passionate about contributing to the future of oral health through dental education, community engagement and research. She hopes to share her insights to encourage members of the dental profession to reflect on opportunities for personal and professional growth to benefit our patients and the wider community.
DR EMMA TURNER BDS,DMD
331300 65 88 22 PREVENTATIVE
View the Colgate Advocates for Oral Health articles
CLICK HERE
LUNOS® PROPHY POWDER
PERIO COMBI (TREHALOSE) - BENEFICIAL FOR WOUND HEALING
Lunos® Prophy Powder Perio Combi, based on trehalose, can be used for supra- and subgingival air-polishing in prophylaxis as well as to support periodontal or periimplantitis therapy.

• effective
• highly soluble
• pleasant taste for patients
• low abrasive
A recent in-vitro study (Weusmann et al. 2021) has shown that trehalose has no pro-inflammatory and no pro-apoptotic effects on human gingival fibroblasts. Wound healing of gingival tissue is, in contrast to glycine, not negatively influenced (Fig. 1).
Thus, the authors suggest that in terms of cell response, trehalose-based air-polishing powder might be more beneficial than glycine-based powder for airpolishing.
Fig. 1
Wound closure of human gingival fibroblasts (HGF) in the presence of glycine and trehalose over 48 h.
*significant difference from all groups °significant difference to control Derived from (Weusmann et al. 2021).
References
Weusmann, Jens; Deschner, James; Imber, JeanClaude; Damanaki, Anna; Leguizamón, Natalia D. P.; Nogueira, Andressa V. B. (2021): Cellular effects of glycine and trehalose air-polishing powders on human gingival fibroblasts in vitro. In: Clinical oral investigations. DOI: 10.1007/s00784-021-04130-0.
34
PREVENTATIVE
Time (h) 0 0 10 20 30 40 50 60 70 61 22 43 64 8 Glycine Trehalose Control Wo und closur e (% ) ° View the Lunos Range on our website CLICK HERE
Lunos® Prophy Powder Perio is beneficial for wound healing in terms of cell response and in contrast to Glycinebased prophylaxis powder.
Like


DO YOU HAVE A REQUEST


35henryschein.com.au DENTAL SOLUTIONS
OF AN ARTICLE YOU’D LIKE TO SEE? AUG SEPT 2022
what you see but not satisfying all your needs? Let us know what articles and content you would like to see in upcoming editions of Dental Solutions. DENTAL SOLUTIONS FEB / MARCH 2022 DENTAL SOLUTIONS NOV DEC 2021 2021 DENTAL SOLUTIONS VOLUME CLICK HERE
ORAL HYGIENE FOR DIFFERENT RESTORATIONS AND APPLIANCES
It is essential that patients have a clear understanding of the oral hygiene practices required to keep their prostheses, and restorations, in good condition. Good care may limit the need for replacement in a shorter-than-anticipated time frame. The following article discusses oral hygiene for commonly used prostheses as well as care of restorations, taking a focus on powered toothbrushes.
1. Dentures
Providing education to patients on denture hygiene is important to enable them to care for their prosthesis as well as the health of their mouth. Patients should be educated and instructed to remove their denture at night to give the oral soft tissues a chance to breathe; allowing areas to heal and prevent infection. Fungal infections enjoy a warm, moist environment to breed; something we all want our patients to avoid. If a patient uses denture adhesive to assist in holding their denture in place, ensure they are cleaning off the adhesive and reapplying daily.
Dentures should be removed from the mouth and cleaned morning and night using warm water, a spare toothbrush or a denture brush, and a non-abrasive cleaner. Liquid hand soap is a simple and inexpensive option, while toothpaste should not be used due to its abrasive nature. Dentures should be brushed over a dish or sink filled with water or a towel to limit the risk of breakage if they are dropped. In addition, patients should be encouraged to soak their dentures daily in a denture cleaning solution by following the directions of the product purchased.
Dentures wipes are now also a cleaning option. These wipes allow denture wearer’s the opportunity to discreetly and safely clean/refresh their dentures when away from home. They are mint-flavoured wipes that negate the need for water, however, are not designed to clean off denture adhesive. To read more about these wipes, see Axe, A., Burnett, G.R., Milleman, K.R., Patil, A., & Milleman, J.L. (2019, February). Randomized Controlled Clinical Study to Determine the Oral and Dermal Tolerability of an Experimental Denture Wipe. Journal of Prosthodontics, 28(2), 138145.
At night, whilst the dentures are out of the mouth, it is important they are stored safely. Storage options can include inside a container dry or soaked in water. Keeping the dentures dry reportedly helps to decrease fungal spores, however with good oral hygiene, keeping them wet in storage overnight remains an option.
2. Sports mouthguards, occlusal splints and essix retainers
Similar care instructions exist for sports mouthguards, occlusal splints and essix retainers. All items should be cleaned well after use and stored in a safe location so as not to get lost, nor within easy reach of pet dogs who may enjoy the taste and subsequently damage or destroy them.
Wash with soft liquid soap and a spare toothbrush with soft bristles after use; do not use toothpaste which can leave marks or cause wear due to its abrasive nature. Allow the prosthesis to air dry or gently dry with a cloth or paper towel before storing it within a closed container. Be sure to note the manufacturing laboratory’s instructions on receiving a prosthesis made from materials you have not used before in case the material used to manufacture the splint, for example, has a different recommendation for cleaning and storage to what you are used to for similar appliances.
For items to be stored dry, it is important the storage container is not closed until the item is completely dry. Depending on where you and your patients reside, the humidity in Australia can be very high. Another consideration, particularly for sports mouthguard and occlusal splint hygiene is that they may be commonly stored for longer periods of time than essix trays. Storing these items in a case with no openings whilst still wet may cause them to become mouldy.
PREVENTATIVE
36
And finally, learn from my experience. It may seem like something you wouldn’t think to mention but ensure your patients do not clean or soak these items with boiling water. This can cause them to lose their shape – something I have witnessed after issuing a sports mouthguard.
3. Restorations
Secondary caries is a common cause of failure of amalgam and composite resin restorations1, making oral hygiene an important preventative factor. As of 2021, nearly 1 in 5 Australians only brush once a day, and 3 in 4 Australians rarely or never floss2. These statistics clearly indicate that we need to continue to educate our patients about oral disease prevention.
Empowering patients to choose the right oral hygiene aids to effectively brush and clean between their teeth can help them to care for their restorations in effort to improve longevity. A great example, and still a point of confusion for patients is whether to use a powered toothbrush and what type.

Powered toothbrushes have been shown to be more effective than manual brushes in reducing dental plaque, gingivitis, and bleeding. Moderate quality evidence demonstrates that powered toothbrushes provide a greater reduction of plaque and gingivitis3.
But remember, it’s not what you have, it’s how you use it!
Biography
Dr Mikaela Chinotti, BDS, MPH, graduated as part of the James Cook University inaugural dentistry cohort. She has previously worked in rural and regional government, private and health fund owned practices. Her passion lies in minimal intervention dentistry, health promotion and education, as well as equitable access to health care. Mikaela currently works as the Australian Dental Association (ADA) Oral Health Promoter and part-time as a general dentist. She is a founding member of the Colgate Advocates for Oral Health: Editorial Community, becoming a member due to her interest in helping and collaborating with fellow dental colleagues and hopes to contribute useful information for young dentists as they start and continue through their careers.

References:
1. Moraschini, V., Fai, C.K., Alto, R.M., & Dos Santos, G.O. (2015, September). Amalgam and resin composite longevity of posterior restorations: A systematic review and meta-analysis. Journal of dentistry, 43(9), 1043-1050. https://doi.org/10.1016/j. jdent.2015.06.005
2. Australian Dental Association. 2021. Consumer Oral Health Data.
3. Yaacob M, Worthington HV, Deacon SA, Deery C, Walmsley A, Robinson PG, Glenny A. Powered versus manual toothbrushing for oral health. Cochrane Database of Systematic Reviews 2014, Issue 6. Art. No.: CD002281. DOI: 10.1002/14651858.CD002281.pub3
DR MIKAELA CHINOTTI BDS, MPH
37henryschein.com.au
PREVENTATIVE
View the Colgate Advocates for Oral Health articles
LOCAL ANAESTHETICS
FREQUENTLY ASKED QUESTIONS
1. Is Articaine more allergenic than Lignocaine since it has an Ester?
No, there is no difference in the allergic presentations with Articaine vs Lignocaine. You can be allergic to one but not the other and you can be allergic to both. You are more likely to be allergic to the preservatives for the adrenaline.
2. Is Articaine safer than Lignospan in patients with Liver disease?
Articaine is metabolised in the blood while Lignocaine is metabolised in the liver. People with liver disease will have a longer half-life of Lignocaine and longer clearances, so Articaine is safer.
3. What situations should general dentists be aware of where adrenaline would be contraindicated in LA?
Adrenaline to local anaesthetic solution is contraindicated for the following diseases like heart diseases, untreated or uncontrolled severe hypertension, uncontrolled hyperthyroidism, uncontrolled diabetes, sulphite sensitivity/allergy, Tricyclic antidepressants, MOAs blockers, and Beta and Calcium Channel blockers. This relates more to blocks and the potential for intravascular injections.
4. Why do we need to avoid adrenaline close to foramen?
Articaine with adrenaline (epinephrine) can cause ischemia in the constricted space of a foramen, The main ones to watch is the mental and infraorbital foramen.
5. Would injecting Local Anaesthetics with adrenaline be contraindicated near the mental foramen?
Yes, don’t inject into the foramen but near it.
6. What anaesthetic to use for hot pulp and why?
It depends on whether it is a maxillary or mandibular tooth, I find that a maxillary infiltration with articaine and an occasional palatine injection when required is fine. On the mandibular I give a IADN with Mepivacaine 3% (1ml) followed by buccal and lingual infiltrations with Articaine.
7. Why don’t we use Adrenaline for Intra-pulpal injections?
An injection into the pulp is an intravascular injection and while it is unlikely to cause a problem it should be avoided. Having said that many colleagues give it with adrenaline without problems.
8. Why is Bupivacaine not used in Inferior Alveolar Nerve Block?
Bupivacaine is the most cardiotoxic of all LAs and the potential to give an intravascular injection is much higher with an IANB.
9. If doing IANB, would you still advise using half a cartridge when using lignocaine?
The tenet for any drug on how much to use is:” Enough to do the job or effect you desire.” Half a cartridge is enough.
10. Does it make much of a difference which LA is used when doing a block?
They all work, my preference is Mepivacaine 3% plain and there are no adrenaline issues, it has the best pKa and therefore works in a wider range of pH and it is the only local that has vasoconstrictor properties. However, use what works in your hands.
PAIN CONTROL
38
11. What are the consequences of injecting LA into a lymphatic vessel?

Lymphatic vessels are everywhere including the pulp and injection into these don’t appear to have any consequences. If we are referring to Lymph nodes, these would best be put to an oral pathologist experience in lymph node biopsy.
12. If LA is stored above 25C for 2-3 days, should we discard it?
This is really a problem for the manufacturer, and I guess it depends on how high the temp got. At 40C the protein definitely denatures. You should always follow manufacturer’s instructions and discard anything outside the recommended advice.
DR. GREGORY MAHONEY
BDSc, PhD, MSc(Dent), GradDipClinDent, FADI, FPFA
President of the Australian Society of Dental Anaesthesiology (2009-2022)

Asia Pacific Representative for International Federation of Dental Anaesthesiology Societies (2003-2015)
President of the Australasian Military Medicine Association (2009- 2018)
Clinical Director Specialist Health Services for Air Force Health Reserves (2013- 2020)
Consultant to the Director of Defence Force Dentistry on dental sedation and epidemiology (1998-2020)
Consultant and Panellist for the Queensland Health Ombudsman, AHPRA and the Australian Dental Association
Watch All Things LocalMisconceptions, Myths, Safety Tips & Tricks Webinar on Demand by Dr. Greg Mahoney

391300 65 88 22
PAIN CONTROL
CLICK HERE
THE STA SINGLE TOOTH ANAESTHESIA Q&A - PART 2
 WITH DR. EUGENE CASAGRANDE
1. What is the feedback from patients when using the STA vs conventional syringes?
The patient response is universally very positive. In the United States alone, 40 million people are dental phobic; Most patients judge dentists by their ability to deliver a “painless” injection; Patients perceive the syringe as a leading cause of their pain anxiety. In a survey of patients who experienced the STA, 100% prefer it over the syringe; 79% are more likely to refer friends and family to the practice; 72% would be willing to pay extra for an STA injection rather than a syringe injection. Many testimonials from STA users and patients to validate how the STA has had a positive and beneficial effect on them is available on the Milestone Scientific website: milestonescientific.com
2. Can we use the STA techniques/ injection sites with our normal conventional syringe?
Yes, the STA injection techniques (AMSA, P-ASA, Intraligamentary, and crestal) are possible with the traditional dental syringe. If the same anaesthetic is deposited at the same injection site, the anaesthetic effect will be the same or similar regardless of the delivery device or instrument. However, there is a major difference between delivery devices.
The STA’s computer-controlled technology produces a consistent and precise flow rate of anaesthetic (one drop every two seconds) that is below the patient’s pain threshold. This flow rate is used for all STA injections and is almost impossible to reproduce with the 160-year-old technology of the traditional syringe which uses manual pressure on the plunger to force the anaesthetic out of the cartridge. There is a great difference between a computer-controlled flow rate versus a manual-controlled flow rate. Using the STA handpiece allows the operator to have excellent control of the needle and to be able to use a finger rest during the injections. Using the STA for these injections makes their delivery easier and less stressful for the operator and virtually painless for the patient in comparison to a dental syringe. There are many more benefits and reasons to use the STA.

3. How can the STA system be advertised to patients?
Primarily by social media platforms, such as Facebook, Linked In, etc. If you only use the STA for all injections on all patients, consider a campaign that lets the public know that you are a syringe-free practice.
40 PAIN CONTROL
4. What is the difference between the Wand & STA Single Tooth Anaesthesia System®?
The first computer-controlled local anaesthetic delivery system was The Wand; the second version of The Wand was called the Wand Plus. The STA Single Tooth Anaesthesia® is the third and last generation of The Wand.

5. Can we use the Wand Handpieces with STA?
The Wand handpieces are used for The Wand and the Wand Plus instruments and are still available. The STA handpieces were modified to allow an automatic purge cycle and cannot be used on the two previous versions of the Wand.
The Wand Handpieces are not interchangeable and cannot be used in place of the STA Handpieces.
6. How long is the warranty for the STA?
The STA (Single Tooth Anaesthesia) is warranted for two years from date of purchase against manufacturing defects in materials.
Please refer to the STA user manual for more information.
More useful information, including important injection videos, is available on the manufacturer’s website: milestonescientific.com

Author: Dr. Eugene R. Casagrande has practiced Cosmetic and Restorative Dentistry for over 30 years in Los Angeles. As the Director of International & Professional Relations for Milestone Scientific for over 23 years, he has published multiple articles and has lectured both nationally and internationally at over 100 dental schools and in over 50 countries on Computer-Controlled Local Anaesthesia.
DR EUGENE R. CASAGRANDE DDS, FACD, FICD

41henryschein.com.au
View
Dental Education Hub PAIN CONTROL
Henry Schein Dental Education
Hub CLICK HERE CLICK HERE
CONSERVATIVE ENDODONTIC TREATMENT OF UPPER FIRST MOLAR

This patient was referred to my care for management of an infected and painful upper left first molar tooth. Tooth 26 was diagnosed with necrotic pulp and symptomatic apical periodontitis and endodontic treatment was performed over two appointments.

This case illustrates the use of fine long-shank carbide burs (Komet Endotracer) to locate canals as well as the ability of flexible, heat-treated rotary NiTi instruments (EdgeEndo X7) to safely negotiate and prepare the root canal system while conserving dentine.
An access cavity is cut in the ceramic crown and a calcification observed in the pulp chamber.


The calcification is removed with ultrasonics and the MB canal orifice is located. Alongside it is the mesial dentine shelf under which the MB groove and MB2 canal are expected to lie with tooth 26.

42 ENDODONTICS
Preoperative periapical radiograph of tooth 26
The preoperative CBCT shows a clear apical radiolucency associated with tooth 26.
The MB groove is carefully explored with fine long-shank carbide round burs (Endotracer). This allows us to locate the MB2 canal while minimising dentine removal. Small, thermally hardened stainless steel hand-files (Komet Patency files) in sizes 6 and 8 are useful in negotiation of these tight canals.


The MB2 canal has been located at the terminus of the MB groove and prepared with the EdgeEndo X7 .04 taper file sequence.

431300 65 88 22 ENDODONTICS
Postoperative periapical radiograph
Postoperative CBCT slices reveal the canal curvatures and the interesting 2-1-2 relationship between the MB and MB2 canals.
DR HARRY MOHAN BDSc DCD (Endo) Melb Gregory Hills & Shellharbour, NSW
View EdgeEndo X7 Online CLICK HERE View Komet Endotracer Online CLICK HERE
PRESERVING PULP IN IMMATURE TEETH

WHY IS IT SO IMPORTANT FOR DENTISTS?
This article highlights the risks of premature tooth loss in young patients, and the role of biomaterials to ensure the long-term survival of the tooth and avoid extraction.
Dental decay: An overview
Dental decay is the most common chronic childhood disease. Worldwide, 42% of children between the ages of 2 to 11 years old have dental caries in the primary dentition. Premature primary or permanent tooth loss can be caused by dental caries and infection, trauma, or ectopic eruption of permanent teeth, however dental decay is the most prominent cause especially for primary and permanent molars. Poor dietary habits, poor oral hygiene habits, and low socioeconomic status have been shown to be correlated with higher caries incidence and premature tooth loss. Following dental decay as the most common cause of premature loss of primary and permanent teeth is trauma.
Risks of premature tooth loss
Keeping immature (and mature) teeth in the oral cavity is critical for many reasons. Let’s review some of the reasons. Pediatric oral health care has several special considerations within the treatment planning process, including children’s growth and development. Maintenance of arch integrity as children transition from primary to mixed dentition is essential to the development of permanent dentition. The primary dentition has several purposes. Not only does it allow for mastication for adequate nutrition, proper occlusion, and esthetics, but they affect the development of speech in children. When lost prematurely, there can be negative consequences seen in the psychological and emotional wellbeing of children and adolescents. Tooth loss can be considered premature when primary teeth are extracted prior to the normal exfoliation timing. Another major consequence of premature loss of primary teeth is space loss in the permanent arch, as well as crowding and malocclusion.
Specifically, the premature loss of primary molars has been found to be associated with major malalignment of the permanent teeth. These effects on succedaneous teeth can result in more expensive and extensive treatment needs in the future.
How to evaluate space maintenance?
Premature tooth loss can lead to space loss but there are several factors to consider when deciding to implement space maintenance for patients in primary and mixed dentition. Specific criteria to consider when evaluating the need for space maintenance includes:
• The time that has passed since tooth loss
• The chronological age of the child, the dental age or development of the child
• Amount of space closure already observed, where in the arch tooth loss is observed
• Direction of space closure
• The timing of eruption of the succedaneous teeth
• The amount of bone remaining over the unerupted permanent tooth.
Premature loss of primary molars poses a significant risk for space loss in the dental arch, making patients three times more likely to require orthodontic treatment after reaching complete permanent dentition. Premature loss of primary anterior teeth does not pose the same risk for space loss in the dental arch. However, premature loss of immature permanent maxillary teeth has deep impact in the esthetics and self-esteem of the patient.
ENDODONTICS 44
Preserving pulp in traumatized teeth

The occurrence of trauma in the permanent immature teeth is common worldwide. Two thirds of all dental trauma have been reported to occur in children and adolescents with the anterior permanent teeth being the most affected. Traumatic injuries may result in pulp exposure, which may lead to infection.
Complicated crown fractures in immature teeth presents a special challenge for the dentist. The main idea is to preserve the pulp inside the root to allow the tooth to complete the root formation and the apex closure. The main objective when preserving the pulp is the use a highly biocompatible material. A favorable material will ensure long term survival of the tooth and avoid the extraction. Various dental materials have advocated for use in direct contact with the pulp.
Traumatized teeth management with Biomaterials


BiodentineTM has excellent properties that protect the vitality of the traumatized tooth pulp:
• The setting time, around 9-12 minutes,
• The compression strength of BiodentineTM similar to the dentin,
Clinical case
• The porosity: Because of the low content of water of BiodentineTM the porosity of the material is lower compared with other materials. This is a significant benefit when a perfect seal is mandatory, like in direct pulp cap treatment,
• The antibacterial property attributed to the high pH of the material. The high alkalinity has inhibitory effect on the growth of microorganisms,
• The biocompatibility of BiodentineTM which has been probed in multiple studies when the material is placed with fibroblasts from the pulp.
Preserving immature primary and permanent teeth is a critical task of contemporary dentistry. Placing a dental material in direct or indirect contact with the pulp is a common option that the dentist has in the treatment armamentarium to guarantee the preservation of the pulp tissue. BiodentineTM, as described above, is highly biocompatible. This ability was investigated in multiple studies in the past 5 years. BiodentineTM, when applied to human pulp cells, confirmed the biocompatible characteristics that resulted in the preservation of the pulp.
An 8-year-old patient presented to our hospital dental clinic after trauma of the front teeth. She was practicing gymnastics and fell off the monkey bars approximately 1 hour before coming to the hospital.
The excellent biocompatibility of BiodentineTM helped to preserve an immature tooth with critical role in the esthetics and growth and development of the patient. A temporary composite was placed over Biodentine TM and the patient was scheduled to come back to the clinic for follow-up in 4 weeks.
Professor, Department of Pediatric Dentistry Indiana University School of Dentistry Riley Hospital for Children

45henryschein.com.au ENDODONTICS
A class III fracture (pulp exposure) was noted over the upper left central incisor
A radiograph was also taken to confirm the nature and extension of the fracture
Tooth was isolated, the pulp exposure was cleaned with saline solution. BiodentineTM was then applied directly in contact with the pulp (direct pulp cap)
JUAN F. YEPES DDS, MD, MPH, MS, DrPH, FDS RCS(Ed)
View Biodentine Online CLICK HERE
DIGITEST 3: A PULP VITALITY TESTER WITH A FAST LEARNING CURVE
WITH GUISEPPE CHIODERA
Digitest 3 is an electrical tester that uses electrical impedance. It’s an easy to use instrument that allows clinicians to check the vitality of a tooth in the diagnostic phase.

Combining accuracy, patient comfort, ergonomics and reliability. The trick when testing pulp vitality is to trigger a response from a vital tooth without hurting the patient. Many pulp testers go from “no reaction” to a jolt of pain in one step.


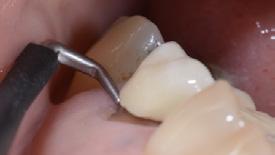


The new Parkell Digitest 3 avoids patient discomfort in two ways: Instead of a constant current, the Digitest 3 stimulus consists of an oscillating pulse.

We like to refer to it as the “gentle pulse” because a vital tooth feels the stimulus at a level well below the pain threshold. The Digitest 3 also increases the stimulus gradually, without sudden jumps that can trigger an “ouch” response.
Conclusion
It is an incredibly easy to use instrument, useful for both diagnosis and monitoring! Compared to other tests such as the traditional cold cotton one,
Digitest 3 is less annoying for the patient, as we can modulate the discharge intensity. Immediate understanding by both the clinician and the patient!
46 ENDODONTICS
Close to an old onlay.
Stump under a crown.
Thin, curved tip for distal access to a crown or fork.
Autoclavable
Probe Tips
Straight thin tip for direct access to an exposed tooth collar.
Curved tip for palatal access to an abutment.
Let’s
In this case, instead, we start with the gel on the tip of Digitest 3.
TIP: If you want to check that the gel does not touch other teeth, I suggest you to use a colored gel, to work as a stain with teeth and gum.


Once in contact, we can start the measurement.
Touch the tooth where you put the gel before.Using gel toothpaste helps as these are usually high


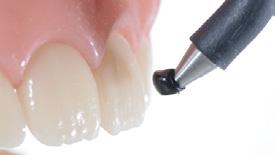
Using
be less precise.
Different tip angle do not affect the measurement.
The
Better
Thanks to the different shapes of Digitest 3 tips, we can reach all areas useful for testing the tooth.


Vestibular
As
471300 65 88 22 ENDODONTICS
the tip without gel we will have no conduction and the measurement will
to add some toothpaste…
curved tip is perfect for difficult to reach areas…
areas In the distal portions
well as in the palatal – lingual portions.
see the step by step procedure. Put the gel both on the tooth and on the tip of the instrument.
density gels.
What is it?
Digitest 3 is an electrical tester that uses electrical impedance.
Alternatively, the manufacturer suggest that the patient holds the “hook”. The electrical circuit should be closed.
How it works
Placing some gel toothpaste on the top of the instrument helps to conduct electricity in order to have a more precise measurement.
It’s important to put the gel only on the tooth we are testing.
TIP: The gel should not ” go ” on other neawn this example, the test will not only measure the values of the first premolar, as it should have done if the gel had remained only on that tooth.
When we turn on Digitest 3 a progressive discharge of electricity starts. We can decide to increase it or to stop it at any time.
Start from

More and more
and than increase
Until we reach a response from the patient. Digitest 3 can be used to measure if the tooth is sensitive (and therefore alive) and also by what numerical value is sensitive.


TIP: It’s important to notice, in addition to the patient’s conscious response, also and above all the unconscious response given by the eyebrows. When the patient starts frowning, it means that he is starting to feel pain. This is the first signal.

Digitest 3 can be used in 2 different cases: 1. To detect if a tooth is alive: If the patient, even if we increase the electrical impulse till the end of the scale (maximum 66), perceives nothing, then most probably the tooth is no longer vital. TIP: It’s always useful to test also a nearby or contralateral tooth, to verify that the instrument is working well and to make the patient understand what he should have felt.
2. To detect if a restored tooth is still viable over time: If we made a deep restoration or a pulp hooding we need to check over time if this restored tooth is still alive or is most probably no longer viable.


ENDODONTICS 48
0
GUISEPPE CHIODERA P hD Brescia BS, Italy View Digitest 3 Online CLICK HERE
HYPOCHLORITE IRRIGATING SOLUTIONS EVALUATING CHLORINE CONCENTRATION
Introduction The goal of root canal treatment is to shape and clean the endodontic space, reducing the bacterial load and removing the pulp tissue. Obviously, the action of the endodontic instruments is limited to the main canals, regardless of the complexity of the endodontic space. Consequently, finding the best possible cleaning technique, which can be obtained chemically using irrigation solutions, is a fundamental aid in endodontic therapy. One of the most commonly used root canal irrigants is sodium hypochlorite (NaOCl), available in various commercial formulations. The effectiveness of NaOCl is undeniable. However, the action of dissolution of the pulp tissue is merely dependent on the concentration and the characteristics of the irrigant itself.
Aim The aim of this study is to evaluate the effective concentration of different commercial formulas of NaOCl, by evaluating the percentage of total chlorine in each product. The dissolution capacity of the pulp tissue of each of the tested products was then analyzed by measuring the required time.

Materials and Methods Three commercial types of NaOCl were selected for this study: 5% NaOCl (ACE, Procter and Gamble), 5% NaOCl (N5, Simit Dental), and 6% NaOCl (CanalPro, Coltene). For each product, 10 packages were used, from which samples of the product were taken and 30ml × 5ml tubes were filled. All samples were divided into three groups and were analyzed using the DIN EN ISO 7393-2 method and the percentage of total chlorine (expressed as a percentage) was calculated. Forty samples of vital pulp were obtained from teeth freshly extracted for periodontal reasons and stored in physiological solution. In order to unify the size and weight of the samples (0.0001 mg), a microtome and a precision balance (Pro Explorer Ohaus) were used.
Each sample, carefully examined by stereomicroscope (×40), was placed in artificial plastic containers and submerged in 0.1 ml of irrigating solution at room temperature (26°C). A fourth control group used saline solution as irrigant. Simultaneously with the insertion of the irrigating solution, a digital stopwatch was activated and the time necessary for the complete dissolution of the pulp sample was measured. The data obtained was subjected to statistical analysis.
Results The average percentages of chlorine detected for each group were: 4.26% (ACE), 5.16% (N5), and 5.97% (CanalPro). The Kruskal–Wallis test showed statistically significant differences between the different commercial formulations of hypochlorite (P < 0.05). CanalPro showed the lowest values, whereas ACE showed the highest values of dissolution time of the pulp.
Discussion The analysis of the total chlorine percentage found that the actual concentration of the NaOCl in the samples is close to the values declared by the manufacturers both in the case of N5 and CanalPro. On the contrary, the concentration detected in the samples of common bench bleach (ACE) is significantly lower, which has average values <5%. This explains the longer time taken for the complete dissolution of the pulp tissue. The average dissolution time of the pulp samples was in fact inversely proportional to the concentration detected in the tested irrigants and hence that a lower time corresponds to a higher concentration.
Author Dr. Alfredo Landolo. Department of Neurosciences, Reproductive and Odontostomatological Sciences, University of Naples Federico II, Naples Italy
49henryschein.com.au
View the CanalPro Recommended Irrigation Protocol View the CanalPro Solution Range CLICK HERE CLICK HERE ENDODONTICS
CASE STUDY WITH PARACORE
The definitive restoration of a tooth that has had root canal treatment with a post, tooth abutment and crown covers a number of complex stages and materials.
The practising dentist is interested in improving the efficiency of the restoration and ensuring for a fixed interface between the post, tooth abutment and crown. This means that the procedure must be simplified so that the treatment takes less time and is less prone to error.
The following clinical case describes a patient with endodontic root canal therapy on tooth 11 after an accident, which was restored using a metal post and a composite core abutment. The unacceptable shade of the composite abutment, the visible metal post, the multiple horizontal and vertical cracks in the enamel accentuated the dark discoloration of the tooth. This meant that a new restoration using a crown with an abutment was indicated. The x-ray examination also showed that a revision of the unsatisfactory root canal filling would be indicated. This part of the treatment however was not shown in this clinical case.
At the start of the treatment, the shade was selected with a moist tooth under varying light conditions using a standardised shade guide. After removal of the old filling with DIATECH diamond burs and by chipping away the residue of the filling with a Heidemann spatula, the metal post was exposed and removed using a pliers with a rotary motion. After preparation of the root canal with Para Post Taper Lux drills, the ParaPost Taper Lux post size 5.5 was trial seated. The easy application and effectiveness of the ParaBond Non-Rinse Conditioner in the root canal and on the complete contact area (for the subsequent core build up) took only 30 s. The excess Non-Rinse Conditioner was then removed from the root canal using a paper point and root canal. The contact area was then dried with air for 2 s. The 1:1 mixed A + B ParaBond Adhesive must be applied onto the
same area in which the Non-Rinse Conditioner was applied to allow for a smooth workflow with the endodontic post immediately after cementing the post. The ParaBond Adhesive in combination with ParaCore offers high Adhesive retention for reliable and permanent restorations. This ensures effective sealing and an excellent marginal fit. The risk of postoperative complications is significantly minimised. The root canal tip can be used to apply ParaCore directly into the root canal. The ParaPost Taper Lux post is first measured for length and then positioned into the canal with the cement cured using blue light. The optimum consistency of the material allows it to be shaped into the approximate shape of a core abutment during application
ParaPost Taper Lux provides an alternative to metal posts, if aesthetically demanding or non-metallic restorations are desired. ParaPost Taper Lux is a translucent glass fibre material in a tooth shade, which prevents the formation of shadows at the gingival margin. With its light transmitting properties, the post can be secured into place using composite cement and a polymerisation lamp. Six different diameters make it easy to prepare the canal safely and atraumatically. The optimum structure of the parallel glass fibre bundles surrounded by a hard fibre matrix provide the post with a module elasticity similar to that of natural dentine. The matching mechanical properties between the post and tooth structure reduce tension and guarantee longterm success of the treatment. To ensure that the essential requirements of increased stability against the opposing occlusion and the amount of insurance reimbursement coverage are met, it is suggested to use a PFM crown.
The stable consistency of ParaCore make it possible to shape the core freehand.
50
ENDODONTICS
Additional light polymerisation accelerates the curing process and enables continual processing almost immediately. The transition between the dentine and the endodontic post is not detectable during preparation. This prevents unnecessary formation of grooves during the preparation of the core build up, which result in time consuming repairs.
The endodontic post was prepared using DIATECH diamond burs. After placement of the retraction cord, the double mix impression was taken using the combination of AFFINIS regular body and AFFINIS putty soft. JET BLUE BITE was ideal for the bite registration, since it can be removed from the mouth quickly and easily. This is easier for both the patient and dentist. After revision of the root canal filling and fixation of a prefabricated protective crown as a temporary, the first stage of the treatment was complete.


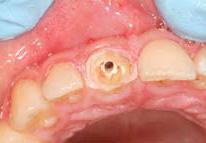

After removal of the temporary denture and simple cleaning of the abutment, the final restoration was trial fitted during the next appointment. Finally, the same Adhesive technique as previously used for cementation of the post was used – this standard routine minimises the risk of errors during treatment. The definitive restoration can now be directly filled using ParaCore and cemented into position.

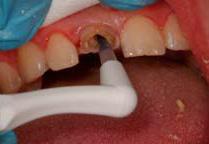

Excess cement is removed using suitable instrumentation and then the chemical cure is complete after only four minutes of waiting time –light-curing is not possible with this metal ceramic crown.
Conclusion Cementing without bonding? In recent years, self-Adhesive composite cements have become well-established. This is certainly understandable from the users’ point of view, since they can achieve good results in fewer steps. However, many products demonstrate low Adhesive values and an inadequate marginal fit between the tooth and cement. Good adhesion and a permanent seal on the tooth surface guarantee for a successful and long-term restoration. ParaCore as a dual cure glass-reinforced composite cement is the ideal choice for the monoblock technique (Adhesive post cementation, core build up abutment and cementation of the crown). This guarantees for an optimum monoblock bond interface between the post, cement and crown. This provides the restoration with outstanding strength and durability. Due to the two practical mixing tips – one tip with a larger orifice and one with a root canal tip –ParaCore can be applied anywhere - even deeply into the root canal.
511300 65 88 22 ENDODONTICS
Fig 1: Initial situation for tooth 11 Fig 2: Shade selection using a standardised shade guide Fig 3:
Root canal without post.
Fig
4: Preparation of the root canal with ParaPost Taper Lux Drills –recognisable due to their wide coloured marker ring
Fig 5: Trial fit of the ParaPost Taper Lux post using size 5.5 Fig 6: Application of the Non-Rinse Conditioner for 30s Fig 7: Air dry Non-Rinse Conditioner for 2s Fig 8: Apply 1:1
mixed
Adhesive A+B directly into
the root canal and
onto
the contact areas
Fig 9: Remove access Adhesive in the root in canal with a paper point Fig 10: Air dry the Adhesive for 2s Fig 11: ParaCore automix 5ml can be applied directly into the root canal using the
Root Canal
Tip Fig 12: Positioned post


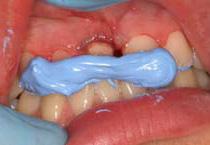


52 ENDODONTICS Fig. 25: Bite registration with JET BLUE BITE fast Fig. 26: Selection of the prefabricated polycarbonate temporary denture and lining using Cool Temp Natural Fig. 27: Temporary denture cemented-in using TempoSIL 2 Fig. 28: Before Fig. 13: Light cure post to accelerate the polymerisation process Fig. 14: The colour coded ring is being removed before cementation Fig. 15: Freehand modelling of the core abutment using the root canal oral tip Fig. 16: Light polymerisation accelerates the curing process so that the user can continue working almost immediately Fig. 17: Preparation of the endodontic post using DIATECH diamond burs Fig. 18: Prepared core abutment Fig. 19: Placement of the Roeko Comprecord retraction cord Fig. 20: Syringing of the preparation using correction material Fig. 21: Impression in the mouth with AFFINIS putty soft tray material Fig. 22: Double mix impression material Fig. 23: Applying JET BLUE BITE fast Fig. 24: JET BLUE BITE fast in situ View the ParaCore 5ml Step by Step Card CLICK HERE


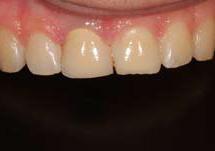
53henryschein.com.au ENDODONTICS Fig. 29: After Fig. 30: Simple removal of the temporary denture and easy cleaning of the abutment Fig. 31: Abutment is prepared for the final restoration Fig. 32: Trial fit of the final restoration Fig. 37: Air dry using a gentle stream of air for 2 s Fig. 38: Direct filling of the restoration using the ParaCore oral tip Fig. 39: Placement of the final restoration with ParaCore dentin shade Fig. 40: Removal of the excess cement and chemical cure after 4 minutes, since this is a PFM crown. Otherwise it is also possible to cure with light polymerisation Fig. 33: Cleaning the restoration and abutment using alcohol Fig. 34: Application of the Non-Rinse Conditioner for 30s Fig. 35: Air dry using a gentle stream of air for 2s Fig. 36: Apply the 1:1 mixed Adhesive A+B Fig. 41: Final situation View the ParaCore System on our website CLICK HERE DR. B. FIETZ MED. DENT, NOVEMBER 2009
SMALL THINGS MAKE A DIFFERENCE
4K IMAGES AND VIDEOS
Employed as a dentist in dental practices, it is common knowledge that working in a small, poorly lit and confined spaces is challenging. Often, procedural treatment outcomes and success are based on small margins.
During the last many years clinicians have not only gained basic and scientific knowledge but has also adapted and incorporated new technologies into the everyday work procedures. Including a dental microscope and thereby improve their vision, working posture and above all clarity or workspace within the oral cavity.
When deciding on a dental microscope it is worthwhile looking at the following aspects.

• Magnified Image is provided via the magnification specifications of the microscope
• Increased Precision and Accuracy via increased magnification allows the dentist to access small, narrow canal opening without removing the tooth structure
• Improved Ergonomics is a natural benefit using a suitable microscope
• Viewing, recording and patient data is available in the newest dental microscopes ranging from internal HD cameras (2D, 3D and 4K Camera), onboard storage, LAN network connection for patient data recording and more
• Outstanding LED Lighting is the important thing to look for when choosing a new dental microscope. The microscopes should be equipped with advanced lightings made of LED that cast a shadow less illumination and comes with a cooler temperature


• Other features to be considered includes FluoDet Fluorescent Module, BiLED Illumination as back up in case of power failure, Multi-functional Handles, and magnetic brakes
The Zumax range (OMS 2000) of microscopes is broad and there is one model for everyone starting $18000 (Valid until 31/12/22)

54 ENDODONTICS
Order on our website CLICK HERE
LUBRINA 2
The benefits of automated handpiece lubrication – for optimal performance of Handpieces
Dental handpieces are a costly investment and every dental practice could benefit from having a simplified protocol to ensure the proper care and maintenance of their handpiece inventory.
Poorly maintained dental handpieces can compromise the quality of performance, lead to potential health and safety risks and can cause costly and time consuming repairs.
It is important to follow the maintenance recommendations of the handpiece manufacturer but almost universally they recommend handpieces are lubricated, purged and chuck maintenance performed on both highspeed and speed increasing red band contra angle handpieces.
Automating handpiece maintenance provides precise and consistent lubrication and purging of handpieces which ensures optimal performance and longevity, increases efficiency as multiple handpieces can be lubricated in one cycle and can significantly reduce the amount of lubricant required.
Morita’s Lubrina 2, with programmable maintenance modes, can effectively and efficiently perform purging and lubrication of 4 handpieces (highspeed or contra angle), automatically. The new Clean Air-Blow function with double-conduit design, ensures residual water is removed from the handpiece prior to oiling, maximising lubrication results. The Clean Air-Blow also effectively removes any surplus oil prior to bagging and autoclaving your handpiece.
The Lubrina 2 is the cornerstone of a standardised, efficient and effective handpiece maintenance protocol for dental practices, minimising maintenance costs and maximising handpiece longevity.
LUBRINA2 M-LUBRINA2
• NEW Clean Air-Blow System
• Dedicated built-in, one touch, Chuck Maintenance port
• NEW Oil mist suction removal
• 20 second high speed handpiece maintenance
• Programmable maintenance modes for different handpiece types
• Maintains up to 4 handpieces in one cycle

• Multiple handpiece coupling options available
• Compatible for use with other manufacturer’s lubricant
• Quiet operation
• Simple unit maintenance
To learn more
551300 65 88 22
CLICK HERE
HANDPIECES
DURABILITY AND LONGEVITY
BENEFITS OF A 3 GEAR SYSTEM IN A 1:5 SPEED INCREASING CONTRA ANGLE HANDPIECE
The Morita TorqTech 1:5 contra angle red band handpiece has a three gear system plus double internal gears and involute gears that all contribute to super durability.

While enhancing both handling and safety, durability is greatly improved by the use of the three-gear system plus double internal gears and involute gears. This enables the handpiece to stand up to repeated autoclaving astonishing well.

Super Durable 3 Gear System
With only 2 gears the teeth must be smaller. The three gear system uses bigger gears by employing internal and involute gears that gradually increase the speed. This makes the whole system more durable and less vulnerable to wear. (CA51FO)
Internal Gear System for Maximum Activity Space
In order to use larger gears within the limited space inside the handpiece, two internal gears are used. These have the teeth on the inside rather than the outside as with conventional gears.


56
Three Gears: Larger teeth carrying the load.
Two Gears: Load is concentrated on smaller teeth.
HANDPIECES
Involute Gears

These gears contribute greatly to better durability because they move more smoothly against each other, reduce friction and lessen wear.

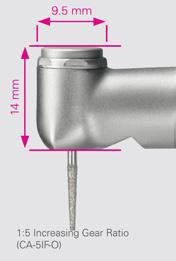

TorqTech vs a Standard Size Head

The smaller head is more comfortable for patients and offers better access in the posterior region. It is especially helpful when the patient has limited opening.

A standard sized head is generally taller and strikes opposing teeth in the treatment area. The sensation of this can be stressful and uncomfortable to patients.
Handling Comparison of TorqTech and Morita’s CAI. Dotted Lines and shaded areas show difference in shape.
Safety
Morita TorqTech contra angle handpieces hold burs with great security. Morita has invented a unique chuck design that uses three prongs and a threedimensional spring mechanism so that the chuck is held both vertically and horizontally. The chuck is highly durable and its gripping strength is hardly at all affected by wear and metal fatigue.
57henryschein.com.au
Involute Gear : Gears that use an involute tooth shape
HANDPIECES
Watch Morita’s TorqTech Red Band Handpiece
Demonstration Video CLICK HERE
BRINGING YOU DENTAL EXCELLENCE SINCE
ENGINEERED BY EXPERTS,
With a variety of patents and utility models granted, KaVo consistently delivers on its promise of Dental Excellence. KaVo
1909
KaVo is founded in 1909 in Berlin-Steglitz by Alois Kaltenbach with a mission to deliver “quality and precision”

1922
Development of the first dental instrument: the first sterilisable handpiece, Asepto, is created in 1924


1977-1980
The MULTIflex coupling sets a worldwide standard and later becomes the MULTIflex LUX system with integrated light
1989
The SUPERtorque 640B is born, the first instrument with a robust light rod thanks to the bundling of 3,000 optical fibres


1970
Introduction of the INTRAmatic coupling, a worldwide standard
1984
SONICflex 2000, the start of a unique air scaling success story that continues to this day
2003
GENTLEpower, low-vibration operation thanks to new triplegear technology
58
VIEW ONLINE HANDPIECES
SINCE 1909 - MADE IN BIBERACH, GERMANY
EXPERTS, FOR EXPERTS
repeatedly set new standards with innovations, especially in terms of instruments, and continue to exceed expectations.
2003
INTRA LUX KL 703

LED motor, the world’s smallest dental micromotor of its time

2010
Introduction of MULTI LED for perfect lighting and fast, economical switching to LED
2014
MASTERsurg surgical unit with one-touch calibration and instrument checking
2020
SURGmatic S201 XL Pro, hexagon clamping system enabling 80 Ncm torque and an outstanding lifetime

2008
DIAGNOdent pen, caries detection based on laser fluorescence technology, with no X-rays or mechanical stress


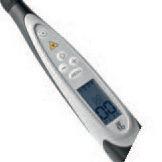
2013
MASTERtorque M9000 L with Direct Stop Technology and improved performance

2018
PROPHYflex 4, the first powder jet device based on the mixing chamber principle for targeted work
2021
DIAGNOcam Vision Full HD, one camera for three diagnostically relevant images in full HD resolution within one second

591300 65 88 22
ONLINE HANDPIECES
THE WONDERFUL WORLD OF PIEZOELECTRIC SURGERY
Piezo-powered surgery is a technique of cutting bone for osteotomy and osteoplasty in implantology, periodontology, endodontics and oral surgery applications.
Piezosurgery, or the use of piezoelectric devices, is a new and rapidly flourishing development in oral and maxillofacial surgery. The main advantages of this technique are precise and selective cuttings, the avoidance of thermal damage, and the preservation of soft-tissue structures.
Piezoelectric surgery is superior to other methods relying on mechanical instruments as it provides for precise, minimally-invasive and highly impeccable handling of delicate or compromised hard- and softtissue conditions, with less risk for the patient and greater ease for the surgeon. Through piezoelectric surgery, implant-site preparation, bone grafting, sinus-floor elevation, edentulous ridge splitting, or the lateralisation of the inferior alveolar nerve becomes technically very feasible.
What are the main features of piezoelectric surgery?
• Micrometric cutting maximum surgical precision and intra-operative sensibility
• Selective cutting is specific for mineralised tissue i.e. bone, and inactive when in contact with soft tissue
• Cavitation effect this lowers the temperature of the cut and increases the intra-operative visibility (bloodless field)
NSK VarioSurg3: cutting-edge technology
VarioSurg3, the latest advance in NSK’s VarioSurg range, maintains the lightweight and slim handpiece design of its predecessor and the same excellent balance and grip, but has 50% more power than the previous model – making it immeasurably more precise and shortens treatment time significantly. This gives the practitioner extraordinary accessibility and visibility during procedures.
Its ergonomic shape and fine balance are designed to minimise hand and finger fatigue, even during extensive usage. The advanced feedback and auto-tuning functions, combined with the finest engineered tips on the market, a triumph of NSK’s meticulous manufacturing using three-dimensional toothing (working) of the sharp edge, make this a refined and elegant tool of surgical excellence.
VarioSurg3 also features the world’s first dynamic link feature, which enables you to operate both VarioSurg3 and SurgicPro via a single foot control. Intuitive controls and a large and clear backlit LCD screen makes VarioSurg3 really easy to operate and takes the strain out of delicate procedures.
Variosurg3 and Handpiece: The NSK VarioSurg3 can be used for the following applications:

• Sinus lift
• Bone graft harvesting
• Ridge expansion
• Mandibular nerve transposition
• Peri-implant osteoplasty
• Implant site preparation
• Cystectomy
• Tooth extraction
• Endodontic surgery
60 HANDPIECES
What are the main advantages of using the NSK VarioSurg3?

• Precision – zero rotational motions completely change the game in both accuracy and surgical impact
• Reduced bleeding through the superbly engineered irrigation and cavitation design


• Completely safe on soft tissue
• Fast operation – reducing patient stress and surgical fatigue
• Up to three times more powerful than a dental
In the accompanying images you will see a comparison of bone cutting using a bur, saw and piezo. This series illustrates beautifully why piezosurgery is at the leading edge of surgical innovation, and the precision and safety of using piezo.
61henryschein.com.au
View NSK Range CLICK HERE VS3_p00-12_D764E_1308.idd 1-2 13.8.28 11:31:12 AM HANDPIECES
ULTRASONIC INSERTS
MAINTENANCE CHECKLIST
How to properly care for your ultrasonic inserts
Did you know a hygienist spends 2 hours per day on average power scaling? With so much usage and often a different insert for many procedures, you must regularly evaluate your inserts to ensure they continue functioning properly.

Ultrasonic inserts combine the power, efficiency, and comfort you need to treat a wide range of patients, but they can also be delicate. Below is a checklist to help you properly use, care for, maintain and therefore extend the useful life of your Ultrasonic Inserts.
1. Check Tip Condition
Just like your hand scalers, ultrasonic insert tips wear with use. Worn insert tips can significantly diminish your scaling efficiency. One millimeter of tip loss results in a 25% loss of efficiency. Two millimeters? That’s a 50% loss of efficiency.
When an insert tip is worn, the “sweep” of the instrument is reduced. The insert tip doesn’t travel as far on its’ optimal path. When using a worn tip, generally more pressure is applied, or generator power is increased to compensate for the efficiency loss— often leading to patient discomfort and increasing the possibility of tip bending/breakage.
When using a worn insert tip, the clinician will likely feel the need to increase the power setting on the generator to facilitate debris removal.
However, scaling efficiency will not increase, and more heat will be generated, especially if the power setting exceeds the recommendation for the insert tip.
Using worn tips can result in inefficient scaling, inferior tip performance, handpiece overheating, and more discomfort for you and your patient.
So, be sure to measure tip wear on a weekly basis and replace inserts as they wear and lose efficiency.
2. Evaluate Pressure Applied
When it comes to the amount of pressure one should use when ultrasonic scaling, light pressure is all you need to allow the tip of the insert to vibrate efficiently, this results in fracture or removal of deposits.
Applying more pressure dampens the tip vibration, leading to poor deposit removal, operator hand fatigue, and patient discomfort. Ultrasonic inserts are designed to work with a light grasp and light lateral pressure – let the insert do the work for you.
3. Double Check Power Settings
Each ultrasonic insert has a recommended power range for optimal performance. Robust tips, such as the HuFriedyGroup #10, #1000, and Beavertail inserts, are intended to remove heavy debris and can be used on higher power settings.
It is recommended that thinner tips, designed for effective deposit removal, be used on low to medium power. Thin inserts with water flow to the tip have narrower water flow channels. If used on high power, the water flow rate may not be enough to cool the insert tip—resulting in handpiece overheating. Use the lowest effective power settings for each insert for maximum scaling and patient comfort. It is highly recommended to adhere to the power ranges specified on the insert packaging for optimal effectiveness.
62 INSTRUMENTS
4. Match Insert Type to Clinical Application
Ultrasonic inserts are designed for specific applications since complex oral anatomy, and debris type/location prohibit an effective “universal” insert. Robust inserts are for moderate to heavy/tenacious deposits and stains in supragingival and accessible subgingival areas.
Thin inserts allow enhanced access to narrow subgingival areas, tight pockets, interproximal concavities, and other difficult-to-access areas. Using thin inserts as “universal” inserts—particularly on moderate/heavy supragingival deposits—can result in excessive tip wear, inefficient deposit removal, and tip bending/breakage.

Much like using the correct power setting, matching the right insert to each clinical application is vital. And remember, more than one type of insert may be needed for each clinical procedure.
5. Don’t Compromise Instrument Shape
Bending or reshaping insert tips is not recommended. Aside from voiding the warranty, reshaping the tip can result in poor tip performance and make the tip susceptible to breakage. Insert tips are designed with precise bends to optimize the elliptical vibration path—bending the tips disrupts this vibration pattern, rendering the tip inefficient at debris removal.
6. Proper Sterilization and Maintenance
Sterilizing inserts in a cassette will protect them and extend their useful life. If your office uses sterilization pouches instead, always use caution when placing the insert in the ultrasonic bath or autoclave, as heavier instruments placed on top can cause bending/ breakage of the tip and/or stack.
Cassettes provide the best long-term protection for your ultrasonic inserts. For a thorough step-by-step process, click here.
7. Prevent Overheating
Sometimes your handpiece can begin to feel warm. You may want to believe that it may cool down on its own, but sometimes it doesn’t. You may reach the point where you need to put it down to either change the ultrasonic insert or switch to hand instrumentation.
Overheating can happen, and in addition to a couple of points mentioned earlier, there is more you can do to prevent such occurrences.
You may experience overheating due to air bubbles trapped in the handpiece. Trapped air can prevent water from contacting the vibrating stack—resulting in heat build-up.
The entire insert stack must be completely submerged in water to operate efficiently. To eliminate/minimize trapped air, be sure the handpiece is filled to the top with water and held vertically when placing the insert.
To further prevent trapped air, it is advisable to run water through the handpiece for at least 2 minutes at the start of each day and for 45 seconds each time you seat an insert into the handpiece.
Another reason for overheating may be that your waterline filter is clogged. Check the waterline that extends from the generator to the wall connection or the operatory unit. This waterline typically has a filter that should be monitored and changed routinely.
A clogged filter will disrupt the water flow through the generator and result in less flow to the insert tip. Regularly changing the filter is an inexpensive, quick maintenance procedure that can help ensure unobstructed water flow.
Your practice makes an investment in its ultrasonic inserts. Any investment needs to be kept up to continue producing an ROI.
If properly used and shown the proper care, your ultrasonic inserts will help keep you the Best in Practice no matter the patient or procedure.
For more helpful information, insights and resources for Ultrasonic Inserts
Crunch The Numbers
You can spend up to two hours per day using ultrasonic inserts. Choosing one that can stand up to that daily usage is important. Use our cost calculator to estimate how much your inserts cost for each procedure and see how you can use inserts at an attractive cost per procedure.
For your cost calculator
Need More Power?
With a 25% longer tip design, a variety of tip sizes, and a focus on clinician comfort, Power Plus Inserts offer an advanced solution for the debridement of tenacious deposits.
Check out these and our other Ultrasonic Inserts.
View Products
HuFriedy Group Products available exclusively at Henry Schein
631300 65 88 22
CLICK HERE CLICK HERE CLICK HERE CLICK HERE INSTRUMENTS
HISTORY OF KEY OPINION LEADERS
THEIR INTEGRAL ROLE IN PRODUCT INNOVATION AND
HuFriedyGroup provides the best dental experience to the industry. Their unique combination of products, services, and support enable dental professionals like you to reduce risk, improve efficiencies, drive compliance, and enhance patient and staff safety.

HuFriedyGroup has a tradition of collaboration - Key Opinion Leaders have a long history of supporting the development of their instrument product portfolio. More than 60% of their products have been developed in partnership with dental professionals, institutions, or universities. As HuFriedyGroup, our Key Opinion Leader program will continue to strongly impact and influence the way we shape, design and create our product offerings. We place great emphasis on maintaining collaborative relationships between our company and opinion leaders.
Our team of artisans, engineers and product specialists encourage our partners to provide input throughout the ideation, research, development and execution processes. We recognize the important role our Key Opinion Leaders play in advancing dentistry and helping HuFriedyGroup continue to be a world leader in dental product innovation.
1942 - Clayton Gracey - Gracey Curette

Back in the 1940’s, Clayton Gracey, a professor at the University of Michigan and a dentist, had an idea to design a series of instruments that could remove deposits from the deepest and least accessible periodontal pockets with minimal trauma to the surrounding tissue.
Clayton Gracey partnered with Hu-Friedy founder, Hugo Friedman, to develop the very first area-specific Gracey Curettes set.
As one of our first Key Opinion Leaders, Gracey provided invaluable knowledge around developing existing products with new innovative elements. Gracey’s contributions lead to dental trends and solutions in the global dental market. Working with Clayton Gracey helped define HuFriedy as the leader in dental manufacturing and education. For almost 70 years, Gracey curettes have been used in schools globally, forever changing the world of dental hygiene.
1975 - Esther Mae Wilkins - Balanced Explorer
Esther Wilkins, an icon in the dental hygiene industry, wanted an instrument that could more easily detect calculus than the existing #17 Explorer, including detection in the subgingival area.

At that time, the #17 Explorer had a more pronounced bend in the terminal shank and was primarily used to detect caries.
Wilkins reached out to Richard Saslow, the owner of Hu-Friedy, and requested the terminal shank be straightened in order to make detection of calculus easier, especially in deeper pockets.
The key design improvement was to place the small end of the instrument “in line” with the handle of the instrument, allowing for enhanced entrance to and exploration of narrow periodontal pockets.
This design also enhanced the tactile sensitivity to subgingival calculus deposits, caries and overhangs.
Wilkins described it as a balanced explorer design in her textbook, “Clinical Practice of the Dental Hygienist” which is in its eleventh edition.
INSTRUMENTS
DEVELOPMENT Part 2 VIEW ONLINE VIEW ONLINE 64
THE DIFFERENCE BETWEEN DENTAL EXAMINATION GLOVE POLYMERS
A polymer refers to the primary raw material used to manufacture medical examination gloves. When choosing the right glove, it should meet your specific needs. There are many factors to consider but understanding the key performance benefits of different polymers is a great place to start.
A latex allergy may be caused by frequent exposure to natural rubber latex polymers
Healthcare workers including dentists and dental hygienists are the most affected occupational group for latex allergy due to their frequent contact with latex gloves when protecting themselves from transmittable infections. Data shows that up to 10% of healthcare workers are diagnosed with latex allergy.1
Due to their frequent repeat exposure, all dental professionals who use latex gloves should be considered high risk for allergic reaction.2
Avoidance is key to prevent a latex allergy in this atrisk group of healthcare professionals. Even as many dental practices transition away from latex gloves, latex allergy remains a highly prevalent occupational health hazard among practitioners and these risks need to be identified. That is, in part, because latex is present not only in gloves but also in common dental products such as dental dams, bite blocks, mixing bowls, syringes, suction tips, oxygen masks, adhesive bandages and more.2
Dental professionals need to consider the use of natural rubber latex products and the potential health risks.
Additional attributes of dental examination gloves
Although a helpful guide, dental examination glove choices should not be made based on the polymer alone. Material formulation, glove design, quality, differentiated features, and proprietary technologies significantly impact the durability, allergenicity, chemical and puncture resistance, grip, and comfort of the gloves.

Contact your Henry Schein Representative to identify the best glove to meet your specific needs and applications.
References
1. Wu M, McIntosh J, Liu J. Current Prevalence rate of latex allergy: Why it remains a problem? Journal of Occupational Health 2016.
2. Dermata A, Arhakis A. Latex Allergy in Dental Care. Balkan Journal of Dental Medicine 2014.
65henryschein.com.au
INFECTION CONTROL
View Ansell Gloves Online CLICK HERE
AUTOMATED INSTRUMENT CLEANING
ULTRASONICS VS. MEDICAL GRADE WASHERS
In 1916 The Medical Summary journal reported, “The possibility of the transmission of disease through the medium of dental instruments has probably been considered by every occupant of the dentist’s chair.” One can only assume that healthcare workers were considering that same risk throughout their day at work.

Within a dental clinic, one of the most potentially hazardous steps in the reprocessing cycle is the cleaning of contaminated instruments; and yet, in 1976 instruments were still only cleaned manually with a short handled brush, sometimes only disinfected and not sterilized, and then stored unwrapped.
It wasn’t until the late 1980’s that Occupational Safety and Health Administration (OSHA) recognized the hazards that healthcare workers were being exposed to and released the first mandatory standard infection control procedures for dentists. This was then followed by the issuing of the final Mandatory Bloodborne Pathogens Standard in 1991. While these were critical steps in protecting healthcare workers from hazards faced in their occupation, OSHA’s sole focus are the employees and their standard does not address patient safety. Thus, to protect both the patient and the healthcare workers, the Centers for Disease Control and Prevention (CDC) issued their first Infection Control Recommendations for dentistry in 1993, and subsequently the first Dental Infection Control Guidelines in 2003.

Thankfully infection control guidelines have come a long way since then and, as patients, we trust that everything is being done to protect us from infections and diseases caused by improper reprocessing and cross contamination. We trust that guidelines are being followed and standards of practice are being adhered to. The patient’s safety and that of every healthcare worker in the dental office, needs to be the number one priority.
There are two methods to clean dental instruments: manual and automated cleaning. Manual cleaning of instruments is not recommended because of the risk it presents to the healthcare worker. In both the 2003 guidelines and the 2016 Summary of Infection Prevention Practices in Dental Settings, the CDC recommends using automated cleaner such as ultrasonic cleaners, or medical grade washers “to improve cleaning effectiveness and decrease worker exposure to blood.” However, of the two automated options, which is safer and more efficient?
A 2016 study done by the Dental Advisor showed that ultrasonic solutions can become up to 70 times more contaminated over the course of the day when the prepared solution is used several times to clean instruments. Furthermore, the average microbial contamination at the beginning of the day was 2190 cfu/mL (Table 1), which is 83% higher than the EPA regulated microbial levels for potable water.
66 INFECTION CONTROL
Photograph of a patient in a dentist’s chair having dental work (by Lewis Wickes Hine, American, 1874-1940), 1917. Silver print. (Photo by GraphicaArtis/Getty Images)
This finding suggests that even when changing the ultrasonic solutions regularly there is still residual contamination from previous runs, requiring the ultrasonic chamber to be cleaned thoroughly at the end of each work day.
A medical grade washer, on the other hand, uses fresh water and cleaning solution for each cycle. In addition some medical grade washers, such as the SciCan’s HYDRIM units even have a self-cleaning cycle that can be run periodically.

When using an ultrasonic there are still many steps involved in the preparation of instruments, such as pre-soaking and scrubbing instruments to remove any gross debris, loading, unloading, rinsing, inspecting, sorting, and drying the instruments before preparing them to be sterilized. All these steps involve handling the contaminated instruments thereby increasing the risk of being exposed to blood and body fluids, as well as the risk of sharps injuries. This risk increases dramatically when using the ‘pat dry’ method to dry the instruments.
Alternatively, when using a medical grade washer, the process only involves loading, unloading, inspecting and preparing the instruments for sterilization. Ultimately a medical grade washer is the safer and more effective option, greatly decreasing microbial contamination and the risk of exposure and injuries.
A medical grade washer is also more time efficient. Medical grade automated washers are designed to improve the workflow while protecting healthcare workers and patients. According to DentistryIQ, “the time saved by automated washing compared to ultrasonic cleaning is approximately one hour of labor for every nine procedural set-ups.”
Another benefit of a medical grade washer is that most can record cycle data. For example, SciCan’s G4 technology’s automatically stores all the cycle data via USB and online. This feature saves the office time by removing the need to manually log cleaning cycles. Moreover, it provides the office the peace of mind of always being prepared for any audit.
 LOUISA VON HEYNITZ Product Manager Scican Ltd

67henryschein.com.au INFECTION CONTROL
10,000 0 20,000 Sample, Day 1Sample, Day 2Sample, Day 3Average 2,920 30,000 40,000 50,000 60,000 70,000 80,000 90,000 Beginning of Day Micr obial Co ntamination (cfu/ml) End of Day 61,000 81,000 38,000 56,000 3,600500 4,150
Hydrim C 61 table top
INFECTION PREVENTION & CONTROL
IN DENTAL SUCTION LINES
As part of a local team of practicing and former dental service technicians (including founder Bill Clark), we at Cattani Australasia completely understand the risks of infection exposure when it comes to dental suction systems.

As a result, this drives us to focus on a holistic infection prevention and control approach in delivering worldclass dental air.
“The Cattani legacy is the embodiment of where our quality comes from, and what we stand for today. From developing large installation modular solutions through to the development of disinfection products for dental suction to mitigate risks of infection to dental professionals, patients and maintenance staff, Cattani Australasia has been painstakingly refining precision performance to keep your surgery operating safely for more than 35 years in Australia.”
Mark Humphries
Your health and safety obligations
Those who operate in the dental health workspace are not only responsible for providing a safe environment where dental health care is being delivered, but also for mitigating the risks of infection for everyone who uses or supports the operation of dental suction systems.
As patients and staff members that operate within this area are generally front of mind when it comes to infection prevention and control for dental suction
systems, the duty of care extends to all the other individuals that may come in contact with the system.
This may include anyone that may enter the plant room. Keep in mind that suction systems within the plant room will undergo weekly and annual routine maintenance as well as potential irregular maintenance, including the collection of amalgam retention containers for recycling purposes.
Differentiating products to be used on medical devices
As Cattani dental suction systems are medical devices, disinfectants intended to be used on Cattani plant equipment are heavily regulated. Cleaners intended to be used on medical devices that do not claim to be a device disinfectant or sterilant are regulated as Class I medical devices.
Liquids, sprays, wipes, and aerosols intended to be used on medical devices that make disinfectant or sterilant claims are regulated as Class IIb medical devices. Puli-Jet Gentle 2.0 is an example of a Medical Device Class IIb, registered an antimicrobial solution made to disinfect dental medical devices.
• Staff and contractors who perform system maintenance on your plant room

68 INFECTION CONTROL
• Patients • Staff who use the suction system
equipment • Amalgam recycling contractors Infection prevention and control considerations:
Details that matter
• Non-foaming
• Ease of use
• Phenol FREE
• Aldehyde FREE
• Disinfects and cleans

• One disinfectant, one dilution, once-a-day
Dental suction disinfection and its impact on suction performance
To ensure optimal suction performance at a dental surgery, it is crucial to have extensive forethought and planning. From the gradient of the pipelines to the distance between the suction unit and chair, through to selecting the appropriate solution used for disinfection, correct suction maintenance is an important part of keeping your surgery operating at its finest.
Whilst it is common practice to disinfect suction lines at the end of each working day, it is also wise to manage the potential of foam emerging within the dental suction system.
Foam management is critical as it can be pulled into the suction motors which can cause damage or even equipment failure if repeated over time, as this component was designed to always remain dry.
Within the dental suction system, foam could occur in several ways including:
a) certain dental treatments that have a large amount of dense liquids such as blood, mucus, and thick saliva; or
b) using unsuitable detergents and cleaners containing ingredients that produce foam.
To address this, there are Antifoaming Disinfectant Tablets to complement end-of-day suction maintenance, for clinics that want an extra level of disinfection throughout the treatment day and want the added benefit of managing foam to protect suction performance.
Conclusion
Dental suction system maintenance is about protecting your business asset, as much as infection prevention and control for all individuals that may come into contact with the dental suction system. Only choose the approved disinfectant that meets your dental practice infection prevention and control requirements and is suitable for use with your dental suction system.
MARK HUMPHRIES Group Technical Manager Cattani Australasia
69henryschein.com.au INFECTION CONTROL View Cattani Online CLICK HERE
PROVEN 3-STEP
WATER TREATMENT PROTOCOL
With increased emphasis on infection control in the current pandemic environment, there is a new focus on ensuring dental unit waterline quality is adequately maintained.

Together with daily waterline maintenance with a proven solution, it’s important to monitor water quality and apply shock treatment as prescribed by local guidelines.
A-dec ICX Renew™ is the perfect complement to self-contained waterline units to ensure the highest quality water is delivered to patients.
ICX Renew is a shock treatment is part of the ‘A-dec 360 Maintenance’ approach which includes regular waterline maintenance; waterline quality monitoring; and periodic shock treatment.

Contaminated water lines can cause odour and foul-tasting water that can also present a potential health risk.
The latest ADA Infection Control Guidelines suggest a shock treatment if CFU (coliform forming units) reach 200 CFU/mL.
These shock treatments are required periodically to clean dental unit waterlines, and more often if dental units have been left unused for any period, such as over a holiday break.
Waterline testing service can be easily incorporated as part of routine equipment servicing – much like periodic steriliser validation.
It is good practice to test microbial levels in water lines quality regularly, at least every six months, as this is a good protocol to ensure dental unit waterline quality is not forgotten.
In keeping with ADA Guidelines, A-dec recommends a three-step: ‘Maintain, Monitor, and Shock’ approach to keeping water lines clean. Monitoring requirements will depend on your water quality and the clinic’s individual requirements. Initially, test water once a month. If the results pass your specified action level (i.e., 200 CFU/mL using the ADA guidelines), then reduce the testing protocol to at least every six months.
The A-dec 360 Maintenance system (comprising water quality testing, shock treatment and ICX tablets), takes the uncertainty out of dental unit waterline maintenance, ensuring water quality and patient safety is maintained, and that equipment is protected.
If your test triggers an action level, treat you dental units with ICX Renew liquid shock treatment. Both ICX and ICX Renew are safe to use in dental units and are non-corrosive and gentle on equipment and will not corrode or clog waterlines. ICX and ICX renew are specifically recommended for A-dec equipment because some other shock treatments use harsh chemicals which can harm dental tubing, diaphragms, ‘O’ rings and other soft components.

70
INFECTION CONTROL
View
A-dec
ICX Renew
Online
DAVID PETRIKAS Dental Writer A-dec CLICK HERE
German engineered and manufactured, MediClean forte is Dr Weigert’s universal mildly alkaline enzymatic detergent for the reprocessing of medical devices.

The benefit of using MediClean forte in your facility is that it can be used in manual and automated reprocessing – i.e. in your sinks, inside your ultrasonic and inside your underbench washer disinfector. So, you don’t need multiple detergent products in your facility and there are no complications due to compatibilities of process chemicals. The product is suitable for use in all brands of ultrasonic or washer disinfector.

We need detergent because we need the surfactants to break down the surface tension of water and to disperse contaminants, soilings (eg cements and amalgams), bio-burden (proteins and fats) etc.
All detergents have a pH – they can be acidic, pH neutral or alkaline and anywhere inbetween. Many guidelines and standards (including AS/NZS 4815 and 4187) recommend that a mildly alkaline detergent is better for the cleaning of surgical instruments (inclusive of dental instruments) because solutions with increasing alkalinity are better able to hydrolyse (i.e. break down) the compounds and contaminants on our instruments.
pH alone though may not be sufficient to “clean” instruments therefore, detergents can also have added enzymes.

Enzymes help to break down biological compounds like proteins and fats. Remember that blood contains proteins.
So, the choice of detergent is very important, and the quality of the detergent can have a big impact on the longevity of instruments.
It’s important to check instrument IFU’s and the recommendations from the manufacturer, however it is more than likely that instruments can withstand a mildly alkaline detergent, even if a pH neutral is recommended. This can be discussed with the detergent and instrument manufacturers further.
GKE Australia recommend the Dr Weigert neodisher MediClean forte, which is a mildly alkaline and enzymatic detergent with added corrosion inhibitors, which act to protect instrument longevity in the long-term. It is also scientifically proven to reduce biofilm and the product is a concentrate, which means being able to use less product per litre of water.
MediClean forte is recommended for use for dental instruments up to complex minimal invasive surgical (MIS) and robotic instruments used in hospitals. So, you can be certain of the quality of product you will be using to clean instruments in your dental facility.

71henryschein.com.au INFECTION CONTROL View MedinClean Online
HAVE YOU TRIED DR WEIGERT’S UNIVERSAL MEDICLEAN FORTE YET?
LAUREN KONTUS BSc (EnvSc) Sales and Contracts Manager
CLICK HERE
DENTAL 3D PRINTING
THE IMPORTANCE OF UV CURING OVENS

About Dr. Luis De Bellis
Dr. Luis De Bellis works as an adjunct professor at the Faculty of Dentistry of the University of Chile, as the thirdyear coordinator of the Oral and Maxillofacial Implantology Postgraduate program. Starting out in the dental world in 2001, as an dental technician, Dr. De Bellis quickly learned about the different techniques to manufacture an array of dental applications, which inspired him to delve deeper into this exciting career. Later he studied dentistry and specialized in oral and maxillofacial implantology.
Venturing into the 3D Printing World
Starting out as a dental technician in 2001 and studying dentistry at a later stage has given me a significant advantage in implantology and employing high tech in my work - I understand the manufacturing processes and learned how digital tools can make my work more efficient early on.
During my postgraduate studies in implantology, I discovered the 3D printing world. While the course covered some details about additive manufacturing, it was too generic to make use of it right away. But it caught my attention & I knew this was the future of medicine.
Consequently, I bought an extrusion 3D printer, which I used to learn about this printing modality. It also helped me to learn how to transform DICOM files into STL and be able to achieve 3D models with smooth surfaces. After about a year of using it, I bought a kit to build a cartesian laser printer. However, it was a real disaster due to the sheer amount of moving parts involved. Nonetheless, this experience was the nudge I needed to build my first DLP printer with a projector.
Wisdom comes from experience
I am currently developing my skills with bioprinter and bioinks, used to print functional tissues. Through this journey, I discovered a similarity to what I first experienced when making my first impressions with resin - the role post-processing plays for the printed
parts. Generally speaking, many people dedicated to 3D printing do not give enough importance to the impact that the post-processing of the manufactured part will have. It is critical to highlight that postprocessing helps us obtain more resistant pieces and contributes to applications that will not be cytotoxic. In other words, we will be able to guarantee to comply with international health standards.
It is worth noting that not all curing units are the same. Unfortunately, more often than not, we can find many enthusiasts using nail ovens to post-process 3d printed parts. These ovens do not fall within any specific classification. Therefore are unable to achieve uniform postpolymerization. Consequently, the risk of obtaining a piece with unintended physical and chemical characteristics will be extremely high.


The world of dental Post-Processing
When it comes to dental applications, we can find class I and class II UV curing units. The difference lies in the kind of resins that each can polymerize and the time that said polymerized pieces can be used intraorally.
Class I units can be used to cure prints that patients will not use intraorally for over 30 days (such as surgical guides, indirect bonding trays, and dental models). On the other hand, Class IIb units can also cure applications meant to stay in the patient’s mouth over a long period (such as splints, dentures, and temporary crowns). UV
72 3D PRINTING
curing units that do not have any classification should only be used for 3D prints that require no classifications, i.e. dental models and gingiva prints to indicate the placement of restorations.
Among these UV curing ovens, we can find differences in quality and price. You can experience noticeable contrast among such equipment with everyday use. 3D printing resins include multiple photoinitiators which react with the UV light emitted by the UV curing unit.
With a mix matrix UV curing unit, a higher degree of conversion can be achieved leading to improved mechanical properties of the 3D printed part. A mix matrix is not common in the most basic curing units, which often employ a light column of a single UV wavelength, a disadvantage considering the penetration power of the radiation will not be enough. Consequently, we will obtain a piece with diminished physical and chemical characteristics.
360 degree light distribution of advanced and specialized dental UV curing ovens add to further in-depth curing versus curing units which have only one light column installed. Technicians or clinicians using cheaper units with single light columns will need to manually rotate the object and it’s unlikely to be approved for biocompatible 3D printing in dentistry, as no uniformity can be achieved.
Moreover, these units do not have temperature control inside the post-curing chamber. Although this factor is generally not considered by many, it will become vital when performing physical and chemical tests.
To provide contrast, we can find equipment with a strategically arranged radiation source among the higher-priced post-curing units. It allows us to obtain a uniform incidence of radiation on the printed piece. As a result, we get a final product with optimal characteristics that meet international health requirements.
Last but not least, we need to consider how the radiation is emitted from the light source. Medium and high-end units come with flash-type radiation sources.
Because the amount of radiation and the temperature inside the post-curing chamber can be perfectly controlled, we obtain a great benefit when carrying out the post-curing cycles.
Validated Printing Workflows
When looking back at the research of the past decade, it’s become clear that post-processing is a vital step in 3D printing biocompatible parts and to ensure that this step meets the requirements, quality assurance in the form of biocompatibility and mechanical property testing is required.
Companies that manufacture mid-range and high-end post-curing units usually work directly with the resin manufacturers to leave validated preset times in the memory of the post-curing units. It is not just a matter of convenience, but much more a matter of risk aversionpreset times mean that experts have taken their time to ensure the curing times will lead to biocompatible, safe and stable 3D printed applications.

Final thoughts
While there are more and more 3D printing systems in the market at various price points, I really appreciate the guaranteed quality that I have received from the Ackuretta ecosystems.
I can attest that these products are not only beautiful to look at but that they are also designed to deliver satisfaction in each action they perform. It translates into a more relaxed day–to–day because they are a true plug-and-play.
DR. LUIS DE BELLIS Owner of Sociedad Odontologica De Bellis & Garay

731300 65 88 22
3D PRINTING
3D PRINTING IN DENTISTRY


FUN AND FUNCTIONAL WITH ACKURETTA DENTIQ
3D printing is great. A fun and exciting process, something futuristic that’s happening in the present, with great return on investment and optimized protocols - it’s the perfect entry to the CAM part of digital dentistry without breaking the bank.
My position is quite unique. I am part of a small family-run office and lab - one chair and a dental lab on-site.
However, working with analog protocols meant we could not reap the benefits of an in-house lab, so out of economic necessity we looked into digital. While the initial cost seemed too high, we still decided to go ahead.

We got our first 3D printer in 2017, a filament printer that could only be used for surgical implant guides and quickly did not match our needs anymore. Since resin printers offer a much greater versatility, we made the change.
Starting out with a low-cost DIY printer, which did not come with any dental specific features brought with it a big learning curve, however, was very affordable. The most significant drawback was the print inconsistencies and the time it took to tweak the printer to perform as required. It was clear that this was not sustainable in the long run.
Looking for more stability, speed, accuracy, and reliability, while remaining in an affordable segment, I found the Ackuretta DENTIQ.

Why buy an Ackuretta 3D printer?
So, I did some research, talked with some colleagues, and eventually someone from Ackuretta and we decided to give it a go. So why did I choose a unit from Ackuretta?
A few things really.
• First and most importantly: Feedback from other users. The consensus was generally: it delivers at high quality, accuracy, reliably and is easy to use.
• Secondly: DENTIQ had a really good PRICE POINT for a professional, calibrated DENTAL printer.
• Thirdly: Validated Workflows - Sometime after printing with DENTIQ and being happy with the performance we got ourselves a CURIE unit as well. So now the whole process of printing is safe and calibrated. Not only do I know that my prints will work, but I also have peace of mind that the final dental application that was printed exhibits the properties of the resin manufacturer intended - good, stable, and if neededbiocompatible and safe to use for my patients.
74 3D PRINTING
Fig.1: Dental Model printed with CURO Model on Ackuretta DENTIQ. Photo and print credit to Dr. Mindaugas Kudelis.
Fig. 3: Ackuretta DENTIQ and compatible CURO resins.
Fig 2: Castable crowns printed with Ackuretta DENTIQ and CURO Cast resin. Photo and print credit to Dr. Mindaugas Kudelis.
Like every new unit on the market - since I got one of the first DENTIQs initially we encountered some minor issues, but we managed to solve them with Ackuretta’s support. Now it’s our daily beater and we print almost everything with great success. Actually, in the last 6 months and hundreds of prints - we had not a single failed print.
And we print a lot - guides, temporaries, models, splints, cast patterns we press later in disilicate. So, from very basic applications to very precise and demanding ones, DENTIQ just delivers.
What defines a great 3D printer?
From my experience - great reliability is essential. DENTIQ is a nicely built unit. Compared to our other, cheaper hobby printers - the price difference is actually visible in the quality of the units.
Another must-have selling point for any of the printers you plan to choose - is material support. With Ackuretta you already have hundreds of resins to choose from.
This is crucial - for dental applications we need specialized resins. And most of the dental resin manufacturers will have support for dental printers, but not for hobby ones. Specialized printers, with calibrated resins, allow me to print temporaries in a totally digital modeless workflow and get reliable results every time.
Start to finish protocols
Being an open system and having loads of resins available - Ackuretta is great. I can choose from a variety of manufacturers and applications, to cover all the bases we need in our clinic/lab.
Choosing Ackuretta CURO resins is a no-brainer because the calibration and settings are on point. The printer/resin combination of the CURO line works extremely well. And having all the parts of the process from the same manufacturer means the final product is most likely to be as expected. Just think about itIF you have a simple non-dental printer, no validated
printing protocol from the dental resin manufacturer, and no clear post-processing guidelines - it’s hard to expect that the final product will work as intended.
Many things can go wrong, and, in the end, you might experience failed or inaccurate prints, or even worse, might have some biocompatibility issues if the post-processing protocol is not robust.
Ackuretta here is one of a few dental printers and resin manufacturers that offer a complete solution.
So, it’s definitely a great option for anyone looking to start their 3D printing journey. You will not only get all parts of the 3d printing equation - printer, washing unit, curing box, and resin. But also, all come with a simple, hassle-free setup, and foolproof printing experience. And most importantly - safe and validated protocols - so PEACE of MIND that everything will work as intended at no compromise for patient safety.
Return on investment (ROI) of 3D printing

I never liked calculating ROI for my dental purchases. Most of the things I bought for the practice had no ROI at first glance. The same can be thought about 3D printing.
With a few $ per temporary crown, guide or splintit’s easy to see that 3D printing is a bargain compared to traditional milled applications.
However, it’s important to understand that some of the ROI is not direct but comes in different shapes. Most of the digital protocols will mean less chairside and lab bench time. Productivity will increase, protocols will be faster, and patients will be happier.
Since printing is a fast procedure - we can make same-day surgeries, same-day temps easily accessible in any practice. The same goes for repairs or accidents - patient breaks temporaries or loses a splint? You can schedule him or her for the afternoon and have a new prosthesis ready for a fraction of the cost. Better yet - it’s easy to print everything in pairs, and if anything happens - always have a spare at hand - because the material cost is so low, and the printing process timewise is still the same if we print one or two applications at the same time.
About the Author
Dr. Kudelis is a member of the RIPE Global Educator Team and specializes in restorative and implant dentistry. As general dentists based in Lithuania, Dr. Kudelis is part of a family-owned lab and dental office and has been focusing on integrating digital workflows into his office for years.
DR. MINDAUGAS KUDELIS BDS, MDS General Dentist, Lithuania
75henryschein.com.au 3D PRINTING
CAD/CAM SUPPORTED FULL DENTURES

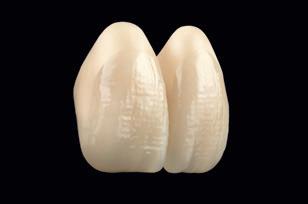
VITA AKZENT LC BRINGS COLOR TO THE DIGITAL WORKFLOW
Thanks to new technological milestones, digital dentures are becoming increasingly common in laboratories.
Where a lot of time was previously spent adjusting denture bases and teeth to the correct spatial position and occlusion so that they were correctly aligned with each other, today, user-friendly and cost-effective solutions are available as part of the digital workflow. We probably all know what it’s like to play with LEGO® and to attach the blocks to each other so that they fit correctly. Today, using the digital workflow, it’s just as easy to combine the teeth and denture base, thanks to the VITA VIONIC VIGO denture tooth, which was developed especially for the digital workflow. With its anatomical layering of dentin and incisal materials, it also offers all the esthetic and functional benefits of a real denture tooth. Fabricated denture teeth using additive or subtractive techniques do not yet meet these requirements, due to their increasingly monochrome and block-based fabrication.
Open system, efficient full dentures
The secret is that VITA VIONIC VIGO is already reduced at the base and pre-conditioned. After additive or subtractive fabrication of the denture bases, the denture teeth are simply removed individually from the blister pack and bonded one by one in the sandblasted alveoli using the special VITA VIONIC BOND adhesive. Thanks to the precise and stable fit, the bond is extremely thin, clean and also saves time. Thanks to the idealized setup selected in the design software, the denture teeth also fit each other occlusally, requiring a minimum amount of milling and resulting in dentures that can be delivered with nearly perfect teeth.

Those who are already working in a digital workflow in their laboratory can use this existing hardware and software infrastructure for digital full dentures in the future.
That’s because the VITA VIONIC VIGO denture tooth can be used with all standard and open CAM and 3D print systems, making it the key analog component in enabling the implementation of digital prosthetics in the daily laboratory routine.
Fabrication of full dentures as part of the digital workflow helps you make greater use of hardware and software, increasing amortization.
76 CAD/CAM
Fig. 1: The VITA VIONIC VIGO denture tooth was designed especially for the digital workflow.
Fig. 2: The tooth is already reduced at the base and comes with integrated rotation protection for precise seating.
Gingival morphology
The benefits of digital dentures include efficient fabrication, a good fit without delays, and in the case of loss or damage, reproduction at the touch of a button.
Providing the denture base with anatomical morphology is possible in the design software in exactly the same way as using a wax knife and modeling instruments. In addition, as a single-tooth, non-block solution, VITA VIONIC VIGO already provides the necessary leeway for gingiva during virtual designing of the denture bases. However, until now, the characteristic shade effect of the labial frenulum, blood vessels, alveolar ridges and unattached and attached gingiva, could only be reproduced with analog craftsmanship and a brush.


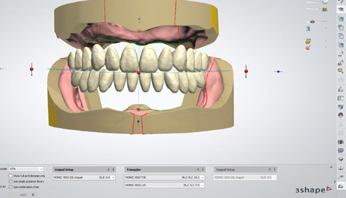

This is where the VITA AKZENT LC light-curing composite stains with their multi-facetted effects come into play, turning the labial shield into a canvas of creativity.

The labial shield as a canvas of creativity
For micro-retentive adhesion, the labial shield was recontoured using an acrylic bur and the corresponding area sandblasted with aluminum oxide. Finally, a brush was used to bring the monochromatic base to life in the esthetic zone. For this purpose, VITA AKZENT LC EFFECT STAINS were used in the blue, pink, white and dark-red shade effects. To characterize the attached gingiva and the labial frenulum, a 1:1 mixture of white and dark-red was prepared on the mixing palette. This was used to gently redraw the labial frenulum, and to recontour the shape and shade of the alveolar ridges in the area of the attached gingiva from 13 to 23.
In doing so, the unattached marginal gingiva directly surrounding the cervical areas was left out to create a reddish appearance in the alveolar arches. Under the tapered alveolar process and in particular in the concave areas of the labial shield, the mucosa was reproduced using a 1:1 mixture of dark-red and pink.
Finally, veins and arteries in the oral mucosa were simulated using blue and dark-red. Intermediate curing was performed for each step using the dental curing light to ensure that the stains were fixed before applying the next substance. After the entire customized area was leveled using VITA AKZENT LC GLAZE, the denture was placed in the light furnace for final curing.

771300 65 88 22 CAD/CAM
Fig. 3: After virtual model analysis, the VITA VIONIC VIGO denture tooth was selected in the CAD software (here: 3Shape).
Fig. 4: The first suggested setup in the posterior and anterior region, generated automatically at the touch of a button based on the model analysis.
Fig.
5:
The resulting design after anatomical shaping of the denture bases.
Fig. 6: In this case, both denture bases were fabricated additively as part of the digital workflow.
Fig. 7: Each pre-conditioned denture tooth can be removed individually from the blister pack and immediately bonded in the alveoli of the denture base.
Shade facettes for hybrid ceramics, polymers and composites

In the meantime, with the establishment of the digital workflow, completely new indirect restoration materials have already made their way into laboratories and practices. In addition to the standard variants of ceramic materials, materials made from hybrid ceramics such as VITA ENAMIC or cross-linked polymers and composites are also popular because of how efficient and easy they are to process as part of the digital workflow.The lightcuring composite stain system VITA AKZENT LC now enables reliable and natural reproduction of all shade facets on these materials.
Thanks to their ideal viscosity, the composite stains can be applied with precise detail and pinpoint accuracy. In addition, VITA AKZENT LC CHROMA STAINS enable adaptation of the basic tooth shade in VITA classical A1–D4 and VITA SYSTEM 3D-MASTER across a large surface area. The shade of denture teeth can also be characterized if required. In doing so, it is generally also possible to use the composite stains internally in combination with veneering composite systems, such as VITA VM LC flow to create depth effects. As a result, the natural variety of colors familiar to dental technicians from ceramic stain systems is now also available when using light-curing.


78
VITA ® and the names of the VITA products mentioned are registered trademarks of VITA Zahnfabrik H. Rauter GmbH & Co. KG, Bad Säckingen, Germany.
CAD/CAM
Fig. 11: The upper denture (fabricated using VITA VIONIC VIGO and CAD/CAM technology) after sandblasting of the labial shield using aluminum oxide.
Fig. 12: A mixture of VITA AKZENT LC white and pink was prepared on the mixing palette.
Fig. 13: The characterization of the labial frenulum using the mixture of the VITA AKZENT LC EFFECT STAINS white and pink.
Fig. 14: In the area of the attached gingiva, the alveolar process was characterized and recontoured at the same time.
Fig. 15: At the unattached gingiva, the concave areas were highlighted using a mixture of VITA AKZENT LC dark-red and pink.
Fig. 16: Small arteries in the mucosa were reproduced using VITA AKZENT LC dark-red.
Fig. 17: Small veins were simulated in precise detail using VITA AKZENT LC blue.
Fig. 18: The complete labial shield was sealed using VITA AKZENT LC GLAZE.
Fig. 19: For each intermediate step during characterization, the dental curing light was used for curing.
Fig. 20: The result after final curing of the complete characterization in the light furnace.
Fig. 8: The special VITA VIONIC BOND adhesive is applied in the sandblasted alveolus of the denture base.
Fig. 9: Using a microbrush, VITA VIONIC BOND is also applied in the preconditioned cervical area of the denture tooth.
Fig. 10: The precise and simple bonding of denture tooth 21 in the alveolus of the denture base.
ANDREAS BUCHHEIMER Head of Vita Application Technology Department
MARTINA ROSENBUSCH Dental Technician VITA
NEW PRODUCTS
THE
INNOVATIONS
SUPPLY
OUR
79henryschein.com.au
SEE
LATEST
FROM
LEADING GLOBAL
PARTNERS
THE LUNOS PRODUCT SYSTEM
LUNOS® Has four reasons for brighter smiles:

1. Systematic prophylaxis. Fast, effective, and convenient in application. For all prophylaxis specialists, dentists, hygienists and patients.
2. Premium prophylaxis solution with an extensive product portfolio ranging from handpieces to powder and pastes.
3. Meets the highest medical standards in terms of product performance and ingredients.
4. Low-pain treatment and maximum patient comfort
LUNOS HANDPIECE

Supragingival and Subgingival Air-polishing
The powder jet handpiece MyLunos® offers simple, powerful and ergonomic assistance when you need to remove discolouration, deposits and biofilms. Using one single handpiece with two different nozzles, it is ready for either supragingival or subgingival application. The detachable powder chamber is quick and easy to change, leaving one free to always use exactly the right powder for the purpose. MyLunos® offers great flexibility and efficiency.
Supra & Perio nozzle
Prepared for a broad range of clinical situations
Sterile single-use perio tip
Easy and hygienic with depth grading, broad powder jet, high flexibility, long working area
Hygenic
All components suitable for manual and automated reprocessing including sterilisation (except single-use tips)
Exchangeble powder chamber
High flexibility in powder usage
5 coupling types
Adaptable to most dental chairs
80
NEW PRODUCTS
Powerful yet gentle: LUNOS® powders
Innovative abrasive agent trehalose. Best water solubility.
Ergonomic bottle with a single-hand flip-spout cap
LUNOS® Prophy powder gentle clean


For supragingival, fast and effective cleaning and removal of extrinsic discolouration.


Flavours: Neutral, Orange and Spearmint. 180g bottle
LUNOS® Prophy powder perio combi
For subgingival and supragingival cleaning. Ideal for recall. Removes biofilm quickly, effectively, thoroughly and yet gently. Flavour: Neutral. 180g bottle
LUNOS® Prophy Pastes
With self-reducing abrasive particles. Removal of discoloration and polishing in a single step
LUNOS® Prophy Paste Super Soft

Smooth and high-gloss polish Particularly suited for sensitive surfaces, implants, for children Supports remineralization and long term protection.

81henryschein.com.au NEW PRODUCTS
View the NEW Range of Lunos Prophylaxis Products
CLICK
HERE
NEW FROM KOMET – DIAO

Efficiency, created from diamonds and pearls.
More concentration of power, longer service life, better control
• A new generation of diamonds for preparations of unmatched quality.
• Concentrated power for exceptional durability
• Optimum control
• Rose gold color for easy recognition during every- day work at the practice
On average, 64 % longer service life compared to traditional instruments* *Source: Test lab Komet Dental, mechanical cutting test 2020

More concentration of power, longer service life, better control. DIAO is much easier to handle and impresses the user with its smooth opera- tion and the way it glides across the tooth. Although easy to control, the instrument removes material consistently and at a greater speed.
Directions
• Optimum speed 160,000 rpm (except KP6370: 100,000 rpm) Preferably use in a red contra-angle. The maximum speed is indicated on the product label.
• At 300,000 rpm, the instrument can also be used in a dental turbine. (except KP6370).
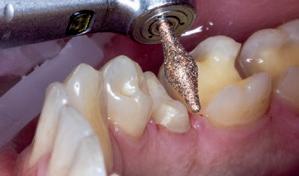
• Always provide sufficient spray cooling at least 50 ml/min.
• To achieve a good preparation result, the surface should be smoothed with a finisher of indentical matching shape after the pre-preparation.

• The instruments remove material very effectively. Therefore, only low contact pressure (<2N) has to be applied during work.

82
NEW PRODUCTS
Hoping you can use the
DIAO.
The range.
Instruments with 8 mm working length
Instruments with 8 mm working length
Instruments with 8 mm working length
Cylinder, round edge Cylinder, round Torpedo Tapered, round Torpedo, tapered Flame


Cylinder, round edge Cylinder, round Torpedo Tapered, round Torpedo, tapered Flame KP6881.314.012 KP6878.314.012 KP6856.314.014 KP6878K.314.014 KP6862.314.012
KP6837KR.314.012
KP6881.314.012 KP6878.314.012 KP6856.314.014 KP6878K.314.014 KP6862.314.012
KP6837KR.314.014 KP6881.314.014 KP6878.314.014 KP6856.314.016 KP6878K.314.016 KP6862.314.016
KP6837KR.314.014 KP6881.314.014 KP6878.314.014 KP6856.314.016 KP6878K.314.016 KP6862.314.016

KP6837KR.314.016 KP6881.314.016 KP6878.314.016 KP6856.314.018 KP6878K.314.018
KP6837KR.314.016 KP6881.314.016 KP6878.314.016 KP6856.314.018 KP6878K.314.018
KP6856.314.021
Instruments
KP6856.314.021
Instruments with 10 mm working length
10 mm
Instruments with 10 mm working length
Cylinder, round Torpedo Tapered, round Torpedo, tapered
Cylinder, round Torpedo Tapered, round Torpedo, tapered
KP6882.314.012 KP6879.314.012 KP6850.314.014 KP6879K.314.014
KP6882.314.012 KP6879.314.012 KP6850.314.014 KP6879K.314.014
KP6882.314.014 KP6879.314.014 KP6850.314.016 KP6879K.314.016
KP6882.314.014 KP6879.314.014 KP6850.314.016 KP6879K.314.016
KP6882.314.016 KP6879.314.016 KP6850.314.018 KP6879K.314.018
KP6882.314.016 KP6879.314.016 KP6850.314.018 KP6879K.314.018
Instrument with 12 mm working length
Cylinder, round KP6879L.314.014
KP6837KR.314.012 KP6370.314.030
reduction
Instrument with 12 mm working length Cylinder, round

KP6879L.314.014


KP6370.314.035
Occlusal/lingual reduction
Occlusal/lingual
OccluShaper
KP6370.314.030
KP6370.314.035
KP6379.314.023
www.kometdental.de
831300 65 88 22
below product images and code grid?
Occlusal/lingual
OccluShaper Egg
with
working length Instruments with 12 mm working length Hoping you can use the below product images and code grid? DIAO. The range.
Egg
www.kometdental.de
reduction The DIAO range. NEW PRODUCTS
NEW FROM KOMET – PROCODILE Q
CORE COMPETENCE REVISITED - THE FLEXIBLE WAY
• Variable core for variable canals
• Heat Treated
• Hungry & Fast cutting
• Suitable for use in all established power systems


• This evolution makes the endodontic world even safer & easier. Procodile Q is the first heat treated reciprocating file with a variably tapered core. For unprecedented flexibility, combined with an incredibly effective performance.

New
Q stands for heat The new Procodile Q file is heat-treated so that it can contribute even more effectively to a successful endodontic treatment. The heat treatment makes the file easier to bend while increasing the flexibility and safety.
Unique - The variably tapered file core
The preparation of the root canal using a file with a constant taper ensures a homo¬genous obturation. The Procodile Q file has a variably tapered file core. With this new feature, the diameter of the core decrea¬ses towards the shank, which makes the file even hungrier and more adaptable.
Hungry - Fast and effective substance removal
The variably tapered file core of the Procodile Q file increases its chip space. As a result, infected tissue is removed from the canal even more effectively in very little time.
Adaptable
Optimum preparation even of curved canals In combination with the variably tapered file core and the Double-S cross-section, the heat-treated material lends the Proco dile Q file an unprecedented flexibility. The file follows the anatomic course even of curved canals, so that the preparation can go ahead in complete safety.
Resilient
Evolution of flexibility Procodile O compared to preceding systems, based on in-house tests. Supporting data is available
Increased safety for the user and the patient Procodile Q files are clearly more resilient than other files on the market. They are up to 300 % more resistant to cyclic fatigue, compared to the files of other recipro- cating file systems. This significantly reduces the risk of file fracture.
Up to 300 % safer Resistance to cyclic fatique. Procodile files compared to leadingcompetitors, based on in-house tests. Supporting data is available.

Testimonial
“I would like to carry out my endodontic treatments with a file system that enables effective work and gives the user a safe feeling when preparing narrow and curved root canals. The heat treatment has implemented my requirements very pleasantly and effec- tively. This file system is distinguished by the unique combination of efficient subs- tance removal, gentleness and retention of the canal geometry”
DR. DAVID CHRISTOFZIK
Endodontic expert, Kiel

84
NEW PRODUCTS
HYSOLATE DENTAL DAMS
HySolate Latex Dental Dam is made of pure, natural rubber latex and is powder free.
Powder free, low protein Dental Dam is a simple and clever measure to reduce the risk of developing latex hypersensitivity. Latex Dental Dam provides strong retraction. HySolate Dental Dam is available in a comprehensive variety of colours and sizes (5”x5” (127 x 127 mm) and 6”x6” (152 x 152 mm)),
• The lighter colours have the advantage of naturally illuminating the operating field whereas the darker colours can help with visual contrast.
• Powder free, low protein latex dam reduces the risk of developing latex hypersensitivity
• Increased visibility on the treatment site through isolation
• Acts as an infection control barrier
• Creates a dry operating field
HySolate black Dental Dam has the template for marking the tooth position printed on.
This saves the working step of marking the dam before punching. Like the Knight figure in a chess play you can leap steps, move faster and clever towards the goal of absolute moisture control.
The black colour provides ultimate, clear contrast and is ideal for taking photographs.
• Pre-printed dental dam reduces the number of working steps


• Black colour provides ultimate, clear contrast and is ideal for taking photographs.
• Powder free, low protein latex quality reduces the risk of developing latex hypersensitivity
• Acts as an infection control barrier
• Creates a dry operating field
85henryschein.com.au NEW PRODUCTS
view the NEW HySolate Dental Dams on our website
CLICK HERE
TRIOS 5
TRIOS 5 Wireless
Intelligent. The ultimate TRIOS.
TRIOS 5 Wireless

• Next-level ergonomics.
Intelligent. The ultimate TRIOS.
TRIOS 5 Wireless Intelligent. The ultimate TRIOS.
• Effortless scan technology.
• Hygienic by design.
• Next-level ergonomics.
• Next-level ergonomics.
• Effortless scan technology.
• Effortless scan technology.
TRIOS 5 is made to fit perfectly in every hand.
• Hygienic by design.
• Hygienic by design.
TRIOS 5 is made to fit perfectly in every hand. It sets a new standard in infection control. And the ScanAssist engine delivers precision scans effortlessly. So you can concentrate on the excellent care that makes patients come back.
It sets a new standard in infection control. And the ScanAssist engine delivers precision scans effortlessly. So you can concentrate on the excellent care that makes patients come back.
TRIOS 5 is made to fit perfectly in every hand. It sets a new standard in infection control. And the ScanAssist engine delivers precision scans effortlessly. So you can concentrate on the excellent care that makes patients come back.
SIMPLY.ERGONOMIC SIMPLY.EFFORTLESS SIMPLY.HYGIENIC


TRIOS Share.
Pass the scanner, share the power.
TRIOS Share. Pass the scanner, share the power.
TRIOS Share.
TRIOS Share technology enables you to digitize your entire clinic with just one TRIOS wireless intraoral scanner. Walk around with only one wireless TRIOS and use it on every PC in your practicevia your Wifi network.
Pass the scanner, share the power.
TRIOS Share technology enables you to digitize your entire clinic with just one TRIOS wireless intraoral scanner. Walk around with only one wireless TRIOS and use it on every PC in your practicevia your Wifi network.
TRIOS Share technology enables you to digitize your entire clinic with just one TRIOS wireless intraoral scanner. Walk around with only one wireless TRIOS and use it on every PC in your practicevia your Wifi network.

86 24
CLICK HERE 24
TO WATCH VIDEO
24
NEW PRODUCTS
RADIOMETER X
CURIOUS CURING
Digital Dentistry at Your Fingertips
Digital Dentistry at Your Fingertips

How do you know if you’re getting the right output from your LCU?
Get the power to take your practice to the next level
Conclusion
Light
245g featherweight with improved grip for comfort
Smooth
Dental curing units, or light-curing units (LCUs), are essential in dental offices; they are used daily in restorative dentistry, orthodontics and hygiene to cure resin-based restoratives, luting materials and sealants.
Automatically selects frames to deliver optimal scanned images. Improved speed for a smoother scanning experience
The clinical success of all these materials depends on the LCU delivering sufficient light to polymerize the resin - otherwise, incomplete polymerization will occur.
Vivid
Transmits 3D images via hardware auto brightening technology
The Brain of the i700 with a Splash of Colour
•
Accurate
An easy to use dental radiometer that accurately reports the power (mW) and irradiance (mW/ cm2) from their LCUs should result in more reliable curing and greater longevity of resin-based restorations. For medical/legal reasons alone, it’s recommended that dentists record the power output from their LCUs when new and keep a daily record.


They can then respond appropriately to any decrease in light output from the LCU.
Dr. Richard Price is the division head for fixed prosthodontics at Dalhousie University in Halifax, Nova Scotia. Price also works as a prosthodontist in the

He has written more than 100 peer-reviewed articles.
the i700
practice at the university, is involved in research
implants, dental resins and curing lights, and teaches about
2014 and 2015 he organized two symposiums on
curing in dentistry at Dalhousie University, which were attended by more than 40 key opinion leaders from academia and industry.
BY RICHARD PRICE BDS, DDS, MS, FRCD(C), PhD
871300 65 88 22
Super
• Super Light • Super Fast • Just Like
DR
View Radiometer X Online CLICK HERE Author
faculty
on
light curing.
In
light
CLICK HERE Read full article here Curious Curing How do you know if you’re getting the right output from your LCU? Dental curing units, or light-curing units (LCUs), are essential in dental offices; they are used daily in restorative dentistry, orthodontics and hygiene to cure resin-based restoratives, 50
Get the power to take your practice to the next level Light 245g featherweight with improved grip for comfort Smooth Automatically selects frames to deliver optimal scanned images. Improved speed for a smoother scanning experience Vivid Transmits 3D images via hardware auto brightening technology The Brain of the i700 with a Splash of Colour • Super Accurate • Super Light • Super Fast • Just Like the i700 NEW PRODUCTS
KAVO UNIQA
Ergonomic patient chair
Ergonomically perfected for practitioners thanks to the shortened base plate, the narrow backrest and the connection via the curve segment, even more comfortable for patients thanks to the new armrests and the adapted upholstery shape.

Efficient operation
Easy to touch thanks to the fulltouch display on the dentist element with the intuitive operating concept for time-saving and smooth treatment processes, capacitive control panel on the assistant element with all the functions which are important for your assistance, acoustic signal for the parking position of the spittoon bowl to optimise the workflow.
Interactive patient communication
Display of images on high-resolution screens, integrated data interfaces for easy access to patient data with CONEXIO or stand-alone and completely without additional software installation with the new CONNECTbase.

Hygiene efficiently automated
Integrated rinsing programs incl. Hygiene Center, DEKAmat and OXYmat for timesaving, automated cleaning and in compliance with RKI guidelines.
Integrated endodontics and surgery function
Three different modes for file control and an expandable file database, plus a small lightweight surgical motor plus integrated saline solution pump.
New upholstery colours
KaVo has three new upholstery colours in its range exclusively for the uniQa - a total of 17 individually selectable colours are available.
KaVo DIAGNOcam Vision Full HD
Intraoral camera for optimal patient communication and for perfected caries diagnostics in Full HD.
KaVo foot control
Proven KaVo foot control with ergonomic right-left movement for intensity control, wireless foot control for free positioning now with Bluetooth technology.
THE HIGHLIGHTS AT A GLANCE
88 NEW PRODUCTS
3 new exclusive upholstery colours: Chili Red, Apricot & Silk Grey
THE NEW PREMIUM COMPACT CLASS IN DETAIL
New patient chair
• Modern, sporty and compact chair design for maximum ergonomics

• Clear lines through the curve segment with side armrest connection for easy entry and exit
• New armrest design, can be folded down on both sides or mounted fixed on one side if wanted
• Maximum position of 830mm and lowest position of 350mm for an ergonomic treatment position in sitting and standing position

Intuitive user interfaces
• Proven and self-explanatory KaVo operating concept on the dentist element with high-quality touchscreen with fast and direct access to all functions for timesaving and smooth treatment processes


• Possibility to integrate endodontics and surgery function including the saline solution pump to optimise workflow by reducing the number of devices and improve hygiene
• Individualisation options for up to 6 users
• Intuitive step-by-step instructions for starting the hygiene processes - also with the water bottle system
• Height-adjustable assistant element with capacitive touch panel and clear user interface, via which all central functions are directly and quickly available
• 5 integrated instrument trays for maximum equipment options
• Optimised Progress backrest with even less depth and comfortable elbow rests
• Integrated Trendelenburg movement for your patients to move them comfortably into the desired position
• Patient weight up to 185kgIn addition to the 14 standard colours, there are three new upholstery colours in a velvety matte look exclusively for the uniQa: Chili Red, Apricot & Silk Grey.
89henryschein.com.au
NEW PRODUCTS
Optimised and efficient hygiene workflow
• Integrated rinsing programs, DEKAmat and OXYmat as well as the hygiene center with integrated adapters for time-saving, automated cleaning

• Smooth and easy to reach surfaces for an effortless wipe disinfection

• Removable components for easy reprocessing
New unique design
• Precise edges, all-round chamfers and clear design language give the treatment centre a light and slim appearance
• High quality materials provide value, durability and functionality
Maximum flexibility
• Four table versions: from the compact TM-, S-table and Cart versions, which are also suitable for left-handers, to the even more elegant and more ergonomic T-table for right-handers.
• Due to the continuous cover, all common connection points can be covered (e.g. Sirona, Anthos, Stern Weber, Ultradent, Belmont)
• Numerous technical individualisation options offer the possibility of equipping the treatment centre according to personal requirements.
Proven KaVo quality
The big advantage of KaVo uniQa for you as a specialist dealer? We have retained the proven and improved and simplified what was possible. This means for you concretely:
• Familiar parts, tested over years and known for their reliability, are installed at function-critical points (e.g. DVGW water block, Vision 4-way valve) for proven KaVo quality from day 1

• Shortened training for KaVo experienced service technicians and sales staff
• Simplification of installation and maintenance
• Your technicians will not need new tools
Optimal patient communication
• Connection of the KaVo DIAGNOcam Vision Full HD 3-in-1 intraoral camera for images in brilliantly sharp quality for caries diagnostics & patient communication

• High-resolution screens: KaVo Screen HD 22 inch and KaVo Screen One in 19 inch
• Easy and network-independent patient communication with the new, self-sufficient KaVo CONNECTbase or
• Access to patient data directly at the treatment centre with CONEXIO

• Inconspicuous features, such as magnetic closures in the hygiene area, simplify the process
• Individual look due to the large range of upholstery and lacquer colours, table variants and much more
• The list of new spare parts and maintenance kits is extremely manageable, which will keep inventory simple despite the introduction of a new treatment centre
• Easy transfer of the unit to the practice thanks to the intuitive operation

NEW PRODUCTS 90
CLICK HERE View KaVo uniQa CLICK HERE View KaVo DIAGNOcam Vision CLICK HERE
CONNECTBASE COMMUNICATION
Integrated, easy and efficient
KaVo CONNECTbase offers an innovative, easy patient communication workflow – you can use KaVo CONNECTbase to inform your patients about their dental situation on your KaVo uniQa; there’s no need to install any additional software.

Just connect your camera and get started straight away. The images are displayed directly on the treatment unit’s screen and can be compared with past saved images.
Innovation in a beautiful package: The all-in-one camera DIAGNOcam Vision Full HD
Imagine taking three different diagnostic images with one camera - sharp quality every time, in less than one second, as easy as one, two, three.

You call it amazing - KaVo call it the DIAGNOcam Vision Full HD. Intraoral images for the first visual caries diagnostic, true insight views into the dental structure via transilluminating technology and fluorescence images - all captured in a single shot and instantly displayed in Full HD resolution on your screen.


911300 65 88 22 NEW PRODUCTS
Fluorescence March 10 2020 Intraoral March 10 2020 Transillumination March 10 2020 View KaVo DIAGNOcam Vision CLICK HERE View CONNECTbase The Patient Communication Workflow CLICK HERE
NEW DIAGNOCAM VISION FULL HD
With the new KaVo DIAGNOcam Vision Full HD, everything literally “clicks”, because it enables three-in-one diagnosis with a simple push of a button. KaVo’s new Premium intraoral camera offers an entirely new imaging concept for the dental practice.
With the new KaVo DIAGNOcam Vision Full HD, everything literally “clicks”, because it enables threein-one diagnosis with a simple push of a button.
KaVo’s new Premium intraoral camera offers an entirely new imaging concept for the dental practice.

With the innovative 3-in-1 concept, intraoral, transillumination and fluorescence images are created in brilliant, Full HD quality.
That means that three clinically relevant images are generated in less than one second and with just one simple click.

With this feature, the DIAGNOcam Vision Full HD optimally supports a straightforward, reliable and patient-friendly diagnostic process.
The user can also choose between a one photo mode or a combination of two or three modes for an individually optimised workflow that is appropriate to the treatment process.
Convincing Communication
“The clearer my patients see caries or other findings, the more likely they accept my treatment recommendation. The DIAGNOcam Vision Full HD is my most persuasive assistant: the first look from the patients to the three Full HD images is enough to secure further treatment – because they see the clinical situation for themselves.
Whether you are treating critical or pregnant patients or kids: all recordings are X-ray free, so the DIAGNOcam Vision Full HD is perfect for
monitoring and gaining immediate acceptance at any appointment, with any patient, on any tooth. It is not only a device for me, but my whole team also loves to use it: All my dental assistants take images DIAGNOcam Vision Full HD –which saves me a lot of time.
In my view, the DIAGNOcam Vision Full HD is the first step for caries prevention: I see more, I can show more – and I can treat caries earlier and less invasively, if needed at all.”


1 CLICK, 1 SECOND, 3-IN1 DIAGNOSIS
92 NEW PRODUCTS
Following are testimonials from three European dentists about the DIAGNOcam Vision Full HD.
Permanent Autofocus
“There are many devices that have an autofocus function to take a sharp image. But most of the time it takes too long to get a clinically relevant shot as you must wait for the image to sharpen. The permanent autofocus function of the DIAGNOcam Vision Full HD is completely different: It is always on, there is no need to press a button or to adjust anything. It focuses automatically and without interruption – I always get a sharp image instantly.
The result is impressive: You can barely take an image that isn‘t perfectly sharp – in Full HD quality. This is true regardless of whether you use the DIAGNOcam Vision Full HD as an intraoral camera, as a transilluminating light-beam device or if you are working in the fluorescence mode – or combining all of them into one shot.”

MAC compatibility and integration

“Using the DIAGNOcam Vision Full HD, I can check caries even before checking my operating system in the practice. It is compatible with Apple and Microsoft and can be used directly with the treatment unit, no matter what brand it is.
It automatically starts as soon as it is removed from the holder. Simply place the tip over a tooth and initiate the recording. Thanks to its intuitive handling, I can diagnose caries with extreme safety. And even better: My whole team can use it, with almost no training at all. That’s plug and play at its best.”


93henryschein.com.au
JOCHEN KANIA Germany
LUIGI CIACCI Italy
View KaVo DIAGNOcam Vision
CLICK
HERE
MACIEJ MIKOŁAJCZYK
Poland
Enquire about our Introductory Offer CLICK HERE NEW PRODUCTS
FROM HENRY SCHEIN


94 Advantages • High quality CADCAM Milling Burs on the market • Long lasting, low tool cost per unit • Less labour cost changing burs • Better surface finish • Made in the USA Product Offering • Dentsply Sirona • Imes Icore • Amann Girbach • Ivoclar • VHF • Arum Applications • Zirconia • Wax and PMMA • Glass ceramics • Metal DIAMOND YIELD STUDY Milled Over 1000 Units Using zirconia material, 1000 units were milled using diamond coated tools. Proven Results Documented tool wear at 50-unit increments Quantified Tool Yield Real testing data produced accurate unit and time expectations the cutting edge to excellence TM EXCLUSIVELY
SIERRA DENTAL TOOLS
