NEW TESLA TRAINING FROM DELPHI

YOUR LETTERS ANSWERED

MOT GARAGE REACTIONS
LIFE IN THE PITLANE

ENTER THE CPD ZONE!

YOU COULD EARN ONE CPD CREDIT THIS MONTH BY READING THIS MAGAZINE


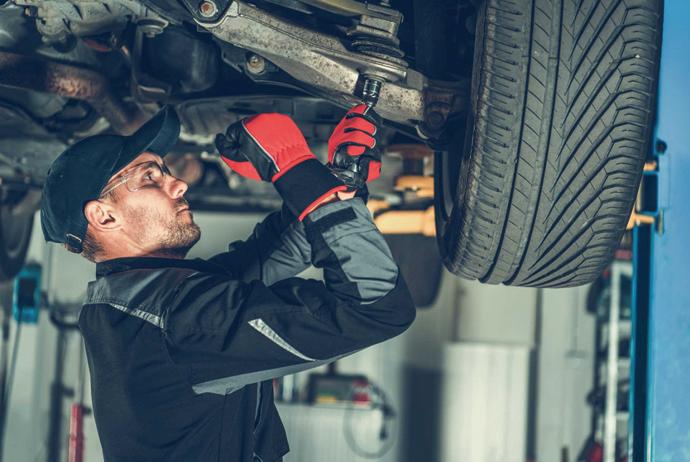
DIAGNOSTIC TROUBLESHOOTERS ON BMW & VAG VEHICLES


INSTALLATION TIPS ON CLUTCHES, BRAKE PADS, BELTS & ABS UNITS


CLASSIC CAR MAINTENANCE EXPLORED
BEST PRACTICE TIPS ON BRAKE TESTING, CLUTCH CONVERSION, ADAS & FILTERS
FREE TOTHE TRADE
MAY 2023
PMM
COMMON FAULTS WITH TURBOS PROFESSIONAL M OTOR M ECHANIC
Editor’s Picks
14
TROUBLESHOOTER
Make sure to read this month’s troubleshooter where diagnostics expert Ben Johnson investigates of a headlamp failure on a BMW E60.
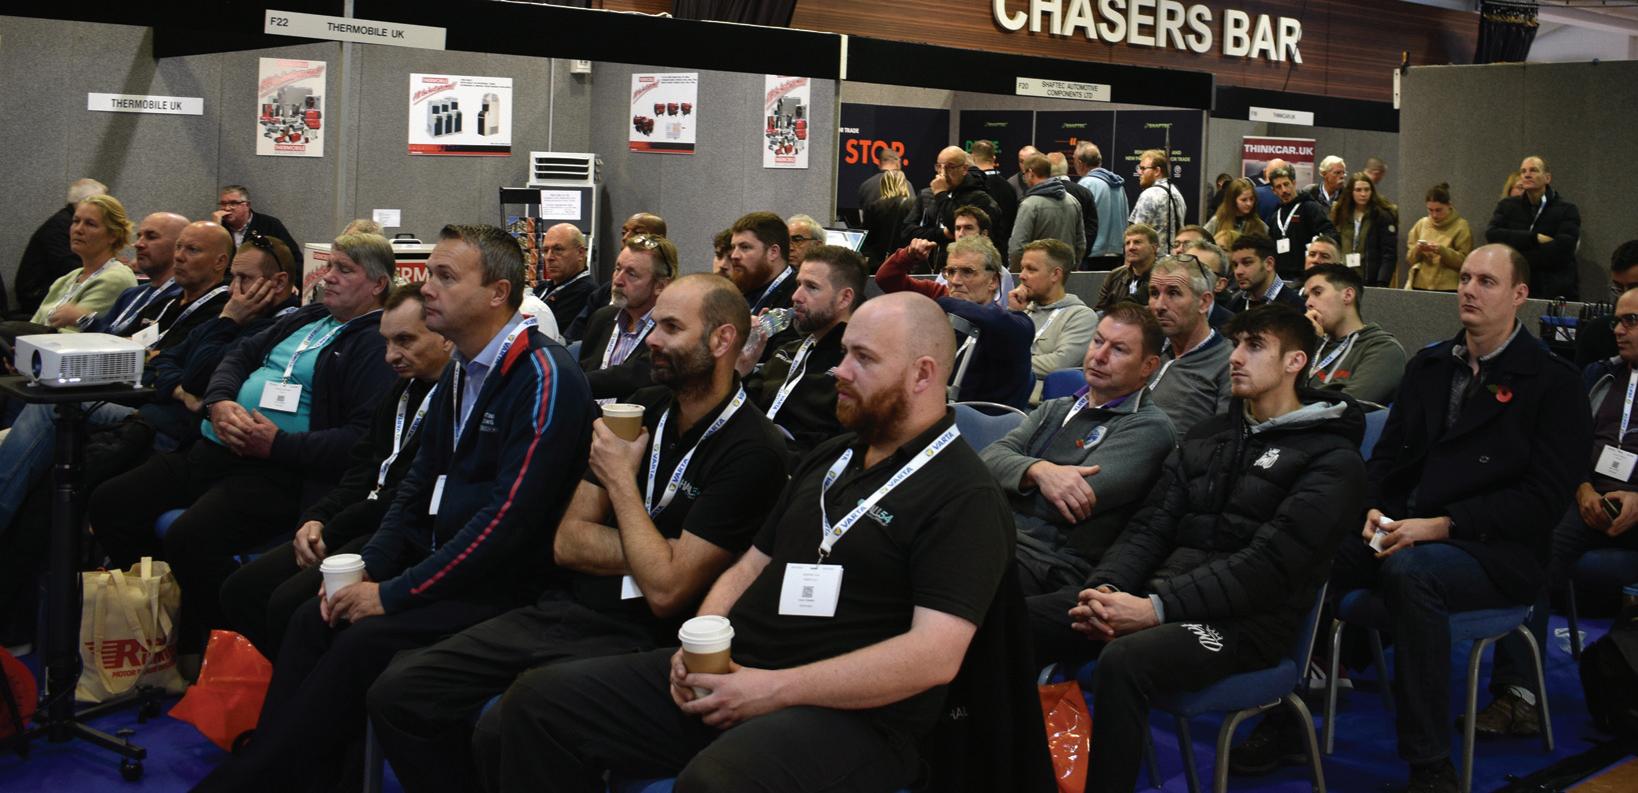
42 ALL ABOUT MOTS
Recently, the PMM team went out on the road to hear what you, our readers, had to say about the MOT. Find out some garages’ opinions and see if you agree.
48 TO REPLACE OR TO OVERHAUL?
ACtronics makes a case for why overhauling might be the better option when it comes to failing electronic components, as opposed to replacing the device.

54
MODERN OILS FOR CLASSIC CARS
Ever wondered how to break into the classic car market? Learn how to take advantage of this growing market thanks to Motul, here to inform PMM readers about which oils and lubricants are available for which classics.

Contents VOLUME 24 ISSUE 5 MAY 2023 Features Total Average Net Distribution 54,319 1st July 2021 – 30th June 2022 PMM MAY 2023 3 45-51 BRAKES & CLUTCHES 53-57 CLASSIC CAR Regulars 6-10 AFTERMARKET NEWS 13-30 CPD ZONE NEW 32-37 BUSINESS & TRAINING 39-42 SPECIAL REPORTS 68 PIT STOP 69 ONLINE REPORT 70-72 WHAT’S NEW? 73 MYTHBUSTERS
66-67 ADAS
59-65 FILTERS
Editor KIERAN NEE

News and Products Editor

FREYA COLEMAN
Digital Manager
KELLY NEWSTEAD
Group Manager
ROBERT GILHAM
Account Manager
ALEX DILLEIGH
Magazine Designer
GEMMA WATSON
Group Production Manager
CAROL PADGETT
Production Assistant
CLAIRE SWENDELL
Distribution Manager
KARL CLARK
Subscriptions
PROFESSIONAL MOTOR MECHANIC is a business magazine for firms and individuals involved in all aspects of the motor trade. It is published eleven times a year and is available nationally FREE to the trade through leading motor factors. It is also available through the post at a cost of £30.
EUROPE and OVERSEAS
1 year (11 issues) £50
Airmail 1 year (11 issues) £65
Printed by Walstead Peterborough
Published by HAMERVILLE MEDIA GROUP


Regal House, Regal Way, Watford, Herts, WD24 4YF.
Tel: Watford (01923) 237799
Fax: (01923) 246901
E-mail: pmm@hamerville.co.uk
Sales enquiries: pmmsales@hamerville.co.uk
Website: www.pmmonline.co.uk
Facebook: /ProfessionalMotorMechanic

Twitter: @pmmmagazine
Copyright © 2023
The publishers and editor do not necessarily agree with the views expressed by contributors,nor do they accept responsibility for any errors of translation in the subject matter in this publication.
A credit to yourself
It’s finally here. After much discussion, I have finally managed to get enough ducks in a row to get PMM’s technical articles CPD accredited. So, barring any unforeseen circumstances, the Tech Tips section of the magazine will henceforth be banished –replaced by the new and shiny CPD Zone. What does this mean for you, the reader, or for the magazine, or indeed for me, the editor? Well, firstly, for me and by extension for our contributors, it has brought an already notoriously early copy deadline even earlier (for this issue it was early March) and an extra layer of process to get through each month. Secondly, for the magazine, it means that our technical content is subject to another pair of eyes scrutinising it for its neutrality, usefulness and value to the reader. Lastly, and most importantly, CPD accreditation means that you, our reader, will be able to quickly and easily add CPD points to your account, which can be put towards any professional scheme you are involved in. Does this mean the content is any different this month compared to last month? Well, surprisingly, no.
We were pleased to find that the technical content we run each month was already up to scratch in terms of technical rigour, but of course we already knew that! In fact, the reason we first approached a CPD accreditation scheme was that it was brought to my attention that the magazine was already a valid contribution towards CPD points, something which already depends largely upon self-reporting your research and learning.
What are CPD points? Well, for those of you who aren’t aware or may want to know a bit more about the scheme, CPD stands for continuous professional development. Schemes like the IMI’s TechSafe professional EV recognition scheme relies on participating technicians to take it upon themselves to top up their learning as they continue their professional careers. It’s a common gripe among industry professionals that there is a lack of official accountability and qualifications. Unless you are a part of an official trade body, there is very little to keep workshop mechanics on the straight and narrow besides their own good faith, which luckily is usually enough. Mechanics, differently from other trades such as electricians and gas engineers, aren’t beholden to an official regulatory scheme unless they are working on electric vehicles (in which case electrical regulations kick in).
However, CPD credits are open to anyone willing to do the learning and to keep on top of the latest updates. Of course, gaining access to the scheme is free of charge for readers and is easy to maintain each month – you simply need to do the reading and scan the QR code on the last page of the CPD Zone in each issue. With this new zone, we are hoping to further increase the professionalism of the aftermarket, so please make good use of it!
VIEWPOINT
Nee
Kieran
Editor
Listen on Amazon Podcasts Listen on Spotify Podcasts Listen on Apple Podcasts Associate member Find every episode at www.pmmonline.co.uk/podcasts Also available: JOIN M E EACH M ONTH ON THE
MM
P
PODCAST
PMM NEWS with
NEWSIN BRIEF
■ MILLENIALS HANDS-ON Research has found that millenials are more likely to undertake minor car repairs versus baby boomers who are more willing to put their hands in their pockets to get vehicles fixed.
■ CASTROL NEW BRANDING
According to the oils brand, the aim of this re-brand is to reflect the changing needs of its customers and its commitment to investing in the future. Evidence of this is shown by the release of EV transmission fluids and EV greases, but don’t worry, the new logo still contains the iconic red, green and white colours, making its products recognisable to technicians.
■ CAR PRODUCTION RISE SMMT
chief executive Mike Hawes says 13.1 per cent car production growth in February shows an industry on the road to recovery.
■ MG MOTOR The Motor Ombudsman has given accreditation for its motor industry code of practice for new cars to MG Motor UK. This underlines the marque’s commitment to delivering high standards of service. It also gives MG car owners access to the ombudsman’s dispute resolution service.
■ HAVE A CUPPA Airtex was welcoming workshops to its brand last month by sending them a welcome box of goodies as a ‘thank you’ for purchasing their water pump kits. The boxes included tea, coffee, a branded mug as well as snacks such as biscuits, a chocolate bar and crisps.
Freya Coleman
Government outlines zero emissions roadmap
The government has launched a consultation on its plans for a zeroemission vehicle (ZEV) mandate, which will force manufacturers to sell a certain proportion of EVs leading up to the 2030 phase-out of petrol and diesel vehicles.
The proposed minimum ZEV target trajectory for new cars being sold begins at 22 per cent in 2024, increasing to 80 per cent in 2030 and 100 per cent in 2035. If a manufacturer cannot meet these targets, the proposal suggests payments of £15,000 per non-ZEV car.
Mike Hawes, SMMT chief said: “While the proposals rightly reflect the sector’s diversity, late publication and lack of regulatory certainty make product planning near impossible, and continiued lack of
clarity as to what technologies will be permitted beyond 2030 undermines attempts to secure investment”.
The consultation is seeking views on the final proposed regulatory framework, specifically on the level of ZEV uptake, how allowances and credits could be allocated and derogations and exemptions. The consultation closes on the 24th of May.
This comes after EU restrictions relax to allow e-fuel exemptions in its 2035 combustion engine ban following pressure from Germany. Despite ministers and experts urging the UK government to follow lead, such as Sir Iain Duncan Smith telling the Telegraph the 2030 deadline is “simply not achievable”, it appears the government is unlikely to postpone.

EV tyres proving to be MOT bugbear
The Institute of the Motor Industry (IMI) has conducted in-depth analysis of MOT data, working with Garage Industry Trends, to examine root causes in current patterns of MOT failure.
The analysis provides clear evidence that extending the date for the first MOT will significantly increase road user risk. In particular, the risks surrounding electric vehicles as they are heavier than ICE vehicles and cause heavier wear to their tyres.
Evidence drawn from MOT testing records supplied to the IMI by the Department for Transport shows that comparative to petrol engine vehicles, electric vehicles are much more likely to fail their first MOT test.
EV failure rates for 2018 registered vehicles (all classes) was 11.51 per cent. This is lower than diesel (15.98 per cent) but higher than petrol (10.89 per cent). This pattern holds for 2017 and 2016 registrationyears. Given that a large proportion of EV owners in 2018 can be classed as enthusiast early adopters and would likely maintain their car better than today’s average EV driver, the IMI believes this is a significant finding.
Whether or not the government has chosen to extend the MOT to a 4-1-1 or even 4-2-2 system, it’s clear to see how tyre wear on EVs is going to pose a problem for garages and motorists in the future.
6 MAY 2023 PMM
©AdobeStock/bizoo_n
FOR UP-TO-DATE NEWS, SIGN UP FOR THE WEEKLY E-NEWSLETTER AT WWW.RDR.UK/AAX001
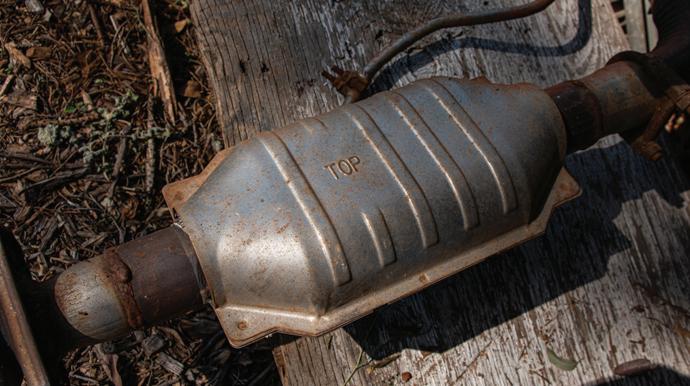
Cat burglar strikes garage owner
A Berkshire garage owner has recently had 12 catalytic converters stolen in one night. He estimates that each theft has cost him around £1,600. One of the cars affected is a sports car whose catalytic converter can only be imported from Japan. Catalytic converter theft has been branded by one MP as an “epidemic”.
Repair prices on the rise
According to a study from Intelligent Motoring, the cost of vehicle repairs rose by 40 per cent between 2018 and 2022.
NEWSIN NUMBERS
64 %
the proportion of drivers that are planning on restricting their car usage to minimise fuel bills according to BookMyGarage.com. For garages, this means motorists are also cutting back on what they will spend on their car, with 28.4 per cent saying they would put off cosmetic repairs.
300,000
the number of public chargers the Department for Transport has said it wants in operation by 2030, despite fewer than 9,000 being installed in 2022.
67 %
CEO Duncan McClure Fisher explained that repair costs started to climb after the referendum in 2016 and were made worse by the knock COVID-19 inflicted on the automotive sector. He added that the financial impact will be made worse by rising inflation and an increase in the costof-living.

However, with the rising cost of parts, the cost-of-living increase and inflation, this is no suprise. Moreover, according to leading industry experts, independent garages regularly undercharge for their work.
of UK car owners support keeping the first MOT at three years rather than extending to four according to the SMMT, saying it is not worth the 23p a week saving. This contradicts a survey from Startline that found that 89 per cent of drivers back four-year MOTs.
17 % of drivers who had scheduled MOTs for May couldn’t afford the £54.85 due to the cost-of-living crisis.
In pictures: PMM attended the IMI annual awards and dinner, seeing winners such as Thomas Morris from Bridgewater and Taunton college achieving full-time student of the year.
PMM MAY 2023 7
DATES FORTHE DIARY
■ PMM has confirmed it will be hosting a stand at this year’s Automechanika Birmingham, which will take place at the NEC in Birmingham on the 6th, 7th and 8th of June. Come and visit our stand for your chance to be featured on the PMM Podcast!
■ Garage management software Garage Hive has announced the Blend is back on the 7th of October 2023 at the Eastside Rooms in Birmingham, with tickets now on sale. It is a two-in-one event featuring a conference during the day where you can hear from industry speakers on how to run your business more efficiently, before the evening event with a threecourse meal and the chance to network.
■ The BIG Awards are back this year on Friday the 22nd of September at Leicester City Football Club. Categories include the business improvement award, the diversity equality and inclusion award and the training and development award among many others.
■ The SMMT International Automotive Summit is taking place on Tuesday 27th the of June. Speakers will include senior executives from vehicle manufacturers, policy makers and a host of content experts from automotive and aligned industries.
with Freya Coleman
DVSA apologises for MOT comments
Following a number of offensive comments from MOT records circulating on social media, the Driver and Vehicle Standards Agency (DVSA) has had to apologise.
From the original tweet, which was viewed 1.3 million times, one Twitter user responded with a link to a Facebook post with around 70 other examples of inappropriate MOT advisories.
The comments included: “beautiful owner”, “owner needs a haircut” and “number of
wotsits in the glovebox below requirements”.
The DVSA has said “We apologise for any offence caused to the vehicle owners and members of the public viewing MOT records through the ‘check MOT history service’ feature”.
The agency has also said it is investigating the misuse of its free text advisory feature, following up with any testers or garages who were found using the function inappropriately.
‘No argument for changing MOT’ according to PMM Podcast


If you’re concerned or confused about MOT proposals from the government, you need to listen to the ‘MOT madness’ episode of the PMM podcast.
“Does the MOT still need to be an annual test?” is THE big question that has been buzzing around the industry lately, especially when concerning the government’s recent consultation.
So, to get a straight answer, we spoke to Nick Lyes, head of roads policy at the RAC who said “the government’s line is that the vehicles today are completely different to those we drove round 40 years ago. I completely understand. Vehicles generally are mechanically more reliable, but when you look at some aspects of the MOT –suspensions, brakes and tyres –those things haven’t really changed.”
We also spoke to Barry Babister, managing director at MOT Juice, who doesn’t think “there’s an argument for allowing the first MOT to go to four years because I think road safety will be impacted, especially on tyres with EVs and

hybrids really, as they are that bit heavier”
The PMM team also went out on the road to talk to independent garages to get their thoughts on the MOT. “It’d be very dangerous because customers only know when there's something wrong with their car or it’s not fit for purpose for the road when they bring it for an MOT. Some customers don't even know how to change tyres, look at tyres, top wheels, that sort of stuff.” says one garage we spoke to regarding the government’s proposals.
So, join us in uncovering some myths and getting to the bottom of the governments’ proposals and the impact MOT test frequency could have in the UK.
8 MAY 2023 PMM PMM NEWS
To listen, scan the QR code
LETTERS Writetotheexperts
When readers get in touch with a query, we get PMM product tester and diagnostics expert Tony Powell on the case.
The query we heard this month was from PMM reader Ben Dobson who was looking at our website, specifically our five steps for coding injectors. He asked: “Do I need a specific code/diagnostics reader for a 2005 Ford Mondeo 2.2tdci and if each injector needs coding as I put it in or can it be done after changing all four?”
To this query, Tony Powell had the below response:
“There are so many different ‘code readers or scanners’ out there these days it's a difficult one to answer to be 100 per cent correct. Many will list the job of injector coding but when it comes down to it, they won’t or can't do it.
The only real answer to be guaranteed is the dealer tool. However, many aftermarket tools will also code them no problem and it's a case of try and fail or try and pass. You don't say what tools you have access to and I don't own them all so can't comment on them. It's probably best to go with a tool based upon recommendation from someone who has done this job on this car with this engine before. Coding injectors individually or as a whole set is again down to the individual vehicle. The other thing you need to be aware of is which way around you code them in for example English 1234 or French 4321 or firing order. Research will be your best friend here.”
If you have any queries you want to the PMM team to answer, get in touch pmm@hamerville.co.uk
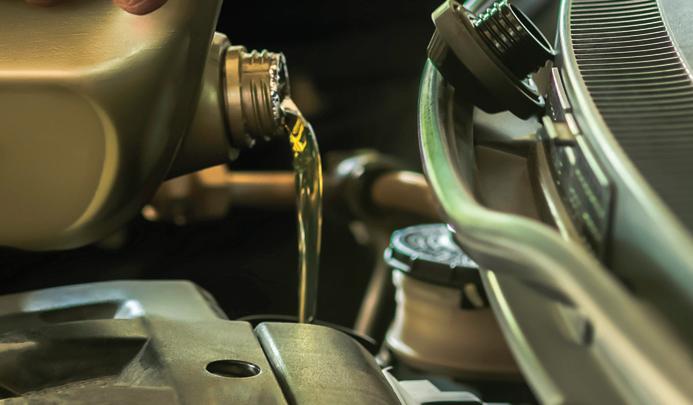
Beware using latest engine oils on ageing cars says VLS chairman
Mike Bewsey, VLS chairman, is warning mechanics on the risks of using the latest engine oils in ageing customer vehicles.
Engine technology has evolved over recent years to meet government requirements for reduced emissions, but are these highly efficient lubricants suitable for ageing vehicles? Traditionally, when newer oils were developed, some were designed to be ‘backwards compatible’. However, with an increasingly complex range of industry and OEM specifications, backwards compatibility cannot be assumed.
Using the wrong oil risks accelerated wear, decreased fuel economy and damage to emission control devices. VLS strongly

recommends referring to the vehicle handbook or using an online database to identify the correct oil for every vehicle. Looking beyond the viscosity to specific ACEA and OEM standards is essential. This ensures that the lubricant is fit for purpose in that specific vehicle.
The team up between GS Yuasa and Tunnock’s is set to continue with a pack of ten Tunnock’s Tea Cakes coming with each battery purchase.

Also included is the chance for garages to win one of three £100 JustEat vouchers.
The two companies first collaborated at the end of last year to raise spiritis during winter, and are back as spring has sprung.
As well as ten tea cakes, each Tunnock’s pack includes a unique code to the prize draw for the JustEat vouchers.
10 MAY 2023 PMM Treat yourself MESSAGE ME YOUR NEWS AT FCOLEMAN@HAMERVILLE.CO.UK
In pictures: Liqui Moly signs a one-year contract with the racing series, meaning they will be sponsoring Formula 1 for the fifth consecutive year.

YOU ARE NOW ENTERING
PMM has teamed up with the CPD Group to offer you the chance to gain CPD points while you read every issue!
Continuing professional development (CPD) can be broadly defined as any type of learning you undertake which increases your knowledge, understanding and experience of a subject area and your role within it. To help professionals to better document and prove this process, our new CPD Zone features articles that have been checked, verified and accredited by a thirdparty specialist organisation.
The content within the CPD Zone will provide you with 1 CPD Credit, or 1 hour’s worth of continuous professional development.
Once you have read through the articles contained within, you will be able to scan the QR code at the end of the last article. This will provide you with a downloadable certificate, personalised to you. This can then be used as part of your ongoing CPD record, as needed to satisfy various organisations and schemes. Regular readers of PMM, therefore, could earn 11 CPD points just by reading the magazine each month.
DO NOT SCAN THE QR CODE UNLESS YOU HAVE READ ALL OF THE CONTENT WITHIN THIS SECTION!
CPD relies on self-certification, which in turn relies on professionalism and honesty from those who participate. We have great faith in the diligence and professionalism of our readers – we are called Professional Motor Mechanic, after all. It is fairly safe to assume that if you are picking up PMM each month, then you are already interested in reading and understanding technical content. Indeed, we are a lifeline for many in the industry who rely on us to spread the word on the latest changes and developments originating with the OEMs.
THIS PROCESS IS COMPLETELY FREE
Don’t worry – you won’t have to pay a penny to gain your CPD points each month. It’s on us!
All certificates are valid for one year from the issue date. If you have any issues downloading the certificate or using the system please email us at: pmm@hamerville.co.uk
NEW USERS –ACCESS YOUR BESPOKE CPD CERTIFICATE IN FIVE STEPS


Read ALL of the articles within this month’s CPD Zone
Scan the QR code or enter the RDR.Link in your web browser –both are found at the end of the last article in this section
Enter your email address
Fill out your details on the contact form
Download your certificate for use as part of your annual CPD record
PREVIOUS USERS –ACCESS YOUR CPD CERTIFICATE IN FOUR STEPS

Read ALL of the articles within this month’s CPD Zone

Scan the QR code or enter the RDR.Link in your web browser –both are found at the end of the last article in this section
Enter your name and email address
Download your certificate for use as part of your annual CPD record


PMM MAY 2023 13
CPDZONE READ ME TO REGISTER YOUR CPD POINTS
TROUBLESHOOTER
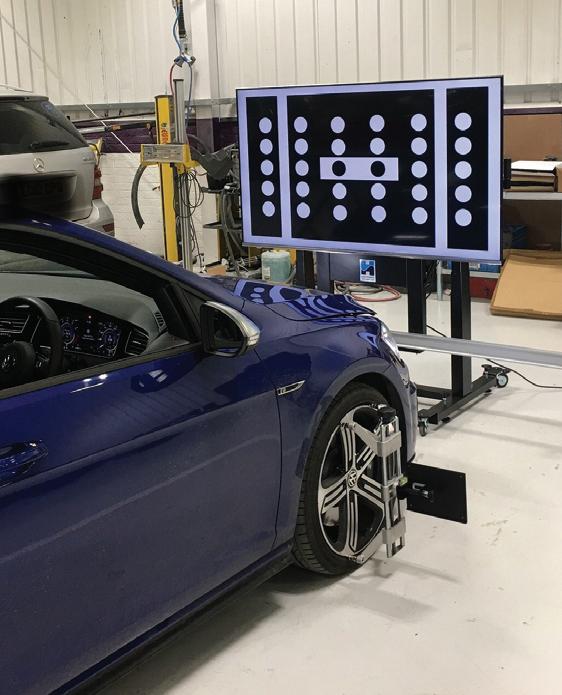
Why did the BMW E60’s headlamp fail?
Diagnostics expert Ben Johnson investigates a recent headlamp failure on a BMW E60.
It would be fair to state that, at Schmiedmann, we tend to get our share of BMW Exx generation vehicles of which some are, by now, nearly 20 years old. Most of them have fared well during this long time with only the odd sensor failure, corrosion or part needing to be replaced. In general, they are a fairly hardy vehicle if looked after, well made and easy to work on even if, every now and then, they tend to suffer issues such as the well reported and dreaded battery drain problems that can be tricky to narrow down, even with the proprietary software, ISTA.
Confirming the fault
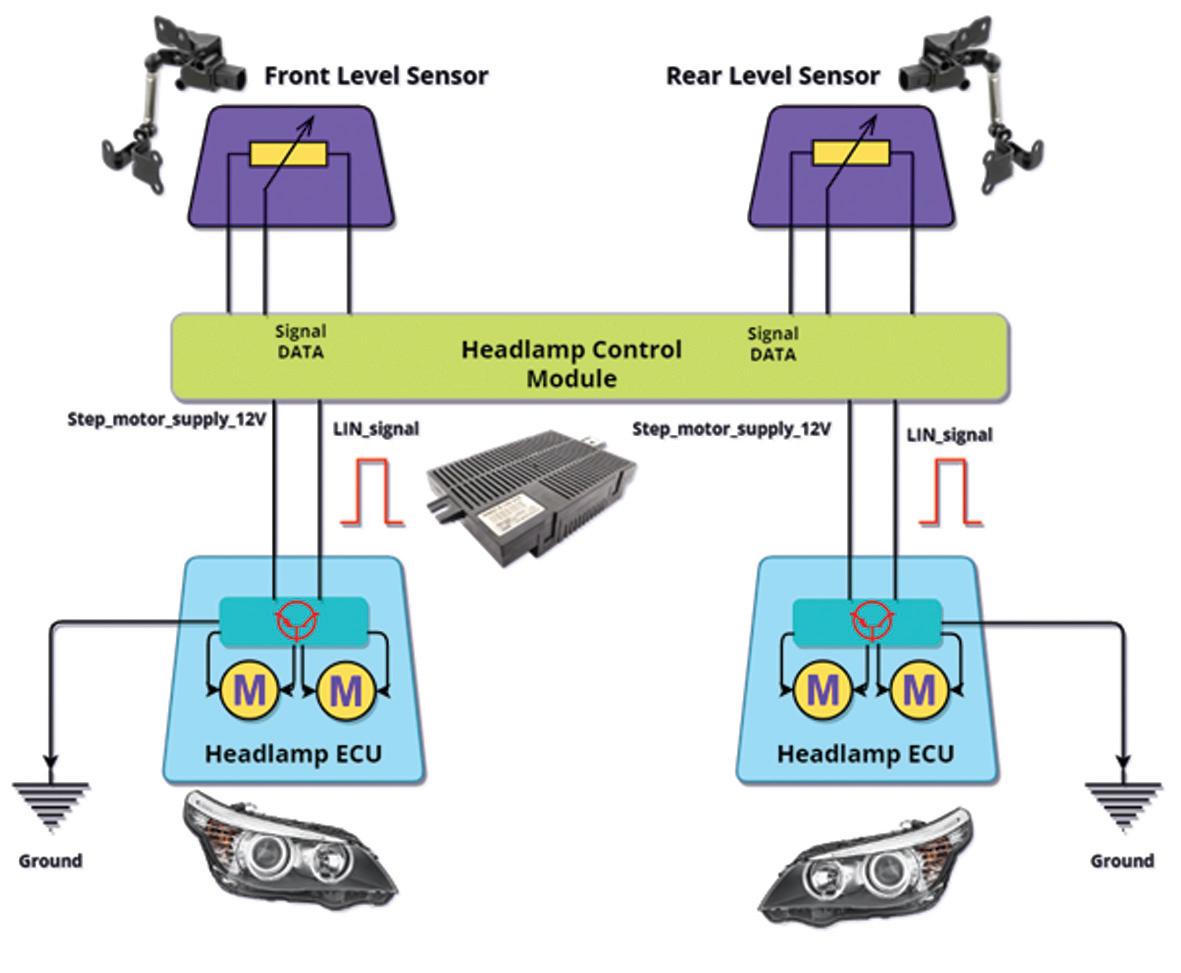
So, it was good news for me that this example came with what was assumed to be a xenon ballast module failure and not intermittent battery draining! During the customer interview he mentioned that a warning lamp illuminated with subsequent right headlamp shut down completely. The fault was confirmed both visually and by observing an active CC message (check control) that was present in both the Kombi and the CID. Kombi, for those unfamiliar with BMW terminology, refers to the instrument cluster and the CID refers to the central information display which is the screen displaying radio, menu functions and satellite navigation that sits in the centre of the dash above the radio and heater controls. This lighting design features a lighting module (LM) that utilises a 19.2 baud single wire system to communicate with an SMC module inside the headlamp. The SMC module is responsible for actuating the
stepper motors that alter the headlamp beam angle. The SMC module according to the wiring diagram is referred to as “headlamp ECU” for simplicity and the LM is referred to as “headlamp control module”
As is customary when looking at problems that need to be solved, sticking to a rigid test plan is not something that I am inclined towards as it tends to prevent the free thinking and dynamic deductive reasoning that have
become a habit of mine. After so many years fault finding, it becomes almost second nature to “feel” what is happening or, as in this case, not happening. From the stored fault codes (006140 LM: communication with SMC, right, disrupted), it was determined that the issue was possibly a noncomms event between the headlamp on the right side and the headlamp control module which is situated in the pedal box area. The SMC module in the headlamp came to mind at first since they can fill with water and corrode the circuit boards. Looking at the physical position of the right headlamp it was determined that it was pointing far too high. Sometimes the headlamp control unit can receive information via the headlamp swivel module position sensors feedback from the SMC module on the LIN if the swivel motor, for example, had failed thus leaving this headlampposition too high. In such a situation, as a result of this undesirable positioning, the headlamp module switches off the xenon lamp completely. This is done to avoid dazzling oncoming traffic. In this particular case, however, the fault code related to a loss of communication between the headlamp and the headlamp module and not of a swivel motor failure though the result was similar: Switching off the headlamp completely.
Smart beginnings
I find that it pays dividends in terms of timesaving to decide upon the best area in which to start to find some evidence as to the root cause of the fault. The headlamp control unit was clearly the smart choice as
14 MAY 2023 PMM
Figure 1: AHL headlamp schematic - BMW Exx (simplified) by the author
“I find that it pays dividends in terms of timesaving to decide upon the best area in which to start to find some evidence as to the root cause of the fault.”
READ ME TO COLLECT YOUR CPD POINT CPDZONE
Ben Johnson, diagnostics expert
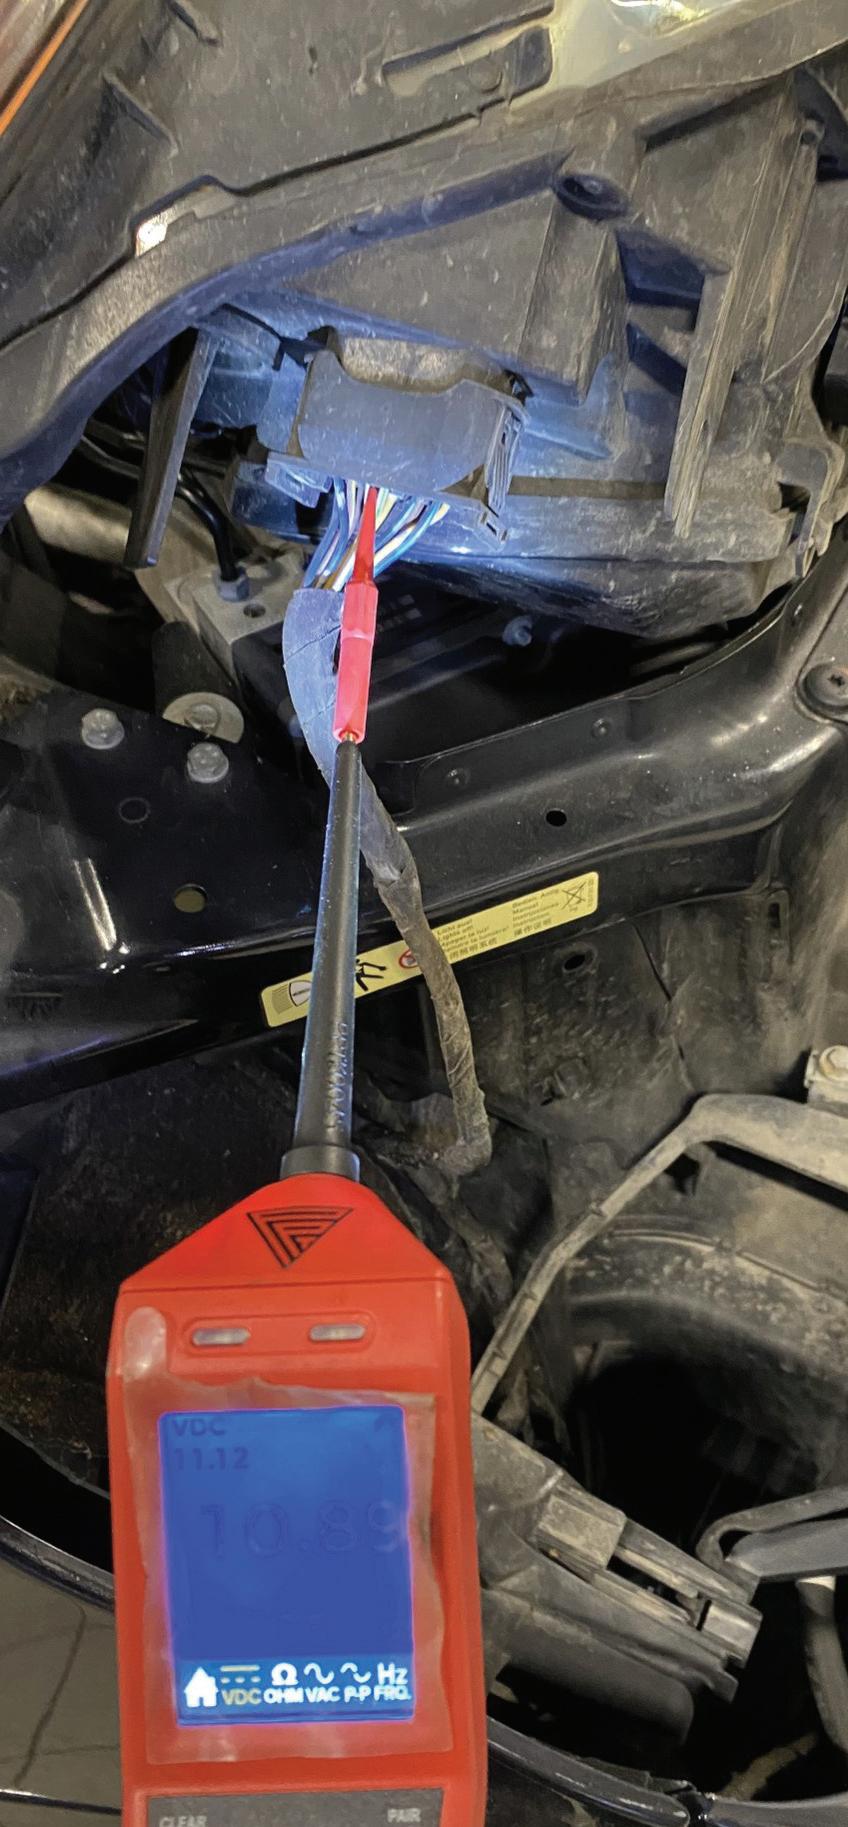
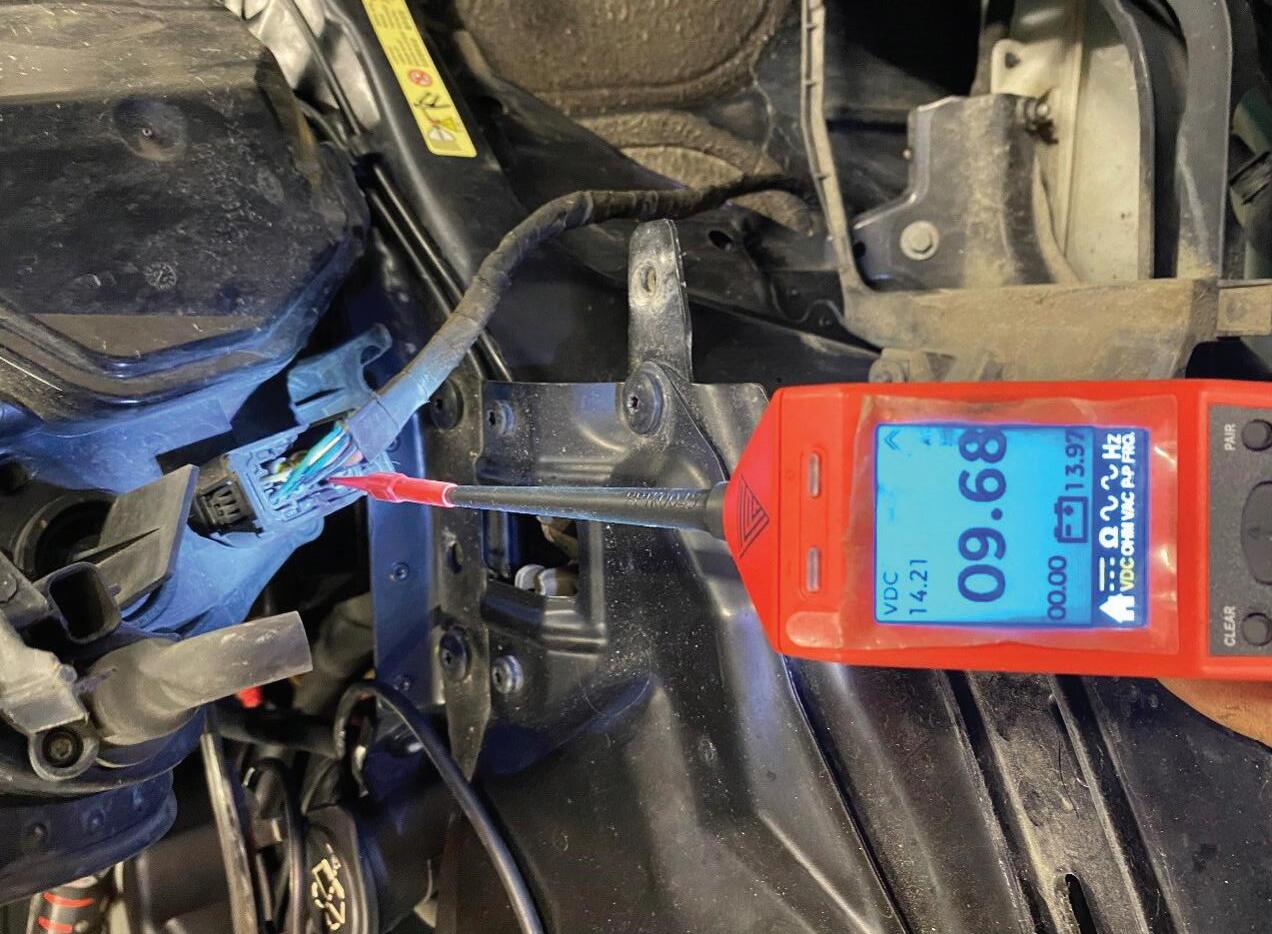
it required only a few screws and the lower panel removing under the steering wheel. What I was aiming for was to take a reading of the voltage on the LIN bus and compare it to the working side which happened to be the left side on this vehicle since the functional description didn’t include what precisely the LIN voltage should be.
Checking the left output from the headlamp showed a LIN operating at around 9.68 V with a 14 V battery support connected. In contrast to this, the right headlamp displayed a voltage of 10.89 V with battery support temporarily removed during testing as it was a little awkward to leave in place with the removed headlamp in the way. The battery was somewhat worn so the overall battery voltage was lower than 12 V. Of course, LIN voltage is not static but there shouldn’t be such a large difference between sides. With the battery support re-connected, the LIN voltage increased to over 12 V on the affected (faulty) headlamp. The amount measured at the headlamp control module inside the car was almost the same value as at the headlamp.
It seemed pretty obvious to me that there was a dominant voltage on the right LIN line which meant that I could be dealing with either a short to 12 V inside the headlamp control unit, internal failure/short to power of the left headlamp module SMC or the line itself had chafed and shorted to power somewhere. Finding the exact problem area would be a case of disconnecting the wire
and checking for continuity to 12 V. If this was confirmed, a further evaluation on the wire would be carried out using a voltage drop technique and/or making some strategic cuts in the harness which would separate a portion of the wire from the 12 V short to determine the affected area.
The customer, on a budget, decided that he would simply only like a new wire running in. “As cheap as possible,” were the exact words of the customer. This is something that I always try to avoid since
PMM MAY 2023 15
Figure 2: Correct LIN voltage in left headlamp
Figure 3: Right headlamp LIN Voltage higher than the left side under similar operating conditions (note lower battery voltage due to temporary battery support removal)
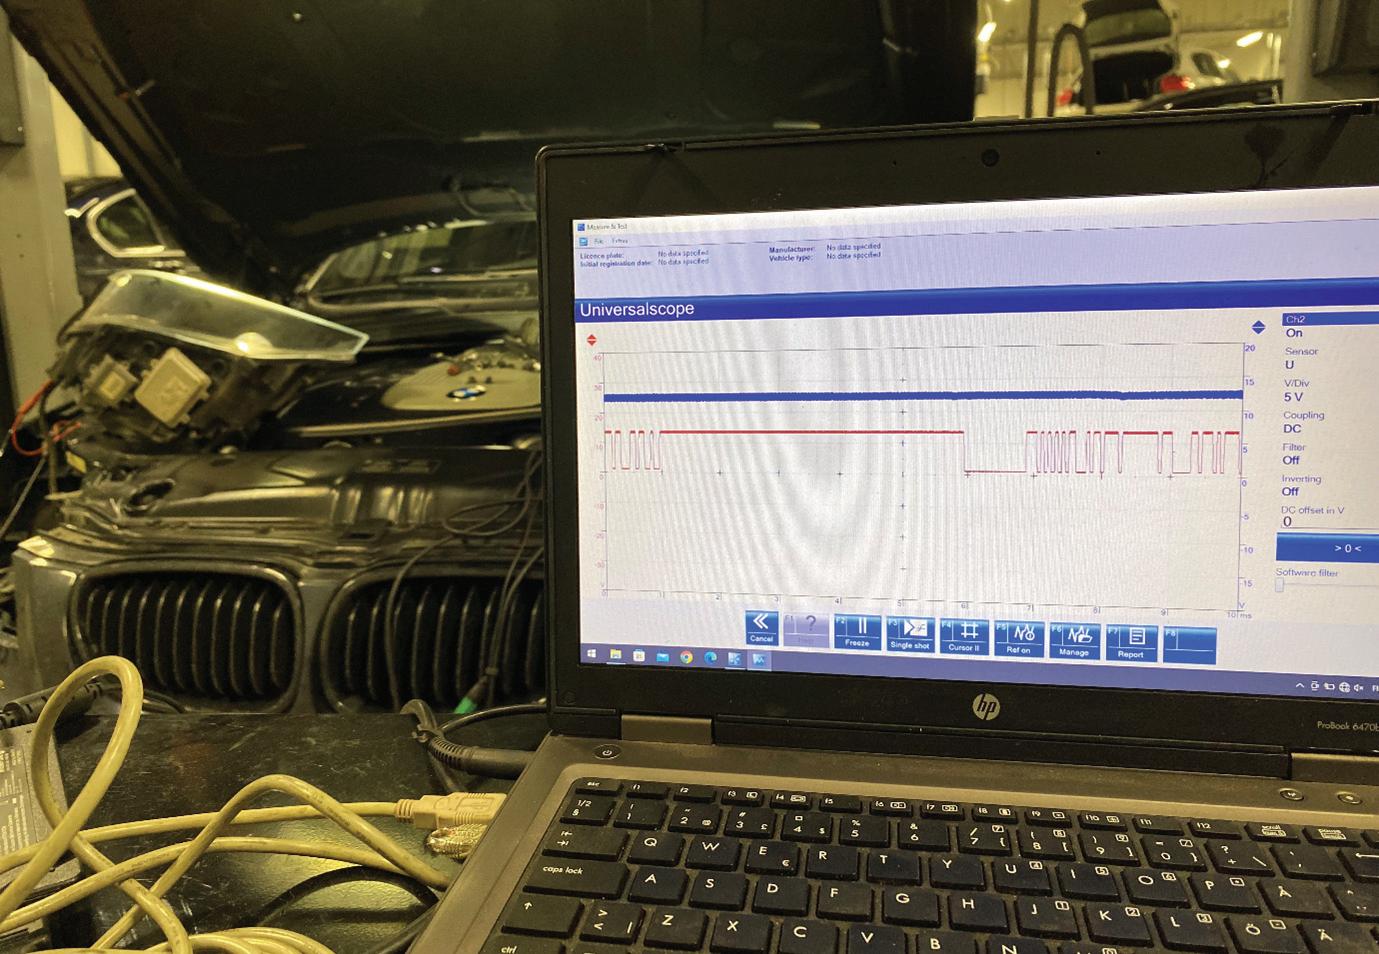
Figure 4: Blue trace short to 12 V / Red trace good LIN signal (Voltage divisions not to scale in the oscilloscope.)
there could be a raft of other wires in a similar condition so it is always best practice, where practicable, to find the actual break. However, it is the customer who pays us and I can only do what they are willing to pay to do in these cases unless a requirement breaches safety protocols such as with restraint systems bypassing etc. Those, clearly, are things I will not carry out.
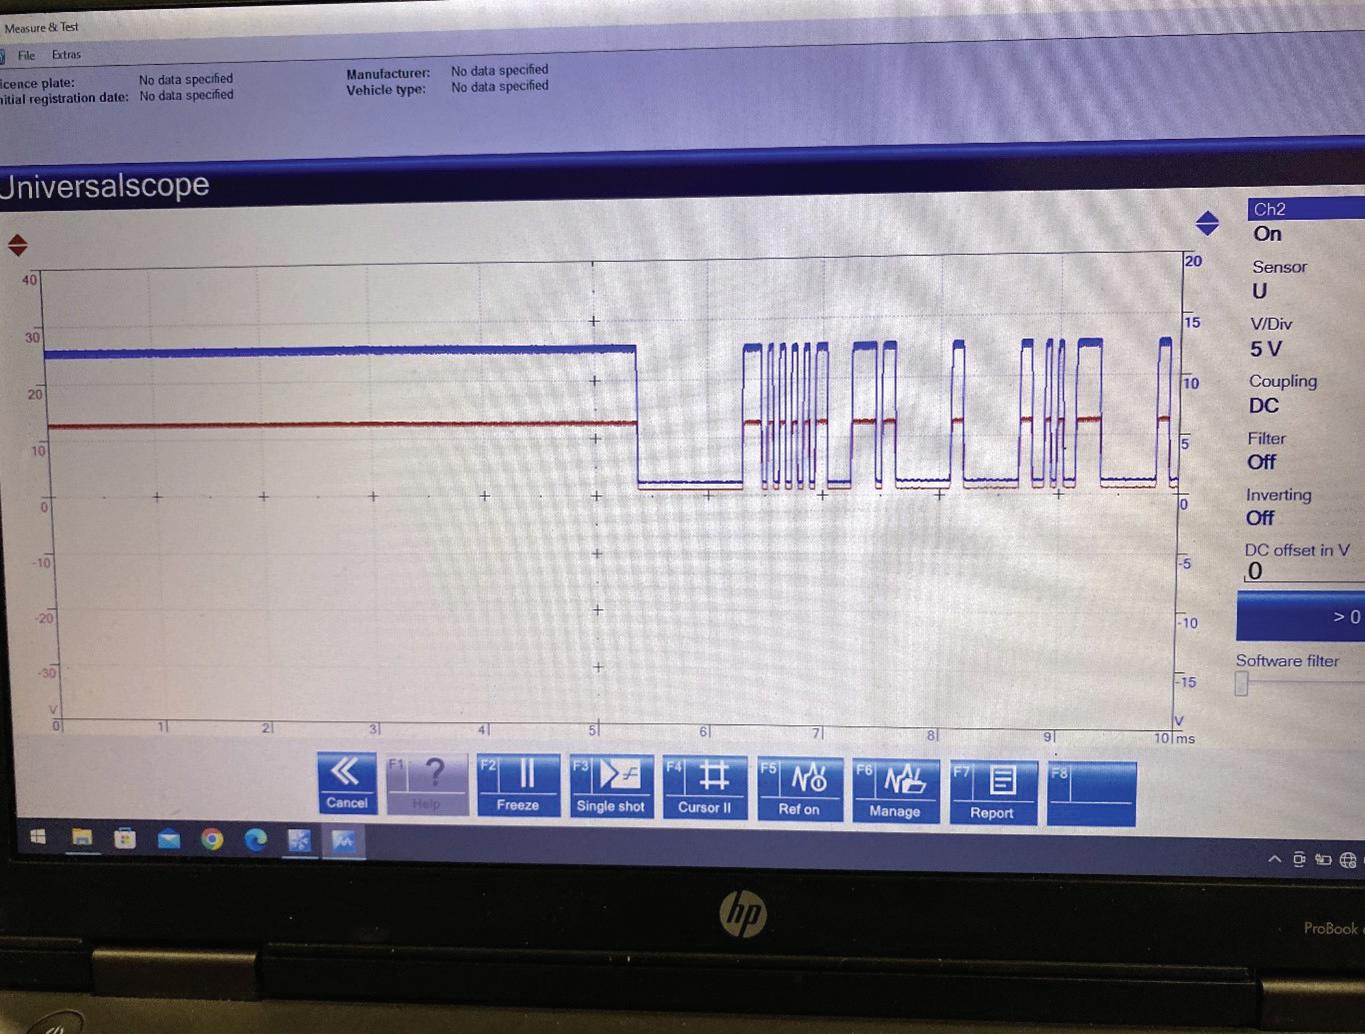
With an obvious issue in the LIN line, I decided to use the scope to see the signal, or lack thereof. Hooking up the AVL Di-Test 2 channel scope revealed a nice LIN signal on the left working headlamp (the red trace shown in Fig.4) and, as suspected, dominant battery voltage with no signal on the right headlamp shown here as the blue trace.
The solution
The issue of deciding whether the issue was with the wire, headlamp control unit or the headlamp electronics itself was straightforward. The headlamp LIN was disconnected from the left headlamp and the pin output from the headlamp control unit was similarly disconnected. A straightforward measurement with the power probe maestro was taken that showed that the voltage on a disconnected wire was above 12 V. Continuity testing to 12 V with the fluke would achieve the same results.
All that remained was to run a temporary wire from the removed wire receptacle of the headlamp control unit to the disconnected headlamp module LIN connector. The result was immediate: the headlamp lit up and the swivel function of the adaptive lights moved when the steering wheel was rotated.
All that remained was to make the bypassed wiring harness good, cap off the dead wire, adjust the headlamps, erase the fault codes and carry out a function test. I would have liked to have been given permission to strip the harness and find the exact break or chafe but this would have cost a lot more and not everyone has the money to pay for extra time. Customer perception can be a difficult thing to overcome and we must do our best to do the job the way that we all would like to do where possible, customer permission willing.

16 MAY 2023 PMM WANT TO KNOW MORE? FOR MORE INFORMATION WWW.RDR.LINK/AAX002
Figure 5: LIN disconnected from headlamp control module. a short to 12v was confirmed
READ ME TO COLLECT YOUR CPD POINT CPDZONE
Figure 6: Restored LIN function between headlamp control module and headlamp module (SMC)

PMM THE PODCAST


WHAT DO CHANGING A BATTERY, CHANGING A BABY (JUST THE NAPPY) AND CHANGING YOUR MORNING RADIO STATION ALL HAVE IN COMMON?
THEY OFFER THE PERFECT OPPORTUNITY TO LISTEN TO THE PROFESSIONAL MOTOR MECHANIC PODCAST WITH KIERAN NEE.


HEAR ADVICE ON PRICING JOBS, MANAGING PARTS SUPPLY, ELECTRIFICATION, RECRUITMENT AND MUCH MORE.


Listen on Google Podcasts Listen on Apple Podcasts Listen on Amazon Podcasts Listen on Spotify Podcasts LISTEN NOW ON YOUR PODCAST PLATFORM OF CHOICE
HOW TO

Replace the clutch on a Ford Transit II
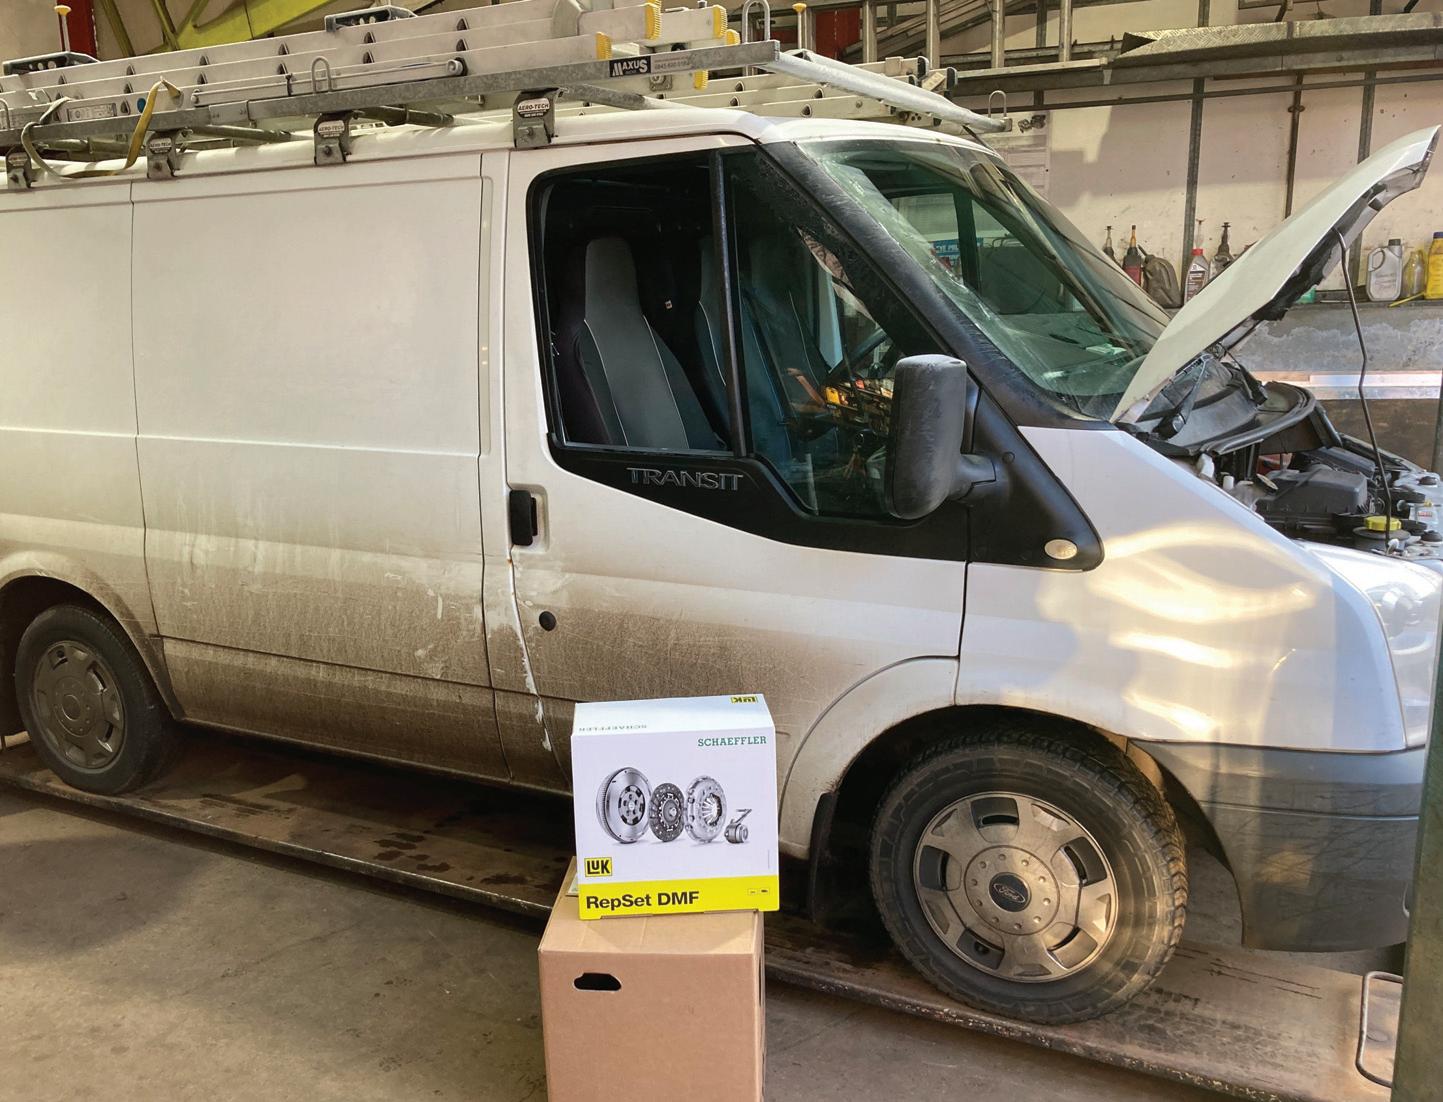
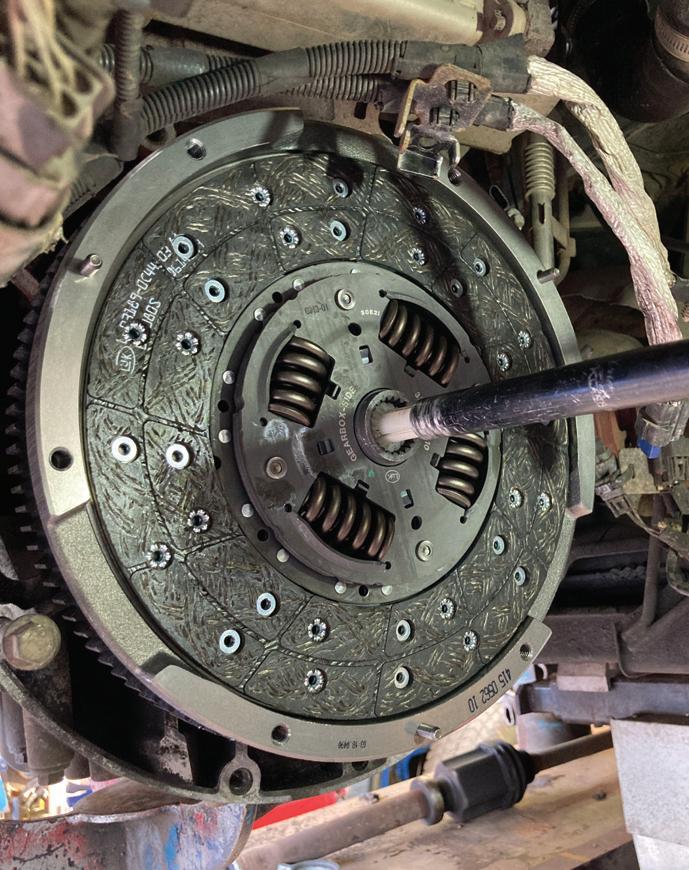
In this month’s Schaeffler LuK Clutch Clinic, REPXPERT Alistair Mason is focusing on best practice clutch replacement to ensure an efficient and quality repair, using a front wheel drive 2012 Ford Transit fitted with a 2.2 TDCi engine that has covered more than 113,000 miles.
Vehicle Information
Manufacturer: Ford
Model: Transit
Year: 2012
Engine: 2.2 TDCi
Mileage: 113,000
Noticeably, there are more vans on the roads these days as delivery businesses are booming, mainly down to online purchasing increasing customer demands, as well as tradesman that rely on their vans to transport essential equipment. So, the key to these repairs is to carry out a fast and efficient repair, whilst eliminating any repeat repairs that will cause more downtime of the vehicle.
The vehicle in question was diagnosed with a worn clutch due to slight ‘clutch slip’ and the customer was also advised that it would be good practice to replace the dual mass flywheel (DMF), as the vehicle had covered more than 113,000 miles and usually transported heavy loads.
A Schaeffler LuK RepSet DMF kit was ordered for the vehicle, as this contains all components required to replace the clutch and DMF, and both are designed and manufactured to work together. It is therefore strongly recommended not to mix and match different brands in one system.
Prior to starting the repair, the QR code was scanned on the side of the box (Fig.1) using Schaeffler’s REPXPERT app, and the
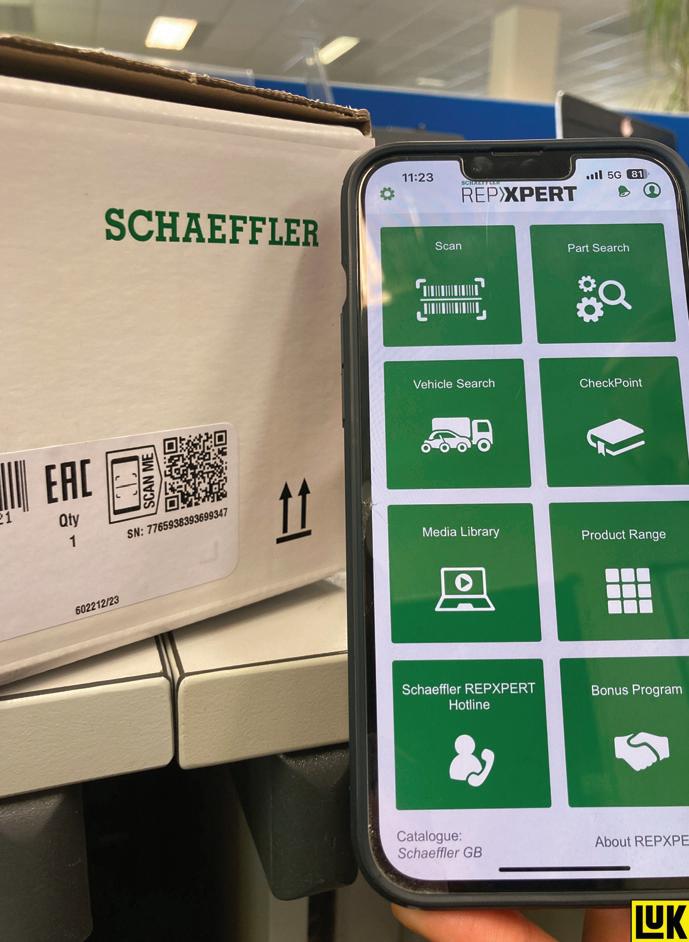
technical documents were checked to find any service information or bulletins that were critical to the repair. A 30 second scan for information could easily save hours should a service instruction be overlooked, for example. So, with all the parts and information available, repair instructions and torque values printed off, it’s time to carry out the repair.
The advised workshop equipment:
■ Vehicle lift, two post or wheel free is ideal
■ Transmission jack
■ Engine support
■ Self-adjusting clutch tool
■ Waste oil drain system
■ Clutch bleeding tool, a vacuum bleeder is recommended
PMM MAY 2023 19
CPDZONE READ ME TO REGISTER YOUR CPD POINTS
With the vehicle positioned on the lift, it’s best practice to connect a ‘back up’ battery to retain the radio code, then disconnect the negative battery lead located under the driver’s seat. Open the bonnet, remove the engine cover, air filter/box assembly (which will allow good access to remove the gear cables), upper section of the gearbox mounting, electrical multiplugs and upper bell housing bolts. Then, clamp the flexible section of the hydraulic clutch pipe and disconnect the pipe from the concentric slave cylinder (CSC).
With the vehicle still placed on the ground, slacken both front hub nuts, raise the lift to access the underside, drain the gearbox oil and, whilst the oil is draining, remove both front wheels. Release both bottom ball joints, remove the hub nuts, release the O/S driveshaft support bearing, remove the outer CV joints from the hubs and then both front driveshafts.
Removal

Remove the lower gearbox mounting, starter motor, electrical multiplugs and bell housing bolts, but leave two easily accessible to support the gearbox until the gearbox is ready to be removed.
Lower the lift and support the engine with an engine brace and remove the gearbox mounting, then lower the engine slightly on the engine brace as this will aid gearbox removal. Raise the vehicle lift to access the underside, support the gearbox with a
transmission jack, remove the final two bell housing bolts and ease the gearbox away from the engine. When the gearbox input shaft is clear of the clutch, lower the transmission jack and remove the gearbox from the vehicle.
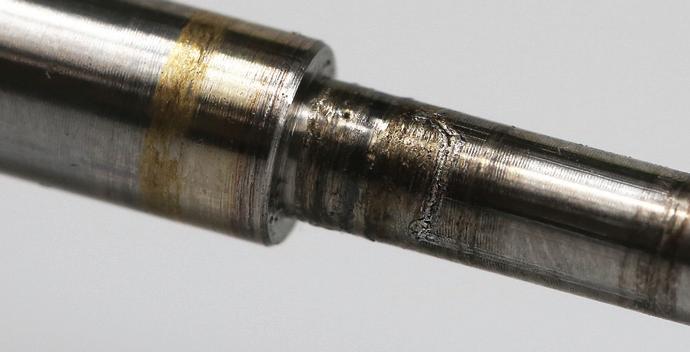
With the gearbox removed, a good indication of whether the clutch is at the end of its service life is if the three small, yellow adjusting springs have extended (Fig.2).
which are available on REPXPERT. With the flywheel removed, check the back of the engine for any oil or coolant leaks, rectify as required and then clean the back of the engine with clutch and brake dust cleaner.
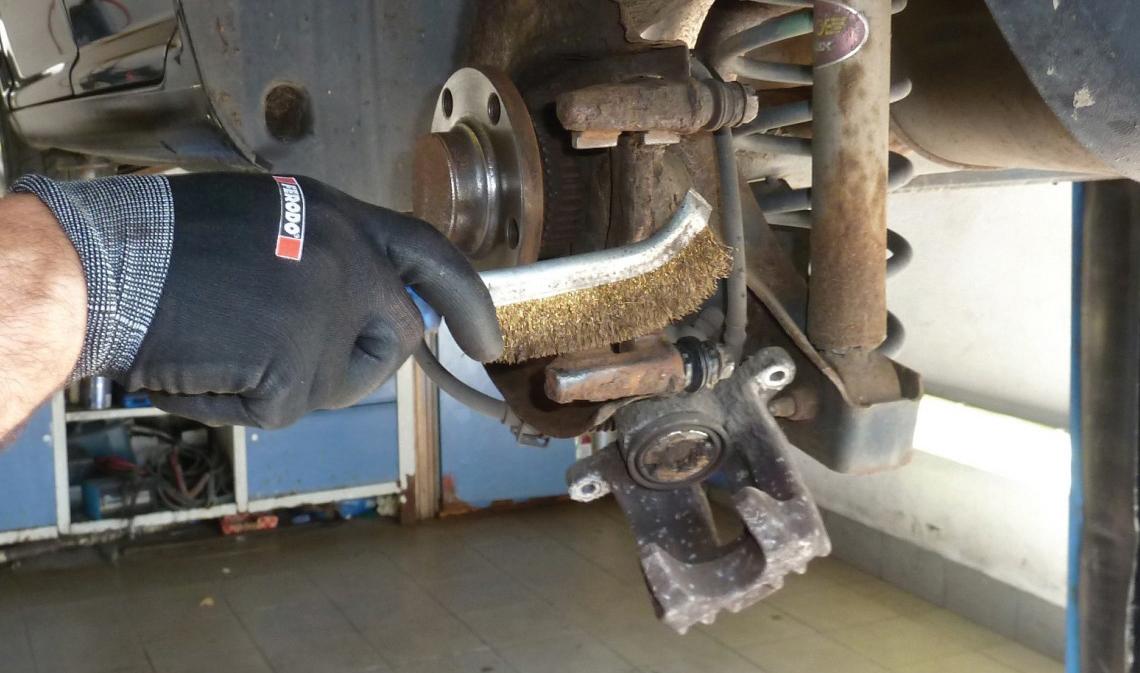
Turning attention to the gearbox and the release system, remove the CSC, check the gearbox for any leaks and rectify if required. Clean the bell housing and input shaft area to prevent the old clutch dust from contaminating the new clutch and DMF.
Replacing the CSC
The CSC must always be replaced when replacing a clutch as the guide tube can become dirty, corroded and pitted and therefore damage the hydraulic seal when removing the gearbox.
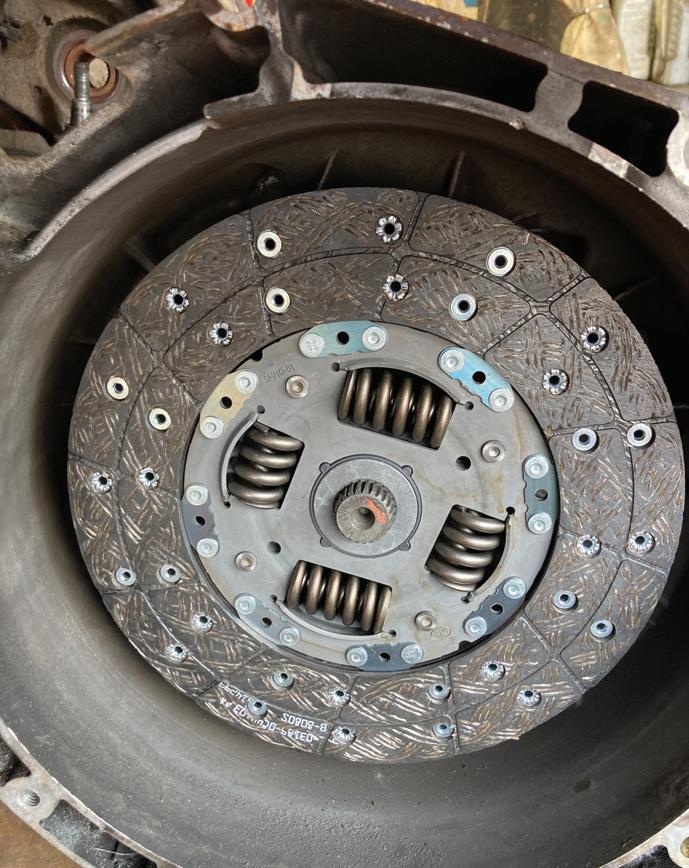
Remove the six clutch assembly bolts, ease the clutch cover off the dowels and then remove the clutch assembly, noting which way round the clutch plate is as it is useful to refer back to.
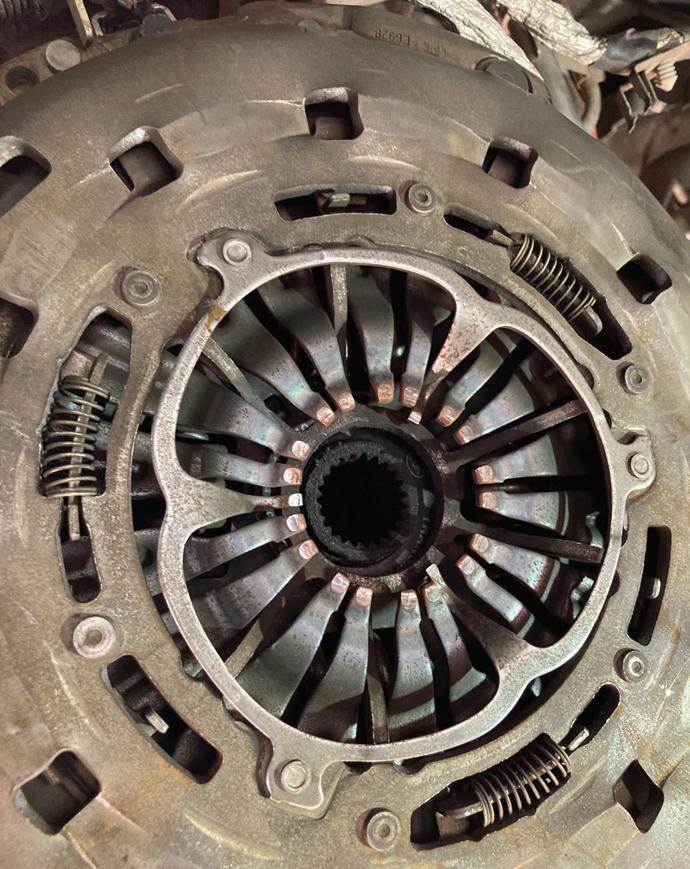
Remove the DMF by detaching the eight flywheel bolts. In this case, slight ‘blueing’ was noticed on the flywheel surface, which would indicate the heat generated with clutch slip and was another good reason to replace the DMF, as this heat will affect the internal grease and arc springs and compromise the DMF’s performance. If required, the DMF can be tested for rotational free play and rock, full instructions and specifications for
Remembering to never squeeze the new CSC, as this can cause damage to the new unit, fit the new CSC supplied with the RepSet DMF kit, but ensure the seating area for the CSC is clean. Then mount the CSC squarely and ensure that all the bolts are tightened correctly.
Now apply a light smear of high melting point grease to the gearbox input shaft and mount the new clutch plate onto the input shaft (Fig.3). This will ensure that the clutch plate is the correct fitment and also evenly distribute the grease, then remove the clutch plate and wipe off any excess grease.
Going back to the clutch and DMF, ensuring that it is located correctly, mount the
20 MAY 2023 PMM
READ ME TO COLLECT YOUR CPD POINT CPDZONE
“When fitting a selfadjusting clutch, it is strongly recommended to use a self-adjusting clutch mounting tool.”
REPXPERT. Make sure the DMF face is clean and grease free using clutch and brake dust cleaner.
When fitting a self-adjusting clutch, it is strongly recommended to use a self-adjusting clutch mounting tool, as otherwise there is a risk that the clutch could adjust, the cover twist or even strip threads in the new DMF.
So, using the self-adjusting clutch tool, mount the clutch plate in position using the clutch alignment tool (Fig.4) ensuring the plate is facing the correct way (gearbox side facing away from the engine). Clean and degrease the clutch pressure plate, mount the clutch pressure plate onto the dowels of the flywheel, fit the self-adjusting clutch tool (Fig.5) and then ease the clutch pressure plate into position. Insert half of the clutch bolts and ‘nip up’, then remove the tool, insert the remaining bolts and torque to the manufacturer’s torque value.
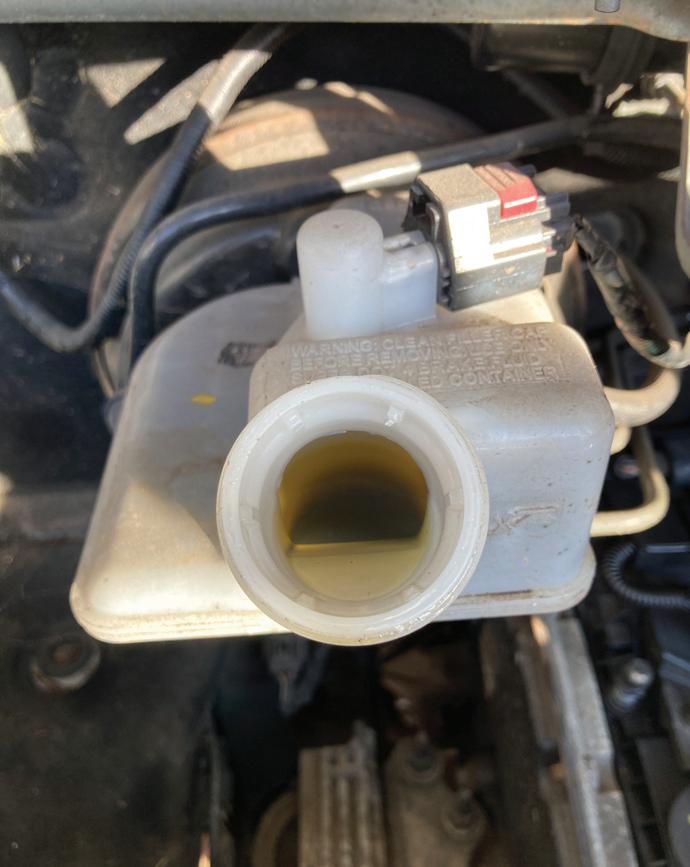
Drain, flush, replace
Before refitting the gearbox, an important part of the job that often gets overlooked, is to drain, flush and replace the clutch fluid. This is because the fluid is usually old, brown in colour and is contaminated with moisture (Fig.6). This in turn, will contaminate the new CSC seal and potentially cause a failure a short time after the repair.
specification of new fluid, allow that to flush through the system, re-clamp the hydraulic clutch pipe, and refill the reservoir.
Finally, ensure the gearbox to engine alignment dowels are installed correctly (Fig.8) and all cables etc are clear of the bell housing area, so that they don’t get trapped as the gearbox is being installed.
Using the transmission jack, ease the gearbox into position, taking time to confirm the alignment is correct, and once the gearbox is mounted onto the alignment dowels, insert and tighten the accessible bell housing bolts.

clutch pedal in a steady manner, and always allow the system to stabilise before pressing the pedal again, as this can easily over pressurise the system and damage the new CSC.
After connecting the battery, reset all relevant electrical systems where required, and carry out a full road test to confirm a quality repair has been completed.
WWW.RDR.LINK/AAX003

PMM MAY 2023 21
TO KNOW MORE? FOR MORE INFORMATION
WANT
HOW TO
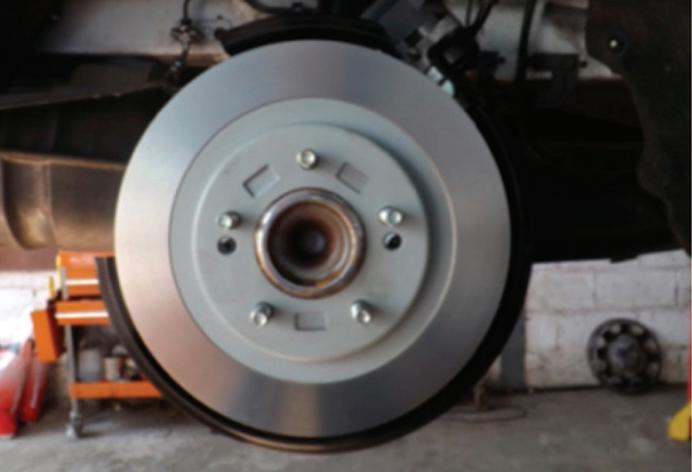
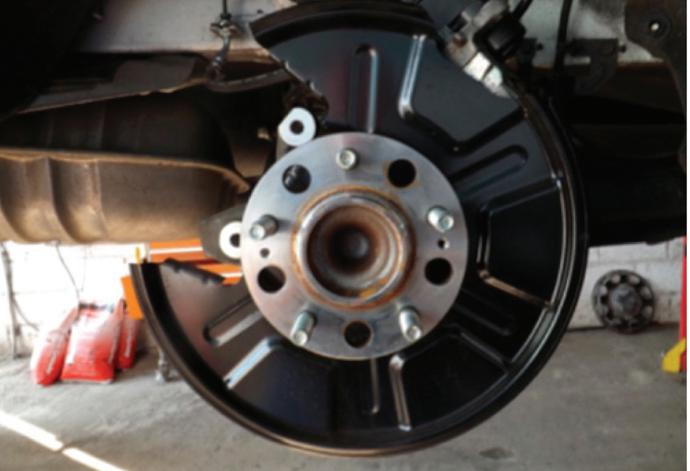
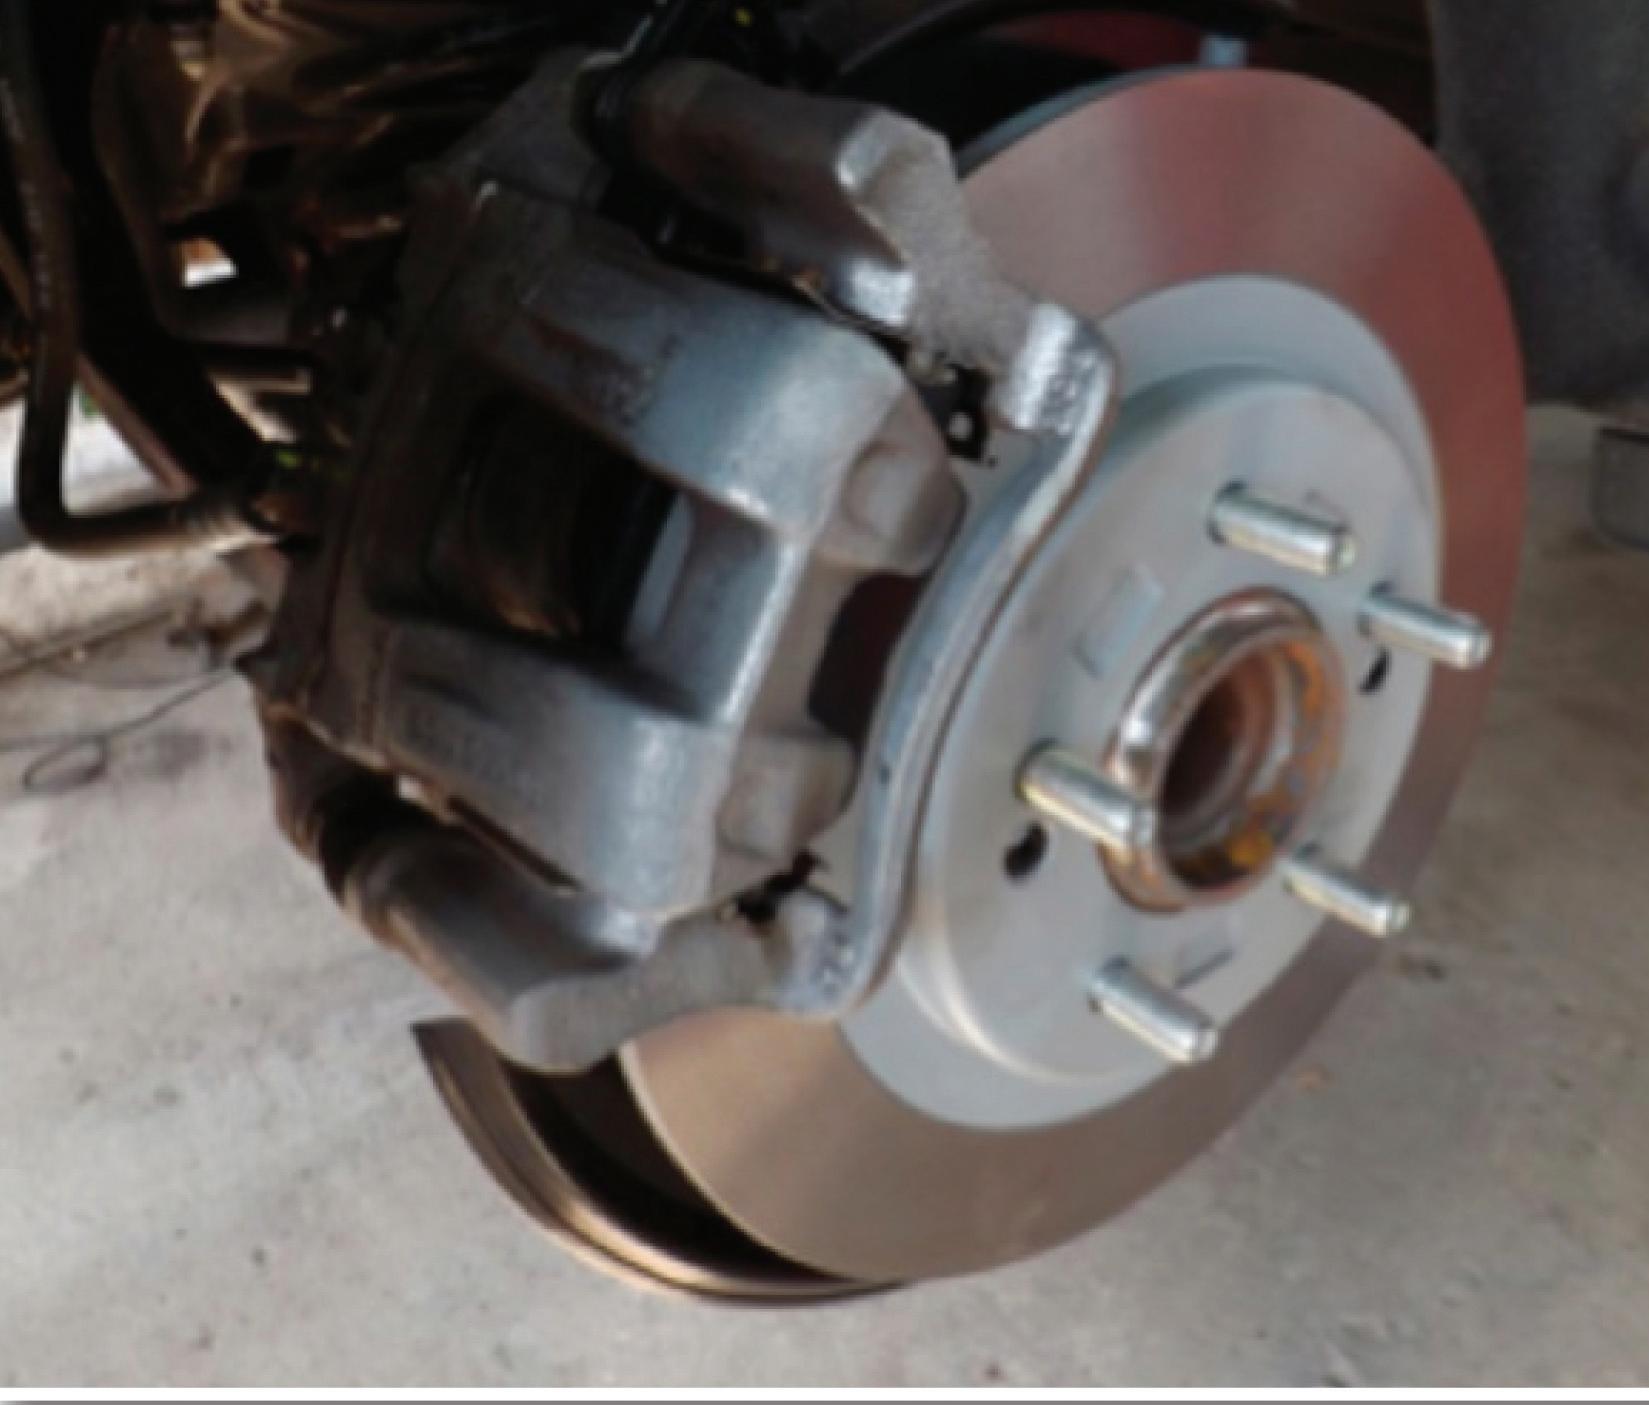
Change the rear brake pads on a Hyundai i40


Blue Print guides readers of PMM through the replacement process for the rear brake pads on the Hyundai i40.
The Hyundai i40 saloon and tourer estate cars were designed specifically for the European market and, with its keen pricing, good looks, great quality and spot on selection of engines and trim levels, aimed to take on the Ford Mondeo at its own game. The i40 uses an electromechanical parking brake system similar to other manufacturers such as Volkswagen, Renault, Volvo, Ford and BMW. The following procedure is for changing rear brake pads and discs:
With the vehicle raised, remove the rear wheels and check the condition of the brake hoses, parking brake motor cable and connections, and the rear brake pads and discs. The minimum disc thickness is 8.4 mm and the minimum rear brake pad thickness is 2.0 mm.
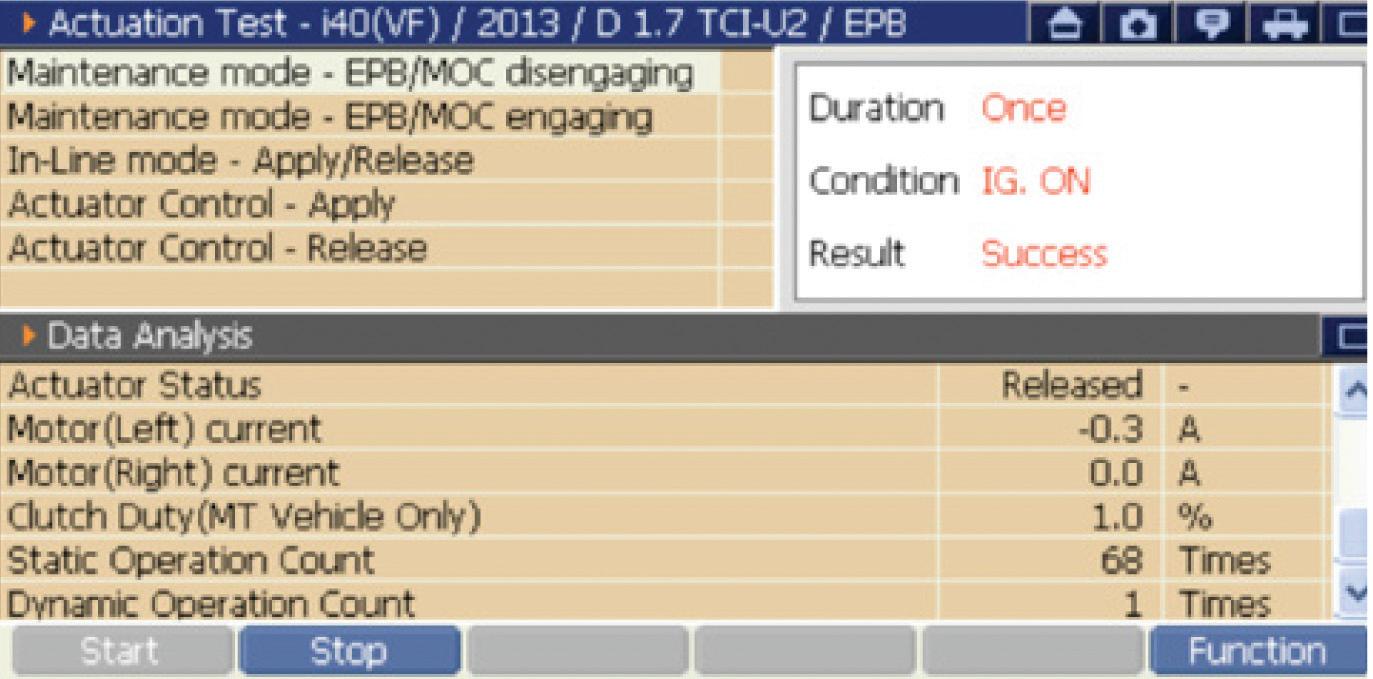
Carry out a braking system health check with regards to fluid level and condition, leaks, and check the operation of the parking and foot brakes. Note: It is advisable to connect a battery support unit as the parking brake motors draw a lot of current (approximately 14-20 amps) when in use With the ignition on, plug a diagnostic tool into the 16 pin diagnostic socket and check for fault codes in the EPB and ABS systems.
Perform
PMM MAY 2023 23
3 1 CPDZONE READ ME TO REGISTER YOUR CPD POINTS
the EPB motor wind back procedure using a suitable diagnostic tool.
2
4
Remove the two 12mm headed bolts on the brake caliper and remove the caliper carefully putting it to one side, without putting excessive stress on the brake hose and motor wiring.
There is no need to wind back the piston; it can just be pushed back
5 8
6 7 9 10
Remove the old rear brake pads and retaining plates.
In order to remove the caliper carrier (A), first remove a suspension link bolt (B). This will enable you to remove the two caliper carrier bolts (C).
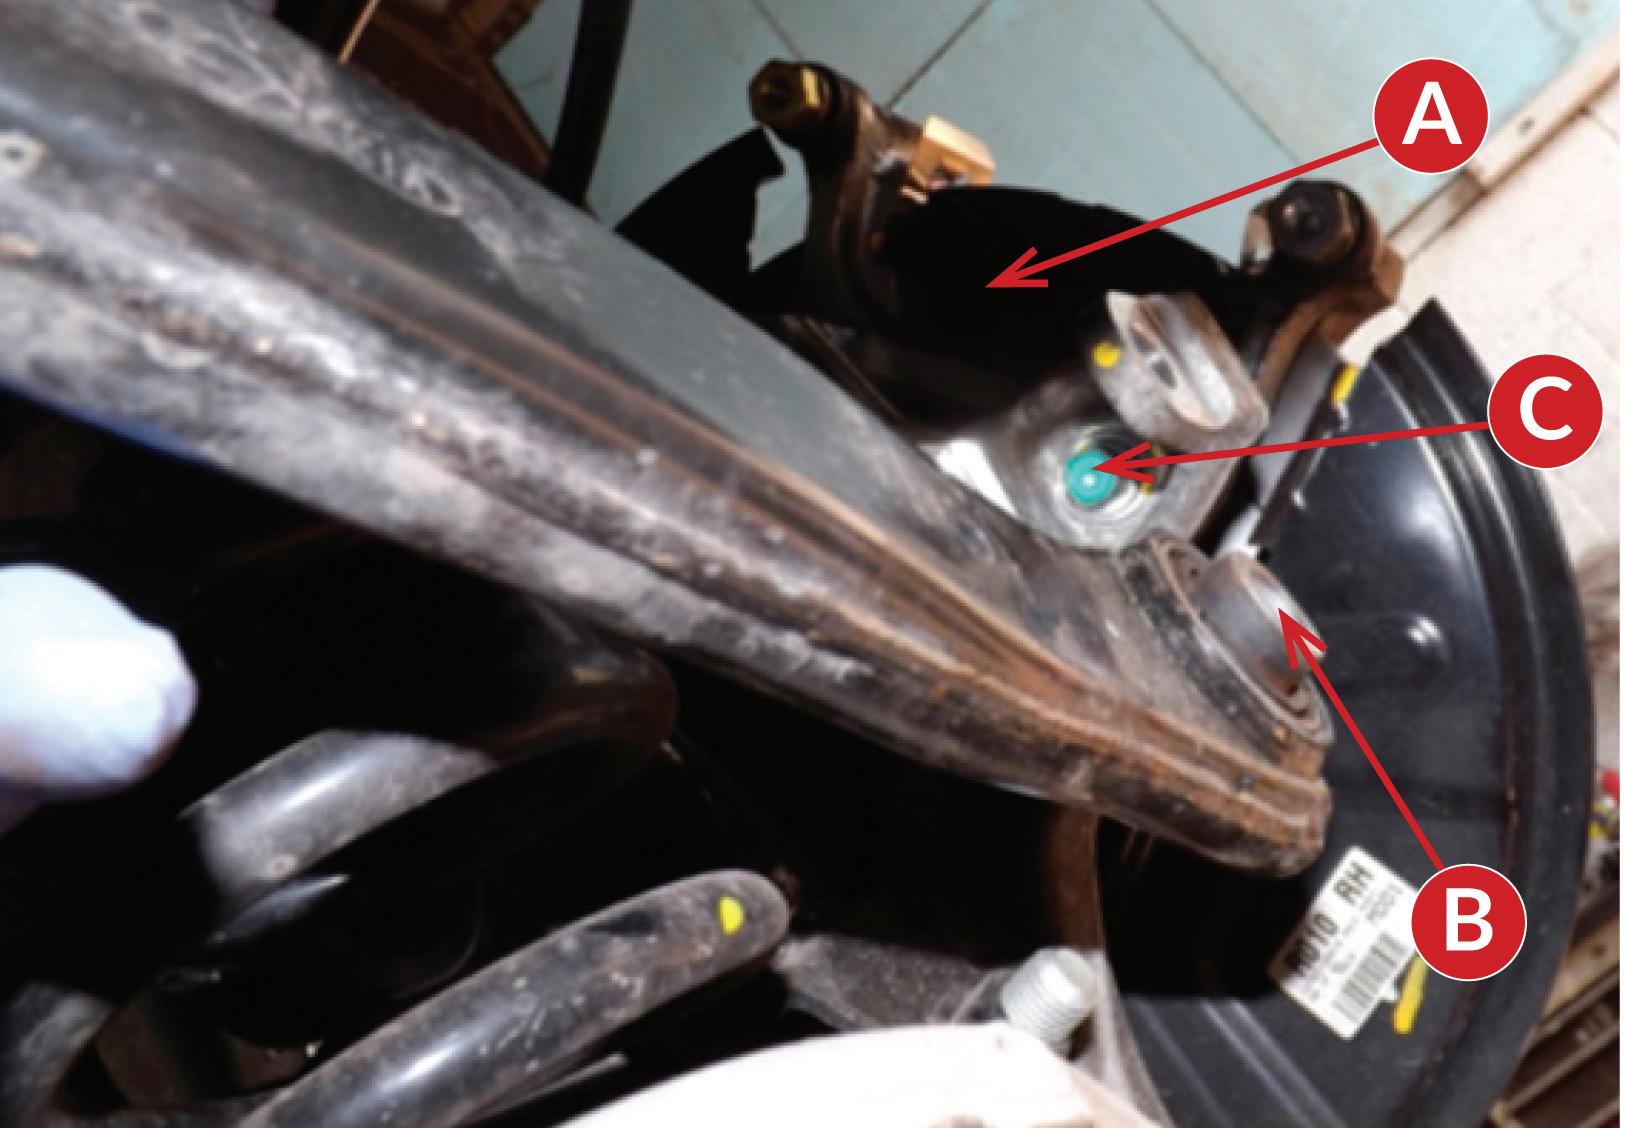
Remove the rear brake disc retaining screws and then the old brake disc. Clean the mating surfaces and degrease (where necessary) the new brake disc before fitting.
Refit the caliper carrier bolts, the suspension link bolt, and then fit the new brake pads and retaining plates – once this is done refit the brake caliper.
Finally, rewind the EPB motors and check the operation of the parking and foot brakes, which includes checking for fluid leaks. Then recheck for fault codes in the EPB and ABS systems, refit the wheels and torque wheel nuts to 88-108 Nm and road test.
WANT TO KNOW MORE? FOR MORE INFORMATION
WWW.RDR.LINK/AAX004
24 MAY 2023 PMM
READ ME TO COLLECT YOUR CPD POINT CPDZONE

COMMON FAULTS
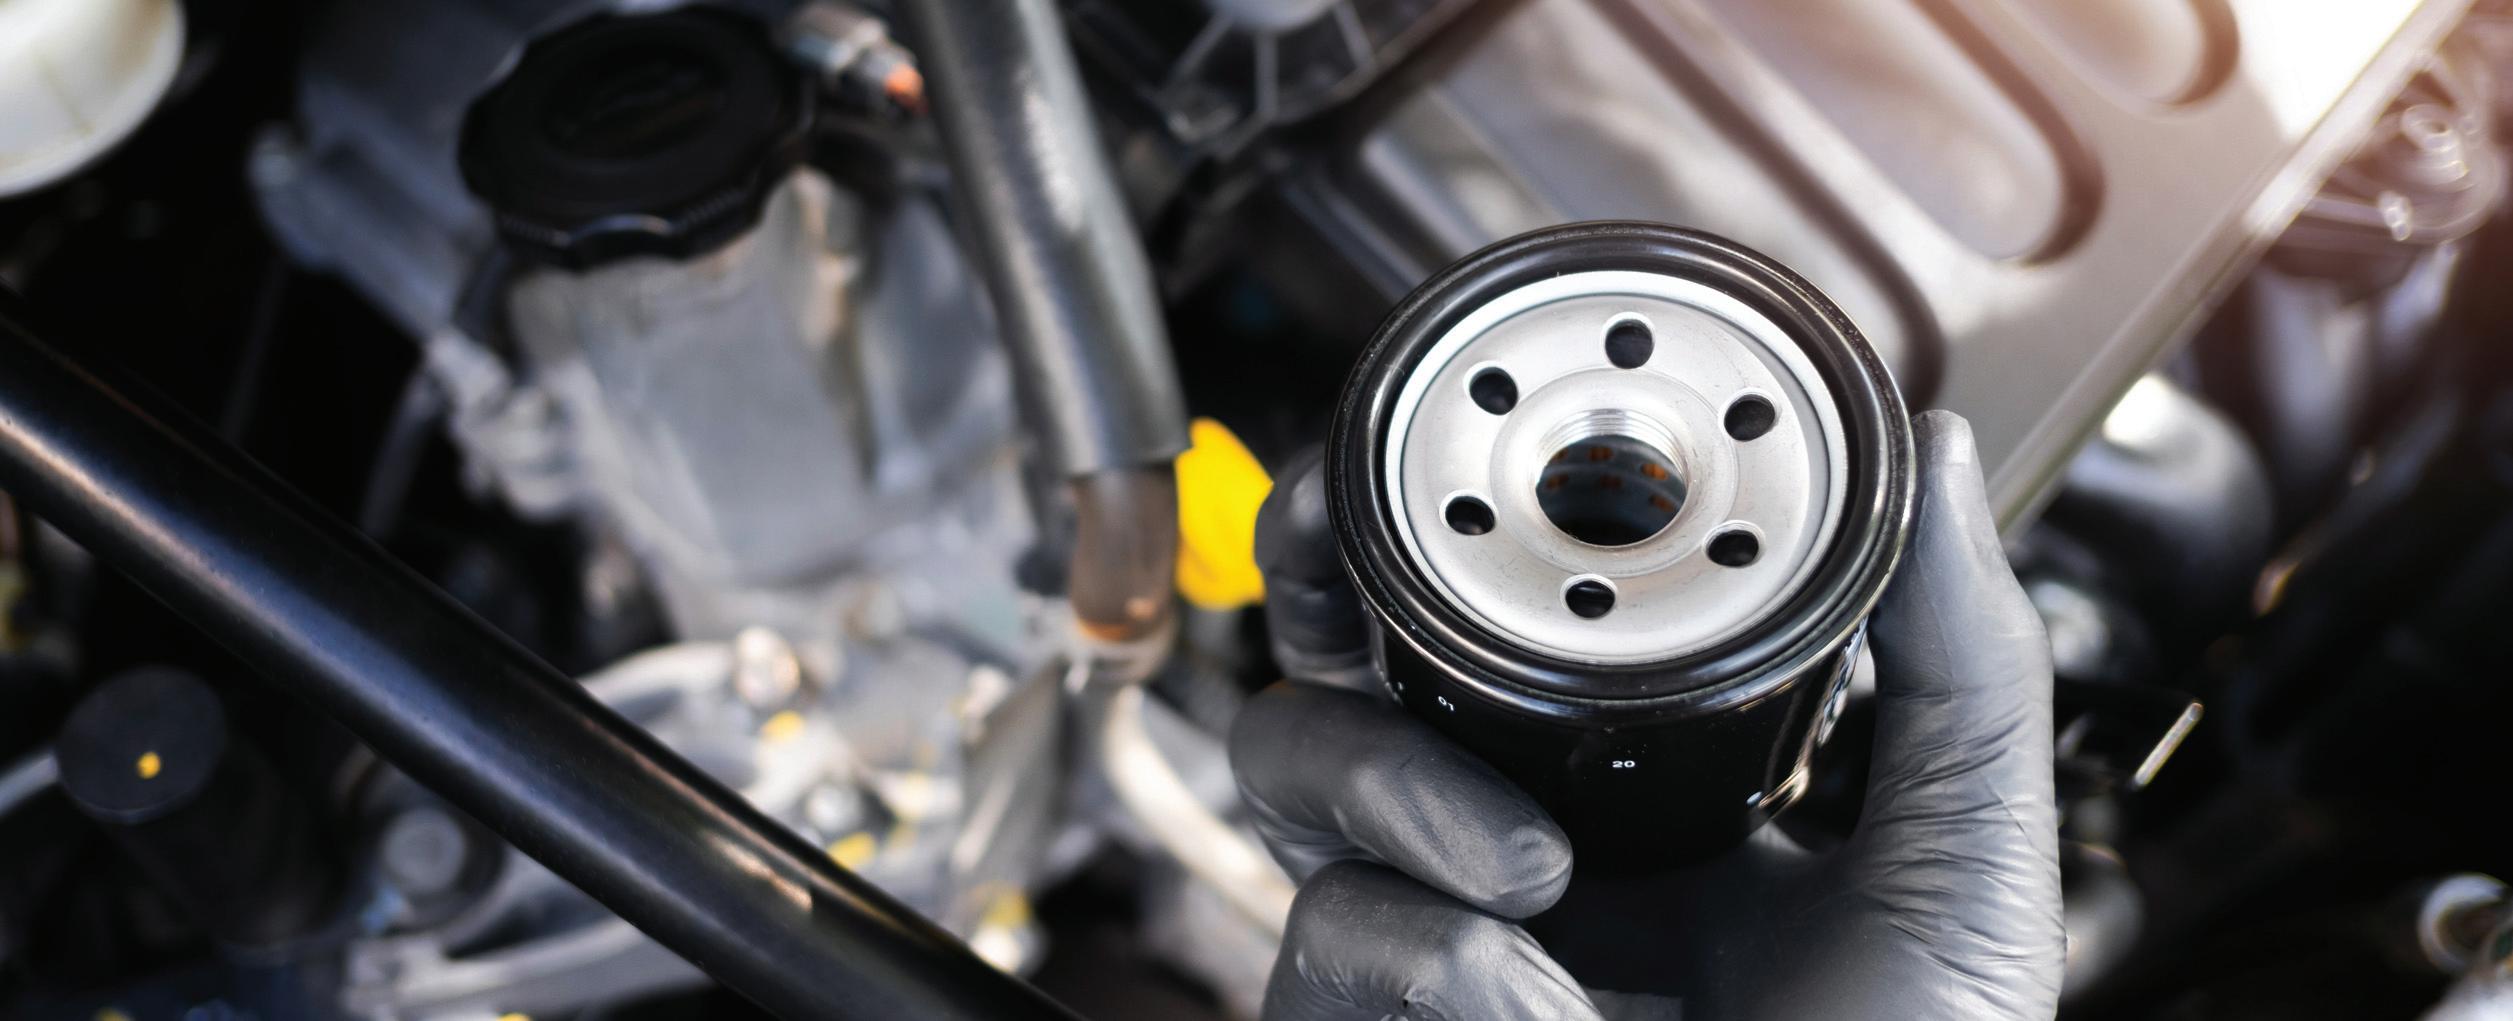
Oil Starvation and Turbos
Despite the issue being well documented, oil starvation continues to be at the heart of remanufacturer Carwood’s no-fault-found warranty returns. Like any turbo failure, it’s important to determine why it failed, and fix it, before a new one is fitted. Otherwise, the replacement unit will fail too.
What is oil starvation?
With modern vehicles demanding the power output of larger engines, but with the economy of smaller ones, today’s turbochargers operate at over 300,000 revs per minute and close on a 1,000°C temperatures. This puts a huge strain on the engine oil, the turbo’s lifeblood. So, if its supply is restricted, even momentarily, it can cause catastrophic damage to the bearing systems, destroying a turbo within a matter of seconds, and in severe cases, the engine.
What causes oil starvation?
Insufficient oil can be caused by many factors, including:
■ Low oil levels.
■ Incorrect grade or degraded, high-mileage, contaminated oil.
■ Short frequent journeys or repeated hot engine shutdowns causing carbon build up – this can block oil galleries.
■ Hard acceleration from cold starts not allowing sufficient oil to circulate.
■ Carbon deposits or other contaminants in the oil supply lines.
■ A bent or kinked oil feed or pipe.
■ A damaged, clogged or poor-quality oil filter.
■ Failure to prime the replacement turbo with oil during installation and before start-up.
■ Engine left idle for sustained periods, particularly in colder weather.
■ Incorrect or worn oil gaskets.
What are the signs of oil starvation?
There are a number of tale-tale signs, some more obvious than others:
■ Oil warning light illuminated.
■ Reduced fuel economy.
■ Poor engine performance – unable to achieve full boost pressure.
■ Engine overheating from increased metalto-metal contact.
■ Different or excessive noise from turbo.
■ Black exhaust smoke.
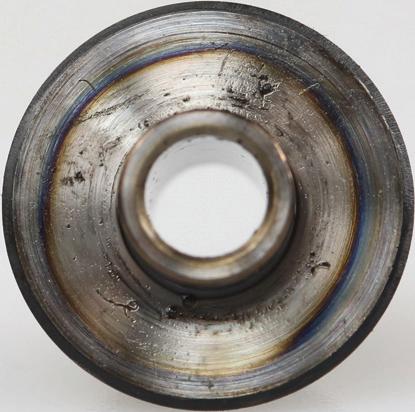
■ Blue discolouration of the shaft journal surface as a result of increased friction and heat.
■ Wear to the inside of the journal bearings causing the shaft to become out of balance – as result the wheels may contact and rub against their housing bores.
■ Broken/snapped shaft due to prolonged excessive temperatures.
■ Loose or missing compressor wheel nut following shaft seizure.
■ Excessive wear to the thrust bearing due to friction between bearing and collar.
Blue discolouration of shaft and bearing fused onto shaft due to excessive heat and friction
■ Discolouration of and scoring to the thrust collar due to excessive heat and friction.
■ Transfer of bearing material onto the shaft.
How to resolve oil starvation?
If oil starvation is diagnosed, perform the following remedial actions:
■ Check and clean the entire oil supply system – this may require the removal of the sump, oil pump and internal oil feed lines. Replace components where required.
■ Fit new VM-spec filters, gaskets and oil supply pipes.
26 MAY 2023 PMM
READ ME TO COLLECT YOUR CPD POINT CPDZONE
Transfer of bearing material onto shaft
■ Flush and change the engine oil with the correct grade and quantity recommended.
■ Conduct an oil pressure test to identify any issues and check it’s supplying full pressure.
How to prevent oil starvation?
By adopting some simple, best-practice measures in your work, the risk of oil starvation can be minimised in the first place:
■ Check that the entire air induction system is clean and object free, especially in high-mileage vehicles.
■ Inspect all pipework for signs of wear and tear – clean and/or replace as necessary.
■ Always fit new oil feed and return pipes when replacing a turbo.
■ Never bend or use excessive force when fitting a new feed or return pipe, and
torque tighten at both ends, as per VM guidelines, to prevent leaks.
■ Ensure that the oil is at the optimum level –too little can starve the turbo of oil, but too much can cause a build-up within the bearing housing.
■ Always use fresh oil and new OE-quality oil and air filters, as specified by the vehicle or engine manufacturer.
■ Only ever use new, OE-quality gaskets, seals and fitting kits.
■ Prime the replacement turbo with the correct grade oil before fitting.
■ When starting a vehicle for the first time after fitting a turbo, crank the engine in one second bursts, at least 10 times, or if practical, for 10 seconds continuously, without starting. This will lubricate the bearings and shaft at a low enough rpm to prevent seizure or damage.
■ Once started, allow the engine to idle at tick over for a few minutes before revving or accelerating to enable full oil pressure
build-up which will eliminate any air or hydraulic locks.
■ Never use using silicone on oil gaskets –it can easily become detached and block oil passages.
For a right first time service, and fewer comebacks, always diagnose and fix what caused the original unit to fail – or you risk the replacement turbo failing too! Whilst this may add additional expense to customer’s bill, it is far more cost and time-effective in the long run, for you and the vehicle owner.
WANT TO KNOW MORE? FOR MORE INFORMATION WWW.RDR.LINK/AAX005 Thrust collar discolouration and scoring due to heat and friction
Scoring and wear to thrust bearing
EQUIPOTENTIALEVBONDING


Last month, I described equipotential bonding as the process of connecting metalwork and conductive parts so that the voltage is the same throughout both. EPB is used to reduce the risk of damage and injury. This time we will look at how the tests are carried out.

Checking that the EPB is meeting regulations, is something that could become more common as more high voltage vehicles hit our workshops. It could also be a new income stream.

The EPB testing equipment shown as Fig.1, is computer-based so generates a results which are saved after each measurement. These results are dated and linked to the vehicle and technician, as proof that tests have been carried out by a specified person using calibrated equipment, at a specific date and time.
In principle the EPB test is simple, a known current (up to 1 A as per ECE R100 regulations) is made to flow and the voltage is measured. Resistance (R) is then calculated using the current flowing (I) and the measured voltage (V) using the formula: R=V/I.
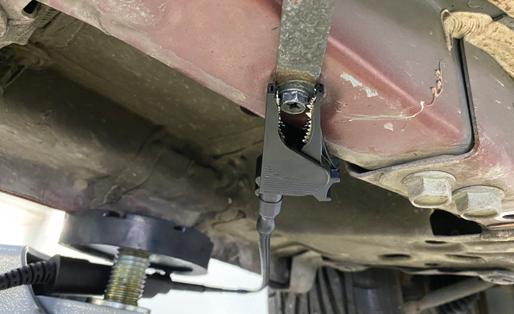
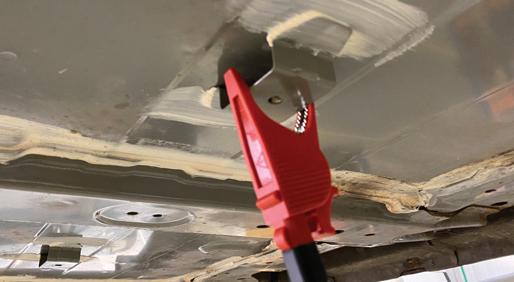
‘Kelvin leads’ can be used, so the voltage at the test points is measured using a separate circuit to the one where the current is flowing. The special crocodile clip

(Fig.2) has each jaw insulated from the other. The clip is therefore attached to a twin core insulated cable.


My colleague Eliot Smith ( WWW.RDR.LINK/AAX006) and I tested the AVL DiTEST HV Safety 2000 on a Nissan Leaf. To even see the battery pack on a Nissan Leaf, a large protective cover has to be removed – not difficult but it does take time. The pack is painted and, as this is an older car, it was also a little corroded and dirty. We connected one lead after scratching a small amount of paint off (which was replaced!). In this way the connection is definitely to the actual pack rather than a bolt or strap.
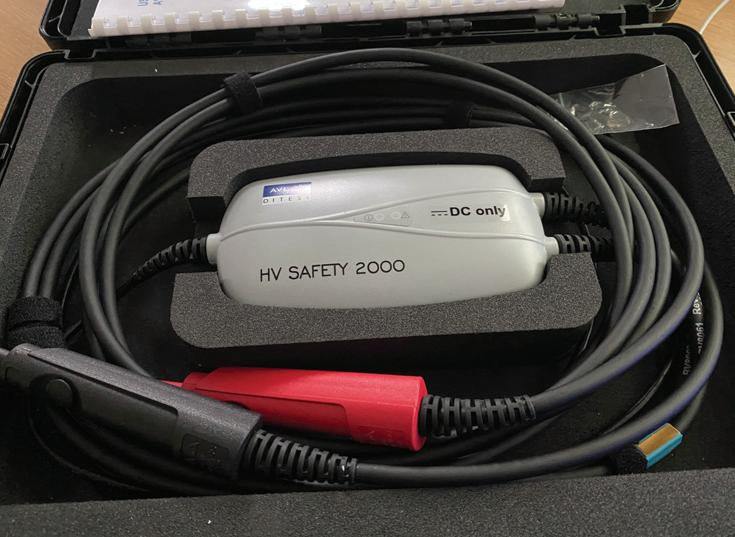
We cleaned a chassis bolt and made the other connection. In this way, if the result was as required (less than 100mΩ) it would prove a low resistance circuit between the battery case and the vehicle chassis. Our result was 5mΩ, so well within specifications.
Checking the EPB on the motor and other components was simpler because they were easier to access. One connection to the
chassis, and one to the body of the motor after the area was cleaned. We got a result of 8mΩ.
Using the specialised equipment ensured accurate tests and kept a record. However, it is possible to complete an EPB test using a battery and variable resistor, together with an accurate ammeter and millivoltmeter. Make a circuit that causes 1 A to flow through the item under test (battery case as above) to the chassis. Measure the volt drop and calculate the resistance.
Because of the time involved in removing covers or access panels, we felt it would not be appropriate to carry out a full set of tests after every repair. However, if asked to carry out safety tests after major accident damage or other repairs, then EPB checks will be essential. These tests may also become a requirement at some point.

PARTTWO Sponsored by
MORE INFORMATION GO TO WWW.RDR.LINK/ AAX007
FIG.1 AVL DiTEST HV Safety 2000 measures EPB resistance with a resolution of just 1 mΩ at up to 1 A,
FOR
FIG.2 Kelvin lead crocodile clip showing insulated connections
FIG.3 Kelvin probe connected to the battery pack
READ ME TO COLLECT YOUR CPD POINT
FIG.4 Chassis bolt connection
BEST PRACTICE
Repairing Ford 1.0L EcoBoost “Fox” Engines
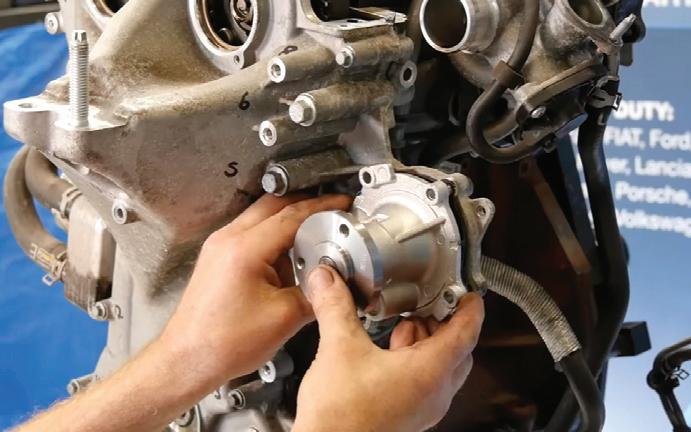
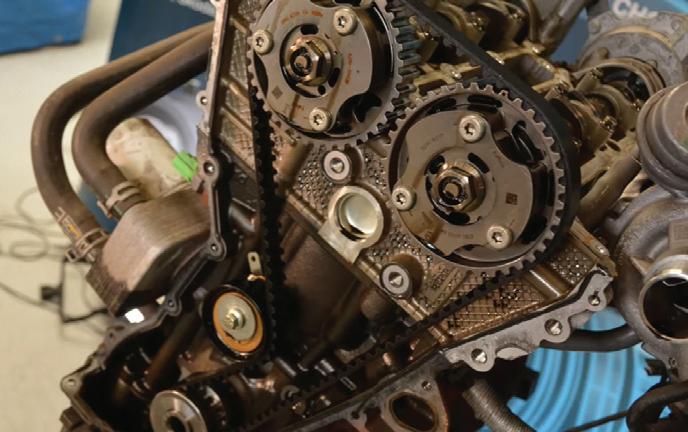
Belt manufacturer Dayco addresses some of the wider issues of the timing belt replacement on Ford’s 1.0 litre EcoBoost “Fox” engines.

Although with the correct locking tools, the belt and tensioner replacement and timing reset on this engine are not particularly complicated in themselves, several associated steps need to be understood and applied correctly, to ensure a full and thorough repair.
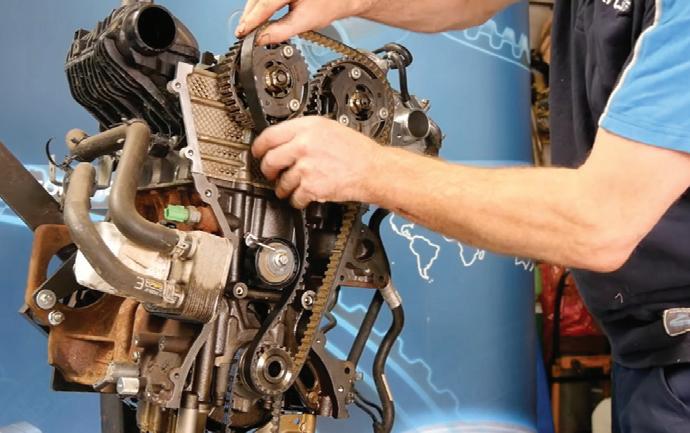
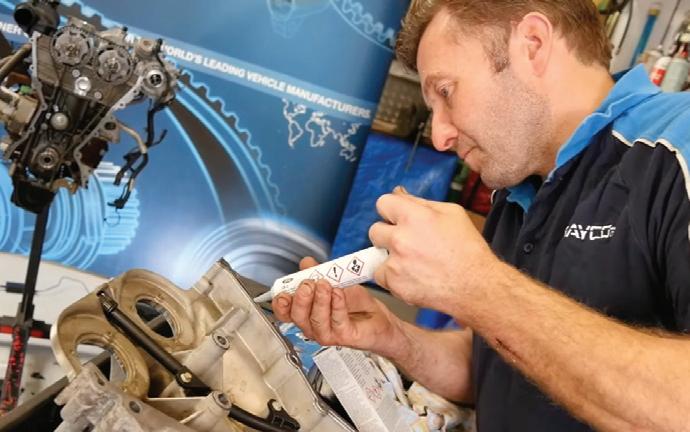
This begins with the sealant that must be used on the timing belt cover and the sump, to ensure there is no leakage when the engine is refitted and refilled with oil. It is strongly recommended that this is sourced through a Ford dealer, as its specification is crucial. As it only has a 10 minute window before it starts to become hard and unmanageable, it’s important for technicians to have all the tools and the cover bolts laid out and ready before applying the sealant. However, further preparation is necessary before the application stage.
Getting started
First, it is advised to replace the crankshaft oil seal before refitting the timing belt cover, but easier to fit the new one once the cover is secured in place. Second, replacing the water pump is another best practice procedure and as two of the seven bolts that secure it are incorporated into the timing belt cover, it’s also an obvious thing to do.
As the pump comes in a Dayco timing belt and water pump kit (the KBIOWP020 or KBIOWP030 dependent on the engine variant), it’s also an easy option for workshops when ordering the parts. Proper installation of the water pump is equally important. So, cleaning the mating surfaces and flushing out the old coolant, as well as priming the new pump, must not be overlooked and, to seal correctly, it only needs the new gasket supplied with the kit –no sealant should be used.
To ensure that the sealant applied to the timing belt cover is in the correct quantity and on the right surfaces, and that the specified tightening sequence and torque values are followed, technicians must refer to a reputable source of service and repair data, such as that supplied by Autodata or HaynesPro. Likewise for the refitting of the sump.
Up next
Two crucial steps remain on this side of the timing belt installation, one is to fit a new friction washer, which is a part that was not fitted when the engine was originally built and only comes into play when a timing belt replacement is carried out. The second is using the correct torque value and process for tightening the replacement crankshaft pulley bolt.
Although fitting the friction washer is straightforward, providing the mating surfaces have been cleaned with brake and clutch dust remover, installing the new pulley bolt and applying the correct torque, without the pulley slipping, is less so.
The correct torque for the bolt is 300 Nm plus 90°, so a torque multiplier will need to be used for the final tightening, but before that value is applied, the bolt first needs to be tightened to 25 and then 75Nm. However, as there is not a keyway in the pulley/crankshaft, to prevent it from slipping during the tightening procedure, a locking tool (supplied with the timing locking kit) must be inserted through a hole in the pulley, into the matching hole in the timing belt cover.
PMM MAY 2023 29
WANT TO KNOW MORE? FOR MORE INFORMATION WWW.RDR.LINK/AAX008 CPDZONE READ ME TO REGISTER YOUR CPD POINTS
TROUBLESHOOTER
DPF warning light on a VAG vehicle
IVS 360 from Opus IVS is backed by over 100 OE-certified master technicians delivering live diagnostic repair guidance. Here, we follow the team as they diagnose a vehicle displaying a DPF warning light on the instrument panel cluster, along with the pre-glow warning light.
Symptoms:
1. DPF warning light on together with pre-glow warning light.
2. Loss of power.
3. Engine Management light on.
Fault Codes:
■ P2002 (8194) Particle filter bank 1 malfunction ECM - ECM
■ P242F (9263) Particle filter maximum load exceeded ECM - ECM
Cause:
■ High soot loading in the diesel particulate filter (DPF).
Repair step-by-step
Read the fault memory of engine ECM.
If no fault is logged, and only the DPF light is on, then the vehicle needs DPF regeneration.
a. The DPF light does not signify a fault with the vehicle but means that the vehicle has not managed to regenerate the DPF due to frequent short journeys, stop/start trips or insufficient exhaust gas flow.
b. To regenerate the DPF, change to a driving profile as described in the owner’s manual.
If a fault has been logged in the ECU: Action the fault, and carry out an emergency DPF regeneration
Inspect the intake and boost system for leaks (Including all the hoses and pipe work)
Read out the live data for the DPF pressure and temperatures with the ignition on and at idle, the engine must be above 80°C. DPF pressure should read:
■ Ignition on – 0 mbar +/- 1.5 mbar (If outside these specs, then the fault should be a defective pressure sensor or wiring defect)
■ Engine idling – 10 mbar +/- 5 mbar (Below would require checking the DPF is intact and over would suggest a partially blocked DPF)
Check if all the warning lights for DPF, preglow and engine management are on: If they are all on, these are the two reasons:
a. The soot loading is over 45mg. The vehicle is running in emergency operation.
b. The regeneration cut-off time of 4500 seconds has been exceeded.
c. The soot loading may not be above 45mg to carry out an emergency regeneration.
In either of the above cases, an emergency DPF regeneration would be required.
Note – The engine control module will not allow a regeneration if the soot loading is over 45mg. However, a professional clean and resetting the DPF learnt values may suffice.
Inspect other components in the exhaust system before you replace the DPF as it may not be necessary to do this.
Inspection of the following components would be required:
■ G450 - Exhaust gas pressure sensor
■ G506 / G448 - Temperature sensor before DPF
■ G507 / G235 - Temperature sensor before the turbocharger
■ G527 - Temperature sensor after the FPF
■ G70 - Air mass meter
■ G39 - Lambda probe
If you cannot find a fault with any of the above exhaust components rectify the DPF fault before you re-assess the soot loading of the DPF through the measuring groups.
REDEEM YOUR CPD CREDIT
Congratulations, you have reached the end of the CPD Zone! To access your CPD credit from The CPD Group, scan the QR Code below or WWW.RDR.LINK/AAX009


30 MAY 2023 PMM READ ME TO COLLECT YOUR CPD POINT CPDZONE
TRAINING for TESLAS
PMM’s Kieran Nee catches up with Delphi’s workshop solutions technical lead, Phil Mitchell to find out what the aftermarket company has got lined up to help technicians take on Tesla vehicles in their workshop.

It would be safe to say that the electrification of vehicles’ powertrains has galvanised the automotive industry in a way that hasn’t happened since the introduction of the diesel engine. All of a sudden, the cars we drive and how we drive them are regularly headline news and the source of heated debates between rent-a-gob pundits. There is a risk that this fast-paced (literally) technology will leave the repair sector behind if technicians don’t take it upon themselves to join training course and gain some accreditation.
To be fair, considering the speed with which the government is ordering a switch from ICE
vehicles to EVs, the aftermarket has done a commendable job of signing up for training on handling EVs. These courses, however, have mostly focussed on the health and safety aspect of working with EVs. What this training mostly provides workshops, is the ability to perform routine service and maintenance tasks in a safe manner with the battery successfully isolated. What most workshops have yet to tackle is anything to do with the battery or in-depth diagnostics on EVs. This is something that was emphasised in my recent chat with Delphi Technologies’ Phil Mitchell. Phil, now EMEA workshop solutions technical lead, will be familiar to
many readers for having provided Delphi training in the UK. He told me that there was a growing problem of specifically Tesla owners finding they were unable to get their vehicles repaired – or even serviced or having a tyre changed – by independent garages. Why might this be? Well, in Phil’s words, the aftermarket is “fairly scared of Tesla vehicles.” Phil contrasts Mr Musk’s vehiclecum-tech company with the legacy brands also active in the EV market, noting that when it comes to diagnosing Teslas with aftermarket tools, it’s difficult to know where to start.
Up until around a year and a half ago, Phil tells me, Tesla was a closed book when it
BUSINESS & TRAINING
came to releasing its data to the aftermarket. It was “excruciatingly expensive” to access its dealer tools, and there were no aftermarket diagnostics tools offering Tesla coverage. So, what has Delphi done to help the aftermarket with its Tesla dilemma? Phil explains: “We took a two-pronged attack. We are launching diagnostic software with Tesla capabilities and now, we are accompanying that with an e-training module on our Delphi Academy to guide technicians through some key
diagnostic processes for Teslas. The aim is to provide a full solution for workshops in order to enable them to work on Teslas.”
No aftermarket diagnostics tool will have as much capability as the dealer tool, so will the training academy’s online course focus simply on the tasks which the tool can complete? Not according to Phil: “We looked at the all the common jobs workshops will be doing – the ones they make the most money on – and we included lots of information
about the cars themselves, everything you would need to know to comfortably repair them. But we also look at what jobs you can carry out using the Tesla OE software, which you can’t using our tool.”

The 11-part e-learning course takes users step-by-step through getting set up and acquainted with Teslas and counts towards a user’s IMI CPD credits. WANT

TO KNOW MORE? FOR MORE INFORMATION WWW.RDR.LINK/AAX010
“The aim is to provide a full solution for workshops in order to enable them to work on Teslas.”
Phil Mitchell, Delphi Technology
©AdobeStock/Moose
Real mechanics go to MECHANEX
2023 sees PMM once again rounding up the most important suppliers in the aftermarket to provide workshop owners and technicians with an engaging, informative day out of the workshop.
The UK’s longest-running trade show dedicated solely to the independent aftermarket will once again be held at Sandown Park on Tuesday 7th and Wednesday 8th November.
Mechanex is well known within the independent aftermarket for offering visitors a hands-on experience, bringing them the latest updates and expertise from across the industry and providing an exciting day away from the workshop.
7th-8th November
Registration to visit the show is free and so is parking, so why not come and take a look at what the biggest names in the aftermarket have to show you. In such a competitive industry, Mechanex is an opportunity you can’t afford to miss.
If you like PMM, you’ll love Mechanex –it’s simply the magazine in a live format.
NEW FOR 2023
This year, Mechanex will be featuring the brand new PMM LIVE format for the first time. PMM LIVE aims to educate and inform visitors to the show in the same way the magazine does. We will be keeping you up to date on the latest issues affecting your business on our seminar stand as well as bringing you our FutureDrive Zone. We’ll be hosting a raft of forward looking exhibitors who will be demonstrating the products and technology necessary for the workshops of the future. Plus, we’ll be hosting exclusive talks including a debate from the foremost experts in the field on the real future of how cars in the UK are powered.
TO FIND OUT MORE ABOUT THIS YEAR’S MECHANEX AND PMM LIVE GO TO WWW.MECHANEX.INFO BUSINESS & TRAINING
34 MAY 2023 PMM
The hands-on show for hands-on techs is more committed than ever to bringing PMM to life with new opportunities to debate the future of independent workshops.


The benefitsofoffering WINDSCREENREPAIRS
Garage owners and managers should always be looking for ways to both improve the service that is given to customers and increase their profit margins. Adding windscreen repair could be a simple way to do just that. Those who haven’t carried out windscreen repairs before might think, I don’t know how it works, it’s too expensive, I might not get a good result.
So, let’s break down how windscreen repair works, then consider which system is right for your business, and finally, ways to sell a repair to your customer as an add on service.

How does it work?
Windscreen repair simply works by removing air and debris from the break, filling it with resin, and curing it with an LED lamp. Firstly, examine the break, then drill out the crater. Place the bridge over the break, and the injector into the bridge, over the damage. Inject the resin and the plunger pushes it through the tiny cracks all around the break.
The “pressure on, pressure off” cycle ensures that air is removed from the break and resin fills the damage. Once that is done, remove the bridge, add a little pit fill resin to the screen and the damage is cured in 75 seconds with the LED lamp. Remove the
excess resin from the screen, polish it and you have a screen that is said to be as clear as a new one.
Which is the right kit?
Esprit windscreen repair equipment sell four kits –they all do the same quality job, but there are some differences in price, based on the number of repairs that they will carry out. The elite kit comes with an LED lamp, plus enough resin to carry out 40 repairs. It’s up to you what you charge for a repair, but the company recommends around £25-35. If you charge that amount, you’ll have made back the cost of the kit by the time you finish the resin provided, and after that, you just have to replace resin and other consumables. making each repair going forward cost around £1.50 to carry out, giving you a significant profit margin.
The compact kit is also available which contains the LED lamp but has enough resin for 20 repairs. This kit is better for the occasional repairer, but still contains all the same Esprit products as the elite kit.

Finally, the classic kit and the compact classic which come with the classic bridge and a UV lamp. This is the company’s lowcost option, but the kit still comes with all Esprit products, and the resin and can be upgraded to use the LED lamp.
Selling the repair
If your customer’s vehicle comes in for an MOT, a service or another repair, look at the screen for any chips or breaks. Repairing sooner is always better as if a break is left the car won’t pass its MOT, can turn into a large crack, normally necessitating a costly windscreen replacement.
Make sure your customer knows that when they come to MOT their car, windscreen damage will fail the MOT, but a repaired windscreen will pass. They don’t need to claim on their insurance, and possibly lose a no claims bonus. The cost benefits to the customer of repairing rather than replacing are easy to see.
Repairs only take around 20-30 minutes so they can be carried out as part of the service or MOT. If you charge around £25 for a repair, most customers who are having a service, MOT or other repairs to their car will agree that this is a low-cost way of preventing the need for a windscreen replacement.
WANT TO KNOW MORE? FOR MORE INFORMATION WWW.RDR.LINK/AAX011 BUSINESS & TRAINING
36 MAY 2023 PMM
Esprit advises garages on how they can be improving their services through offering windscreen repairs, and the kits that could help garages achieve this.
PMM sits down with
Automechanika
Birmingham’s marketing director, Alex Jones to find out what’s new this year and what she’s most excited for.
AUTOMECHANIKA Birmingham, 6-8th June
Birmingham’s NEC sees the return of the biennial aftermarket trade show this June. We caught up with the show’s marketing director Alex Jones to find out more.
What does the show offer aftermarket technicians?

What doesn’t the show offer aftermarket technicians? There are 192 hours of free skills training across EV, ADAS, diagnostics, repair and maintenance, battery technology, hydrogen internal combustion, diesel, MOT, customer service, filtration – you name it, we’ll have bite size practical sessions.
What is the best thing about Automechanika?
It’s the Glastonbury of the automotive sector, it’s literally a city built full of new technology, tools and training. Registrations are at a record high and so the buzz hearing 12,000
automotive peers exchanging knowledge and debating the big topics like the supply chain, price rises, MOT tensions, skills gaps… this is where it all gets sorted out!
What are you personally most excited about?
The automotive industry is going through the biggest change in living memory, it’s tough out there for aftermarket businesses; disruption and changes are happening more frequently than ever and it’s harder to make a profit and plan for the future than ever before. So, the thing I’m most excited about is seeing all the work the team have put in come to life. Where the garages can park for free, pick up a free bacon roll and then get their hands on and compare technology and tools from 500 leading suppliers and benefit from the 192 hours of free skills training. All for free! Even if people can come for just one day, they will learn and see more than they can in 6 months from their workplace.
CATCH PMM AT AUTOMECHANIKA!
For the first time Professional Motor Mechanic will be exhibiting at Automechanika Birmingham, offering you the opportunity to come and engage with the team behind your favourite trade mag!
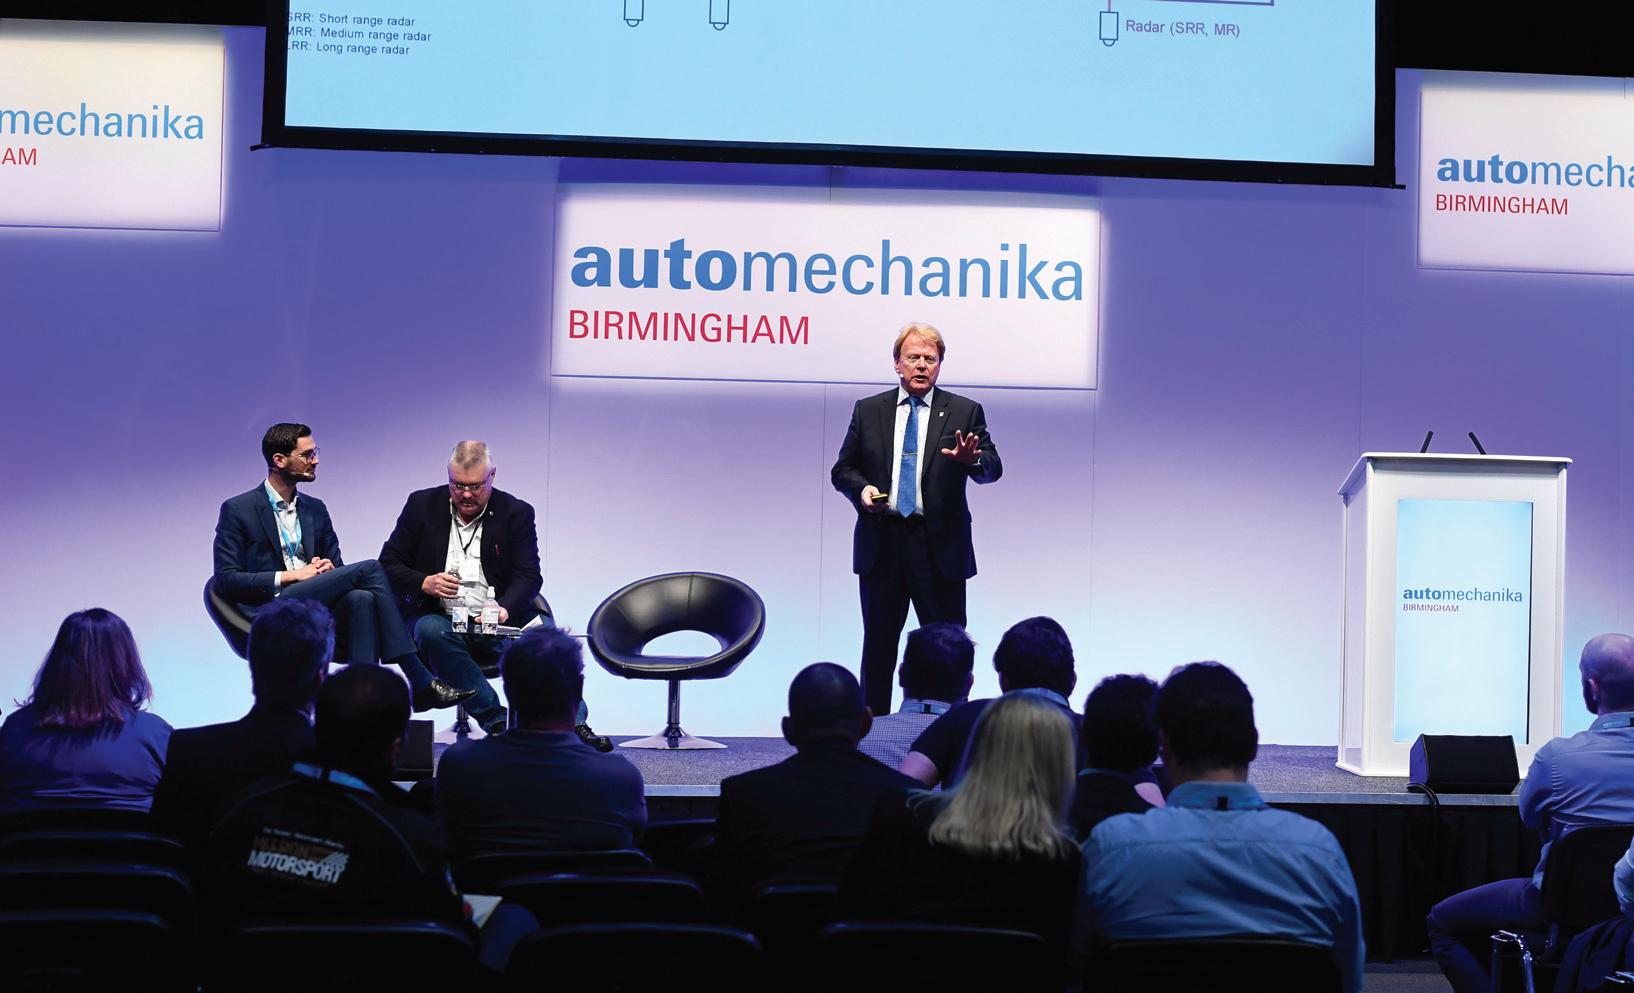
We’ll be bringing a touch of showbiz to the aftermarket show where we’ll be podcasting throughout the three days. We’re giving you the chance to appear on the PMM podcast, simply hop onto our stand (ZZ72) and get in the hot seat armed with nothing more than your opinion. So if you’ve got something to say (and we know you do), come and say it on the aftermarket’s number one podcast! We’ll also have the red carpet rolled out for the special occasion, so if you want to bag yourself a free PMM tshirt don’t forget to say CHEESE – you could even win the mystery prize…
AUTOMECHANIKA BIRMINGHAM TAKES PLACE 6-8TH JUNE AT NEC BIRMINGHAM.
IT IS FREE FOR WORKSHOPS TO ATTEND. TO FIND OUT MORE GO TO WWW.RDR.LINK/AAX044
A NEW chapter
The new logo aims to embody the ethos of Granville, the regular, uniform sides and angles of an equilateral hexagon represent the solid foundation of the business encased in the strongest shape in nature. The G in the icon is split into three parts to show its emphasis on quality, value and customer service. The aim of the modern icon paired with the brand’s traditional font is to remind customers that it still stands for the same fundamentals of service that the company have provided throughout the decades.

This new logo becomes flexible, with the colour of the icon reflecting the placement and colour scheme of the product on which it is placed. For example, for the more trade oriented Hypalube range, the icon becomes silver to fit in with the quality and value for
Launching oils into the 21st century
Whilst rebranding, the company decided to introduce a completely new look and feel to the Hyalube range, with the new trade bottle being the first to embody the new look. The strong lines and sharp corners are tempered slightly with rounded corners for a modern look whilst the bottle remains unmistakably Granville with the addition of subtle hexagons to add interest and grip to the chunky easy-grip handle.
The labels also feature strong branding with a sophisticated feel and colour coding to differentiate between fully synthetic, semi
winter/weight rating of the oil. The dark backgrounds said to complement the gun metal grey bottles to present a premium feel to the trade range.
Continued evolution
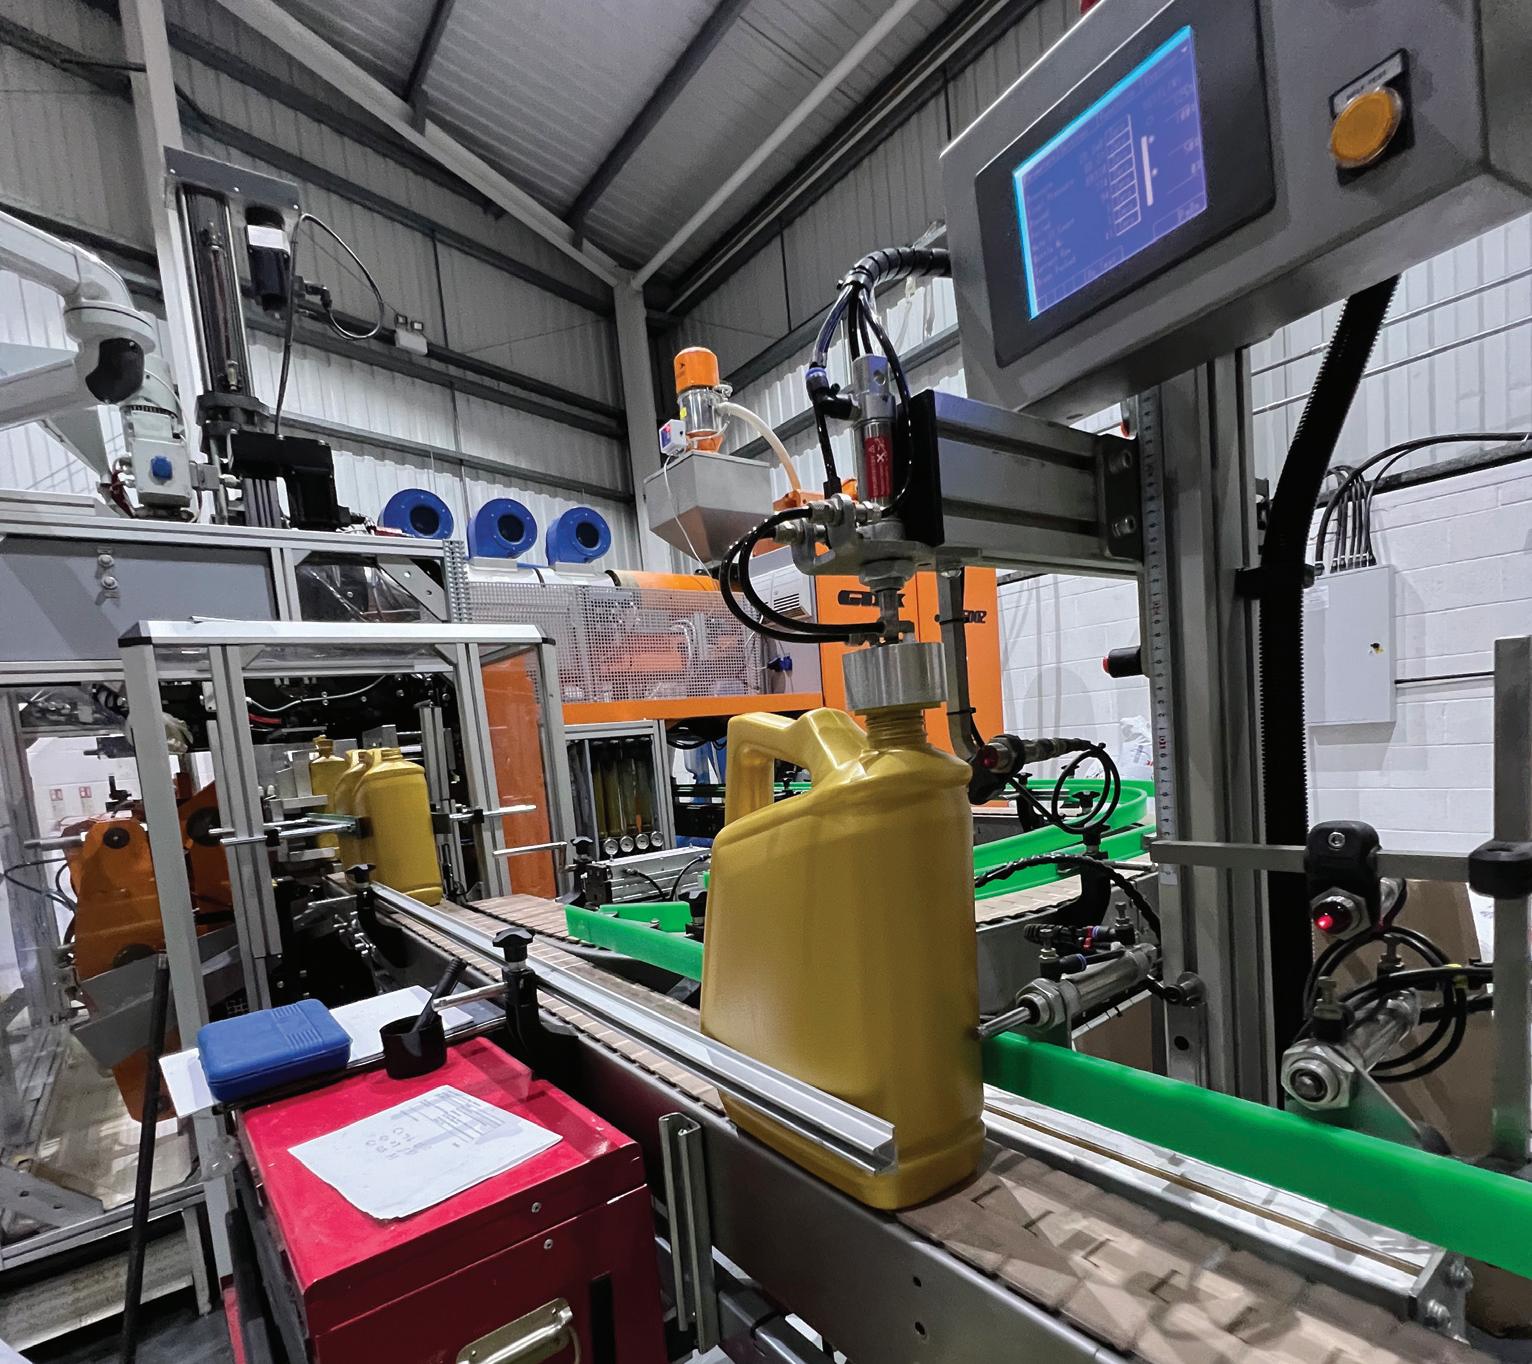
The coronavirus pandemic caused many businesses to revisit their supply chain, operations, stockholding and review their use of just in time production practices as a result of what would previously have been considered unprecedented global disruption. This allowed Granville to review its operations and supply chain and established a weakness which was in the sourcing of bottles.
To resolve this, it has invested in blow moulding equipment to be able to manufacture its own bottles as needed. This improves resilience, efficiency and is significantly more environmentally friendly as it will negate at least 100 truck journeys per year saving 1000 tonnes of CO2 per year. The ability to manufacture bottles and fill them on a single site is a major step forward for Granville’s evolution.
PMM MAY 2023 39
After 20 years of rectangular red and blue tram tracks, Granville has modernised its logo to reflect its evolving brand.
SPECIAL REPORT WANT TO KNOW MORE? FOR MORE INFORMATION WWW.RDR.LINK/AAX012
Granville has invested in blow moulding equipment to be able to manufacture its own bottles as needed.
AUK BATTERYTESTING first
ACleevely’s EV garage in Cheltenham, journalists gathered to learn all about how workshop owners and technicians are now able to offer their customers a simple test that generates an insight into the condition of their EV battery.
In collaboration with Aviloo, a developer of battery diagnostic solutions, Maverick Diagnostics is primed to offer a UK aftermarket first: the fastest and the most comprehensive independent test that measures EV and plug-in hybrid battery condition.
We saw a demonstration of the ‘Flash’ test that in just three minutes generates an analysis of a traction battery while a vehicle is stationary. The diagnostic tool measures several parameters – vehicle communication, battery controller, HV battery state, LV

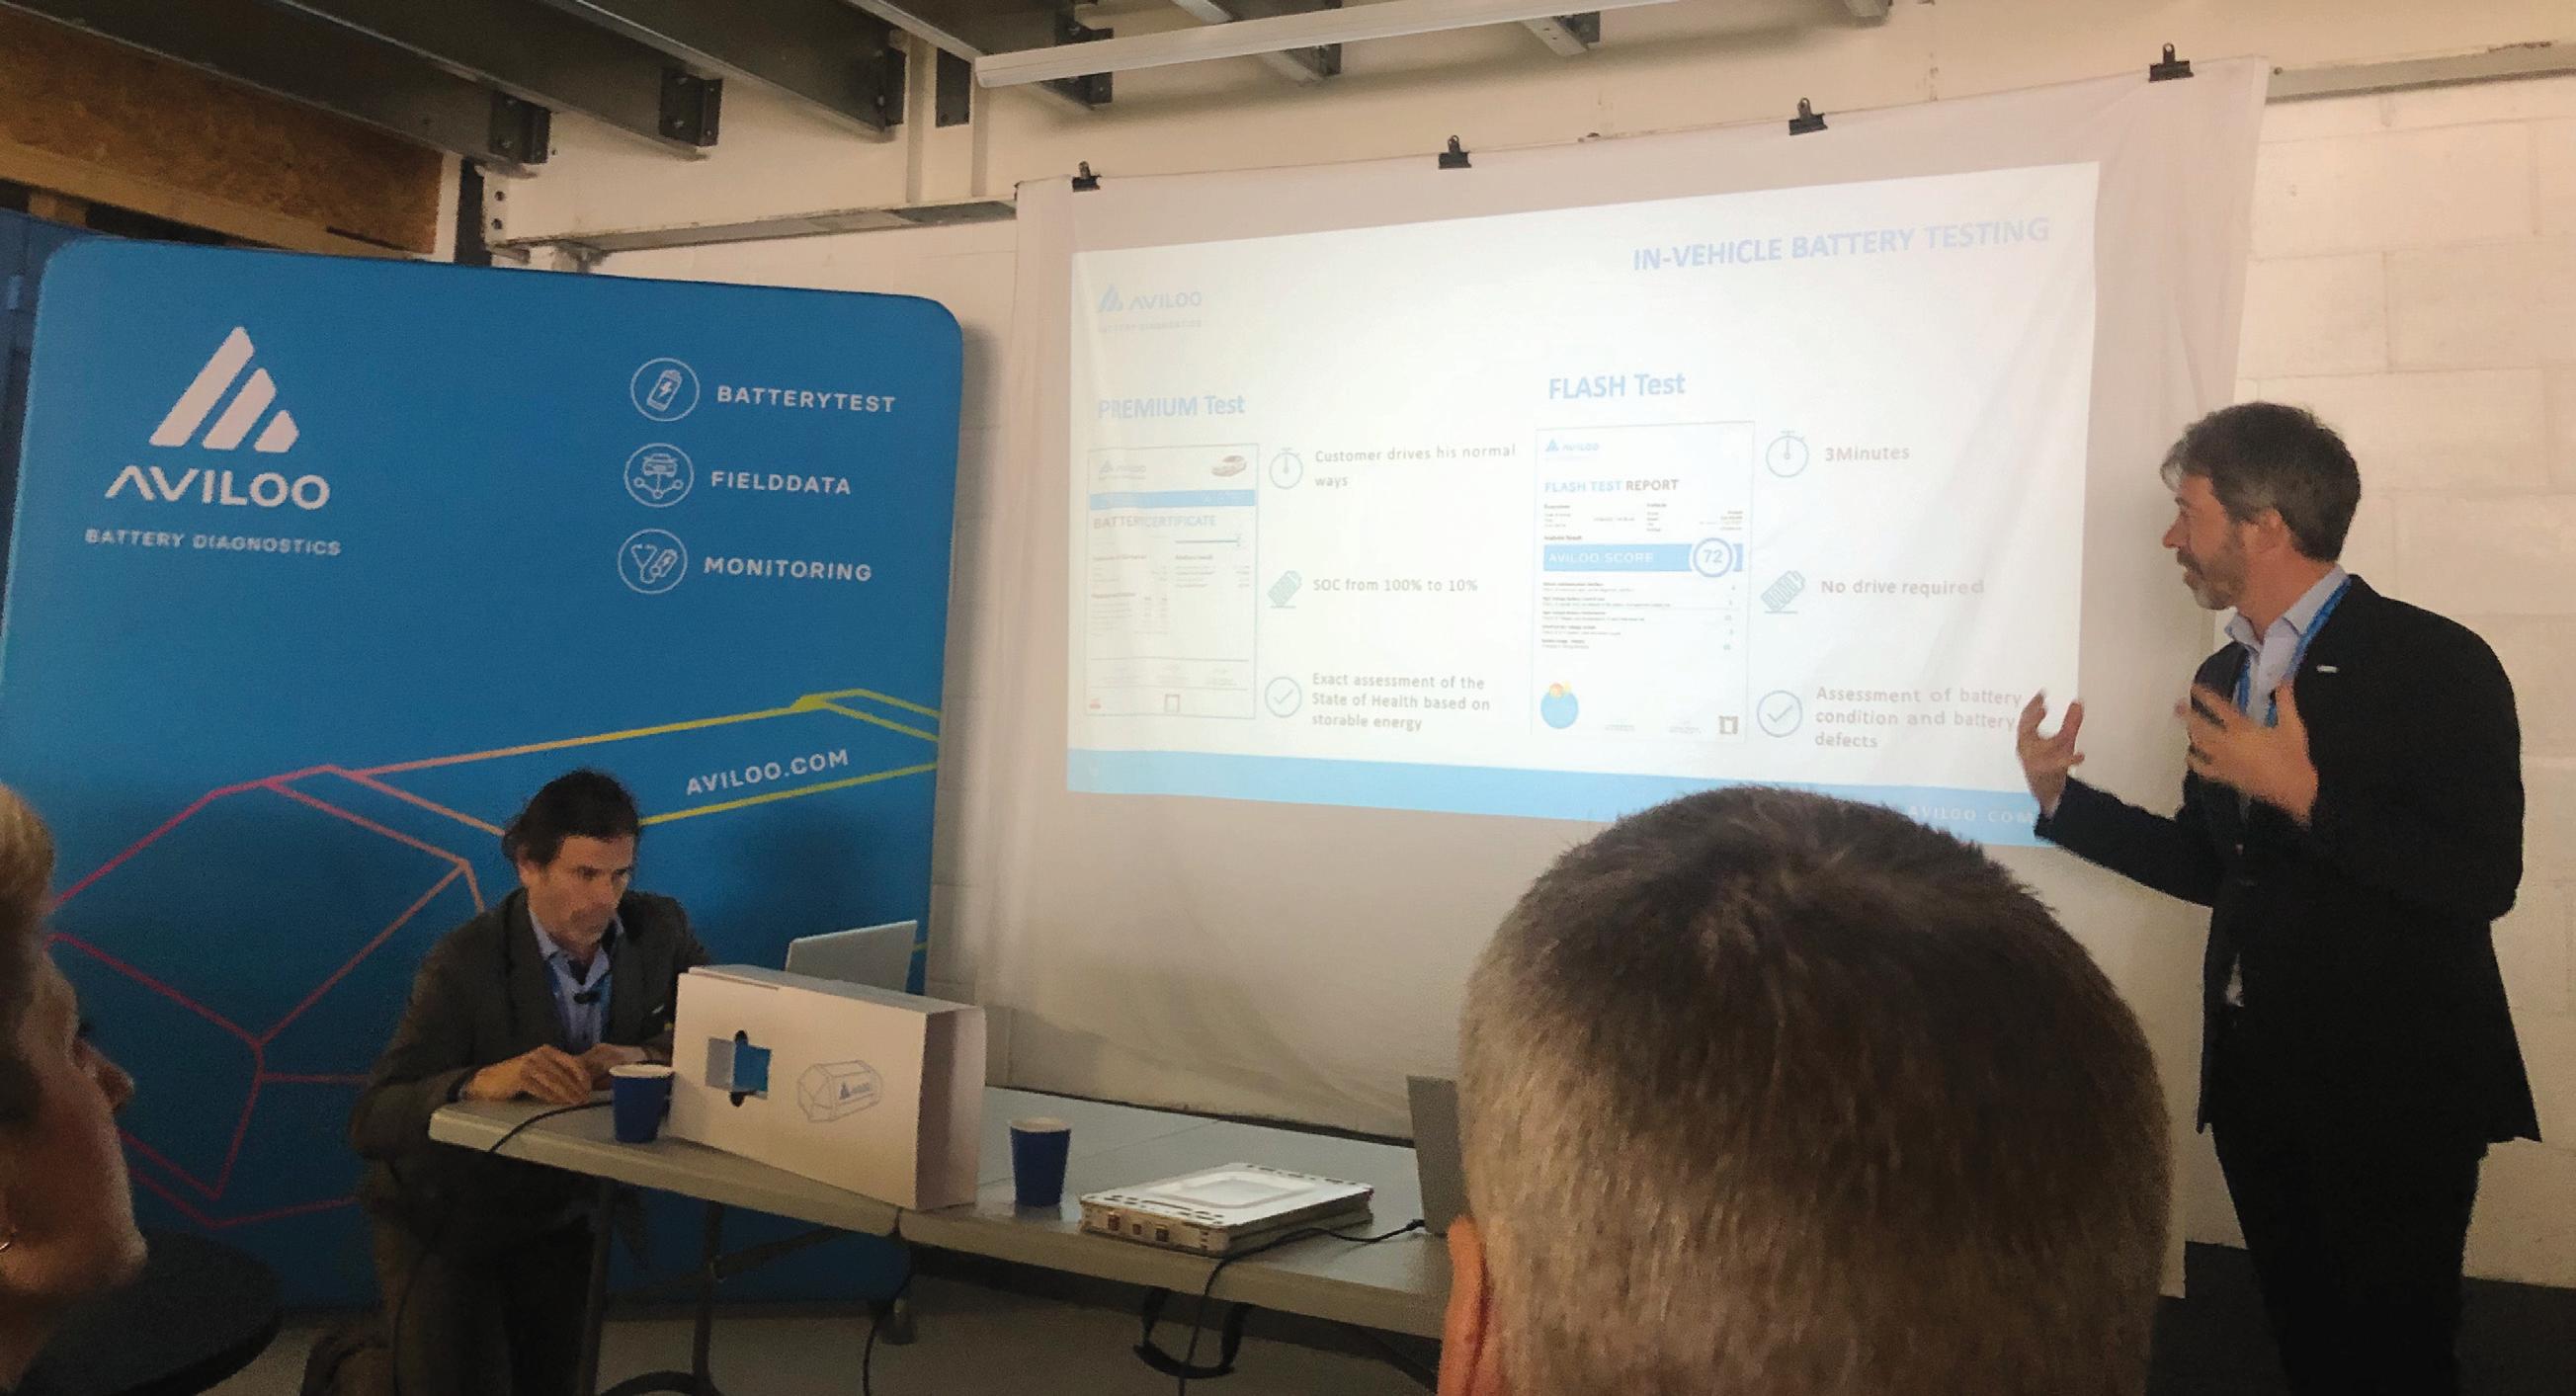
Aviloo, has partnered with Maverick Diagnostics to launch a tool and software package which will help UK garages to check the health of EV batteries for their customers.
system and battery history – before offering a manufacturer-independent test score between one and 100. Technicians can then illustrate that score and the test’s overall findings to customers with a report.
Aviloo chief technical officer, Nikolaus Mayerhofer, explained why battery testing on a regular basis is vital: “Traction batteries are chemical energy storage devices that are subject to a natural ageing process due to load and lose their storage capacity over time. Likewise, usage behaviour, such as permanent driving in the upper power range or frequent charging with high charging powers, can lead to faster battery ageing.”
How does it work?
First, the user plugs an Aviloo box into the OBD port of a vehicle.
Next, wait for a flashing yellow LED light to appear, which indicates the start of the test, then start the vehicle.
Finally, the LED light will turn green to signal that the test is complete. A report will then be immediately generated and sent to the e-mail address synced to the device. This is available on either the app or desktop.
Currently, the tests cover approximately 80 per cent of existing EV and plug-in
hybrid models and with daily work on the introduction of new models, that percentage is growing.
A game changer
As the number of EVs and plug-in hybrids continue to rise, there is a growing opportunity for independent workshops and demand from their customers to ensure their vehicle’s battery is in good health.
Maverick Diagnostics managing director, Andy Brooke, said: “Our partnership with Aviloo represents a game-changing opportunity for workshop owners and technicians. This is the first test of its kind. Customers can now see, in the simplest form, what condition their EV or plug-in hybrid’s battery is in. The technician can then use this accurate and reliable information to make a reliable assessment and, potentially, justify a battery replacement.”
Battery diagnostics solutions from Aviloo are now available in the UK through Maverick Diagnostics.
WANT TO KNOW MORE? FOR MORE INFORMATION
WWW.RDR.LINK/AAX013 SPECIAL REPORT
Austrian battery diagnostics and solutions company
40 MAY 2023 PMM
GOING DIGITAL
In-depth demonstrations on MAM Software’s latest mobile and web solutions took place, including a range of apps that deliver customers’ efficiencies in all aspects of operation management.
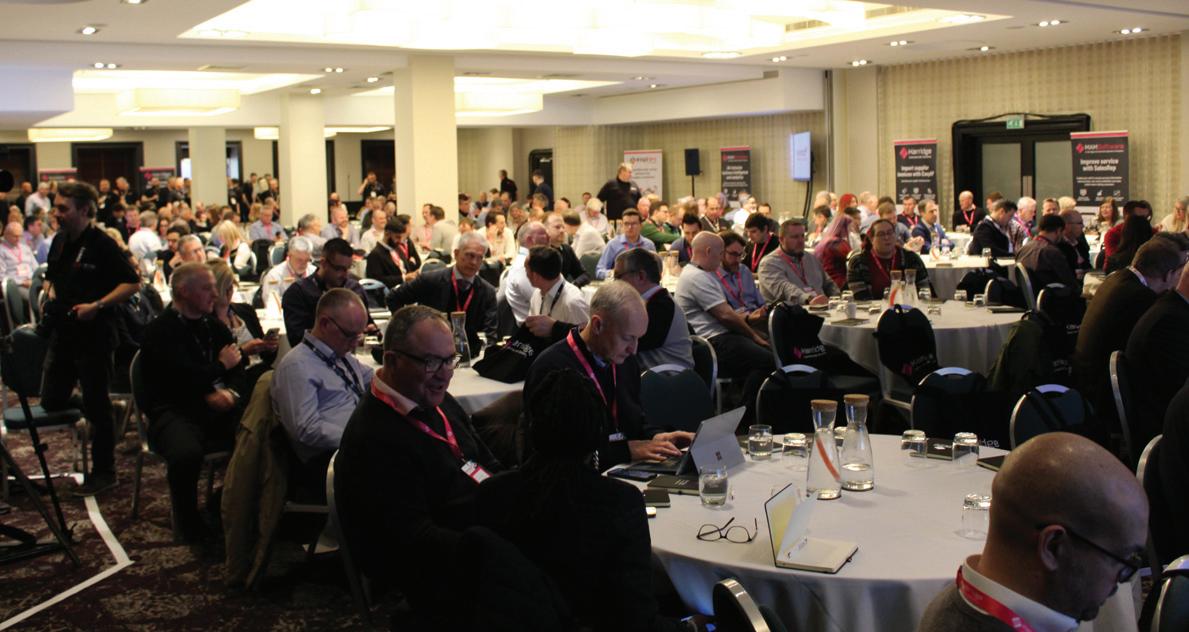
The company also unveiled many initiatives to deliver key benefits to all industries where its customers operate. For example, its new Konnect Online platform will enable KCS to quickly develop and deliver partner solutions that can be made available across all of its markets and core products.
“We recognise that our customers need our support as they work to deliver their carbon reduction strategies, and we are proud to develop and to showcase solutions that can help”, added James Mitchell, managing

director. “Our EasyAP solution, for example, enables customers to automate their accounts payable processes and to remove paper, filing and storage. They can extract invoices from email, import and match, and electronically file an image of the supplier invoice. This removes paper and printing, which results in a more efficient administration process.”
KCS also delivered updates to customers on the latest web strategies available. Customers can choose integrated B2B or B2C web trading products to support their strategies, together with a range of tools that enable a workshop to forge strong integrations with their customers and suppliers.
“Digitisation is not a scary word or strategy for our customers,” says James, “our customers were early adopters of our cloud technology as a means to outsource their IT infrastructure and reduce their energy consumption. They have been using handheld technologies to improve efficiencies but, up to now, the high hardware costs have always been a barrier to adoption. We can now harness the power of cloud computing to deliver cost-effective solutions into areas of the business that staff members manually controlled in the past.”
WANT
At its Konnect conference, spanning the 2nd and 3rd of March in Stratford-uponAvon, Kerridge Commercial Systems (KCS) welcomed over 400 delegates to unveil its sustainable initiatives.
TO KNOW MORE?
WWW.RDR.LINK/AAX014
Have your say ... ON THE MOT
With all this incessant talk about MOTs recently, with experts (and editors) falling over themselves to have their say, we thought it would be a good idea to present some of the opinions that have come to us from you, our readers.
I've been in a cab before and heard a wheel bearing noise and I said, your wheel bearing’s noisy. They said, I MOT’d it three months ago, so I don't need to repair it. And that’s a cab driver, they're driving every day.
“Classic cars don't need an MOT anymore. But I work with a few reputable classic car dealers and they still bring them in here for the annual test to provide assurance that the cars are roadworthy if anything ever happened.”
“PERSONALLY I THINK THE MOT SHOULD BE ON TIME OR MILEAGE. SO, IF YOU DO A CERTAIN AMOUNT OF MILEAGE SINCE YOUR LAST TEST, YOU SHOULD NEED TO BRING THE CAR IN AGAIN. TAKE A GUY DOING 60,000 MILES A YEAR AS OPPOSED TO SOMEONE DOING 5,000 MILES A YEAR. IT'S A MASSIVE DIFFERENCE.”
“IT’S A DANGEROUS THING TO LEAVE IT TWO YEARS BETWEEN CARS BEING LIKE LOOKED AT. THEY'RE OBVIOUSLY OUT OF MANUFACTURER'S WARRANTY. THERE’LL BE A LOT OF PROBLEMS ON THE ROADS – A LOT OF CRASHES CAUSED BY PEOPLE WAITING UNTIL THEIR CARS JUST STOP BEFORE THEY DO ANYTHING. ”
“I think the government probably will have to listen to the outcome of the MOT consultation, because most organisations are objecting to the changes, including most MOT stations. I mean, it'll be far too dangerous for cars to be on the road unchecked for a period of two years.”
“I will enter my thoughts into the Government consultation on the MOT frequency because it's important. Everyone has a voice. Unfortunately, it's about as useful as shouting into the wind. I'll put my thoughts down and it will go into a file somewhere and an MP will read it and then it'll go into the bin and the outcome will be whatever they decide it’s going to be, and then we'll all pick up the pieces later on.”
“It would be very dangerous to change the MOT frequency because customers only know when there's something wrong with their car when it’s too late. It's not fit for purpose for the road when they bring it in for a test. Some customers don't even know how to change tyres, that’s what we’re dealing with here.”
SPECIAL REPORT
42 MAY 2023 PMM
“ IT’S TRUE THAT MODERN CARS ARE PROBABLY BETTER ENGINEERED, BUT THEY ALSO HAVE TOO MUCH TECHNOLOGY THAT GOES WRONG. ”
“ AT THE END OF THE DAY IT’S BAD FOR US SIMPLY BECAUSE WE RELY ON THE INCOME OF PEOPLE GETTING THEIR CARS NOT JUST FIXED, BUT MOT’D AS WELL. ”
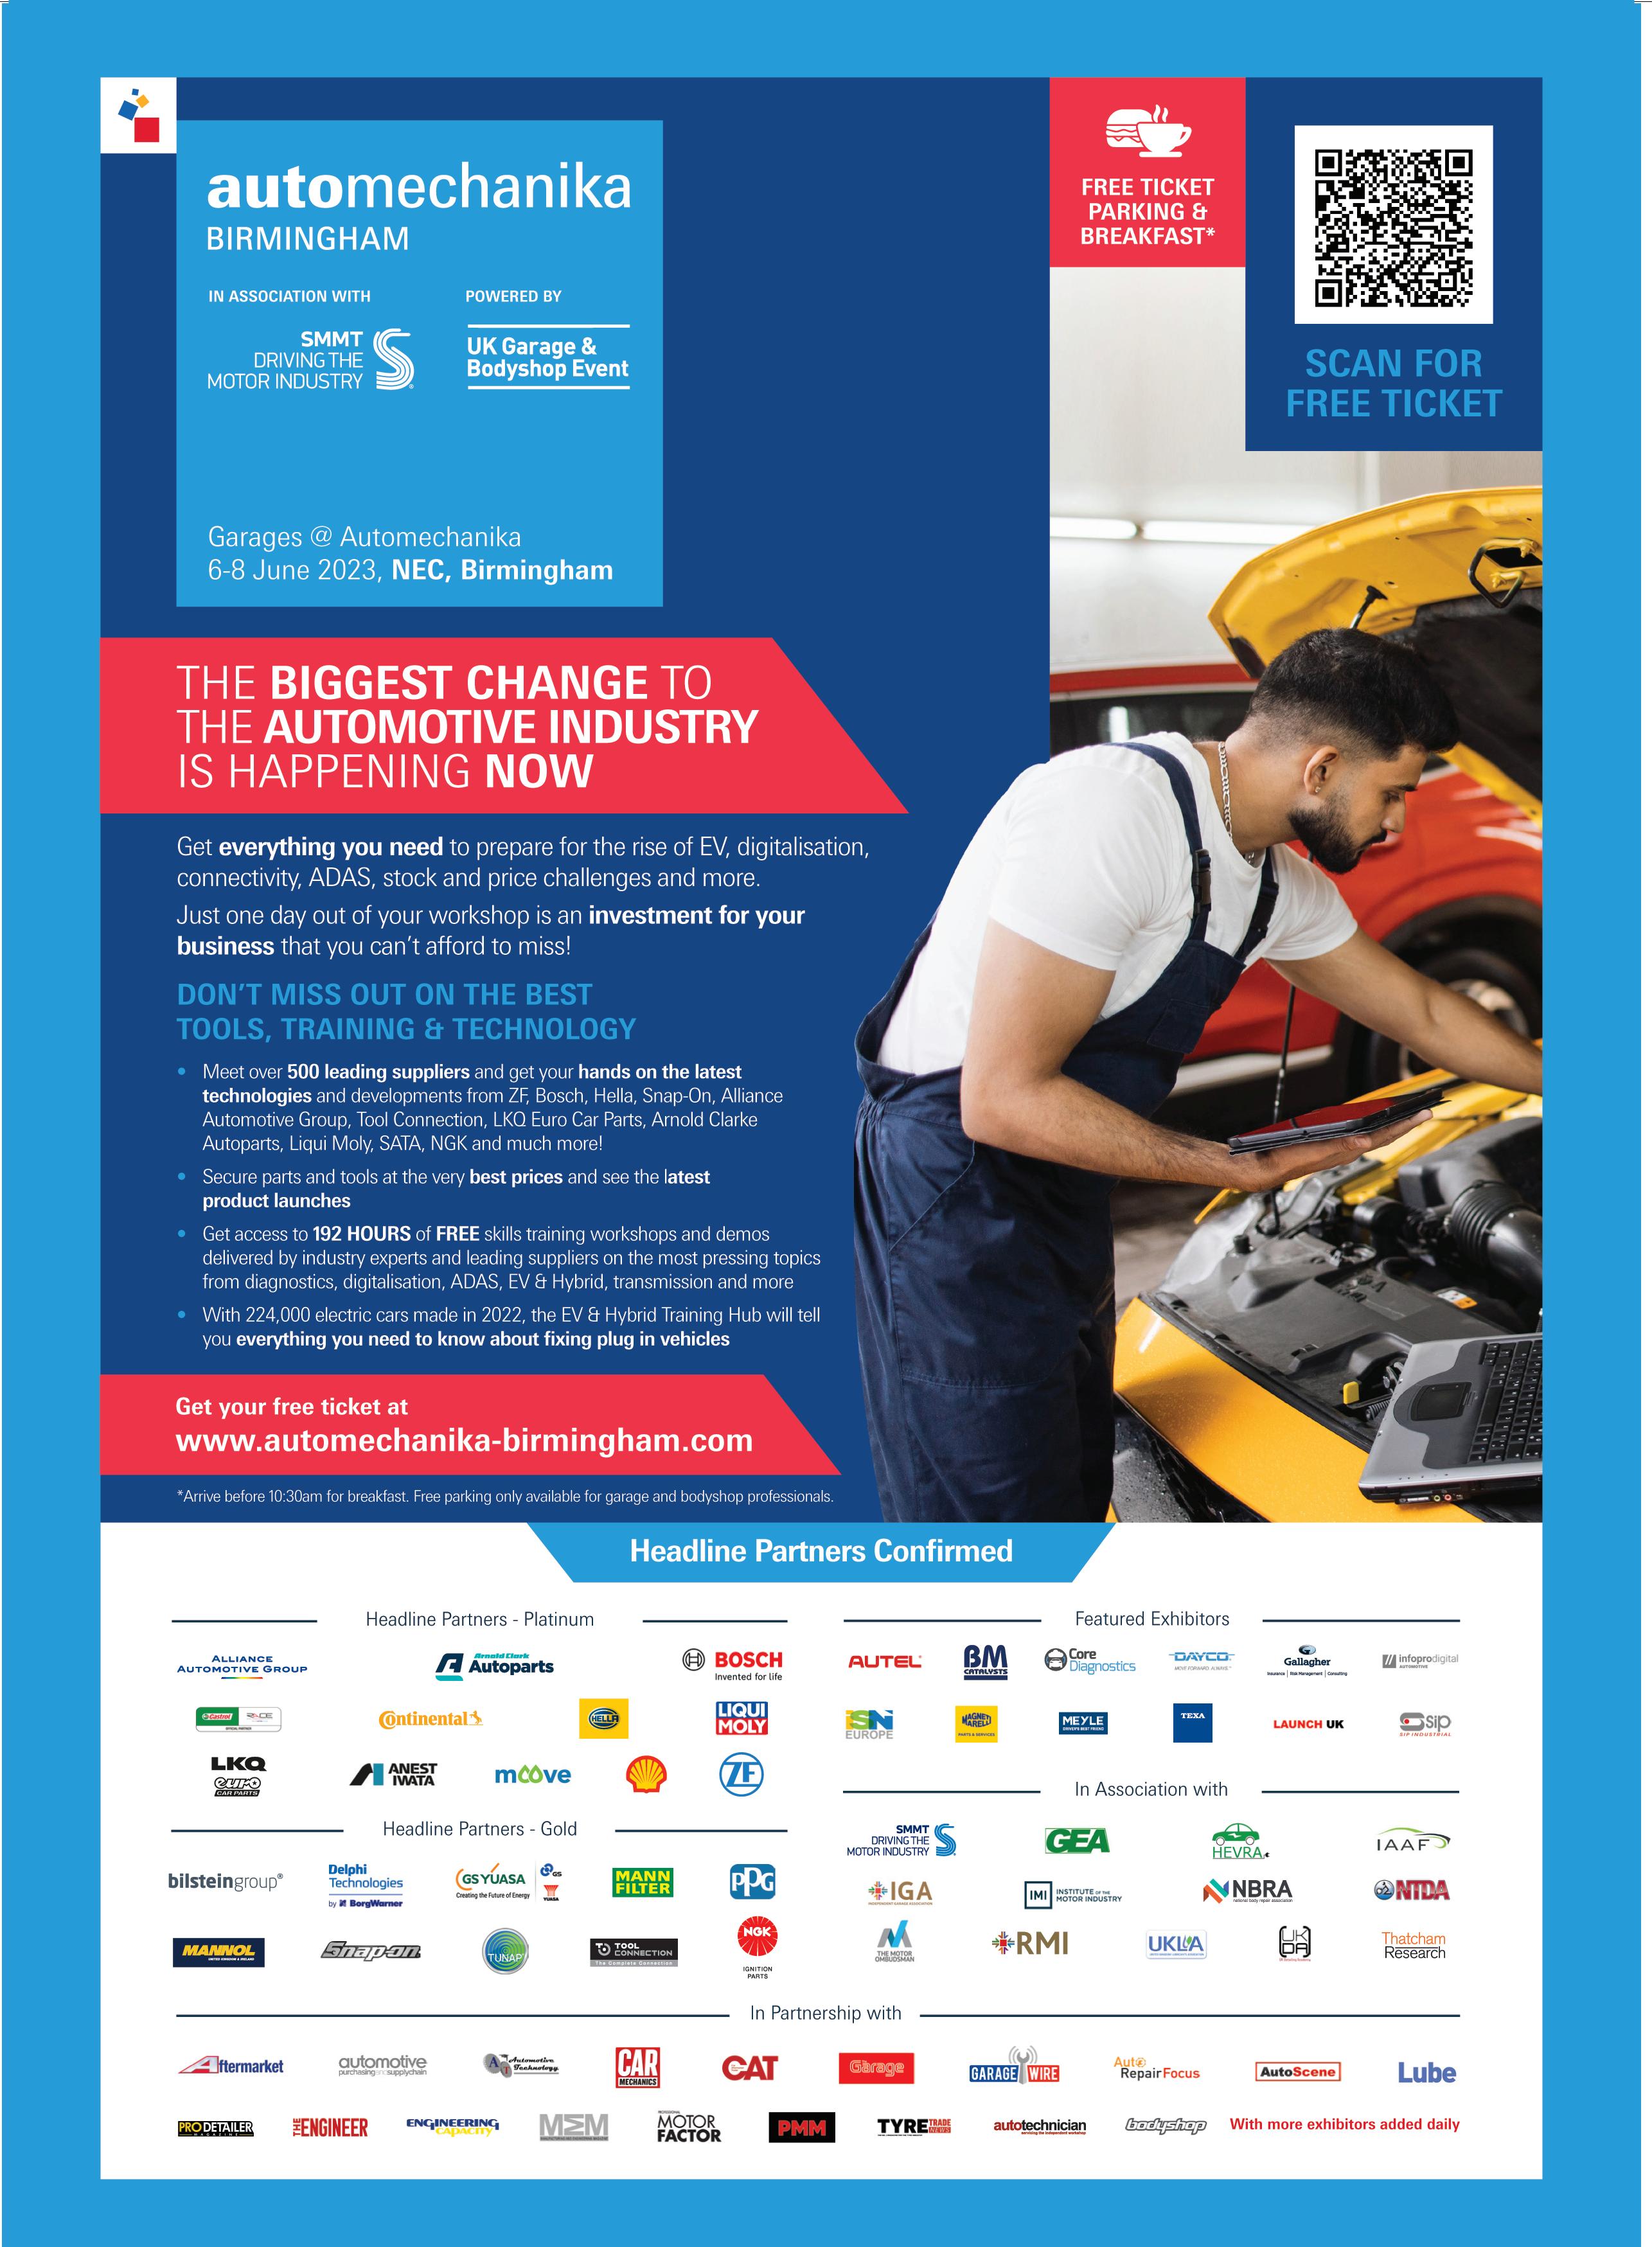
PRECISION MADE PADS.


www.apecautomotive.co.uk
EXCEEDS OE QUALITY . AFT Advanced Friction Technology (AFT) Directional Pad Technology EV Compatible Silent Guard Shim Technology Stop Ready Coating PREMIUM STOPPING POWER.
Take a BRAKE and TEST
Brake tester manufacturer Bowmonk warns PMM readers of the importance of thoroughly checking and servicing brakes on LCVs and trucks.
When the PMM team caught up with Alex Lindley from Garage Indsutry Trends for a recent podcast episode, it came up that brakes are the third most common reason why vehicles fail their MOT. This figure stands at 19.05 per cent, according to the company’s data. An observation discussed in a conversation with a policy technical specialist at the DVSA, raised this point:
Could the main reason for this be the fact that there are still workshops who, when performing a general interim safety check, are either not carrying out a brake performance test or are simply relying on a visual inspection, hoping the annual MOT test will return a positive result?
Roadside checks on LCVs carried out by the DVSA also attributed to this, for at various locations it was also revealed that an avoidable oversight can result in a heavy fine for the driver, an immediate prohibition on the vehicle and a DVSA visit to the operator. All of which can be avoided if regular checks are carried out.
Visual exercise
A point worth noting in defence of the operator: With the exception of braking performance, levels of exhaust emission and headlamp aim, the six-weekly inspection is, in the main, a visual exercise, and can be carried out at the operator’s premises.
But when it comes to providing an interim brake test result, this would typically require a ‘voluntary’ brake test at a DVSA testing station or ATF, costing anything from around £15 per axle. Add to this a possible re-test fee and considerable vehicle/driver downtime and you can appreciate the statistics being as they are. ‘Accountability’ and ‘duty of care’ are important areas surrounding general vehicle roadworthiness and, in particular, braking efficiency.

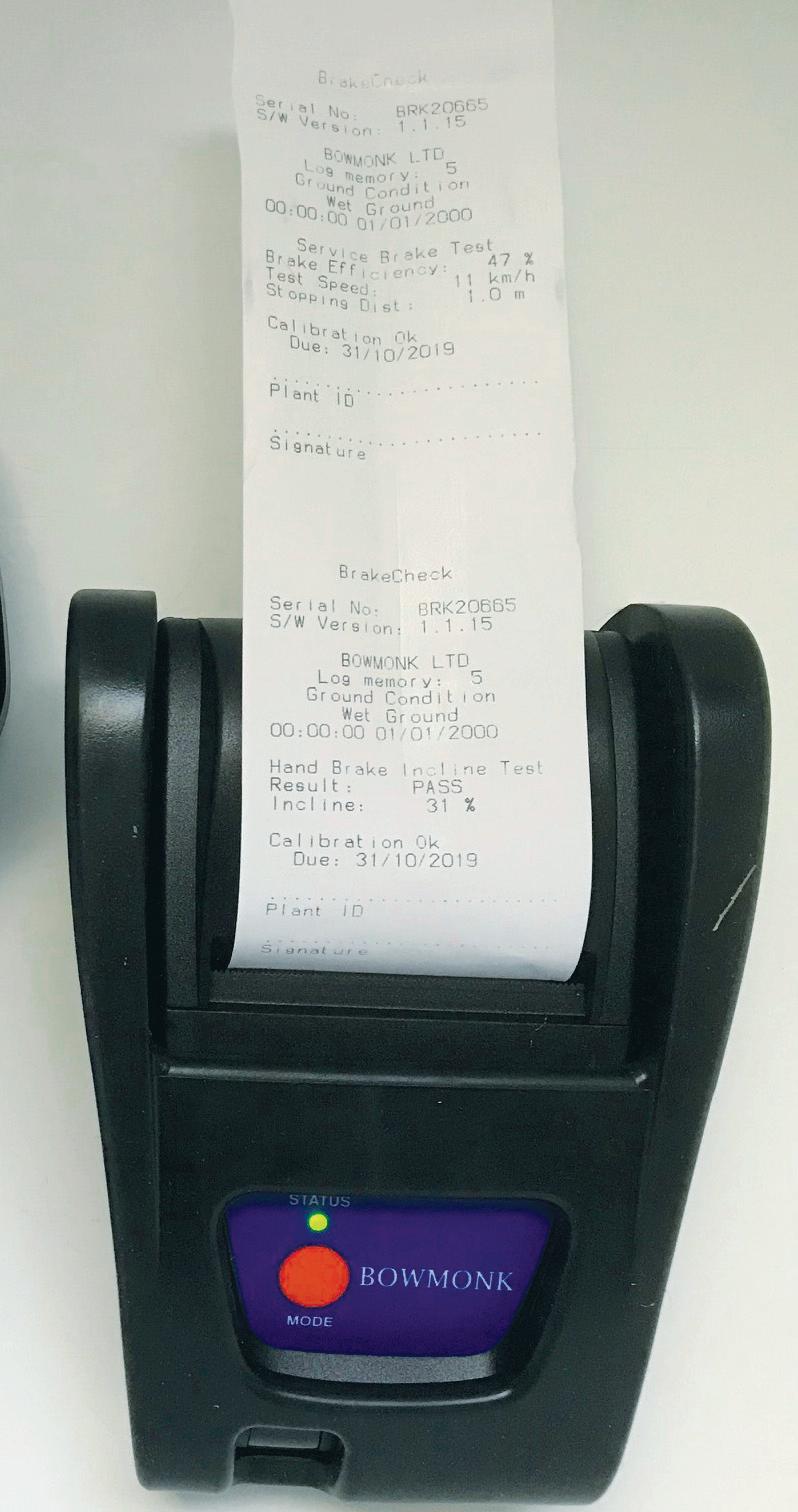
A van or truck has an accident, shunting the vehicle in front of him. Was it driver error or brake failure through poor servicing? Not having any record of an interim brake test result can leave the driver completely vulnerable. Regular brake test results will establish any trends in a vehicle’s braking performance, as checking results against previous tests will identify any defects.
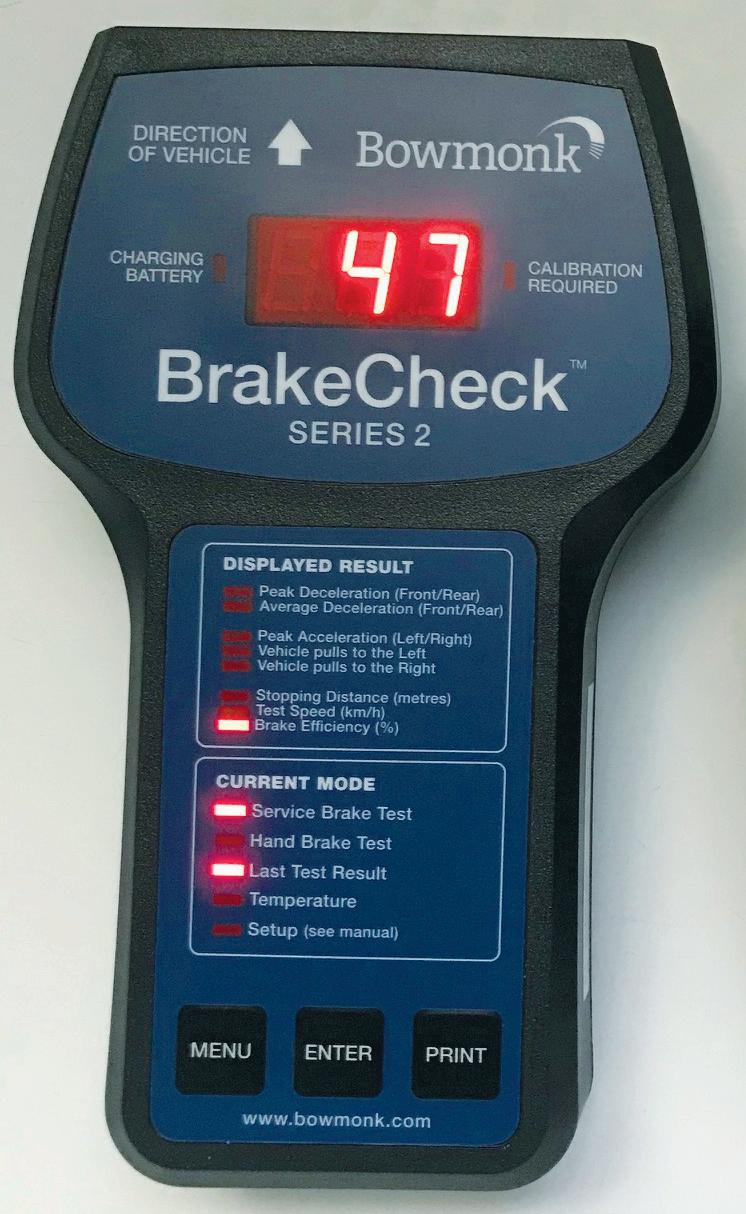
PMM MAY 2023 45
BRAKES & CLUTCHES WANT TO KNOW MORE? FOR MORE INFORMATION WWW.RDR.LINK/AAX015
A sample print out from the BrakeChecks infra-red printer.
Company name Percentage of imbalance Test speed Stopping distance
Brakes are the third most common reason why vehicles fail their MOT, the figure standing at 19.05 per cent.
CONVERTING the masses
Blue Print guides PMM readers through clutch systems and how its Smartfit clutch conversion kits can facilitate clutch repair for independent workshops.

Avehicle’s clutch is the primary system that transfers the engine output to the gearbox, which must be optimally synchronised in all driving conditions. The clutch separates and connects the vehicle’s engine to and from the transmission. When the clutch pedal is depressed, the vehicle’s powertrain is interrupted and a different gear can be selected. The clutch also enables the vehicle to accelerate away smoothly and efficiently.
Vehicle development has evolved and adapted in a variety of ways, this has directly influenced how all the working components of the vehicle have developed. This includes a
vehicle’s clutch components, which must satisfy a host of requirements and have a direct effect on the driver’s comfort and the behaviour of the vehicle.
These include an increased engine torque, stop-start, demand for smooth and quick gear selection and reduction of noise, vibration and harshness characteristics, including damping and noise reduction. A clutch must have good resistance to rotational speed, low overall height, low engagement forces and provide a long service life, to give high transmission reliability. The main clutch components are the clutch cover, friction disc and release bearing. Together they form a friction system with the flywheel.
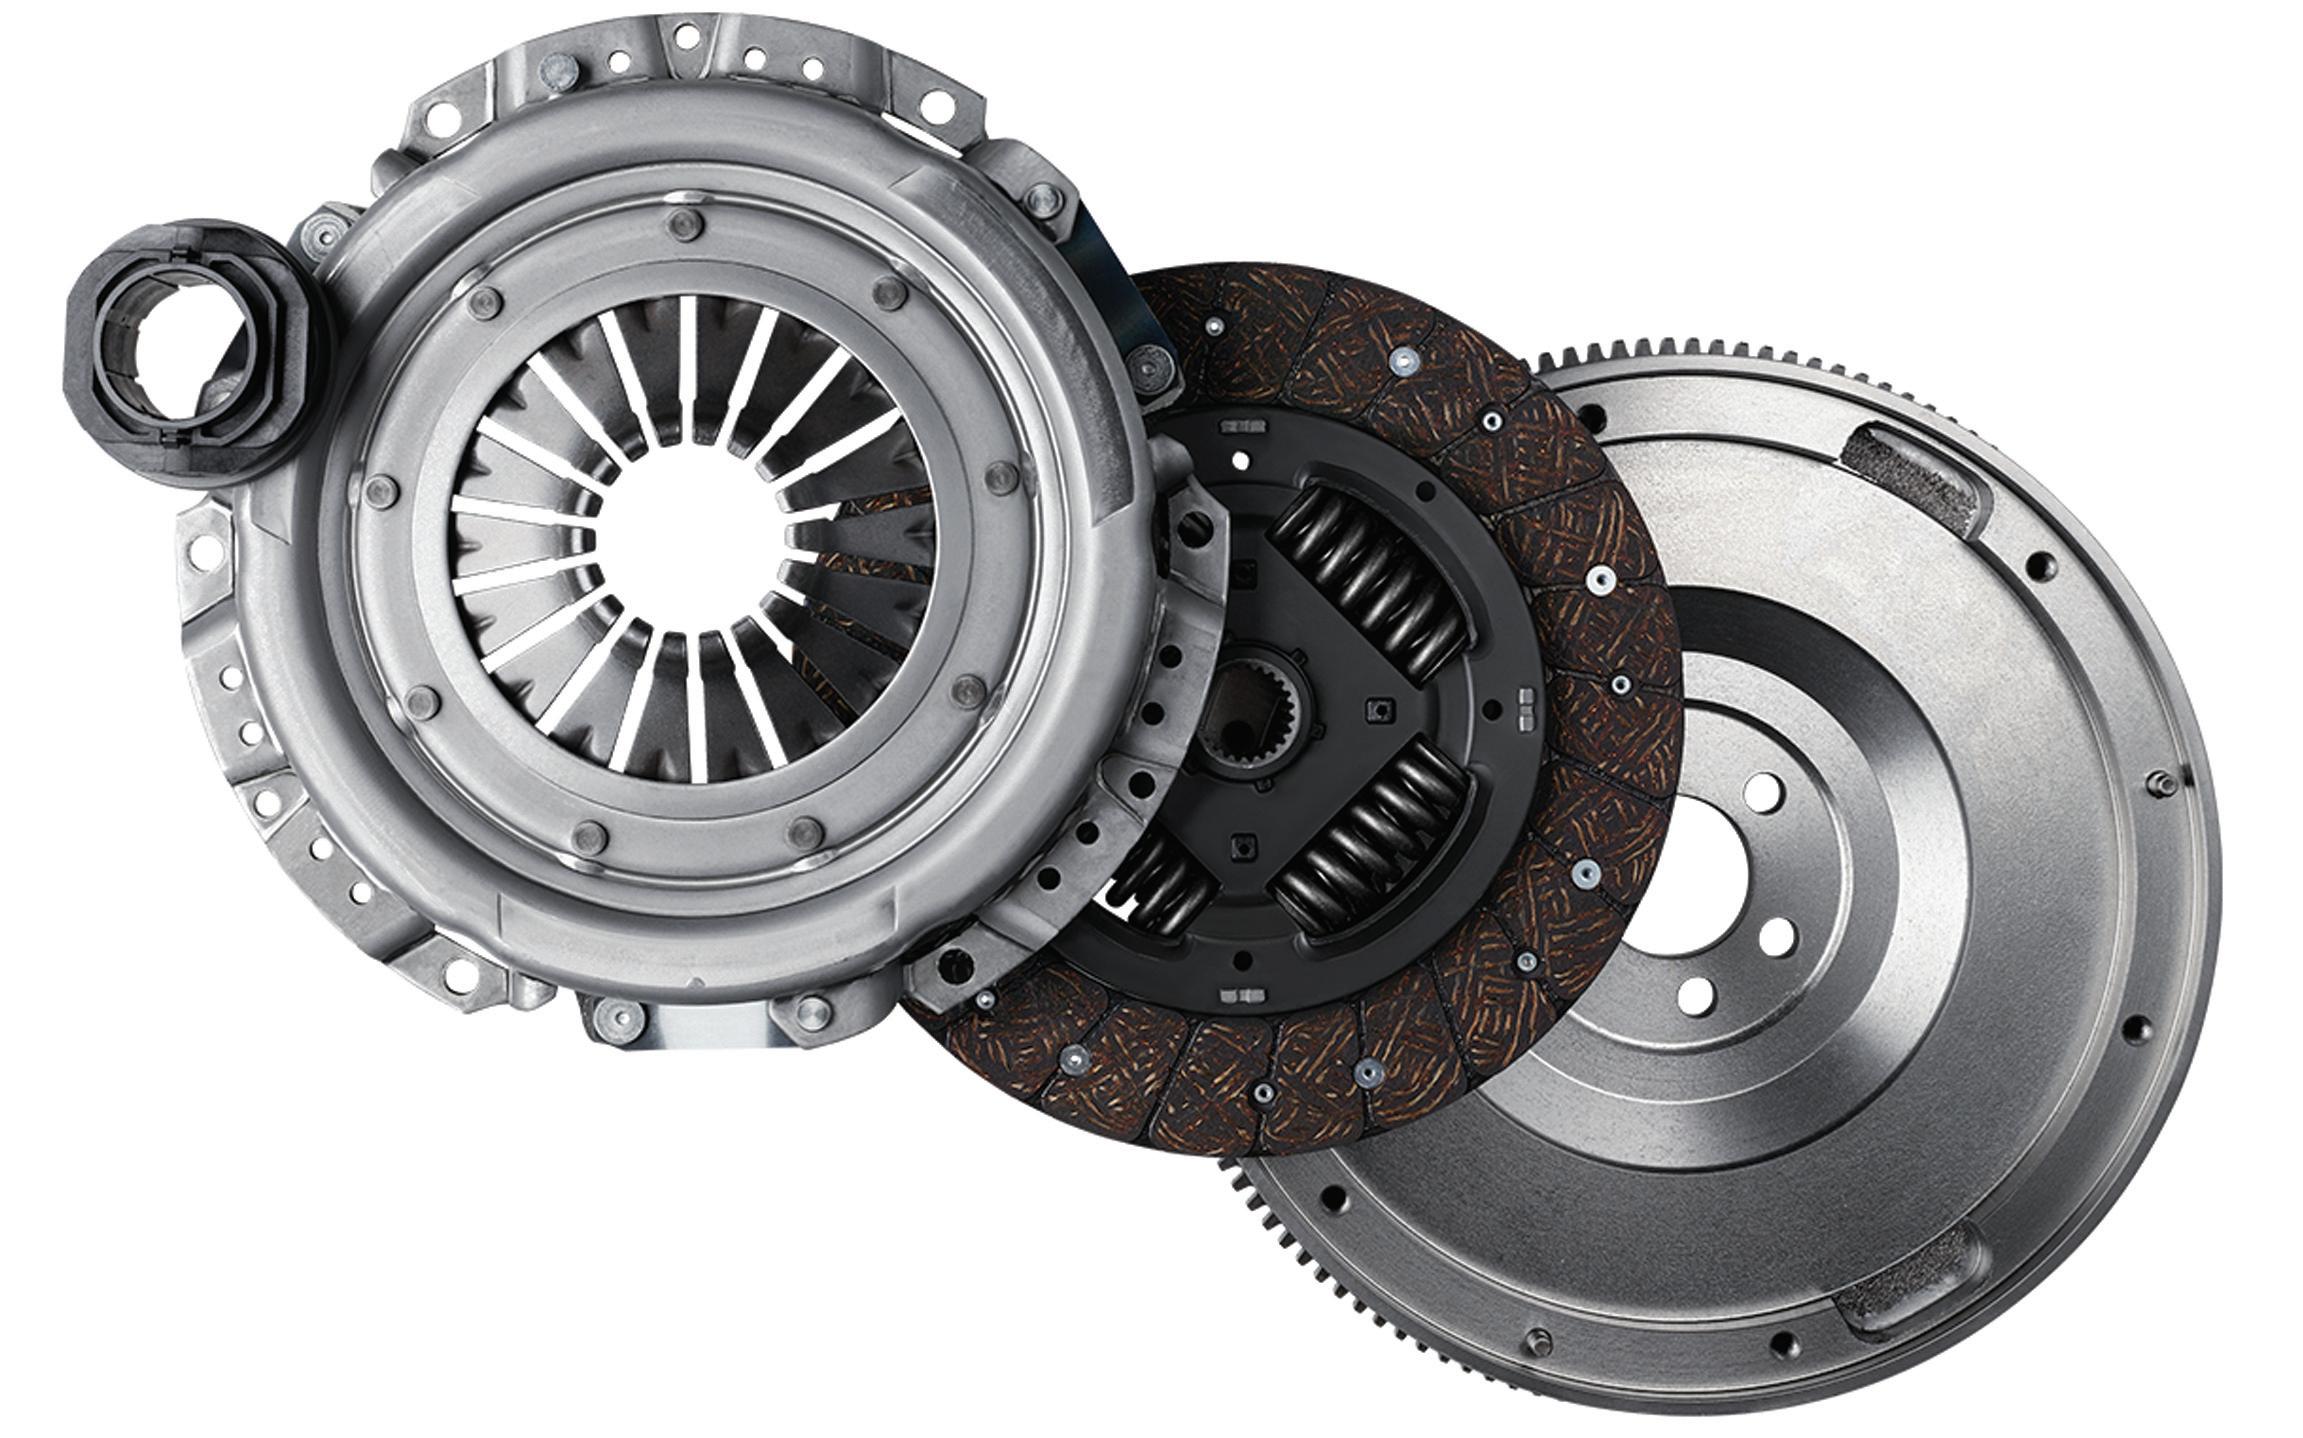
Clutch cover
The clutch cover ensures that the engine torque is transferred smoothly via the friction disc to the transmission intake shaft. Slotted diaphragm springs are used in the pressure plate to increase driver comfort, because it requires less effort to apply pressure on the pedal, due to the lower engaging force. Depending on clutch design, structure and actuation, these are either a push or pull type pressure plate, to compress the diaphragm spring.
BRAKES & CLUTCHES
46 MAY 2023 PMM
Friction disc
The friction disc is the clutch kit’s central connection component, in combination with the clutch cover, it both separates and connects the engine and transmission. Each clutch disc lining is selected to the particular vehicle application, to enable smooth torque build-up when pulling away. They also reduce the speed and torque fluctuations, generated by the internal combustion processes of the engine. The clutch disc must also provide the damping function, in order to reduce noise and stress in the gearbox.
This can be provided by a clutch disc fitted with a torsion damper, which is a solution for overcoming torsion fluctuation problems in the powertrain and guarantees a precise damping function, even when the engine is idling.
Clutch release bearing
The clutch release bearing, forms the link between the rotating diaphragm spring, in the clutch cover on the engine side, and the release mechanism on the transmission side, which slides on the guide sleeve mounted in the gearbox bell housing, as it is operated. This gives the bearing a central position in relation to the diaphragm spring tips of the clutch, which is achieved at all times. Selfaligning reduces the wear on the diaphragm spring fingers, and thereby counterbalances a possible misalignment between engine and transmission. Release bearings are either mechanically or hydraulically operated, via the clutch fork or are of a concentric slave cylinder type, which consists of a ring-shaped hydraulic cylinder, with a built-in release bearing.
Smartfit system
When replacing this important vehicle component, which transmits the engine’s power to the transmission and absorbs the
stress and vibration of constant operation, it is crucial that high quality components are used. Blue Print claims its Smartfit system is a tailor-made solution for a professional and cost-effective repair.
In order to meet the exact demands of each vehicle’s requirements, all clutch components undergo stringent quality control tests, with the aid of automated measurement tools, all product dimensions are checked to be accurate to the thousandth of a millimetre.
Dual-mass flywheel kits
The Smartfit for dual mass-flywheel type clutches is a coordinated combination of a rigid flywheel and clutch disc, with torsion damper guaranteeing, excellent vibration damping and with the customary high degree of driving comfort. In order to protect the gearbox, torsion dampers, tuned specifically to the engine, are used in the Smartfit kit. The torsional vibrations generated by the engine
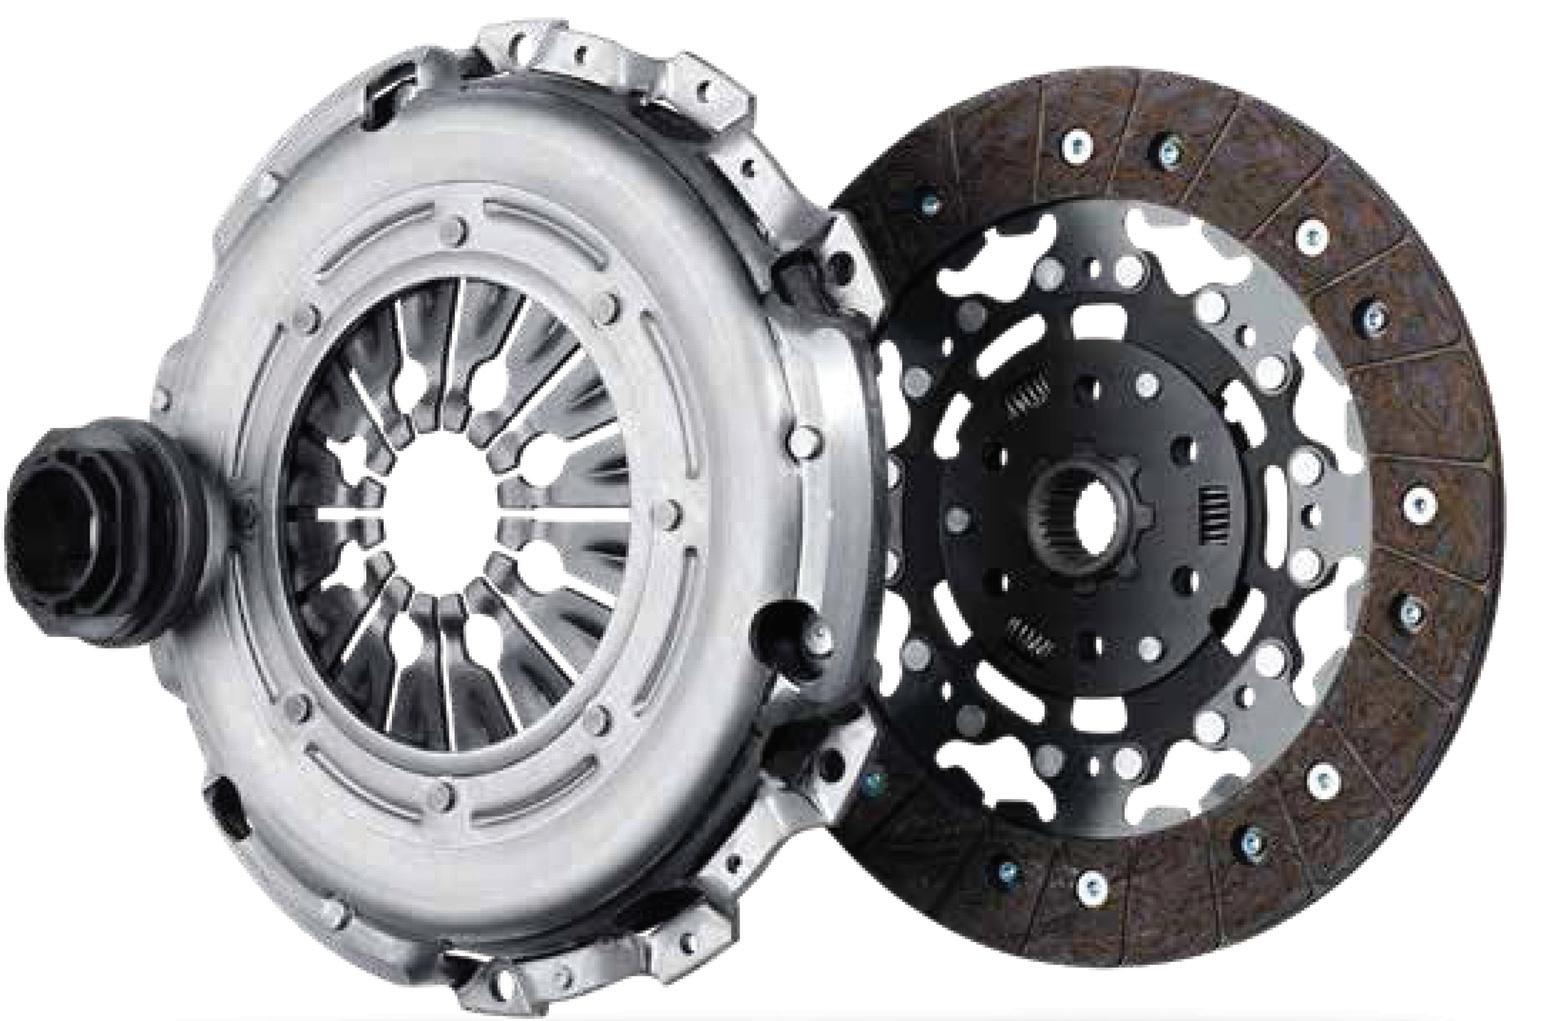
are filtered out in all driving conditions, noise is reduced and the service life of the clutch is prolonged by means of low-wear clutch linings. No special tools are required for these retrofitting kits to provide a quick, professional conversion. New fixing bolts, high-performance grease and specialist installation instructions are enclosed to ensure a straightforward replacement.
Blue Print also supplies these kits without the flywheel. The enormous benefit, is that the previously installed rigid flywheel can be re-used when the clutch is replaced. This means that only the clutch disc, pressure plate and release bearing need to be exchanged.
Self-adjusting clutch kits
The advantages of these Smartfit kits include quick and easy fitment, because conventional clutch covers are used and no special tools are required to install them. Therefore, there is no need to secure the clutch pressure plate without applying a counterforce. This not only significantly reduces the time required, but also the risk of incorrect installation.
PMM MAY 2023 47
WANT TO KNOW MORE? FOR MORE INFORMATION WWW.RDR.LINK/AAX016
The main clutch components are the clutch cover, friction disc and release bearing. Together they form a friction system with the flywheel.
Replacing the ABSUNIT ?
The first idea that comes to mind when an electronic component fails is to replace the device. But is that really the best solution? ACtronics explains why an overhaul could be the better option.
The number of electronic components in a car has increased quite a bit in the last two decades and as a result, nowadays car mechanics really need extensive knowledge of electronics. Unfortunately, the work of diagnosing the problem is not over yet: most modern ECUs need to be coded, programmed and calibrated.
Therefore, replacing such a device also involves a lot of work. ACtronics are familiar with these procedures and argue that it makes more sense to overhaul the current device than to exchange it for a new one.

An example: ABS unit continental MK60
For example, let's look at the ABS unit continental MK60 ACtronics technical guide on how to remove and install the ABS unit does not have many difficult steps to follow. So the replacement should be fairly easy for experienced mechanics. Of course you have
to disconnect the battery and bleed the brakes properly beforehand, but nothing out of the ordinary.
See the “coding” section for the most important instructions. It says: “Only necessary for replacement devices. Remanufactured units do not need to be coded or programmed, they are plug and play. This is a positive message, because after the remanufacture you do not have the same difficulties as installing a new device.” Install, bleed the system, done.
But that's not the only benefit of remanufacturing an ABS/ESP unit. Although manufacturers are constantly improving their products, modern electronic devices still have their weaknesses.
So you can replace a broken ABS unit with a new one, but the same problems could arise again in the near future. Modern overhaul services are always looking for improvements wherever possible.
So if you can eliminate weaknesses, why choose anything else?
BRAKES & CLUTCHES
48 MAY 2023 PMM
Additionally, ACtronics’ remanufacturing services are said to be on par with OEM manufacturing processes. Recently, new robotised remanufacturing lines for TCUs (automatic transmission control units), instrument clusters and ABS units have been put into operation said to guarantee a consistently high-quality product.
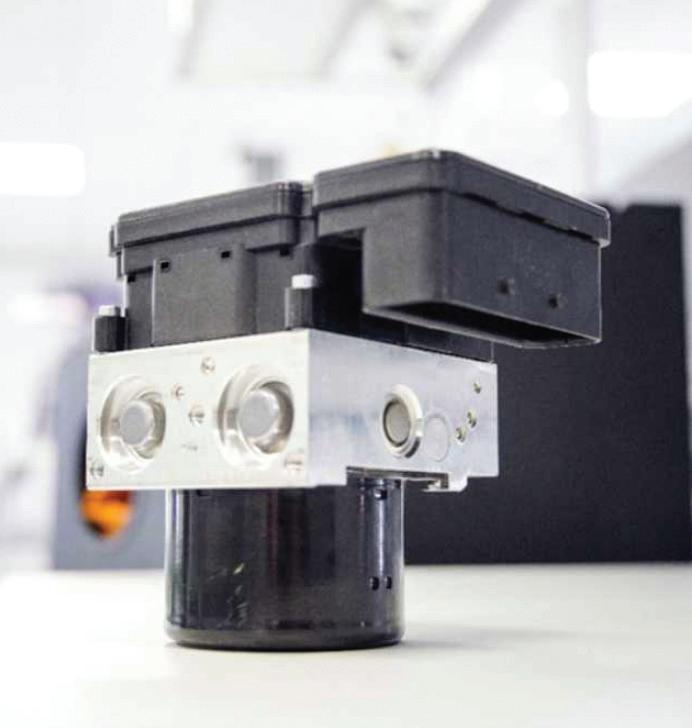
Circular Economy
Besides the ease of installation and the level of quality, there is another important point to consider. Nowadays, people are increasingly worried about the environment. So if you are able to offer your customers an eco-friendly solution that is reliable and cost-effective, they would surely like this option. Don't forget that a workshop that uses a green solution is considered a modern workshop.
So you help the environment and the image of your workshop at the same time.
Be sure to choose a real expert for your overhauls, after all, brakes are a safety feature. Done right, however, a remanufacture makes sense in a number of ways. The company argues that it will definitely opt for remanufacturing rather than replacing at any time.

WANT TO KNOW MORE? FOR MORE INFORMATION WWW.RDR.LINK/AAX017 ABS unit continental MK60 for VAG
Replacing the ABS unit requires a lot of work and so ACtronics argues that it makes more sense to overhaul the current device than to exchange it for a new one.
BEST PRACTICE
Fitting new brake pads
DRiV’s Garage Gurus, the technical support team behind the company’s Ferodo and Jurid OE braking brands look at the best practice for fitting brake pads to optimise safety, performance and durability.
Brake pads are some of the hardest working components on a car. When the brakes are applied, the caliper squeezes the two pads together onto the spinning brake disc, with the friction slowing and eventually stopping the vehicle. Around town and on longer journeys, the brake pads may be called on to slow a car hundreds of times.
Unsurprisingly then, replacing brake pads is one of the most common automotive repairs, it’s also one of the most straightforward jobs for a mechanic. However, while it’s relatively simple to complete, if the correct installation process isn’t followed, then it can give rise to several issues e.g., brake noise, caliper rattle and pad movement.
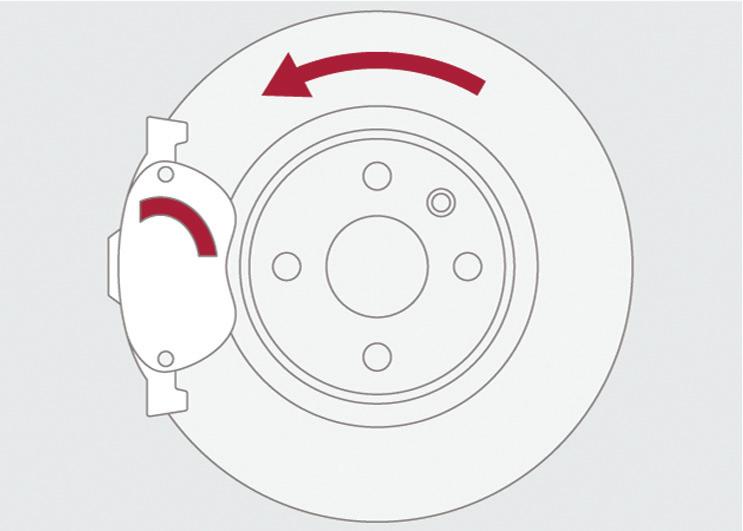
Preparation is key
To ensure compatibility between components and optimum performance, it’s always best to have matching brands of discs and pads, and to use new installation hardware. A good sign of quality brake pads is that these replacement springs and bolts will also be included in the kit.
Before replacing the pads it’s vital to first check and clean the caliper mounting surfaces, which will ensure unrestricted movement of the pistons and remove any contamination or
debris that may cause brake noise.
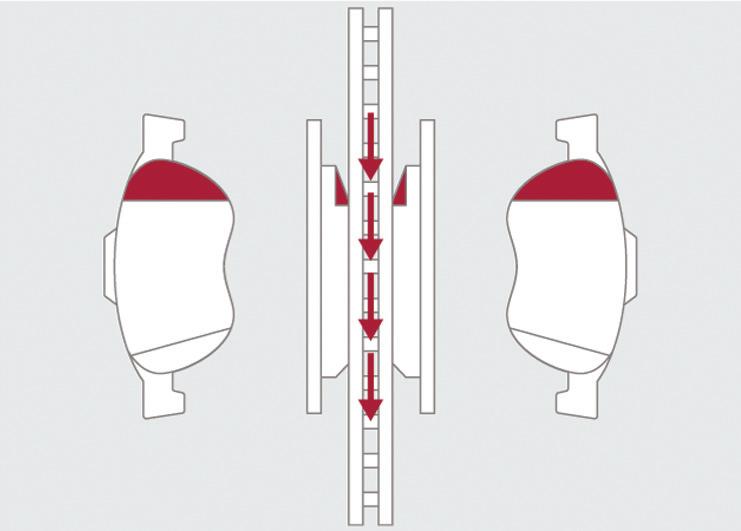
Such noise can also be avoided by adding special temperature-resistant brake grease to the abutment of the brake pads, the caliper mounts and the new brake pad clips. However, never use copper-based grease for brake system parts as this can cause electromechanical corrosion and may also lead to sticking at high temperatures.
Dealing with directional brake pads
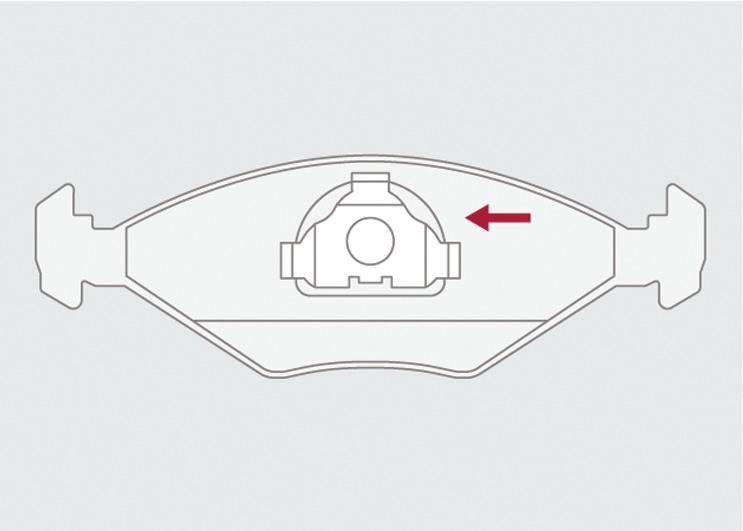
With all the surfaces cleaned and prepared, inserting the brake pads is next. At this stage, determine whether the pads are ‘directional’ or not. ‘Directional’ brake pads have an asymmetrical design that sees them applied to the disc at an angle, which works to reduce vibration and noise.
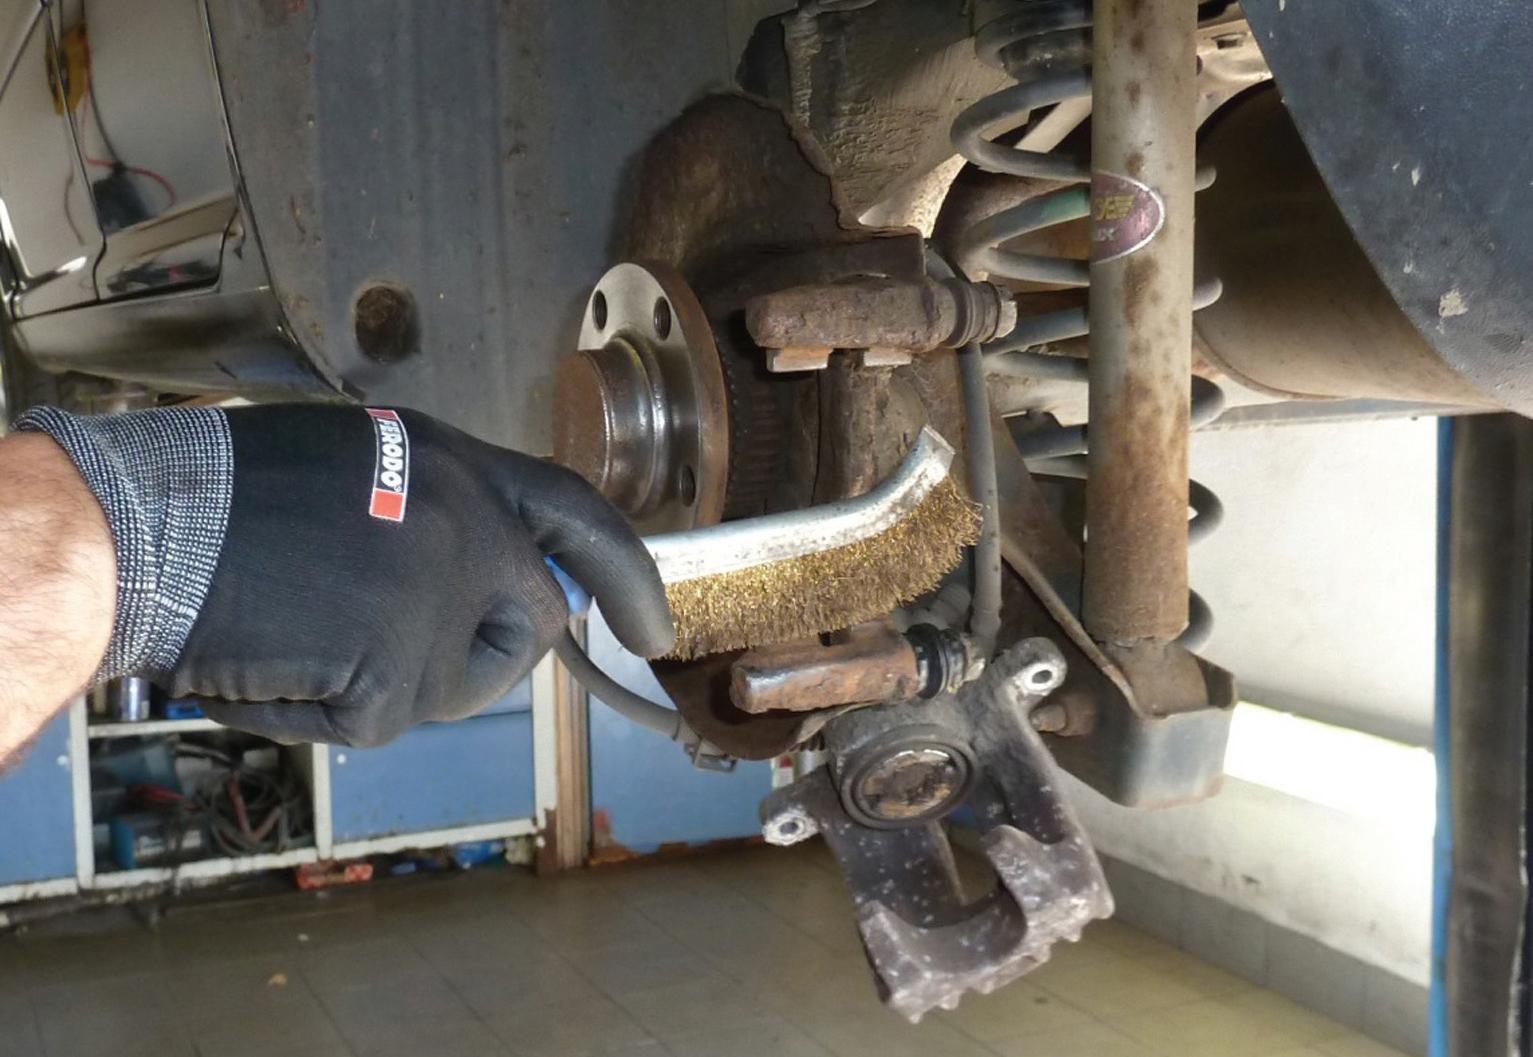
BRAKES & CLUTCHES
50 MAY 2023 PMM
Often, these pads will have a chamfer on the friction surface, or a cut-out in the noise reduction shim on the backing plate that needs to be positioned on the caliper in a specific way. To eliminate potential noise, the arrow marking on the backplate of the pad also needs to match the direction of brake disc rotation. Some brake pads will have rivets on the backplate, too. Again, these types must be fitted in the right position to avoid misalignment and potential noise and vibration.
Bedding-in
With the vehicle back on the ground and the replacement of the brake pads finished, there’s one more vital thing to complete – the correct bedding-in process. First, check the brake pedal for correct travel and feel, and then, for initial bedding-in, apply the brakes around 20 times to slow the vehicle from 80 to 30 km/h using slight or moderate pressure. It’s then a case of advising the customer to avoid sudden braking or braking from high speed for the first 200 miles. Issuing a bedding-in slip with the customer’s invoice can act as a good reminder.
Be aware that some brake pads may also be supplied with an adhesive foil. If this is the case, only the paper needs to be removed. The adhesive foil is there to secure the brake pad to the caliper piston and avoid any movement.
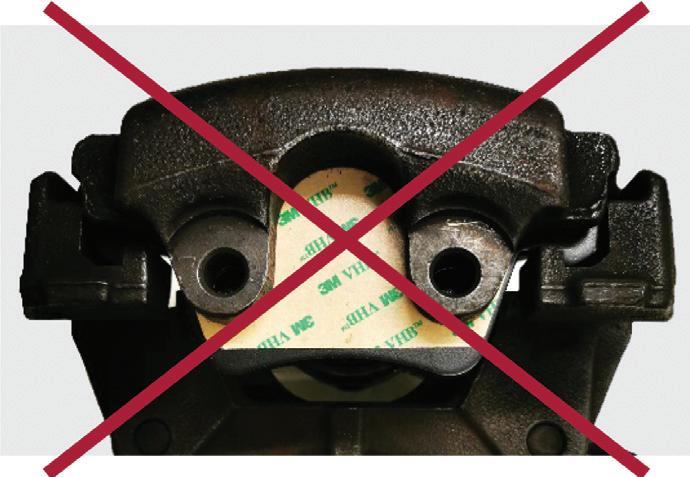
Tightening the caliper and wheel bolts must be done to manufacturer’s recommendations and the use of a pneumatic impact wrench must be avoided. Instead, a gentle compressed air tool and then a torque wrench are recommended.
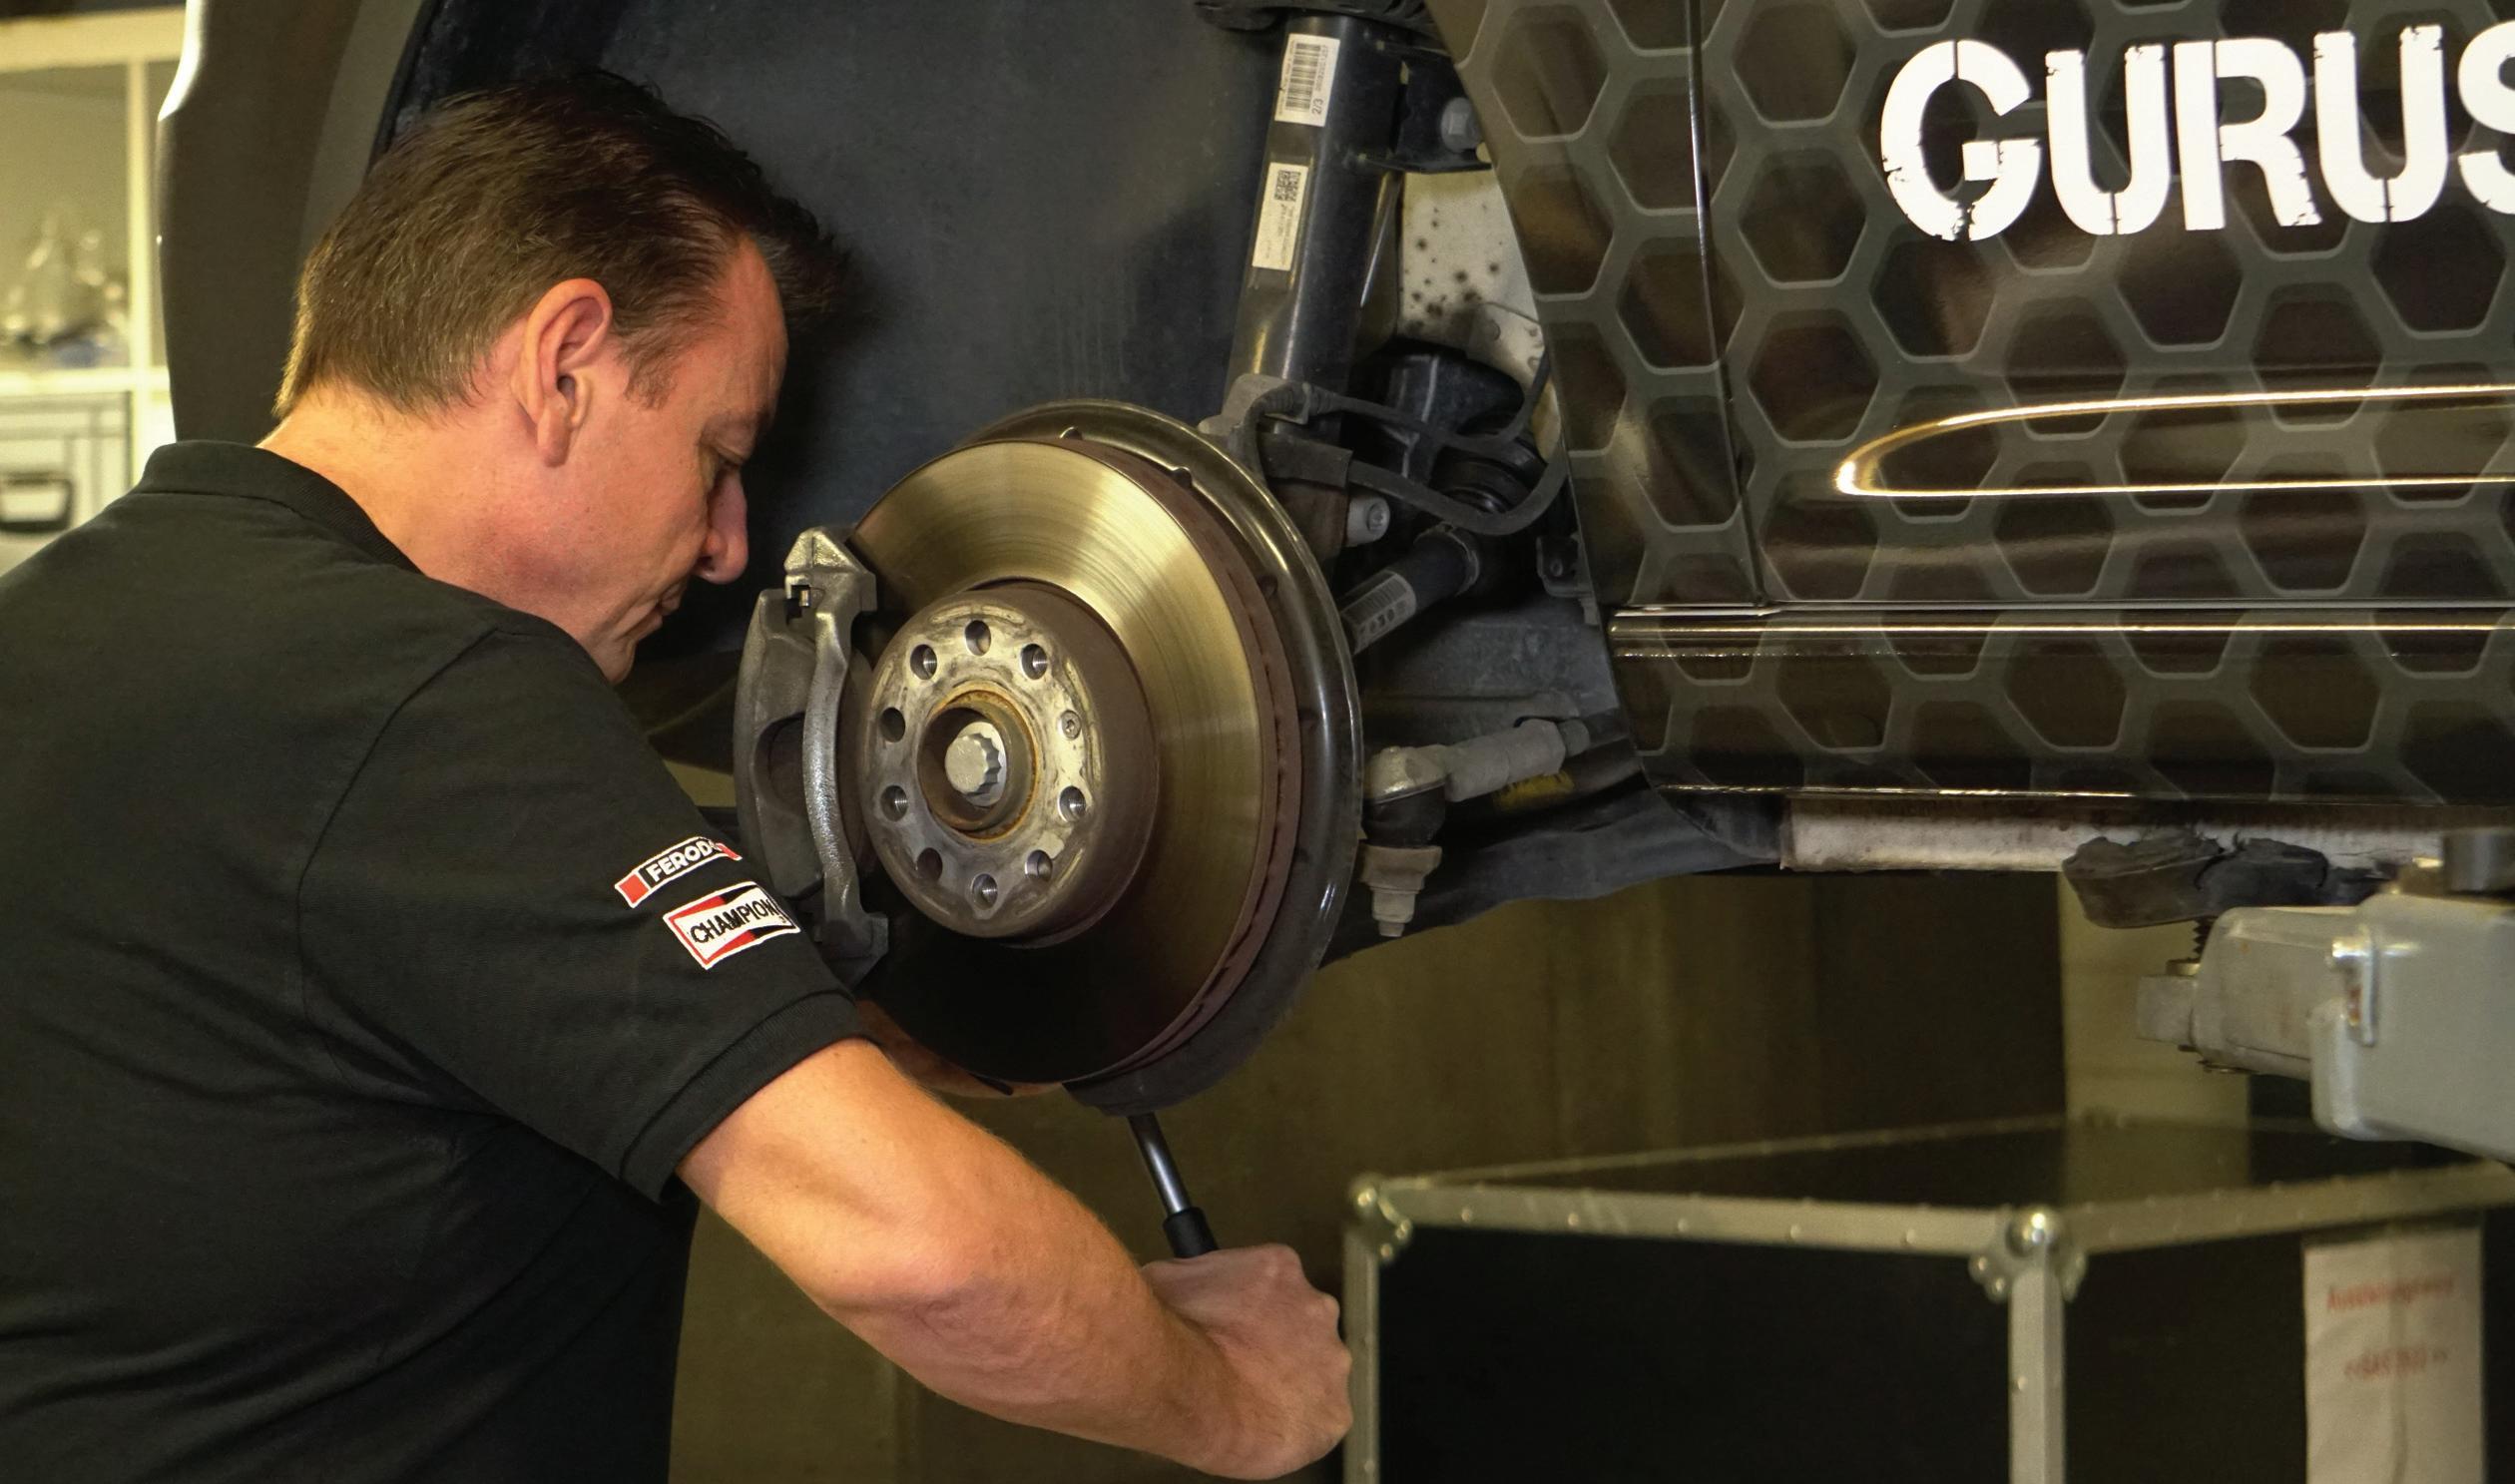
By following the right installation and bedding-in process, the chance of any unwanted noise or vibration are minimised, with the vehicle acting under braking as it should. For the best job, match the right procedure with quality brake pads and brake discs. The company recommends using both pads and discs of the same brand for best compatibility and performance. For matching OE quality, Jurid or Ferodo have decades of proven braking expertise in producing components that excel in all conditions. This way, the customer will benefit from a long-lasting repair that returns their vehicle’s braking performance to as the manufacturer intended.
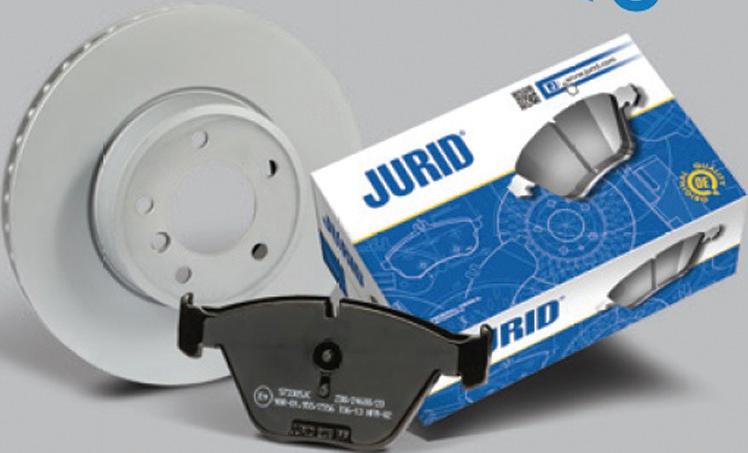
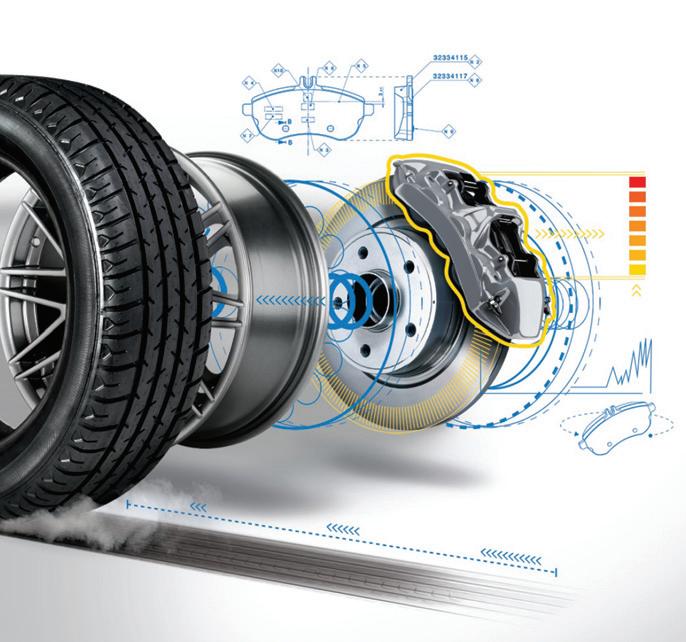
PMM MAY 2023 51
WANT TO KNOW MORE? FOR MORE INFORMATION WWW.RDR.LINK/AAX018
“To eliminate potential noise, the arrow marking on the backplate of the pad needs to match the direction of brake disc rotation.”

CLASSIC GOLD
It’s generally a widely held view that any car manufactured after World War II, or more than forty years old is a ‘classic car’. Whatever the definition, one thing is certain, it is a massive sector worth billions of pounds. One company that helps keep these much loved vehicles on the road is Niterra UK – which has changed its name from NGK Spark Plug – with its respected NGK ignition components.
Full details of the NGK range plus tips and application advice is incorporated in its classic and vintage vehicles catalogue 2022/23 which has been compiled by its technical team and can be downloaded from the downloads section within the part finder sub-site on the company’s website: WWW.RDR.LINK/AAX019
The catalogue contains vehicle specific part numbers and stock numbers for a wide range of classic and vintage cars, including any upgrade plug options. Some obsolete part numbers are also retained, to enable owners to try and source them elsewhere.
Marketing manager Mark Hallam said: “What we are doing as a company is basically helping to keep these classic cars on the road. Our catalogue contains not just parts numbers and stock numbers but additionally details of spark plug upgrades as our iridium spark plugs have greater fouling resilience and can be fitted to classic cars, which some owners may be unaware of, or sceptical.
“In some cases, installation of our iridium and platinum precious metal spark plugs can mask potential issues arising from poor ignition system performance, poor fuelling
control that may lead to fouling, higher ignition coil loads and increasing unwanted emissions, making precious metal spark plugs advantageous for fitting to classic cars.
“They may be more expensive and some owners may be reluctant to spend £17 rather than £7 for a spark plug, but these can help prevent problems.”
Spark plug selection for classic engines
Advice
Classic and vintage engines are, by their very nature, less likely to be used as everyday vehicles. If fuel is left unused for a prolonged period, then the fuel can become ‘stale’ over time. When the engine is attempted to be started, the stale fuel can wet foul spark plugs and fail to start.
A sensible precaution to prevent this issue is to drain any fuel from the vehicle before storage. Modern fuels can be susceptible to degrading more quickly, becoming harder to ignite after a short period of time, often within only a few months. The introduction of higher ethanol content into forecourt fuels has created additional concerns.
actual level of resistance at the electrode gap under combustion chamber pressures is far greater than any resistor installed in a spark plug.
Resistor plugs can and are used by many owners with this system without any issues, providing the ignition system is in good condition. Some owners successfully use the modern NGK iridium ‘IX’ range of spark plugs in conjunction with magneto ignition systems. One advantage of the ‘IX’ range is the use of a very fine-wire centre electrode (0.6mm diameter), which requires less voltage to create a spark, beneficial when using a low powered ignition system.
Counterfeit parts
Classic car owners are advised to be aware of counterfeit products in the market-place and should always source NGK components from a reputable source. The risk of blowing up an expensive engine rebuild for the sake of saving a few quid is not worth it.
Although not a regular occurrence, it has become more common due to the popularity of online sales and it is inevitable that dubious companies may try to cash in on the NGK brands’ established quality reputation.
Resistor
Many older ignition systems are based on lower voltage magneto set-ups. NGK resistor plugs use a high-quality ceramic material for the resistor construction, which provides a very stable resistance level, typically 5k ohms. A magneto ignition system can still generate thousands of volts under normal running conditions, which is more than capable of operating with resistor plugs. The
Thankfully, the UK market has had very few confirmed reports of this problem. Copies can be very deceiving in appearance, but they can significantly underperform genuine NGK products (over-heating, fouling, breakage) and can result in engine damage.
WANT TO KNOW MORE? FOR MORE INFORMATION
WWW.RDR.LINK/AAX020
PMM MAY 2023 53
CLASSIC CAR
The newly christened Niterra UK – formerly NGK Spark Plug – explains what it
is doing to support workshops servicing the classic car market.
Motul is more than 150 years old, so it’ll come as no surprise that it sees the classic car market as an area with increasing opportunity. From “youngtimers” to older cars, the lubricant company tells PMM readers how garages can take advantage of this growing market.


MODERN TECHNOLOGY,

historic vehicles
The constant growth of the classic car sector and its absorption of the increasingly popular “youngtimer” period — cars from the ‘80s ‘90s and even noughties — means that more and more historic vehicles are on the roads, presenting real and growing opportunities for garage workshops.
There have been major steps forward in engine development since the dawn of the motor vehicle and so the oils that help keep them running smoothly and efficiently have also developed. The net effect of this is that if your work brings you into contact with classic cars or even what are described as “youngtimer” vehicles, the latest crop of engine oils might well not be the best option for them. Oil companies have therefore developed ranges of lubricants specifically to
deal with engines of vintages, and these in turn offer opportunities for workshops both for increased customer satisfaction and increased revenue.
Specialised range
Fifteen years ago, Motul launched a specialised classic oil range. These dedicated products have been developed with detergent levels that are adapted to better suit old engines and, where necessary, include additives to prevent potential problems from these older units, as well as promote optimal running. The ranges cover everything from pre-war vehicles to “youngtimers” or future classics. These cars have become available to enthusiasts at a lower level of investment compared to earlier vehicles and, in turn, have become increasingly collectable.
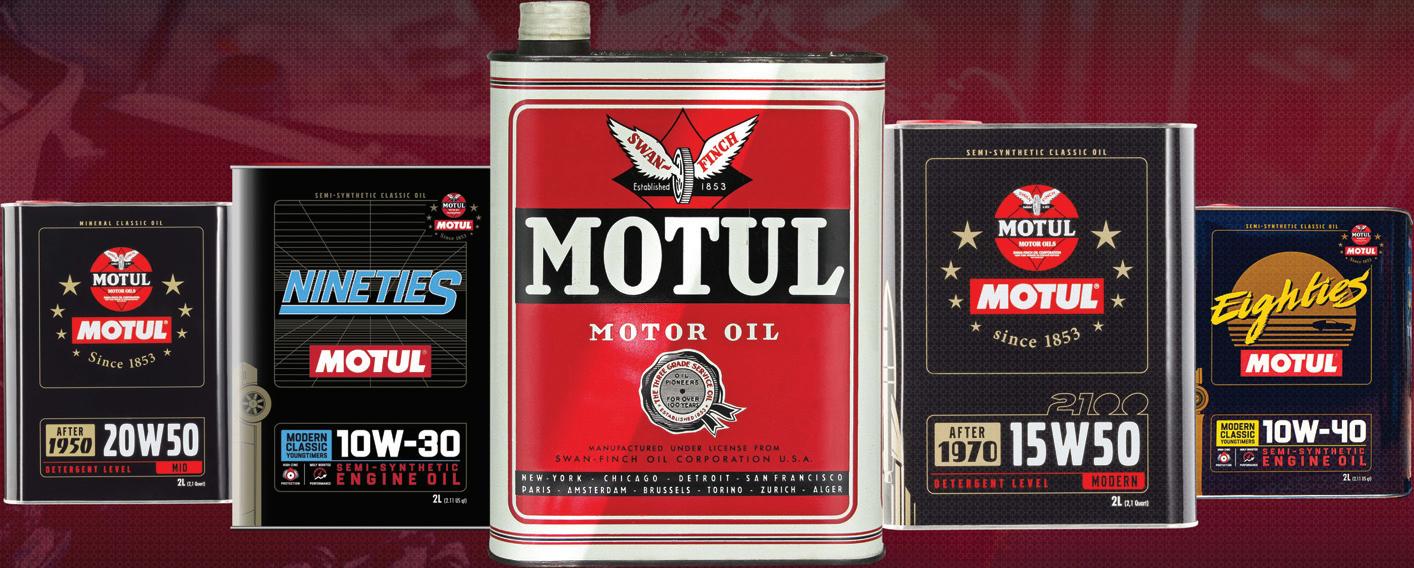
The market is estimated at almost 10 million cars, of which there are hundreds of thousands of in the UK. They are driven for fun, with passion, and by owners with an interest in collecting them – especially sport or premium/limited edition models.
So, when dealing with lubricants for an historic vehicle, there are now lubricant options suited to whatever rolls into the workshop, all using modern technology to help older cars to work as they should. Motul split its classic motor oils into the following specifications of oil – all of which come in tin packs, which help visually differentiate them from modern oils. The key characteristics of each oil are designed to tie in with the specific requirements of engines of their period. So, using the Motul range as an example, what follows will give an idea of what key points to look out for with use with classics of specific eras:
Older cars
1900s-1950s SAE30 AND SAE50: Mineral monograde lubricant with very low detergent level for a complete compatibility with paper, felt or fabric gaskets.
1950s-1970s Classic oil 20W50: Mineral multigrade lubricant with mid-level detergents, compatible with engines which have elastomer gaskets.
CLASSIC CAR
54 MAY 2023 PMM
The 20W50 oil meets standards of the 1950 – 1970 period (API SF/CC) while benefiting from modern technology. Its viscosity is suited to engines with narrow running clearances, due to significant progress at the time in metallurgy, casting and machining. Good anticorrosion and anti-wear properties.
1960s Classic oil 2100 15W-50: In 1966, Motul produced 2100, which was the first semi-synthetic lubricant in the automotive market. This is an updated version of that semi-synthetic oil, now developed for naturally aspirated and turbocharged original engines built after 1970.
Classic eighties 10W-40 and classic nineties 10W-30: Semi-synthetic multigrade engine oils specially designed for modern classic and youngtimer vehicles from the 1970s, 1980s, and 1990s fitted with four-stroke engines, either petrol or diesel –naturally aspirated, supercharged or turbocharged, injection or carburettor. These two engine oils claim to deliver protection and optimum functionality for classic and vintage engines.

Other lubricants
Engine oils provide the central requirement for historic vehicle lubrication, but there are many other lubricant and fluid requirements for both classics and youngtimers, just as with modern
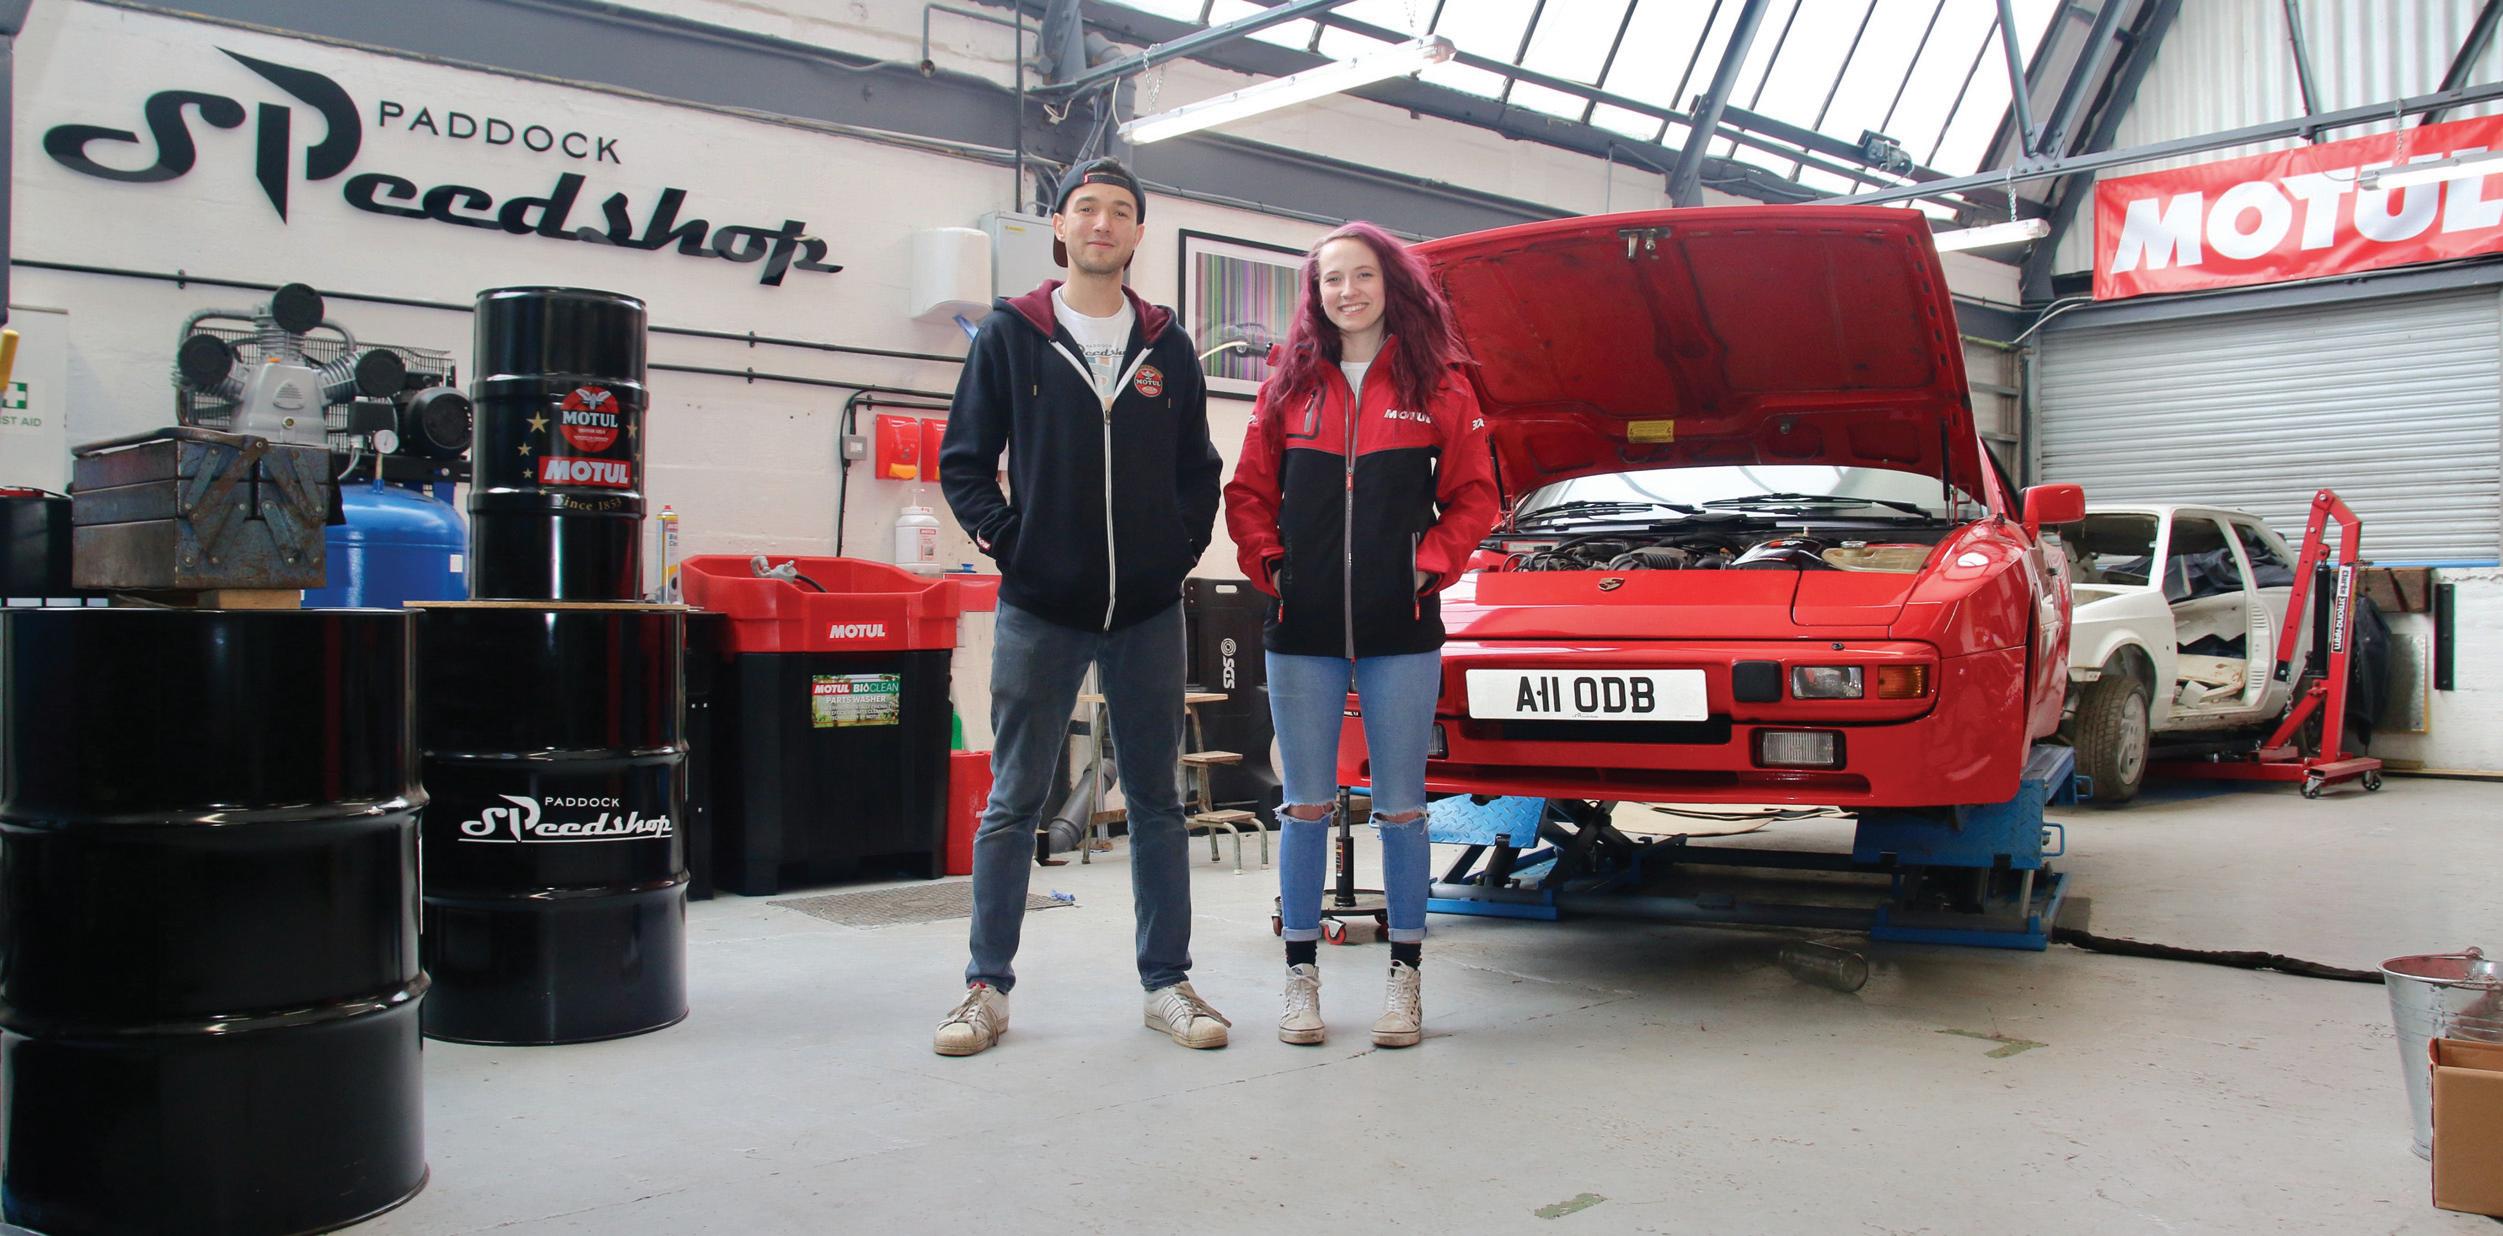
cars. Motul has therefore taken the opportunity to extend its classic range to include coolants, cleaners and vehicle care products, which, like the engine oils, are designed specifically for the maintenance and care of classic cars and offer further opportunity to deliver the optimum product to their owners and extend the upsell as related work.
The time of year
Classics are not always going to be their owners’ daily drive. The better weather of summer make these prime periods for classic car owners to be using their cars.
Many classic vehicle owners will then look to lay up their vehicles for the winter as autumn progresses and offering the opportunity of a workshop service before this time could also prove appealing, so that cars go into “hibernation” in optimum condition. It is worth noting that the additives packages in the classic and youngtimer oils also bring
long-term storage protection during those periods when driving for fun just isn’t possible. So, targeting owners during these periods could pay dividends.
Motul’s involvement
Motul believes that if you talk the talk you have to walk the walk, so it puts a great deal of time and resource into truly being part of the classic car sector. It is a valued partner to many events, clubs and organisations.
Therefore, the company are involved in some of the world’s greatest classic vehicle events - from the Silverstone Classic and Classic Le Mans, The Classic Car and Restoration Show all the way to the Goodwood Revival and it is also the official lubricant partner of The Federation of British Historic Vehicle Clubs.
PMM MAY 2023 55
WANT TO KNOW MORE? FOR MORE INFORMATION
WWW.RDR.LINK/AAX021
The right TOOL for thejob
Whilst many owners carry out their own maintenance or repairs, a specialist is often entrusted to carry out the work and for this a slightly different tool kit may be required. Tool experts Sealey shares its recommendations.
Most European and Japanese car manufacturers adopted the metric system for fasteners many years ago and this has been universally adopted over time by almost all vehicle manufacturers. However, certain classic British models, pre-war particularly, use Whitworth fasteners, and therefore Whitworth-size tools will be required to carry out maintenance successfully.

Whitworth tools are sized according to the shank of the bolt, rather than the head size. Attempting to use an oversized spanner could cause the spanner to slip, rounding off the edges of the hexagon.
Sealey provides a range of Whitworth socket sets and combination spanners, including the S0870 8-piece set, covering sizes 1/8", 3/16", 1/4", 5/16", 3/8", 7/16", 1/2", 9/16". The standard and deep socket sets are available in 3/8” or 1/2” sq. drive.

Before Whitworth was introduced, there was no uniform system for standardising the threads on screws and bolts. In 1841, Joseph Whitworth set forth a concept that was to
simple, to mandate a thread density, angle, and pitch to make interchangeability and reusability key.
Finally, there was a system that would allow the fasteners used on one type of machine to be replaced with another “standard” fastener. The logic was hard to beat, and by 1881 England had adopted the system to such an extent that it effectively became the British standard (BSW). The
CLASSIC CAR
56 MAY 2023 PMM
“It is important to use the correct tools for any job to avoid the risk of injury, component failure, or damage to the vehicle.”
BSF thread (British standard fine) was later developed as a finer thread alternative. It had the same thread angle as the BSW, but the finer thread pitch and smaller thread depth meant the fastener was more resistant to vibration.
Vehicles manufactured after the war adopted a more unified fastener size. The necessity for a system that both American and English manufacturers could use was a direct result of the war effort. The fact that the allies shared much of the same machinery and equipment made interchangeable parts essential. As Whitworth bolts had larger heads, there was also a need to reduce this to conserve metal.
On unified fasteners, the size was given as a measurement across the flats of the hexagon; this was how the term “AF” came into being. This type of fastener was in use for several decades. Again, thought needs to
THE AK694 64-PIECE 3/8” & 1/2” SQ. DRIVE SOCKET SET

The AK694 64piece 3/8” & 1/2” Sq. Drive Socket Set from Sealey provides comprehensive coverage, not only containing metric and imperial sizes but also including 1/2” Sq. Drive Whitworth sockets.
be given to the tools required for maintenance on vehicles using this type. Some metric sockets and spanners will fit AF fasteners, but not many. It is important to use the correct tools for any job to avoid the risk of injury, component failure, or damage to the vehicle.
Always buy the best hand tools you can afford – they reduce fatigue and last a lifetime. All Sealey’s hand tools are manufactured from high-quality materials to exacting standards for a long and durable life. They are also backed up by a lifetime guarantee, offering you peace of mind and many years of service ahead.
WANT TO KNOW MORE? FOR MORE INFORMATION WWW.RDR.LINK/AAX022

Cleaner air OUTSIDE and IN
Meyle explains how electric vehicles have greater space for high-performance cabin air filter technology.
Health awareness is on the rise. However, the air in cities and built-up areas is being polluted by ever greater volumes of traffic. Harmful bacteria, pollen, fungi and suspended particles such as aerosols, viruses, particulate matter and nitrogen oxides (NOx) are contaminating the external air and therefore also the air in vehicle cabins. The answer? Innovative filter technologies and greater space for large cabin air filters in electric vehicles.
Meyle PD cabin air filter
With the PD cabin air filter, Meyle have developed a filter that claims to remove smog, exhaust gas, soot, ozone and pollen, but also particulate matter and nitrogen oxides (NOx). Filtered NOx is chemically bound to activated carbon as a salt in the filter material and is not released again even when disposed of. This cabin air filter thus permanently and sustainably reduces NOx in the environment and directly in the cabin. Currently, Meyle is the only manufacturer in the IAM to offer a filter with this property. The range currently comprises 24 filter solutions for electric vehicles and 30 for hybrid vehicles.
Make room
While there was, until now, little space for highly efficient, high-performance cabin air
filters due to the limited installation space available in vehicles with a combustion engine, electric vehicles can offer this. The absence of an engine means this installation space is now available, meaning large cabin air filters can be installed. For example, depending on the design and architecture of the installation space, the all-electric Renault ZOE offers space for one, the Mercedes EQE space for five and the Tesla model Y even space for up to six PD cabin air filters. In comparison, conventional vehicles have until now only been able to offer space for a maximum of two cabin air filters.
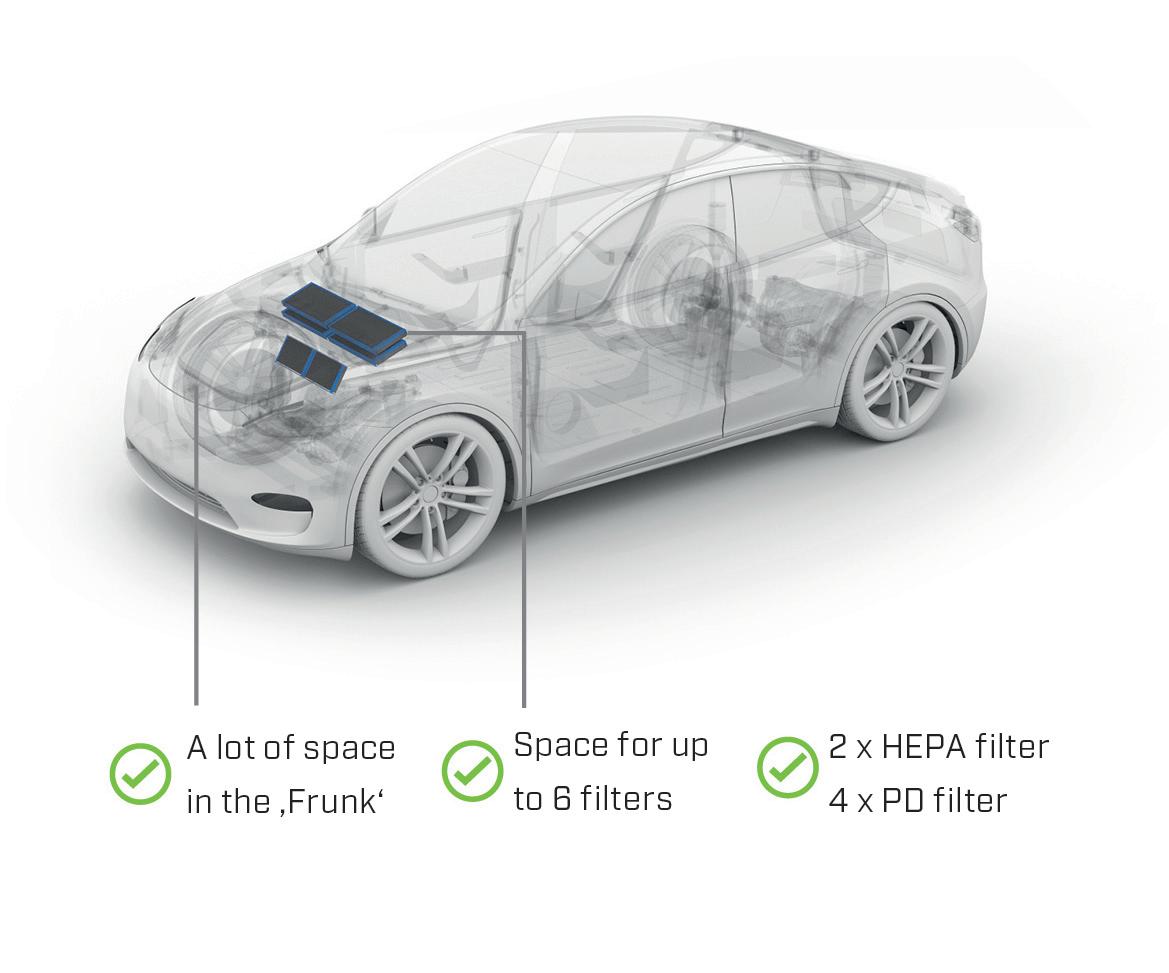

HEPA filters
The latest and most efficient generation of cabin air filters for cars are what are known as HEPA filters (high-efficiency particulate air filters). Classified in accordance with DIN EN 1822 and ISO 29463, they claim to filter more than 99.9 per cent of all dust particles larger than 0.1-0.3 microns (μm) such as viruses, bacteria, toxic dusts and aerosols out of the air. They are used among other things in the medical field in laboratories, clean rooms and sensitive industrial processes. Their efficiency is clearly illustrated when we consider that, until now, conventional cabin air filtration has essentially focused on capturing pollen, which are approximately 100 times the size of suspended particles. The HEPA filters’ efficiency is due to the fibres
HEPA filters filter more than 99.9 per cent of all dust particles larger than 0.1-0.3 microns such as viruses and bacteria out of the air.
being finer and denser. This increases pressure loss on the one hand, but this is offset on the other by the filter medium being folded even more tightly and by the greater surface area. Therefore, the filter class has achieved sets new standards in the filtration of air in electric vehicle cabins.
Meyle has been systematically expediting the mobility transition in the IAM as a developer, manufacturer, and supplier of holistic solutions since 2016. It offers its customers spare parts and solutions for electric vehicles in the independent aftermarket under the name Meyle eSolutions. As a further development of the PD filter, the manufacturer is now developing its own highly efficient and powerful HEPA filter. The new filter will be available as early as this year and will expand the range.
PMM MAY 2023 59
FILTERS WANT TO KNOW MORE? FOR MORE INFORMATION WWW.RDR.LINK/AAX023
Regular combustion engine PD cabin air filter stops NOx –for clean air
E-vehicle Sterile environment with HEPA & PD filters
Filter overview in combustion engine cars versus electric vehicles
BEST PRACTICE
Cleaning diesel particulate filters
In this article, oil and lubricants supplier Wynn’s explores how to start cleaning DPFs in the workshop using its in-house solutions.
Diesel particulate filters (DPFs) are essential to modern diesel engines, designed to capture particulate matter and reduce harmful exhaust emissions. The filter is positioned in the exhaust and traps soot particles, which are burnt off at high temperatures, regenerating the filter. However, many factors can prevent a DPF from regenerating correctly, such as the exhaust not getting hot enough due to short journeys, incorrect oil used, a sticking EGR valve, a faulty turbo, a dirty fuel system or even a low fuel tank. Over time, the DPF can become clogged with soot and other contaminants, leading to increased emissions, poor engine performance and DPF failure.
Cleaning and restoring a DPF is now an essential maintenance task for most workshops, leaving technicians with two options for tackling DPF issues. Send it away to be cleaned or perform the DPF cleaning in the workshop, keeping the revenue in-house and completing the job faster. Have you thought about performing DPF cleans yourself?
Before we get into the benefits, let’s outline the options for cleaning DPFs. Wynn’s offers three DPF cleaning solutions, but what’s the difference and which one should you use?
When faced with an illuminated DPF warning light, the first action is to check the soot-loading level of the DPF using diagnostic equipment. The soot level will determine which solution to use.
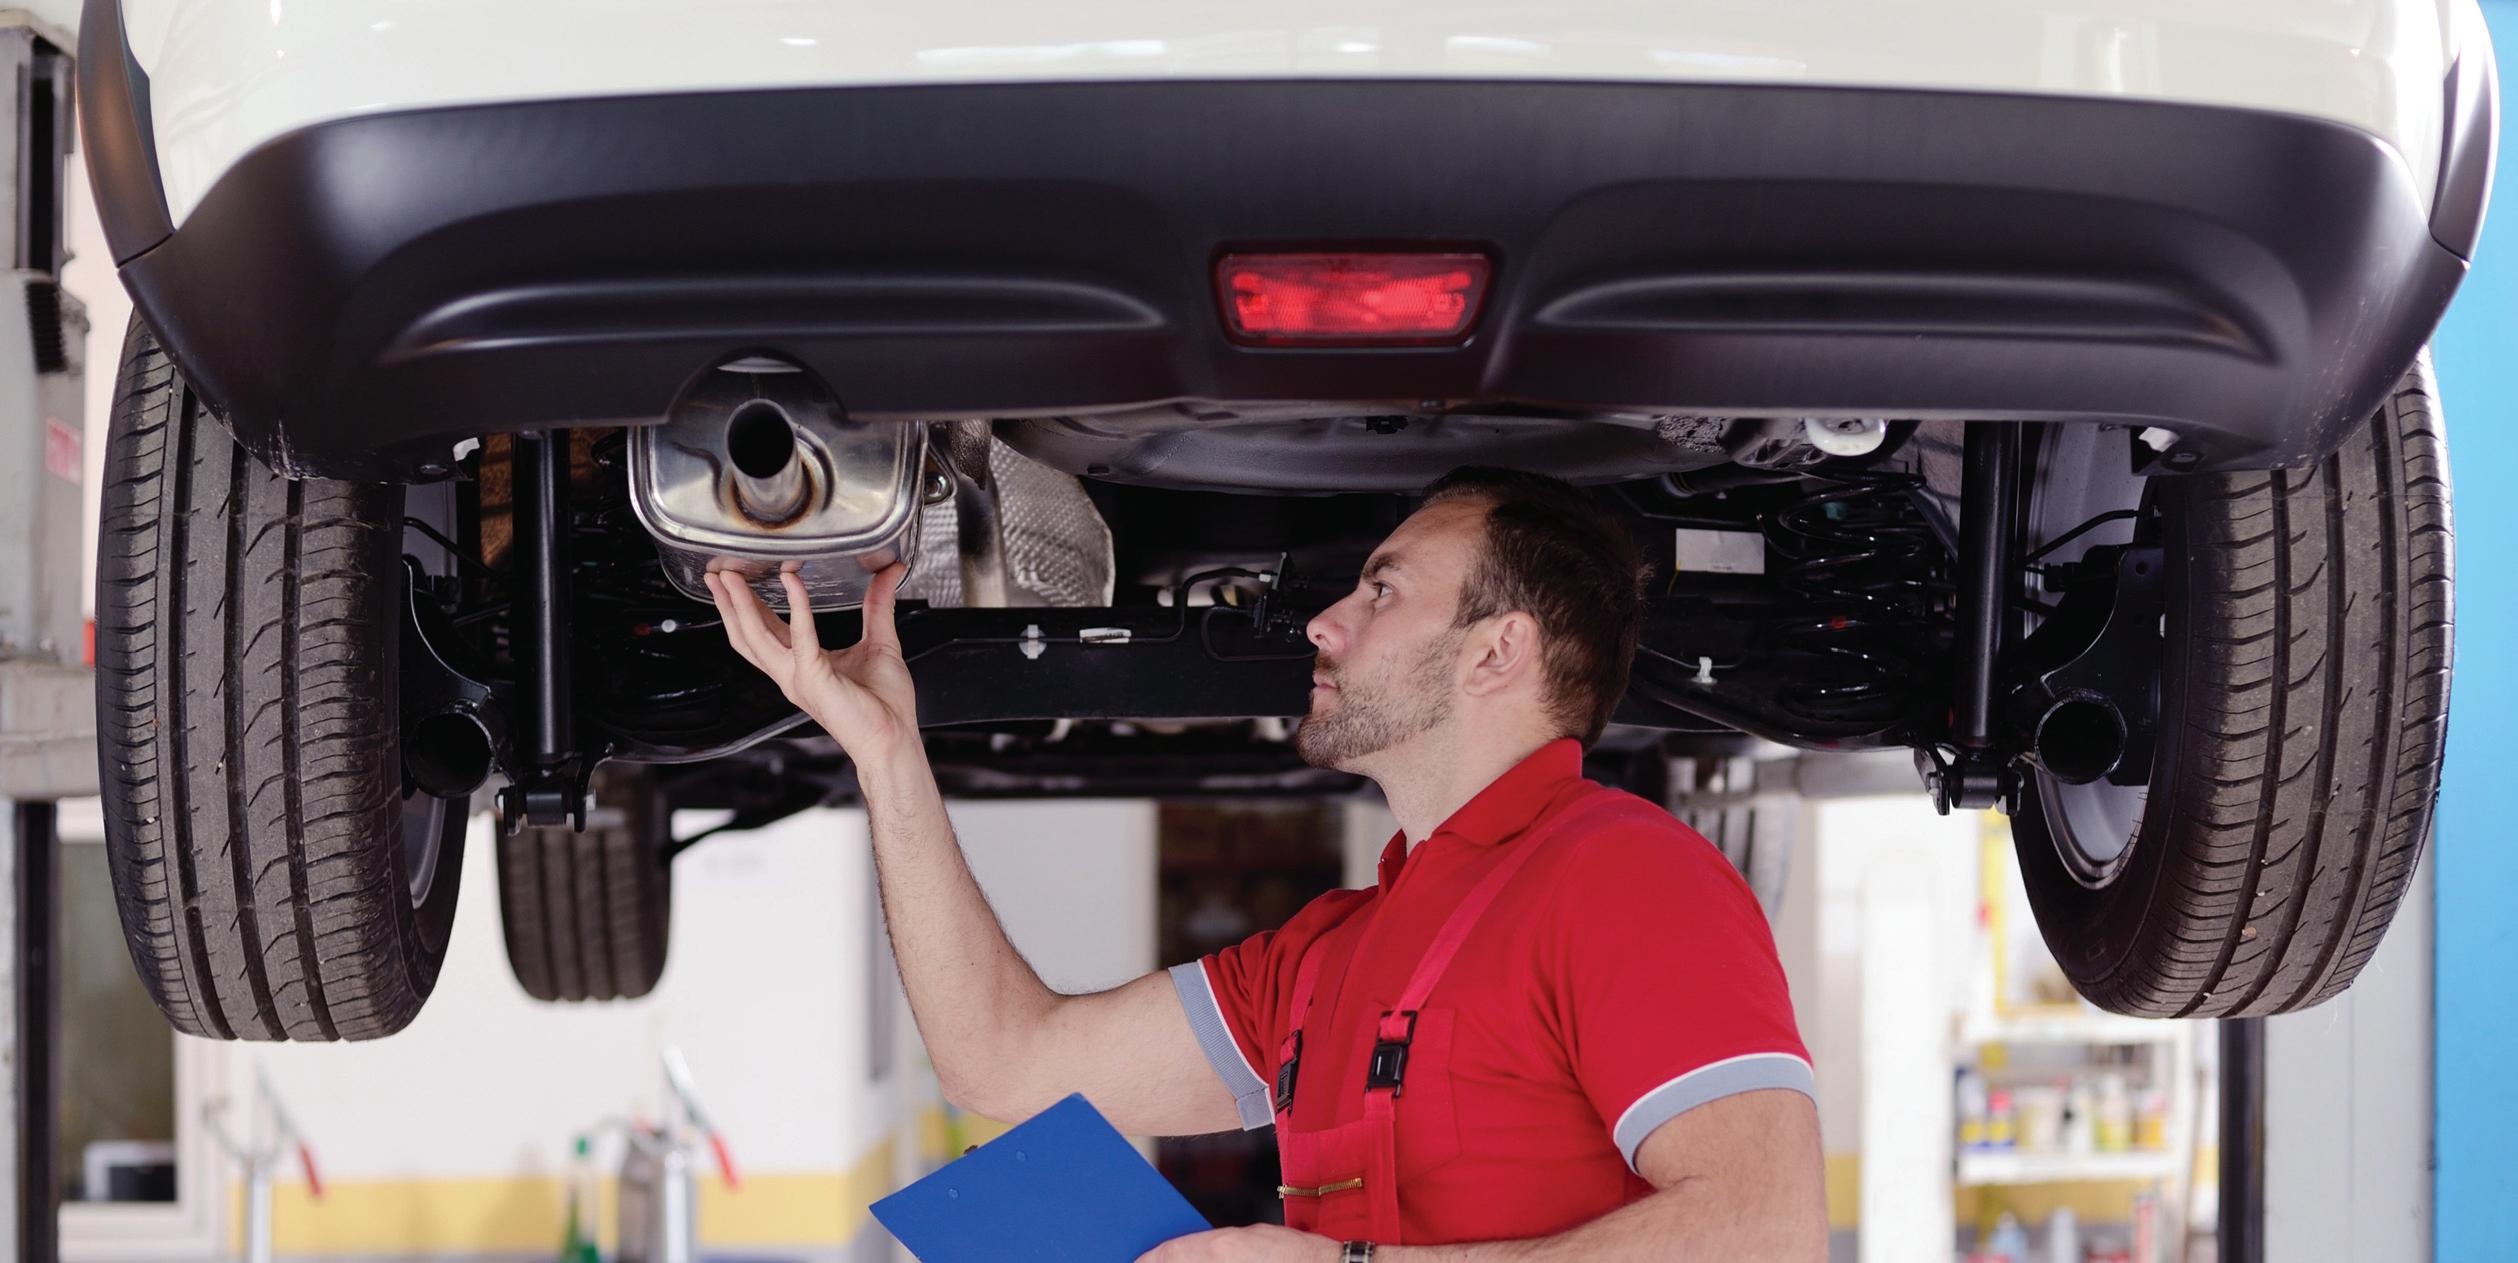
filter regenerator is the easiest solution. Pour one bottle into the fuel tank with at least half a tank of fuel and drive the vehicle until the blockage clears (in line with the manufacturer's instructions). The treatment lowers the temperature at which soot particles burn off, helping to burn off the soot more efficiently and quickly, regenerating the filter.
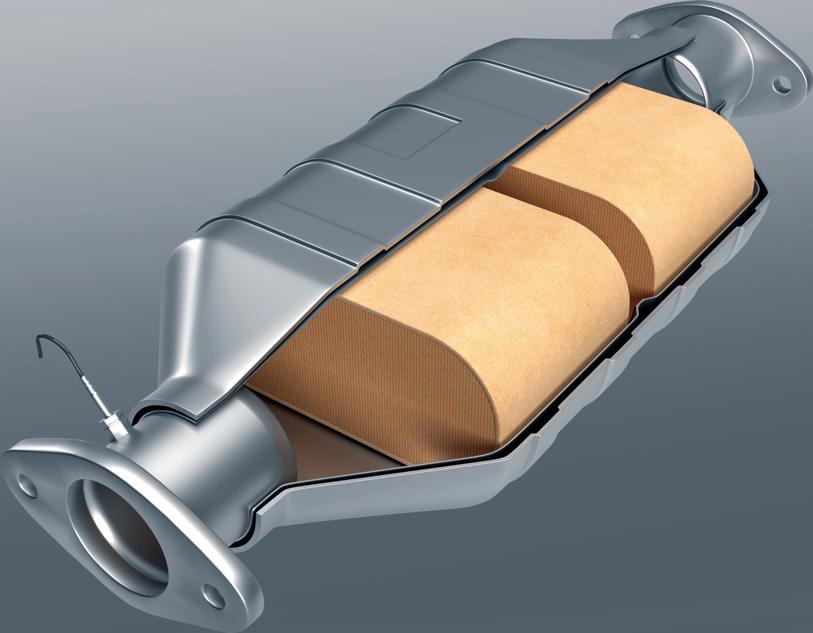
■ 40-70 per cent blocked – DPF and GPF on-car cleaner is designed to clean the filter in situ, without removal. The treatment is applied directly into the filter and is fast and safe to use, with a lowfoam and non-flammable formula.
■ Over 70 per cent blocked – DPF off-car cleaner should be used if the filter is heavily clogged and standard regeneration methods fail. The DPF must be removed for manual cleaning with the cleaner to safely clean away deposits and restore the DPF in as little as 90 minutes.
FILTERS 60 MAY 2023 PMM
Before After
When cleaning the DPF, Wynn’s recommends cleaning the fuel and oil system. Use diesel extreme injector cleaner to clean the vehicle’s fuel system, perform an engine flush using oil system cleaner and change the oil and filter. This ensures the fuel and oil system is free from contamination, the engine performance is restored and the vehicle operates efficiently. Now that we’ve identified which solutions to use when cleaning the DPF in the workshop, what are the benefits?
■ Increase your workshop revenue: The primary benefit of cleaning a DPF in the workshop is the increased profit opportunity. Sending the DPF awaycan be expensive,so youcansavemoney byundertaking in house.
■ Complete the job faster: Time is money. Another advantage of cleaning a DPF inhouse is the faster turnaround time. When sending a DPF to be cleaned, you are left with a vehicle in your workshop until the DPF is back and ready to be refitted,
which can sometimes take several days. Alternatively, cleaning a DPF in-house can take as little as a few hours, which means you can complete the job the same day with minimal downtime, invoiced and get back to your customer.

■ Simplicity: Whether it’s pouring, spraying or soaking, Wynn’s DPF solutions follow a simple process: Clean the DPF (depending on soot load), clean the fuel and oil system and change the oil and filter.
If you start tackling DPF issues in-house, it is advisable to keep all three solutions in stock so you are prepared for any level of contamination.
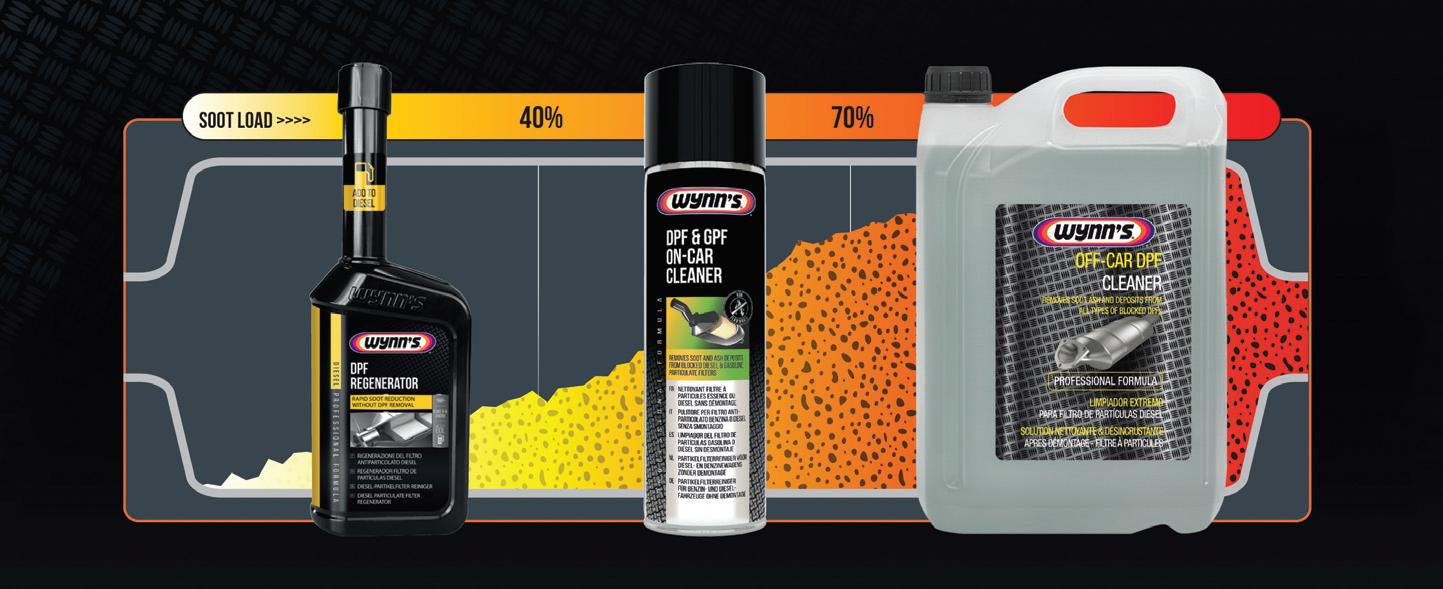
WANT TO KNOW MORE? FOR MORE INFORMATION WWW.RDR.LINK/AAX024
FILTERS fit for purpose
Wix Filters informs PMM about the importance of cabin air filters, the requirements of air filter gaskets and the effect biocomponents have on fuel filters.

The quality of the air filter gasket affects the entire process of filtration and the air that is sucked in by the engine. Each gasket must provide an airtight and durable connection between the filter and the housingin which the filter is installed.
The basic requirement that the air filter gasket must meet is the appropriate deformation resistance. In the case of Wix filters, it is verified in its laboratory whether the air filter gaskets are adequately deformed even under extreme conditions of operation of the filter by measuring the elasticity of the gasket after a period of 96 hours of compressing it to 60 per cent at 110°C. Also, by measuring the elasticity of the gasket after 500 hours of storing the filter in a climate chamber with the air circulation set at 110°C.
Another important requirement that the air filter gasket must meet is tensile strength and resistance to hydrolysis which are controlled in its laboratory using specialised measuring instruments. This is to ensure Wix air filter gaskets have reliable air tightness of the filter in the installed housing. A lack of tightness can result in damage to pistons, bushes, cylinders, and the turbocharger caused by impure oil getting into the engine.
Fuel filters and biocomponents
Fuels with biocomponents are available at stations, an example being E10 gasoline, with a maximum of 10 per cent bioethanol. Fuel of this type has a much more aggressive effect on certain materials and can react with them.
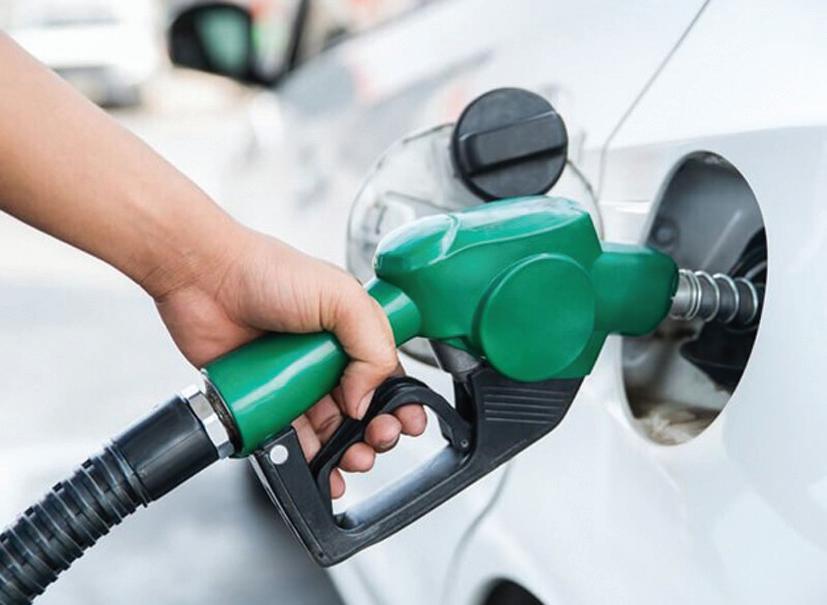
Therefore, it is important that automotive parts which come into contact with fuel are biocomponent resistant. E10 gasoline resistant materials are used in Wix fuel filters to ensure their proper filter operation, even at extremely high and low temperatures. An example of the materials selected for their resistance to particularly difficult working conditions for the fuel filter is the rubber compounds of which the filter seals are made. Two types of mixture are used in the company’s filters:
Nitrile Rubber: The raw material of this rubber is adjusted to the specifications determined by the company, based on laboratory tests. It is resistant to temperatures ranging from -30 to +110°C.
Fluorosilicone rubber: This type of rubber has been used for many years in the aerospace industry. FVMQ rubber is used to produce seals for selected Wix filters in order to provide increased gasket resistance to separation and deformation at extreme temperatures. This rubber is resistant to temperatures ranging from -80 to +230°C.
WHAT DOES A CABIN FILTER PROTECT US FROM?
A cabin filter purifies the air which the passengers and the driver breathe. The filter should be replaced at least once a year, or every 15,000km. Five threats you can avoid:
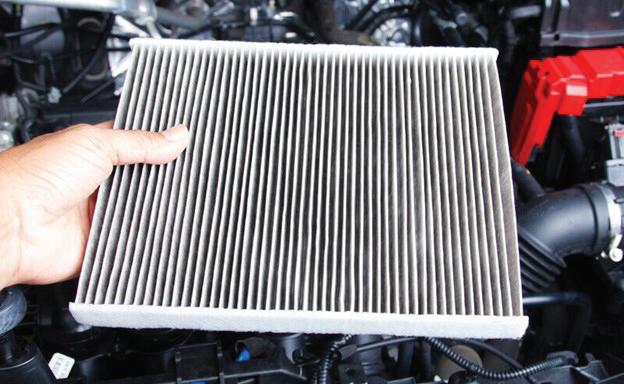
■ Breathing in contaminants: The cabin filter retains microparticles of dust and plant pollen. Inhaling polluted air has negative effects on your health.
■ Fatigue and reduced travel safety: Polluted air in the passenger compartment causes discomfort and fatigue and can significantly decrease the concentration of the driver.
■ Poor visibility: Moisture particles rest on the surface of a worn-out cabin filter; this moisture enters the passenger compartment of the car and causes the windows to fog up, causing poor visibility.
■ Reduced efficiency of the air conditioning system: Over time, every cabin filter becomes clogged with contaminants, leading to reduced air conditioning.
■ Allergic reactions: Using a vehicle with a contaminated cabin filter can cause irritation in the eyes, sneezing, or nasal congestion.
FILTERS
62 MAY 2023 PMM
WANT TO KNOW MORE?FOR MORE INFORMATION WWW.RDR.LINK/AAX025

Cabin ‘FRESHER’
UFI
Filters has expanded its range of cabin filters.
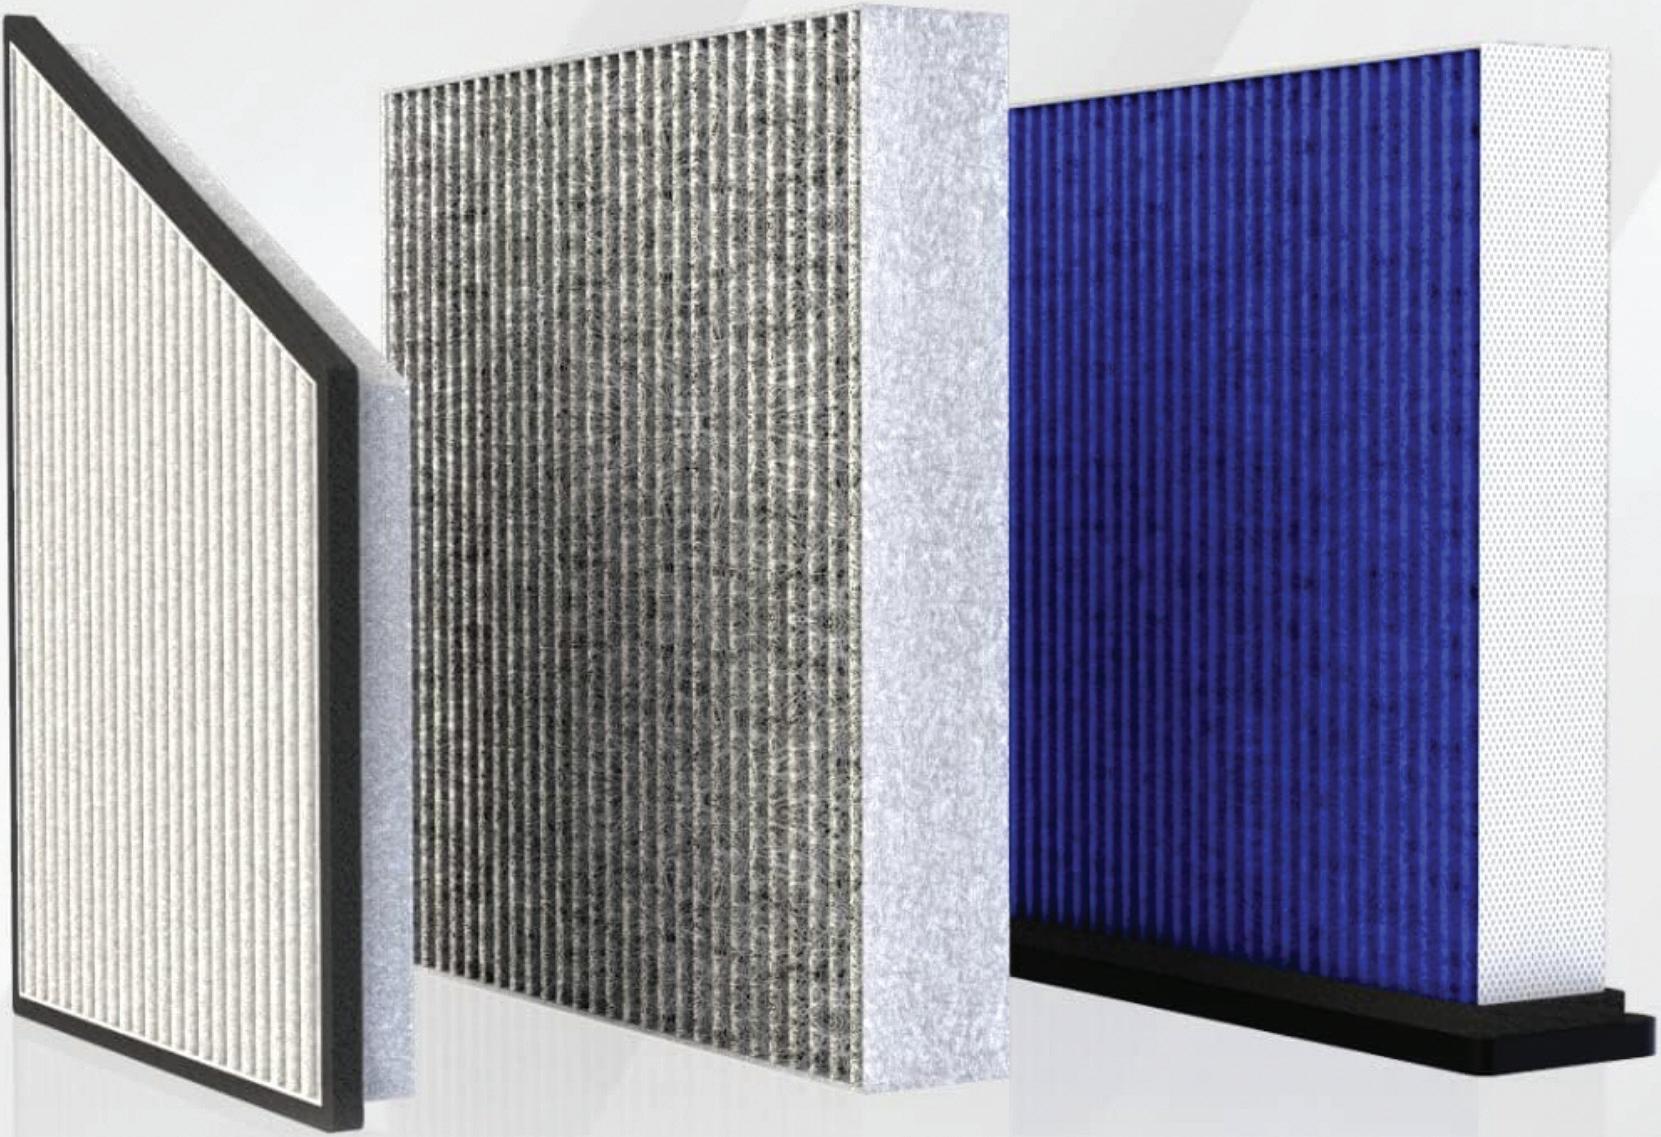
UFI Filters presents a completed range of cabin air filters, whose main function is to protect against dust, soot, bacteria, pollen and other pollutants that may enter the vehicle interior. The entry of these pollutants can, in extreme cases, turn the entire passenger compartment into a comfortable breeding ground for pathogens. This is why it is essential to choose a quality cabin filter and replace it on a regular basis.
Using its experience in research and development of new materials, the company has developed different types of FormulaUFI.Stratiflex filter media for cabin filters, which claim to guarantee high filtering efficiency, resistance to moisture and microbiological neutralisation. This is why the UFI Group can offer three types of cabin air filters in its aftermarket catalogue:
from the traditional pollen filter to the activated carbon filter, which is also capable of blocking unpleasant odours, to the antibacterial filter of its Argentium range.
The brand’s catalogue now offers over 700 references of cabin filters, 607 for cars and commercial vehicles and 111 for on-road and off-road trucks, covering over 19,000 applications. This range has grown significantly over the recent years, ensuring that more than 98.5 per cent of all vehicles on Europe’s roads are covered by UFI Filters.
There are 363 pollen filters made with synthetic non-woven filter media, capable of retaining over 90 per cent of particles with a diameter greater than 2.5 µm, such as PM10
fine dust, dirt and pollen. UFI pollen filters can be identified in the catalogue by the initial code 53.
196 carbon filters, on the other hand, are the references consisting of non-woven filter material combined with activated carbon, which also absorbs gases and odours, and blocks industrial and agricultural pollutants such as hazardous NOX, SO2, NH3 and VOC. UFI carbon filters ensure greater protection inside the vehicle and can be identified in the catalogue by the initial code 54.
Argentium filters
UFI Filters’ 159 UFI Argentium filters are equipped with antibacterial properties. The filter media consists of three layers: structural, absorbent and antimicrobial, incorporating silver particles. Biomaster biocide silver, tested to ISO 22196:2011, can inhibit bacterial growth by up to 99 per cent. Argentium UFI filters can be identified in the catalogue by the initial code 34.
The concentration of dust in the atmosphere and the presence of different types of harmful particles, such as PM10 and PM2.5, depends on weather conditions and the geographical area. Their presence can be up to six times higher inside the vehicle, due to the 'tunnel effect' created through the ventilation circuit. The direct consequences of poor air quality while driving include: allergies, sore throats, sneezing, lack of attention at the wheel to reduced visibility caused by condensation on the windscreen and windows.
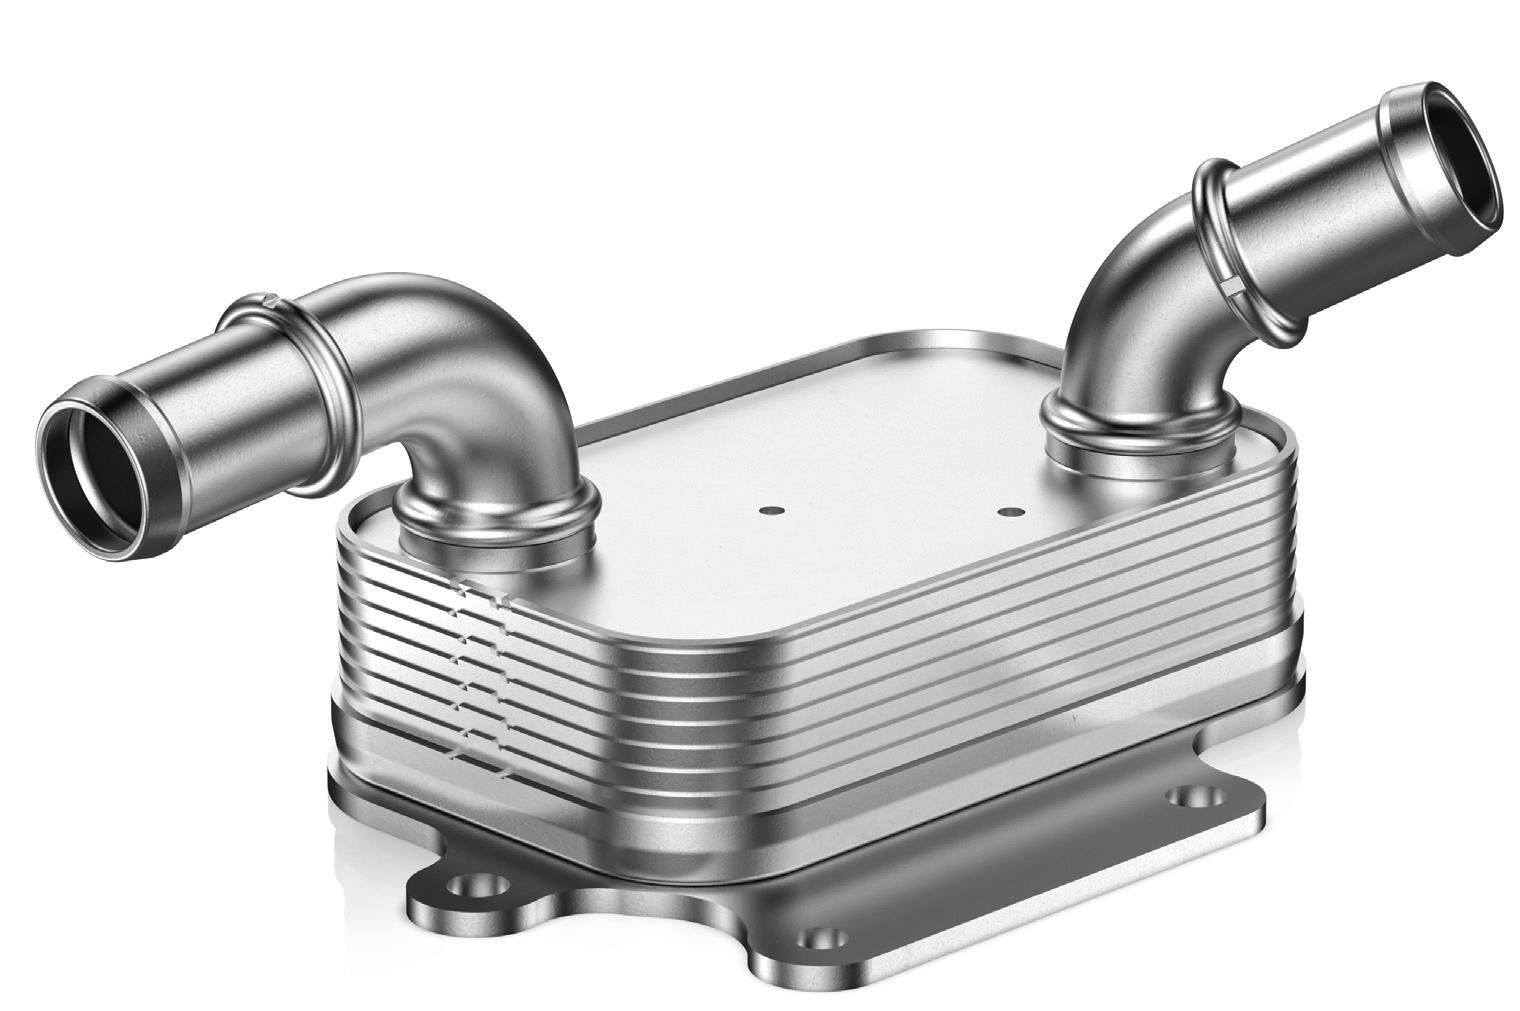
FILTERS
64 MAY 2023 PMM
After autumn and winter have left their mark on the vehicle's cabin air filter with moisture, dust, fine dust and debris, it is important to replace it for spring. The company recommends changing the cabin filter regularly every 15,000 km, and at shorter intervals in particularly dusty areas, or every 6-12 months at the latest.
Heat exchangers specified for Renault and Nissan

UFI Filters is not only involved in filtration, but also in thermal management, and the company is now supplying original equipment heat exchangers for RenaultNissan-Mitsubishi Alliance’s electric motors.
The firm has been chosen to supply the heat exchanger for the new ePT-160 front electric motor, 160kW, mounted on the new Renault Megane E-Tech and Nissan Ariya. The e-motor will also equip other C-segment model vehicles that will be launched by 2024 within the Franco Japanese alliance and has the potential to become very popular in Europe in the next few years.
The heat exchanger for the ePT-160 is of an aluminum plate type and produced
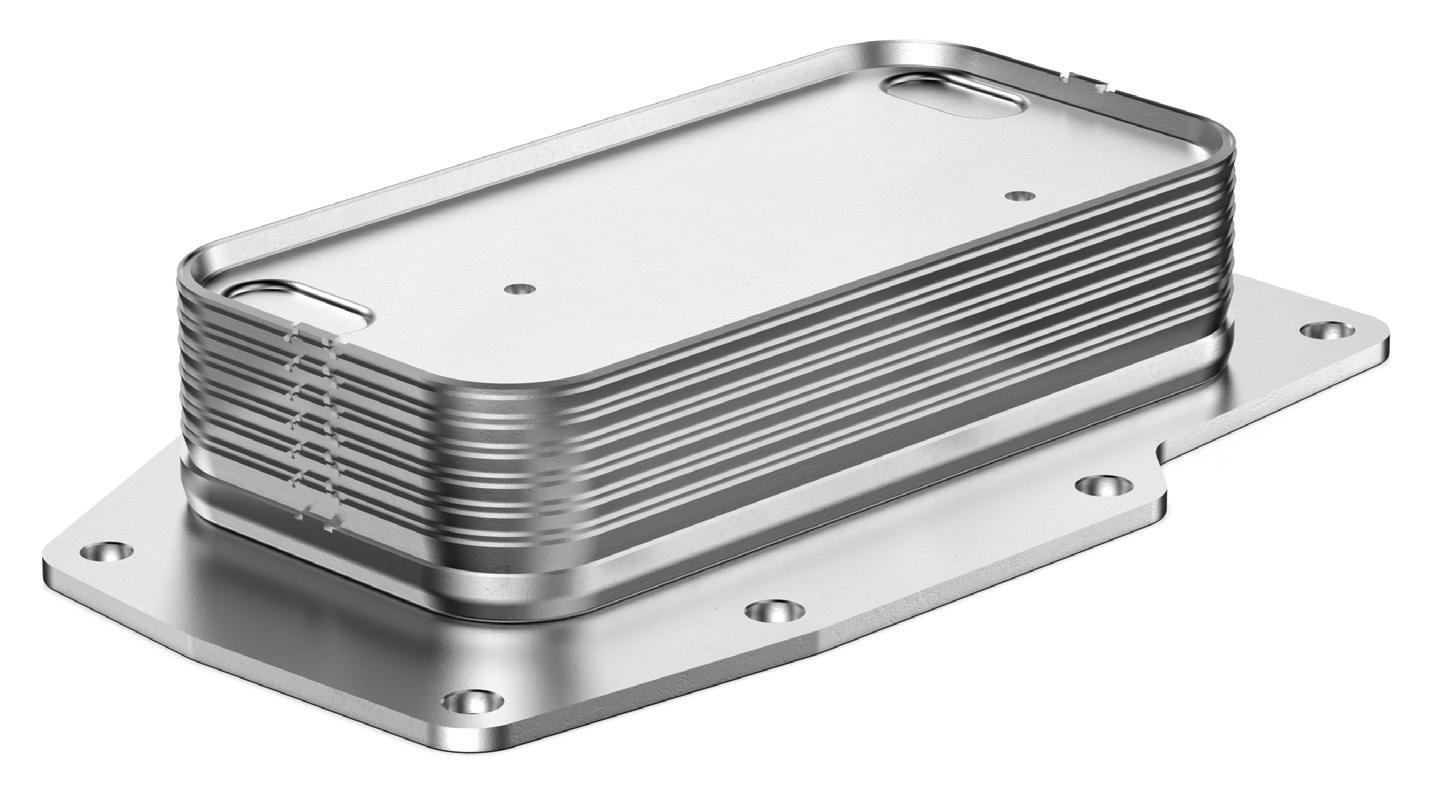
according to vacuum brazing technology that allows for a very robust and clean product. The UFI heat exchanger is made up of four layers dedicated to oil and four to coolant. The oil enters through the base plate fixed directly on the outside of the electric motor. The heat exchanger configuration is diagonal counter-flows. It means that the liquids (oil and coolant) flow in opposite directions, oil and coolants cross their path into alternating layers.
For the 4x4 version available on Nissan Ariya e-4ORCE 4WD, it supplies an additional heat exchanger for the rear electric motor. Also made of aluminum and featuring vacuum brazing technology, it has seven layers for oil and six for coolant. The oil and coolant liquid enter through the base plate fixed directly on the outside of the electric motor. The heat exchanger configuration is parallel counter-flows. The two liquids flow in opposite directions but remaining on the same side of the plates layer.
With these two applications, UFI Filters is strengthening its position as leader in electric motor thermal management.
WANT
TO
MORE INFORMATION
KNOW MORE? FOR
WWW.RDR.LINK/AAX026
The brand’s catalogue now offers over 700 references of cabin filters, 607 for cars and commercial vehicles and 111 for onroad and off-road trucks.
REPAIR and RECALIBRATE

ADAS isn’t exactly new: our vehicles have benefitted from various forms of it for years.
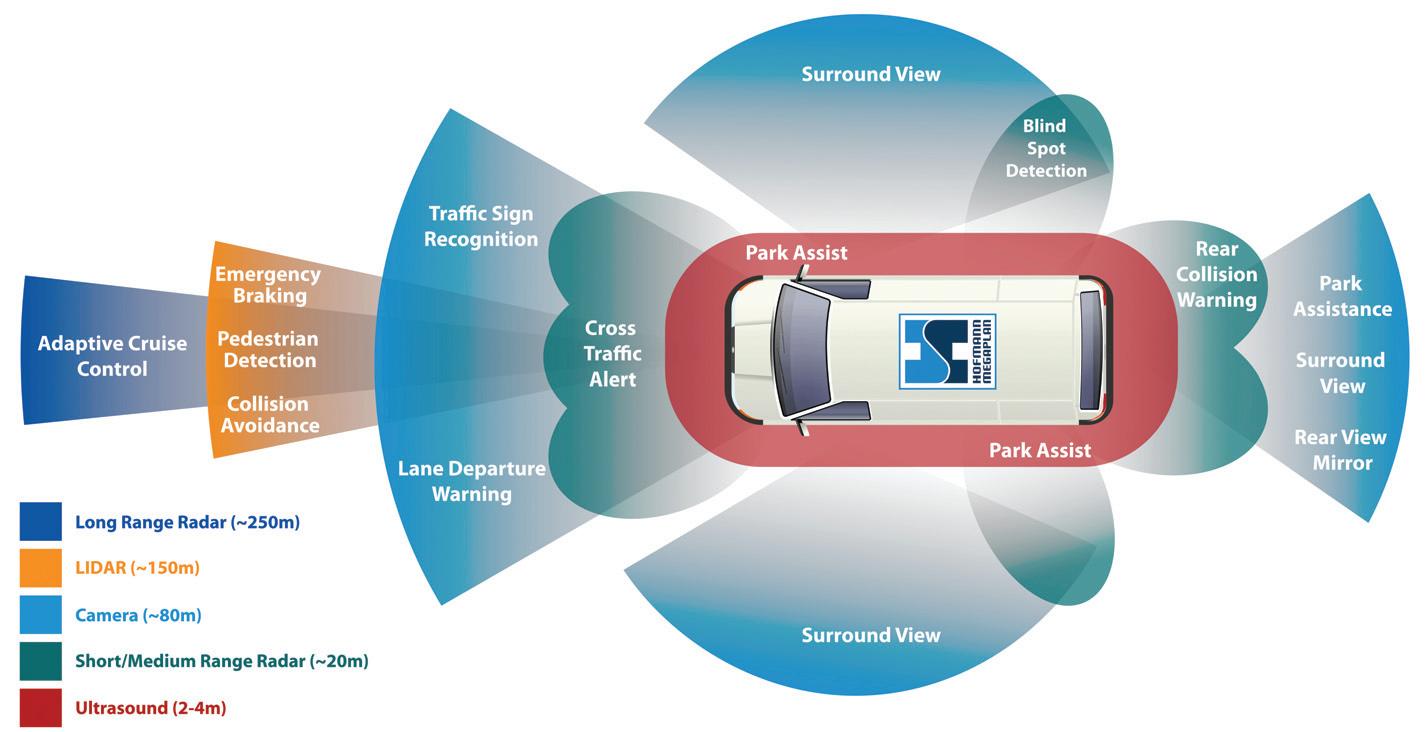
From anti-lock braking and electronic stability programmes in the early days, to windscreen-mounted cameras ‘seeing’ road signs and pedestrians or adaptive cruise control using radar. Engineers have found ways of using it to improve safety for all road users. But for it to work properly it has to be maintained and correctly aligned at all times.
ADAS systems work with the technology and systems in our cars, with the intention of warning the driver of hazards or even taking control of braking and steering systems when

a driver has not responded to a perceived danger, which is fantastic if the ADAS systems are seeing what the driver is seeing. But if the system has become misaligned in some way and is effectively not seeing what the driver is seeing, it could pick up dangers and react to them when they are not in the car’s path. This is where the importance of correctly aligning the system comes to the fore.
If something changes on a car that affects the angle the car presents whilst travelling, it’s possible that certain areas of the driver’s view may not be covered by the system’s camera and radar, potentially missing out on vital information. These changes might be brought about by repairing a broken spring,
or damaged suspension component, or through badly misaligned wheels. Windscreen replacement is another area to be considered if the camera was removed as part of the process; ensuring the camera is correctly aligned after repair is vital.

Standard practice

There is now a growing focus on the importance of correctly functioning ADAS systems. In March this year, the BSI issued updated standards covering windscreen repair. Alongside changes to windscreen repair zones, it included recommendations aimed at ensuring the correct operation of windscreen mounted ADAS and heads up display (HUD) following a windscreen repair. Now, no repair of any type will be conducted in an area of the windscreen that supports an aspect of ADAS technology.
It’s essential that a significant chassis repair is done in conjunction with the correct jig – even a gentle frontal impact that ‘doesn’t look too bad’ can seriously misalign the radar unit, if, as is often the case, it’s
ADAS
66 MAY 2023 PMM
Mark Bristow, technical director at ISN Garage Assist, outlines the importance of maintenance and alignment to ensure ADAS systems continue working correctly.
mounted in the front grill area. The radar uses its long-range abilities to manage active cruise control (by matching the speed of cars ahead) and emergency braking systems (by recognising pedestrians and vehicles which may be in the cars path). If it’s not ‘seeing’ them correctly, it can’t control the vehicle, or warn the driver appropriately.
Another thing to consider is insurance liability. Insurance companies are becoming more and more interested in ADAS functionality when investigating accident claims. Who’s going to be liable if ADAS misalignment is deemed a contributing factor in an accident? If your garage has undertaken a repair that could affect ADAS but you don’t have the equipment to check and adjust it, then you almost certainly have a duty of care to your customer to advise them to get it checked. Better still, you get it checked and realigned for your customer as part of the repair. The most profitable way to do that is
to have your own equipment – why would you want to give business to a competitor?

Buying a state of the art ADAS calibration unit is a major investment for any garage. At ISN Garage Assist we have a team of alignment specialists that regularly demonstrate our ADAS equipment to interested customers. We appreciate that it’s a big decision so when a customer buys one, we also make it our business to ensure they are fully trained on its use. We’re also in the very final stages of developing an IMI alignment and ADAS training course for our customers, which will give them everything they need to become an alignment expert – not just in the use of our machines; it will provide them with a much wider understanding of the impact alignment has on the safety of vehicles.
WWW.RDR.LINK/AAX027
WANT TO KNOW MORE? FOR MORE INFORMATION
MAKE A PITSTOP
LIFE ON THE RACETRACK WITH LUCAS OIL-SPONSORED DRIVER TONY


LYNCH
and the valve spring has broken. This could have been terminal for the engine, but the good news is that as our driver stopped so quickly, the damage was limited. The cylinder and everything else seem OK.
CONNECTIONS QUIZ
As well as delivering race-car reliability on the track, rallycross mechanics can sometimes be called upon to address unexpected issues with support vehicles.
When the Ford transit van we use to transport our rally car, equipment and most of the team suffers a major engine failure 10 miles short of the weekend’s venue, we begin to appreciate why the Duivelsberg circuit in Maasmechelen, Belgium, is also known as the Devil’s Circuit.
Before competing for points, we must get the rally car to the track, but work out how we might all get home again if the van’s engine problem proves non-repairable.
As well as being serious rivals, some of our biggest competitors are also firm friends. They respond to our call for assistance and organise a tow. We have cleared the first hurdle. We will race today and tomorrow.
After prepping the Suzuki Swift rally car, we remove the cylinder head from the van. The circumstances are not ideal. Instead of clinically clean workbenches, we are making do with a sheet on the paddock floor. There’s more bad news. The engine has a bent valve
From a racing perspective, things are better. We pick up points on Saturday, making the trip worthwhile. But as we approach the end of day one, the van’s engine is still in pieces and a repair seems as unlikely as taking our place on the ferry back to the UK tomorrow night! By morning we have conjured up a plan.
If we can replace the valve, we might be able to limp back to the ferry and once in the UK, our AA membership might get us back to base. We utilise years of race-day crisis management and mechanical know-how to improvise a solution.
After accumulating a few more points on Sunday, we start swapping valves donated by rival teams. One is supplied by a team with a Citroen C2 race car, and it is a satisfactory fit. With 7 Ford valves, plus a spring and a valve from the Citroen C2, the van’s engine fires up.
We nurse it all the way to the ferry and once in the UK, it takes us all the way home to the Northwest of England. It’s a mechanical triumph for the team. What’s more, our Championship hopes remain alive with one round of the season to go!
Try and figure out what connects each of the answers!
1. Which blues singer sang Goodnight Irene?
2. When emailing, what does bcc stand for?

3. Which musician was born Frederick Bulsara?
4. What type of medal will you receive if you place second?
5. Which actor voiced ‘Scar’ in The Lion King?
6. The Statue of Liberty is made from 179,000 pounds of what?
7. What’s the name of the 2011 hit by David Guetta featuring Sia?

8. Which Bond film did Shirley Bassey sing the theme for?
9. What is a five-cent coin known as in the US?
10. What is the connection?


WITH
Answers: 1. Leadbelly 2.Blind Carbon Copy 3.Freddy Mercury 4.Silver 5.Jeremy Irons 6.Copper 7.Titanium 8.Goldfinger 9.Nickel 10.Chemical Elements
Digital Digest!

The internet’s top 5
Those of you not taking advantage of the PMM website are truly missing out. With an array of technical articles, breaking news, and helpful business tips, it’s a great source of information right at your fingertips. If you haven’t already, the PMM website is also a great place to listen to our monthly podcast (WWW.RDR.LINK/AAX028 ).


on the camshaft sprocket which can be difficult on used pumps.
WWW.RDR.LINK/AAX029
inconvenience and costs associated with battery failure. Tips inside include using a smart charger to prolong the battery’s service life and ensuring fitment of the right battery.
WWW.RDR.LINK/AAX031
Lubricant advice
If you’re not already convinced, this month, PMM ’s news and products editor, Freya Coleman, takes a look back at the most popular articles on the website from the past month.


2

Diesel bug
In this next popular online article, Liqui Moly investigates the common vehicle problem of a diesel bug, proposing a solution of using their anti-bacterial diesel additive, which should be added at a dosage of 1:200. The active ingredients of the additive kill the bacteria and fungi so they can no longer reproduce.
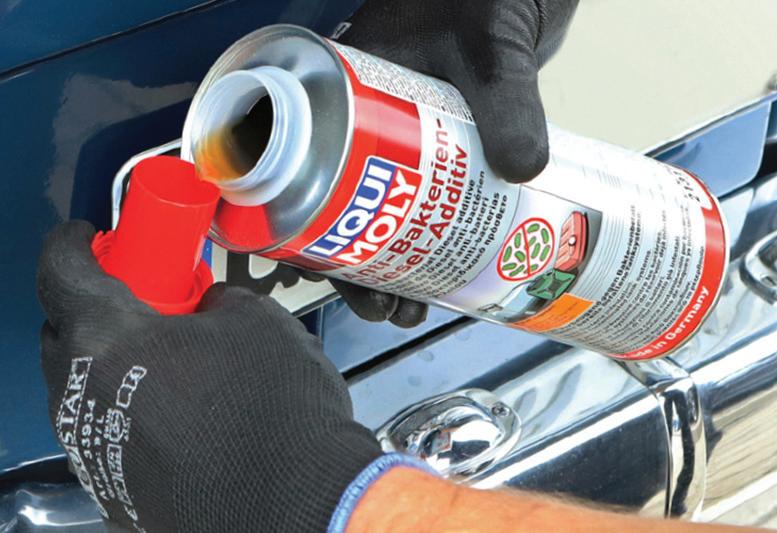
WWW.RDR.LINK/AAX030
4 5 1
In this next online article, Darren Darling, or the DPF doctor, is warning technicians to think again when purchasing a bottle of the cheap stuff when it comes to DPFs. He emphasises that “cutting corners with a sub-standard top up fluid is virtually as bad as disabling the entire emissions’ control system”.
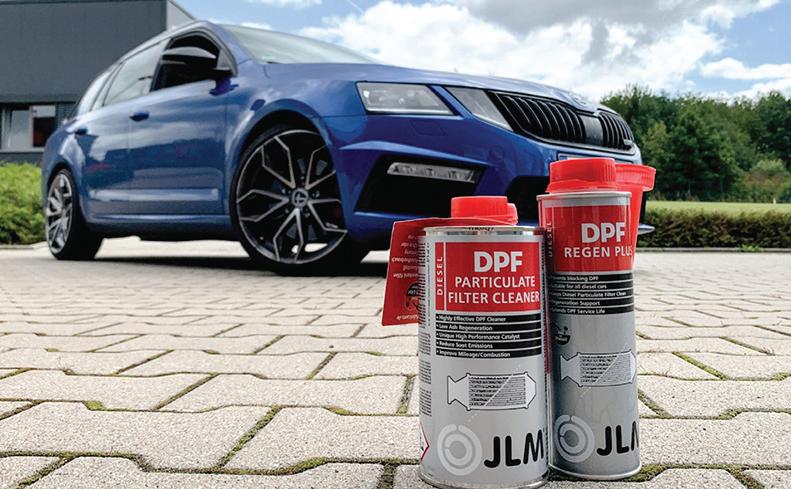
WWW.RDR.LINK/AAX032
Timing belt teeth
Kicking off this month’s list, Continental are here to explain to explain why various diesel engines are prone to the teeth on timing belts being damaged. Inside, the company stresses the importance of correct installation, locating the locking points


3


Avoiding battery replacement


Battery replacement is more stressful than ever as the cost-of-living crisis persists and the weather stays dreary, so GS Yuasa is here to advise PMM readers on how to minimise the
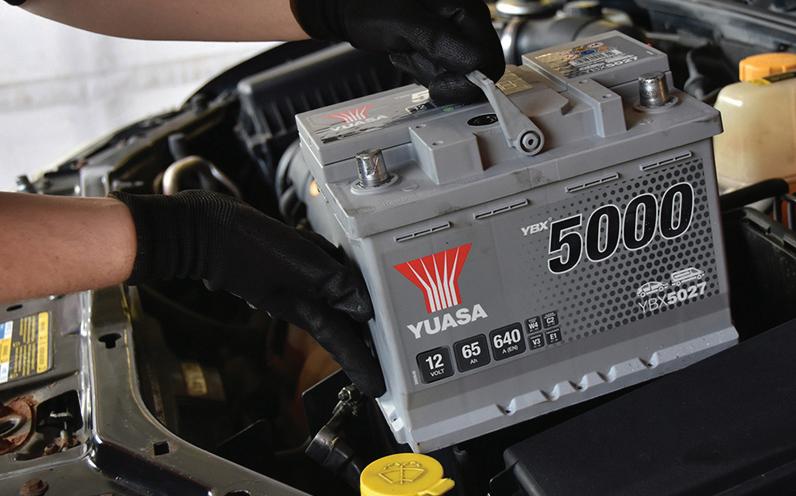
Step-by-step
Rounding off this month’s list is a guide from OESAA members Delphi Technologies and Laser Tools on how to change the fluid in a Volkswagen DSG triple-clutch gearbox on a plug-in hybrid vehicle.
WWW.RDR.LINK/AAX033
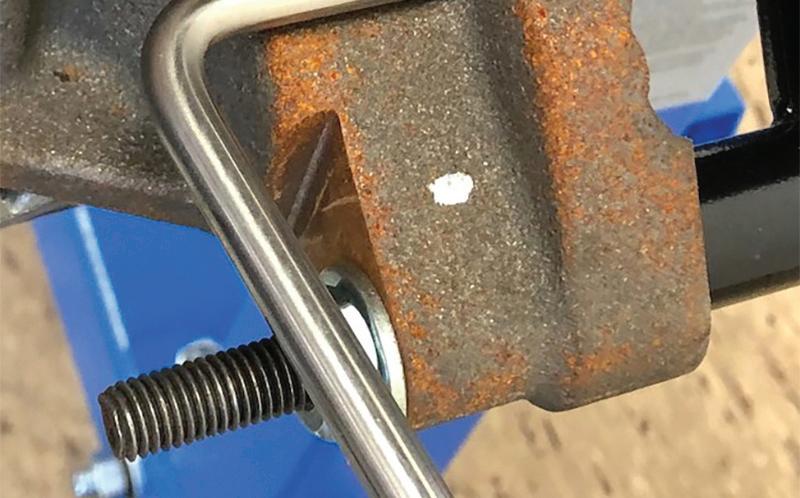
PMM MAY 2023 69
ONLINE ROUND UP
PRODUCT SPOTLIGHT
Nightsearcher’s work light
PMM takes a closer look at the iSpector 750; a dual-purpose LED work light from NightSearcher.


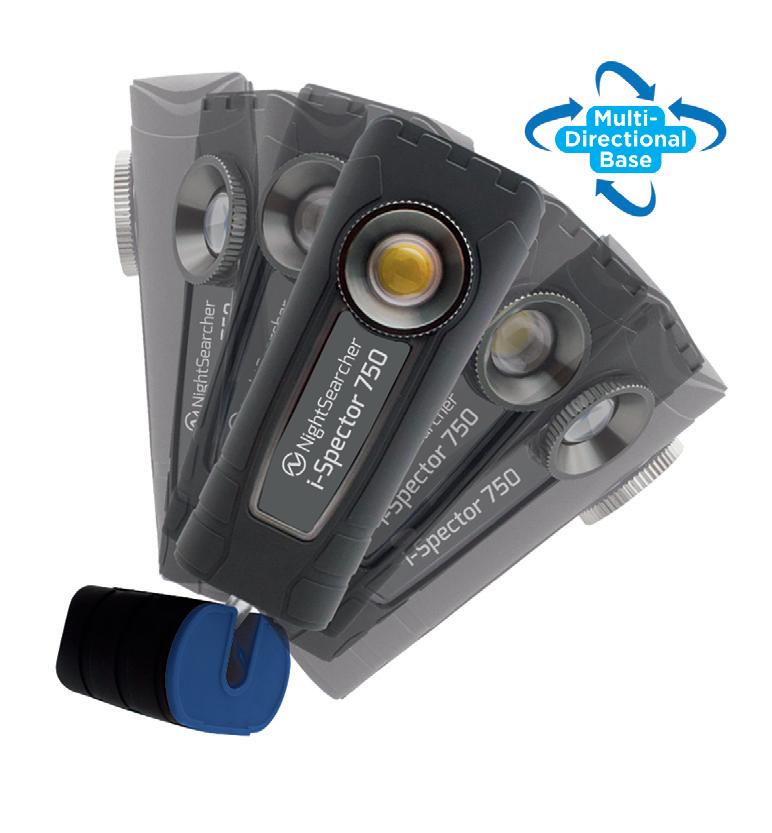
750 lumens
Nightsearcher’s latest product offering is the iSpector 750, a dual-purpose LED inspection light that features a bright work light with a wide flood beam that doubles as a powerful torch with a bright spot beam. Lighting is one thing that affects everything mechanics do in a garage and detailed visibility is paramount when working with vehicles, that’s why it is vitally important to choose the right work light that gives the right amount of light to aid productivity. Essential for the wellbeing and safety of mechanics in garage use. The iSpector 750 lumens has been purposefully designed to encompass all of these factors.
Runtimes and battery
The iSpector 750 has a maximum runtime of seven hours for torch and two hours on high. It has a battery colour indicator display (green to red) on the housing that tells you when you are needing to recharge. There are several ways in which you can recharge; by using the fastcharging type C USB cable which is supplied or by AC adaptor and vehicle adaptor you can purchase as optional extras. It also allows for continuous use safely whilstcharging.
Awkward angle lighting
As it is cordless, you can position the rechargeable LED inspection light in any orientation thanks to its 90-degree angle adjustment and useful integrated hanging hook leaving your hands free. The iSpector 750 can easily illuminate your desired area thanks to its swivel base that rotates through 360 degrees and 90-degree angle adjustment. Once you have chosen your preferred light mode you simply secure the inspection light in place using the magnetic base.
Under the hood
Benefits of using the iSpector 750 for under hood lighting include the amount of light despite its size at 750 lumens with a powerful spot beam distance of 40 meters. The light is also said to be bright enough to be used as a backup emergency light in case of garage blackouts, enabling you to continue working with no disruptions to your day. It can also prevent accidents by visibly high-lighting other hazardous garage workshop machinery. To operate you simply press through the power/light mode switch to select your desired output; 750 lumens (work light high), 350 lumens (low work light) and 170 lumens (torch). The work light is made of rubberised housing that is said to be able to withstand abrasive materials, also featuring a sealed toughened optical lens. Added advantages of the LED usage in the iSpector 750 are to provide flicker fee continuous light that is also energy efficient and gives it a longer lifespan.
70 MAY 2023 PMM PRODUCT SPOTLIGHT
WANT TO KNOW MORE? FOR MORE INFORMATION WWW.RDR.LINK/AAX034
■ TROLLEY JACKS
These trolley jacks from Draper Tools are available in different colours and styles. The heavy-duty chassis are all low profile, the lowest needing just 75mm clearance, making them well-suited for use on sports and custom vehicles with reduced clearance heights. They are said to be also easy to manoeuvre; all fitted with rear swivelling castors. Other features include an integrated rubber saddle pad to prevent damage to the underside of the vehicle and an EVA foam handle cover to stop panel damage when in use.

The wheels of the 2, 2.25 and 3 tonne jacks are made from durable nylon for a quiet and smooth operation that will not damage your garage floor. These jacks have a quick-lift facility too, built with a twin piston pump for a fast lift enabling them to reach their maximum height efficiently. The 2.25, 3 and 4 tonne feature a knurled handgrip on the end of the lifting arm for a more secure hold. For safety, the twin spring return ensures the trolley jacks lowers safely when not under load and the twin safety valve prevents it overloading. There are two 3 tonne expert trolley jacks that include all the features mentioned plus they are fitted with an extra-fast single lift pump, that ensures the jack reaches its full height in just 2.5 strokes.
WWW.RDR.LINK/AAX035
■ DISCONNECT TOOL
Modern automotive pipe and hose fittings are designed to be quick to fit or remove but are often hard to reach. This scarab quickconnector disconnect tool from Laser Tools (part number 8473), is said to be compact, easy-to-use and both the spring-loaded scarab jaws and the handle swivel to let you gain access in the tightest of engine bays. It is designed for two-button-style quick connectors used on fuel, oil, AdBlue and cooling systems. The handle has a sanddipped textured finish for improved grip, and swivels through 180°. Together with the 80° movement of the scarab jaws, it claims to enable easy one-handed operation and locates positively onto the connector.
WWW.RDR.LINK/AAX036
■ INSPECTION LAMP
To further assist technicians in their everyday work lives, Ring’s MAGflex mini-LED inspection lamp, RIL6100, will now also be available in blue and yellow, so technicians can easily and quickly find it as it will stand out on the workbench. The RIL6100 projects 250 lumens and is said to be robust to withstand tough working conditions and has multi-angle positioning, so that users can rotate the lamp to point it at the exact spot needed. The battery life runs up to six hours operating time from just a single charge, but also features a charge level indicator so the technician can see when it needs to be recharged.
WWW.RDR.LINK/AAX037
■ WORKWEAR HOODIES
These hoodies and sweatshirts are probably the most popular products among Snickers Workwear users and are designed specifically for professional craftsmen and women, they’re built for durability and comfort. The ‘full zip’ or ‘overhead’ styles are said to be ideal as midlayer working clothes as they’ll fit well with a jacket on colder days in the workshop and can be worn as an outer layer in the spring and summer months. A selection of fabric options is available including polartec micro fleece and polycotton. There is also 40 styles and a selection of colours to choose from such as khaki green.
WWW.RDR.LINK/AAX038

PMM MAY 2022 71 WHATS NEW?
■ FLUID FUNNEL
Oil funnel (part number 8572) has an extra-long spout from Laser Tools, with a 45-degree cranked spout adaptor and is designed to get right into these hard-to-reach areas. Especially suitable for motorcycles. The transparent funnel shows oil or fluid flow and features a removable plastic filter to prevent debris entering together with a breather pipe to prevent any airlocks. The spout adaptor cap be rotated to allow the extension pipe to be positioned into the filler point while keeping the funnel handle level for easy filling. Said to be robust and long-lasting, the funnel is manufactured from polycarbonate with the extension pipe and adaptor from polypropylene. Funnel diameter: 140mm; spout diameter: 29mm to 13mm; long reach: 368mm.
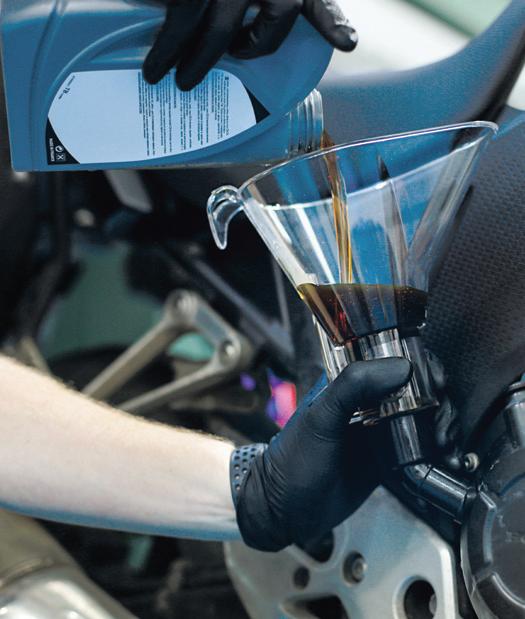
WWW.RDR.LINK/AAX039
■ BRAKE PADS AND DISCS
Delphi Technologies has announced the release of three first-to-market braking components for Jeep and BMW as part of its European aftermarket braking program. The latest additions include front (reference BG9513C) and rear (reference BG5167C) brake discs for the Jeep Compass, Renegade. Front brake pads (reference LP3821) for the BMW M3, M4 Coupe, M4 xDrive Cabrio complete the latest round of first-to-market braking products from the quick-to-respond supplier. Other first-to-markets braking references already released in 2023 include front brake pads (reference LP3713) for Mercedes-Benz GLC200, GLC220, GLC300, GLC400, S350, S400, S450, S500, S580, S580 Maybach 09/2020>; front brake pads (reference LP3854) for Hyundai Elantra 03/2020>; front brake pads (reference LP3679) for Audi RS6 Quattro, RS7 Sportback Quattro, RSQ8 Quattro 2019> and Porsche Cayenne 2020>.

WWW.RDR.LINK/AAX040
■ TOOL PROMOTION
Discover over 100 new lines inside the latest edition of Sealey’s Tool Promotion, valid from 1st April until 30th June 2023. There are great savings on its new range of pressure washers. The models feature a quick-release nozzle system, said to allow fast selection between fan and Rotablast nozzle, and deliver between 100 and 170 bar of pressure with flow rates between 390 and 450L/hr, depending on the model. The 2400W model also features three power modes and a built-in detergent tank that filters into the jet stream. New additions to the SV20 one-battery series are also on offer, including the cordless grease gun and cordless 10L wet and dry vacuum. The handheld vacuum, with a lightweight tank, features quick-release clips for ease of emptying and also includes a built-in blow function.

WWW.RDR.LINK/AAX042
■ PULLING TOWER
Power-TEC have released a pulling tower (part number 92657), that is completely mobile and with its pneumatic vacuum system, anchors to the workshop floor without the need for fixings. To use, place the pulling tower next to the bodywork damage to be repaired; the mechanical hoist is height adjustable. The pulling tower is counterbalanced by the anchoring plate: simply connect to the workshop air supply and the vulcanised rubber suction pad is held securely to the floor. This is a solution for glue-pulling on steel or aluminium panels and can supply a pulling traction force of up to 550kg. The standard tower’s height is 1650mm.
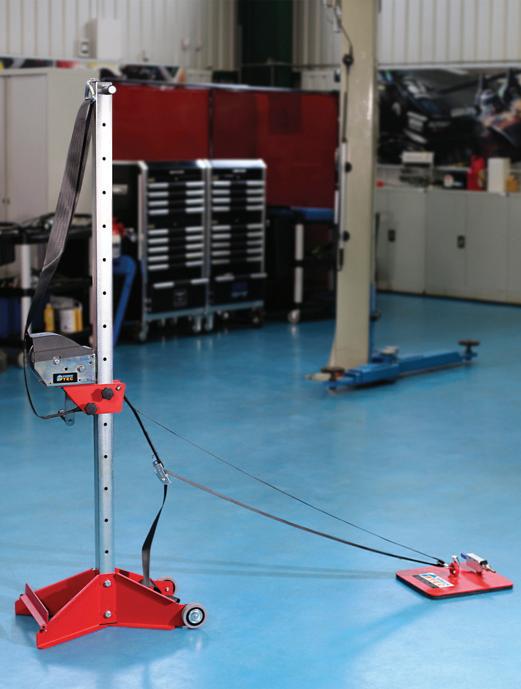
WWW.RDR.LINK/AAX043
■ CORDLESS TYRE INFLATOR
The RTC4000 from Ring is easily chargeable via a USB type C cable or 12V DC cable and is quick to inflate a tyre, even from flat. To save time, this tyre inflator also has a memory function, so the user can save different tyre pressures and activate them from the home screen. It also has an auto-stop feature to reduce the risk of over inflating the tyre. Ring has ensured that this tyre inflator is as compact as it can be, which also means its light and easy to move around the vehicle and top up the tyres. Additionally, there are multiple LED lights on the tool, so inflating tyres can be done at any time.
WWW.RDR.LINK/AAX041

72 MAY 2023 PMM WHAT’S NEW?
WHAT YOU’VE HEARD:
Start-stop systems are bad for batteries.
WHAT WE’VE HEARD:
It’s said that vehicles with start-stop systems require five to 10 times more engine starts than those without, which can put strain on the battery. It’s important for technicians to ask their customers what kind of trips they’re doing; long or short. If the vehicle is doing short trips, then there isn’t enough time to recover the charge of the battery. Someone doing long trips will have more of a chance of the vehicle’s charging system to recover the charge.

We heard from Ken Clark, managing director at Rotronics who said: “Start-stop systems aren’t bad for batteries, but they will pull a lot of demands from the battery, especially if you drive an ICE or older vehicle. If you are stuck in traffic, there will a considerable reliance on the battery, so that’s more reason to make sure that your vehicle battery is in the best condition.
“If the battery is flat or in poor condition, the start-stop will fail. This means that you’ll keep polluting the environment and some of the electrical systems will shut down if there isn’t enough power to keep everything going.
“With the start-stop multiples, in traffic you have lots of engine off/loads on time with the usual consumer loads, such as radio, heated seats continuing to work and creating demands on the battery.”
WHAT WE SAY:
How much strain stop-start driving puts onto batteries depends upon the way in which the customer uses their car, and on what kind of car they have. However, a car’s computer checks charge levels in your battery before attempting to shut it down and if it decides there isn’t enough charge to restart the engine, it’s left running. Nonetheless, it’s important to make sure that car batteries are charged to avoid roadside failures.
Heard something interesting in the workshop (or even the pub) lately and wonder how much truth is in it? Give us a shout and we’ll do our best to sort out the fact from the fiction.
Email us at pmm@hamerville.co.uk GET IN TOUCH
out fact from fiction in the workshop
Mythbusters Sorting
Here is a useful summary of all the adverts that appear in this issue of Professional Motor Mechanic

Each is listed with its page number and a direct URL that will get you straight to the relevant online information
Alliance Automotive/APEC ..............................................(page 44) www.rdr.link/AAX100
Autodata ......................................................................(pages 32,33) www.rdr.link/AAX101
Ben Ad ..............................................................................(page 67) www.rdr.link/AAX102
BG Automotive ..................................................................(page 38) www.rdr.link/AAX103
Bonaprene Prods Ltd/Polybush ..........................................(page 49) www.rdr.link/AAX104
Dayco ........................................................................(page 75/IBC) www.rdr.link/AAX105
Diagnostic Connection ......................................................(page 35) www.rdr.link/AAX106
Driv ....................................................................................(page 31) www.rdr.link/AAX107
Esprit ..................................................................................(page 65) www.rdr.link/AAX108
Ferdinand Bilstein UK Ltd ..................................................(page 4) www.rdr.link/AAX109
Ferdinand Bilstein UK Ltd ..................................................(page 9) www.rdr.link/AAX110
Granville Oil ......................................................................(page 25) www.rdr.link/AAX111
Group Tyre ........................................................................(page 22) www.rdr.link/AAX112
Jack Sealey Ltd ..................................................................(page 63) www.rdr.link/AAX113
Kalimex Ltd ......................................................................(page 35) www.rdr.link/AAX114
Liqui Moly UK ..................................................................(page 12) www.rdr.link/AAX115
MAM Software ..................................................................(page 37) www.rdr.link/AAX116
Mann & Hummel (UK) Ltd ..............................................(page 11) www.rdr.link/AAX117
Mann & Hummel (UK) Ltd ..............................................(page 52) www.rdr.link/AAX118
Messe Frankfurt UK Ltd ....................................................(page 43) www.rdr.link/AAX119
Oil Recoveries ....................................................................(page 17) www.rdr.link/AAX120
PMM Podcast ....................................................................(page 18) www.rdr.link/AAX121
PMM Online ......................................................................(page 57) www.rdr.link/AAX122
Primalec ............................................................................(page 61) www.rdr.link/AAX123
Ring Automotive
Schaeffler Automotive
SP Diagnostics
Tool Connection
UFI Filters
VLS (UK) Ltd
27) www.rdr.link/AAX129
76/OBC) www.rdr.link/AAX130
Wynn Oil UK
KEEP UP TO DATE WITH PMM ADVERTISEMENT INDEX A FOLLOW US ON TWITTER @PMMMAGAZINE B LIKE US ON FACEBOOK @PROFESSIONALMOTORMECHANIC VISIT OUR WEBSITE WWW.PMMONLINE.CO.UK
................................................................(page
41) www.rdr.link/AAX124
..................................................(page
2/IFC) www.rdr.link/AAX125
..................................................................(page
73) www.rdr.link/AAX126
................................................................(page
58) www.rdr.link/AAX127
..........................................................................(page
61) www.rdr.link/AAX128
....................................................................(page
............................................................(page
Quality without compromise

Eicher brake pads and discs are exclusively manufactured in quality-controlled production facilities. We use carefully selected materials and formulations to meet the performance and comfort standards of leading vehicle manufacturers.

All Eicher’s brake pads and discs meet the “parts of matching quality” requirements in the BER EEC Commission Regulation 461/2010 (Block Exemption certified) so they won’t invalidate vehicle warranties, and conform to ECE R90, the European standard for brake performance and safety – so you can fit Eicher with total confidence.
The Eicher brake friction range includes over 1,000 part numbers, providing coverage of 97% of the UK vehicle parc.

• Over 260 quality control checks completed for brake pads
• Bolts & accessories included with the pads where applicable
• 100% Copper free pads – strong green credentials
• Alternative to OE without compromising on quality
• Nationwide stock – local availability across UK and ROI.
Call your local branch now!
* Our braking warranty is no quibble. It does not include off road use (4x4 days or track days). It does not cover alterations outside of the manufacturers specifications.