HOME improvement


Chuck Norris Creators.com
During World War II, through our collective will, American industry was transformed almost overnight. The automotive industry changed completely. In 1941, more than 3 million cars were manufactured in the United States; only 139 more were made during the entire war as a retooled industry was soon seeing B-24 Liberator bombers come off the line every 63 minutes.
As labor and transportation shortages at home made it hard to harvest and move fruits and vegetables to market, citizens answered the call. To help the war effort, nearly 20 million Americans began planting gardens in backyards, window boxes, empty lots, parks, baseball fields, schoolyards and city rooftops. Neighbors pooled their resources, planted different varieties of needed foods and formed cooperatives to get these foods to those who needed them — all in the name of patriotism. The goal was to produce enough fresh vegetables through the summer for the immediate family and neighbors. Any excess produce was canned and preserved for the winter and early spring until next year’s victory garden produce was ripe. Fruit and vegetables harvested in these home and community plots are estimated to be between 9 million and 10 million tons, nearly equal to all commercial production at the time. This effort is commemorated with a re-created victory garden located on the east lawn of the Smithsonian’s National Museum of American History in Washington, D.C.
Victory gardens were not a new concept in 1941 — they existed during World War I. A similar concept emerged during the Great Depression. In these instances, gardens to grow food were started to answer to economic difficulties. Now, in the 21st century, turning to home space and public land to grow victory gardens is viewed as not just a response to economic difficulties, but one of the few sure ways of healthy eating.

Another driver of the revival of victory gardens is the estimation that by 2050, the amount of suitable land available for growing food in this country is expected to shrink considerably. If traditional farming procedures continue as practiced today, approximately 20 percent more land will be needed to grow enough food to feed the population anticipated in 2050. (That equates to about the size of the country of Brazil.) With 70 percent of the world’s population estimated to be living in cities by then, we will need to grow and manage food in a much better way. We might as well begin now.
In fact, a “grow your own” food movement is already underway. City dwellers are planting vegetable-, herb- and fruitbearing gardens in the smallest of urban spaces; homeowners are opting to remove or reduce the amount of lawn space in favor of gardens. This upsurge is, in turn, driving innovation in urban farming technologies that allow plants to grow without sunlight in indoor environments close to or within

| from page 1 cities. There is growing interest in favoring the use of locally sourced materials and products.
But sealing the deal in this movement is the fact that fruits and vegetables from the backyard are generally thought to taste better and deliver more nutrients than supermarket produce. Backyard vegetables picked at their peak provide more diseasebattling antioxidants than the trucked-in variety, according to Men’s Health.
Los Angeles-based gardenplanting service Farmscape, the largest urban farming venture in California, recently set out to prove this point. To demonstrate how good backyard garden produce can taste, Farmscape recently ran its own test of its tomatoes. Using an instrument called a refractometer, Farmscape tested the fruit’s Brix score, a measurement system used in commercial fruit juice, winemaking and other industries to compare sugar contents between batches.
The tomatoes grown in Farmscape plots at various homes in the Los Angeles area

scored between 5.0 and 9.0 on the Brix scale. Farmers market tomatoes scored a 4.3 on average, while local grocery tomatoes scored 4.0. According to Farmscape, none of the purchased tomatoes scored above 5.0.
Farmscape harvested what are known as “heirloom tomatoes,” meaning any of the many thousands of different types of tomatoes that are oldfashioned, true to type, nonhybrid and open-pollinated. Heirlooms are a favored option by knowledgeable consumers precisely because they haven’t been standardized and aren’t part of the $5 billion annual hybrid tomato market, says Barry Estabrook, author of the book “Tomatoland.”
According to Estabrook, while modern commercial plant breeding has tripled yields, it produces fruits with a fraction of the calcium, vitamin A and vitamin C (and 14 times as much sodium) as the tomatoes produced a decade or so ago. Not so your backyard variety.
Chuck Norris’ column,“C Force,” can be found at creators.com.


Nicola Bridges Creators.com
With the cost of energy rising, we’re all looking for ways to make our appliances more efficient—especially our heating and cooling systems. The Department of Energy reports that heating and cooling bills are typically some of the biggest household utility expenses.
In hot months, this means making our air conditioning unit work at its most efficient to maximize the cost of running it. But don’t wait until the heat outside is sweltering to check if your A/C is in tiptop shape and set to efficiently cool your home. Get ahead of the heat and give your A/C a spring cleaning to maximize its efficiency.
With hot weather around the corner, here are 10 easy tips to make your A/C —and how you use it — more efficient, and to maximize energy for better coolness and cost.
- Vacuum your vents. The Central Heating and Air Conditioning Co. website suggests that for consistent and efficient airflow, it’s important to vacuum debris and dust away for your air conditioner’s indoor supply vents. Keep away anything that could block the vents, such as furniture, curtains or blinds.
- Install a new A/C filter. Follow your A/C manufacturer’s recommendations on how often to change the filter. A great tip is when you put in a new filter, write the date on the filter itself. Months later, you will know exactly how long the filter has been in use and if it’s due for a change.
- Keep blinds and curtains closed. As the sun hits your windows directly, you can keep some of the heat outside by drawing your curtains and closing your blinds, which helps your air conditioner manage cool temps through your thermostat setting more efficiently.
- Keep heat-producing appliances and your thermostat apart. Heat around your thermostat will make it think it needs to cool your home more in order to reach your A/C temperature setting, which means your A/C
system is working harder and running longer than it needs to — and costing you more money.
- Up your thermostat a few degrees. In hot months, adjusting your thermostat up by five to ight degrees can actually save energy and cost. You don’t have to keep your home frigid in hot months, just at a coolness level that’s comfortable for you.
- Install a pre-programmable thermostat. Automatically adjust the temperature for different parts of the day, such as when you’re at home and need it to be cool, or at work and you aren’t using the A/C. It’s OK for the internal temperature to be somewhat warmer to help you maximize the efficiency and cost of your system.
- Clean your condenser unit. If you have an outdoor condenser unit, keep it clear of debris and shrubs, and keep it clean to optimize its effectiveness. Be sure to have it professionally deep-cleaned ahead of each summer season.
- Insulate exposed ductwork. Ductwork that runs


through spaces that are not air-conditioned can lead to the cooler, conditioned air escaping from your home, which means your A/C has to work harder to keep the temperature at a cool setting. Before the hot season in your area, schedule a professional maintenance check and ask them to check for ductwork air leaks to repair.
- Be smart about using your oven and dryer. A dryer draws warm air into your home,
while an oven adds heat to your house, both of which make it harder for your A/C to maintain a cool setting. Cook less in the summer, and take advantage of salads and no-cook meals that are also healthier for you. Consider buying an outdoor drying rack, clothesline or rotary drying/clothes line that spins in the wind, using the sun and the breeze to dry your laundry in the most environmentally friendly way.
- Use a dehumidifier. A dehumidifier is a great investment. When the temperature rises, switch it on, as removing the moisture of the humidity from your home will make it feel more comfortable. This will also help keep your A/C from boosting on more than it needs to. Keep your internal air temperature at the recommended 78 degrees for maximum efficiency and manageable energy cost.


By Evan Walsh Managing Editor
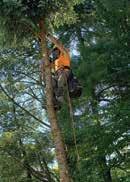
GRAFTON – For Tom Nuccio, it all began by splitting firewood with friends. The next thing he knew, he was leading Templeman Tree, one of Central Mass.’s preeminent tree service companies.
Cliff Templeman founded the company in 1972, passed the business to Steve Stratton around 1990, and, in 2023, Nuccio took the reins.
For its entire existence, Templeman Tree has promoted high-quality customer service.
“I believe that this industry, it’s customer service-based when you boil it down,” said Nuccio, a Connecticut native who has been involved with the company for 12 years. “We excel in customer service, that part of it. We also excel in all of tree climbing, pruning, and cabling. We take great pride in our ability to make customers happy, give them the best service.”
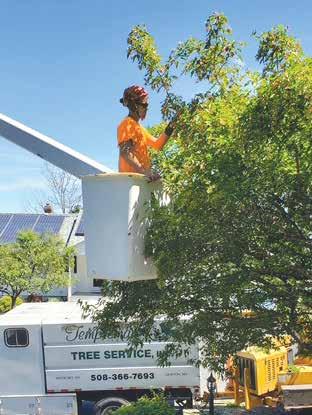


Templeman Tree is a full-service tree company that specializes in pruning, cabling, and tree removal. Though the business services commercial properties, the focus of Templeman is residential clients — the people who have a tree-related issue and want the problem solved quickly, affordably, and, most importantly, professionally.
“It comes down to planning, having the right plan of action to take care of the project. All the jobs are different, and with the proper planning, everybody in the long run is happy. The customer is happy we took excellent care of their lawn, brought the right tools and personnel. We do it safely and efficiently, and that’s the most important,” said Nuccio.
There’s nothing like the feeling of when a job is done right.
And for Templeman Tree, seeing satisfied customers is a matter of personal pride.
“I enjoy the look on the customers’ faces after they see an ornamental tree we pruned for them. When they say ‘wow’ and smile, I really enjoy it. It keeps
“At the end of the day, we like to see our customers happy. And we’re here to help people improve their lawn, prune their trees, or remove trees if necessary. It’s all about doing an excellent job for the people that trust us.”
- Tom Nuccio, Templeman Tree


me motivated, keeps customers happy, and makes me proud of our work,” said Nuccio.
“At the end of the day, we like to see our customers happy,” he continued. “And we’re here to help people improve their lawn, prune their trees, or remove trees if necessary. It’s all about doing an excellent job for the people that trust us.”
For more information on


Mark J. Donovan Creators.com
Painting is a necessary home maintenance project that few of us enjoy. However, if your home has exterior wood siding, Mother Nature dictates painting the exterior of the home every five to seven years. Between sun, moisture and dramatic temperature changes, exterior house paint begins to fade, crack and peel over time. The interior walls of the home can take a similar beating; however, instead of Mother Nature’s wrath causing wear and tear, it tends to be that of children, pets and everyday life.
Listed below are my top 10 house painting tips for making your DIY project go a little smoother.
1) Prepare the painting area appropriately. This includes removing items and obstructions from the room or work area, such as curtains, furniture and mechanical hardware wherever possible. Also make sure the room is well ventilated, if you are working on an interior project. In addition, fill all holes or cracks with spackling and tape all items that you do not want to paint and cannot remove from the walls. Wiping down wall surface areas with a damp cloth prior to applying paint is advisable. You would be surprised how much dust clings to wall surfaces.
Finally, if you are tackling an interior paint project, remove all outlet and switch faceplate covers. You will waste more time cutting around them and will inevitably leave paint marks on some of them.


Make no mistake, no time is more wasted when painting than in shuffling articles around the room, removing outlet covers at the last minute and cycling between taping and painting. When the preparation work is complete, then pull out the paintbrush and rollers.
2) If the old paint on the exterior of the home is chipped and flaking, then scrape the exterior prior to applying new paint. However, before starting to scrape off old paint, make sure it has been tested to confirm that it is lead-free. There are strict federal and state procedures for removing lead-based paint products. Lead is a hazardous material to humans and should only be removed by a licensed professional.
Also, it is wise to powerwash the exterior of a home prior to painting. Mold and mildew, as well as dirt, rust and other foreign materials, can collect on the walls. If not removed, the paint adhesion could be compromised.
3) In the event you are using a paint sprayer for painting the exterior of your home, use newspaper and masking tape to cover windows and other large surfaces that do not need to be painted.
4) Use plenty of drop cloths and have a damp rag in your pocket at all times. Attempting to not drip is a time-consuming chore. Unless you want to have a contest while painting to see who drips the least paint, use copious amounts of drop cloths. Having the damp rag in your pocket will save time when you make that minor mistake with the cutting brush, too.
5) Have a sufficient number of ladders with the appropriate height requirements. Running up and down ladders and constantly readjusting them is timeconsuming and tiring. Using the wrong ladder can also be dangerous to your personal well-being.
6) If the walls have never seen paint — e.g., bare plasterboard — prime them first. You will save money on highpriced paint absorption, and you will get a much better finish.
7) Cut first with a small angled paintbrush and then pull out your paint rollers. Cutting in means that you use a brush to paint areas that are too small for rollers. These areas are usually
around baseboards, ceilings and corners. By rolling paint after you cut the corners and floor and ceiling transitions, you can hide the brush marks and achieve a nicer finish.
8) Make sure weather conditions are right for painting. Hold off painting the exterior of a home until you are sure the siding is completely dry. Also make sure the weather forecast is free of rain and fog, and the temperature is above 50 degrees Fahrenheit. Even if you are tackling an interior home painting project, it is best to paint on a dry and low-humidity day for quick drying times.
9) If you are using latex paint, clean your brushes thoroughly after use. If you are using an oil-based paint, then use mineral spirits to clean your brushes. Nothing can be more frustrating to go out the second day on your paint project and find your brushes hard and unusable.
10) Finally, have a radio or iPod player nearby. Nothing helps to soothe the soul more than listening to your favorite music while you paint.
Happy house painting!


Under Pressure Power
Washing has been providing customized power washing, cleaning and property maintenance for its many customers for over a quartercentury.
“It has been 26 years of helping people love and appreciate their homes again,” says Mark Mercer, who owns the Hopkinton-based family business. “We clean and help maintain everything on a home’s exterior from the top down.”
Under Pressure’s list of services include pressure and soft washes for roofs, siding, windows, gutters, decks, patios, walkways, solar panels and fences.
Says Mercer: “Our work helps improve the look of a home and preserve its longevity.”
Because every home is unique, Under Pressure tailors its services for each house and homeowner.
“We use soft washes and eco-friendly products when we are working on the house,”


Mercer says. “The first 20 minutes we are on a job is spent assessing what we’ll be doing and protecting the plants and landscaping. We use the right chemicals to do the work of cleaning and killing mildew while not hurting the plants and landscaping around a house.”
The company also spends time protecting exterior lights, cameras and speakers.
“We protect anything that needs to be protected, adjusting our work on-site to the needs of the property,” Mercer says. “We’ve been around for 26 years, so we know how to use our tools the right way. We never pressure wash a house. We save that for walkways or patios. Instead, we do a soft wash, a gentle, eco-friendly cleaning, that will make the house look great while preserving the paint job.”
Under Pressure also can apply an EnvioShield treatment that will help protect from future mildew and mold growth.
Adds Mercer: “We all love
nature but don’t want too much of it on the outside surfaces of our homes.”
Providing customers with even greater peace of mind, Under Pressure offers annual home maintenance plans. Mercer says the plans, which have been very popular, include twice-yearly window, patio, deck and gutter cleaning plus siding and roof washing every other year.
“The packages can be tailored to the needs of the homeowner and the property,” says Mercer, noting snow plowing and other services can be added.
The plan begins with an evaluation of the home’s exterior.
“My dad was a builder, and I have been working with homes all my life,” says Mercer. “I understand how houses work and can help homeowners streamline the process of owning a home. We all live in homes, but we don’t all know how to maintain them. I can help a homeowner maintain their home and prevent small
problems from becoming big repairs.”
Under Pressure has working relations with trusted plumbers, electricians and handymen who can help with specific issues.
Happy to be celebrating the company’s 26th anniversary, Mercer thanks his community for its support.
“Hopkinton (and surrounding towns) has been good to us,” he says. “We have a great customer base and are glad to live and work here.”

For more information about Under Pressure Power Washing, visit UnderPressureWash. com or call 508-944-6644.


Nicola Bridges Creators.com
Gardeners often get the bug from messing around in the dirt as kids. You can encourage your kiddos’ green thumbs with these easy projects that are sure to delight them.
Get Creative with Containers
For your kids’ indoor or outdoor starter garden, let them get creative choosing their own planters — from big old toy trucks to metal lunch boxes to fun-shaped kiddie sandboxes to paddling pools. Clean store-bought vegetable cans are a great choice — with the tops taken off and the sharp edges smoothed. Have the kids scavenge in the yard for small stones to layer in the bottom of the containers for drainage. Then they can get their hands dirty by putting in composting soil and pushing in bean seeds. Water every few days and watch your magic beans grow!
Topsy-Turvy Recycle and Upcycle
This project comes from Sayward Rebhal, who blogs at BonzaiAphrodite.com. If you have a deck or porch but don’t have a yard, you can grow tomatoes upside down in large empty water bottles. Cut the bottom off each container and pierce four holes, one on each side of the jug, and push twine or thick string through for hanging. Delicately feed the stems of a young tomato plant through the open bottleneck, and then fill the bottle with potting soil almost to the top. Clear containers are best so your kids can see the soil and spot the roots and stems growing down. Hang low so your little ones can easily reach them for watering.
Grow Herbs on a Sponge
Indoor sponge gardens mean no messy soil. Have your kiddos pick some colorful kitchen sponges from the store. Then, for the container, they can choose a shallow tray, plastic storage tub or even a mug or old teapot. To get really creative, cut the sponges into shapes to make a de -

sign. Anything goes for the container. After soaking the sponges thoroughly in clean water, place on the tray or cut them to snuggly fit a creative container, such as a teapot. Have the kids sprinkle herb seeds of one kind onto each different sponge. If the seeds are larger, push them into the holes of the sponge. Next, cover with an upturned clear plastic container or (loosely) with plastic wrap. This helps the seeds germinate when kept in a warm location such as a sunny windowsill. Your kids will be delighted when they see the seedlings start to emerge. That’s when they can remove the plastic and watch their herb garden grow. When
herbs have reached 3 to 4 inches tall, your kids can enjoy helping you cook with them.
Egghead Herbs Gently crack the top of an eggshell and discard the egg or save it for cooking. Rinse the shell and use a pin to pierce a hole in the bottom of each one. Your kids can gently draw faces on the eggshells or write the name of the herb they’ll plant in each one. Then place the shells in eggcups or an empty egg carton. Place a wet cotton ball in each egg, sprinkle in seeds and watch the eggs’ herb hair grow within days. Or place a small bulb in each eggshell with no soil; keep moist and
flowers will start to grow! You can then plant the entire biodegradable eggshell directly in the garden. You can also grow flower and vegetable seedlings in the egg carton itself, with a spoonful of potting soil in each egg compartment.
Make Your Own Flower Seed Balls
This idea comes from KidsGardening.org. Seed bombs are often dropped from planes to help areas of devastation grow back — for example, from wildfires. Kids will love getting their hands muddy in the clay to make the balls to bury in your own backyard. Pretty much any seeds go,
but especially consider wildflowers such as red poppies; milkweed, which is food for caterpillars; and coneflowers, which birds and butterflies love. You’ll need fives parts clay (from your local craft store), one part potting soil or compost and one part seeds. First, have your kids mix the clay and the compost, adding a little water to make the mixture sticky. Then add the seeds and dig in to roll the mixture into spheres the size of golf balls. Let the balls air-dry and then plant them in large outdoor containers or directly into your garden. Your kids will love it because it’s messy and fun!


Chelle Cordero Creators.com
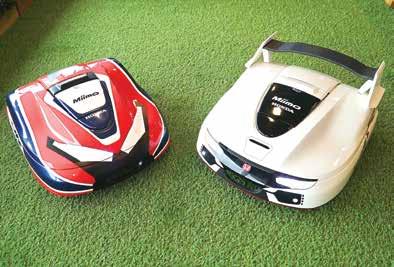
Hiring a robot to do your lawn chores may sound like something out of a sci-fi movie plot, but it's a reality, and it can go a long way in saving you precious time — and backaches. Why bother with mundane chores when you could pick up a new hobby or actually relax in your freshly maintained garden instead?
Robotic lawn mowers, weeding robots, electric lawn sweepers and hydroponic gardens are welcome advancements that will improve efficiency, increase your crop yield, have a positive environmental impact and improve your overall lawn care experience.
Similar to robotic carpet sweepers, a robotic mower will run by itself, allowing you to relax in the hammock or tend to other business as it trims away. These mowers run on

(rechargeable) battery power, so they are much more environmentally friendly than gaspowered mowers and require less maintenance. While more frequent mowing is required, since their blades cut short grass better, this promotes greener lawns and extends the mower battery life.
Robotic mowers cover less ground than regular push mowers or ride-on mowers, so it is a slower process and usually works best on a smaller yard. You'll need to set up the mowing area, often by laying a perimeter wire, which can be tedious but will probably only need to be done once per mowing season. In the Digital Trends "Best Robotic Lawn Mowers" article, writer Parker Hall calls out the Honda Miimo 3000 as the favorite on the market, saying, "While many
robotic lawnmowers are limited to smaller yards, this model can mow up to an acre with ease. ... One of the real standout features with the Miimo series is the paired app. This allows you to adjust cutting height, start or stop the unit, and also manage a calendar, all from your smartphone." If simply lifting a finger to get your lawn care process started sounds ideal, then a robotic mower may be the way to go. Just consider what obstacles it would have to deal with. Is your yard peppered with rocks, brush or water that could prevent it from making clean passes? Is there too steep a slope to where it would lose its footing going down or be unable to climb back up? The cost can run a few hundred dollars to a few thousand, which is often far less than its gas-powered
counterparts, so just evaluate the whole picture to make sure it's effective before moving forward.
Power lawn sweepers are a unique technological advancement, and a great alternative to a leaf blower or rake. When pushed over a newly cut lawn, they sweep all of the debris (leaves, twigs and cut grass)
into a hopper for you to conveniently add it to a compost pile and create a healthy lawn mulch. The ES100 Power Brush Electric Lawn Sweeper is the only sweeper on the market powered by a 12-volt fused electric motor. "This allows for continuous high speed brush pick-up even around tight corners, flower beds, and other


landscaping," says the Sears website. With this, or even a manual sweeper, your lawn will easily be enriched by the beneficial nutrients and retain moisture on hot, sunny days. Farmers will especially benefit from the emerging weeding robots. They are taught to recognize crops (like lettuce and raw vegetables) and desired flowers and distinguish them from weeds. Using a spray technology, they can precisely eliminate many harmful

weeds with herbicides. Some weeders are capable of tilling the soil around desired plants to keep the rows weed-free. And a few of the newer designs are self-powered through solar energy. There's no need for an herbicide shower or tedious hours of weeding with this smart and easy-to-use device. While robotics certainly seem to be the wave of the future, improved gardening systems is also a growing (excuse the pun) field. Hydroponic gar-
dening is an age-old method that is still a serious interest for many gardeners given its natural characteristics. Meaning "working water," plants are grown in a soilless solution and grow at a rate of 30 to 50 percent faster than traditionally grown field plants. This increases crop size and yield while using less natural resources, such as water. There is no worry about soil erosion and root damage, and pesticides are not necessary in
hydroponic systems, removing concerns about chemicals. Most importantly, areas that are suffering from drought, extreme weather conditions and other natural or manmade hazards can benefit by the increased production and controlled environment that a hydroponic system offers. There are hydroponic growing systems for just about any plant-growing goals, whether on a commercial scale or on the counter in your studio
apartment. Some shake their heads at technological innovation and automation, especially with regard to putting it in nature. But not everyone has a green thumb, and when it comes to benefits like ease, health, environmental impact and efficiency, sometimes change is for the better. So before you send these gadgets out to pasture, shop around to see how they could make a positive impact on your lawn care experience.