

BSF farming in Rwanda Manual
Lara Huys and Lani Vints


Introduction
We are happy to welcome you to this manual. This manual is designed specifically for farming Black Soldier Flies (BSF) in Rwanda. BSF is a great business opportunity due its high protein content and waste reduction capacity. We will take you throught the wonderfull world of BSF, step by step. For each step of the cycle, we will describe different options. The information for this manual is gathered by doing literature research, interviewing BSF farmers, engaging in BSF farming ourselves and consulting experts.
The figure below gives you a introduction of the BSF lifecycle. The entire lifecycle of BSF takes around 34 days, highly depending on the temperature and moisture level. When the conditions are unfavourable, the cycle can last multiple months.

Good luck!
Step 1: Incubating eggs
Materials needed:
• Jerrycans/Crates
• Rack(s)
• Maize bran
• Water
• A net
How to:
To start the process of Black Soldier Fly farming, a batch of BSF eggs or larvae is needed Theseeggsor larvae are placed on a food source in a jerrycan/crate, typically consisting of maize bran and water. You can use a mix of 1 kg maize bran and 1 l water These jerrycans are now placed in a rack. Depending on the season and climate, the amount of water needed may vary. When starting to farm BSF, it will be a process of trial and error to determine the optimal moisture level. A good indicator to check the moisture is to squeeze the mix. When water is running out, it is too wet. When it does not sticktogether,itistoodry.Ideally,itreleases very few drips when squeezing.

The eggs can be placed directly on the food orindirectly.Thelattermeanstheyareputon
a net stretched above the food source It is advisable to use this technique and place
the eggs on the net instead of directly on the feed. Firstly, using the net can prevent other insects from infiltrating the maize bran mix and competing for feed with the BSF. Secondly, it is shown that using the net results in considerably more larvae.

When incubating the eggs, it is recommended not to place too many eggs on the maize bran mix. It’s best to place 1 g of eggs per 1 kg of maize bran mix to maximize productivity. After approximately four days, the eggs will hatch and the larvae can immediately start eating the feed.
Note!
The moisture level of the maize bran mixed should be monitored closely If the mix is either too wet or too dry, the larvae will not thrive.
Step 2: Batching small larvae
Materials needed:
• Substrate (manure/ market waste/ kitchen waste)
• Basins
• Dark room
• Water/maize bran
How to:
When five to seven more days have passed, the larvae are big enough to be placed in
Basins with substrate. For this substrate, maize bran, manure and/or market waste are often used. The actual mix depends on availability and circumstances. We recommend using mainly own available substrate. If it is necessary to purchase substrate somewhere else, we recommend using market waste. Fruits and vegetables are the preferred substrates for the larvae.

If the substrate cannot be provided to the larvae immediately after collecting, it is advisable to store it sealed. By placing it in a closed area, the likelihood of other insects oranimalsenteringthesubstrateisreduced. This helps prevent them from laying eggs or consuming the substrate, both are undesirable.
The substrate should be maintained at an optimal moisture level - not too dry but also not too wet. If the substrate begins to crumble, it is too dry and some water can be added. If there’s a layer of water present in the substrate, it is too wet and mixing in somemaizebrancanhelpabsorbtheexcess water. Additionally, it is recommended to grind the substrate into small pieces as much as possible. This allows the larvae to more easily consume the substrate.
The larvae should be placed in a dark environment to optimize production. BSF are very sensitive to light and tend to move away from it. Keeping the larvae in darkness helps to reduce stress and promotes normal behaviour. Using a dark room can also help regulate the temperature.
In this phase it should be decided which larvae will be used for reproduction These should be kept separately The larvae grow rapidly and produce their own heat, which cancausetheboxestoheatupto40degrees Celsius.

Step 3: Harvesting big larvae for production
How to:
Ten to fifteen days after being placed in the boxes on substrate, the larvae have eaten enough (they stop eating when entering the prepupal phase) and are ready to be harvested. This can be recognized through the substrate becoming dehydrated and the temperature cooling down.
It is recommended to harvest the larvae as soon as they reach this stadia. When waiting too long, the larvae will become prepupae. They turn black and are therefore more difficult to spot among the substrate. They also tend to be less active. If you wait even longer and the larvae become pupae, it becomes nearly impossible to conduct handpickedharvesting.Pupaearealsoblack and have completely stopped moving, causing them to be scattered throughout the substrate rather than clustered together.
For harvesting, the larvae need to be separated from the substrate for further
processing. For this step, different techniques are used:
Technique 1:
Materials needed:
• Plastic bag/sheet
How to:
One method is placing a plastic bag or sheet in the container underneath the substrate. Most larvae automatically place themselves under the bag once they are doneeating and ready topupate.This makes harvesting easy. The remaining ones have to be picked by hand.

Technique 2:
Meterials needed:
• Nothing
How to:
Some farmers pick all the larvae by hand without using the plastic sheet.
Technique 3:
Materials needed:
• Bowl
• Sauce/oil
How to:
Another method uses attraction: here a bowl containing a bit of oil or sauce is placed in the middle of the box full with larvae. The larvae will be drawn by the smell and get trapped in the bowl.

Technique 4:
Materials needed:
• Sieve(s)
How to:
A more efficient method uses one or two sieves. The mesh of the first sieve has bigger holes, where most of the substrate and larvae fall through. This way the biggest chucks of substrate are taken out. Afterwards the remainder goes through a sieve with small holes. Here the substrate passesthroughandthelarvaeareleftbehind on the sieve.
To effectively use sieves, it is important that the substrate has the right structure. This can be achieved by using finely cut substrate. The sieve’s holes should not be too large, otherwise the larvae will fall through along with the substrate.

Note!
The larvae for reproduction are not yet harvested and are kept separately. They remain on the substrate in order for them to develop into prepupae. They get more and higher quality feed such as juicy fruit and vegetables so they become bigger and stronger.
Step 4: Drying
Materials needed:
• Heating source
• Cooking materials
• (Drying machine)
How to:
The larvae that are not kept for reproduction, are used for the production of livestock feed. To preserve these larvae, they are dried. This can be done with a drying machine but a commonly used approach in Rwanda for this purpose is sun drying. The larvae are first fried for typically five to ten minutes (up to 30 minutes). This can also be substituted with blanching for five minutes. Afterwards, they are placed in the sun for aboutthreedays,dependingonthe weather, until fully dried.
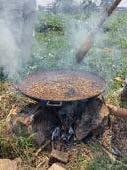

Regardless of the technique used, it is important to check whether all larvae died. This can be done when they are placed on the tarp for sun drying. During this process,
you have to watch out for birds that are looking for a snack. Therefore, it is recommended to keep a close watch for birds while sun drying the larvae.

Note!
In the future, when considering farm updates, it may be advisable to build a construction for drying the larvae. This is cheaper than a drying machine and can prove to be highly beneficial. Such a facility would be designed to elevate the larvae off the ground to protect them from mice and ants. Additionally, it would be surrounded by nets to safeguard the larvae from birds.

Step 5: Livestock
Materials needed:
• (Crushing machine)
How to:
Once fully dried, the larvae are ready to be given as feed for other animals such as pigs and chickens. It is preferable to first crush the dried larvae so they can more easily be mixed with other feed materials. The crushing machine for the larvae is very expensive and therefore not often used. Dried larvae can also be manually crushed or given as a whole.


Step 6: reproduction
Materials needed:
• Smelly substance
• Wooden boards
• Water
• Fly cage
• Dark room
• Light source
How to:
Twelve to eighteen days afterthe larvae were placed in boxes with substrate, the first prepupae are to be found. The prepupae can be recognized by their black colour. When they stop moving around, they have become pupae. In this phase, they should be placed in a darkened room. After approximately
one to two weeks, the flies emerge. A setup that can be used to imitate this dark room, is a dark space underneath the fly cage, with a hole connecting both spaces. This way the flies will be attracted to the light when they emerge, and reach the fly cage.

Lastly, new eggs are needed. In order for the flies to mate, a light source needs to be present.Forthisreason,asee-throughpanel can be placed in the roof to let the sun's rays through.

Two days after becoming flies, the BSF are ready to mate. Two days after mating, the female flies search for a good place to lay their eggs. To be able to have some control over where the eggs are laid, the flies can be lured to a designed egg holder placed on a smelly substance.This egg holder preferably has a lot of cracks. One method to achieve this is by stacking wooden boards in a manner that creates small gaps or openings.

Step 7: harvesting eggs
Materials needed:
• Small knife
• Wooden boards
• Jerrycan
How to:
To start a new BSF cycle, the eggs need to be harvested. The eggs can be found on the wooded boards.
The eggs can easily be harvested by scrapping them off the wooden boards. They are placed on the maize bran mix and after three days the eggs become larvae. The BSF farming process can then be restarted.

Possibilities
Small larvae could be sold as starting population to other farmers or as feed to fish farmers. The harvested larvae could also be soldasfeedforpoultryorpigs.Eventhefrass could be sold as fertilizer.
Depending on your specific area, you can look for other profit opportunities related to BSF.