Section 212 - OBSERVABLE SYMPTOMS AND SYSTEM DIAGNOSIS
Group 20 - Engine
Group 30 - Fuel, Air Intake, and Cooling Systems
Group 40 - Electrical System
Group 45 - Electronic Control Units
Group 50A - Drive Train (without Transmission)
Group 50B - SyncroPlus™ Transmission
Group 50C - PowrReverser™ Transmission
Group 50D - PowrQuad™ Transmission
Group 60A - Steering
Group 60B - Brakes
Group 70 - Hydraulic System
Group 80A - Machine-Specific Systems
Group 80B - Suspension Systems
Group 90 - Operator′s Cab
Section 220 - ENGINE
Group 20 - Exhaust Aftertreatment, Theory of Operation
Group 50 - Tests and Adjustments
Section 230 - FUEL, AIR INTAKE, AND COOLING SYSTEMS
Group 05 - General Information
Group 20A - Fuel System, Theory of Operation
Group 20B - Air Intake System, Theory of Operation
Group 20C - Cooling System, Theory of Operation
Group 20E - Cold-Weather Starting System, Theory of Operation
Group 50 - Fuel, Air Intake and Cooling Systems - Tests and Adjustments
Section 239 - FUEL, AIR INTAKE AND COOLING SYSTEMS - COMPONENT INFORMATION
Group 40A - Fuel System, Component Information
Group 40C - Cooling System, Component Information
Group 40D - Charge Air Circuit, Component Information
Group 40E - Cold-Weather Starting System, Component Information
Section 240 - ELECTRICAL SYSTEM
Group 05 - Summary of References
Group 50AA - 50AA - Starting Motor and Charging Circuit
Group 50AB - 50AB - External Cold-Weather Starting Aids
Group 50BA - 50BA - Lights/Turn-Signal Lights
Group 50CA - 50CA - Operator′s Seat
Group 50CB - 50CB - Acoustic Alarms
Group 50CC - 50CC - Windshield and Rear Window Wipers
Group 50CD - 50CD - Heater/Ventilation/Air-Conditioning System
Group 50CE - 50CE - Sockets
Group 50CF - 50CF - Radio
Group 50CH - 50CH - Accessories (General Information)
Group 50EA - 50EA - TEC Control Software and Implement CAN Bus
Group 50FA - 50FA - Electronic Engine Control
Group 50FB - 50FB - Immobilizer
Group 50FC - 50FC - Fuel System
Group 50GA - 50GA - Transmission
Group 50GE - 50GE - Front and Rear PTOs
Group 50GG - 50GG - Brakes
Group 50HA - 50HA - Rear Hitch
Group 50HD - 50HD - Suspended Front-Wheel Drive Axle
Group 50IA - 50IA - Display
Group 50JA - 50JA - CAN Bus Systems
Group 50X - 50X - Ground Connections
Section 245 - ELECTRONIC CONTROL UNITS
Group 05 - Electronic Control Units - General Information
Group 10B - Electronic Control Units - Interactive Tests and Calibrations
Group 10C - Electronic Control Units - Information on Programming
Group 20 - Electronic Control Units - Theory of Operation
Group 30 - Electronic Control Units - Diagnostic Schematics
Group 40 - Electronic Control Units - Component Information
Group 50 - Electronic Control Units - Tests and Adjustments
Group Immobilize - Immobilizer Control Unit
Group AIC - AIC Control Software
Group BLC - BLC Control Software
Group CCU - CCU Control Software
Group ECU_(Level - ECU Control Software (Level 23 ECU)
Group ECU_(Level - ECU Control Software (Level 16 ECU)
Group EIC - EIC Control Software
Group FCC - FCC Control Software
Group HCC - HCC Control Software
Group OIC - OIC Control Software
Group PDU - PDU Control Software
Group PTF - PTF Control Software
Group PTQ - PTQ Control Software
Group PTR - PTR Control Software
Group RPT - RPT Control Software
Group SFA - SFA Control Software
Group SMB - SMB Control Software
Group TEC - TEC Control Software
Group TEI - TEI Control Software
Group TIQ - TIQ Control Software
Group VTV - VTV Control Software
Section 249 - ELECTRICAL CONNECTORS, WIRING HARNESSES AND COMPONENTS
Group 40 - Summary of Electrical Components and Harnesses
Group 40A - Electrical Components - Assemblies
Group 40B - Electrical Components - Sensors
Group 40E - Electrical Components - Miscellaneous Devices and Equipment
Group 40F - Electrical Components - Protective Equipment
Group 40G - Electrical Components - Power Supply and Alternator
Group 40H - Electrical Components - Monitoring and Signalling Devices
Group 40K - Electrical Components - Relays
Group 40M - Electrical Components - Electrical Motors
Group 40R - Electrical Components - Resistors
Group 40S - Electrical Components - Switches
Group 40V - Electrical Components - Diodes
Group 40W - Electrical Components - Wiring Harnesses
Group 40XA - Connectors from X0001 to X0099
Group 40XB - Connectors from X0100 to X0199
Group 40XC - Connectors from X0200 to X0299
Group 40XD - Connectors from X0300 to X0399
Group 40XE - Connectors from X0400 to X0499
Group 40XF - Connectors from X0500 to X0599
Group 40XG - Connectors from X0600 to X0699
Group 40XH - Connectors from X0700 to X0799
Group 40XI - Connectors from X0800 to X0899
Group 40XJ - Connectors from X0900 to X0999
Group 40XK - Connectors from X1000 to X1099
Group 40XL - Connectors from X1100 to X1199
Group 40XM - Connectors from X1200 to X1299
Group 40XW - Connectors and Contacts
Group 40XX - Ground Points
Group 40Y - Electrical Components - Solenoid Valves and Solenoids
Group 40Z - Electrical Components - Other
Section 250A - DRIVE TRAIN (WITHOUT TRANSMISSION)
Group 10 - Drive Train (without Transmission) - Operational Checks
Group 20 - Drive Train (without Transmission) - Theory of Operation
Group 50 - Drive Train (without Transmission) - Tests and Adjustments
Section 250C - POWRQUAD™ TRANSMISSION
Group 05 - PowrQuad™ Transmission - General Information
Group 10 - PowrQuad™ Transmission - Operational Checks
Group 20 - PowrQuad™ Transmission - Theory of Operation
Group 30 - PowrQuad™ Transmission - Schematics
Group 50 - PowrQuad™ Transmission - Tests and Adjustments
Section 250E - POWRREVERSER™ TRANSMISSION
Group 05 - PowrReverser™ Transmission - General Information
Group 10 - PowrReverser™ Transmission - Operational Checks
Group 20 - PowrReverser™ Transmission - Theory of Operation
Group 30 - PowrReverser™ Transmission - Schematics
Group 50 - PowrReverser™ Transmission - Tests and Adjustments
Section 250F - SYNCROPLUS™ TRANSMISSION
Group 05 - SyncroPlus™ Transmission - General Information
Group 10 - SyncroPlus™ Transmission - Operational Checks
Group 20 - SyncroPlus™ Transmission - Theory of Operation
Group 30 - SyncroPlus™ Transmission - Schematics
Group 50 - SyncroPlus™ Transmission - Tests and Adjustments
Section 259 - DRIVE TRAIN - COMPONENT INFORMATION
Group 40A - Drive Train (without Transmission) - Component Information
Group 40C - PowrQuad™ Transmission - Component Information
Section 260A - STEERING
Group 05 - Steering - General Information
Group 10 - Steering - Operational Checks
Group 20 - Steering - Theory of Operation
Group 50 - Steering - Tests and Adjustments
Section 260B - BRAKES
Group 05 - Brakes - General Information
Group 10 - Brakes - Operational Checks
Group 20 - Brakes - Theory of Operation
Group 30 - Brakes - Schematics
Group 50 - Brakes - Tests and Adjustments
Section 269 - STEERING AND BRAKES - COMPONENT INFORMATION
Group 40A - Steering - Component Information
Group 40B - Brakes - Component Information
Section 270 - HYDRAULIC SYSTEM
Group 05 - Hydraulic System - General Information
Group 10 - Hydraulic System - Operational Checks
Group 20 - Hydraulic System - Theory of Operation
Group 20A - Oil Filter, Additional Oil Reservoir, Charge Pump and Hydraulic Pump - Theory of Operation
Group 20B - Rear Hitch - Theory of Operation
Group 20C - Front Hitch - Theory of Operation
Group 20D - Selective Control Valves (SCVs) - Theory of Operation
Group 20E - Independent Control Valves (ICVs) - Theory of Operation
Group 30 - Hydraulic System - Schematics
Group 50 - Hydraulic System - Tests and Adjustments
Section 279 - HYDRAULIC SYSTEM - COMPONENT INFORMATION
Group 40 - Hydraulic System - Component Information
Section 280A - MACHINE-SPECIFIC SYSTEMS
Group 10 - Machine-Specific Systems - Operational Checks
Group 50 - Machine-Specific Systems - Tests and Adjustments
Section 280B - SUSPENSION SYSTEMS
Group 10 - Suspension Systems - Operational Checks
Group 20 - Suspended Front-Wheel Drive Axle - Theory of Operation
Group 30 - Suspended Front-Wheel Drive Axle - Schematics
Group 50 - Suspended Front-Wheel Drive Axle - Tests and Adjustments
Section 289 - SUSPENSION SYSTEMS - COMPONENT INFORMATION
Group 40 - Suspended Front-Wheel Drive Axle - Component Information
Section 290 - OPERATOR′S CAB
Group 10 - Operator′s Cab - Operational Checks
Group 20 - Operator′s Cab - Theory of Operation
Group 50 - Operator′s Cab - Tests and Adjustments
Section 299 - OPERATOR′S CAB - COMPONENT INFORMATION
Group 40 - Air Conditioning System - Component Information
Section 300 - SPECIAL TOOLS
Foreword
DO NOT change this block . Insert a new block, then delete this one.
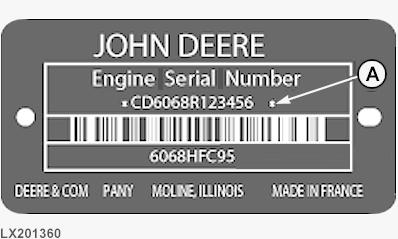
Information on Engine Version
Regional differences in emissions regulations result in the employment of different methods of treating exhaust gases (for details, see relevant engine CTM).
The seventh digit of engine serial number (A) identifies the emissions level of the tractor.
Tractors with Tier 4 / Level IIIB to 97/68/EC (with exhaust cleaning system)
Engine types:
4-cylinder engines with serial number CD4045R XXXXXX
6-cylinder engines with serial number CD6068R XXXXXX
Electronic Engine Control:
Level 23 ECU
Tractors with Tier 2 / Level II to 97/68/EC (without exhaust cleaning system)
Engine types:
4-cylinder engines with serial number CD4045G XXXXXX
6-cylinder engines with serial number CD6068G XXXXXX
Electronic Engine Control:
Level 16 ECU
Engine Serial Number Plate
Group 05 - Safety Measures
General Information - Safety - Summary of References
General Information - Safety - Summary of References
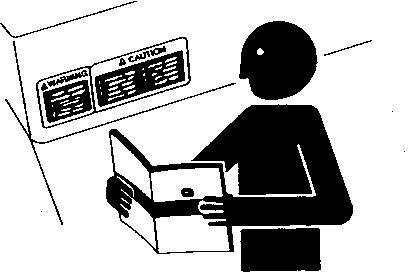
Recognize Safety Information
Understand Signal Words
Follow Safety Instructions
Prevent Machine Runaway
Operating the Tractor Safely
Operating the Loader Tractor Safely
Passenger Seat
Use Safety Lights And Devices
Towing Trailers/Implements Safely (Mass)
Use Caution on Slopes and Uneven Terrain
Freeing a Mired Machine
Avoid Backover Accidents
Handle Fuel Safely Avoid Fires
Handling Batteries Safely
Prepare for Emergencies
Avoid High-Pressure Fluids
Service Cooling System Safely
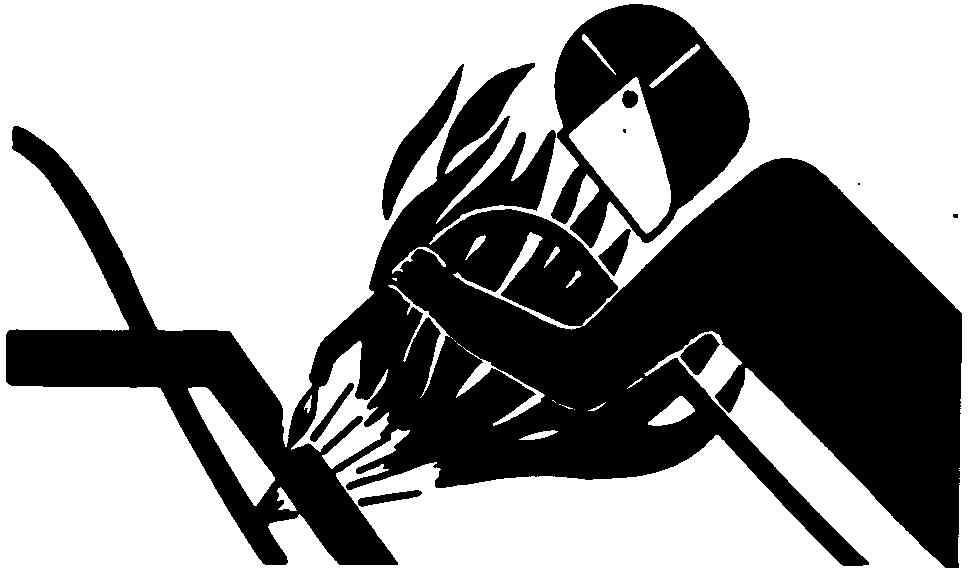
Remove Paint Before Welding or Heating
Avoid Heating Near Pressurized Fluid Lines
Work In Ventilated Area
Avoid Contact with Agricultural Chemicals
Handle Agricultural Chemicals Safely
Stay Clear of Rotating Drivelines
Wear Protective Clothing
Protect Against Noise
Practice Safe Maintenance
Stay Away from the Hot Exhaust System
Exhaust Filter Cleaning
Clean Exhaust Filter Safely
Read Operator Manuals for ISOBUS Devices
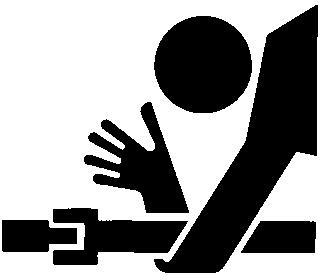
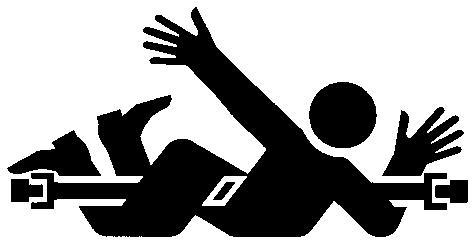
Use Seat Belt Properly
Park Machine Safely
Use Proper Lifting Equipment
Construct Dealer-Made Tools Safely
Support Machine Properly
Work in Clean Area
Illuminate Work Area Safely
Service Machines Safely
Service Accumulator Systems Safely
Servicing Tires Safely
Use Proper Tools
Service Front-Wheel Drive Tractor Safely
Avoid Eye Contact with Radar
Keep ROPS Installed Properly
Replace Safety Signs
Replace Safety Decals
Dispose of Waste Properly
Live With Safety
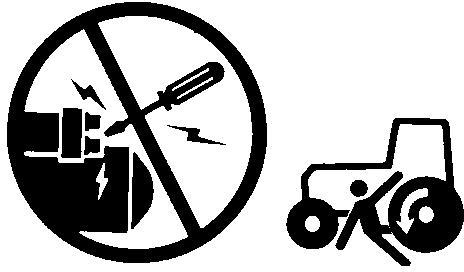
Safety Measures on Electronic Control Units
Servicing Electronic Control Units
Welding Near Electronic Control Units
Keep Electronic Control Unit Connectors Clean.
Safety Instructions for Replacing a Halogen Bulb
Safety Instructions for Replacing Xenon (HID) Bulbs and Ballast Units
Recognize Safety Information
Safety-alert symbol
This is a safety-alert symbol. When you see this symbol on your machine or in this manual, be alert to the potential for personal injury.
Follow recommended precautions and safe operating practices.
Understand Signal Words
Signal Words
A signal word DANGER, WARNING, or CAUTION is used with the safety-alert symbol. DANGER identifies the most serious hazards.
DANGER or WARNING safety signs are located near specific hazards. General precautions are listed on CAUTION safety signs. CAUTION also calls attention to safety messages in this manual.
Follow Safety Instructions
Safety Messages
Carefully read all safety messages in this manual and on your machine safety signs. Keep safety signs in good condition. Replace missing or damaged safety signs. Be sure new equipment components and repair parts include the current safety signs. Replacement safety signs are available from your John Deere dealer.
There can be additional safety information contained on parts and components sourced from suppliers that is not reproduced in this operator′s manual.
Learn how to operate the machine and how to use controls properly. Do not let anyone operate without instruction.
Keep your machine in proper working condition. Unauthorized modifications to the machine may impair the function and/or safety and affect machine life.
If you do not understand any part of this manual and need assistance, contact your John Deere dealer.
Prevent Machine Runaway
Machinery Runaway
Avoid possible injury or death from machinery runaway.
Do not start engine by shorting across starter terminals. Machine will start in gear if normal circuitry is bypassed.
NEVER start engine while standing on ground. Start engine only from operator’s seat, with transmission in neutral or park.
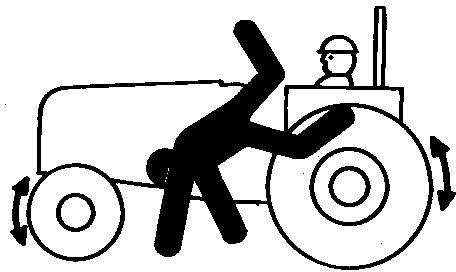
Operating the Tractor Safely
Safety Fall Off Tractor
Safety PTO
You can reduce the risk of accidents by following these simple precautions:
Use your tractor only for jobs it was designed to perform, for example, pushing, pulling, towing, actuating, and carrying a variety of interchangeable equipment designed to conduct agricultural work. This tractor is not intended to be used as a recreational vehicle.
Read this operator’s manual before operating the tractor and follow operating and safety instructions in the manual and on the tractor.
Follow operation and ballasting instructions found in the operator’s manual for your implements/attachments, such as front loaders
Make sure that everyone is clear of machine, attached equipment, and work area before starting engine or operation. Keep hands, feet, and clothing away from power-driven parts
Driving Concerns
Never get on or off a moving tractor.
Keep all children and nonessential personnel off tractors and all equipment.
Never ride on a tractor unless seated on a John Deere approved seat with seat belt.
Keep all shields/guards in place.
Use appropriate visual and audible signals when operating on public roads.
Move to side of road before stopping.
Reduce speed when turning, applying individual brakes, or operating around hazards on rough ground or steep slopes.
Couple brake pedals together for road travel.
Pump brakes when stopping on slippery surfaces.
Towing Loads
Be careful when towing and stopping heavy loads. Stopping distance increases with speed and weight of towed loads, and on slopes. Towed loads with or without brakes that are too heavy for the tractor or are towed too fast can cause loss of control.
Consider the total weight of the equipment and its load.
Hitch towed loads only to approved couplings to avoid rearward upset.
Parking and Leaving the Tractor
Before dismounting, shut off SCVs, disengage PTO, stop engine, lower implements/attachments to ground and securely engage park mechanism, including the park pawl and park brake. In addition, if tractor is left unattended, remove key. Leaving transmission in gear with engine off will NOT prevent the tractor from moving.
Never go near an operating PTO or an operating implement.
Wait for all movement to stop before servicing machinery.
Common Accidents
Unsafe operation or misuse of the tractor can result in accidents. Be alert to hazards of tractor operation.
The most common accidents involving tractors:
Tractor rollover
Collisions with motor vehicles
Improper starting procedures
Entanglement in PTO shafts
Falling from tractor
Crushing and pinching during hitching
Operating the Loader Tractor Safely
Loader Tractor
When operating a machine with a loader application, reduce speed as required to ensure good tractor and loader stability.
To avoid tractor rollover and damage to front tires and tractor, do not carry load with your loader at a speed over 10 km/h (6 mph).
To avoid tractor damage do not use a front loader or a sprayer tank if the tractor is equipped with a 3 Meter Front Axle.
Never allow anyone to walk or work under a raised loader.
Do not use loader as a work platform.
Do not lift or carry anyone on loader, in bucket, or on implement or attachment.
Lower loader to ground before leaving operators station.
The Rollover Protective Structure (ROPS) or cab roof, if equipped, may not provide sufficient protection from load falling onto the operators station. To prevent loads from falling onto the operators station, always use appropriate implements for specific applications (that is, manure forks, round bale forks, round bale grippers, and clampers).
Ballast tractor in accordance to Ballast Recommendations in PREPARE TRACTOR section.
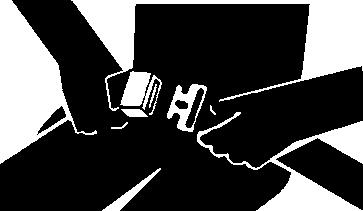
Passenger Seat
Use Seat Belt
The passenger seat is intended only for transport of a passenger in on-road operations (i.e. transport from farm to field).
If it is necessary to transport a passenger, the passenger seat is the only means of transport of a passenger condoned by John Deere.
Use
Safety Lights and Devices
Prevent collisions between other road users, slow moving tractors with attachments or towed equipment, and self-propelled machines on public roads. Frequently check for traffic from the rear, especially in turns, and use turn signal lights.
Use headlights, flashing warning lights, and turn signals day and night. Follow local regulations for equipment lighting and marking. Keep lighting and marking visible, clean, and in good working order. Replace or repair lighting and marking that has been damaged or lost. An implement safety lighting kit is available from your John Deere dealer.
Towing Trailers/Implements Safely (Mass)
Towing trailers/implements safely (mass)
Stopping distance increases with speed and mass of trailer/implement, and when transporting on slopes. Towed mass with or without brakes that is too heavy for the tractor or is towed too fast can cause loss of control. Consider the total weight of the equipment and its load.
Tow Towed Mass Safely
Trailer/implement brake system
- unbraked
- independent
- overrun brake
- hydraulic brake
- single-line air brake
- dual-line air brake
Top speed
25 km/h (15.5 mph)
25 km/h (15.5 mph)
25 km/h (15.5 mph)
25 km/h (15.5 mph)
25 km/h (15.5 mph)
Maximum design speed
There may be legal limits in force that restrict travel speeds to figures lower than those quoted here.
Use additional caution when towing loads under adverse surface conditions, when turning, and on inclines.
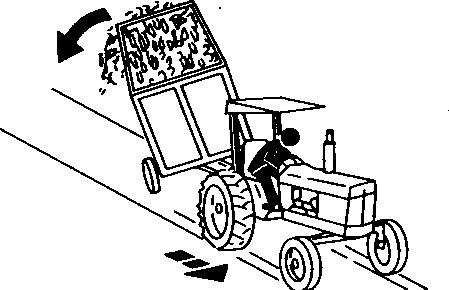
Use Caution On Slopes and Uneven Terrain
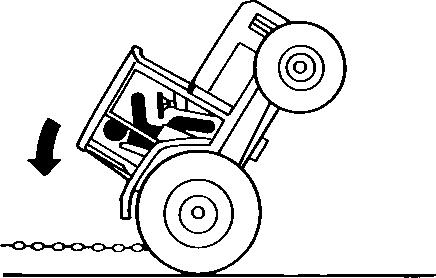
Avoid holes, ditches, and obstructions which cause the tractor to tip, especially on slopes. Avoid sharp uphill turns. Driving forward out of a ditch, mired condition, or up a steep slope could cause tractor to tip over rearward. Back out of these situations if possible.
Danger of overturn increases greatly with narrow tread setting, at high speed.
Not all conditions that can cause a tractor to overturn are listed. Be alert for any situation in which stability may be compromised.
Slopes are a major factor related to loss-of-control and tip-over accidents, which can result in severe injury or death. Operation on all slopes requires extra caution
Never drive near the edge of a gully, drop-off, ditch, steep embankment, or a body of water. The machine could suddenly roll over if a wheel goes over the edge or the ground caves in
Choose a low ground speed so you will not have to stop or shift while on a slope.
Avoid starting, stopping or turning on a slope. If the tires lose traction, disengage the PTO and proceed slowly, straight down the slope.
Keep all movement on slopes slow and gradual. Do not make sudden changes in speed or direction, which could cause the machine to roll over.
Freeing a Mired Machine
Tractor Tipping
Attempting to free a mired machine can involve safety hazards such as the mired tractor tipping rearward, the towing tractor overturning, and the tow chain or tow bar (a cable is not recommended) failing and recoiling from its stretched condition.
Back your tractor out if it gets mired down in mud. Unhitch any towed implements. Dig mud from behind the rear wheels. Place boards behind the wheels to provide a solid base and try to back out slowly. If necessary, dig mud from the front of all wheels and drive slowly ahead.
If necessary to tow with another unit, use a tow bar or a long chain (a cable is not recommended). Inspect the chain for flaws. Make sure all parts of towing devices are of adequate size and strong enough to handle the load.
Always hitch to the drawbar of the towing unit. Do not hitch to the front pushbar attachment point. Before moving, clear the area of people. Apply power smoothly to take up the slack: a sudden pull could snap any towing device causing it to whip or recoil dangerously.
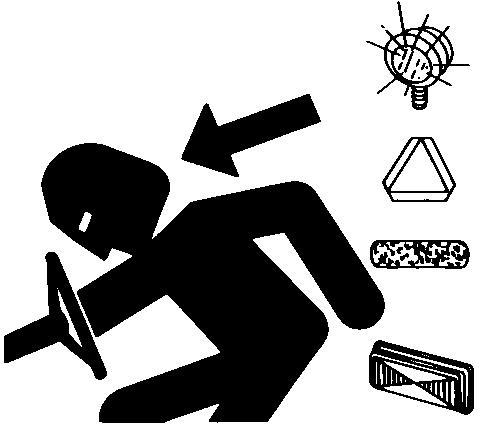
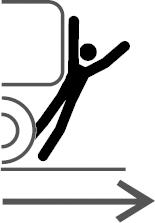
Avoid Backover Accidents
Avoid Backover Accidents
Before moving machine, be sure that all persons are clear of machine path. Turn around and look directly for best visibility. Use a signal person when backing if view is obstructed or when in close quarters.
Do not rely on a camera to determine if personnel or obstacles are behind the machine. The system can be limited by many factors including maintenance practices, environmental conditions, and operating range.
Handle Fluids Safely—Avoid Fires
Avoid Fires
When you work around fuel, do not smoke or work near heaters or other fire hazards.
Store flammable fluids away from fire hazards. Do not incinerate or puncture pressurized containers.
Make sure machine is clean of trash, grease, and debris.
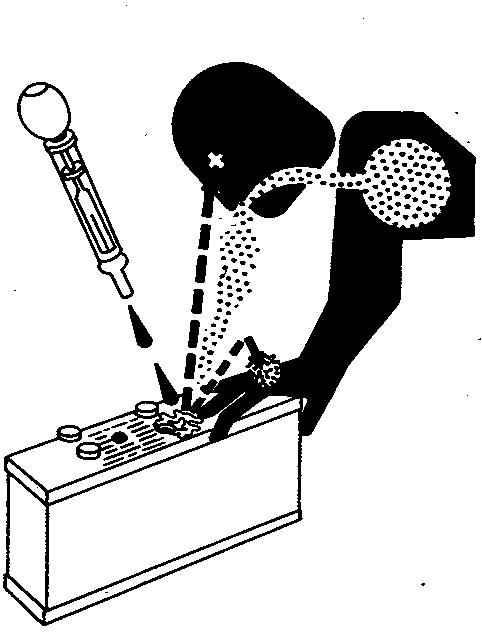
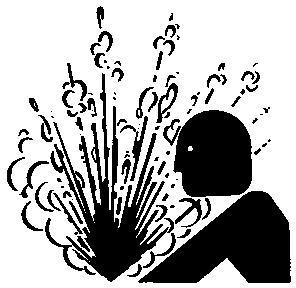
Handling Batteries Safely
Caution
Caution
Battery gas can explode. Keep sparks and flames away from batteries. Use a flashlight to check battery electrolyte level.
Never check battery charge by placing a metal object across the posts. Use a voltmeter or hydrometer.
Always remove grounded (-) battery clamp first and replace grounded clamp last.
Sulfuric acid in battery electrolyte is poisonous and strong enough to burn skin, eat holes in clothing, and cause blindness if splashed into eyes.
Avoid hazards by:
Filling batteries in a well-ventilated area
Wearing eye protection and rubber gloves
Avoiding use of air pressure to clean batteries
Avoiding breathing fumes when electrolyte is added
Avoiding spilling or dripping electrolyte
Using correct battery booster or charger procedure.
If acid is spilled on skin or in eyes:
1. Flush skin with water.
2. Apply baking soda or lime to help neutralize the acid.
3. Flush eyes with water for 15 30 minutes. Get medical attention immediately.
If acid is swallowed:
1. Do not induce vomiting.
2. Drink large amounts of water or milk, but do not exceed 2 L (2 qt.).
3. Get medical attention immediately.
WARNING: Battery posts, terminals, and related accessories contain lead and lead compounds, chemicals known to the State of California to cause cancer and reproductive harm.Wash hands after handling.
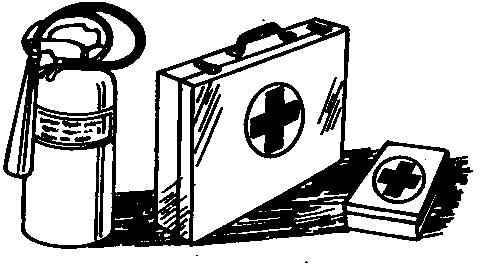
Prepare for Emergencies
First Aid Kit
Be prepared if a fire starts.
Keep a first aid kit and fire extinguisher handy.
Keep emergency numbers for doctors, ambulance service, hospital, and fire department near your telephone.
Avoid High-Pressure Fluids
Inspect hydraulic hoses periodically – at least once per year – for leakage, kinking, cuts, cracks, abrasion, blisters, corrosion, exposed wire braid or any other signs of wear or damage.
Replace worn or damaged hose assemblies immediately with John Deere approved replacement parts.
Escaping fluid under pressure can penetrate the skin causing serious injury.
Avoid the hazard by relieving pressure before disconnecting hydraulic or other lines. Tighten all connections before applying pressure.
Search for leaks with a piece of cardboard. Protect hands and body from high-pressure fluids.
If an accident occurs, see a doctor immediately. Any fluid injected into the skin must be surgically removed within a few hours or gangrene may result. Doctors unfamiliar with this type of injury should reference a knowledgeable medical source. Such information is available in English from Deere & Company Medical Department in Moline, Illinois, U.S.A., by calling 1-800-822-8262 or +1 309-748-5636.
Service Cooling System Safely
Cooling System
Explosive release of fluids from pressurized cooling system can cause serious burns.
Shut off engine. Only remove filler cap when cool enough to touch with bare hands. Slowly loosen cap to first stop to relieve pressure before removing completely.
High Pressure
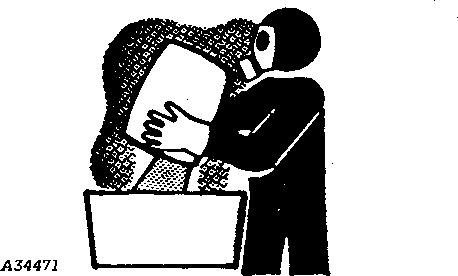
Remove Paint Before Welding or Heating
Toxic Fumes
Avoid potentially toxic fumes and dust.
Hazardous fumes can be generated when paint is heated by welding, soldering, or using a torch.
Remove paint before heating:
Remove paint a minimum of 100 mm (4 in.) from area to be affected by heating. If paint cannot be removed, wear an approved respirator before heating or welding.
If you sand or grind paint, avoid breathing the dust. Wear an approved respirator.
If you use solvent or paint stripper, remove stripper with soap and water before welding. Remove solvent or paint stripper containers and other flammable material from area. Allow fumes to disperse at least 15 minutes before welding or heating.
Do not use a chlorinated solvent in areas where welding will take place.
Do all work in an area that is well ventilated to carry toxic fumes and dust away.
Dispose of paint and solvent properly.
Avoid Heating Near Pressurized Fluid Lines
Flammable Spray
Flammable spray can be generated by heating near pressurized fluid lines, resulting in severe burns to yourself and bystanders. Do not heat by welding, soldering, or using a torch near pressurized fluid lines or other flammable materials. Pressurized lines can accidentally burst when heat goes beyond the immediate flame area.
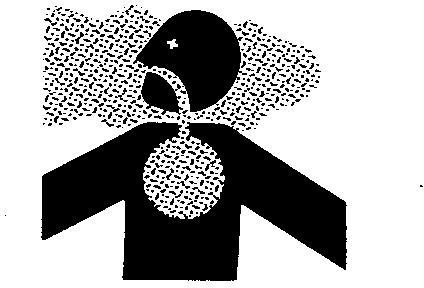
Work In Ventilated Area
Engine exhaust fumes
Engine exhaust fumes can cause sickness or death. If it is necessary to run an engine in an enclosed area, remove the exhaust fumes from the area with an exhaust pipe extension. If you do not have an exhaust pipe extension, open the doors and get outside air into the area.
Avoid Contact with Agricultural Chemicals
Harmful Pesticides
Pesticide Use
This enclosed cab does not protect against inhaling vapor, aerosol or dust. If pesticide use instructions require respiratory protection, wear an appropriate respirator inside the cab.
Before leaving the cab, wear personal protective equipment as required by the pesticide use instructions. When re-entering the cab, remove protective equipment and store either outside the cab in a closed box or some other type of sealable container or inside the cab in a pesticide resistant container, such as a plastic bag.
Clean your shoes or boots to remove soil or other contaminated particles prior to entering the cab.
Handle Agricultural Chemicals Safely
Safety
Safety
Chemicals used in agricultural applications such as fungicides, herbicides, insecticides, pesticides, rodenticides, and fertilizers can be harmful to your health or the environment if not used carefully.
Always follow all label directions for effective, safe, and legal use of agricultural chemicals.
Reduce risk of exposure and injury:
Wear appropriate personal protective equipment as recommended by the manufacturer. In the absence of manufacturer′s instructions, follow these general guidelines:
Chemicals labeled′Danger′ : Most toxic. Generally require use of goggles, respirator, gloves, and skin protection.
Chemicals labeled′Warning′ : Less toxic. Generally require use of goggles, gloves, and skin protections.
Chemicals labeled′Caution′ : Least toxic. Generally require use of gloves and skin protection.
Avoid inhaling vapor, aerosol or dust.
Always have soap, water, and towel available when working with chemicals. If chemical contacts skin, hands, or face, wash immediately with soap and water. If chemical gets into eyes, flush immediately with water.
Wash hands and face after using chemicals and before eating, drinking, smoking, or urination.
Do not smoke or eat while applying chemicals.
After handling chemicals, always bathe or shower and change clothes. Wash clothing before wearing again.
Seek medical attention immediately if illness occurs during or shortly after use of chemicals.
Keep chemicals in original containers. Do not transfer chemicals to unmarked containers or to containers used for food or drink.
Store chemicals in a secure, locked area away from human or livestock food. Keep children away.
Always dispose of containers properly. Triple rinse empty containers and puncture or crush containers and dispose of properly.
Stay Clear of Rotating Drivelines
Rotating Drivelines
Drivelines
Entanglement in rotating driveline can cause serious injury or death.
Keep tractor master shield and driveline shields in place at all times. Make sure rotating shields turn freely.
Wear close fitting clothing. Stop the engine and be sure that PTO driveline is stopped before making adjustments, connections, or cleaning out PTO driven equipment.