REVIEWCOPYPLEASEDONOTSHARE


lock printing is a centuries-old technique, using carved wooden blocks with intricate patterns to hand-print fabric and paper. India became a hub for block-printed fabrics in the twelfth century and it remains globally renowned, with unmatched craftsmanship in hand-carving detailed wooden blocks and the labourintensive printing process that continues to thrive.
Hand-printed fabrics have become increasingly popular in recent years as the printing process has become much more widely recognised. The use of hand-printed fabrics by designers and fashion houses helps to promote the tradition and heritage of this ancient art form. In the UK brands such as East have long used traditional wood-block and heritage-inspired prints in their collections.

Having block printed here in the UK, we were wellversed in the hand-printing process and knew some of its history. However, nothing compares to experiencing block printing in India, at the very heart of this ancient craft. Immersed in the vibrant culture and surrounded by master artisans, we were able to gain a deeper appreciation for the skill, tradition and precise effort that goes into each piece. Witnessing the craft in its birthplace brought the history to life in ways we could never have imagined.
Our first visit to India was an experience we’ll never forget, and it remains a significantly influential trip that has shaped our entire journey with block printing. A trip to Rajasthan is now an annual fixture for us and still gives us the same sense of elation as our first visit. These trips keep us connected to a place where we feel completely at home and we can recharge with inspiration for the year ahead. Being there allows us to get together with many of the artisans we collaborate with.


This section covers the basics you’ll need to get started with block printing and is one of the most important parts of the book.
Having the right equipment and learning the basic techniques can make a big difference in whether your prints are successful or not. It’s common to feel discouraged and lack confidence if things don’t go to plan, so we always recommend that our customers and workshop guests take their time with the basics before moving on to the next step.
Making mistakes is part of learning how to do it right, which is why practice is so important. It can also help to understand why a print didn’t turn out as expected. We’ve included a section on understanding your results (see page 27) to help you see how your prints should or shouldn’t look.
The printing equipment you’ll need is basic; you should be able to find all the required materials at home or from your local art and craft store.


nderstanding spacing and knowing how to work it out before starting a project is an important factor for every printer to understand. Without this knowledge, you may lack the confidence to start certain projects, or never be happy with the finished results. Each project talks you through the spacing that you will need to follow during the steps, but once you start printing your own creations, you’ll need to know how to do this yourself. Spacing can be difficult to work out by eye, which is why we have a couple of handy tips to help you get started.
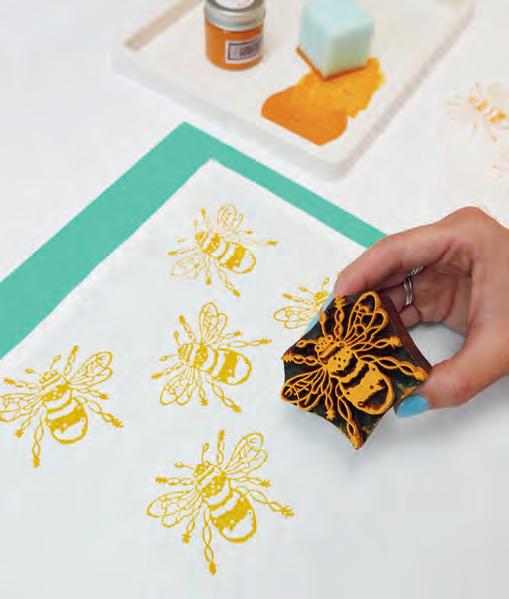
If you are planning to print a design all over a piece of fabric in straight lines (we refer to this as a straight line repeat), you need to know how many prints you can fit across the width and height of your fabric. In the activity shown, we worked out that we could fit four prints down the height and width of our square of fabric. This method works with all shapes of fabric; take the time to work out your spacing and fold the fabric.
To replicate this pattern on paper, use a ruler and pencil to measure the page into equal segments and faintly mark each box. After printing, you can rub out the pencil marks.


1 Hold the printing block onto the fabric to measure how wide you will need each row to be, then fold the fabric to form the number of rows you require. Iron the fold lines and then unfold the fabric to reveal the crease marks, which will perfectly outline where your four rows of prints should go.
2 You can use the same fold and iron technique to work out how many prints you can fit across the width of your fabric. When you unfold your fabric, you’ll be left with a grid system showing you exactly where to print within.
3 Print your design centrally in each square (see one-colour printing, page 21), and you’ll be left with a perfectly spaced piece of printed fabric.

Our simple but effective letter tote bag makes the perfect personalised gift, which is sure to impress. Thanks to the simple printing techniques required, this project can be carried out by all abilities of block printers and is great for adults and children alike.

1 Start by marking up your initial. If the shape of the letter is simple, you can do this with masking tape. To find the centre of your bag to correctly position and space the letter, fold and iron the item to create a crease line. The masking tape will act as a guide, which you will print within.
• Natural cotton tote bag
• Letter stencil or card
• Printing blocks – we used Leaf Bunch, Small Curly Leaf, Simple Monstera Leaf, Mini Seedhead Starburst, Simple Dragonfly, Small Outline Flower, Mini Daisy, Straight Petal Daisy, Mini Flower, Single Leaf, Small Acorn Leaf and Small Detailed Leaves
• Fabric paints – we used Khaki, Violet, Indian Aqua, Leafy Green, Indian Yellow, Aquamarine and Coral
• Basic printing equipment (see page 18)

2 For more complicated letters that you can’t mark with masking tape, you can use a letter stencil or make your own. We created an ‘S’ stencil using A3 paper. To do this, draw your letter in bubble writing, cut the inside of the letter out and fix the stencil in place on your bag with masking tape.

3 Start the design by using your biggest printing blocks – these will take up the most space so it’s harder to squeeze them in at the end. Print each design several times within the masking tape. It works best if you overlap your prints onto the masking tape, as this will help create the edges of your printed letter. We suggest sticking to the same colour on each printing block, so you don’t confuse the design.

4 Each time you print with a new design, the amount of blank space will reduce. Continue printing within the masking tape, with each design close together or partially overlapping – this will bring the whole design together.
5 Using the smaller designs, fill in any gaps until the entire inside of the letter is printed.

For truly unique Christmas gifts that look spectacular under the tree, handprinting your own wrapping paper is a wonderful way to make use of your printing blocks. Brown paper can have a shiny side and a rough side – always make sure you print with the rough side facing up. Start by measuring how much paper you need to wrap the gift. It’s easier and more efficient to print the correct size piece of paper, otherwise you may find you waste time printing off-cuts. A simple one-colour print in a single festive colour is fun and easy to print and can give a chic minimalist effect that is sure to impress

WILL NEED
• Roll of brown kraft paper, cut to the size of your gift
• Drawing pins
• Printing block – we used Christmas Starburst
• Water-based acrylic or fabric paint –we used Santa Red acrylic
• Scissors
• Roll of hessian string or twine
• Basic printing equipment (see page 18)
1 Lay your brown kraft paper out onto your printing mat. Use drawing pins in each corner to hold the paper flat. You won’t see the small holes made by the pins once you have wrapped the item.

The size of the item you are wrapping determines the number of prints you should make. If you’re wrapping a small item, use a small design block and print the pattern more frequently across the paper. For larger items and bigger sheets of paper, use a larger design with lessfrequent printing.

2 Following the same printing technique as we used on the cards and tags (see page 117), hold the Christmas Starburst printing block in your right hand, and support it with your left to avoid any slipping. Ensure you are applying the correct pressure to avoid the printing block from puncturing through the paper.

3 Start from one end and work your way across the paper until the entire sheet is printed in your chosen design. Once finished, leave the paper to dry before use.