KnowHOW
Analogue to digital In part 1 of making the transition from analogue to digital, Lectrosonics’ Gordon Moore shares some tips for a smooth changeover AS THE COSTS OF DIGITAL MIXING consoles continue to drop, more and more churches are making the transition from an analogue to a digital board. For many, especially smaller churches, this is a major transition for a volunteer team used to the “simpler” analogue workflow. Unless it is planned out a bit in advance, the transition can be jarring and lead to some disruption of what was a fairly routine setup. The key to a good transition is analysis, planning, training and practice.
Analysis – phase one The very first step is to analyse your existing sound system. Most churches are somewhat surprised to find out that their sound system will probably see an extensive simplification when a digital board is introduced. A fully analogue installation may have several layers of signal processing and effects components which will no longer be needed in a digital world. A typical analogue setup would involve a mixer, compressors for the individual channels, equalisers, delays and dynamics processors for the various feeds (house amplifiers, monitors,
recordings, etc.). The easiest way to run this analysis is to draw the signal flow out on a piece of paper. Digital consoles have the vast majority of the signal processing you will need built into the DSP processors onboard the mixer. In most cases, there will be many more capabilities than you could have considered on a moderate budget in the analogue realm. By analysing the processors you currently have in place, you will achieve two goals: identifying the equipment you will eliminate and identifying the functions you want to have in the new board. When we made our transition, we eliminated several pieces of equipment (including a patchbay, an EQ, a set of compressor limiters and a hodge-podge of signal processors – all replaced by the built-in capabilities of the new console).
Analysis – phase two Now that you have eliminated the redundant equipment you no longer need, the next step is to decide what features you are looking for in a new board. Build a checklist.
Start first with your stage setup. You currently have analogue audio cables running from the stage area to your mixer location. Floor pockets, guitar interfaces and wireless are all feeding back to your analogue mixer. You can continue to use those lines to feed the analogue inputs of your new mixer. But also consider the possibility of a remote digital setup where all those sources feed to a head end unit at the stage which is connected to the mixer via a single Ethernet cable. Why would you want a digital pathway instead of your existing analogue cables? There are several good reasons. 1. No signal loss due to impedance. Long analogue cable runs have increasing resistance to AC signals with greater losses at higher frequencies. This is non-existent with a digital transport system. 2. Digital transport systems can help eliminate ground loops. One of the biggest problems with analogue systems is ground loops between the sound booth and the stage area. The guitar
3.
4.
5.
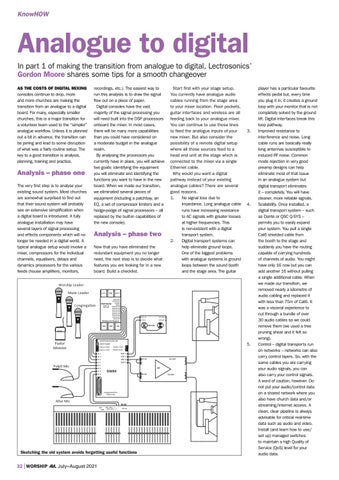
Sketching the old system avoids forgetting useful functions
player has a particular favourite effects pedal but, every time you plug it in, it creates a ground loop with your monitor that is not completely solved by the ground lift. Digital interfaces break this loop pathway. Improved resistance to interference and noise. Long cable runs are basically really long antennas susceptible to induced RF noise. Common mode rejection in very good preamp designs can help eliminate most of that issue in an analogue system but digital transport eliminates it – completely. You will have cleaner, more reliable signals. Scalability. Once installed, a digital transport system – such as Dante or QSC Q-SYS – permits you to easily expand your system. You pull a single Cat6 shielded cable from the booth to the stage and suddenly you have the routing capable of carrying hundreds of channels of audio. You might have only 16 now but you can add another 16 without pulling a single additional cable. When we made our transition, we removed nearly a kilometre of audio cabling and replaced it with less than 75m of Cat6. It was a visceral experience to cut through a bundle of over 30 audio cables so we could remove them (we used a tree pruning shear and it felt so wrong). Control – digital transports run on networks – networks can also carry control layers. So, with the same cables you are carrying your audio signals, you can also carry your control signals. A word of caution, however. Do not put your audio/control data on a shared network where you also have church data and/or streaming/internet access. A clean, clear pipeline is always advisable for critical real-time data such as audio and video. Install (and learn how to use/ set up) managed switches to maintain a high Quality of Service (QoS) level for your audio data.
32 WORSHIP AVL July–August 2021
WAVL Pg32-33 KnowHow AUDIO.indd 32
26/05/2021 16:27
Ne inp wa of co de m ne W br as an dig yo No lis su S dig (co ga als fo ind E ef ch ef se se R in m an ev So ca ge ca in m th fa th It’ of