PRODUCT FOCUS
Revit Platform 2015 In your Revit models, locate the Survey Point and mark it with an annotation symbol that will export with the model and show up in the CAD file. This will act as a reference point to help you position everything in the correct place. Next, turn on all the layers in the CAD file that you exported from Revit and move everything until the exported survey point is placed at 0,0,0.
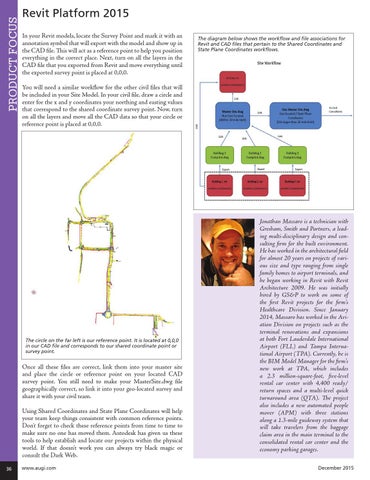
The diagram below shows the workflow and file associations for Revit and CAD files that pertain to the Shared Coordinates and State Plane Coordinates workflows.
You will need a similar workflow for the other civil files that will be included in your Site Model. In your civil file, draw a circle and enter for the x and y coordinates your northing and easting values that correspond to the shared coordinate survey point. Now, turn on all the layers and move all the CAD data so that your circle or reference point is placed at 0,0,0.
The circle on the far left is our reference point. It is located at 0,0,0 in our CAD file and corresponds to our shared coordinate point or survey point.
Once all these files are correct, link them into your master site and place the circle or reference point on your located CAD survey point. You still need to make your MasterSite.dwg file geographically correct, so link it into your geo-located survey and share it with your civil team. Using Shared Coordinates and State Plane Coordinates will help your team keep things consistent with common reference points. Don’t forget to check these reference points from time to time to make sure no one has moved them. Autodesk has given us these tools to help establish and locate our projects within the physical world. If that doesn’t work you can always try black magic or consult the Dark Web. 36
www.augi.com
Jonathan Massaro is a technician with Gresham, Smith and Partners, a leading multi-disciplinary design and consulting firm for the built environment. He has worked in the architectural field for almost 20 years on projects of various size and type ranging from single family homes to airport terminals, and he began working in Revit with Revit Architecture 2009. He was initially hired by GS&P to work on some of the first Revit projects for the firm’s Healthcare Division. Since January 2014, Massaro has worked in the Aviation Division on projects such as the terminal renovations and expansions at both Fort Lauderdale International Airport (FLL) and Tampa International Airport (TPA). Currently, he is the BIM Model Manager for the firm’s new work at TPA, which includes a 2.3 million-square-foot, five-level rental car center with 4,400 ready/ return spaces and a multi-level quick turnaround area (QTA). The project also includes a new automated people mover (APM) with three stations along a 1.3-mile guideway system that will take travelers from the baggage claim area in the main terminal to the consolidated rental car center and the economy parking garages. December 2015