

Design Manual
Library of Tools
Adrienne Ofria
Fay Jones Sschool of Architecture & Design
3rd Year Interior Design Student
T
O C
Preliminary Design Client & Goals 01 Schematic Design Construction Documentation Design Development Inventory & History of Inventory 03 Collages 13 Physical Building site model 15 In person site analysis 17 Building and site diagrams 19 Activity analysis & Matrix 25 Figure Grounds & Concept Models 29 Concept & Inspo 35 Client & Goals 01 Client & Goals 01 Client & Goals 01
PREL INAR
The preliminary design stage of a project is the stage that sets the fountation. It includes the basics like research and site analysis, concept development, model making and abstract drawings/sketches. These things will lead you through the rest of the project.
ELIMRY
Designing for Fayetteville
In the bustling heart of Fayetteville, Arkansas, a visionary interior architect embarks on a transformative endeavor—to craft a haven of creativity and innovation in the form of a library of tools. With meticulous attention to detail and a deep understanding of the city's unique spirit, the architect envisions a space where craftsmanship meets community engagement. Drawing inspiration from Fayetteville's rich heritage of craftsmanship and innovation, the architect integrates elements of rustic charm with modern functionality. Every corner of the library is thoughtfully curated to inspire both seasoned artisans and aspiring creators alike. From state-of-the-art machinery to traditional hand tools, each resource is carefully selected to empower individuals to bring their ideas to life. As the project unfolds, it becomes more than just a physical space; it becomes a symbol of Fayetteville's commitment to fostering creativity, collaboration, and lifelong learning. With the library of tools, the city not only gains a hub for innovation but also a testament to the enduring spirit of craftsmanship that defines Fayetteville.

01 Client & Goals
Project Goals

By creating the list of goals below before fully diving into the design process, I can start to form a foundation for the project by referencing my goals through each step of the design process.
Set a new standard of excellence for the tool industry
Enhance the quality of life for the Fayetteville community, library employees and volunteers.
Understand the functional requirements of the library space, including the storage needs for various types of tools (e.g., hand tools, power tools, gardening tools).
Convey a sense of energy, creativity, passion, and future focus.
Incorporate ergonomic design principles to enhance user comfort and safety when accessing and using tools.
Integrate flexible storage solutions to accommodate a variety of tool sizes and types, including adjustable shelving and modular storage units.
02 Preliminary Design
03 Inventory
SAFETY WELDING POWER TOOLS HAND TOOLS
1. Safety Vest
* Fully stocked year round
* Available in different sizes
2. Work Gloves
* Fully stocked Year round
* Available in different sizes
3. Head Protection
* Fully stocked Year round
* Available in differnt sizes


4. Plasma Cutters
* Fully stocked year round
5. Stick welders
* Fully stocked Year round
6. Soldering iron
* Fully stocked Year round
7. Saws
* Fully stocked year round
* Variety of sizes
8. Drills
* Fully stocked Year round
9. Sander
* Fully stocked Year round


10. Wrenches
* Fully stocked round
* Variety of 11. Screwdriver
* Fully stocked round
* Variety of 12. Hammer
* Fully stocked round
* Variety of


Preliminary Design
TOOLS OUTDOOR
13. Leaf Blower
stocked year sizes
Screwdriver stocked Year sizes stocked Year sizes
* Fully stocked year round
14. Pressure Washer
* Fully stocked Year round
15. Lawn Mower
* Fully stocked Year round
SNOW AUTO MOTIVE
16. Snow Blower
* Fully stocked from November to Feberuary
17. Snow Shovel
* Fully stocked from November to Feberuary
18. Generator
* Fully stocked Year round


19. Floor Jack
* Fully stocked year round
20. Jump starters
* Fully stocked year round
21. Cargo Carrier
* Fully stocked Year round


04
1777
It is commonly told that Samual Miller was awarded the first patent for what is considered the first circular saw machine. Some say that his patent indicates the circula blade itself was in common use by the time; it was the sawing machine itself that Miller had invented.
1878
W.R. & John Barnes Company of Rockford, Ilinois created the treadle-powered circular table saw. The saw was operated by pumping a treadle mounted beneath the table of the machine.
1810
Tabitha Babbitt is believed to have come up with the creation of the circular saw by attaching a circular blade to her spinning wheel so that every movement of the saw would produce a cut.
Tabitha Babbit was a shaker who was unable to patent her ideas due to religious reasons, fortunatly her and her inventions were not forgotten.
https://www.yorksaw.com/ history-circular-saw/
1929
The idea of a portable circular saw was invented by Art Emmons.
1922
Raymond Dewalt created the first adial arm saw by using a circular saw blade. The saw wasn’t portable but it was more conventional.


05 History of Inventory
The History of the Circular Saw
https://www.christofix.com/table-saw-basics/#:~:text=A%20 brief%20history%20of%20 table%20saws%20Tracing%20 its,a%20sliding%20table%20 were%20added%20for%20further%20enhancement.
A Shaker woman named Tabitha Babbitt is said to have invented a circular saw entirely of her own volition and design in 1810. As legend has it, she got the idea while watching two Shaker men struggling with a pit saw. At the time, these saws could only cut in one direction, making ripping logs a horribly tedious task.
The lumbermen would waste half their energy moving their saw back and forth, only cutting on the forward stroke. Babbitt noticed the inefficiency of this method and set out to make a saw that would waste less time and effort. She created a notched tin disk and rigged it to spin with the pedal push of her spinning wheel. With this simple invention, wood could be cut with a fraction of the time and effort it took using the old pit saw.
Her basic idea was used to create a much larger device for use in the sawmill, and the circle saw quickly caught on as the wood processing tool of choice. While Babbitt’s design was similar to Miller’s or Taylor’s, hers appeared to be much larger and more useful on a larger scale — modifications which differentiated her design from the rest.
WOMAN
06 Preliminary Design

https://www. bbc.co.uk/ahistoryoftheworld/ objects/5i3wIsz6Q52ctjekt4--EA
The Invention of the Step Ladder
There are different types of ladders. There are rope ladders that can be used for gym activities or they are thrown out of helicopters to rescue people from mountains. Fire engines have extendable ladders to rescue people from tall buildings or blocks of flats.
There are also fixed ladders that are used on the sides of boats or on some Lorries.
John H_ Basely of Dayton invented the step ladder in 1862. When he made it he put hinges on it so when someone had finished they could fold it away.
Some old ladders were made of rope and are still used in some countries. There are also ladders made out of wood which are quite strong they were used in world war two. Step ladders are made out of metal so they are very very strong.
Many ladders are used for different occasions. Some for building.
07 Preliminary Design
One Step at a Time

John H. Basely
John H. Balsley (May 29, 1823 – March 12, 1895) was a master carpenter and inventor, inventing a practical folding wooden stepladder and receiving the first U.S. patent issued for a safety stepladder in the year.

https://www.flyboysdeli. com/dayton-ohio-inventions/john-h-balsley/#:~:text=John%20H.%20 Balsley%20%28May%20 29%2C%201823%20 %E2%80%93%20March,issued%20for%20a%20safety%20stepladder%20in%20 the%20year.
08 Preliminary Design
The mystery of who invented the hammer
The use of simple hammers dates back to around 3.3 million years ago, according to a 2012 find made by Sonia Harmand and Jason Lewis of Stony Brook University.
Although the actual inventor of the hammer is unknown, some historians believe that the earliest hammers were developed by the Ancient Egyptians around 3,000 BC. The modern hammer as we know it today was invented by blacksmiths in Europe during the Middle Ages. Charles C. Moore, an American blacksmith and inventor, patented his hammer design in 18363.
https://www.tffn. net/who-invented-the-hammer/

09 Preliminary Design Unknown
Inventor
The Origin of the Hammer
Archaeologists have now discovered the first appearance of a tool used as a hammer was 3.3 million years ago (149 found in Lake Turkana in northern Kenya in 2015) when a “hammer stone” was used to splinter more brittle stones like flint, into cutting and killing tools. After they began to perfect their technique, they formed and shaped axes, knives, then more intricate arrow heads and spear heads. Still later these proto-humans used the formed shards into carving tools for wood, to break open animal skulls, bones, shells and even make jewellery.

This embryonic hammer, was little more than a heavy elliptical stone between 300 grams to a kilo smoothly formed at the bottom of a river bed, or from the sea. The stone was used to hit an object, which was sitting on a large flat stone below it, like an anvil. If a more intricate point was needed, the stone hammer would be replaced with a smaller stone, bones, ivory and antlers using more finesse for finishing the new cutting tools.
Then around 30,000 BC, an incredible 3.27 million years later. The next stage of the hammer’s evolution came into being. The addition of a handle; the stone being tied to either a piece of wood or bone with leather, vine, sinew, hair or similar substance tying the head to the handle. Creating the more familiar modern day looking hammer, similar to those made by native americans in the 1800’s.

https://langs.co.uk/ blog/2017/06/30/ the-history-of-the-hammer-from-its-prehistoric-beginnings/
10 Preliminary Design
The man who intertwined electricity with hardwear tools.
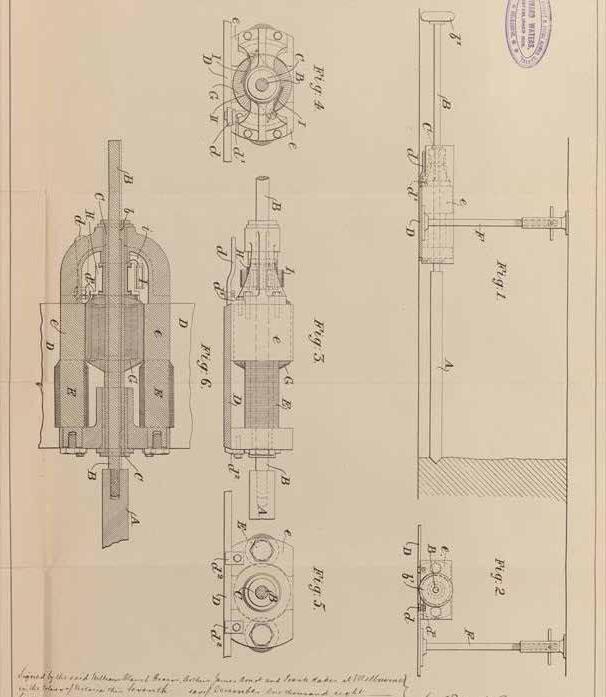
When it comes to adding electricity, Arthur James Arnot and William Blanch Brain of Australia get credit for inventing the first electric power drill way back in 1889. Check out the patent filing which shows how they created a shield to protect the user from sparks emanating from the motor compartment.
 Arthur James Arnot
https://www.protoolreviews. com/what-is-a-drill/#:~:text=When%20it%20comes%20 to%20adding%20electricity%2C%20Arthur%20James,first%20electric%20power%20 drill%20way%20back%20 in%201889.
The Famous Power Drill
Ab imaiossum derestem ilitiae delecus et doloreiciam siminim enitibu saessinctore de voluptae quae re ne volorec aepudit iumquia tissequ idebitat fuga. Soluptum que nemquun tiscipient andande rferchil et, omnimetur, vitiam acearchil imusci iusciis que aliquat. Cestius dis sae ea ipsa vid quaectemquis sape lat. Apis nonet arupis si ate offictatur auda volore ea con con ese dolorep eliquis quibus archit autestiis et ant incid magnimp elitisquat vernat lamus etur?
Elessin corpor sendisit veriatu ribero omniassunt unt, ut re inihil iunt licimus, sit et, nat utatet paria quam, et quam eos eatur, tem. Itatio exere non cus, nonsecum sit, sit dolor anducil minullenimi, omniatem nis etur sa sincienihic te endenti andamenis mo est, te ommolo tem unt libus doluptatent, veliatur, qui dellabo. Lendunti di ipsam que velis molorei cillabo. Nequis et ulparch illabor erspelles elitatem velluptae que sa nis venissit hicid ut pe veles none et, cume sequis sunt.
Ratint magnam quodis velibere volupti sa dolum reium quunt et et voluptatur aute officiundia nis de
11 Preliminary Design
Power

https://langs.co.uk/ blog/2017/06/30/ the-history-of-the-hammer-from-its-prehistoric-beginnings/
COLLAGES
1. COLLAGE
For my first collage, I drew inspiration from color and material. I wanted to see what it would look like to mix light wood and orange together. This gave me so much inspiration for ideas to further my design because I was able to visualize and brainstorm things, I could do with the space by seeing these
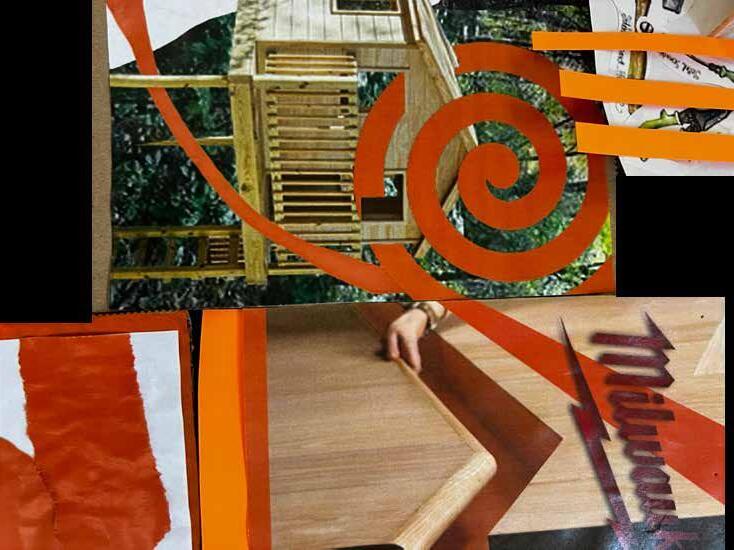
2. COLLAGE
When I think about tools and woodshops, my mind leans towards building a simple bird house or tree house. I made this collage as a reminder for a concept for space. As the design process continues, I want to dive deeper into the concept of designing the space inspired by a tree house or bird house.
Because the idea wooded handrail
As I was making reminder of is tools. I wanted beginning and myself of what

13 Collages
4. COLLAGE
3.COLLAGE
Because this space is designed around tools, I love idea of having a lot of the detail carved into the wooded elements. In this photo you can see that the handrail has been carved out of the wooden wall.
COLLAGE
making these collages, I needed a of the things or goal at hand which wanted to bring myself back to the and have something to remind what space is really for.

5.COLLAGE
Storage will be so important throughout the space. By showing a collage that extrudes off the page, I was able to think of creative ways to provide storage by working with tangible materials. I wanted to highlight the idea of having openings within the storage walls to intertwine the storage into the circulation of the space.
6.COLLAGE
Parion pereperum in pliae. Ut esequam, cor magnis ut autas quatur, voluptae prerecea quibus que cupta dernatu rerio. Nulloreiundi dolorepero torunti coratas perspid et, ius quuntias explaborum que magnimporest vereperovid erro eum
14 Preliminary Design

Physical model of the building, site, and topography at the scale of 1/16” = 1’0”. This model includes cutout people and cars/ trucks to help visualize scale from a human level. This model was made from cardboard with some things being laser cut and other things hand cut.

15 Physical Model


16 Preliminary Design


Diagrams of the Site
19 Building & Site Diagrams
20 Preliminary Design Water Hydrant Water Lateral Point Water Meter Location Water System Valve Buildings Parking Lots Main Water Line Water Hydrant Main Water Line Water Lateral Point Water Meter Location Water Service Line Water System Valve Buildings Surface Parking Lots Sidewalk Streets Water Hydrant Main Water Line Water Lateral Point Water Meter Location Water Service Line Water System Valve Buildings Surface Parking Lots Sidewalk Streets


Train Tracks Surrounding Buildings/Small Streets 1 2 3 4 5 6 1 2 3 4 5 6 Project Building Younion Apartments HamOnTrees Restaurant Parking Garage Ice House Frisco Apartments 3 4 5 6 21 Preliminary Design

1 Project Building
At doloren imilles archil estione ssimus ad es sam quati dolorem hitemporibus et velitibus iditas alis magnam culpa vel eume cus eatecto consequ aturitiam quid quae ero dolest harchil is velectati blaboris
1 Project Building
At doloren imilles archil estione ssimus ad es sam quati dolorem hitemporibus et velitibus iditas alis magnam culpa vel eume cus eatecto consequ aturitiam quid quae ero dolest harchil is velectati blaboris
1 Project Building
At doloren imilles archil estione ssimus ad es sam quati dolorem hitemporibus et velitibus iditas alis magnam culpa vel eume cus eatecto consequ aturitiam quid quae ero dolest harchil is velectati blaboris
1 Project Building
At doloren imilles archil estione ssimus ad es sam quati dolorem hitemporibus et velitibus iditas alis magnam culpa vel eume cus eatecto consequ aturitiam quid quae ero dolest harchil is velectati blaboris
1 Project Building
At doloren imilles archil estione ssimus ad es sam quati dolorem hitemporibus et velitibus iditas alis magnam culpa vel eume cus eatecto consequ aturitiam quid quae ero dolest harchil is velectati blaboris
1 Project Building
At doloren imilles archil estione ssimus ad es sam quati dolorem hitemporibus et velitibus iditas alis magnam culpa vel eume cus eatecto consequ aturitiam quid quae ero dolest harchil is velectati blaboris
1 2
22 Preliminary Design
Full wall of storage and such
Homier more comfortable lighting options? Door would function better if it swong open the other way

Thing about more personal/intimate lighting
Natural light makes narrow hallways appear larger
Storage
Incorperate Pin up Spaceor a pin up board
Long table with lots of space

Not alot of privacy for the offices as people walk outside
Wide table to ensure space for laptops and papers for multiple people at one time
Easily accessable snacks!Good for converstions
*Needs to be aquipt for long hours*


Main light source is natural light! This space will mainly be used during the day. Overhead lighting is also instaled if needed
Errogonomic seating
Panneling for better accoustics! Helps with focusing to block noise
Comfortable seating for Posture
Able to view egress. The stairwells

Temporary seating! Meant for short term perposes
25 Activity Analysis
6” 10” 1’ - 2”1’ 6” 2’ 8” 6’ 2’ 0” 2’ 0” 2’ 0” 3’ 3” 1’ 3” 1’5” 6” 4’ - 10” 1’ 2”1’ - 6” 2’ - 8” 6’ 2’0” 2’0” 2’0” 3’3” 1’3” 1’5” 6” 4’ - 10” 1’ - 2”1’ - 6” 2’ - 8” 6’ 2’ 0” 2’0” 2’ 0” 3’3” 1’ 3” 1’ 5” 6” 4’ - 10” 1’ - 2”1’ 6” 2’ - 8” 6’ 2’0” 2’0” 6” 4’ - 10” 1’ - 2”1’ - 6”
Task lighting and overhead lighting

Consider acustics through the material choices more throughly
Detailed Ceiling adds intrest as well as acustical help
Work Station Lighting
Each workstation need to include what is neccessary! This may include a monitor

Different chair options! These chairs leave imprents on legs and get too hot or too cold

Charging stations that are easily accessable on or near workstations are neccessary

Bars on chairs are used as a foot rest
Carpet flooring; Helps with acustics
Make the storage lockers blend into to the interior design concept and such
Notice how the cabinets aren’t too high or too low
Central Stations for storage lockers
Minimal overhead lighting

Bringing the lights down to the human level helps people concentrate
Comfortable-ish seating options
26 Preliminary Design
2’ - 8” 6’ 2’ 0” 2’ 0” 2’ 0” 3’ 3” 1’3” 1’ 5” 6” 4’ 10” 1’ - 2” 1’ 6” 2’0” 3’ 3” 1’ 3” 1’ 5” 2’ 8” 6’ 2’ 0” 2’ 0” 2’0” 3’ 3” 1’ 3” 1’ 5” 6” 4’ - 10” 1’ - 2” 1’ - 6” 1’ - 6” 2’ - 8” 6’ 2’0” 2’0” 2’0” 3’3” 1’3” 1’5” 6” 4’ - 10” 1’ - 2” 1’ - 6” 3’ 3” 1’3” 1’5”
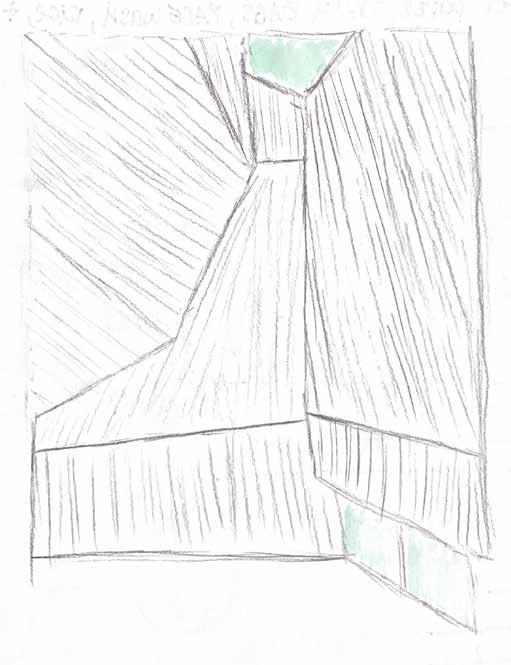
Concept Model One


29 Preliminary Design
For this figure ground, I created a pattern made from the lighting bolt logo from the toold brand, Milwaki. This idea also came from collage number 3. I wanted to remind myself how I can abstract the literal and use the lightning bolt in ways I wouldn’t have thought about before. Being able to see the pattern in black and white I started to depict the black areas as solid ground and the white area as voids. For the physical model I represented the three levels on the building wiht each floor being cut in the shape of a cropped Milwaki lightning bolt.
This figure ground is inspired by collage number 3. The white space is the handrail and the different levels of hatching represent the level of shading and color tones from the ofigional collage. I wanted to show the impact of carving directly into wood rather than adding material to it.
30 Preliminary Design
N
F I G U R E G R O U
D S

Both of these figure grouds are inspired by different aspects of collage number 2. The squares and lines from the first figure ground in the top left corner represents the tree house. The wood is connected and builds following a grid. By “taking apart” the tree house and laying out the grid I started to pinpoint the connection between the lines. This is how I got the idea to layout pinpoints along the cardboard following a winding grid.
This figure ground is also inspired by collage number 2. Except, instead of addressing the tree house, I focused this one on the intertwining woods and orange spiral weaving in an out of the tree house. This led me to show this idea by using transparent trace paper intertwining through the pinpoints as a form of navigation though the typical scenery of chaotic tools.

31 Preliminary Design


32 Preliminary Design


33 Preliminary Design
Concept model tHree
Figure Grounds
This figure ground is inspired by collage number 5. Although storage is important, it is also important to acknoledge how the different levels connect and where their should be voids/openings and where there shouldn’t. I used the ideas from both figure grounds to get this concept model to the left. I want to expand the idea of using angles to take up space and divide space rather than typical streight walls.
The inspiration for the top figure ground comes from collage number one. I wanted the angles of the triangles as well as the shadows and lines of the steps to be the most prominent while still a chieving a flat image. Through the process of stretching the black triangle along the “stair steps” to create long, stretched triangles I thought of what it would be like to divide space with triangles.
34 Preliminary Design
The topic of my design is ‘tools’. My assignment is to create a space for the city of Fayetteville, AR that is compeling to the user, helpful for the city, and thoughtfully contains the tools. After carful thought of what elements would help meet the expected critereia, my mind kept coming back to some form of a man cave but with some adjustments and revamping of a typical man cave. This is how I got the concept of ‘Modern Cave’.
CONCEPT
The WorkShop
A play on ‘The Man Cave’

35 Preliminary Design


36 Preliminary Design
SC MAT H
The Schematic design stage of the project is aimed at curating the floor plan for the space that is best compliant with the program, the clients wants, and needs, and the concept.
C ETIC
H