
Quick Guidance To HP Envy Inspire 7955e Setup
Setting up a new printer is an easy task and can be finished quickly if you have proper guidance. Well, before operating your printer, you have to complete the initial process. It involves the hardware setup and the software installation. On this page, you can get a detailed procedure for your HP ENVY Inspire 7955e setup, driver download, installation, and more. So, let’s get started by proceeding with the upcoming sections!
Procedure For Hardware Setup
Start Preparing Your Printer
● Open the printer box and remove the power cord, printed documentation, and ink cartridges from the package.
● Carefully pull the HP ENVY Inspire 7955e printer from the box and discard the packing materials.


● Just make sure that the delivered contents (including the printer) are not damaged.
● Then, remove all the blue protective tapes outside the printer
● Also, discard all the packing materials and protective tape inside the printer
Turn On Your HP Envy Inspire 7955e
● Plug the power cord into the back of your HP ENVY Inspire printer
● Then, connect the other end of the power cord to an electrical outlet.
● Now, the printer will turn on automatically
● If it is not, press the Power button on the printer
● Then, follow the on-screen prompts on the printer and set your language and country/region.
Did you turn on your printer and complete the initial setup? Fantastic! Just a few more steps to go!
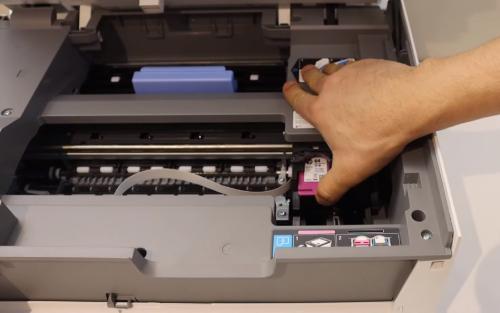
Proceed To The Ink Cartridge Installation
● Now, open the front door of your printer and lift the cartridge access door
● Unwrap one of the ink cartridges from the package.
● Remove the protective tape from the cartridge.
● Now, slowly insert the ink cartridge into the respective slot.
● Make sure that the cartridge is installed correctly in its place.
● Follow these instructions to insert the remaining ink cartridge into the respective slot.
● Close the front door and the cartridge access door
Start Loading The Correct Paper
● Pull out the input tray from your printer and move the paper width guides as far as possible.
● Load a stack of plain sheets into the input tray Make sure that the loaded sheets do not exceed the maximum limit.
● Now, adjust the paper width guides until it stops at the edges of the stack.
● Insert the input tray into the printer
● Pull out the output tray from your printer and raise the tray extension.
● Go to the printer s control panel and proceed with the on-screen prompts to complete the alignment process.
Doing good? Well, you have now reached the end of the hardware setup. Let’s proceed to the software setup and finish it as fast as possible!
Procedure For Software Setup
Installing the compatible driver on your computer will allow you to operate your printer without trouble. This driver will allow your printer to connect with other devices. Therefore, your printer can accept the printing and scanning jobs from your computer and complete the required tasks. For mobile printing purposes, you can install and use the HP Smart app, which supports Android and iOS devices. Well, let’s get into the software setup right now!
Software Setup Without CD-ROM – Download HP Smart
The users who do not have the installation CD can download the compatible and latest printer driver on this page. Yes! We have provided the software download buttons below this section. Just make a click on it as per your system requirements.
Download Software For Windows
Download Software For Mac
The above Download buttons will help you to download the HP Smart app on your Windows and Mac computers. Have you downloaded the app? Good! Let’s move on to the procedure to finish the installation as fast as we can!
Steps To Install The HP Printer Software

● Once you have downloaded the HP Smart app on your computer, open it.
● Click the Get Started button in the welcome window
● Now, you need to accept the default Data Collection Settings and the HP Privacy Statement.
● Then, click the Continue button to proceed.
● You can now see the “Choose a printer” pop-up window on the screen. It will display the recently installed printer
● Pick your respective printer from the available list and start setting it up on the HP Smart app.
● If your printer is not listed, or you are performing the setup process for the first time, click the Skip button.
● Now, you have to connect your printer and computer using a USB cable or Wi-Fi network.
● If you connect your devices wirelessly, make sure that your printer and computer are on the same network.
● After that, go to the HP Smart setup screen on your computer and click the Plus sign ( + ) below the Add a printer option.
● Now, the HP Smart app will start to detect your printer that is connected to the same network.

● Suppose, your printer is not listed on the screen, pick Set Up a New Printer on top of the window
● Then, select your appropriate printer from the list and click the Continue button at the bottom-right side of the screen.
● Proceed with the on-screen instructions and complete the HP Smart app installation on your computer
Well, great job! You could have now installed theStart Connecting Your Devices Through Various Methods
In order to connect your printer and computer you can make use of any one of the methods, such as USB, wireless, or Wi-Fi Direct. Connecting your devices will let you print, scan, and copy directly from that device. However you are going to get detailed information about the connection method. So, just keep reading!
● The printer installation window will appear on the screen.
● Now, follow the on-screen prompts to complete the printer setup.
● In case you are Windows 10 user go to the Start menu and launch Settings.
● Click Devices and go to the Printers & Scanners category from the left menu panel of the screen.
● Next, click the Add a printer or scanner option.
● Select your printer from the available list.

● You can see the printer installation window on the screen.
● Now proceed with the on-screen instructions and finish the installation.
Looking for a proper procedure to connect your devices through a wireless network? Well, read more!
Connect Your Devices Over Wi-Fi Envy Inspire 7955e Wi-Fi Setup
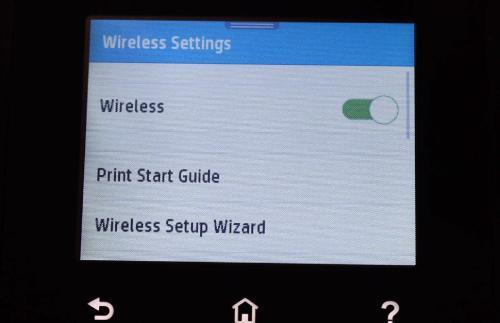
Wireless Setup Using The Printer’s Control Panel
● First, check whether the HP ENVY Inspire printer is turned on.
● Make sure to connect the printer to the same network to which the computer is connected.
● Ensure to know your wireless network name and password.
● Now, tap the Wireless icon from the top menu on the printer screen.
● Touch the Settings icon.
● Tap the Wireless Setup Wizard option from the list.
● Now, your printer will start to search for the wireless network.
● Once it is detected, tap the wireless network name and touch the OK button.
● Enter your network password and follow the on-screen prompts on the printer to complete the wireless setup.
● Confirm that you have connected your printer and computer
● Now, launch the HP printer software on your computer

● Go for the Tools tab at the top of the window
● Click on the Device Setup & Software option from the list.
● Select the Connect a new device option.
● Go for the Manual Setup option and choose wireless.
● Now follow the on-screen prompts to finish the wireless s
Link : https://fixmyprinter.us/hp-envy-inspire-7955e-setup/
Tollfree : +1 909-751-0101